


上午
1
、环境准备
(
1
)
yum
源
(一个云仓库
+pepl
仓库)
[root@web ~]# vim /etc/yum.repos.d/hh.repo
[a]
name=a
baseurl=file:///mnt
gpgcheck=0
[root@web ~]# vim /etc/fstab
/dev/cdrom /mnt iso9660 defaults 0 0
[root@web ~]# mount -a
[root@web ~]# yum repolist
[root@web ~]# ping www.baidu.com
[root@web ~]# yum -y install wget
[root@web ~]# vim /etc/resolv.conf
将
dns
该为
114.114.114.114 8.8.8.8
[root@web ~]# ping www.baidu.com //
可以
ping
通百度即可进行下一步
[root@web ~]# wget -O /etc/yum.repos.d/CentOS-Base.repo
http://mirrors.cloud.tencent.com/repo/centos7_base.repo
[root@web ~]# yum clean all
[root@web ~]# yum makecache
[root@web ~]# yum -y install epel-release.noarch
[root@web ~]# yum clean all
[root@web ~]# yum makecache
(
2
)防火墙和
selinux
[root@web ~]# systemctl stop firewalld
[root@web ~]# systemctl disable firewalld
Removed symlink /etc/systemd/system/multi-user.target.wants/firewalld.service.
Removed symlink /etc/systemd/system/dbus-org.fedoraproject.FirewallD1.service.
[root@web ~]# setenforce 0
[root@web ~]# vim /etc/selinux/config
SELINUX=permissive
2
、安装配置
web
服务器
(
1
)使用自建的
yum
仓库下载
nginx
1
、先只安装不下载
nginx
[root@web ~]# yum -y install --downloadonly --downloaddir=./soft/ nginx
2
、下载
cteaterepo
,自建仓库
[root@web ~]# yum -y install createrepo
[root@web ~]# createrepo ./soft/
[root@web ~]# ls soft/
[root@web ~]# vim /etc/yum.repos.d/nginx.repo
[nginx]
name=nginx
baseurl=file:///root/soft/
gpgcheck=0
enable=1
[root@web ~]# yum clean all
[root@web ~]# yum makecache
3
、使用自己建造的仓库下载
nginx
[root@web ~]# yum -y install nginx
[root@web ~]# nginx //
启动
nginx
检查服务是否启动:
[root@web ~]# netstat -lnput | grep nginx
[root@web ~]# ps -aux | grep nginx
浏览器访问测试:
(
2
)在
nginx
的首页中插入自己的图片与视频
1
、查找
nginx
的配置文件位置
[root@web html]# find / | grep nginx
/usr/share/nginx/html
[root@web html]# rpm -ql nginx
/usr/share/nginx/html/404.html
[root@web nginx]# cd /usr/share/nginx/html/
[root@web html]# ls
404.html 50x.html en-US icons img index.html nginx-logo.png
poweredby.png
2
、将图片与视频放到指定路径下
可以将其直接拖拽到
vm
中,也可以使用
scp
进行传输文件。
[root@web html]# yum -y install lrzsz
[root@web html]# rz -E //
将图片拖到
/usr/share/nginx/html
中或
者
/usr/share/nginx/html/img
中
[root@web html]# vim index.html
<img src="3.jpg" alt="
示例图片
" width="500" height="300">
[root@web html]# nginx -s reload
浏览器继续访问,查看图片是否上传成功
[root@web html]# rz -E //
将视频拖到
/usr/share/nginx/html
中
[root@web html]# vim index.html
<video width="320" height="240" controls>
<source src="1.mp4" type="video/mp4">
</video>
<img src="3.jpg" alt="
示例图片
" width="500" height="300">
[root@web html]# nginx -s reload
最终浏览器效果如下图

3
、安装配置
nfs
服务器
NFS
(
Network File System
,网络文件系统)是一种分布式文件系统协议,允许一个系统在网络上
与他人共享目录和文件。
rpcbind
是一个用于支持
RPC
(
Remote Procedure Call
,远程过程调用)的服务。在一些操作系统
中,如
CentOS 8
,
NFS
(
Network File System
,网络文件系统)的实现依赖于
RPC
机制,而
rpcbind
充当了
NFS
服务器和客户端之间的中介,用于完成从远程到本地的映射过程。
搭建
NFS
服务器时,需要安装
rpcbind
以及
nfs-utils
软件包来提供
NFS
共享服务。
(另起一台机子)
(
1
)下载
nfs
软件与其依赖软件
[root@nfsserver ~]# yum -y install nfs-utils.x86_64 rpcbind.x86_64
(
2
)创建一个目录
/share
并创建文件
/share/passwd
[root@nfsserver ~]# mkdir /share
[root@nfsserver ~]# touch /share/passwd
(
3
)将
web
机子的图片和视频拷贝过来到
/share
目录下
[root@nfsserver ~]# scp root@10.0.0.30:/usr/share/nginx/html/3.jpg /share/
[root@nfsserver ~]# scp root@10.0.0.30:/usr/share/nginx/html/1.mp4 /share/
(
4
)编辑配置文件
/etc/exports
指定要暴露的文件(
/share
)
[root@nfsserver ~]# vim /etc/exports
/share *(rw,sync)
这段配置的含义是,将
/share
目录共享给所有的客户端(
*
代表所有),并且赋予客户端可读写
(
rw
)和数据同步(
sync
)的权限。
(
5
)测试
下午
1
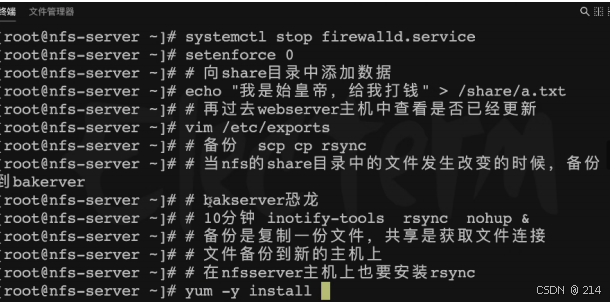
、自动监控备份静态文件
(
1
)修改
hostname
[root@beifen ~]# hostnamectl set-hostname bakserver
[root@beifen ~]# reboot
(
2
)关闭防火墙与
selinux
[root@bakserver ~]# systemctl stop firewalld
[root@nfsserver ~]# systemctl disable firewalld
[root@bakserver ~]# setenforce 0
[root@nfsserver ~]# vim /etc/selinux/config
SELINUX=permissive
(
3
)安装
rsync
,
2
个主机都有安装
[root@bakserver ~]# yum -y install rsync
[root@nfsserver ~]# yum -y install rsync
(
4
)安装
inotify
监控
[root@nfsserver ~]# yum -y install inotify-tools-devel.x86_64
(
5
)同步一份文件到
bakserver
上
(
每次都需要输入密码不方便,设置免密
)
[root@nfsserver ~]# rsync -av /share/ root@10.0.0.31:/tmp/
(
6
)设置免密
[root@nfsserver ~]# ssh-keygen
[root@nfsserver ~]# ssh-copy-id root@10.0.0.31
(
将公钥字符串添加到对方家目录中的
authorized_keys
文件中
也可以使用
scp
将
id_rsa.pub
文件上传到
bakserver
主机,手工将文件中的字符串复制到
authorized_keys)
(
7
)确定全部都免密,测试实时
rsync
是否能够免密备份
[root@nfsserver ~]# rsync -av /share/ root@10.0.0.31:/tmp/
(
8
)在备份主机上创建
/bakpu
目录
[root@bakserver ~]# mkdir /bakpu //
同步的信息都存放在这里
(
9
)在
nfs
上编辑脚本,并进行监控,实现自动同步
[root@nfsserver ~]# vim rn.sh
#!/bin/bash
inotifywait -mrq -e modify,create,delete,attrib,move /share/ | while read
events
do
rsync -av /share/ root@10.0.0.31:/bakpu
echo "`date +%F\ %T`
出现时间
$events" >> /var/log/rsync.log 2>&1
done
[root@nfsserver ~]# chmod +x rn.sh
[root@nfsserver ~]# nohup ./rn.sh &
[root@nfsserver ~]# touch /share/1.txt
(
10
)查看是否同步成功
[root@bakserver ~]# ls /bakpu/
1.mp4 1.txt 3.jpg a.txt passwd
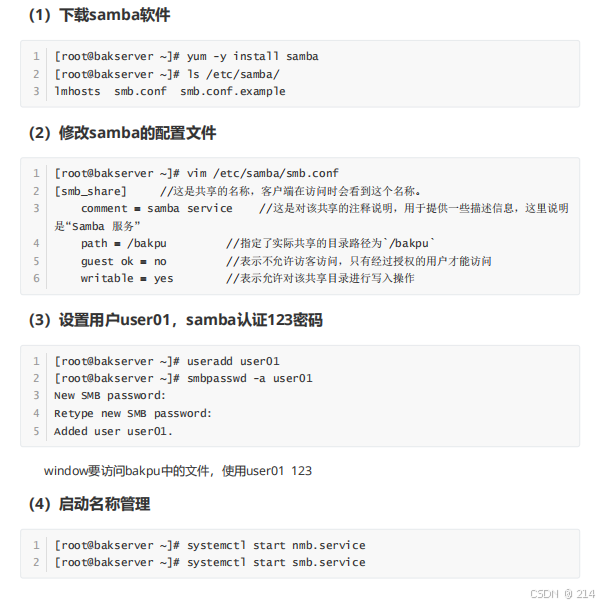
2
、
SAMBA
文件共享
Samba
是在
Linux
和
Unix
系统上实现
SMB
(
Server Message Block
)协议的一个免费软件。
SMB
协议主要用于
Windows
操作系统的文件和打印共享。通过
Samba
,
Linux
和
Unix
系统可以
与
Windows
系统进行良好的交互和资源共享。
Samba
的主要特点和优势包括:
1.
跨平台文件共享:允许
Windows
、
Linux
和
macOS
等不同操作系统之间共享文件和打印机。
2.
易于配置:可以通过简单的配置文件和命令来设置共享目录、用户权限等。
3.
支持多种身份验证方式:例如本地用户、域用户等。
在实际应用中,
Samba
常用于以下场景:
企业办公环境:让
Windows
客户端能够访问
Linux
服务器上的共享文件。
家庭网络:在不同操作系统的设备之间共享多媒体文件。
例如,在一个小型办公室中,可以使用
Samba
在一台
Linux
服务器上设置共享目录,使得办公室内
的
Windows
电脑能够方便地访问和存储文件。
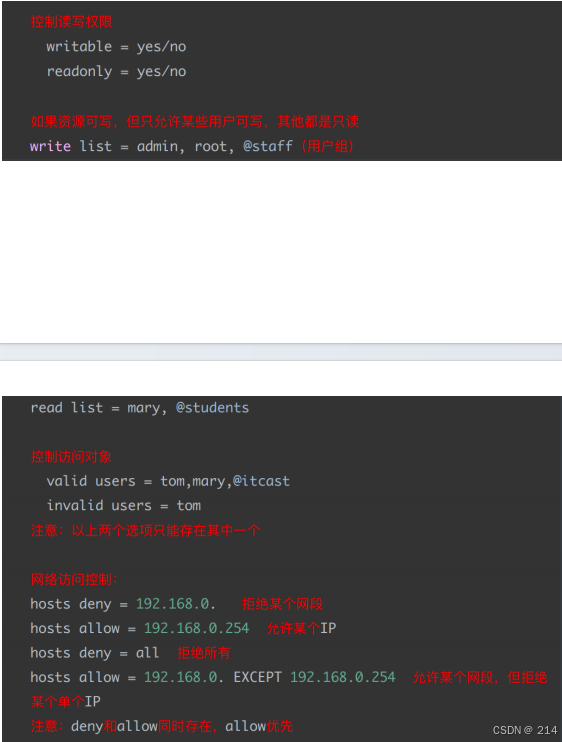
配置
Samba
时,需要编辑
/etc/samba/smb.conf
文件来定义共享目录、访问权限、用户等信
息。
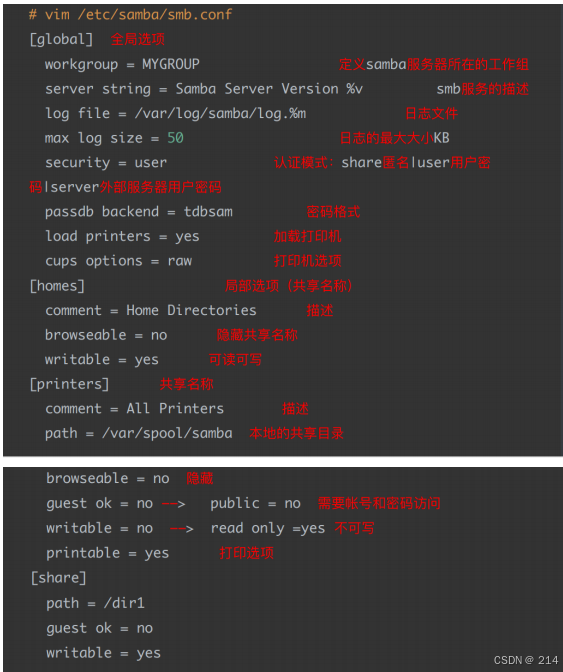
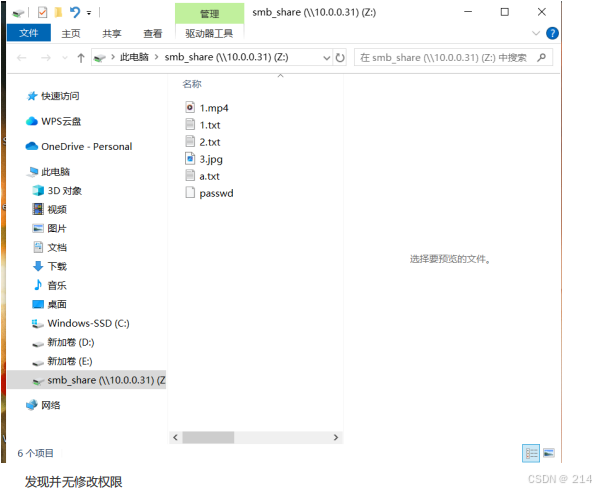
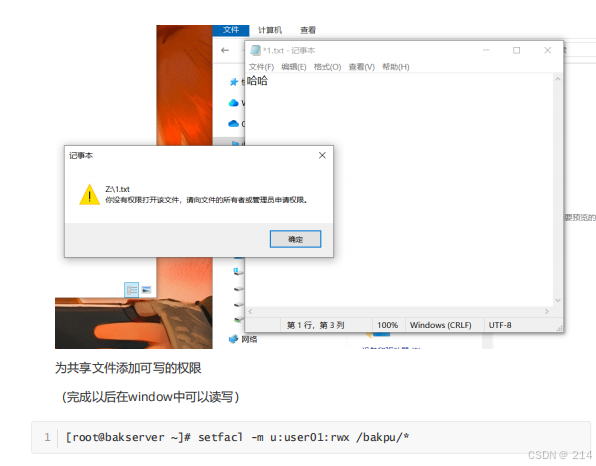
即可查看到
samba
文件共享的内容
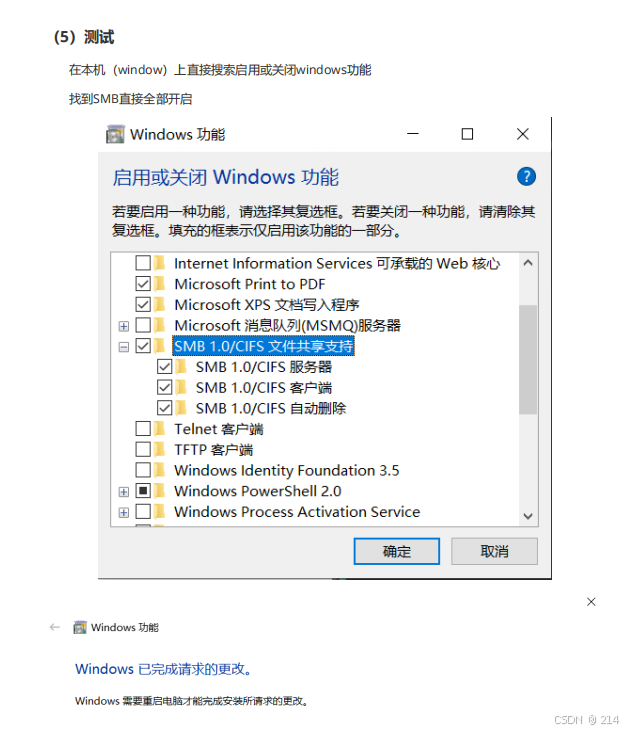
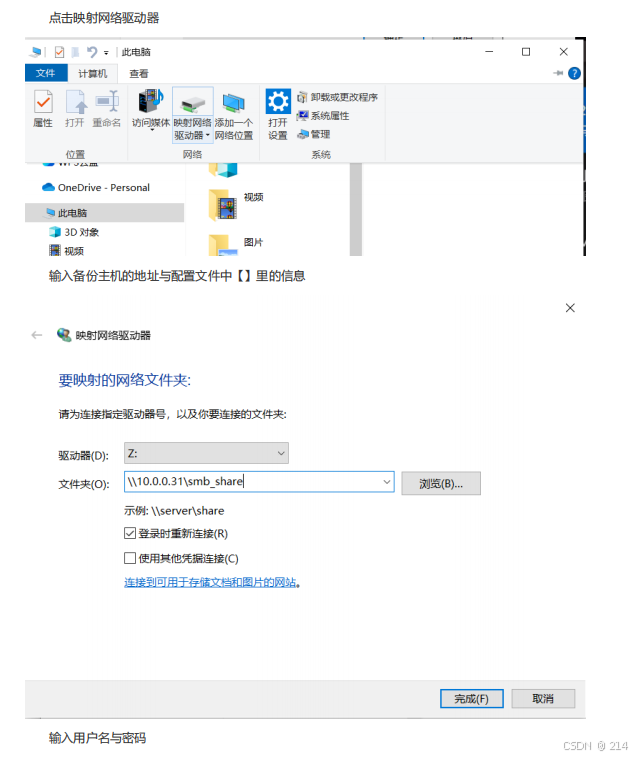
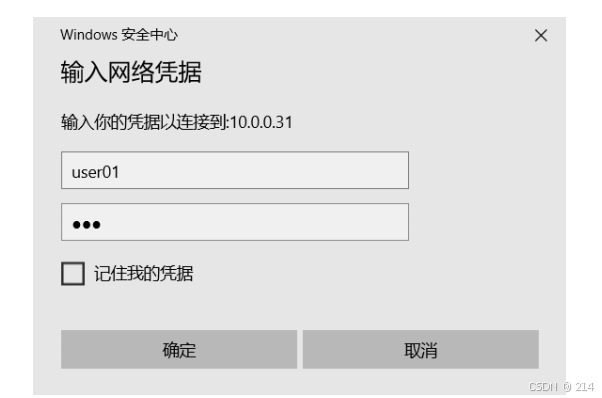
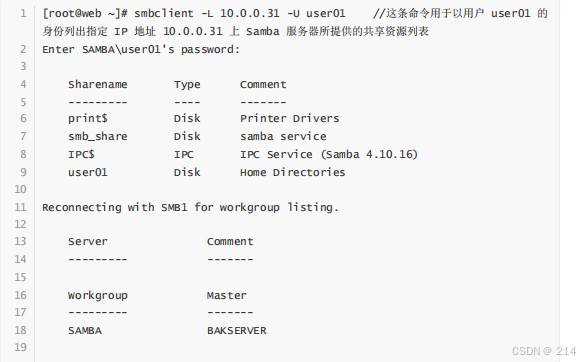
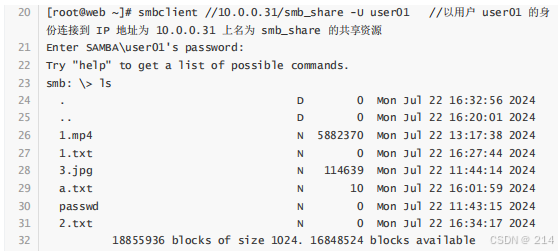
(
2
)使用
smb
客户端访问服务器

[root@web ~]# yum -y install cifs-utils
[root@web ~]# mount.cifs -o user=user01,pass=123 //10.0.0.31/smb_share ~/aaa/
[root@web ~]# ls aaa/
1.mp4 1.txt 2.txt 3.jpg a.txt passwd
总结
1. ftp
局域⽹和外⽹都可以
2. nfs
局域⽹ 挂载⽅式访问
mount.nfs
侧重于
Linux
与
Linux
之间
3. samba
局域⽹ 直接访问
(smbclinet)
挂载的⽅式
mount.cifs
侧重于
Windows
与
Linux
之间


 被折叠的 条评论
为什么被折叠?
被折叠的 条评论
为什么被折叠?
 到【灌水乐园】发言


