


目录
注销/退出功能的实现( 用户登录后,面向已登录用户页面导航栏的一个 a 标签)
个人博客列表页实现( myblog_list.html 页面)
博客详情页实现( blog_content.html 页面)
博客删除功能的实现(myblog_list.html 页面)
博客列表页的实现(blog_list.html 页面,面向所有用户的,该页面实现了分页功能)
项目简介
采用前后端分离方法,使用数据库来存储相关数据,基于SSM框架实现了一个网页版的博客系统
- 项目具备用户登录、注册、注销基本功能;
- 已登录用户可对自己的文章进行定时/即时发布、修改、查看详情以及个人信息修改,并持有对博客文章进行评论及删除评论的权利;
- 未登录用户可以使用博客列表页、查看所有用户的文章详情;
- 项目采用自己实现的加盐算法对用户密码进行加密、使用 Redis 实现 Session 持久化、采用拦截器实现强制登录功能、在列表页实现了分页功能、登录页面实现了“用户多次登录,账号冻结”功能、注册页面使用hutool工具实现图片验证码功能。
相关技术
- Spring Boot
- Spring MVC
- MyBatis
- MySQL
- HTML / JS / CSS / AJAX
数据库设计
在这里数据库的设计就是对数据库/数据表的创建,建表就需要我们去抓住所需要的实体,这里是一个简易版的个人博客系统,根据系统的相关功能,不难想到我们需要创建用户表、博客表以及评论表。建库建表sql如下:
CREATE DATABASE IF NUT EXISTS mycnblog;
use mycnblog;

-- ----------------------------
-- 创建用户表
-- ----------------------------
DROP TABLE IF EXISTS `userinfo`;
CREATE TABLE `userinfo`  (
  `id` int(11) NOT NULL AUTO_INCREMENT,
  `username` varchar(100) CHARACTER SET utf8mb4 COLLATE utf8mb4_general_ci NOT NULL,
  `password` varchar(65) CHARACTER SET utf8mb4 COLLATE utf8mb4_general_ci NULL DEFAULT NULL,
  `photo` varchar(500) CHARACTER SET utf8mb4 COLLATE utf8mb4_general_ci NULL DEFAULT '',
  `createtime` timestamp NOT NULL ,
  `state` int(11) NULL DEFAULT 0,
  `nickname` varchar(100) CHARACTER SET utf8mb4 COLLATE utf8mb4_general_ci NULL DEFAULT NULL,
  `remark` varchar(1024) CHARACTER SET utf8mb4 COLLATE utf8mb4_general_ci NULL DEFAULT NULL,
  PRIMARY KEY (`id`) USING BTREE,
  UNIQUE INDEX `username`(`username`) USING BTREE
) ENGINE = InnoDB AUTO_INCREMENT = 1 CHARACTER SET = utf8mb4 COLLATE = utf8mb4_general_ci ROW_FORMAT = Dynamic;


-- ----------------------------
-- 创建博客表
-- ----------------------------
DROP TABLE IF EXISTS `articleinfo`;
CREATE TABLE `articleinfo`  (
  `id` int(11) NOT NULL AUTO_INCREMENT,
  `title` varchar(100) CHARACTER SET utf8mb4 COLLATE utf8mb4_general_ci NOT NULL,
  `content` text CHARACTER SET utf8mb4 COLLATE utf8mb4_general_ci NOT NULL,
  `createtime` timestamp NOT NULL,
  `updatetime` timestamp,
  `uid` int(11) NOT NULL,
  `rcount` int(11) NOT NULL DEFAULT 1,
  `state` int(11) NULL DEFAULT 1,
  PRIMARY KEY (`id`) USING BTREE
) ENGINE = InnoDB AUTO_INCREMENT = 1 CHARACTER SET = utf8mb4 COLLATE = utf8mb4_general_ci ROW_FORMAT = Dynamic;

-- ----------------------------
-- 创建评论表
-- ----------------------------
DROP TABLE IF EXISTS `commentinfo`;
CREATE TABLE `commentinfo`  (
  `id` int(11) NOT NULL AUTO_INCREMENT,
  `aid` int(11) NULL DEFAULT NULL,
  `uid` int(11) NULL DEFAULT NULL,
  `nickname` varchar(50) CHARACTER SET utf8mb4 COLLATE utf8mb4_general_ci,
  `photo` varchar(500) CHARACTER SET utf8mb4 COLLATE utf8mb4_general_ci NULL DEFAULT '',
  `comment` varchar(1000) CHARACTER SET utf8mb4 COLLATE utf8mb4_general_ci NULL DEFAULT NULL,
  `createtime` timestamp NOT NULL ,
  PRIMARY KEY (`id`) USING BTREE
) ENGINE = InnoDB AUTO_INCREMENT = 1 CHARACTER SET = utf8mb4 COLLATE = utf8mb4_general_ci ROW_FORMAT = Dynamic;


-- ----------------------------
-- 插入测试信息
-- ----------------------------

-- 用户信息
INSERT INTO `userinfo` (`id`, `username`, `password`, `photo`, `createtime`, `state`, `nickname`, `remark`) VALUES (1, 'admin', '0f5e2d50665f4d2fbb457da16d8e858b$c0a3f07e1c83b07df2cbafe9c84f29c8', '', '2021-12-06 17:10:48', 0, '小小落叶', '写好每一篇博客!');


-- 文章信息
INSERT  INTO `articleinfo` (`id`, `title`, `content`, `createtime`, `updatetime`, `uid`, `rcount`, `state`) VALUES (1, '热爱生活', '# 热爱生活\n积极向上,热爱生活,不断前进!', '2023-08-21 10:23:10', '2023-08-21 14:07:23', 1, 23, 1), ;


-- 评论信息
INSERT  INTO `commentinfo` (`id`, `aid`, `uid`, `nickname`, `photo`, `comment`, `createtime`) VALUES (1, 1, 1, '小小落叶', '', 'yes', '2023-08-24 08:35:17');
项目主要页面设计
整个项目的页面包括
- 注册页面(面向所有用户)
- 登录页面(面向所有用户)
- 博客列表页(面向所有用户)
- 个人博客列表页(面向已登录用户)
- 个人博客详情页(面向已登录用户)
- 个人博客发布页(面向已登录用户)
- 个人博客修改页(面向已登录用户)
- 个人信息修改页(面向已登录用户)
注册页面

用户通过注册页面输入用户名和密码并经验证码验证通过后,即可实现账号的注册,注册成功后用户可选择跳转到登录页面
登录页面

用户在登录页面输入用户名和密码,经后端校验成功后即可跳转至个人博客列表页;若用户名或密码错误,弹窗提示
博客列表页

点击导航栏主页即可进入博客列表页,该页面允许所有用户访问;未登录用户可通过点击查看全文按钮浏览文章详情,即进入博客详情页;用户也可通过点击按钮实现翻页功能
个人博客列表页

用户登录成功即可跳转至该页面,此页面展示了用户的昵称、简介、所发布博客文章数等信息,用户通过在该页面点击相关按钮进行个人信息修改、个人博客详情查看、修改博客、删除博客等操作
个人博客详情页

用户可通过该页面浏览博客文章详情、文章所有评论、也可进行评论;删除评论权限只归评论发布者和当前博客文章的作者所有,未登录用户无权评论;此外,这里会展示当前博客的阅读量,只要文章被访问,阅读量就会 +1
个人博客发布页

用户点击写博客即可跳转至该页面,在该页面可进行博客内容的编写并根据需要选择定时 / 即时的发布博客
个人博客修改页

用户在个人博客列表页点击修改按钮即可跳转至本页面,然后就可以对自己的博客内容进行修改
个人信息修改页

用户登录后在导航栏点击个人中心,即可跳转至此页面,对自己的用户名、密码、昵称、简介进行修改并保存
项目功能模块实现(考虑到篇幅问题,本篇展示基础模块实现)
项目的基础模块:
AOP处理模块
用户模块
文章模块
密码的加盐加密模块
准备工作
1. 先创建一个Spring Boot项目,具体可参考:IDEA创建一个Spring Boot项目_拾.柒.的博客-CSDN博客
项目创建成功后可选择将application.properties配置文件替换为application.yml文件(两个文件的功能是一样的,配置语句的语法不同,可根据需要选择使用哪一个,这里我用的是.yml文件)
2. 添加项目需要的依赖包(在项目创建时选择的引入依赖,已经存在于pom.xml里的,这里就不需要再添加了),添加的方式有以下两种:
a. 直接将下面语句插入pom.xml中,然后reload Maven
	<dependencies>
		<dependency>
			<groupId>org.springframework.boot</groupId>
			<artifactId>spring-boot-starter-web</artifactId>
		</dependency>
		<dependency>
			<groupId>org.mybatis.spring.boot</groupId>
			<artifactId>mybatis-spring-boot-starter</artifactId>
			<version>2.3.1</version>
		</dependency>

		<dependency>
			<groupId>org.springframework.boot</groupId>
			<artifactId>spring-boot-devtools</artifactId>
			<scope>runtime</scope>
			<optional>true</optional>
		</dependency>
		<dependency>
			<groupId>com.mysql</groupId>
			<artifactId>mysql-connector-j</artifactId>
			<scope>runtime</scope>
		</dependency>
		<dependency>
			<groupId>org.projectlombok</groupId>
			<artifactId>lombok</artifactId>
			<optional>true</optional>
		</dependency>
		<dependency>
			<groupId>org.springframework.boot</groupId>
			<artifactId>spring-boot-starter-test</artifactId>
			<scope>test</scope>
		</dependency>
		<dependency>
			<groupId>org.mybatis.spring.boot</groupId>
			<artifactId>mybatis-spring-boot-starter-test</artifactId>
			<version>2.3.1</version>
			<scope>test</scope>
		</dependency>
		<dependency>
			<groupId>org.springframework.boot</groupId>
			<artifactId>spring-boot-starter-security</artifactId>
		</dependency>
		<dependency>
			<groupId>cn.hutool</groupId>
			<artifactId>hutool-all</artifactId>
			<version>5.8.16</version>
		</dependency>
		<dependency>
			<groupId>org.springframework.boot</groupId>
			<artifactId>spring-boot-starter-data-redis</artifactId>
		</dependency>
		<dependency>
			<groupId>org.springframework.session</groupId>
			<artifactId>spring-session-data-redis</artifactId>
		</dependency>

	</dependencies>

	<build>
		<plugins>
			<plugin>
				<groupId>org.springframework.boot</groupId>
				<artifactId>spring-boot-maven-plugin</artifactId>
				<version>2.7.14</version>
				<configuration>
					<excludes>
						<exclude>
							<groupId>org.projectlombok</groupId>
							<artifactId>lombok</artifactId>
						</exclude>
					</excludes>
				</configuration>
			</plugin>
		</plugins>
	</build>

</project>
b. 通过右键Generate去添加
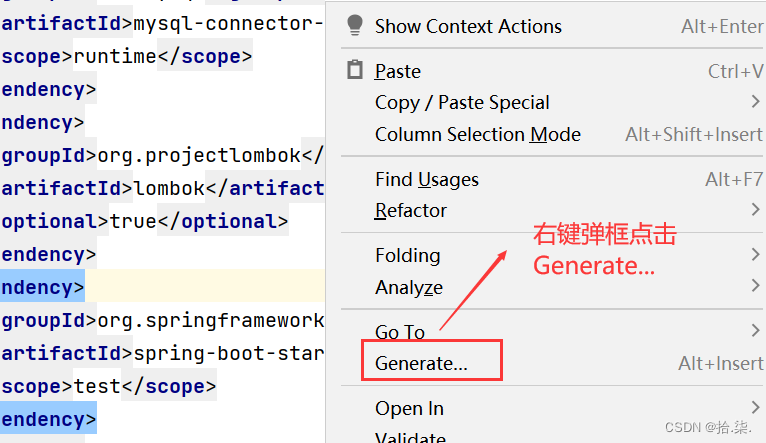
选择Edit Starters(如果没有,需要自己去Plugins安装哦~)

然后点击OK
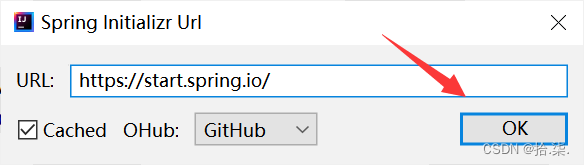
选择需要添加的依赖,add,然后点击OK,最后 reload Maven

3. 配置application.yml文件(① 为了方便基础模块的理解,这里只是暂时配置了项目基础模块需要的,后续项目实现过程中,有需要再进行配置;② 注意根据个人情况进行适当修改,部分应修改的地方代码中有提示)
spring:
  jackson:  #全局的时间格式化
    date-format: 'yyyy-MM-dd'
    time-zone: 'GMT+8'
  datasource:
    url: jdbc:mysql://127.0.0.1:3306/mycnblog?characterEncoding=utf8&useSSL=false
    username: root
    password: #这里写你自己数据库的密码
    driver-class-name: com.mysql.cj.jdbc.Driver

#session的过期时间
server:
  port: 8080
  servlet:
    session:
      timeout: 1800

#mybatis xml的保存路径
mybatis:
  mapper-locations: classpath:mapper/**Mapper.xml
  configuration: # 配置打印 MyBatis 执行的 SQL
    log-impl: org.apache.ibatis.logging.stdout.StdOutImpl
#开启MyBatis的sql日志打印
logging:
  level:
    com:
      example:
        demo: debug
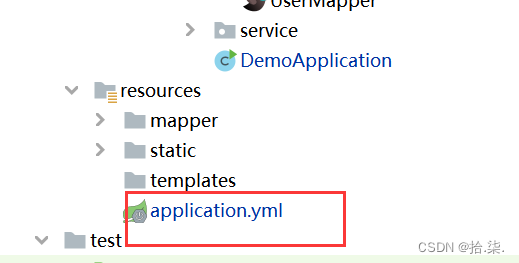
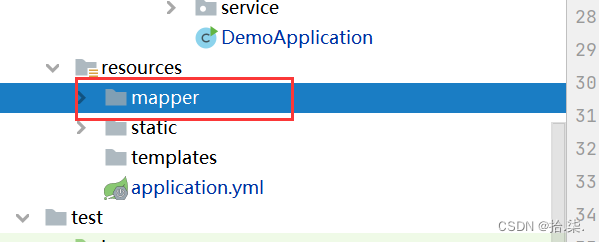
注意!!!这里需要根据mapper-locations中的约定信息在src / main / resources下创建一个名为mapper的文件夹以备后用(要根据自己约定的信息去设置名字哦~)

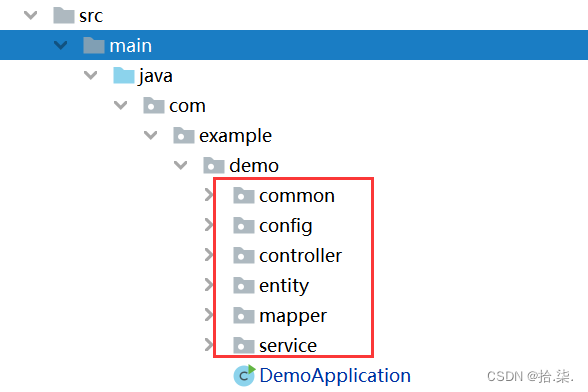
4. 创建项目分层,以便于后续管理与功能实现
此处划分了六个层级,各层级分工如下:
- common(工具层):存放项目中多处需要的功能类;
- config(公共层):存放整个项目需要的功能类;
- controller(控制层):接收前端请求,验证前端参数,验证无误,调用 service ,接收 service 返回的数据,然后以统一的格式返回给前端;
- entity(实体层):存放项目中涉及到的实体类;
- mapper(持久层):操作数据库的一层,分为 mapper 接口层和 mapper.xml 层两部分:① mapper 接口层:定义在 service 接口中没有完成真正实现、需要通过书写 SQL 语句才能完成其功能的方法。② mapper.xml 层:配置通用查询映射结果以及完成 mapper 接口中方法的 SQL 语句实现
- service(服务层):进行服务的编排和调度,调用 mapper 层并提供给 controller 层使用,间接和数据库打交道。
图示如下:
AOP处理模块
此模块主要实现了统一数据格式返回处理、统一登录鉴权以及统一异常处理。
统一返回数据格式处理就是实现一个统一数据返回的保底类,即在数据返回之前,检测数据的类型是否为统一对象,如果不是,封装成统一对象,从而方便前端对接收到的数据进行处理;
统一登录鉴权主要就是为了保护每个用户的账号安全以及用户的隐私,拦截未登录用户操作需登录权限的页面,并强制返回登录页面;
统一异常处理能够将系统中出现的异常统一被工具类拦截下来,实现集中管理。
统一数据格式返回的实现
1. 设定一个数据格式
首先,添加统一返回类型(此处命名为AjaxResult,当然这个名字是啥无所谓的);在common底下创建一个类AjaxResult

具体实现代码如下(@Data 是 Lombok 下的一个注解,该注解的主要作用就是提高代码的简洁,使用它可以省去实体类中大量的 get()、set()、toString() 等方法):
@Data
public class AjaxResult implements Serializable {
    //状态码
    private Integer code;
    //状态码描述信息
    private String msg;
    //返回的数据
    private Object data;

    /**
     * 操作成功返回的结果
     */
    public static AjaxResult success(Object data) {
        AjaxResult result = new AjaxResult();
        result.setCode(200);
        result.setMsg("");
        result.setData(data);
        return result;
    }
    public static AjaxResult success(int code,Object data) {
        AjaxResult result = new AjaxResult();
        result.setCode(code);
        result.setMsg("");
        result.setData(data);
        return result;
    }
    public static AjaxResult success(int code,String msg,Object data) {
        AjaxResult result = new AjaxResult();
        result.setCode(code);
        result.setMsg(msg);
        result.setData(data);
        return result;
    }

    /**
     * 返回失败的结果
     */
    public  static AjaxResult fail(int code,String msg) {
        AjaxResult result = new AjaxResult();
        result.setCode(code);
        result.setMsg(msg);
        result.setData(null);
        return result;
    }
    public  static AjaxResult fail(int code,String msg,Object data) {
        AjaxResult result = new AjaxResult();
        result.setCode(code);
        result.setMsg(msg);
        result.setData(data);
        return result;
    }

}
2. 统一数据返回保底类
统一返回类型有了,此时又出现了个小小的问题——有的小伙伴知道,会在返回数据给前端之前调用一下;有的小伙伴不知道,或者说是忘记调用了,那我们前端的小伙伴将会看到各种各样的返回格式的数据——所以,为了保证从我们项目出去的数据格式都保持一致,我们在返回之前定义一个保底的类,就是在返回数据之前,检查一下数据的类型是否为统一的对象,如果不是,就给他封装成统一的对象,也就是说,让数据返回之前都经过这个类,使其返回我们想要的数据格式,好了,直接看代码:
创建 config.ResponseAdvice 继承 ResponseBodyAdvic e接口,重写 supports、beforeBodyWrite 方法

@RestController
public class ResponseAdvice implements ResponseBodyAdvice {

    @Autowired
    private ObjectMapper objectMapper;

    /**
     *开关,如果是true,才会调用beforeBodyWrite
     */
    @Override
    public boolean supports(MethodParameter returnType, Class converterType) {
        return true;
    }

    /**
     * 对数据格式进行校验和封装
     */
    @SneakyThrows
    @Override
    public Object beforeBodyWrite(Object body, MethodParameter returnType, MediaType selectedContentType, Class selectedConverterType, ServerHttpRequest request, ServerHttpResponse response) {
        if(body instanceof AjaxResult) return body;
        //需要对字符串进行特殊处理
        if(body instanceof String) {
            return objectMapper.writeValueAsString(AjaxResult.success(body));
        }
        return AjaxResult.success(body);
    }
}
beforeBodyWrite()方法:
a. 判断body,若本身就是咱们要返回的格式,直接返回;
b. 若不是,先判断是否为 String ,若是 String ,需先把 body 封装成一个统一的返回对象,然后再手动将这个对象转换成 Json 格式再返回(因为 String 比较特殊,不转换会报错的);
c. 若前两个都不是,则直接封装成统一的返回对象返回就行。
统一登录鉴权的实现
1. 创建一个普通的拦截器
此处通过 Session 会话信息检验用户是否处于登录状态,未登录用户将会被强制跳转至 login.html 登录页面,另外,此处考虑到项目中多处需要获取 Session 会话信息,所以定义一个统一的常量类作为存储咱们的全局变量的。创建 common.AppVariable 类,目前里面存储的是有两个:① 用户登录成功后,将其身份信息存储 Session 时需要用到的字符串常量;② 用户多次输入登录密码错误后的冻结时间(拓展模块中会详细说明);

/**
 * 全局变量
 */
public class AppVariable {
    //用户session key
    public static final String USER_SESSION_KEY = "USER_SESSION_KEY";
    public static final Integer FREEZE_TIME = 10;
}
然后,创建 config.LoginInterceptor 类,实现 HandlerInterceptor 接口,重写一下 preHandle 方法;

public class LoginIntercept implements HandlerInterceptor {

    /**
     * true -> 用户已登录
     * false -> 用户未登录
     */
    @Override
    public boolean preHandle(HttpServletRequest request, HttpServletResponse response, Object handler) throws Exception {
        HttpSession session = request.getSession();
        if(session != null && session.getAttribute(AppVariable.USER_SESSION_KEY)!= null) {
            //用户登录
            return true;
        }else {
            //用户未登录
            response.sendRedirect("login.html");
            return  false;
        }
    }
}
2. 配置拦截器并添加拦截规则
创建 config.AppConfig 类,实现 WebMvcConfigurer 接口,然后重写 addInterceptors() 方法

@Configuration
public class AppConfig implements WebMvcConfigurer {

    @Override
    public void addInterceptors(InterceptorRegistry registry) {
        registry.addInterceptor(new LoginIntercept())
                .addPathPatterns("/**")
                .excludePathPatterns("/css/**")
                .excludePathPatterns("/editor.md/**")
                .excludePathPatterns("/img/**")
                .excludePathPatterns("/js/**")
                .excludePathPatterns("/login.html")
                .excludePathPatterns("/reg.html")
                .excludePathPatterns("/blog_list.html")
                .excludePathPatterns("/blog_content.html")
                .excludePathPatterns("/art/listbypage")
                .excludePathPatterns("/art/detail")
                .excludePathPatterns("/art/incr-rcount")
                .excludePathPatterns("/comment/add")
                .excludePathPatterns("/comment/show")
                .excludePathPatterns("/comment/del")
                .excludePathPatterns("/user/login")
                .excludePathPatterns("/user/show")
                .excludePathPatterns("/user/getuserbyid")
                .excludePathPatterns("/user/my-massage")
                .excludePathPatterns("/user/reg")
                .excludePathPatterns("/getcaptcha")
                .excludePathPatterns("/image/**");
    }
}
统一异常处理的实现
创建 controller.ExceptionController 类,作为全局异常处理类,处理被抛出但无人接收的异常

 @RestControllerAdvice
    public class ExceptionController {
        // 捕捉所有异常
        @ExceptionHandler(Exception.class)
        public AjaxResult handleException(Exception e) {
            e.printStackTrace();
            return AjaxResult.fail(-6,"系统访问异常");
        }

    }
用户模块实现
该模块主要负责用户登录、注册、退出/注销以及信息展示,涉及到的页面主要包括登录页面、注册页面、个人博客列表页、个人博客详情页;
服务器使用 Session 会话保存用户的登录信息和状态(后期会将 Session 持久化到 Redis 中),基于 SSM 实现对数据库的 CRUD
创建用户实体类
创建 entity.Userinfo
@Data
public class Userinfo implements Serializable {
    private Integer id;
    private String username;
    private String password;
    private String nickname;
    private String remark;
    private String photo;
    private LocalDateTime createtime;
    private Integer state;
}
创建 UserMapper 接口
创建 mapper.UserMapper 接口,其中包含方法如下:
- reg:用户注册,往数据库添加一条用户信息
- getUserByName:根据用户名查询 userinfo 对象(用户信息),主要用于登录页面实现登录功能
- getUserById:根据用户 id 查询 useinfo 对象(用户信息),主要用于界面左侧用户信息卡片上展示
- upUserInfo:更新用户的个人信息,即个人中心修改个人信息(后期拓展详细说明)
- getStateByName:根据用户名获取当前进行登录操作的用户 state 字段的值,用于登录时验证,当 state 字段值为 3 时,进行账号冻结(后期拓展详细说明)
- updateStateByName:根据用户名更新当前进行登录操作的用户 state 字段的值,用户输错密码,state += 1,state = 3 执行冻结操作;若用户输入正确,则 state = 0(后期拓展详细说明)
@Mapper
public interface UserMapper {

    //注册
    int reg(Userinfo userinfo);

    //(根据用户名查询userinfo对象)
    Userinfo getUserByName(@Param("username") String username);

    Userinfo getUserById(@Param("id") Integer id);

    int upUserInfo(@Param("username") String username,
                   @Param("nickname") String nickname,
                   @Param("password") String password,
                   @Param("remark") String remark,
                   @Param("id") Integer id);


    int getStateByName(@Param("username") String username);


    int updateStateByName(@Param("username") String username,@Param("sta")  Integer sta);
}
实现 UserMapper.xml
<?xml version="1.0" encoding="UTF-8"?>
<!DOCTYPE mapper PUBLIC "-//mybatis.org//DTD Mapper 3.0//EN" "http://mybatis.org/dtd/mybatis-3-mapper.dtd">
<mapper namespace="com.example.demo.mapper.UserMapper">

        <insert id="reg">
            insert into userinfo(username,password) values(#{username},#{password})
        </insert>

        <select id="getUserByName" resultType="com.example.demo.entity.Userinfo">
            select * from userinfo where username=#{username}
        </select>

        <select id="getUserById" resultType="com.example.demo.entity.Userinfo">
            select * from userinfo where id=#{id}
        </select>

        <update id="upUserInfo">
            update userinfo set username=#{username},nickname=#{nickname},
            password=#{password}, remark=#{remark}
            where id=#{id}
        </update>

        <select id="getStateByName" resultType="Integer">
            select `state` from userinfo where username=#{username}
        </select>

        <update id="updateStateByName">
            update userinfo set `state`=#{sta} where username=#{username}
        </update>
</mapper>
创建 UserService
创建 service.UserService ,本项目中它的作用就是调用mapper层并返回结果给controller层使用;这里,我的 service.UserService 里的方法名都是和 mapper.UserMapper 里的方法名一一对应的。
@Service
public class UserService {

    @Resource
    private UserMapper userMapper;
    public int reg(Userinfo userinfo) {

        return userMapper.reg(userinfo);
    }

    public Userinfo getUserByName(String username) {

        return userMapper.getUserByName(username);
    }

    public Userinfo getUserById(Integer id) {

        return userMapper.getUserById(id);
    }

    public int upUserInfo(Userinfo userinfo) {
        return userMapper.upUserInfo(userinfo.getUsername(),userinfo.getNickname(),
                userinfo.getPassword(),userinfo.getRemark(),userinfo.getId());
    }


    public  int getStateByName(String username) {
        return userMapper.getStateByName(username);
    }

    public  int updateStateByName(String username,  Integer sta) {
        return userMapper.updateStateByName(username,sta);
    }
}
创建 UserController
创建 controller.UserController,它的作用是接收前端请求,验证前端参数,验证无误,调用UserService,接收 UserService 返回的数据,然后以统一的格式返回给前端(这部分具体代码实现在每一个功能进行详细实现时作以展示,以便于咱们更好的理解)
@RestController
@RequestMapping("/user")
@Slf4j
public class UserController {
     ...
     ...
     ...
}
注册功能实现( reg.html 页面)
前端操作
a. 引入发送 ajax 请求的依赖
<script src="js/jquery.min.js"></script>b. 约定前后端的交互接口
url :"/user/reg"
type : "POST"
data : "username,password"
后端返回 data != null, code=200 表示注册成功,用户可选择是否跳转至登录页面;返回 code == -1 表示注册失败 + msg (失败原因),返回 code 为 200 和 -1 外的值,表示该用户名已被使用(三种情况都会有弹框提示)
c. 前端代码
1. 给用户名、密码、确认密码分别加 id 属性,给提交按钮加点击事件mysub()
 <div class="login-container">
        <!-- 中间的注册框 -->
        <div class="login-dialog">
            <h3>注  册</h3>
            <div class="row">
                <span>用户名</span>
                <input type="text" id="username">
            </div>
            <div class="row">
                <span>密码</span>
                <input type="password" id="password">
            </div>
            <div class="row">
                <span>确认密码</span>
                <input type="password" id="password2">
            </div>

            <div class="row">
                <button id="submit" onclick="mysub()">提交</button>
            </div>
        </div>
    </div>
2. 点击提交按钮,提交注册事件,触发 ajax 请求(通过 jQuery 接收定位元素,获取用户输入)
 //提交注册事件
        function mysub() {
            //1.非空校验
            var username = jQuery("#username");
            var password = jQuery("#password");
            var password2 = jQuery("#password2");
            //var checkCode = jQuery("#checkCode");验证码后期详细说
            if(username.val()=="") {
                alert("请先输入用户名!");
                username.focus();//将鼠标光标移动到用户名的控件
                return;
            }
            if(password.val().trim()=="") {
                alert("请先输入密码!");
                password.focus();
                return;
            }
            if(password2.val().trim()=="") {
                alert("请先输入确认密码!");
                password2.focus();
                return;
            }
            //2.判断两次密码是否一致
            if(password.val() != password2.val()) {
                alert("两次输入的密码不一致,请重新输入!");
                password.focus();
                return;
            }
            //3.ajax提交请求
            jQuery.ajax({
                url:"/user/reg",
                type:"post",
                data:{
                    "username":username.val(),
                    "password":password.val(),
                },
                success:function(result) {
                    if(result.code==200 && result.data!=null) {
                        alert("恭喜,注册成功!");
                        if(confirm("是否要去登录页面 ?")) {
                            location.href = "login.html";
                        }
                    } else if(body.code == -1) {
                        alert("抱歉, 注册失败, 请重新注册! " + result.msg);
                    } else {
                        alert("该用户名已被使用, 请重新输入!");
                    }
                }
            });
        }
后端操作--注册涉及到数据库表的添加操作
a. 先实现 mapper.UserMapper( mapper 层)
//注册
    int reg(Userinfo userinfo);
b. 写对应的 xml 实现
 <insert id="reg">
            insert into userinfo(username,password) values(#{username},#{password})
 </insert>
c. 实现 service.UserService ( service 层代码)
public int reg(Userinfo userinfo) {

        return userMapper.reg(userinfo);
    }
d. 实现 controller.UserController ( controller 层)
@RequestMapping("/reg")
    public AjaxResult reg(UserinfoVO userinfoVo) {
        //非空校验和参数有效性校验
        if(userinfoVo == null || !StringUtils.hasLength(userinfoVo.getUsername())
            || !StringUtils.hasLength(userinfoVo.getPassword()) {
            return AjaxResult.fail(-1,"非法参数!");
        }

        return  AjaxResult.success(userService.reg(userinfoVo));
    }
这是没有添加图片验证码和进行加盐加密的版本哦,后面会一一添加的,这样写方便咱们初期理解
登录功能的实现( login.html 页面)
前端操作
a. 引入发送 ajax 请求的依赖
<script src="js/jquery.min.js"></script>b. 约定前后端的交互接口
url :"/user/login"
type : "POST"
data : "username,password"
后端返回 data != null, code=200 表示登录成功,跳转至个人博客列表页面;若为其他情况,弹框展示返回的 msg.
c. 前端代码
1. 给用户名、密码分别加 id 属性,给提交按钮加点击事件mysub()
 <div class="login-dialog">
            <h3>登 录</h3>
            <div class="row">
                <span>用户名</span>
                <input type="text" id="username">
            </div>
            <div class="row">
                <span>密码</span>
                <input type="password" id="password">
            </div>
            <div class="row">
                <button id="submit" onclick="mysub()">提交</button>
            </div>

        </div>
2. 点击提交按钮,提交登录事件,触发 ajax 请求(通过 jQuery 接收定位元素,获取用户输入)
 function mysub() {
            //1.非空效验
            var username = jQuery("#username");
            var password = jQuery("#password");
            //var captcha = jQuery("#captcha");
            if(username.val() == "") {
                alert("请先输入用户名!");
                username.focus();
                return;
            }
            if(password.val() == "") {
                alert("请先输入密码!");
                password.focus();
                return;
            }

            //2.ajax请求登录接口
            jQuery.ajax({
                type:"POST",
                url:"/user/login",
                data:{"username":username.val(),"password":password.val()},
                success:function(result) {
                    if(result != null && result.code == 200 && result.data != null) {
                        location.href = "myblog_list.html";
                    }else {
                        alert(result.msg);
                    }
                }
            });
        }
后端操作--登录涉及到数据库表的查询操作
a. 先实现 mapper.UserMapper( mapper 层)
//(根据用户名查询userinfo对象)
    Userinfo getUserByName(@Param("username") String username);
b. 写对应的 xml 实现
<select id="getUserByName" resultType="com.example.demo.entity.Userinfo">
            select * from userinfo where username=#{username}
</select>
c. 实现 service.UserService ( service 层代码)
public Userinfo getUserByName(String username) {

        return userMapper.getUserByName(username);
    }
d. 实现 controller.UserController ( controller 层)
    @RequestMapping("/login")
    public AjaxResult login(HttpServletRequest request, HttpServletResponse response,
                            String username, String password)
            throws IOException, ParseException, ParseException {
        //非空校验
        if(!StringUtils.hasLength(username) || !StringUtils.hasLength(password)) {
            return AjaxResult.fail(-1, "账号或密码错误,请稍后重试!");
        }

        //验证用户
        Userinfo userinfo = userService.getUserByName(username);
        if(userinfo == null || !StringUtils.hasLength(userinfo.getUsername()) ||
                !StringUtils.hasLength(userinfo.getPassword())) {
            return AjaxResult.fail(-2, "账号不存在!");
        }

        if(password != userinfo.getPassword()) {
            return AjaxResult.fail(-5, "用户名或密码错误!");
        }
        //登录成功
        HttpSession session = request.getSession(true);
        session.setAttribute(AppVariable.USER_SESSION_KEY, userinfo);

        return AjaxResult.success(1);
    }
这是没有进行加盐加密解密和 ”用户多次登录,账号冻结“ 的版本哦,后面会一一添加的,这样写方便咱们初期理解
注销/退出功能的实现( 用户登录后,面向已登录用户页面导航栏的一个 a 标签)
前端操作---操作面向已登录用户页面的导航栏
该功能实现需要用户登录校验,也是需要发送 ajax 请求的,因此需要给 a 标签添加点击事件,但是 a 标签的 onclick 事件支持兼容性不是很好,有些浏览器是不认咱们 a 标签的 onclick 事件的,所以需要在 href 标签中写 js 代码,具体如下:
<a href="javascript:logout()">退出</a>a. 引入发送 ajax 请求的依赖
<script src="js/jquery.min.js"></script>b. 约定前后端的交互接口
url :"/user/logout"
type : "POST"
data : {}
后端只要返回 code = 200 ,就表示退出成功,跳转至登录页面
c. 前端代码
 function logout() {
            if(confirm("确定要退出登录?")) {
                jQuery.ajax({
                    type:"POST",
                    url: "/user/logout",
                    data: {},
                    success: function(result) {
                        if(result != null && result.code == 200) {
                            location.href = "/login.html";
                        }
                    }
                });
            }
        }
后端操作--退出只涉及 controller 层,无需对数据库进行操作
  @RequestMapping("/logout")
    public AjaxResult logout(HttpSession session) {
        session.removeAttribute(AppVariable.USER_SESSION_KEY);
        return AjaxResult.success(1);
    }
博客文章模块实现
该模块主要负责博客文章的发布、修改、删除以及查看详情功能的实现,涉及的页面主要为博客列表页、博客详情页、个人博客发布页、个人博客修改页;基于 SSM 实现对数据库的 CRUD
创建文章实体类
创建entity.articleinfo
【注意】此处要对时间进行一个特殊处理,不然返回给前端的结果将会是一个时间戳
@Data
public class Articleinfo {
    private Integer id;
    private String title;
    private String content;
    // 格式化时间处理
    @JsonFormat(pattern = "yyyy-MM-dd HH:mm:ss",timezone = "GMT+8")
    private LocalDateTime createtime;
    private Integer uid;
    private Integer rcount;
    private Integer state;
}
创建 ArticleMapper 接口
创建 mapper.ArticleMapper 接口,其中包含方法如下:
- getArtCountByUid:根据用户 id 获取该用户的文章总数,用于用户信息模块中的文章总数设置;
- getMyList:根据用户 id 获取该用户的所有博客文章,用于个人博客列表页展示当前登录用户的所有博客文章;
- del:根据用户 id 和博客文章 id 进行博客删除操作,二者不对应是无法进行博客删除的;
- getDetail:根据博客文章 id 获取文章的详情信息,用于博客详情页的内容获取与展示;
- incrRCount:用于博客详情页对博客阅读量的增加,每访问一次,阅读量 + 1;
- add:发布博客,往数据库增加一条博客信息;
- update:修改博客;
- getListByPage:实现博客列表页的分页功能,通过每页显示博客文章的最大条数和 offset 偏移量来进行分页;
- getCount:获取文章总数,实现分页功能中的点击末页跳转到最后一页。
@Mapper
public interface ArticleMapper {

    int getArtCountByUid(@Param("uid") Integer uid);

    List<Articleinfo> getMyList(@Param("uid") Integer uid);

    int del(@Param("id") Integer id,@Param("uid") Integer uid);

    Articleinfo getDetail(@Param("id") Integer id);

    int incrRCount(@Param("id") Integer id);

    int add(Articleinfo articleinfo);

    int update(Articleinfo articleinfo);

    List<Articleinfo> getListByPage(@Param("psize") Integer psize,
                                    @Param("offsize") Integer offsize);

    int getCount();
}
实现 ArticleMapper.xml
<?xml version="1.0" encoding="UTF-8"?>
<!DOCTYPE mapper PUBLIC "-//mybatis.org//DTD Mapper 3.0//EN" "http://mybatis.org/dtd/mybatis-3-mapper.dtd">
<mapper namespace="com.example.demo.mapper.ArticleMapper">

    <select id="getArtCountByUid" resultType="Integer">
        select count(*) from articleinfo where uid=#{uid}
    </select>

    <select id="getMyList" resultType="com.example.demo.entity.Articleinfo">
        select * from articleinfo where uid=#{uid}
    </select>

    <delete id="del">
        delete from articleinfo where id=#{id} and uid=#{uid}
    </delete>

    <select id="getDetail" resultType="com.example.demo.entity.Articleinfo">
        select * from articleinfo where id=#{id}
    </select>

    <update id="incrRCount">
        update articleinfo set rcount=rcount+1 where id=#{id}
    </update>

    <insert id="add">
        insert into articleinfo(title,content,uid)
        values(#{title},#{content},#{uid})
    </insert>

    <update id="update">
        update articleinfo set title=#{title},content=#{content}
        where id=#{id} and uid=#{uid}
    </update>

    <select id="getListByPage" resultType="com.example.demo.entity.Articleinfo">
        select * from articleinfo limit #{psize} offset #{offsize}
    </select>

    <select id="getCount" resultType="Integer">
        select count(*) from articleinfo
    </select>
</mapper>
创建 ArticleService
创建 service.ArticleService ,本项目中它的作用就是调用mapper层并返回结果给controller层使用;这里,我的 service.ArticleService 里的方法名都是和 mapper.ArticleMapper 里的方法名一一对应的。
package com.example.demo.service;

import com.example.demo.entity.Articleinfo;
import com.example.demo.mapper.ArticleMapper;
import org.springframework.beans.factory.annotation.Autowired;
import org.springframework.stereotype.Service;

import java.util.List;

@Service
public class ArticleService {

    @Autowired
    private ArticleMapper articleMapper;


    public int getArtCountUid(Integer uid) {
        return articleMapper.getArtCountByUid(uid);
    }

    public List<Articleinfo> getMyList(Integer uid) {
        return articleMapper.getMyList(uid);
    }

    public int del(Integer id,Integer uid) {
        return articleMapper.del(id ,uid);
    }

    public Articleinfo getDetail(Integer id) {
        return articleMapper.getDetail(id);
    }

    public int incrRCount(Integer id) {
        return articleMapper.incrRCount(id);
    }

    public int add(Articleinfo articleinfo) {
        return articleMapper.add(articleinfo);
    }

    public int update(Articleinfo articleinfo) {
        return articleMapper.update(articleinfo);
    }

    public List<Articleinfo> getListByPage(Integer psize,Integer offsize){
        return articleMapper.getListByPage(psize,offsize);
    }

    public int getCount(){
        return articleMapper.getCount();
    }
}
创建 ArticleController
创建 controller.ArticleController,它的作用是接收前端请求,验证前端参数,验证无误,调用ArticleService,接收 ArticleService 返回的数据,然后以统一的格式返回给前端(这部分具体代码实现在每一个功能进行详细实现时作以展示,以便于咱们更好的理解)
@RestController
@RequestMapping("/art")
public class ArticleController {

    @Autowired
    private ArticleService articleService;

    ...
}
个人博客列表页实现( myblog_list.html 页面)
1. 左侧个人信息展示
前端操作
a. 引入发送 ajax 请求的依赖
<script src="js/jquery.min.js"></script>b. 约定前后端的交互接口
url :"/user/showinfo"
type : "GET"
data : {}
后端返回 code=200 ,构造数据进行展示,否则弹框提示” 个人信息加载失败,请重新刷新“
c. 前端代码
【注意】
此处我们需要展示用户名和文章数量,那么选择从后端去请求文章数量和用户名可以保证咱们的数据是最及时的(难免用户可能存在多个浏览器登录同一账号的情况)
 //获取左侧个人信息
        function showInfo() {
            jQuery.ajax({
                type:"GET",
                url:"/user/showinfo",
                data:{},
                success:function(result) {
                    if(result != null && result.code == 200) {
                        jQuery("#username").text(result.data.username);
                        jQuery("#artCount").text(result.data.artCount);
                    }else {
                        alert("个人信息加载失败,请重新刷新!");
                    }
                }
            });
        }
        showInfo();
此处还没有进行昵称和个性签名字段添加,后续实现个人信息修改页面时添加即可
后端操作--涉及到数据库表的查询操作
a. 先实现 mapper.UserMapper( mapper 层)
int getArtCountByUid(@Param("uid") Integer uid);b. 写对应的 xml 实现
<select id="getArtCountByUid" resultType="Integer">
        select count(*) from articleinfo where uid=#{uid}
</select>
c. 实现 service.UserService ( service 层代码)
 public int getArtCountUid(Integer uid) {
        return articleMapper.getArtCountByUid(uid);
    }
d. 实现 controller.UserController ( controller 层)
【注意】
我们可以从 Session 中获取当前登录用户信息,根据用户 id 去获取文章数量,并且这里返回的就不是咱们单纯的 Userinfo 对象了,而是在咱们的基础上加了文章数量这一信息的,所以咱们创建一个 UserinfoVO 实体类(用于创建前端展示的对象),使其继承 Userinfo 实体类
@Data
public class UserinfoVO extends Userinfo {
    private Integer artCount;//当前用户发表的文章总数

}
controller 层代码如下:
 @RequestMapping("/showinfo")
    public AjaxResult showInfo(HttpServletRequest request) {
        UserinfoVO userinfoVO = new UserinfoVO();
        //1.得到当前登录用户(从session当中获取)
        Userinfo userinfo = UserSessionUtils.getUser(request);
        if(userinfo == null ) {
            return AjaxResult.fail(-1,"非法请求");
        }

        //Spring提供的深克隆方法
        BeanUtils.copyProperties(userinfo,userinfoVO);

        //2.得到用户发表文章的总数
        userinfoVO.setArtCount(articleService.getArtCountUid(userinfo.getId()));
        return AjaxResult.success(userinfoVO);
    }
2. 右侧个人文章列表的展示
前端操作
a. 引入发送 ajax 请求的依赖
<script src="js/jquery.min.js"></script>b. 约定前后端的交互接口
url :"/art/mylist"
type : "POST"
data : {} 这里是不能传参的,后端直接从 Session 中拿当前登录用户的 id 去查询就可以了,如果允许传参,那么就可能出现:当前登录的小玺,传了个小源的 id ,导致小玺查到小源文章的情况
后端返回 code = 200 ,会有两种情况:一个是用户发了文章,一个是用户没有发过文章;如果用户没发表过文章,就显示一个"暂无文章";如果用户发表了文章,就构造数据进行查询结果展示(此处为列表页,肯定不能将每篇文章全部内容都展示出来,这是详情页要做的事,所以咱们要进行截取展示,这个功能我是交给后端做了,稍后会详细说明)。
后端返回 code != 200,弹框提示”查询文章列表出错!请重试!“
c. 前端代码
//获取我的文章列表数据
function getMyArtList() {
jQuery.ajax({
type:"POST",
url:"/art/mylist",
data:{},
success: function(result) {
if(result != null && result.code == 200) {
//有两种情况:发表了文章;没有发表文章
if(result.data != null && result.data.length>0) {
//发表了文章的
var artListDiv = "";
for(var i = 0; i < result.data.length; i++) {
var artItem = result.data[i];
artListDiv += '<div class="blog">';
artListDiv += '<div class="title">'+ artItem.title + '</div>';
artListDiv += '<div class="date">' + artItem.createtime + '</div>';
artListDiv += '<div class="desc">';
artListDiv += artItem.content;
artListDiv += '</div>';
artListDiv += '<a href="blog_content.html?id=' + artItem.id +
'" class="detail">查看全文 >></a>  ';
artListDiv += '<a href="blog_edit.html?id=' + artItem.id +
'" class="detail">修改 >></a>  ';
artListDiv += '<a href="javascript:myDel('+ artItem.id +');" class="detail">删除 >></a>  ';
artListDiv += '</div>';
}
jQuery("#artDiv").html(artListDiv);
}else {
//没有发表文章
jQuery("#artDiv").html("<h3>暂无文章</h3>");
}
}else {
alert("查询文章列表出错!请重试!");
}
}
});
}
getMyArtList();后端操作--涉及到数据库表的查询操作
a. 先实现 mapper.ArticleMapper( mapper 层)
List<Articleinfo> getMyList(@Param("uid") Integer uid);b. 写对应的 xml 实现
 <select id="getMyList" resultType="com.example.demo.entity.Articleinfo">
        select * from articleinfo where uid=#{uid}
 </select>
c. 实现 service.ArticleService ( service 层代码)
public List<Articleinfo> getMyList(Integer uid) {
        return articleMapper.getMyList(uid);
    }
d. 实现 controller.ArticleController ( controller 层)
【注意】
列表页不能够显示每篇文章的详细内容,咱们需要对每篇文章内容大小进行一个截取,我这里选择了展示长度为 100 ,当然你也可以选择别的值,这里的做法是:不足 100 的直接展示,不做处理;超过 100 的,截取 (1,100)后面拼接一个 "..." 作以前端展示(这里之所以从 1 开始而不是从 0 开始,是因为咱们用的 Markdown 编辑器,后端也是按这种格式存储的,从 1 开始就可以去掉 "#" 了,这里小于 100 的也可以做这样一个处理,小伙伴们可以加一下)
  @RequestMapping("/mylist")
    public AjaxResult getMyList(HttpServletRequest request) {
        Userinfo userinfo = UserSessionUtils.getUser(request);
        if(userinfo == null) {
            return AjaxResult.fail(-1,"非法请求!");
        }
        List<Articleinfo> list = articleService.getMyList(userinfo.getId());
        for (Articleinfo ai:list) {
            if (ai.getContent().length() >= 100) {
                ai.setContent(ai.getContent().substring(1, 100) + "...");
            }
        }
        return AjaxResult.success(list);
    }
博客详情页实现( blog_content.html 页面)
该页面稍稍有一点点复杂,需要展示所访问文章的详情信息、该文章所属的作者详情信息以及当前文章的阅读量和发布时间,后续还会加个评论区进去,先不考虑评论区,咱们先来理一下实现思路,就会比较清晰一点了
① 从 URL 中得到当前文章的 id
② 从后端查询文章详情信息(包括咱们的 uid )
③ 根据上一步查询的 uid 去查询一下咱们文章作者的信息
④ 实现阅读量 +1 (针对这一步,我们的实现思路有两个:一个是先查询文章阅读量,给其 +1 后再设置到数据库,但这个有两步操作,不是原子的,在并发场景下可能存在线程安全问题,因此咱们使用另一个思路,直接将两步操作合二为一,让数据库帮我们实现原子性。)
前端操作
a. 引入发送 ajax 请求的依赖
<script src="js/jquery.min.js"></script>b. 约定前后端的交互接口
查询文章详情:
url :"/art/detail"
type : "POST"
data : id -- 为当前博客文章的 id (从 URL 中获取)
后端返回 code=200 ,构造数据进行展示,否则弹框提示” 查询失败,请重试“
查询文章所属作者的详情信息:
url :"/user/getuserbyid"
type : "POST"
data : id -- 为上一步查询文章详情顺带查询过来的 uid
后端返回 code=200 并且返回的 data.id > 0(说明是有效用户),构造数据进行展示,否则弹框提示” 查询用户信息失败,请重试“
阅读量 +1:
url :"/art/incr-rcount"
type : "POST"
data : id -- 为当前博客文章的 id (从 URL 中获取)
只是更新 rcount 字段的值,后端返回后不做任何处理
c. 前端代码
从 URL 中获取当前文章的 id (因为会多处使用到,因此将该方法封装到 common.js 里):
//获取当前Url参数的公共方法
            function getUrlValue(key) {
                //ex:?id=8&v=6
                var params = location.search;
                if(params.length >1 ) {
                    //ex:id=8&v=6
                    params = location.search.substring(1);
                    var paramArr = params.split("&");
                    for(var i=0; i<paramArr.length;i++) {
                        var kv = paramArr[i].split("=");
                        if(kv[0]==key) {
                        //是我要查询的url
                        return kv[1];
                        }
                    }
                }
                return "";
            }
查询博客文章的详情信息:
 //查询文章详情
            function getArtDetail(id) {
                if(id == "") {
                    alert("非法参数!");
                    return;
                }
                jQuery.ajax({
                    type:"POST",
                    url:"/art/detail",
                    data:{"id" : id},
                    success: function(result) {
                        if(result != null && result.code == 200) {
                            jQuery("#title").html(result.data.title);
                            jQuery("#createtime").html(result.data.createtime);
                            jQuery("#rcount").html(result.data.rcount);
                            initEdit(result.data.content);
                            //得到用户id
                            showUser(result.data.uid);
                        }else {
                            alert("查询失败,请重试!");
                        }
                    }
                });
            }
            getArtDetail(getUrlValue("id"));
查询该文章所属作者的详情信息
 //查询用户的详情信息
            function showUser(id) {
                jQuery.ajax({
                    type:"POST",
                    url:"/user/getuserbyid",
                    data:{"id":id},
                    success: function(result) {
                        if(result != null && result.code == 200 && result.data.id>0) {
                            jQuery("#username").text(result.data.username);
                            jQuery("#remark").text(result.data.remark);
                        }else {
                            alert("查询用户信息失败,请重试!");
                        }
                    }
                });
            }
文章阅读量 +1:
  //阅读量+1
            function updateRCount() {
                //得到文章id
                var id = getUrlValue("id");
                if(id !="") {
                    jQuery.ajax({
                        type:"POST",
                        url:"/art/incr-rcount",
                        data:{"id":id},
                        success:function(result) {}
                    });
                }

            }
            updateRCount()
后端操作--涉及到数据库表的查询和修改操作
a. 先实现 mapper 层
ArticleMapper:
Articleinfo getDetail(@Param("id") Integer id);

int incrRCount(@Param("id") Integer id);
UserMapper:
Userinfo getUserById(@Param("id") Integer id);b. 写对应的 xml 实现
ArticleMapper.xml:
    <select id="getDetail" resultType="com.example.demo.entity.Articleinfo">
        select * from articleinfo where id=#{id}
    </select>

    <update id="incrRCount">
        update articleinfo set rcount=rcount+1 where id=#{id}
    </update>
UserMapper.xml:
<select id="getUserById" resultType="com.example.demo.entity.Userinfo">
            select * from userinfo where id=#{id}
</select>
c. 实现 service 层代码
ArticleService:
public Articleinfo getDetail(Integer id) {
        return articleMapper.getDetail(id);
    }

public int incrRCount(Integer id) {
        return articleMapper.incrRCount(id);
    }
UserService:
public Userinfo getUserById(Integer id) {

        return userMapper.getUserById(id);
    }
d. 实现 controller 层
ArticleController:
   @RequestMapping("/detail")
    public AjaxResult getDetail(Integer id) {
        if(id == null || id <= 0) {
            return AjaxResult.fail(-1,"非法参数!");
        }
        return AjaxResult.success(articleService.getDetail(id));
    }

    @RequestMapping("/incr-rcount")
    public AjaxResult incrRCount(Integer id) {
        if(id != null && id > 0) {
           return AjaxResult.success(articleService.incrRCount(id)) ;
        }
        return AjaxResult.fail(-1,"未知错误!");
    }
UserController:
 @RequestMapping("/getuserbyid")
    public AjaxResult getUserByID(Integer id) {
        if(id == null || id <= 0) {
            return AjaxResult.fail(-1,"非法参数!");
        }
        Userinfo userinfo = userService.getUserById(id);
        if(userinfo == null || userinfo.getId() <= 0) {
            return AjaxResult.fail(-1,"非法参数!");
        }
        //去除Userinfo中的敏感数据ex:密码
        userinfo.setPassword("");
        UserinfoVO userinfoVO = new UserinfoVO();
        BeanUtils.copyProperties(userinfo,userinfoVO);
        //查询当前用户发表的文章数
        userinfoVO.setArtCount(articleService.getArtCountUid(id));
        return AjaxResult.success(userinfoVO);
    }
博客发布页实现( blog_add.html 页面)
这里暂时只实现即时发布博客,后续拓展模块实现定时发布
前端操作
a. 引入发送 ajax 请求的依赖
<script src="js/jquery.min.js"></script>b. 约定前后端的交互接口
url :"/art/add"
type : "POST"
data : title,content
后端返回 code = 200 并且 data = 1 ,提示发布文章成功,用户可选择是否继续添加博客,若为是,继续添加,若用户选择否,跳转至个人博客列表页;返回结果不满足条件,则弹框提示”抱歉~文章添加失败,请重试!“
c. 前端代码
此处我们需要给发布文章按钮添加点击事件 mysub() 、创建编辑器标签,然后写出相应的 js 代码,进行编辑器设置和请求后端添加博客文章操作,代码如下:
   <!-- 标题编辑区 -->
    <div class="title">
        <input type="text" id="title" placeholder="输入文章标题">
        <button onclick="mysub()" id="send-button">发布文章</button>
    </div>
    <!-- 创建编辑器标签 -->
    <div id="editorDiv">
        <textarea id="editor-markdown" style="display:none;"></textarea>
    </div>
var editor;
function initEdit(md){
// 编辑器设置
editor = editormd("editorDiv", {
// 这里的尺寸必须在这里设置. 设置样式会被 editormd 自动覆盖掉.
width: "100%",
// 高度 100% 意思是和父元素一样高. 要在父元素的基础上去掉标题编辑区的高度
height: "calc(100% - 45px)",
// 编辑器中的初始内容
markdown: md,
// 指定 editor.md 依赖的插件路径
path: "editor.md/lib/",
saveHTMLToTextarea: true //
});
}
initEdit("# 在这里写下一篇博客"); // 初始化编译器的值
// 提交
function mysub(){
if(confirm("确认提交?")) {
//1.非空效验
var title = jQuery("#title");
if(title.val() == "") {
alert("请先输入标题!");
title.focus();
return;
}
if(editor.getValue() == "") {
alert("请先输入文章内容!");
return;
}
//2.请求后端进行博客添加操作
jQuery.ajax({
type:"POST",
url:"/art/add",
data: {"title":title.val(),"content":editor.getValue()},
success: function(result) {
if(result != null && result.code == 200 && result.data == 1) {
if(confirm("文章添加成功!是否继续添加文章?")) {
location.href = location.href;
}else {
location.href = "/myblog_list.html";
}
}else {
alert("抱歉~ 文章添加失败,请重试!");
}
}
});
// alert(editor.getValue()); // 获取值
// editor.setValue("#123") // 设置值
}
}
后端操作--涉及到数据库表的添加操作
a. 先实现 mapper.ArticleMapper( mapper 层)
int add(Articleinfo articleinfo);b. 写对应的 xml 实现
<insert id="add">
insert into articleinfo(title,content,uid)
values(#{title},#{content},#{uid})
</insert>c. 实现 service.ArticleService ( service 层代码)
public int add(Articleinfo articleinfo) {
return articleMapper.add(articleinfo);
}
d. 实现 controller.ArticleController ( controller 层)
我们可以从 Session 中获取当前登录用户信息,将当前登录用户的 id 设置到所添加的博客文章对象的 uid 字段中 ,因为保存文章信息时,需要指明文章出自哪一个用户
@RequestMapping("/add")
public AjaxResult add(Articleinfo articleinfo,HttpServletRequest request) {
//1.非空校验
if(articleinfo == null || !StringUtils.hasLength(articleinfo.getTitle())
|| !StringUtils.hasLength(articleinfo.getContent())){
//非法参数
return AjaxResult.fail(-1,"非法参数!");
}
//2.数据库添加操作
//a.得到当前登录用户的uid
Userinfo userinfo = UserSessionUtils.getUser(request);
if (userinfo == null || userinfo.getId() <= 0) {
//无效的登录用户
return AjaxResult.fail(-2,"无效的登录用户!");
}
articleinfo.setUid(userinfo.getId());
//添加数据库并返回结果
return AjaxResult.success(articleService.add(articleinfo));
}博客修改页实现( blog_edit.html 页面)
① 从 URL 中拿到我们要修改的博客文章 id
② 后端通过此文章 id 从数据库中查询出文章信息,然后将文章的标题和内容初始化到 Markdown 编辑器上
③ 进行文章的修改然后进行提交
前端操作
a. 引入发送 ajax 请求的依赖
<script src="js/jquery.min.js"></script>b. 约定前后端的交互接口
文章初始化接口约定:
url :"/art/detail"
type : "POST"
data : id --- 咱们当前要修改的文章 id (也就是当前 URL 中的 id )
后端返回 code = 200 ,说明查询成功,将文章标题和内容初始化咱们的 Markdown 编辑器上,否则弹框提示” 查询失败!请重试!“
修改文章接口约定:
url :"/art/update"
type : "POST"
data : title,content
后端返回 code = 200 并且 data = 1 ,提示修改文章成功,跳转至个人博客列表页;返回结果不满足条件,则弹框提示”抱歉!操作失败!请重试!“
c. 前端代码
从 URL 中获取当前文章的 id (因为会多处使用到,该方法是封装到 common.js 里的,前面博客详情页实现也有用到的):
//获取当前Url参数的公共方法
function getUrlValue(key) {
//ex:?id=8&v=6
var params = location.search;
if(params.length >1 ) {
//ex:id=8&v=6
params = location.search.substring(1);
var paramArr = params.split("&");
for(var i=0; i<paramArr.length;i++) {
var kv = paramArr[i].split("=");
if(kv[0]==key) {
//是我要查询的url
return kv[1];
}
}
}
return "";
}请求后端,通过文章 id 从数据库中查询出文章详情信息,然后将文章的标题和内容初始化到 Markdown 编辑器上
var editor;
        function initEdit(md){
            // 编辑器设置
            editor = editormd("editorDiv", {
                // 这里的尺寸必须在这里设置. 设置样式会被 editormd 自动覆盖掉.
                width: "100%",
                // 高度 100% 意思是和父元素一样高. 要在父元素的基础上去掉标题编辑区的高度
                height: "calc(100% - 45px)",
                // 编辑器中的初始内容
                markdown: md,
                // 指定 editor.md 依赖的插件路径
                path: "editor.md/lib/",
                saveHTMLToTextarea: true //
            });
        }
        initEdit("# 在这里写下一篇博客"); // 初始化编译器的值
        // 提交
        function mysub(){
            if(confirm("确认提交?")) {
                //1.非空效验
                var title = jQuery("#title");
                if(title.val() == "") {
                    alert("请先输入标题!");
                    title.focus();
                    return;
                }
                if(editor.getValue() == "") {
                    alert("请先输入文章内容!");
                    return;
                }
                //2.请求后端进行博客添加操作
                jQuery.ajax({
                    type:"POST",
                    url:"/art/add",
                    data: {"title":title.val(),"content":editor.getValue()},
                    success: function(result) {
                        if(result != null && result.code == 200 && result.data == 1) {
                            if(confirm("文章添加成功!是否继续添加文章?")) {
                                location.href = location.href;
                            }else {
                                location.href = "/myblog_list.html";
                            }
                        }else {
                            alert("抱歉~ 文章添加失败,请重试!");
                        }
                    }
                });
                    // alert(editor.getValue()); // 获取值
                    // editor.setValue("#123") // 设置值
            }

        }
进行文章标题和内容的修改并提交,后端将修改后的文章更新至数据库
 // 提交
        function mysub(){
            //1.非空效验
            var title = jQuery("#title");
            if(title.val() == "") {
                alert("请先输入文章标题");
                title.focus();
                return;
            }
            if(editor.getValue() == "") {
                alert("请先输入正文!");
                return;
            }
            //2.进行修改操作
            jQuery.ajax({
                type:"POST",
                url:"/art/update",
                data:{"id" : id,"title" : title.val(),"content":editor.getValue()},
                success:function(result) {
                    if(result != null && result.code == 200 && result.data == 1) {
                        alert("修改成功!");
                        location.href = "myblog_list.html";
                    }else {
                        alert("抱歉!操作失败!请重试!");
                    }
                }
            });
        }
后端操作--涉及到数据库表的查询和修改操作
【注意】这里涉及到对文章的修改操作,修改必须要满足从 Session 中拿出来的用户 id 和我们数据库中存储的原文章中的 uid 一致才能修改成功(即:是当前登录用户的文章才能修改,我们是没有权限修改别人的文章的),这一步在修改数据库时完成校验,不一致直接更新失败
a. 先实现 mapper.ArticleMapper( mapper 层)
  Articleinfo getDetail(@Param("id") Integer id);

  int update(Articleinfo articleinfo);
b. 写对应的 xml 实现
 <select id="getDetail" resultType="com.example.demo.entity.Articleinfo">
        select * from articleinfo where id=#{id}
 </select>


 <update id="update">
        update articleinfo set title=#{title},content=#{content}
        where id=#{id} and uid=#{uid}
 </update>
c. 实现 service.ArticleService ( service 层代码)
 public Articleinfo getDetail(Integer id) {
        return articleMapper.getDetail(id);
    }
 public int update(Articleinfo articleinfo) {
        return articleMapper.update(articleinfo);
    }
d. 实现 controller.ArticleController ( controller 层)
我们在 getDetail() 方法中将查询出的文章详情信息返回给前端进行 Markdown 初始化展示,然后在更新方法中,先从 Session 中获取当前登录用户信息,将当前登录用户的 id 设置到更新后的博客文章对象的 uid 字段中(以此解决修改文章归属人的判定问题) ,因为修改文章信息时,需要修改后的文章 uid 和原文章的 uid 相等才可以(相等说明是此人的文章,此人可以修改)
@RequestMapping("/detail")
    public AjaxResult getDetail(Integer id) {
        if(id == null || id <= 0) {
            return AjaxResult.fail(-1,"非法参数!");
        }
        return AjaxResult.success(articleService.getDetail(id));
    }

@RequestMapping("/update")
    public AjaxResult update(Articleinfo articleinfo,HttpServletRequest request) {
        //1.非空校验
        if(articleinfo == null || !StringUtils.hasLength(articleinfo.getTitle())
                || !StringUtils.hasLength(articleinfo.getContent())
                || articleinfo.getId() == null){
            //非法参数
            return AjaxResult.fail(-1,"非法参数!");
        }
        //a.得到当前登录用户的id
        Userinfo userinfo = UserSessionUtils.getUser(request);
        if (userinfo == null || userinfo.getId() <= 0) {
            //无效的登录用户
            return AjaxResult.fail(-2,"无效用户!");
        }
        //很核心的代码,(解决了修改文章归属人的判定问题)
        articleinfo.setUid(userinfo.getId());
        articleinfo.setCreatetime(LocalDateTime.now());
        return AjaxResult.success(articleService.update(articleinfo));
    }
博客删除功能的实现(myblog_list.html 页面)
此功能是只有 myblog_list.html 页面上有,是一个删除按钮,只有当前登录的用户具备删除自己所发布的文章的权利,其他人是不具备该种权利的
前端操作
a. 引入发送 ajax 请求的依赖
<script src="js/jquery.min.js"></script>b. 约定前后端的交互接口
url :"/art/del"
type : "POST"
data : id --- 当前要删除的文章的 id
后端返回 code = 200 并且 data = 1 ,提示删除文章成功,刷新当前页面;返回结果不满足条件,则弹框提示”删除失败!请重试!“
c. 前端代码
此处我们需要给删除文章按钮添加点击事件 myDel(id) (这个 id 是每篇文章各自的 id ,这个在列表页展示的时候,一同从后端获取,然后构造就知道了的,你点击哪一篇文章下的删除按钮,此时这个 id 就是哪篇文章的 id),代码如下:
<a href='javascript:myDel(id)' class="detail">删除 >></a> function myDel(id) {
if(confirm("确认删除文章?")) {
//删除文章
jQuery.ajax({
type:"POST",
url:"/art/del",
data:{"id" : id},
success: function(result) {
if(result != null && result.code == 200 && result.data == 1) {
alert("操作成功!");
//刷新页面
location.href = location.href;
}else {
alert("删除失败!请重试!");
}
}
});
}
}后端操作--涉及到数据库表的删除操作
a. 先实现 mapper.ArticleMapper( mapper 层)
int del(@Param("id") Integer id,@Param("uid") Integer uid);b. 写对应的 xml 实现
<delete id="del">
        delete from articleinfo where id=#{id} and uid=#{uid}
</delete>
c. 实现 service.ArticleService ( service 层代码)
 public int del(Integer id,Integer uid) {
        return articleMapper.del(id ,uid);
    }
d. 实现 controller.ArticleController ( controller 层)
我们可以从 Session 中获取当前登录用户信息,未登录用户不能进行删除
 @RequestMapping("/del")
    public AjaxResult del(Integer id,HttpServletRequest request) {
    if(id == null || id <= 0) {
        //参数有误
        return AjaxResult.fail(-1,"参数异常");
    }
    Userinfo user = UserSessionUtils.getUser(request);
    if(user == null) {
        return AjaxResult.fail(-2,"用户未登录");
    }
    return AjaxResult.success(articleService.del(id,user.getId()));
    }
博客列表页的实现(blog_list.html 页面,面向所有用户的,该页面实现了分页功能)
该页面展示所有用户发布的博客,实现了分页功能,对于分页功能的实现有两个思路/方式:一个是自己实现分页功能,一个是使用 MyBatis-Plus 分页插件实现分页;本项目中是自己实现分页,通过这个方式咱们可以了解一下该功能原始的实现思想,后续也可将其改为第二种实现方式,接下来,我们一起来看一下自己如何实现分页功能:
前端操作
a. 引入发送 ajax 请求的依赖
<script src="js/jquery.min.js"></script>b. 约定前后端的交互接口
项目中只是通过首页、上一页、下一页和末页四个按钮实现一个简单的分页,通过分析,不难发现,实现这四个按钮的分页功能需要三个全局变量:当前页码、每页显示条数、最大页数
        //当前页码
        var pindex = 1;
        //每页显示条数
        var psize = 2;
        //最大页数
        var pcount = 1;
知道这三个变量后,我们来分析一下各个按钮对应功能实现思想:
- 首页:将 pindex 设置为 1 ,请求后端获取当前博客列表,请求中的参数为 pindex、psize;
- 上一页:如果 pindex 为 1 ,则提示”当前已在首页“,若不是,则请求后端获取当前博客列表,请求中的参数为 pindex - 1、psize ;
- 下一页:如果 pindex = pcount,则提示”当前已在末页“,若不是,则请求后端获取当前博客列表,请求中的参数为 pindex + 1、psize;
- 末页:将 pindex 设置为 pcount ,并请求后端获取文章列表(pcount 的值在访问该页面时,触发 ajax 请求后端数据,我们就可以从后端返回的数据中得到).
前后端交互接口为:
url :"/art/listbypage"
type : "POST"
data : pindex、psize
后端返回 code = 200 并且 data.list.length > 0 (查询到的文章条数大于 0 ) ,构造当前页面数据并进行展示同时给 pcount 赋值,反之不做处理
c. 前端代码
1>首先给四个按钮添加点击事件,点击可触发相应操作,跳转至某页
 <div class="blog-pagnation-wrapper">
                <button onclick="goFirstPage()" class="blog-pagnation-item">首页</button>
                <button onclick="goBeforePage()" class="blog-pagnation-item">上一页</button>
                <button onclick="goNextPage()" class="blog-pagnation-item">下一页</button>
                <button onclick="goLastPage()" class="blog-pagnation-item">末页</button>
 </div>
//点击首页
function goFirstPage() {
if(pindex <= 1) {
alert("当前页已是首页!");
return;
}
location.href = "blog_list.html";
}
//点击上一页按钮
function goBeforePage() {
if(pindex <= 1) {
alert("当前页已是首页!")
return;
}
pindex = parseInt(pindex)-1;
location.href = "blog_list.html?pindex="+pindex;
}
//点击下一页按钮
function goNextPage() {
if(pindex == pcount) {
alert("当前页已是末页!");
return;
}
pindex = parseInt(pindex)+1;
location.href = "blog_list.html?pindex="+pindex;
}
//点击末页
function goLastPage() {
if(pindex == pcount) {
alert("当前页已是末页!");
return;
}
pindex = pcount;
location.href = "blog_list.html?pindex="+pindex;
} 2> 得到当前 URL 中的页码 pindex,请求后端,得到当前页面的数据并进行展示,同时给 pcount 赋值
//1.先尝试得到当前url中的页码
pindex = (getUrlValue("pindex") == "" ? 1 : getUrlValue("pindex"));
//2.查询后端接口,得到当前页面的数据,并进行显示
function initPage() {
jQuery.ajax({
type: "POST",
url: "/art/listbypage",
data: {"pindex":pindex,"psize":psize},
success: function(result) {
if(result != null && result.code == 200 && result.data.list.length > 0) {
var artListHtml = "";
for(var i = 0;i < result.data.list.length;i++) {
var articleinfo = result.data.list[i];
artListHtml += '<div class="blog">';
artListHtml += '<div class="title">'+articleinfo.title +'</div>';
artListHtml += '<div class="date">'+articleinfo.createtime+'</div>';
artListHtml += '<div class="desc">'+articleinfo.content +'</div>';
artListHtml += ' <a href="blog_content.html?id='+ articleinfo.id+'" class="detail">查看全文 >></a>';
artListHtml +='</div>';
}
jQuery("#artListDiv").html(artListHtml);
pcount = result.data.pcount;
}
}
});
}后端操作--涉及到数据库表的查询操作
对于前端传过来的两个参数 pindex 和 psize,我们如何通过这两个参数查询出前端所需的数据呢?也就是说,如何通过这俩参数实现这个列表页的分页功能呢?不急,慢慢来,我们先明确一点:
在我们后端,我们最后是通过 MyBatis 对我们的数据库进行操作的,从数据库查出所需的数据,那我们的 SQL 就可以这样写:
select * from articleinfo limit #{psize} offset #{offsize}a. psize 是咱们约定好的每页显示条数,从前端直接传过来的,项目中我用的是 2 ,也就是每页最多显示两条数据;
b. offset 是偏移量,就是当前查询从哪个下标开始查,首页的话,起始下标就是 0,offset = 0,其他页面,我们可以通过公式: offset = (pindex - 1) * psize 计算出偏移量,offset 计算交给 controller 层,稍后展示具体代码,然后对于这个公式的推导,这里简单说明一下:
- 假设当前页码 pindex 为 1,每页显示 psize 为 2,那么 offset = 0,从下标为 0 的第一条数据开始查询,查询两条数据出来;
- 假设当前页码 pindex 为 2,每页显示 psize 为 2,那么 offset = 2,因为下标为 0、1 的两条数据已经在第一页展示了,那么第二页需要从第 3 条数据(下标 2)开始查两条数据出来,以此类推,就可以得出该公式。
a. 先实现 mapper.ArticleMapper( mapper 层)
 List<Articleinfo> getListByPage(@Param("psize") Integer psize,
                                    @Param("offsize") Integer offsize);
b. 写对应的 xml 实现
 <select id="getListByPage" resultType="com.example.demo.entity.Articleinfo">
        select * from articleinfo limit #{psize} offset #{offsize}
 </select>
c. 实现 service.ArticleService ( service 层代码)
public List<Articleinfo> getListByPage(Integer psize,Integer offsize){
        return articleMapper.getListByPage(psize,offsize);
    }
d. 实现 controller.ArticleController ( controller 层)
这里,我们需要进行以下几步操作:
- 计算出偏移量 offset 传给 service 层进行后续数据查询操作;
- 将查询到的每篇文章内容进行一个截取,以便前端展示列表;
- 从后端查询我们当前博客总数 totalCount ,用总数 totalCount 除以每页显示的最大条数 psize ,这个结果是可能为小数的,所以用 double pcountdb = totalCount / (1.0*psize) ,然后用进一法得到我们的总页数 int pcount = (int) Math.ceil(pcountdb);
- 最后将我的文章列表和总页数放到 HashMap 中以统一的数据格式返回给前端.
@RequestMapping("/listbypage")
    public AjaxResult getListByPage(Integer pindex,Integer psize) {
        //1.参数校正
        if(pindex == null || pindex <= 1) {
            pindex = 1;
        }
        if(psize == null || psize <= 1) {
            psize = 2;
        }
        //分页公式的值(当前页码-1)*每页显示条数
        int offset =  (pindex - 1) * psize;
        //文章列表数据
        List<Articleinfo> list = articleService.getListByPage(psize,offset);
        for (Articleinfo ai:list) {
            if (ai.getContent().length() >= 100) {
                ai.setContent(ai.getContent().substring(1, 100) + "...");
            }
        }
        //当前列表一共多少页
        //a.总共有多少条数据
         int totalCount = articleService.getCount();
        //b.总条数/psize(每页显示多少条数据)
        double pcountdb = totalCount / (1.0 * psize);
        //c.使用进一法得到总页数
        int pcount = (int) Math.ceil(pcountdb);
        HashMap<String,Object> result = new HashMap<>();
        result.put("list",list);
        result.put("pcount",pcount);
        return AjaxResult.success(result);
    }
密码的加盐加密模块
该模块主要实现对用户密码的加盐加密与解密(更安全的)
为什么要进行加盐加密?
- 明文保存密码是不可行的,会泄露用户隐私;
- 传统的 MD5 是可以实现加密,而且也是不可逆的,但是它是有规律的,是可以被暴力破解的,现在网上也有彩虹表的存在(它里面记录了几乎所有字符串的 MD5 对照表),所以使用传统的 MD5 加密其实就是掩耳盗铃;
- 加盐加密是更安全的,为什么嘞?这是因为他这个盐值是随机的,同一个字符串每次调用加密方法产生的盐值都不一样,所以是没有规律的,此时如果想暴力破解,是不容易的,破解成本比较高的。
加密思路
- 产生随机盐值(32位)。这个盐值可以使用咱们 Java 提供的 UUID 生成,具体可通过调用 UUID 中的 randomUUID 方法生成一个长度为 36 位的随机值,这36 位中包含四个"-",这里咱们自己约定的格式是没有"-"的,所以可以将产生的值先调用 toString 方法转化成字符串,然后调用 replaceAll 方法将字符串中的"-"用""空字符串代替;
- 将咱们的盐值和明文密码拼接起来,然后整体使用 MD5 加密,得到 32 位的密文;
- 根据我们自己约定的格式,这里我用的是“ 32 位盐值 + $ + 32位加盐后得到的密文 ”格式进行加密得到最终的密码。之所以这样规定是为了方便后面解密更容易的去获取到这个盐值(直接调用 split 方法以 "$" 分割字符串,分割得到的字符串数组中,下标为 0 的就是我们解密要用到的盐值。(这里盐值之所以不直接新作为一个字段存储到数据库主要是因为两个原因:一个是盐值与表的业务逻辑无关,加入该字段不符合数据库第三范式;一个是把它单独作为一列可能会被黑客猜到这个就是盐值)
解密思路
加密其实蛮简单的,难在咱们的解密,因为我们每次加密都使用的不可逆的算法,所以解密会相对比较麻烦,但是,麻烦不等于就学不会,现在,我们一起看一下解密的思路:
- 首先从数据库中存储的最终密码中通过"$"分割得到盐值(这个最终密码可通过用户名从数据库中获得,因为在进行数据库设计的时候,我们的用户名是加了唯一约束的,每个用户名只能出现一次);
- 将用户输入的明文密码使用与在数据库中存储的最终密码相同的方法进行加密(即使用刚刚说到的加密思路再进行加密一次)。这里的代码实现上,我是重载了进行加密的方法,这个方法里我们盐值不再随机生成,而是作为参数被传入,然后用已知的这个盐值对用户输入的密码进行加密。
- 将刚刚加密得到的密码(可以将其称为待验证密码)与数据库保存的用户最终密码进行对比,若一致,密码正确,登录成功。
加密解密具体实现
加密解密就涉及到咱们的注册和登录页面,主要还是在后端 controller 层进行操作,在注册时,将新注册用户的用户名和密码(加盐加密后)保存到用户表中,登录时,将用户输入的明文密码使用与该用户在数据库中存储的最终密码相同的加盐方式(盐值也得一样)加密,然后对比两次的密码,若一致,登录成功,否则失败(这里还未考虑多次登录,账号冻结,拓展模块会添加此项功能)。
创建 common.PasswordUtils 类,在该类里面实现加盐加密与解密功能(解密直接返回对比结果 true or false)

 /**
     * 加盐并生成密码
     *
     * @param password 明文密码
     * @return 保存到数据库中的密码
     */

    public static String encrypt(String password) {
        //a.产生盐值(32位)
        String salt = UUID.randomUUID().toString().replace("-","");//uuid是36位的,去掉-就变32位的了
        //b.生成加盐之后的密码
        String saltPassword = DigestUtils.md5DigestAsHex((salt+password).getBytes());
        //c.生成最终密码(保存到数据库里的密码)[约定的格式:32位盐值+$+32加盐之后的密码]
        String finalPassword = salt + "$" + saltPassword;
        return finalPassword;
    }

    /**
     * 生成加盐的密码(方法一的重载)
     * @param password 明文
     * @param salt 固定的盐值
     * @return 最终密码
     */

    public static String encrypt(String password,String salt) {
        //1.生成加盐之后的密码
        String saltPassword = DigestUtils.md5DigestAsHex((salt + password).getBytes());
        //2.生成最终的密码
        String finalPassword = salt + "$" + saltPassword;
        return  finalPassword;
    }

    /**
     * 验证密码
     * @param inputPassword 用户输入的明文密码
     * @param finalPassword 数据库保存的最终密码
     * @return
     */

    public static boolean check(String inputPassword,String finalPassword) {
        if(StringUtils.hasLength(inputPassword) && StringUtils.hasLength(finalPassword)
          && finalPassword.length() == 65) {
            //1.得到盐值
            String salt = finalPassword.split("\\$")[0];
            //2.使用之前的加密的方式,将明文密码和已经得到的盐值进行加密,生成最终的密码
            String confirmPassword = PasswordUtils.encrypt(inputPassword,salt);
            //3.对比两个密码是否相同
            return confirmPassword.equals(finalPassword);
        }
        return false;
    }
实现加盐后 controller 层代码的如下:
注册代码:
@RequestMapping("/reg")
    public AjaxResult reg(UserinfoVO userinfoVo) {
        //非空校验和参数有效性校验
        if(userinfoVo == null || !StringUtils.hasLength(userinfoVo.getUsername())
            || !StringUtils.hasLength(userinfoVo.getPassword()) ||
            !StringUtils.hasLength(userinfoVo.getCheckCode()) ||
                !StringUtils.hasLength(userinfoVo.getCodeKey())) {
            return AjaxResult.fail(-1,"非法参数!");
        }

        //密码加盐加密
        userinfoVo.setPassword(PasswordUtils.encrypt(userinfoVo.getPassword()));
        return  AjaxResult.success(userService.reg(userinfoVo));
    }
登录代码:
 @RequestMapping("/login")
    public AjaxResult login(HttpServletRequest request, HttpServletResponse response,
                            String username, String password)
            throws IOException, ParseException, ParseException {
        //非空校验
        if(!StringUtils.hasLength(username) || !StringUtils.hasLength(password)) {
            return AjaxResult.fail(-1, "账号或密码错误,请稍后重试!");
        }

        //验证用户
        Userinfo userinfo = userService.getUserByName(username);
        if(userinfo == null || !StringUtils.hasLength(userinfo.getUsername()) ||
                !StringUtils.hasLength(userinfo.getPassword())) {
            return AjaxResult.fail(-2, "账号不存在!");

        //ps:这里注意要对加盐密码解密
        if(userinfo == null || !PasswordUtils.check(password, userinfo.getPassword())) {
            //用户名不存在或密码错误
            return AjaxResult.fail(-5, "账号或密码错误,请稍后重试!");
        }

        //登录成功
        HttpSession session = request.getSession(true);
        session.setAttribute(AppVariable.USER_SESSION_KEY, userinfo);
        return AjaxResult.success(1);
    }
结语
本篇博客到这儿就结束了,很开森能和你一起学习吖!简单总结一哈昂,这里主要实现了整个项目的基础模块部分的功能,由于篇幅等各方面的因素呢,咱们开头提到的其他功能将作为拓展功能后面陆续呈现出来~期待还能和你一起学习哦~


 386
386


 被折叠的 条评论
为什么被折叠?
被折叠的 条评论
为什么被折叠?
 到【灌水乐园】发言


