


日常开发中,无论是内部服务之间的调用,还是第三方服务,都免不了发起http请求。Java中常见的http请求方式大致有原生的HttpURLConnection、Apache的HttpClient、Spring的RestTemplate等。
1、HttpURLConnection方式
get请求
public static void main(String[] args) {
        try {
            // 1. 得到访问地址的URL
            URL url = new URL("http://localhost:8080/index.html");
            // 2. 得到网络访问对象java.net.HttpURLConnection
            HttpURLConnection connection = (HttpURLConnection) url.openConnection();
            /* 3. 设置请求参数(过期时间,输入、输出流、访问方式),以流的形式进行连接 */
            // 设置是否向HttpURLConnection输出
            connection.setDoOutput(false);
            // 设置是否从HttpUrlConnection读入
            connection.setDoInput(true);
            // 设置请求方式("GET"/"POST")
            connection.setRequestMethod("GET");
            // 设置是否使用缓存
            connection.setUseCaches(true);
            // 设置此 HttpURLConnection 实例是否应该自动执行 HTTP 重定向
            connection.setInstanceFollowRedirects(true);
            // 设置超时时间
            connection.setConnectTimeout(3000);
            // 连接
            connection.connect();
            // 4. 得到响应状态码的返回值 responseCode
            int code = connection.getResponseCode();
            // 5. 如果返回值正常,数据在网络中是以流的形式得到服务端返回的数据
            String msg = "";
            if (code == 200) { // 正常响应
                // 从流中读取响应信息
                BufferedReader reader = new BufferedReader(new InputStreamReader(connection.getInputStream()));
                String line = null;
                while ((line = reader.readLine()) != null) { // 循环从流中读取
                    msg += line + "\n";
                }
                reader.close(); // 关闭流
            }
            // 6. 断开连接,释放资源
            connection.disconnect();

            // 显示响应结果
            System.out.println(msg);
        } catch (IOException e) {
            e.printStackTrace();
        }
    }
post请求
public static void main(String[] args) {
        try {
            // 1. 获取访问地址URL
            URL url = new URL("http://localhost:8080/index.jsp");
            // 2. 创建HttpURLConnection对象
            HttpURLConnection connection = (HttpURLConnection) url.openConnection();
            /* 3. 设置请求参数等 */
            // 请求方式
            connection.setRequestMethod("POST");
            // 设置连接超时时间
            connection.setConnectTimeout(3000);
        // 设置是否向 HttpUrlConnection 输出,对于post请求,参数要放在 http 正文内,因此需要设为true,默认为false。
            connection.setDoOutput(true);
            // 设置是否从 HttpUrlConnection读入,默认为true
            connection.setDoInput(true);
            // 设置是否使用缓存
            connection.setUseCaches(false);
            // 设置此 HttpURLConnection 实例是否应该自动执行 HTTP 重定向
            connection.setInstanceFollowRedirects(true);
            // 设置使用标准编码格式编码参数的名-值对
            connection.setRequestProperty("Content-Type", "application/x-www-form-urlencoded");
        // 添加 HTTP HEAD 中的一些参数。
        // JDK8中,HttpURLConnection默认开启Keep-Alive
       // connection.setRequestProperty("Connection", "Keep-Alive");
            // 连接
            connection.connect();
            /* 4. 处理输入输出 */
            // 写入参数到请求中
            String params = "username=test&password=123456";
            OutputStream out = connection.getOutputStream();
            out.write(params.getBytes());
            out.flush();
            out.close();
            // 从连接中读取响应信息
            String msg = "";
            int code = connection.getResponseCode();
            if (code == 200) {
                BufferedReader reader = new BufferedReader(new InputStreamReader(connection.getInputStream()));
                String line;
                while ((line = reader.readLine()) != null) {
                    msg += line + "\n";
                }
                reader.close();
            }
            // 5. 断开连接
            connection.disconnect();

            // 处理结果
            System.out.println(msg);
        } catch (MalformedURLException e) {
            e.printStackTrace();
        } catch (IOException e) {
            e.printStackTrace();
        }
    }
2、HttpClient方式
get请求
public String get(JSONObject parameters, String url) {
        CloseableHttpClient httpClient = HttpClients.createDefault();
        if (parameters != null) {
            StringBuffer query = new StringBuffer();
            int i = 0;
            for (String key : parameters.keySet()) {
                if (i == 0) {
                   query.append("?");
                }
                query.append( key + "=" + parameters.getString(key) + "&");
                i++;
            }
            if (query.length() > 0) {
                query.deleteCharAt(query.length() -1);
            }
            url = url + query;
        }
        HttpGet method = new HttpGet(url);
        String body = null;

        if (method != null & parameters != null) {
            try {
                // 建立一个NameValuePair数组,用于存储欲传送的参数
                method.addHeader("Content-type", "application/json; charset=utf-8");
                method.setHeader("Accept", "application/json");
                CloseableHttpResponse response = httpClient.execute(method);
                int statusCode = response.getStatusLine().getStatusCode();
                if (statusCode != HttpStatus.SC_OK) {
                    System.out.println("调用失败:" + response.getStatusLine());
                }

                // Read the response body
                body = EntityUtils.toString(response.getEntity());
                response.close();
                httpClient.close();
            } catch (IOException e) {
                // 网络错误
                e.printStackTrace();
            }
        }
        return body;
    }
post请求
public static void main(JSONObject parameters , String url ){
        CloseableHttpClient httpClient = createSSLClientDefault();
        //get类型的请求
        HttpGet method = new HttpGet(uriBuilder.build());
        //post类型的请求
        HttpPost method = new HttpPost(url);
        method.setHeader("Accept", "application/json");
        String body = null;
        if ( parameters != null) {
            try {
                method.addHeader("Content-type", "application/json; charset=utf-8");
                method.setEntity(new StringEntity(parameters.toString(), Charset.forName("UTF-8")));
                CloseableHttpResponse response = httpClient.execute(method);
                int statusCode = response.getStatusLine().getStatusCode();

                if (statusCode != HttpStatus.SC_OK) {
                    HttpEntity httpEntity = response.getEntity();
                    String jsObject = EntityUtils.toString(httpEntity, "UTF-8");
                    System.out.println("调用失败:" + response.getStatusLine());
                    System.out.println("调用失败:" + jsObject);
                    return null;
                }
                // Read the response body
                body = EntityUtils.toString(response.getEntity());
                response.close();
                httpClient.close();
            } catch (IOException e) {
                // 网络错误
                e.printStackTrace();
            }
        }
        return body;

    }


//解决https访问失败的情况
public static CloseableHttpClient createSSLClientDefault() {
        try {
            SSLContext sslContext = new SSLContextBuilder().loadTrustMaterial(null, new TrustStrategy() {
                // 信任所有
                public boolean isTrusted(X509Certificate[] chain, String authType) throws CertificateException {
                    return true;
                }
            }).build();
            HostnameVerifier hostnameVerifier = NoopHostnameVerifier.INSTANCE;
            SSLConnectionSocketFactory sslsf = new SSLConnectionSocketFactory(sslContext, hostnameVerifier);
            return HttpClients.custom().setSSLSocketFactory(sslsf).build();
        } catch (KeyManagementException e) {
            e.printStackTrace();
        } catch (NoSuchAlgorithmException e) {
            e.printStackTrace();
        } catch (KeyStoreException e) {
            e.printStackTrace();
        }
        return HttpClients.createDefault();

    }
3、RestTemplate方式
如果是基于Spring框架,那么强烈推荐使用这种方式。优势:只需要关心具体的URL、header、body等,其他细节不必关心,都已经封装好了。只需要使用RestTemplate.exchange就可以了,它支持GET、POST、PUT、DELETE等
1)配置和使用
创建RestTemplate,只需要把RestTemplate注入到bean里面
@Configuration
public class RestTempleConfig {

    @Bean
    public RestTemplate restTemplate() {
        return new RestTemplate();
    }
}
在工程中,常用的方式是扩展做成一个工具类,且能支持https
@Configuration
public class RestTemple {

    @Bean
    public RestTemplate httpsRestTemplate(HttpComponentsClientHttpRequestFactory httpsFactory){
        RestTemplate restTemplate = new RestTemplate(httpsFactory);
        restTemplate.setErrorHandler(new ResponseErrorHandler() {
            @Override
            public boolean hasError(ClientHttpResponse clientHttpResponse) {
                return false;
            }

            @Override
            public void handleError(ClientHttpResponse clientHttpResponse) {
                //默认处理非200的返回,会抛异常
            }
        });
        return restTemplate;
    }

    @Bean(name = "httpsFactory")
    public HttpComponentsClientHttpRequestFactory httpComponentsClientHttpRequestFactory() throws Exception{
        CloseableHttpClient httpClient = HttpsClientUtils.acceptsUntrustedCertsHttpClient();
        HttpComponentsClientHttpRequestFactory httpsFactory = new HttpComponentsClientHttpRequestFactory(httpClient);
        httpsFactory.setReadTimeout(2000);
        httpsFactory.setConnectTimeout(2000);
        return httpsFactory;
    }


    public  <T> String httpRequest(String url, HttpMethod method, HttpEntity<T> entity){
        try {
            //发起一个POST请求
            ResponseEntity<String> result = httpsRestTemplate(httpComponentsClientHttpRequestFactory()).exchange(url, method, entity, String.class);
            return result.getBody();
        } catch (Exception e) {
            System.out.println("请求失败: " + e.getMessage());
        }
        return null;
    }

}
支持https的类:
public class HttpsClientUtils {
/*
* https ip地址请求忽略证书设置
*
* */
    public static CloseableHttpClient acceptsUntrustedCertsHttpClient() throws KeyStoreException, NoSuchAlgorithmException, KeyManagementException {
        HttpClientBuilder b = HttpClientBuilder.create();

        // setup a Trust Strategy that allows all certificates.
        //
        SSLContext sslContext = new SSLContextBuilder().loadTrustMaterial(null, new TrustStrategy() {
            @Override
            public boolean isTrusted(X509Certificate[] arg0, String arg1) throws CertificateException {
                return true;
            }
        }).build();
        b.setSSLContext(sslContext);

        // don't check Hostnames, either.
        //      -- use SSLConnectionSocketFactory.getDefaultHostnameVerifier(), if you don't want to weaken
        HostnameVerifier hostnameVerifier = NoopHostnameVerifier.INSTANCE;

        // here's the special part:
        //      -- need to create an SSL Socket Factory, to use our weakened "trust strategy";
        //      -- and create a Registry, to register it.
        //
        SSLConnectionSocketFactory sslSocketFactory = new SSLConnectionSocketFactory(sslContext, hostnameVerifier);
        Registry socketFactoryRegistry = RegistryBuilder.create()
                .register("http", PlainConnectionSocketFactory.getSocketFactory())
                .register("https", sslSocketFactory)
                .build();

        // now, we create connection-manager using our Registry.
        //      -- allows multi-threaded use
        PoolingHttpClientConnectionManager connMgr = new PoolingHttpClientConnectionManager( socketFactoryRegistry);
        connMgr.setMaxTotal(200);
        connMgr.setDefaultMaxPerRoute(100);
        b.setConnectionManager( connMgr);

        // finally, build the HttpClient;
        //      -- done!
        CloseableHttpClient client = b.build();

        return client;
    }

}
使用:
@Autowired
RestTemple restTemple;

public void test(){
        HttpHeaders headers = new HttpHeaders();
        headers.set("Content-type","application/x-www-form-urlencoded; charset=UTF-8");
        headers.set("Accept", "application/json, text/plain, */*");
        JSONObject js = JSONObject.parseObject(unVar);
        js.put("key","value");
        //设置访问的Entity
        HttpEntity entity = new HttpEntity<>(js.toString(), headers);
        String result = restTemple.httpRequest(urlLogin, HttpMethod.POST, entity);

}
2)多个请求之间传递cookie
如果多个请求之间需要传递cookie参数,如何处理呢?
可以在RestTemle类中增加一个getCookie函数,返回cookie的值
@Configuration
public class RestTemple {
    public  List<String> getCookie(String url, HttpMethod method, HttpEntity<String> entity){
        try {
            //发起一个POST请求
            ResponseEntity<String> result = httpsRestTemplate(httpComponentsClientHttpRequestFactory()).exchange(url, method, entity, String.class);
            return result.getHeaders().get("Set-Cookie");
        } catch (Exception e) {
            System.out.println("请求失败: " + e.getMessage());
        }
        return null;
    }

    public  <T> String httpRequest(String url, HttpMethod method, HttpEntity<T> entity){
        try {
            //发起一个POST请求
            ResponseEntity<String> result = httpsRestTemplate(httpComponentsClientHttpRequestFactory()).exchange(url, method, entity, String.class);
            return result.getBody();
        } catch (Exception e) {
            System.out.println("请求失败: " + e.getMessage());
        }
        return null;
    }
}
然后在使用时将cookie传入heads中:
public void test(){
List cookies = login();
addInfo(cookies);
}
public List login(){
HttpHeaders headers = new HttpHeaders();
headers.set("Accept", "application/json, text/plain, */*");
String params = "admin";
HttpEntity entity = new HttpEntity<>(params, headers);
List cookies = restTemple.getCookie(urlCreateLogin, HttpMethod.POST, entity);
return cookies;
}
public void addInfo(List cookies){
JSONObject js = new JSONObject();
js.put("key","value");
HttpHeaders headers = new HttpHeaders();
//把cookies设到headers中
headers.put(HttpHeaders.COOKIE, cookies);
HttpEntity entity = new HttpEntity<>(js.toString(), headers);
String result = restTemple.httpRequest(urlAdd, HttpMethod.POST, entity);
System.out.println(result);
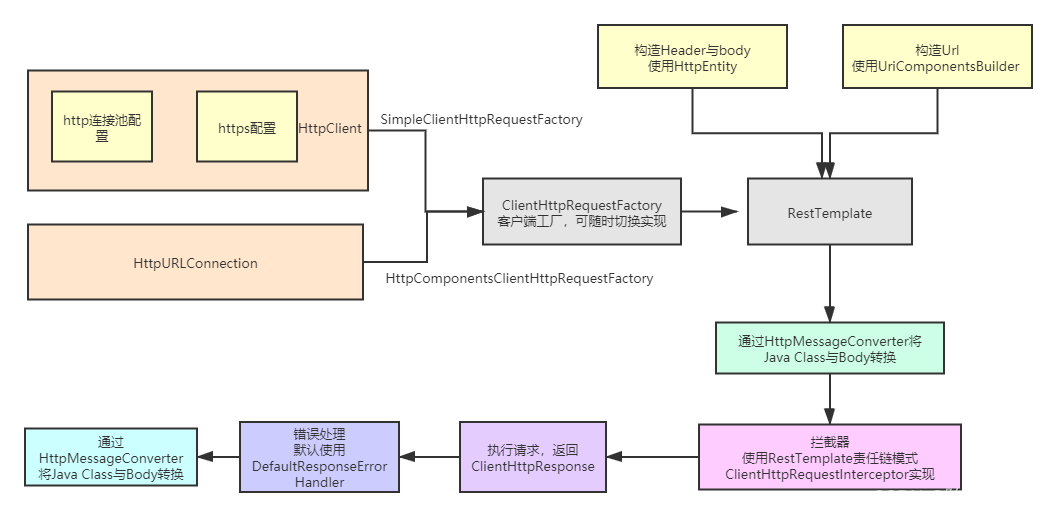
}附:RestTemplate架构图


 2400
2400


 被折叠的 条评论
为什么被折叠?
被折叠的 条评论
为什么被折叠?
 到【灌水乐园】发言


