


大家好,本人自己手写分析,如有需要更正的欢迎评论区或者私信t我😀
介绍:
@Async注解是Spring框架中用于实现异步方法调用的注解。通过在方法上使用@Async注解,Spring会在调用该方法时将其放入一个专用的线程池中执行,而不是在调用线程中同步执行。这对于处理一些异步任务非常有用,可以提高系统的响应性能。
使用场景:
- 耗时任务: 当有一些任务需要花费较长时间完成,而你不想让主线程阻塞等待它们完成时,可以考虑使用@Async注解。这可以包括文件上传、邮件发送等操作。
- 提高系统吞吐量: 对于一些可以并行执行的操作,通过异步方式处理可以提高系统的吞吐量。例如,在批量处理数据时,可以使用@Async来并发执行多个处理任务。
- 定时任务: 如果你需要在固定的时间执行一些任务,但又不希望阻塞主线程,可以使用@Async注解配合定时任务来实现。
- 异步通知: 当需要异步通知某些事件的发生时,@Async也是一个很好的选择。比如,异步地通知用户某个长时间操作已完成。
先说如何使用:
-
在自己的方法上声明
@Async注解后面指明你自己声明的这个线程池id(@Async("【Bean的id】")),如果没有默认就是声明Bean的那个方法的方法名@Async("generateExchangeCodeExecutor") public void asyncGenerateExchangeCode(Coupon coupon) { }@Bean //没有指明Bean的id,默认为方法名 generateExchangeCodeExecutor public Executor generateExchangeCodeExecutor(){ } -
紧接着在引导类上加上
@EnableAsync注解来开启异步功能@EnableAsync //开启异步功能 @SpringBootApplication public class PromotionApplication { }
之后每次使用这个方法就会使用线程池中的线程来执行这个方法
老版本SpringBoot2.0.9以前,使用的线程池默认为 SimpleAsyncTaskExecutor,使用 SimpleAsyncTaskExecutor线程池的缺点是每次使用都会创建新的线程 ,之后默认使用ThreadPoolTaskExecutor,只要使用了@Async注解,就自己声明一个线程池,然后再需要使用异步的方法上指明线程池的id就行了;
之后的版本为什么还要自己创建线程池呢?
因为默认的线程池
SimpleAsyncTaskExecutor的默认最大线程池(2147483647)数量太多大了、队列最大值(2147483647)也太大了,可能会这两个原因导致内存溢出,所以自己声明线程池,把值改小点。
例子:
现在有两个方法1:
@Override
public void issueCoupon(Long id,CouponIssueFormDTO dto) {
    log.debug("发放优惠券  线程名:{}",Thread.currentThread().getName());
    ……
    //异步生成兑换码
    exchangeCodeService.asyncGenerateExchangeCode(coupon); //异步生成兑换码
}
issueCoupon方法中调用了 asyncGenerateExchangeCode方法来异步生成兑换码
@Async("generateExchangeCodeExecutor") //使用 generateExchangeCodeExecutor 自定义线程中的线程异步执行
public void asyncGenerateExchangeCode(Coupon coupon) {
    log.debug("生成兑换码  线程名:{}", Thread.currentThread().getName());
    ……
}
自定义线程池:
import lombok.extern.slf4j.Slf4j;
import org.springframework.context.annotation.Bean;
import org.springframework.context.annotation.Configuration;
import org.springframework.scheduling.concurrent.ThreadPoolTaskExecutor;

import java.util.concurrent.Executor;
import java.util.concurrent.ThreadPoolExecutor;

@Slf4j
@Configuration
public class PromotionConfig {

    @Bean
    public Executor generateExchangeCodeExecutor(){
        ThreadPoolTaskExecutor executor = new ThreadPoolTaskExecutor();
        // 1.核心线程池大小
        executor.setCorePoolSize(2);
        // 2.最大线程池大小
        executor.setMaxPoolSize(5);
        // 3.队列大小
        executor.setQueueCapacity(200);
        // 4.线程名称
        executor.setThreadNamePrefix("exchange-code-handler-");
        // 5.拒绝策略
        executor.setRejectedExecutionHandler(new ThreadPoolExecutor.CallerRunsPolicy());
        executor.initialize();
        return executor;
    }
}
现在执行打印结果:
发放优惠券  线程名:http-nio-8092-exec-5

生成兑换码  线程名:exchange-code-handler-1
可见:发放优惠券方法`issueCoupon`使用的是Tomcat默认的线程池,线程名为:`http-nio-8092-exec-5`,但是在`issueCoupon`方法最后调用了`asyncGenerateExchangeCode`方法生成兑换码,这个方法执行的线程名为:`exchange-code-handler-1`,是自定义线程池中的线程,所以就是异步执行的。
### 源码分析:

```java
@GetMapping("test")
public void test(){
    //http-nio-8099-exec-6不做任何处理,默认情况下是使用tomcat默认线程的线程处理该请求
    System.out.println(Thread.currentThread().getName() +"	线程开始");
    try{
        Thread. sleep(3000); //3s
    }catch (InterruptedException e){
         e. printStackTrace();
    }
    System.out.println(Thread.currentThread().getName()+"线程结束");
}
打印:
http-nio-8099-exec-6	线程开始
http-nio-8099-exec-6	线程结束
使用的是Tomcat默认的线程池,如果不想使用默认的线程池,想要异步的执行
- 在自己的方法上声明
@Async注解 - 引导类上加上
@EnableAsync注解来开启异步功能
@GetMapping("test")
@Async	//异步
public void test(){……}
打印结果:
task-1	线程开始
task-1	线程结束
线程池名为:task-1 说明使用了线程池中的线程 异步执行,但是这个线程池指的不是tomcat,这个是SpringBoot默认定义的一个线程池
进一步解释,再写一个测试类:
@Autowired
ThreadPoolTaskExecutor executor;	//springboot封装后的线程
@GetMapping("test1")
public void test1(){
    System.out.println(executor);
    System.out.println("默认前: "+executor.getThreadNamePrefix());
    System.out.println("默认核心线程数: "+executor. getCorePoolSize());
    System.out.println("默认最大线程池: "+executor.getMaxPoolSize());
    System.out.println("当前活跃线程池数:"+executor.getActiveCount());
    System.out.println("临时线程空闲时间: "+executor.getKeepAliveSeconds());
    System.out.println("队列最大值: "+executor. getQueueCapacity());
    System.out.println("队列数量: "+executor.getQueueSize());
}
执行结果:
默认前缀:task-  //默认SpringBoot这个容器内默认的线程池前缀就是 task-
默认核心线程数:8
默认最大线程池:2147483647  //Integer的最大值
当前活跃线程池数:0
临时线程空闲时间:60
队列最大值:2147483647	//Integer的最大值
队列数量:0
ThreadPoolTaskExecutor的源码:

ThreadPoolTaskExecutor其实就是SpringBoot对jdk的里边的线程池 ThreadPoolExecutor的一个封装,在SpringBoot项目启动的时候,他的容器里边默认创建好这个线程池ThreadPoolTaskExecutor,可以直接注入使用。
SpringBoot什么时候帮咱们提供的这么一个线程池呢?
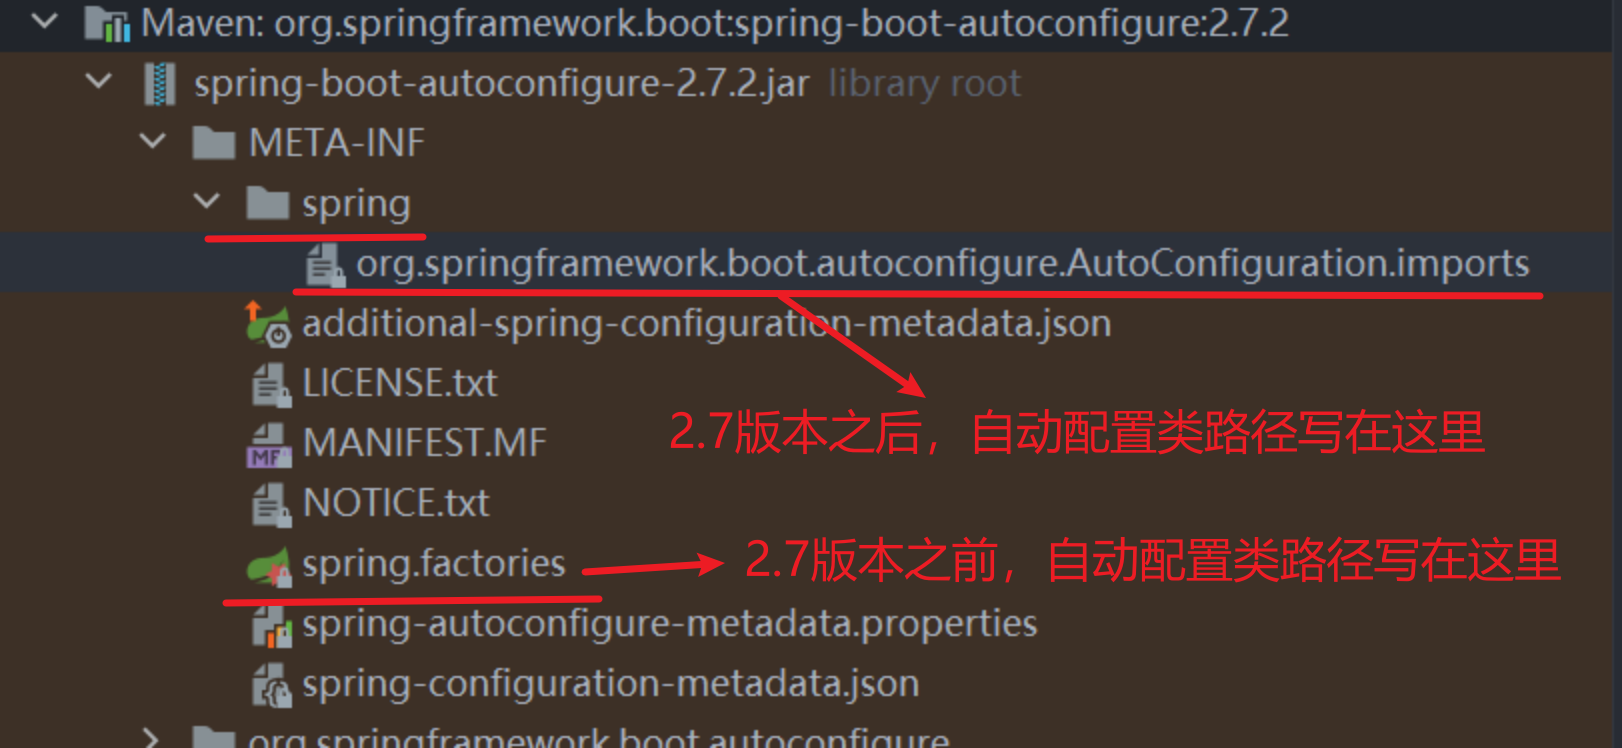
与自动装配有关,只要是SpringBoot项目,在启动的时候一定会加载一个文件。只要是SpringBoot项目一定会有一个Maven: org.springframework.boot:spring-boot-autoconfigure:2.7.2依赖包:
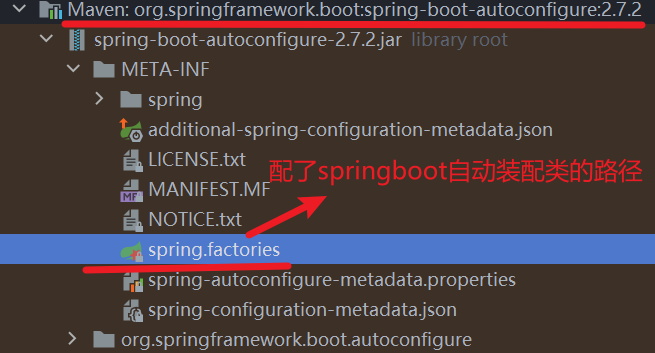
里面有一个spring.factories文件,当前springboot版本为2.7.2,在2.7版本之前,自动装配类的路径是写在了spring.factories文件;
从2.7版本之后,spring.factories文件没有自动装配类的路径了。而是放在了这个依赖包下的spring/org.springframework.boot.autoconfigure.AutoConfiguration.imports文件中
在文件中搜索到对应的自动配置类路径:

TaskExecutionAutoConfiguration源码
点进去,下面是部分源码:
@ConditionalOnClass({ThreadPoolTaskExecutor.class})
@AutoConfiguration
@EnableConfigurationProperties({TaskExecutionProperties.class})
public class TaskExecutionAutoConfiguration {
    public static final String APPLICATION_TASK_EXECUTOR_BEAN_NAME = "applicationTaskExecutor";

    public TaskExecutionAutoConfiguration() {
    }

    @Bean
    @ConditionalOnMissingBean
    public TaskExecutorBuilder taskExecutorBuilder(TaskExecutionProperties properties, ObjectProvider<TaskExecutorCustomizer> taskExecutorCustomizers, ObjectProvider<TaskDecorator> taskDecorator) {
        Pool pool = properties.getPool();
        TaskExecutorBuilder builder = new TaskExecutorBuilder();
        builder = builder.queueCapacity(pool.getQueueCapacity());
        builder = builder.corePoolSize(pool.getCoreSize());
        builder = builder.maxPoolSize(pool.getMaxSize());
        builder = builder.allowCoreThreadTimeOut(pool.isAllowCoreThreadTimeout());
        builder = builder.keepAlive(pool.getKeepAlive());
        Shutdown shutdown = properties.getShutdown();
        builder = builder.awaitTermination(shutdown.isAwaitTermination());
        builder = builder.awaitTerminationPeriod(shutdown.getAwaitTerminationPeriod());
        builder = builder.threadNamePrefix(properties.getThreadNamePrefix());
        Stream var10001 = taskExecutorCustomizers.orderedStream();
        var10001.getClass();
        builder = builder.customizers(var10001::iterator);
        builder = builder.taskDecorator((TaskDecorator)taskDecorator.getIfUnique());
        return builder;
    }

    @Lazy
    @Bean(
        name = {"applicationTaskExecutor", "taskExecutor"}
    )
    @ConditionalOnMissingBean({Executor.class})
    public ThreadPoolTaskExecutor applicationTaskExecutor(TaskExecutorBuilder builder) {
        return builder.build();
    }
}
源码拆分:
先拆分分析:
@Bean   //声明这个线程池
@ConditionalOnMissingBean
public TaskExecutorBuilder taskExecutorBuilder(……){
    ……
    return builder;
}
-
这里声明这个线程池,不过这个方法是个
Builder,方法返回值是一个builder; -
@ConditionalOnMissingBean注解:当容器中没有这个bulider对象时,他才回去创建这个对象,这样可以保证整个容器中只有这一个TaskExecutorBuilder -
方法里面是给线程赋值:核心线程、最大线程空闲时间、线程名前缀等;属性参数都是从
TaskExecutionProperties properties中取的;
进入TaskExecutionProperties类中:
@ConfigurationProperties("spring.task.execution")
public class TaskExecutionProperties {
    private final TaskExecutionProperties.Pool pool = new TaskExecutionProperties.Pool();
    private final TaskExecutionProperties.Shutdown shutdown = new TaskExecutionProperties.Shutdown();
    private String threadNamePrefix = "task-";

    public TaskExecutionProperties() {
    }
    ……
}
-
@ConfigurationProperties("spring.task.execution"):自己可以在yaml文件去声明这个线程池相关的东西 -
如果不声明,方法里面有一个静态内部类
public static class Pool { },里面有默认值
public static class Pool {
    private int queueCapacity = 2147483647;
    private int coreSize = 8;
    private int maxSize = 2147483647;
    private boolean allowCoreThreadTimeout = true;
    private Duration keepAlive = Duration.ofSeconds(60L);

    public Pool() {}

    public int getQueueCapacity() {return this.queueCapacity;}

    public void setQueueCapacity(int queueCapacity) {this.queueCapacity = queueCapacity;}

    public int getCoreSize() {return this.coreSize;}

    public void setCoreSize(int coreSize) {this.coreSize = coreSize;}

    public int getMaxSize() {return this.maxSize;}

    public void setMaxSize(int maxSize) {this.maxSize = maxSize;}

    public boolean isAllowCoreThreadTimeout() {return this.allowCoreThreadTimeout;}

    public void setAllowCoreThreadTimeout(boolean allowCoreThreadTimeout) {
        this.allowCoreThreadTimeout = allowCoreThreadTimeout; }

    public Duration getKeepAlive() {return this.keepAlive;}

    public void setKeepAlive(Duration keepAlive) {this.keepAlive = keepAlive;}
}
里面设置的值就是之前打印出来的:
默认前缀:task-  //默认SpringBoot这个容器内默认的线程池前缀就是 task-
默认核心线程数:8
默认最大线程池:2147483647  //Integer的最大值
当前活跃线程池数:0
临时线程空闲时间:60
队列最大值:2147483647	//Integer的最大值
队列数量:0
再声明下面的这个Bean的时候,直接builder.build();这个线程池对象ThreadPoolTaskExecutor就创建出来了
@Lazy
@Bean(
    name = {"applicationTaskExecutor", "taskExecutor"}
)
@ConditionalOnMissingBean({Executor.class})
public ThreadPoolTaskExecutor applicationTaskExecutor(TaskExecutorBuilder builder) {
    return builder.build();
}
这个才是去声明它的线程池对象,(TaskExecutorBuilder builder)把builder注入进来,builder.build();调用build()方法
综上结果:
就是在TaskExecutionAutoConfiguration声明的线程池对象,
在org.springframework.boot.autoconfigure.task.TaskExecutionAutoConfiguration自动配置装配
所以使用的时候就直接注入使用就可以了:@Autowired ThreadPoolTaskExecutor executor;;也可以不注入,直接在方法上加入@Async注解,他的底层就是用它默认的线程池 ThreadPoolTaskExecutor ,用这个池子里的方法来执行方法。


 3730
3730


 被折叠的 条评论
为什么被折叠?
被折叠的 条评论
为什么被折叠?
 到【灌水乐园】发言


