


一.前言
本章看似内容很多,但是其实一点也不多,折合到每个都是一丁点,所以内容根本不多的。
二.输入输出重定向
输入输出只能对文件进行操作,不能对目录操作。
2.1输出重定向
输出:
> 输出重定向, 将命令执行结果不输出到屏幕上,输出到文件里,会清空原文件,所以输出的时候一 定要注意,文件名称要看好了。
[root@localhost ~]# head -20 services > 2.txt
[root@localhost ~]# cat 2.txt
[root@localhost ~]# seq 100 > 1.txt
[root@localhost ~]# echo 123 > 1.txt
[root@localhost ~]# cat 1.txt
123
[root@localhost ~]# > 1.txt # 清空文件内容
[root@localhost ~]# cat 1.txt
>> 输出追加重定向,不会清空原文件
[root@localhost ~]# echo aaaaa >> 2.txt
[root@localhost ~]# cat 2.txt
#标准正确输出重定向1
#标准错误输出重定向2
[root@localhost ~]# cat test.txt
我是往日情怀酿作酒。
期待你的点赞关注加收藏。
[root@localhost ~]# cat test# 错误信息默认是打印在屏幕上的,如果我们想记录错 误信息,就可以用到标准错误输出
cat: jadent: 没有那个文件或目录
[root@localhost ~]# cat jaden.txt 1>1.txt 2>2.txt # 指令正确会将数据保存到1.txt中
[root@localhost ~]# cat 1.txt
我是往日情怀酿作酒。
期待你的点赞关注加收藏
[root@localhost ~]# cat 2.txt
[root@localhost ~]# cat jade 1>1.txt 2>2.txt #jade文件不存在,报错信息会进入 到2.txt中
[root@localhost ~]# cat 1.txt
[root@localhost ~]# cat 2.txt # 记录了报错信息
cat: jade: 没有那个文件或目录
输出重定向我们用的很多,输入重定向用的很少,所以简单演示一下即可。
2.2 输入重定向
输入:
< 输入重定向
[root@localhost ~]# cat < jaden.txt > 3.txt # 将jaden.txt的数据输入过来并写 入3.txt中
[root@localhost ~]# cat jaden.txt
<< 输入追加重定向(这个就不演示了,遇到了再说)
# 标准输入0,支持用户直接输入内容
[root@localhost ~]# cat << 0
> 1
> 2
> 2222
> 0
1
2
2222
[root@localhost ~]# cat << 0 > 22.txt
> a
> b
> ddd
> 0
[root@localhost ~]# cat 22.txt
a
b
ddd
关于输入输出重定向就说这么多。
三.压缩打包
3.1 tar
# 压缩文件有时候我们也叫做归档文件。但是归档和压缩有一些区别,归档只是将多个文件捆绑成一个文件, 并没有压缩,而压缩才是将大小压缩的更小。
#Linux最常用的压缩和解压指令是:
tar:能够解压的文件格式是xx.tar.gz
压缩:tar -zcf 压缩包路径 目标1 目标2 目标3 ...
解压:tar -zxf 解压路径
例子1:压缩和解压文件
[root@localhost ~]# ls
123.txt 4.txt a.txt c.txt jaden.txt
1.txt anaconda-ks.cfg b.txt jaden.tar.gz services
[root@localhost ~]# rm -f *
[root@localhost ~]# ls
[root@localhost ~]# cp /etc/services .
[root@localhost ~]# tar -zcf jaden.tar.gz services #压缩文件
[root@localhost ~]# ls
jaden.tar.gz services
[root@localhost ~]# ls -lh
-rw-r--r-- 1 root root 134K 3月 22 14:51 jaden.tar.gz
-rw-r--r-- 1 root root 655K 3月 22 11:22 services
[root@localhost ~]# rm -f services # 删除原文件之后就再解压
[root@localhost ~]# tar -zxf jaden.tar.gz # 解压文件
[root@localhost ~]# ls
-lh -rw-r--r-- 1 root root 134K 3月 22 14:51 jaden.tar.gz
-rw-r--r-- 1 root root 655K 3月 22 11:22 services #看到和源文件一样的文件,包括文件 属性也一样。
例子2:
#归档,但是不压缩
tar -cf
[root@localhost ~]# cp /etc/services ./shike # 再拷贝一个services文件过来
[root@localhost ~]# ls -lh
总用量 14M
-rw-r--r-- 1 root root 13M 3月 22 14:58 2.tar.gz
-rw-r--r-- 1 root root 134K 3月 22 14:56 jaden.tar.gz
-rw-r--r-- 1 root root 655K 3月 22 14:55 services
-rw-r--r-- 1 root root 655K 3月 22 15:04 shike
[root@localhost ~]# tar -cf 3.tar.gz services shike #归档,但是不压缩
[root@localhost ~]# ls -lh
总用量 15M
-rw-r--r-- 1 root root 13M 3月 22 14:58 2.tar.gz
-rw-r--r-- 1 root root 1.3M 3月 22 15:04 3.tar.gz #看大小就知道没有压缩大小。
-rw-r--r-- 1 root root 134K 3月 22 14:56 jaden.tar.gz
-rw-r--r-- 1 root root 655K 3月 22 14:55 services
-rw-r--r-- 1 root root 655K 3月 22 15:04 shike
例子3:
#查看压缩包内容
[root@localhost ~]# tar -tf 3.tar.gz
services
shike
tar这个指令的参数可以不加-,比如tar tf 3.tar.gz
3.2 gzip
#打包和压缩
gzip
#压缩文件,会自动删除原文件,和tar不同,tar会留着原文件
[root@localhost ~]# gzip services
[root@localhost ~]# ls -lh
总用量 15M
-rw-r--r-- 1 root root 133K 3月 22 14:55 services.gz
-rw-r--r-- 1 root root 655K 3月 22 15:04 shike
# 解压,会自动删除原压缩包
[root@localhost ~]# gzip -d services.gz
[root@localhost ~]# ls -lh
总用量 16M
-rw-r--r-- 1 root root 655K 3月 22 14:55 services
-rw-r--r-- 1 root root 655K 3月 22 15:04 shike
#压缩多个文件,每一个文件产生一个单独的压缩包
[root@localhost ~]# gzip services shike
[root@localhost ~]# ls -lh
总用量 15M
-rw-r--r-- 1 root root 133K 3月 22 14:55 services.gz
-rw-r--r-- 1 root root 133K 3月 22 15:04 shike.gz
#解压缩
[root@localhost ~]# gzip -d services.gz shike.gz
[root@localhost ~]# ls -lh
总用量 16M
-rw-r--r-- 1 root root 655K 3月 22 14:55 services
-rw-r--r-- 1 root root 655K 3月 22 15:04 shike
gzip其实感觉并不太好用,但是工作中我们可能会遇到gzip的压缩包。
3.3 zip
#压缩
zip
例子1:
[root@localhost ~]# zip -r 1.zip services shike #会保留原文件
adding: services (deflated 80%)
adding: shike (deflated 80%)
[root@localhost ~]# ls -lh
总用量 16M
-rw-r--r-- 1 root root 267K 3月 22 15:25 1.zip
-rw-r--r-- 1 root root 655K 3月 22 14:55 services
-rw-r--r-- 1 root root 655K 3月 22 15:04 shike
#解压
unzip
例子1: # 解压之前先把原文件删掉,以免冲突[
root@localhost ~]# unzip 1.zip
[root@localhost ~]# ls -lh
总用量 16M
-rw-r--r-- 1 root root 267K 3月 22 15:25 1.zip
-rw-r--r-- 1 root root 655K 3月 22 14:55 services
-rw-r--r-- 1 root root 655K 3月 22 15:04 shike
3.4 rar
windows上常见的rar格式的压缩包,在linux上其实比较难解压,需要我们安装专业的工具:
安装:
#解压rar包
#需要安装软件
yum install epel-release -y
yum install unar -y
#再进行解压
unar -o 解压路径 被解压文件路径
例如:
unar -o /opt 456.rar
后面会给大家介绍linux安装软件的
解压:
[root@localhost ~]# ls
1.zip 2.tar.gz 3.tar.gz jaden.rar jaden.tar services shike
[root@localhost ~]# mkdir xx
[root@localhost ~]# unar -o ./xx jaden.rar j
aden.rar: RAR 5 j
aden.txt (49 B)... OK. Successfully extracted to "./xx/jaden.txt".
[root@localhost ~]# ls xx/
jaden.txt
尽量不要给linux发送rar的压缩包。全世界通用的是zip格式的压缩包。好,关于压缩和解压我们就先说 这么多。
四.文件传输
和Linux进行文件传输,大概有下面这么几种情况,看图
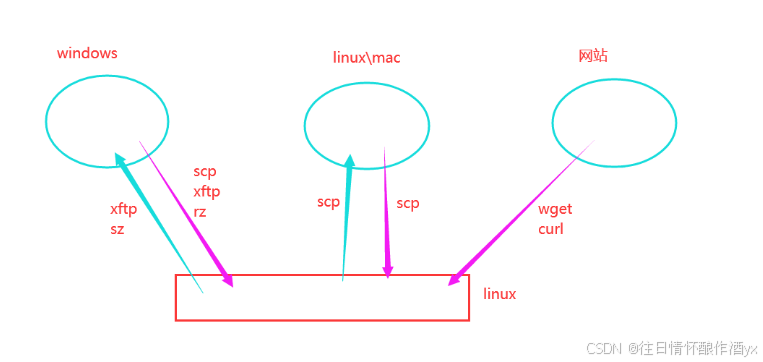
4.1 网站下载文件
#下载文件
curl
例子1:
#下载文件
curl -o 本地存放路径 文件网址
例如:有些网站在后台可能禁了curl下载,导致下载不下来
curl -o 123.zip https://github.com/nmap/nmap/archive/refs/heads/master.zip
wget 文件网址
# 需要自行安装一下才有这个功能,curl是系统自带的
# yum install -y wget
[root@localhost ~]# wget
https://github.com/nmap/nmap/archive/refs/heads/master.zip
# wget比curl方便,最起码不需要指定文件名,curl如果不指定文件名路径的话会将文件内容打印在屏幕上
#使用curl和wget的前提是要有网
#检查网络畅通
ping
例子1:ping www.baidu.com
#如果网不通,重启网络服务
systemctl restart network
#查看文件类型
file
例子1:file 123.zip
4.2 scp传输
我们准备两台linux虚拟机来玩:
#主要用于linux和linux服务器之间传输文件,scp要求接受数据的一方要开启了ssh服务端才行,如果你电 脑是苹果电脑mac系统,也可以使用scp来传输,mac默认ssh服务端是没有开启的,可以自行开启,客户端是 可以直接使用的。windows往linux上面发送文件也可以用scp,但是只能单向的,因为windows上没有ssh服务端。
#把本地文件推送到远程服务端
# 格式: scp 本地文件路径 远程主机用户@远程主机ip地址:远程主机某个目录
scp typora-setup-x64.exe root@10.0.0.128:/tmp
#把远端服务文件拉取到本地
# 格式:scp 远程主机用户@远程主机ip地址:远程主机某个文件路径 本地路径
scp root@10.0.0.128:/tmp/typora-setup-x64.exe .
win10及以上版本是有scp指令的,win和win之间是不能使用scp互相传文件的,因为windows上默认是 没有ssh的服务端的,只有客户端。
# windows使用scp给linux上传文件的时候,文件路径和文件名中不允许出现中文和空格。
# 格式和上面一样
scp typora-setup-x64.exe root@10.0.0.128:/tmp
mac系统也是直接可以使用scp来给linux上传文件的。
4.3 rz和sz
#上传和下载
rz #上传
sz #下载
#需要先安装lrzsz软件包,这个用的比较多
yum install lrzsz -y
#上传的例子
如果使用xshell,那么直接鼠标拖拽即可,或者执行rz -E选择要上传的文件
#下载的例子
sz /root/test3.tar.gz # windows上自行选择存储目录
当然,这些都只是介绍,我们有一款工具叫做xftp,这个只需要拖动就行了,特别好用
五.总结
今天说的这些大多数都没啥用,但是还是做个了解,做最全的linux基础教程,没必要花太多时间,大家点赞关注加收藏,遇到再来看就行啦!


 414
414

 被折叠的 条评论
为什么被折叠?
被折叠的 条评论
为什么被折叠?
 到【灌水乐园】发言


