


前期准备
- GoLand :2024.1.1
下载官网:https://www.jetbrains.com/zh-cn/go/download/other.html
- Postman:
下载官网:https://www.postman.com/downloads/
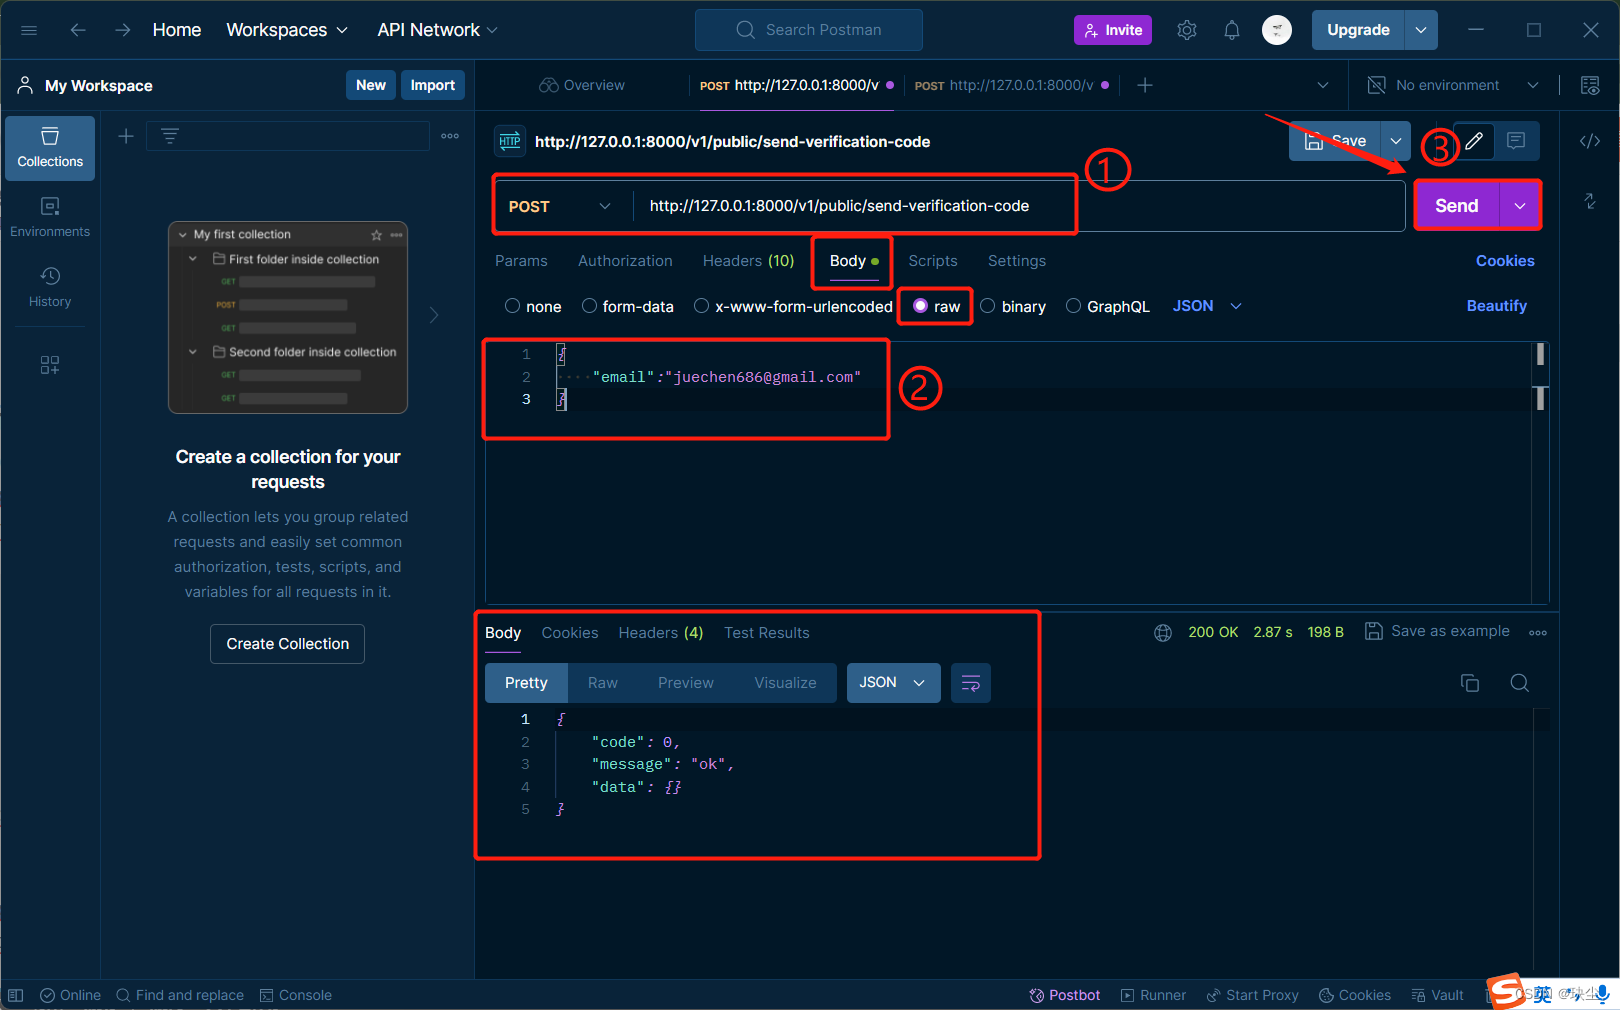
效果图(使用Postman)
- Google:
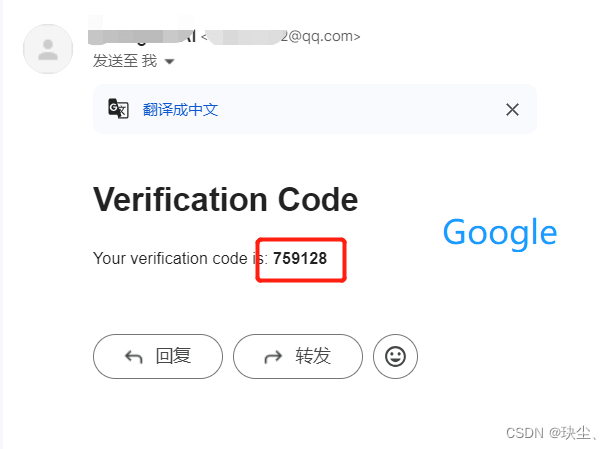
- QQ:
And so on…
Just you can try!
项目结构
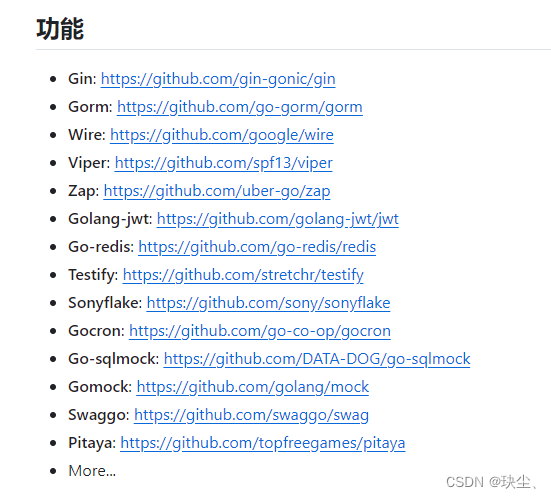
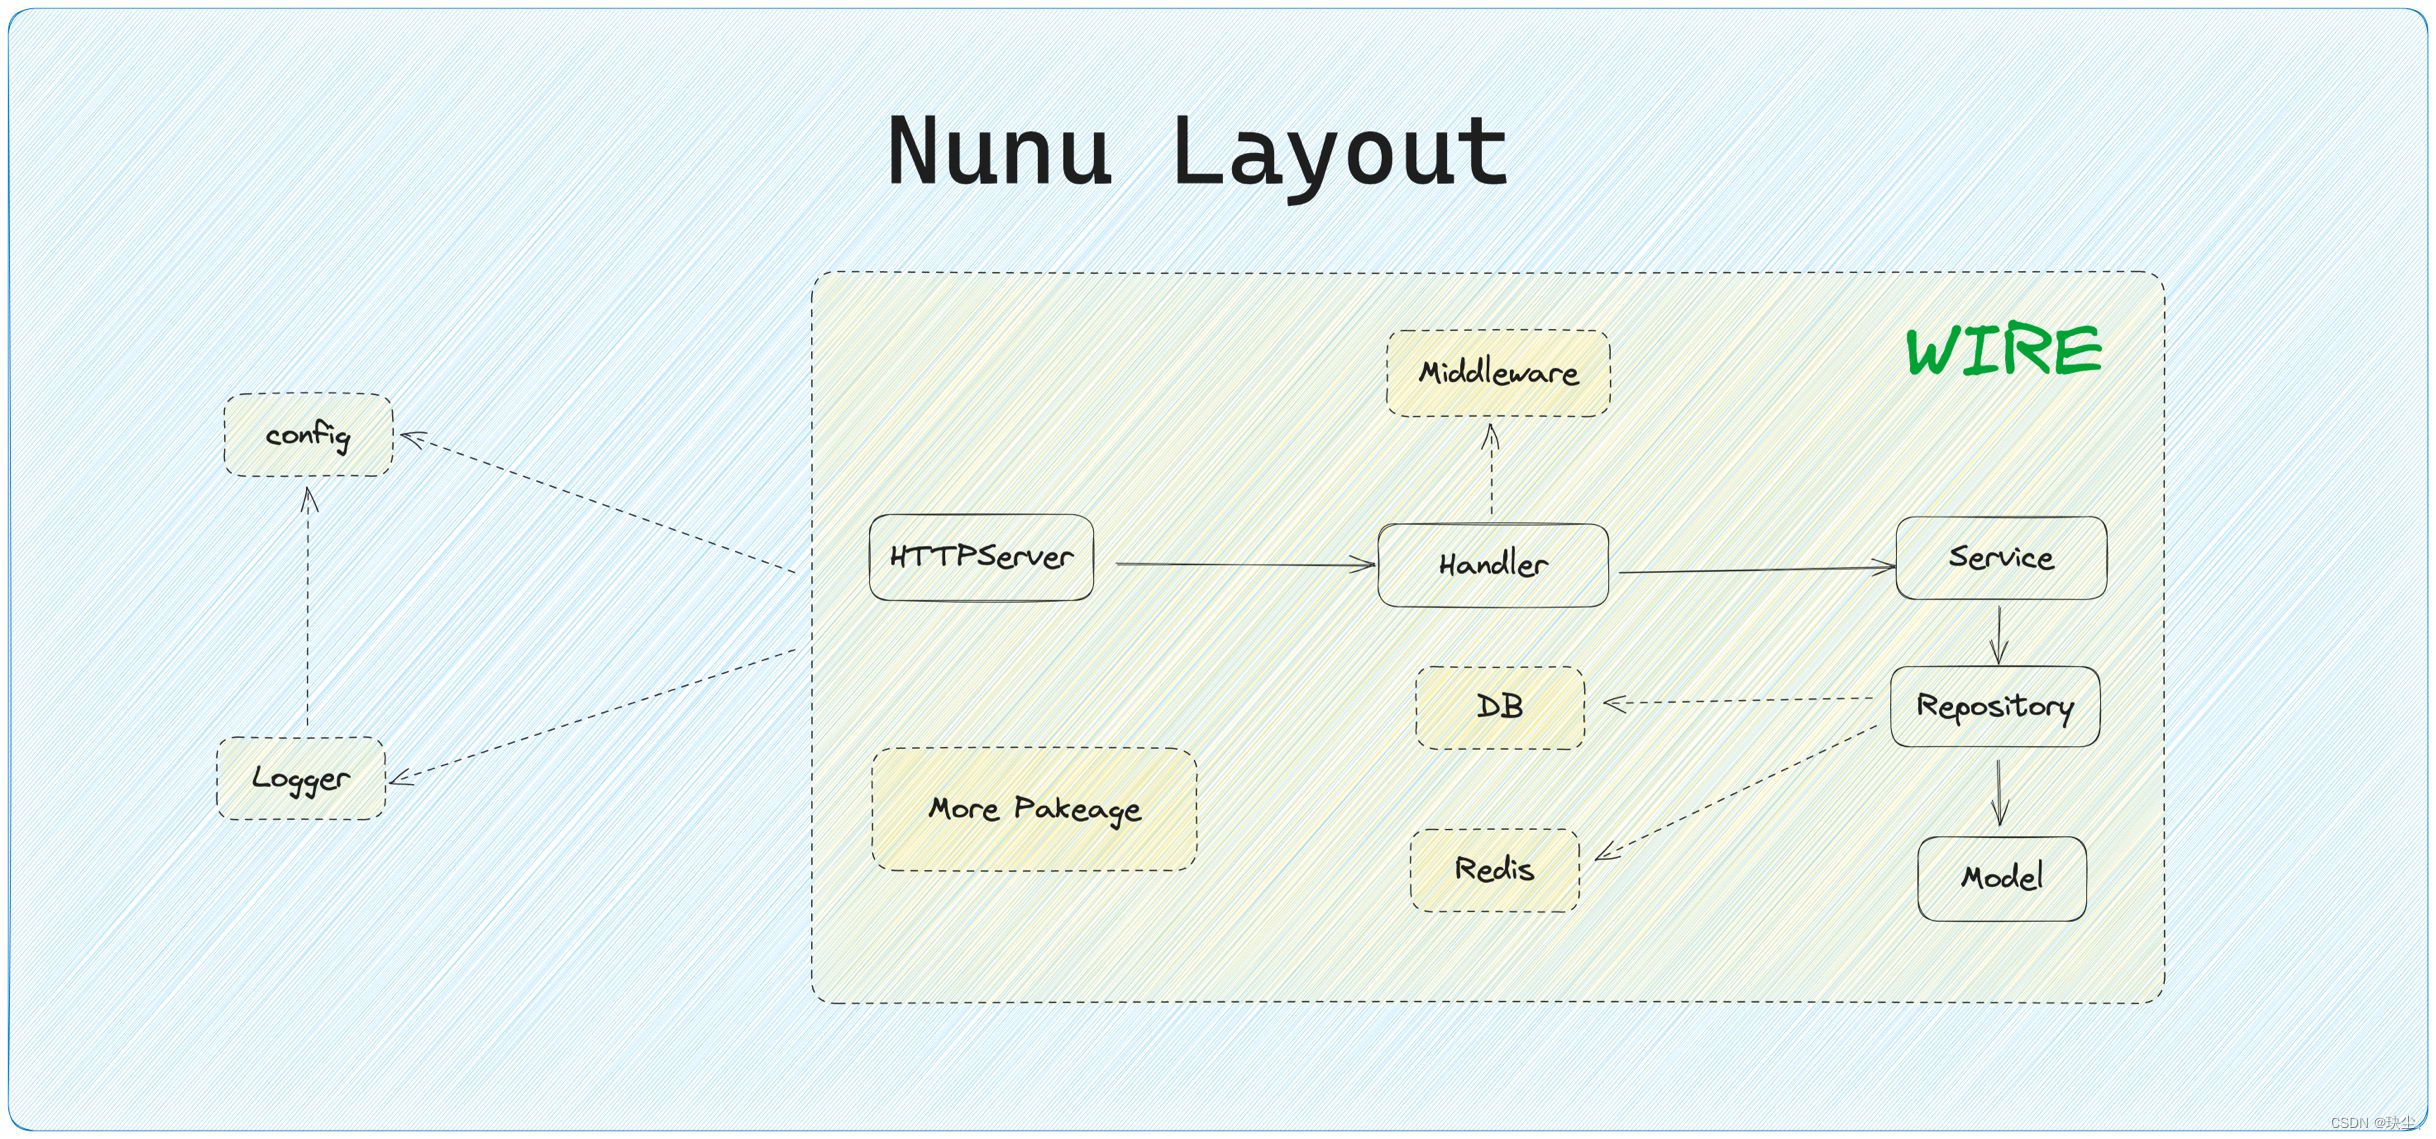
本项目基于nunu基础上实现(github地址:https://github.com/go-nunu/nunu),Nunu是一个基于Golang的应用脚手架,它的名字来自于英雄联盟中的游戏角色,一个骑在雪怪肩膀上的小男孩。和努努一样,该项目也是站在巨人的肩膀上,它是由Golang生态中各种非常流行的库整合而成的,它们的组合可以帮助你快速构建一个高效、可靠的应用程序。拥有以下功能:
从nunu官方按照规范安装好之后:
基本操作流程
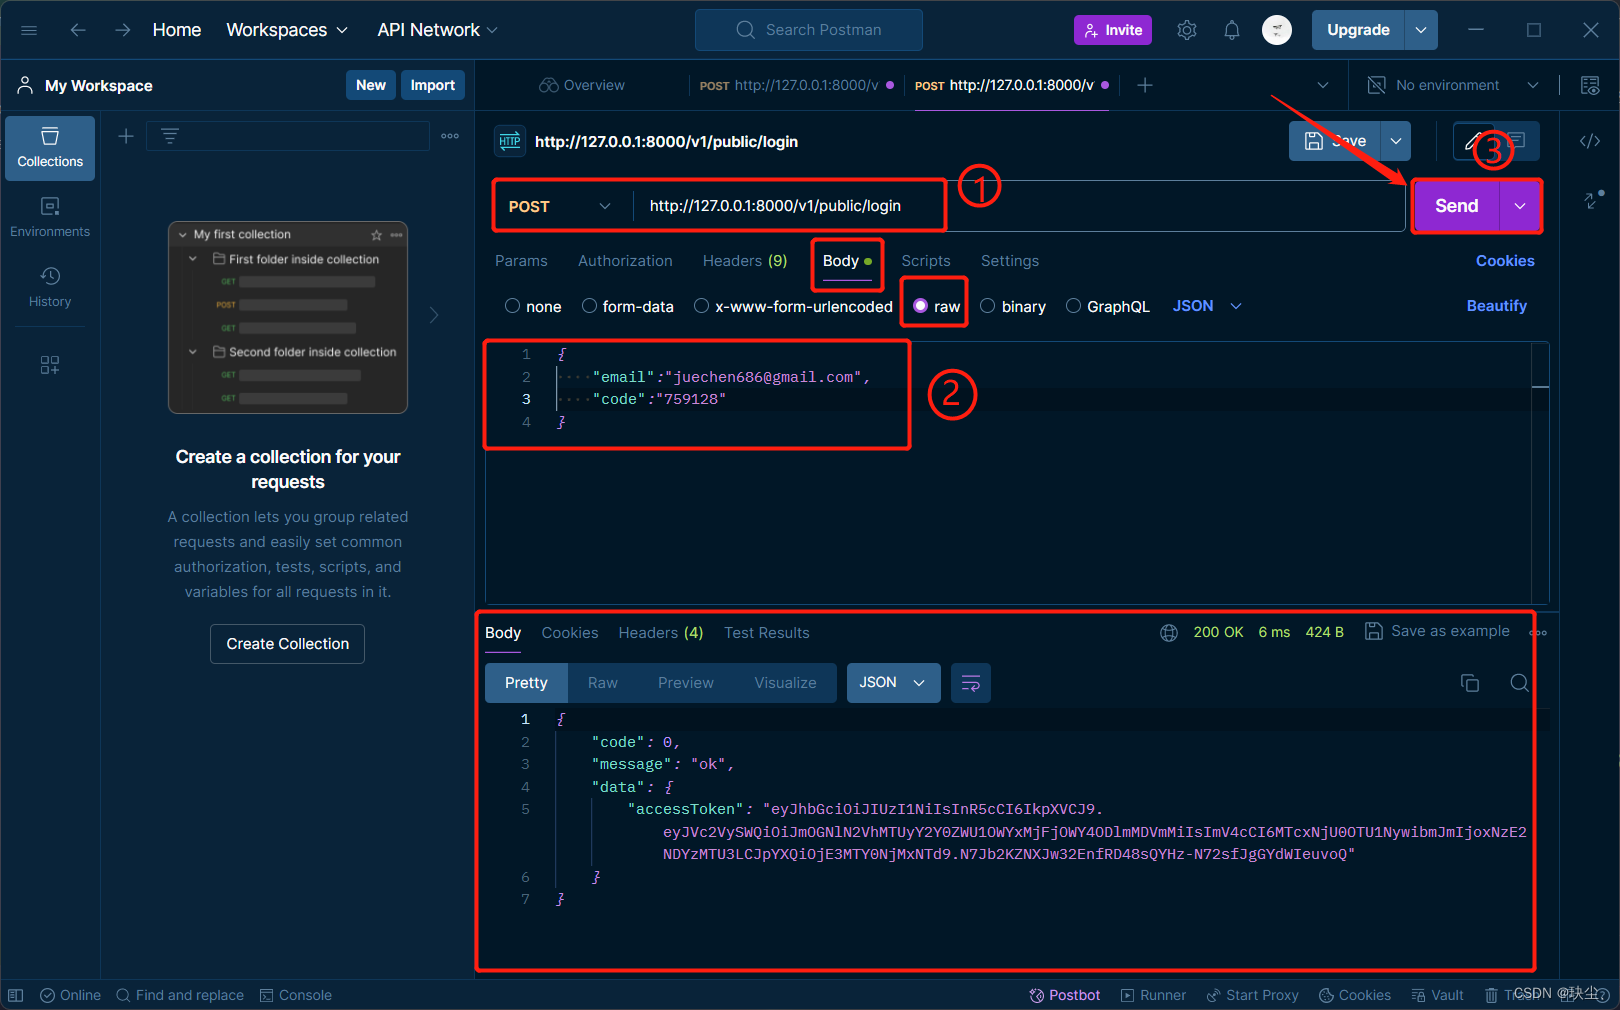
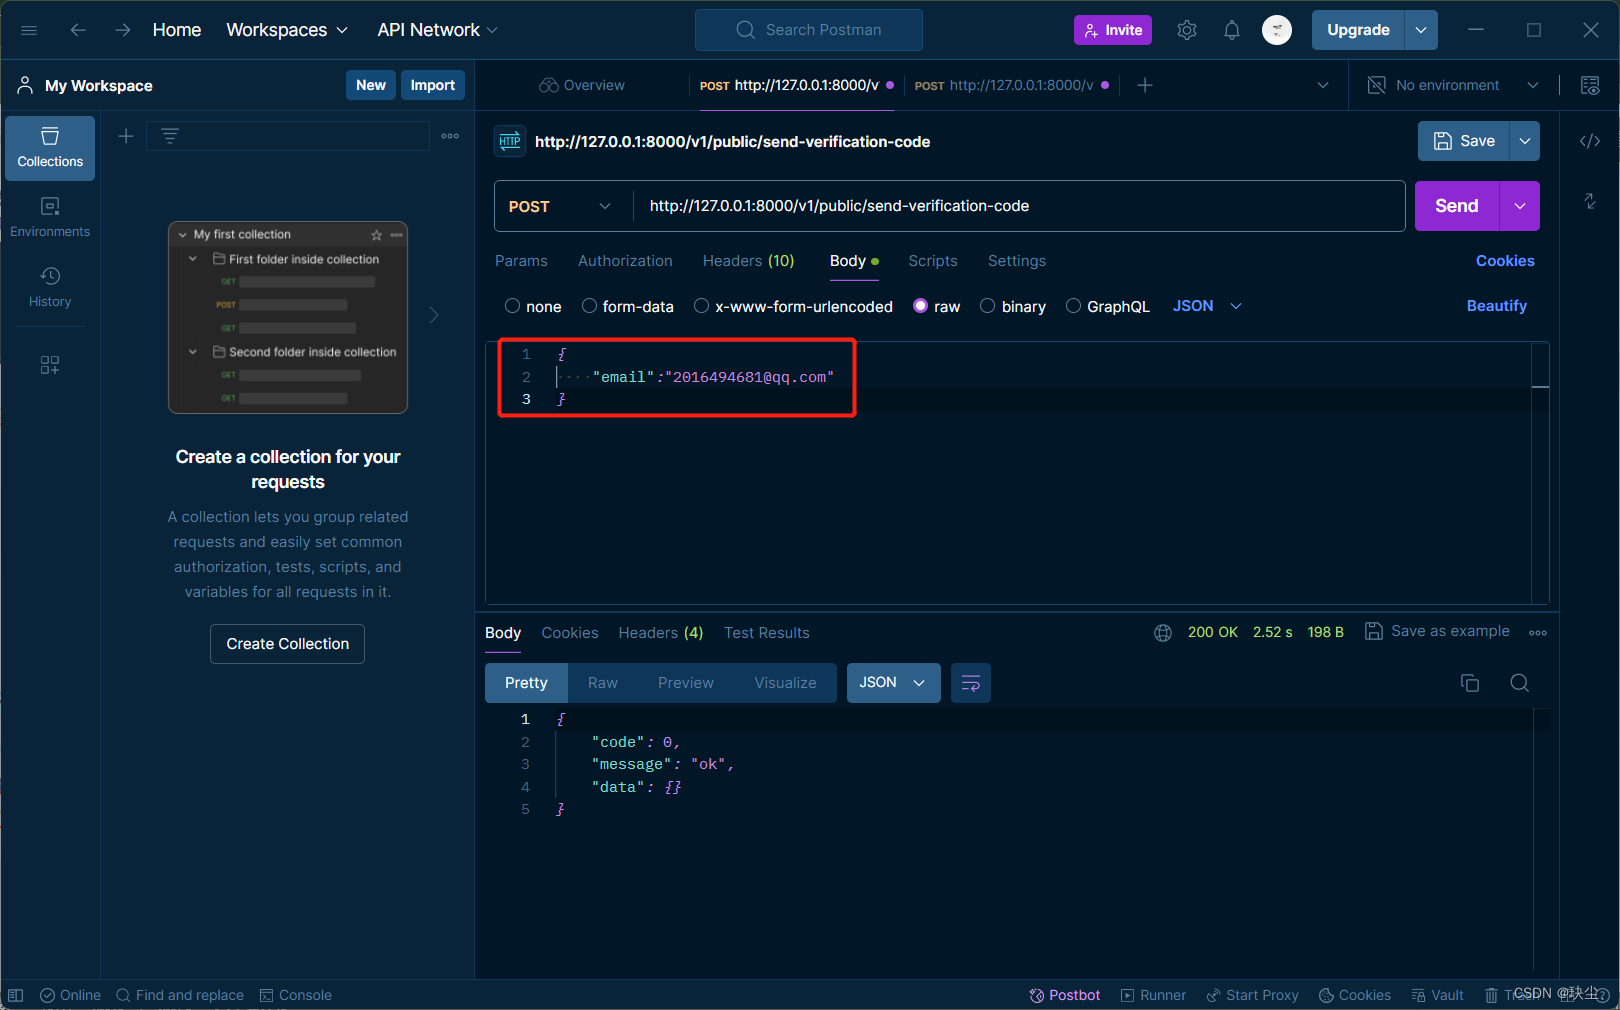
- 用户提交邮箱(email) 以请求 验证码(code)。
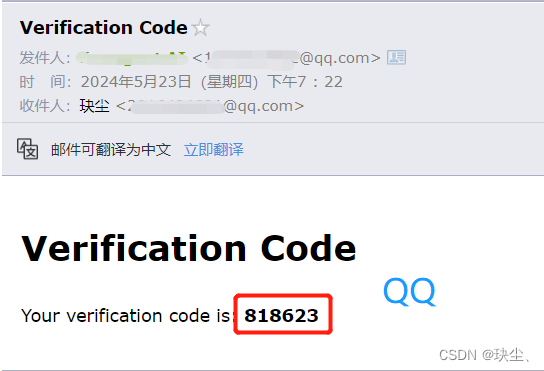
- 服务器生成验证码并发送到用户邮箱。
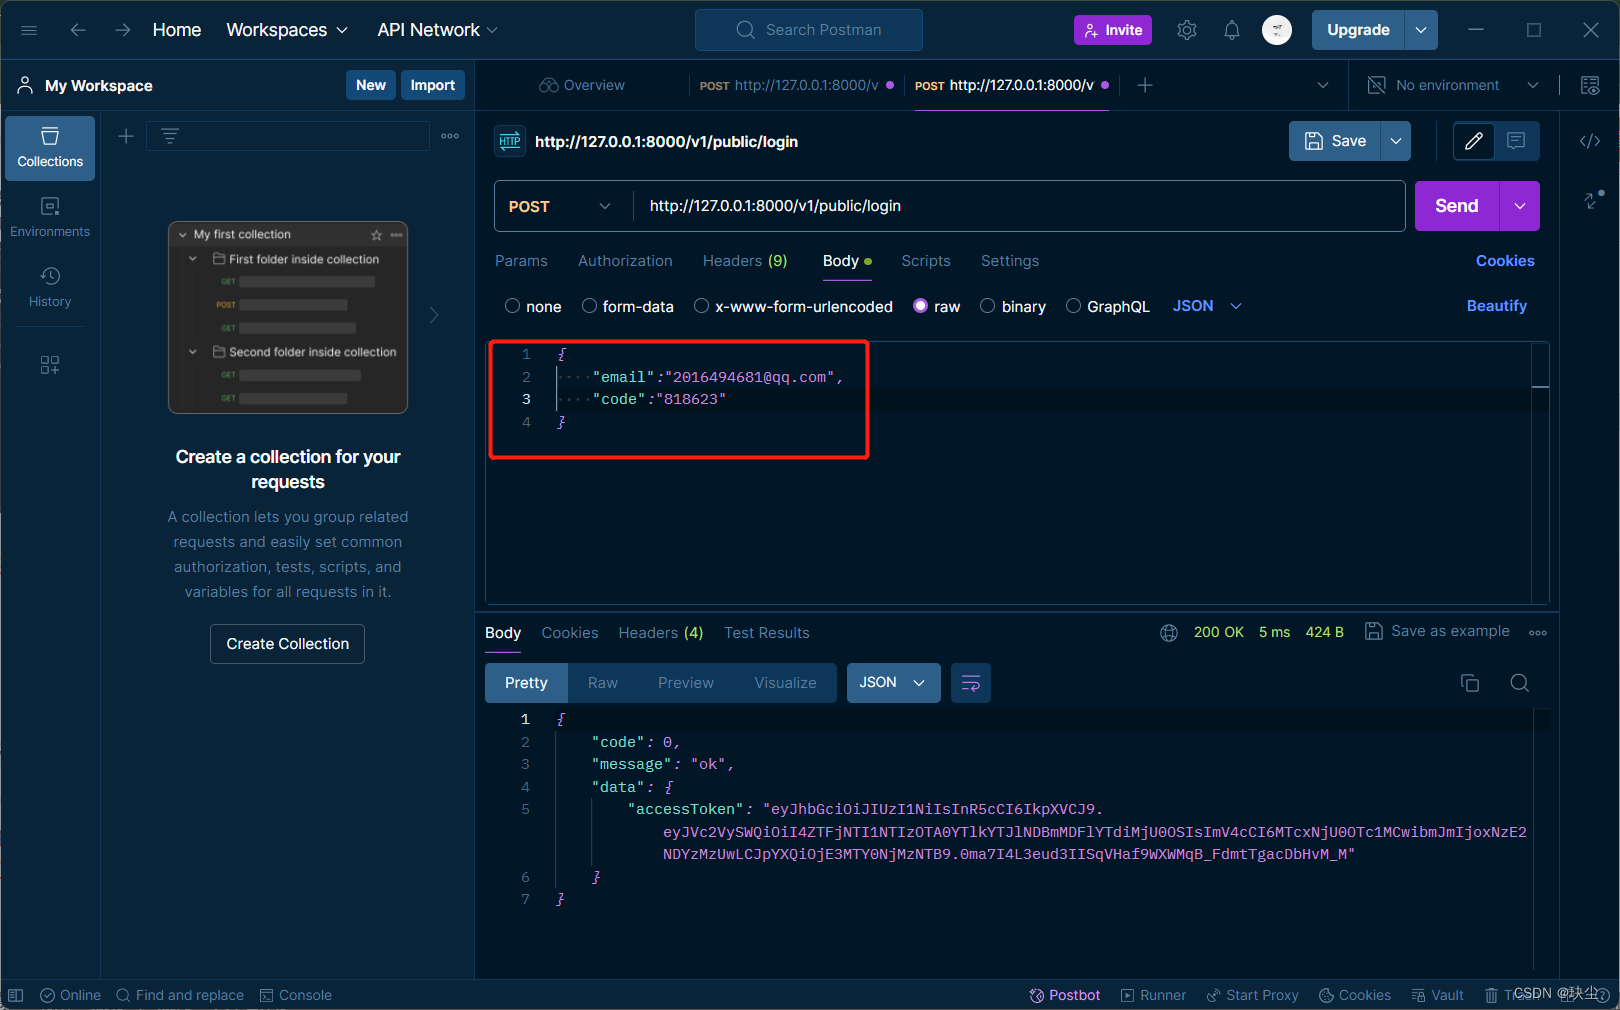
- 用户输入收到的验证码和邮箱进行登录(login)。
- 服务器验证验证码和邮箱。
- 如果验证成功,用户登录成功(sucess);否则,返回错误信息(error)。
代码实现
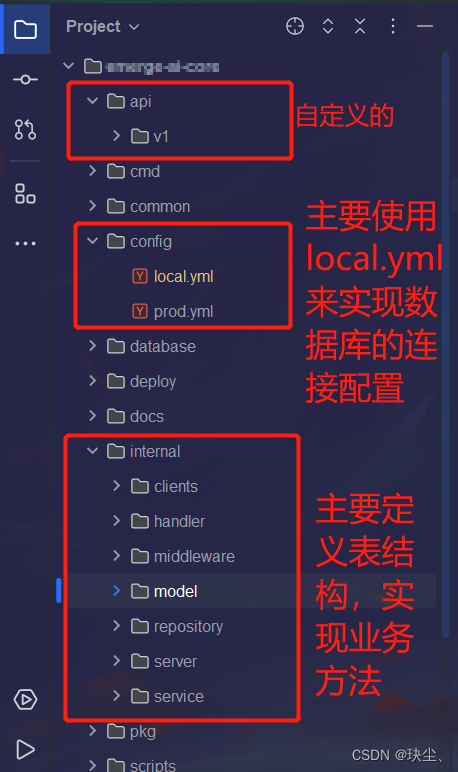
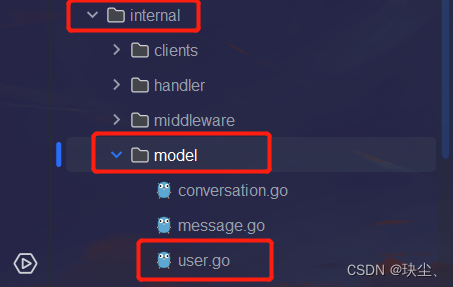
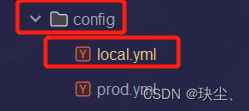
1.internal/model/user.go和config/local.yml
注意:config和internal在同一级目录下
咱们先定义一个表结构,然后去连接数据库,创建对应映射的表,存储咱们的userid和email,验证码(code)是临时的,保存在cache里就好,不需要落库。
package model

import (
	"time"

	"gorm.io/gorm"
)

type User struct {
	Id        string `gorm:"primarykey"`
	Email     string `gorm:"not null"`
	CreatedAt time.Time
	UpdatedAt time.Time
	DeletedAt gorm.DeletedAt `gorm:"index"`
}

func (u *User) TableName() string {
	return "users"
}
建议直接从右边状态栏里直接连接mysql数据库:

对应的SQL建表语句:
create table users
(
    id         varchar(255) not null
        primary key,
    email      varchar(255) not null,
    created_at timestamp    not null,
    updated_at timestamp    not null,
    deleted_at timestamp    null,
    constraint email
        unique (email),
    constraint id
        unique (id)
);
另外还需要在config包下修改local.yml数据库连接配置信息:
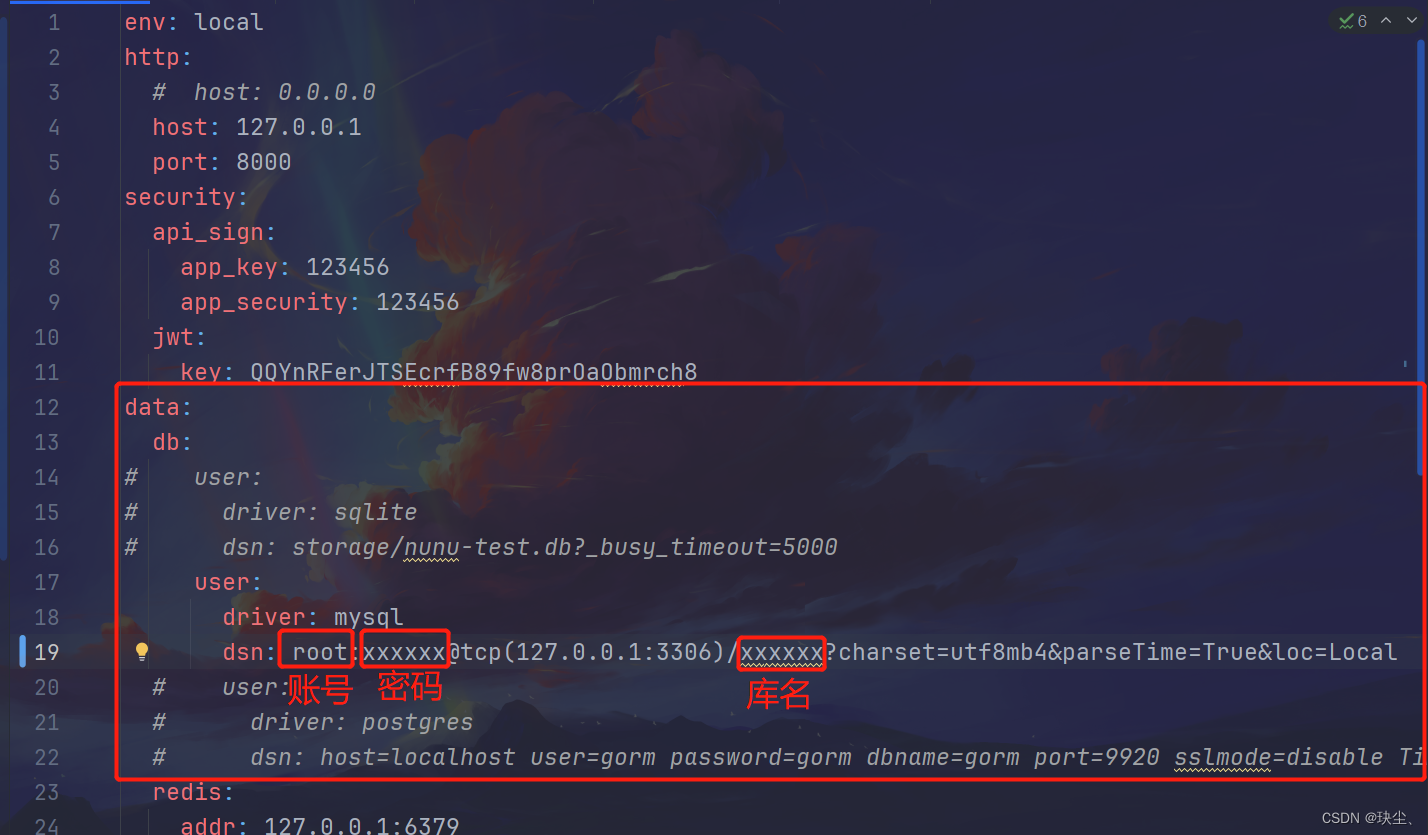
库名为刚才所添加表的所在库名哦!
2.api/v1/user.go
package v1

type LoginResponseData struct {
	AccessToken string `json:"accessToken"`
}

type SendVerificationCodeRequest struct {
	Email string `json:"email"`
}

type LoginByVerificationCodeRequest struct {
	Email string `json:"email"`
	Code  string `json:"code"`
}
这段Go代码定义了三个结构体:
LoginResponseData:表示登录成功后的响应数据,包含一个AccessToken字段,用于标识用户的访问令牌。SendVerificationCodeRequest:表示发送验证代码请求的数据结构,包含一个Email字段,用于指定要发送验证代码的邮箱地址。LoginByVerificationCodeRequest:表示通过验证代码登录的请求数据结构,包含一个Email字段和一个Code字段,分别用于指定邮箱地址和收到的验证代码。
3.internal/repository/user.go
GetByEmail函数通过邮箱地址从数据库中获取用户信息。
- 参数:
ctx context.Context表示上下文信息,email string表示要查询的邮箱地址。 - 返回值:
*model.User表示查询到的用户信息,error表示错误信息。 - 该函数首先根据邮箱地址查询数据库中是否存在该用户,如果查询成功,则返回用户信息;如果查询失败,则返回错误信息。
CreateUserByEmail函数通过邮箱地址创建一个新的用户。
- 参数:
ctx context.Context表示上下文信息,email string表示要创建的用户的邮箱地址。 - 返回值:
*model.User表示创建的用户信息,error表示错误信息。 - 该函数首先生成一个唯一的用户ID,然后使用邮箱地址创建一个新的用户实例,并设置创建时间和更新时间为当前时间。
- 接着,将新用户实例插入到数据库中,如果插入成功,则返回新创建的用户信息;如果插入失败,则返回错误信息。
package repository

import (
	"context"
	"errors"
	"fmt"
	"time"

	"emerge-ai-core/common/utils"
	"emerge-ai-core/internal/model"

	"gorm.io/gorm"
)

type UserRepository interface {
	GetByEmail(ctx context.Context, email string) (*model.User, error)
	CreateUserByEmail(ctx context.Context, email string) (*model.User, error)
}

func NewUserRepository(
	r *Repository,
) UserRepository {
	return &userRepository{
		Repository: r,
	}
}

type userRepository struct {
	*Repository
}

func (r *userRepository) GetByEmail(ctx context.Context, email string) (*model.User, error) {
	var user model.User
	if err := r.DB(ctx).Where("email = ?", email).First(&user).Error; err != nil {
		return nil, err
	}
	return &user, nil
}

// CreateUserByEmail creates a user by email
func (r *userRepository) CreateUserByEmail(ctx context.Context, email string) (*model.User, error) {
	now := time.Now()
	user := &model.User{
		Id:        utils.GenerateUUID(),
		Email:     email,
		CreatedAt: now,
		UpdatedAt: now,
	}
	if err := r.DB(ctx).Create(user).Error; err != nil {
		return nil, fmt.Errorf("failed to create user by email: %v", err)
	}
	return user, nil
}
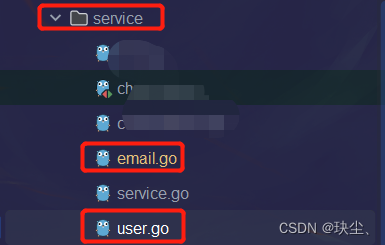
4.internal/service/email.go和internal/service/user.go
user.go:
- 定义了一个名为
UserService的接口,其中包含一个GenerateTokenByUserEmail方法,用于生成用户的令牌。实现该接口的是userService结构体,它通过NewUserService函数进行实例化。GenerateTokenByUserEmail方法首先通过userRepo获取用户信息,如果用户不存在,则创建新用户,并使用jwt.GenToken方法生成令牌。
package service

import (
	"context"
	"errors"
	"time"

	v1 "emerge-ai-core/api/v1"
	"emerge-ai-core/internal/model"
	"emerge-ai-core/internal/repository"

	"github.com/patrickmn/go-cache"
	"golang.org/x/crypto/bcrypt"
	"gorm.io/gorm"
)

type UserService interface {
	GenerateTokenByUserEmail(ctx context.Context, email string) (string, error)
}

func NewUserService(
	service *Service,
	userRepo repository.UserRepository,
) UserService {
	return &userService{
		userRepo: userRepo,
		Service:  service,
	}
}

type userService struct {
	userRepo     repository.UserRepository
	emailService EmailService
	*Service
}

// GenerateTokenByUserEmail generates a token for a user
func (s *userService) GenerateTokenByUserEmail(ctx context.Context, email string) (string, error) {
	// get user by email
	user, err := s.userRepo.GetByEmail(ctx, email)
	if err != nil {
		if errors.Is(err, gorm.ErrRecordNotFound) {
			// is new user create user
			user, err = s.userRepo.CreateUserByEmail(ctx, email)
			if err != nil {
				return "", err
			}
		} else {
			return "", err
		}
	}

	// generate token
	token, err := s.jwt.GenToken(user.Id, time.Now().Add(time.Hour*24*1))
	if err != nil {
		return "", err
	}

	return token, nil
}
email.go:
- 提供了一个电子邮件服务,用于发送和验证用户邮箱中的验证代码。
package service

import (
	"context"
	"fmt"
	"math/rand"
	"net/smtp"
	"time"

	"github.com/jordan-wright/email"
	"github.com/patrickmn/go-cache"
)

var (
	// cache for storing verification codes
	// 缓存中的验证代码将在创建后5分钟内有效,且每隔10分钟进行一次清理。
	verificationCodeCache = cache.New(5*time.Minute, 10*time.Minute)
)

type EmailService interface {
	SendVerificationCode(ctx context.Context, to string) error
	VerifyVerificationCode(email string, code string) bool
}

type emailService struct {
}

func NewEmailService() EmailService {
	return &emailService{}
}

// SendVerificationCode sends a verification code to the user's email
func (e *emailService) SendVerificationCode(ctx context.Context, to string) error {
	code := generateVerificationCode()

	err := e.sendVerificationCode(to, code)
	if err != nil {
		return err
	}

	// store the verification code in the cache for later verification
	verificationCodeCache.Set(to, code, cache.DefaultExpiration)

	return nil
}

// sendVerificationCode 发送验证代码到指定的邮箱。
// 参数 to: 邮件接收人的邮箱地址。
// 参数 code: 需要发送的验证代码。
// 返回值 error: 发送过程中遇到的任何错误。
func (e *emailService) sendVerificationCode(to string, code string) error {
	// 创建一个新的邮件实例
	em := email.NewEmail()
	em.From = "Xxxxxxx <xxxxxxxxxx@qq.com>"
	em.To = []string{to}
	em.Subject = "Verification Code"
	// 设置邮件的HTML内容
	em.HTML = []byte(`
		<h1>Verification Code</h1>
		<p>Your verification code is: <strong>` + code + `</strong></p>
	`)

	// 发送邮件(这里使用QQ进行发送邮件验证码)
	err := em.Send("smtp.qq.com:587", smtp.PlainAuth("", "xxxxxxxxxx@qq.com", "这里填写的是授权码", "smtp.qq.com"))
	if err != nil {
		return err // 如果发送过程中有错误,返回错误信息
	}
	return nil // 邮件发送成功,返回nil
}

// 随机生成一个6位数的验证码。
func generateVerificationCode() string {
	rand.Seed(time.Now().UnixNano())
	code := fmt.Sprintf("%06d", rand.Intn(1000000))
	return code
}

// VerifyVerificationCode verifies the verification code sent to the user
func (e *emailService) VerifyVerificationCode(email string, code string) bool {
	// debug code
	if code == "123456" {
		return true
	}

	// retrieve the verification code from the cache
	cachedCode, found := verificationCodeCache.Get(email)
	// 如果没有找到验证码或者验证码过期,返回false
	if !found {
		return false
	}

	// compare the cached code with the provided code
	if cachedCode != code {
		return false
	}

	return true
}
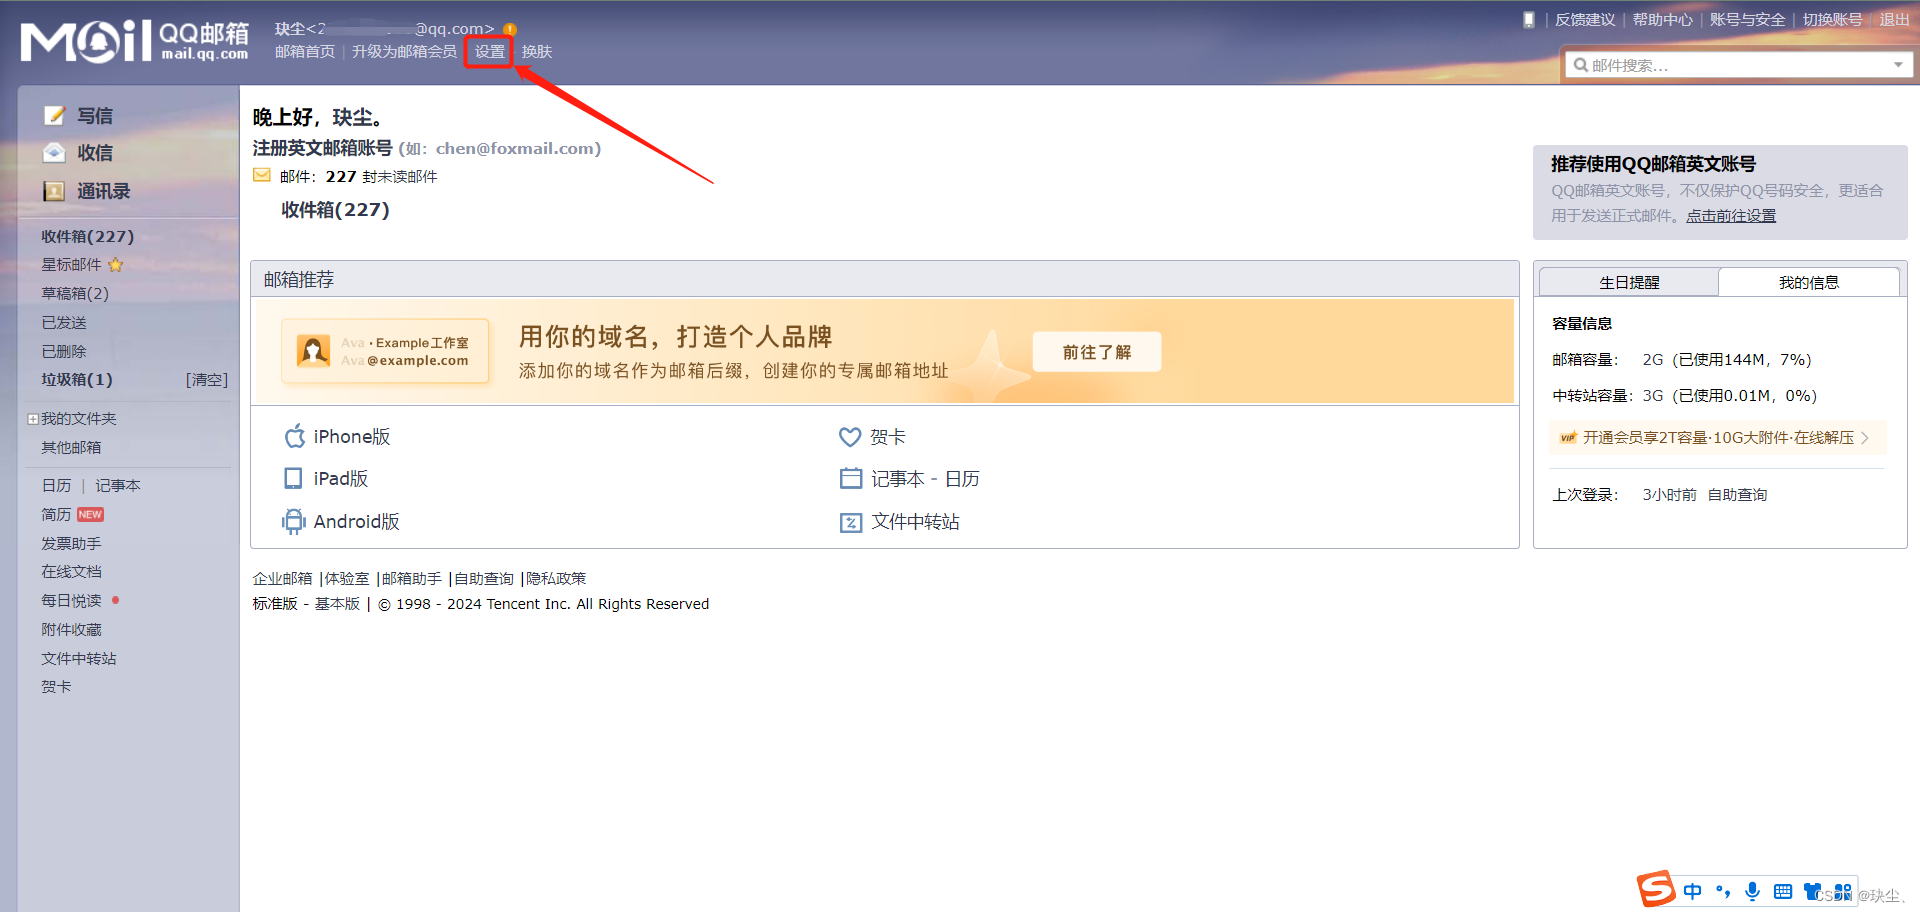
注意:这里需要SMTP协议知识,并且要想获取到授权码,一般要去所在邮箱官方进行申请,这里以QQ为例:
-
电脑端打开QQ邮箱,点击
设置。
-
点击
账号。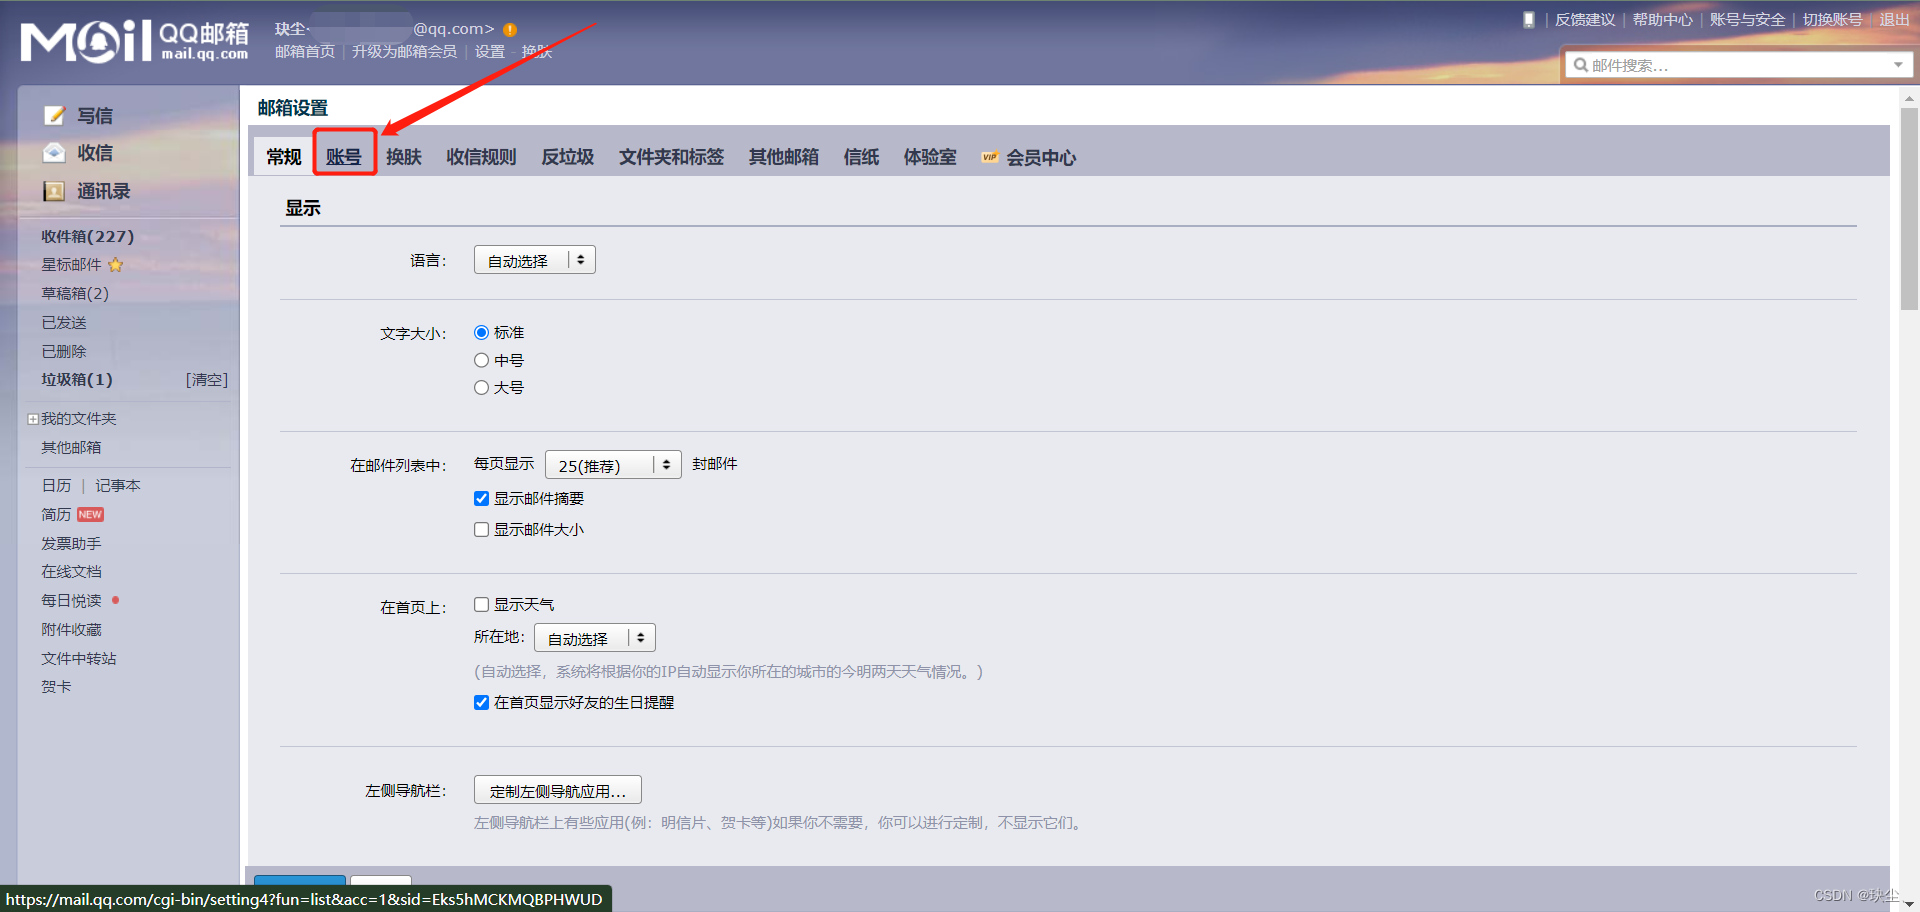
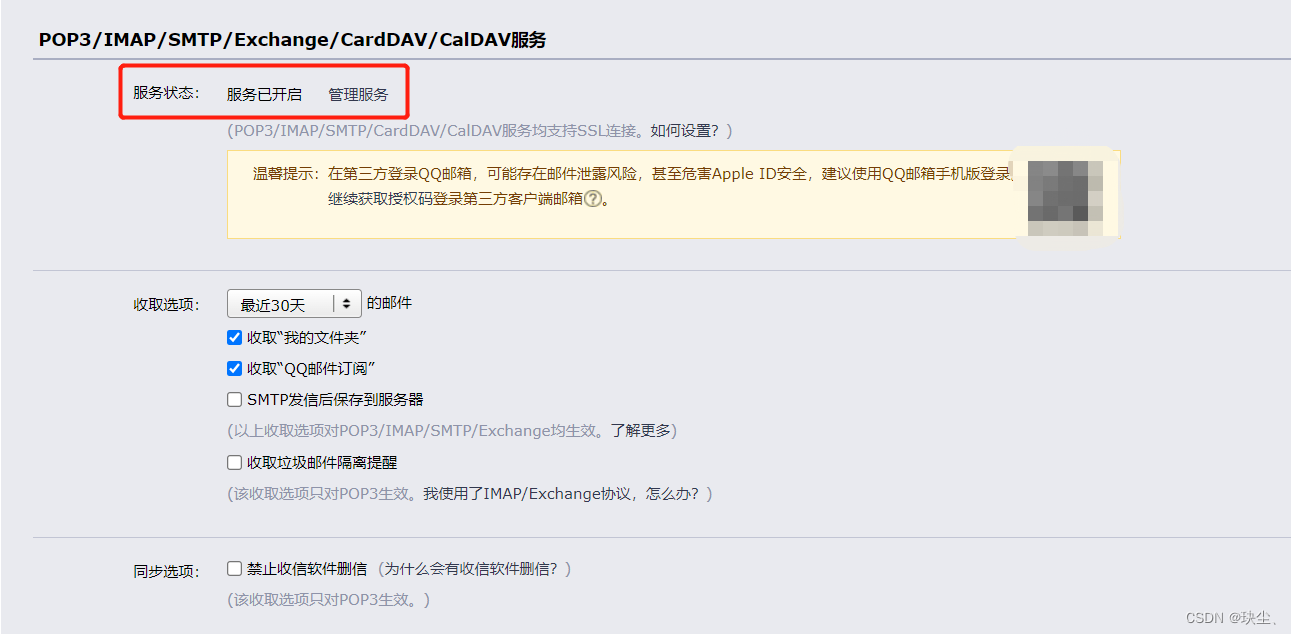
-
往下滑,找到
POP3/IMAP/SMTP/Exchange/CardDAV/CalDAV服务,我这里已经开启了服务。
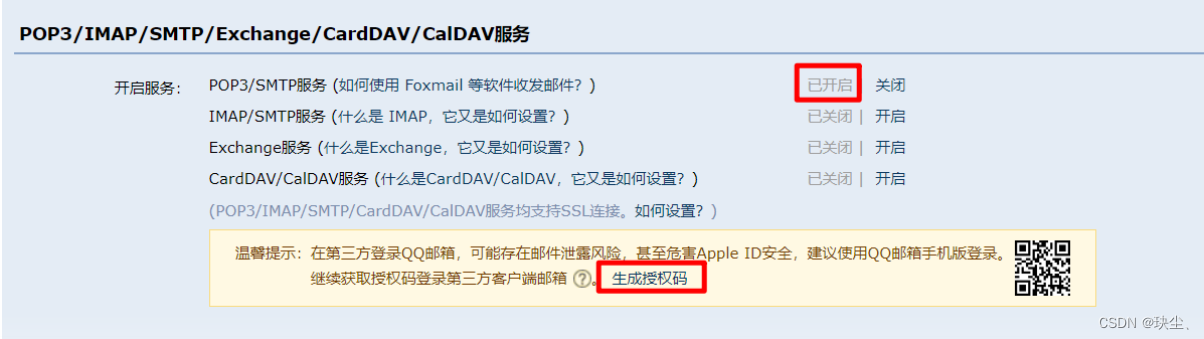
-
即可获取到授权码!
5.internal/handler/user.go
- 处理用户通过验证代码登录的HTTP请求
package handler

import (
	"net/http"

	"emerge-ai-core/api/v1"
	"emerge-ai-core/internal/model"
	"emerge-ai-core/internal/service"

	"github.com/gin-gonic/gin"
	"go.uber.org/zap"
)

type UserHandler struct {
	*Handler
	userService  service.UserService
	emailService service.EmailService
}

func NewUserHandler(handler *Handler, userService service.UserService, emailService service.EmailService) *UserHandler {
	return &UserHandler{
		Handler:      handler,
		userService:  userService,
		emailService: emailService,
	}
}

// SendVerificationCode send verification code
func (h *UserHandler) SendVerificationCode(ctx *gin.Context) {
	var req v1.SendVerificationCodeRequest
	if err := ctx.ShouldBindJSON(&req); err != nil {
		v1.HandleError(ctx, http.StatusBadRequest, v1.ErrBadRequest, err.Error())
		return
	}

	if err := h.emailService.SendVerificationCode(ctx, req.Email); err != nil {
		v1.HandleError(ctx, http.StatusInternalServerError, v1.ErrInternalServerError, err.Error())
		return
	}

	v1.HandleSuccess(ctx, nil)
}

// LoginByVerificationCode by verification code
func (h *UserHandler) LoginByVerificationCode(ctx *gin.Context) {
	var req v1.LoginByVerificationCodeRequest
	if err := ctx.ShouldBindJSON(&req); err != nil {
		v1.HandleError(ctx, http.StatusBadRequest, v1.ErrBadRequest, err.Error())
		return
	}

	// check verification code
	if !h.emailService.VerifyVerificationCode(req.Email, req.Code) {
		v1.HandleError(ctx, http.StatusBadRequest, v1.ErrBadRequest, nil)
		return
	}

	token, err := h.userService.GenerateTokenByUserEmail(ctx, req.Email)
	if err != nil {
		v1.HandleError(ctx, http.StatusUnauthorized, v1.ErrUnauthorized, err.Error())
		return
	}
	v1.HandleSuccess(ctx, v1.LoginResponseData{
		AccessToken: token,
	})
}
6.internal/server/http.go
- 创建一个以
/v1为前缀的路由分组v1,然后在该分组下创建子分组/public。在/public子分组下定义了两个POST请求的路由,分别对应/send-verification-code和/login,并绑定相应的处理函数。
package server

import (
	apiV1 "emerge-ai-core/api/v1"
	"emerge-ai-core/docs"
	"emerge-ai-core/internal/handler"
	"emerge-ai-core/internal/middleware"
	"emerge-ai-core/pkg/jwt"
	"emerge-ai-core/pkg/log"
	"emerge-ai-core/pkg/server/http"

	"github.com/gin-gonic/gin"
	"github.com/spf13/viper"
	swaggerfiles "github.com/swaggo/files"
	ginSwagger "github.com/swaggo/gin-swagger"
)

func NewHTTPServer(
	logger *log.Logger,
	conf *viper.Viper,
	jwt *jwt.JWT,
	userHandler *handler.UserHandler,
	chatHandler *handler.ChatHandler,
) *http.Server {
	gin.SetMode(gin.DebugMode)
	s := http.NewServer(
		gin.Default(),
		logger,
		http.WithServerHost(conf.GetString("http.host")),
		http.WithServerPort(conf.GetInt("http.port")),
	)

	...

	v1 := s.Group("/v1")
	{
		publicRouter := v1.Group("/public")
		{
			// POST /v1/public/send-verification-code
			publicRouter.POST("/send-verification-code", userHandler.SendVerificationCode)

			// POST /v1/public/login
			publicRouter.POST("/login", userHandler.LoginByVerificationCode)
		}
	}

	return s
}
Postman测试
同效果图
- Google:
- QQ:
And so on…
Just you can try!


 55
55

 被折叠的 条评论
为什么被折叠?
被折叠的 条评论
为什么被折叠?
 到【灌水乐园】发言


