


RHCSA
- 一、重置root密码
- 二、远程连接
- 三、Linux中执行命令
- 四、文件管理
- 五、 目录操作相关命令
- 六、用户和组管理
- 七、 文件系统权限
- 八、 网络管理
- 九、 磁盘管理
- 十、 包和进程管理
篇幅过长,分为两篇文章
一、重置root密码
重新启动系统

在此界面,快速按下e键

得到如下界面

得到此界面后输入代码 rd.break

命令提示符下输入
mount -o remount,rw /sysroot 回车
mount | grep sysroot 回车

得到如下界面,继续输入代码
0 在命令提示符下输入如下命令:
chroot /sysroot/
echo 123 | passwd --stdin root
touch /.autorelabel
回车后,输入两次exit

得到此界面等待,系统会自动重新启动,启动好后 No list 处输入 username:root,password:123 后即可登录
二、远程连接
2.1安装Xshell软件

双击Xshell安装
打开VMware软件,开启虚拟机

2.2查询IP地址
打开Terminal

输入 ip add,回车,得到IP地址
或者:
ip address

ip addr

ip ad

ip a

ifconfig

2.3开始连接
打开Xshell软件,在命令提示符下输入root@192.168.142.128(自己的IP地址),回车
输入root的密码

得到如下代码

说明远程连接成功。
2.4通过Xshell操控
2.4.1 重启系统命令
[root@bogon ~]# reboot # 推荐使用
[root@bogon ~]# init 6 # 此命令在新版本中不推荐使用了。
2.4.2 关机命令
shutdown 关机指令,你可以man shutdown 来看一下帮助文档。例如你可以运行如下命令关机:
shutdown –h 10 ‘This server will shutdown after 10 mins’ 这个命令告诉大家,计算机将在10分钟后关机,并且会显示在登陆用户的当前屏幕中。
shutdown –h now 立马关机
shutdown –h 20:25 系统会在今天20:25关机
shutdown –h +10 十分钟后关机
shutdown –r now 系统立马重启
shutdown –r +10 系统十分钟后重启
reboot 就是重启,等同于 shutdown –r now
halt 关闭系统,等同于shutdown –h now 和 poweroff
2.5 ping 网络是否畅通
使用格式:ping IP地址
Ctrl键 + C停止
指-c :指定ping的次数
三、Linux中执行命令
在Linux中,命令分为内部命令和外部命令。
内部命令:
[root@bogon ~]# type cd
cd is a shell builtin
有 builtin 这个单词就是内部命令
外部命令:
[root@bogon ~]# type cat
cat is /usr/bin/cat
3.1 命令格式
命令 [选项] [参数…]
Ctrl键+l可以清屏

符号使用英文符号!!!

TAB键在Linux里面可补全命令

解决乱码:Ctrl键+C
3.2 查看帮助的命令
在使用命令之前,可通过帮助来查看这个命令的格式和使用方式。
在Linux中,有两个帮助命令,help 和 man(manual:手册)
注意!!!在Linux里面不能用Ctrl键+C,而用右键点击copy 进行复制代码
3.2.1 help
例如:cd,此命令只知道命令的名称,不知道使用方式,就可用help来查看使用格式为
[root@bogon ~]$ help cd
得到 cd 的功能:改变工作路径
[redhat@bogon ~]$ help cd
cd: cd [-L|[-P [-e]] [-@]] [dir]
    Change the shell working directory. //修改shell工作目录,即改变工作路径

    Change the current directory to DIR.  The default DIR is the value of the
    HOME shell variable. //将当前目录更改为DIR。文件的值为默认DIR HOME shell变量

    The variable CDPATH defines the search path for the directory containing
    DIR.  Alternative directory names in CDPATH are separated by a colon (:).
    A null directory name is the same as the current directory.  If DIR begins
    with a slash (/), then CDPATH is not used.
    //变量CDPATH定义包含的目录的搜索路径DIR。
      CDPATH中的备选目录名以冒号(:)分隔。
      空目录名称与当前目录名称相同。
      如果DIR开始带有斜杠(/),则不使用CDPATH。

    If the directory is not found, and the shell option `cdable_vars' is set,
    the word is assumed to be  a variable name.  If that variable has a value,
    its value is used for DIR.
    //如果没有找到目录,并且设置了shell选项' cdable_vars',这个词被假定为一个变量名。
      如果这个 变量有一个值,它的值用于DIR。
例如利用 --help 查看 ls 的作用

3.2.2 man
man 是 manual (手册)的简写。
使用方式:man 命名名称

SYNOPSIS :摘要
例如:通过man来查看ls的命令的使用
# man ls
LS(1)                               User Commands                                         LS(1)

NAME
       ls - list directory contents

SYNOPSIS
       ls [OPTION]... [FILE]...
说明:进入这个使用的帮助信息后,按向下箭头可以向下滚动一行,向上箭头可往前滚动一行,空格可向下翻页;
h键:帮助
q键:退出
3.3 指令 nmcli
使用格式:

OPTIONS : 选项 OBJECT : 对象 COMMAND : 命令
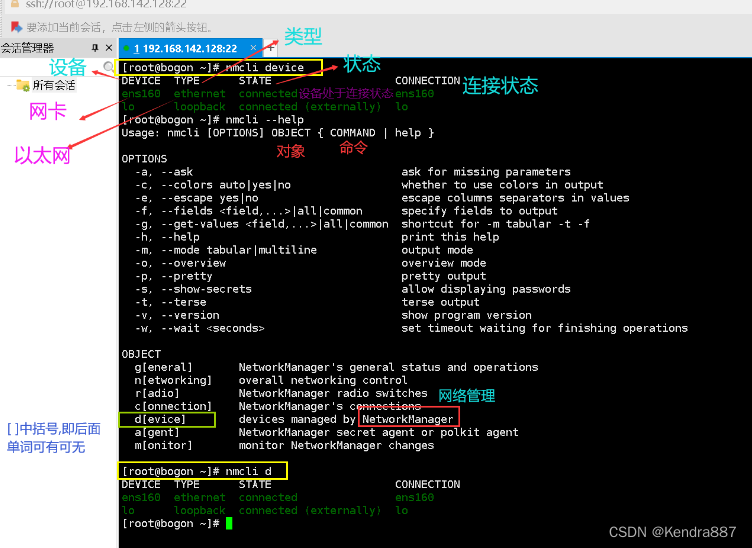
#查看网络设备
[root@bogon ~]# nmcli device
DEVICE  TYPE      STATE                   CONNECTION
ens160  ethernet  connected               ens160
lo      loopback  connected (externally)  lo

[root@bogon ~]# nmcli d
DEVICE  TYPE      STATE                   CONNECTION
ens160  ethernet  connected               ens160
lo      loopback  connected (externally)  lo
得到结论:我的电脑设备网卡ens160
loopback:本地回环(本机回送地址)
使用 ens160
[root@bogon ~]# nmcli connection ens160
Error: argument 'ens160' not understood. Try passing --help instead.
[root@bogon ~]#

//en160没有被理解,尝试用--help解决
报错原因:没有指定OBJECT
[root@bogon ~]# nmcli device connect ens160
Device 'ens160' successfully activated with '22770786-e198-3e41-8a7f-fb9dbcf1c37b'.
[root@bogon ~]#
[root@bogon ~]# nmcli connect up ens160
Connection successfully activated (D-Bus active path: /org/freedesktop/NetworkManager/ActiveConnection/4)
[root@bogon ~]#
3.4 日期 date
[root@bogon ~]# date
Wed Nov  1 10:17:23 PM CST 2023
[root@bogon ~]#
CST:中国时区
UTC:世界时区
CST=UTC+8
更改显示日期的形式(利用 help 或者 man )
3.4.1 年/月/日 date +%Y/%m/%d
格式:date +%Y/%m/%d
  %y   last two digits of year (00..99)
  %Y   year
  %d   day of month (e.g., 01)
  %D   date; same as %m/%d/%y
  %m   month (01..12)
  %M   minute (00..59)
[root@bogon ~]# date +%y/%m/%d
24/02/28
3.4.2 年-月-日 时:分:秒 date ‘+%Y-%m-%d %H:%M:%S’
格式:date ‘+%Y-%m-%d %H:%M:%S’
[root@bogon ~]# date +%Y-%m-%d %H:%M:%S
date: extra operand ‘%H:%M:%S’ //额外的操作数
Try 'date --help' for more information.
报错原因:格式部分有了空格
解决方式:把格式化的内容放在引号中
[root@bogon ~]# date '+%Y-%m-%d %H:%M:%S'
2023-11-01 22:49:20
[root@bogon ~]# date "+%Y-%m-%d %H:%M:%S"
2023-11-01 22:50:06
在Linux中,单引号和双引号是同等作用
3.5 修改时区 timedatectl
timedatectl:查询或修改系统时间和日期设置
3.5.1 显示当前时间设置 timedatectl status
timedatectl status : 显示当前时间设置
[root@bogon ~]# timedatectl status
               Local time: Wed 2024-02-28 21:11:31 CST
           Universal time: Wed 2024-02-28 13:11:31 UTC
                 RTC time: Wed 2024-02-28 13:11:30
                Time zone: Asia/Shanghai (CST, +0800)
System clock synchronized: yes
              NTP service: active
          RTC in local TZ: no
3.5.2 设置系统时区 timedatectl set-timezone Asia/Shanghai
timedatectl set-timezone ZONE:设置系统时区
[root@bogon ~]# timedatectl set-timezone Asia/Shanghai
3.6 用户切换 su
在Linux中,用户分为三类:
超级用户,uid = 0,用于管理系统

系统用户,uid = 1~999,

普通用户,uid =
用户切换需要使用 su 命令来实现
su:修改生效的用户ID和组ID为
在使用 su 来切换用户时,带有 - 和不带的区别:带有 - 的不仅仅是切换用户,同时还会切换用户的运行环境。
3.6.1从超级用户切换到普通用户
由于在安装 Redhat 时已经添加了一个叫 redhat 的普通用户。我们再在就在 root 超级用户和 redhat 普通用户,这两个用户之间来进行切换。
[root@bogon ~]# su redhat
[redhat@bogon root]$
@ 前面表示当前登录用户的名称,而 @ 后面表示主机名称
su -lredhat
[root@bogon ~]# su -l redhat
[redhat@bogon ~]$
- 由 [root@bogon] 变为了 [redhat@bogon]
- 中括号后的 # 号变为了 $ 符号
( # 表示超级用户的提示符,而 $ 表示是普通用户的命令提示)
3.6.2再从普通用户切换到超级用户中
[redhat@bogon ~]$ su -l
Password:
[root@bogon ~]#
说明:从普通用户切换到超级用户时,要输入超级用户的登录密码,在输入密码的过程中,对话框不会有任何字符,自行输入密码后回车即可
如果su后面不带用户名,默认就会切换到root用户
注意:在切换用户时带有 -l 选项和不带 -l 选项,区别是带了后在切换用户的同时也会切换用户的环境,否则不会切换用户环境只会切换用户(尽量带上-l)
切换用户后,如果想回到之前的用户: 可以使用 exit 命令来退出当前用户的登录状态
[root@bogon ~]# exit
logout
[redhat@bogon ~]$
[redhat@bogon ~]$ exit
logout
[root@bogon ~]#
3.6.3 显示当前登录系统的用户 whoami
打印与当前有效用户ID关联的用户名。
[root@bogon ~]# whoami
root
3.7 设置主机名称 hostnamectl
通常我们为了区分以及后面搭建集群时可以更好的标识一个虚拟机,我们都会给当前的系统指定主机名称。
指定主机名称通过 hostnamectl 命令来实现。
hostnamectl:查询或修改系统主机名
3.7.1 查看主机名称的状态
[root@bogon ~]# hostnamectl status
 Static hostname: bogon
       Icon name: computer-vm
         Chassis: vm 🖴
      Machine ID: 7c696f2d721b452c8385e282206ab7d2
         Boot ID: 2605681a7e234d0189b10332e143a33e
  Virtualization: vmware
Operating System: Red Hat Enterprise Linux 9.2 (Plow)
     CPE OS Name: cpe:/o:redhat:enterprise_linux:9::baseos
          Kernel: Linux 5.14.0-284.11.1.el9_2.x86_64
    Architecture: x86-64
 Hardware Vendor: VMware, Inc.
  Hardware Model: VMware Virtual Platform
Firmware Version: 6.00
3.7.2 获取主机名称
[root@bogon ~]# hostnamectl hostname
bogon
[root@bogon ~]#
3.7.3 修改主机名称
[root@bogon ~]# hostnamectl hostname redhat01
//输入hostnamectl hostname redhat01 回车
[root@bogon ~]# hostnamectl hostname
// 再输入hostnamectl hostname 回车
redhat01
[root@bogon ~]#
从上面的命令执行后的效果可以发现:主机名称已经修改成功,但是在命令提示符上显示的还是原来的名称。要想它也跟着变化我们 需要重启服务 。
3.8 获取当前路径 pwd
pwd:打印当前工作目录的名称
[root@bogon ~]# pwd // 输入pwd 回车
/root
[root@bogon ~]# cd /home/redhat //输入cd /home/redhat 回车
[root@bogon redhat]# pwd //输入pwd 回车
/home/redhat
[root@bogon redhat]#
3.9 修改密码 passwd
[root@rhcsa001 ~]# passwd
Changing password for user root.
New password:  //输入新密码 回车
BAD PASSWORD: The password is shorter than 8 characters
Retype new password:  //再次输入新密码 回车
passwd: all authentication tokens updated successfully. //修改成功
[root@rhcsa001 ~]#
3.10显示指定路径下的所有的文件信息 ls
ls( list的简写): 显示指定路径下的所有的文件信息
常用选项:
-a: 用于显示 所有文件 包括隐藏文件及目录
-d : 显示 目录本身 而不是目录下的内容
-l : 以 长列表 的方式来显示内容
-h : 以人的读取习惯显示内容
-r : 递归显示
显示根目录下的所有内容
[root@bogon ~]# ls /
afs          bin   dev  home  lib64  mnt  opt   root  sbin  sys   tmp  var
autorelabel  boot  etc  lib   media  old  proc  run   srv   temp  usr  web
/ :是 linux 系统的根目录,所有的文件或目录都是挂载到它之下的
使用命令:
afs
boot 它是系统启动时所需要的文件
etc 它是系统中所有的配置文件所在目录    !!!重要命令 , 后续学到高级课程时就需要修改它里面的文件
lib 库文件,在系统运行过程中所需要的一个库文件
media 媒体,它是用户挂载的,一般我们光盘就可以挂载到它下面
opt 它是第三方软件安装目录
root 它是 root 用户有家目录
sbin 超级用户可以执行的命令所在目录
sys 这是用户存储虚拟的文件路径
usr unix software resource 它是软件资源所在目录
bin 普通用户可以执行的命令所在目录
dev 设备文件所在目录
home 它是普通用户所在的家目录
lib64 它也是库文件所在目录
mnt 它是挂载目录
proc 进程所在目录
run 程序运行时相关的文件所在路径
srv 网络服务数据
tmp 运行程序时产生的临时文件,在这个目录中不要存储重要信息,因为它可能会被系统删除
var 用于存放一些变化的数据,例如日志
在 linux 中,一切皆文件,Windows中,文件类型是以扩展名来区分,Linux中不存在扩展名的说法,一共有 七 种文件类型,分别是如下:
- -:表示普通文件
- d:表示目录
- c:表示字符设置文件
- p:表示管道符文件
- b:表示块设置文件
- s:表示套接字文件
- l:表示链接文件
软链接文件:它有自己的 inode 值,它的内容是这个文件的链接地址,如果删除原文件,则链接文件失效。
硬链接文件:它只是引用同一个文件,因此它们的 inode 值一致,只是增加了文件的链接数据,当删除源文件时,链接数减1。
3.10.1 -a 选项
[root@rhcsa002 ~]# ls -a /
.  ..  afs  autorelabel  .bash_history  bin  boot  dev  etc  home  lib  lib64  media  mnt  opt  proc  root  run  sbin  srv  sys  tmp  usr  var
[root@rhcsa002 ~]#
当指定了 -a 选项时,发现多了一些内容:
. 表示当前目录
. . 表示上一级目录
.bash_history 表示它是一个隐藏文件或目录
#注意:
- 在 linux 中以 . 开头的文件或目录是 隐藏文件或目录
- 任何一个目录,当执行了 ls 命令后,都可以看到 . 和 . .
3.10.2 -d 选择
只显示目录本身,而不会显示目录内容
[root@rhcsa002 ~]# ls /usr
bin  games  include  lib  lib64  libexec  local  sbin  share  src  tmp
[root@rhcsa002 ~]# ls -d /usr
/usr
[root@rhcsa002 ~]#
3.10.3 -l 选项
以长列表的方式来显示内容
[root@rhcsa002 ~]# ls /usr
bin  games  include  lib  lib64  libexec  local  sbin  share  src  tmp //下面是带了 -l 选项的
[root@rhcsa002 ~]# ls -l /usr
total 240
dr-xr-xr-x.   2 root root 45056 Oct 15 19:44 bin
drwxr-xr-x.   2 root root     6 Aug 10  2021 games
drwxr-xr-x.   3 root root    23 Oct 15 19:39 include
dr-xr-xr-x.  38 root root  4096 Oct 15 19:49 lib
dr-xr-xr-x. 123 root root 73728 Oct 15 19:52 lib64
drwxr-xr-x.  46 root root 12288 Oct 15 19:44 libexec
drwxr-xr-x.  12 root root   131 Oct 15 19:37 local
dr-xr-xr-x.   2 root root 20480 Oct 15 19:43 sbin
drwxr-xr-x. 213 root root  8192 Oct 15 19:43 share
drwxr-xr-x.   4 root root    34 Oct 15 19:37 src
lrwxrwxrwx.   1 root root    10 Aug 10  2021 tmp -> ../var/tmp
[root@rhcsa002 ~]#
内容格式说明:
 d       r-xr-xr-x.      2       root      root         45056        Oct     15 19 :40   bin
 1       2               3       4         5            6            7       8
1 . 文件的类型
2 . 文件的操作权限
3 . 硬连接数
4 . 文件所有者(创建文件的人)
5 . 文件所发属组名称
6 . 文件大小,单位为字节
7 . 文件最后一次修改时间
8 . 文件名称
在Linux中,一切皆文件
3.10.4 -h 选项
[root@rhcsa002 ~]# ls -l -h /usr
total 240K
dr-xr-xr-x.   2 root root  44K Oct 15 19:44 bin
drwxr-xr-x.   2 root root    6 Aug 10  2021 games
drwxr-xr-x.   3 root root   23 Oct 15 19:39 include
dr-xr-xr-x.  38 root root 4.0K Oct 15 19:49 lib
dr-xr-xr-x. 123 root root  72K Oct 15 19:52 lib64
drwxr-xr-x.  46 root root  12K Oct 15 19:44 libexec
drwxr-xr-x.  12 root root  131 Oct 15 19:37 local
dr-xr-xr-x.   2 root root  20K Oct 15 19:43 sbin
drwxr-xr-x. 213 root root 8.0K Oct 15 19:43 share
drwxr-xr-x.   4 root root   34 Oct 15 19:37 src
lrwxrwxrwx.   1 root root   10 Aug 10  2021 tmp -> ../var/tmp
我们可以在命令后面跟多个选项,多个选项之间用空格分隔,当然也可以把选项进行组全,例如:
3.11 别名命令 alisa
别名是命令的快捷方式。对于需要经常执行,并需要很长时间输入的长命令创建快捷方式很有用。
语法: alias [-p] [name[=value] … ] alias 别名=’原命令 [选项]…… [参数]……’
显示别名:
[root@bogon ~]# alias ll
alias ll='ls -l --color=auto'
// 即, ll 命令就是 ls -l 这个命令的别名。
定义别名,将 ll = ls - l 这个命令定义别名为 openlab
[root@bogon ~]# alias ll='ls -l'
[root@bogon ~]# alias openlab='ls'
[root@bogon ~]# openlab
file1  passwd  test  txt.tar
3.12 历史命令 history
history,查阅命令历史记录,也可在命令利用向上或向下光标键来进行查询
选项说明:
number:显示最近number条命令历史
-c:清空当前历史命令
-a [file]:后面没跟文件时,默认将缓冲区中历史命令写入~/.bash_history中
-r [file]:将历史命令文件中的命令读入当前历史命令缓冲区中
-w:将当前历史命令缓冲区命令写入历史命令文件中;
使用示例:
[root@bogon ~]# history
 1  cat /etc/passwd
 2  cat -n /etc/passwd
 3  cat --help
 4  head --help
 5  head /etc/passwd
 .
 .
 .
 238  alias ll='ls -l'
 239  alias openlab='ls'
 240  openlab
 241  history
将 241 条命令再执行一遍:
[root@bogon ~]# !1
cat /etc/passwd
root:x:0:0:root:/root:/bin/bash
.
.
.
执行上一条命令
[root@bogon ~]# !!
四、文件管理
4.1文件的命名规则
- 不能使用 “/” 来作为文件名称,因为在 Linux中它代表根目录
- 文件名称不能超过 255 个字符
- 名称区分大小写
#注意:在 Linux 中目录也是文件,而在 Linux 中没有扩展名,我们在定义文件时指定扩展名是为了 我们自己能看懂。
4.2文件类型
在 linux 中,一切皆文件,Windows中,文件类型是以扩展名来区分,Linux中不存在扩展名的说法,一共有 七 种文件类型,分别是如下:
- -:表示普通文件
- d:表示目录
- c:表示字符设置文件
- p:表示管道符文件
- b:表示块设置文件
- s:表示套接字文件
- l:表示链接文件
软链接文件:它有自己的 inode 值,它的内容是这个文件的链接地址,如果删除原文件,则链接文件失效。
硬链接文件:它只是引用同一个文件,因此它们的 inode 值一致,只是增加了文件的链接数据,当删除源文件时,链接数减1。
要想查看文件,我们需要使用 ls (list)命令
#查看当前所在目录下的内容
[root@localhost ~]# ls
12a  12c  BC1  BC3      Documents  m1  m3         menu02.sh  Music  n72  passwd    Public     test5
12b  12d  BC2  Desktop  Downloads  m2  menu01.sh  menu03.sh  n71    n73  Pictures  Templates  Videos
#查看当前目录下所有内容,包括隐藏文件
[root@localhost ~]# ls -a
.    12b  .bash_history  .bashrc  BC3      .cshrc     Downloads  m1  menu01.sh  Music  n73       Public   Templates  .viminfo
..   12c  .bash_logout   BC1      .cache   Desktop    .lesshst   m2  menu02.sh  n71    passwd    .ssh     test5      .Xauthority
12a  12d  .bash_profile  BC2      .config  Documents  .local     m3  menu03.sh  n72    Pictures  .tcshrc  Videos
#以长列表的格式进行查看
[root@localhost ~]# ls -l
total 4
-rw-r--r--. 1 root   root      0 Jan 25 14:43 12a
-rw-r--r--. 1 root   root      0 Jan 25 14:43 12b
-rw-r--r--. 1 root   root      0 Jan 25 14:43 12c
-rw-r--r--. 1 root   root      0 Jan 25 14:43 12d
-rw-r--r--. 1 root   root      0 Jan 25 14:38 BC1
-rw-r--r--. 1 root   root      0 Jan 25 14:38 BC2
-rw-r--r--. 1 root   root      0 Jan 25 14:38 BC3
drwxr-xr-x. 2 root   root      6 Feb 19 09:08 Desktop
drwxr-xr-x. 2 root   root      6 Feb 19 09:08 Documents
drwxr-xr-x. 2 root   root      6 Feb 19 09:08 Downloads
-rw-r--r--. 1 root   root      0 Jan 25 14:32 m1
-rw-r--r--. 1 root   root      0 Jan 25 14:32 m2
-rw-r--r--. 1 root   root      0 Jan 25 14:32 m3
-rw-r--r--. 1 root   root      0 Jan 25 14:35 menu01.sh
-rw-r--r--. 1 root   root      0 Jan 25 14:35 menu02.sh
-rw-r--r--. 1 root   root      0 Jan 25 14:35 menu03.sh
drwxr-xr-x. 2 root   root      6 Feb 19 09:08 Music
-rw-r--r--. 1 root   root      0 Jan 25 14:34 n71
-rw-r--r--. 1 root   root      0 Jan 25 14:34 n72
-rw-r--r--. 1 root   root      0 Jan 25 14:34 n73
-rw-r--r--. 1 root   root   2400 Jan 25 16:20 passwd
drwxr-xr-x. 2 root   root      6 Feb 19 09:08 Pictures
drwxr-xr-x. 2 root   root      6 Feb 19 09:08 Public
drwxr-xr-x. 2 root   root      6 Feb 19 09:08 Templates
#查看指定目录的内容
[root@localhost ~]# ls -l /dev
total 0
crw-r--r--. 1 root root     10, 235 Feb 21 09:41 autofs
drwxr-xr-x. 2 root root         160 Feb 21 09:41 block
drwxr-xr-x. 2 root root          60 Feb 21 09:41 bsg
lrwxrwxrwx. 1 root root           3 Feb 21 09:41 cdrom -> sr0
drwxr-xr-x. 2 root root        3040 Feb 21 09:41 char
crw--w----. 1 root tty       5,   1 Feb 21 09:41 console
lrwxrwxrwx. 1 root root          11 Feb 21 09:41 core -> /proc/kcore
drwxr-xr-x. 6 root root         120 Feb 21 09:41 cpu
crw-------. 1 root root     10, 124 Feb 21 09:41 cpu_dma_latency
drwxr-xr-x. 8 root root         160 Feb 21 09:41 disk
brw-rw----. 1 root disk    253,   0 Feb 21 09:41 dm-0
brw-rw----. 1 root disk    253,   1 Feb 21 09:41 dm-1
drwxr-xr-x. 2 root root          60 Feb 21 09:41 dma_heap
crw-rw----+ 1 root audio    14,   9 Feb 21 09:41 dmmidi
drwxr-xr-x. 3 root root         100 Feb 21 09:41 dri
#如果只希望查看目录本身而不是目录的内容
[root@localhost ~]# ls -l Documents/
total 0
[root@localhost ~]# ls -l -d Documents/
drwxr-xr-x. 2 root root 6 Feb 19 09:08 Documents/
[root@localhost ~]# ls -ld Documents/
drwxr-xr-x. 2 root root 6 Feb 19 09:08 Documents/
#查看文件的inode值
储存文件元信息的区域就叫做 inode,中文译名为"索引节点"
[root@localhost ~]# ls -lai
total 48
 33554562 dr-xr-x---. 15 root   root   4096 Feb 21 09:42 .
      128 dr-xr-xr-x. 18 root   root    235 Oct 15 19:36 ..
 34762523 -rw-r--r--.  1 root   root      0 Jan 25 14:43 12a
 34762524 -rw-r--r--.  1 root   root      0 Jan 25 14:43 12b
 34776687 -rw-r--r--.  1 root   root      0 Jan 25 14:43 12c
 34776689 -rw-r--r--.  1 root   root      0 Jan 25 14:43 12d
 34762509 -rw-------.  1 root   root   1547 Feb 19 11:49 .bash_history
 36303874 -rw-r--r--.  1 root   root     18 Aug 11  2021 .bash_logout

 [root@localhost ~]# ls -ila /
total 28
      128 dr-xr-xr-x.  18 root root  235 Oct 15 19:36 .
      128 dr-xr-xr-x.  18 root root  235 Oct 15 19:36 ..
 67157107 dr-xr-xr-x.   2 root root    6 Aug 10  2021 afs
    13383 lrwxrwxrwx.   1 root root    7 Aug 10  2021 bin -> usr/bin
      128 dr-xr-xr-x.   5 root root 4096 Oct 15 19:45 boot
我们在使用 ls 命令查看时,我们发现目录下都有两个特殊的目录:
. 表示当前目录
. . 表示上一级目录
如果不是根目录,那么当前目录和上一级目录的 inode 值是不一样的
这说明它们是两个不同的目录;
如果是根目录,则当前目录和上一级目录的 inode 值是一样的,这说明它们两个是同一个目录,因为根目录没有上一级目录,为了程序的完整,所以根目录的上一级目录指向了它自身。
4.2.1 表示普通文件 -
4.2.2 表示目录 d
4.2.3 字符设备文件 c
4.2.4 管道文件 p
4.2.5 块设备文件 b
4.2.6 套接字文件 s
4.2.7 链接文件(分为软链接和硬链接)l
储存文件元信息的区域就叫做inode,中文译名为"索引节点"
软链接文件:它有自己的 inode 值,它的内容是这个文件的链接地址,如果删除原文件,则链接文件失效。
硬链接文件:它只是引用同一个文件,因此它们的 inode 值一致,只是增加了文件的链接数据,当删除源文件时,链接数减1。
4.3 路径切换cd
cd 是 change directory 的简写,切换用户的工作路径。
在Linux中,路径分为绝对路径和相对路径
绝对路径:是以 / 开头的路径,
相对路径:是以当前路径为起点的目标路径
. 表示当前目录
. . 表示上一级目录
pwd:打印当前工作目录的名称
[root@bogon ~]# pwd
/root
[root@bogon ~]# cd /var/log
[root@bogon log]# pwd
/var/log
[root@bogon log]# cd ..  #切换到上级目录
[root@bogon var]# pwd
/var

[root@bogon var]# cd /usr/local/etc
[root@bogon etc]# ls
[root@bogon etc]# pwd
/usr/local/etc
[root@bogon etc]# cd ../../  #切换到 /usr 目录下
[root@bogon usr]# pwd
/usr
# cd - 会在最近两个目录之间来回切换
[root@bogon usr]# cd -
/usr/local/etc
[root@bogon etc]# cd -
/usr
[root@bogon usr]# cd -
/usr/local/etc
[root@bogon etc]# cd -
/usr
# 如果只写 cd ,不带参数,则表示切换到 root 用户的家目录
[root@bogon usr]# cd
[root@bogon ~]#
# cd ~ 也会切换到当前用户所在的家目录
[root@bogon ~]# cd ~
[root@bogon ~]#
4.4普通文件管理
4.4.1 创建文件
创建文件可以有以下几种方式:
- 使用 touch 命令
- 使用重定向符
- vi或vim命令
4.4.1.1 touch
touch 是用于 创建一个空的文件
如果创建的文件不存在则创建
如果存在则 更新文件的元数据 ,但是创建时间不变。
选项说明:
-a :改变文件 访问时间, 即,atime(access time)
-m:改变文件 修改时间, 即,mtime(modify time)
-c:修改文件元数据的时间(元数据:描述数据的数据),即 ctime(change time)
touch 是用于 创建一个空的文件
如果存在则 更新文件的元数据,但是创建时间不变。
[root@localhost ~]# touch a.txt

# 查看这个文件的元数据信息,使用 stat 命令来查看
[root@localhost ~]# stat a.txt
  File: a.txt
  Size: 0         	Blocks: 0          IO Block: 4096   regular empty file
Device: fd00h/64768d	Inode: 34762516    Links: 1
Access: (0644/-rw-r--r--)  Uid: (    0/    root)   Gid: (    0/    root)
Context: unconfined_u:object_r:admin_home_t:s0
Access: 2024-02-21 11:42:25.552932073 +0800
Modify: 2024-02-21 11:42:25.552932073 +0800
Change: 2024-02-21 11:42:25.552932073 +0800
 Birth: 2024-02-21 11:42:25.552932073 +0800

[root@localhost ~]# touch a.txt
[root@localhost ~]# stat a.txt
  File: a.txt
  Size: 0         	Blocks: 0          IO Block: 4096   regular empty file
Device: fd00h/64768d	Inode: 34762516    Links: 1
Access: (0644/-rw-r--r--)  Uid: (    0/    root)   Gid: (    0/    root)
Context: unconfined_u:object_r:admin_home_t:s0
Access: 2024-02-21 11:45:43.123726570 +0800
Modify: 2024-02-21 11:45:43.123726570 +0800
Change: 2024-02-21 11:45:43.123726570 +0800
 Birth: 2024-02-21 11:42:25.552932073 +0800
touch 是用于创建一个 空的文件 ,如果存在则 更新文件的元数据,但是创建时间不变。
Access: 2024-02-21 11:42:25.552932073 +0800 表示访问文件的时间

Modify: 2024-02-21 11:42:25.552932073 +0800 表示文件内容的修改时间

Change: 2024-02-21 11:42:25.552932073 +0800 表示文件元数据的修改时间

 Birth: 2024-02-21 11:42:25.552932073 +0800 表示文件的创建时间
创建多个文件:
[root@localhost ~]# touch file{1..4}
[root@localhost ~]# ls
a.txt  file1  file2  file3  file4
[root@localhost ~]# touch file{11,12,13}
[root@localhost ~]# ls
a.txt  file1  file11  file12  file13  file2  file3  file4
4.4.1.2 echo
这个命令的作用是将它的 参数显示在终端 上。
# 显示123
[root@localhost ~]# echo 123
123
# 显示 aaa
[root@localhost ~]# echo aa
aa
# 显示变量$USER的内容
[root@localhost ~]# echo $USER
root
# 显示变量$PWD的内容
[root@localhost ~]# echo $PWD
/root
4.4.1.3 重定向
数据流向:输入和输出。
标准输入:在默认情况下,标准输入是从键盘或鼠标中获取输入的内容。

标准输出:在默认情况下,标准输出是将命令执行后的正确结果传到终端(屏幕)上。

标准错误输出:将命令执行后的错误信息输出到屏幕或文件中。
输入是使用 < 来表示
输出是使用 > 或 >> 来表示:
>:表示覆盖的形式来输出内容
>>:表示是追加的形式来输出内容
标准输入的数字代码为 0,标准输出的数字代码为 1,标准错误输出的数字代码为 2。
通过 echo 加上重定向来创建文件。
# 将当前日期写入到 date.txt 文件中
[root@localhost ~]# date 1> date.txt		# 注意1和>之间不要有空格,它表示将命令执行后的结果输出到指定文件中
[root@localhost ~]# cat date.txt
Wed Feb 21 02:25:36 PM CST 2024

[root@localhost ~]# echo hello >> date.txt
[root@localhost ~]# cat date.txt
Wed Feb 21 02:27:10 PM CST 2024
hello
使用 > 或者 >> 时,如果文件不存在,则会自动把文件创建起来;如果文件存在,则覆盖或追加内容到指定的文件中。
[root@localhost ~]# ls /etc/passwd
/etc/passwd
[root@localhost ~]# ls /etc/passwd >> date.txt
[root@localhost ~]# cat date.txt
Wed Feb 21 02:27:10 PM CST 2024
hello
/etc/passwd

# 查看一个不存在的文件或目录
[root@localhost ~]# ls /aaa
ls: cannot access '/aaa': No such file or directory

# 将正确执行的结果写入到 success.txt 文件中,将执行过程中发生的错误信息写入到 error.txt 文件中
[root@localhost ~]# ls /aaa > success.txt 2>> error.txt
[root@localhost ~]# ls
a.txt  date.txt  error.txt  file1  file11  file12  file13  file2  file3  file4  success.txt
[root@localhost ~]# cat success.txt
[root@localhost ~]# cat error.txt
ls: cannot access '/aaa': No such file or directory
4.4.2 查看文件状态 stat
查看文件的状态(包括创建时间、修改时间、访问时间),可以使用 stat 命令来实现。
4.4.3 浏览文件内容
4.4.3.1 cat 查看文件的所有内容
cat 命令是把一个文件中的内容全部输出,一般使用这个命令来显示小内容的文件。
选项说明:
-b :显示没有空行的行号
-n :显示行号
-A :会在末尾显示 $ 符号
[root@localhost ~]# cat a.txt
hello
redhat
world
hadoop
python
java
linux
# 查看时输出行号
[root@localhost ~]# cat -n a.txt
     1	hello
     2	redhat
     3	world
     4	hadoop
     5	python
     6	java
     7	linux

# 内容中加了空行
[root@localhost ~]# cat a.txt
hello

redhat
world

hadoop
python
java
linux

# 使用 -n 时空行也会标上行号
[root@localhost ~]# cat -n a.txt
     1	hello
     2
     3	redhat
     4	world
     5
     6	hadoop
     7	python
     8	java
     9	linux

# 使用 -b 时空行不会标上行号
[root@localhost ~]# cat -b a.txt
     1	hello

     2	redhat
     3	world

     4	hadoop
     5	python
     6	java
     7	linux

# -A 选项,会在末尾显示 $ 符号
[root@bogon ~]# cat -A /etc/passwd
root:x:0:0:root:/root:/bin/bash$
bin:x:1:1:bin:/bin:/sbin/nologin$
daemon:x:2:2:daemon:/sbin:/sbin/nologin$
4.4.3.2 head 前10行标准输出
将每个FILE的前10行打印到标准输出。如果有多个文件,在每个文件之前加上一个头文件,给出文件名
选项说明:
-c :输出每行的第一个字符
-n :输出指定的行数,默认为 10 行
#使用 head 命令来查看文件前 10 行数据
[root@bogon ~]# head /etc/passwd
root:x:0:0:root:/root:/bin/bash
bin:x:1:1:bin:/bin:/sbin/nologin
daemon:x:2:2:daemon:/sbin:/sbin/nologin
adm:x:3:4:adm:/var/adm:/sbin/nologin
lp:x:4:7:lp:/var/spool/lpd:/sbin/nologin
sync:x:5:0:sync:/sbin:/bin/sync
shutdown:x:6:0:shutdown:/sbin:/sbin/shutdown
halt:x:7:0:halt:/sbin:/sbin/halt
mail:x:8:12:mail:/var/spool/mail:/sbin/nologin
operator:x:11:0:operator:/root:/sbin/nologin
# 使用 -c 选项来查看指定文件的前面指定的几个字符。注意:如果 -c 后面的数字是负数,那么会从
后向前截取。
[root@bogon ~]# head -c 5 /etc/passwd    // 查看前面 5 个字符
root:
[root@bogon ~]# head -c 2 /etc/passwd    // 查看前面 2 个字符
ro

# 使用 -n 选项用于显示指定的行数,默认不指定时是 10 行。注意:如果 -n 选项后面的数字是负数,则会把文件最后指定行去掉后再显示
[root@bogon ~]# head -n 2 /etc/passwd
root:x:0:0:root:/root:/bin/bash
bin:x:1:1:bin:/bin:/sbin/nologin

# 显示前面10行并且带行号
[root@localhost ~]# head /etc/passwd | cat -n
     1	root:x:0:0:root:/root:/bin/bash
     2	bin:x:1:1:bin:/bin:/sbin/nologin
     3	daemon:x:2:2:daemon:/sbin:/sbin/nologin
     4	adm:x:3:4:adm:/var/adm:/sbin/nologin
     5	lp:x:4:7:lp:/var/spool/lpd:/sbin/nologin
     6	sync:x:5:0:sync:/sbin:/bin/sync
     7	shutdown:x:6:0:shutdown:/sbin:/sbin/shutdown
     8	halt:x:7:0:halt:/sbin:/sbin/halt
     9	mail:x:8:12:mail:/var/spool/mail:/sbin/nologin
    10	operator:x:11:0:operator:/root:/sbin/nologin
4.4.3.3 tail 显示文件的最后 10 行数据
选项说明:
-c :显示指定字符
-n :显示指定行数
-f :显示追加内容
#查看密码文件的最后 10 行内容
[root@localhost ~]# tail /etc/passwd
gdm:x:42:42::/var/lib/gdm:/sbin/nologin
cockpit-ws:x:983:982:User for cockpit web service:/nonexisting:/sbin/nologin
cockpit-wsinstance:x:982:981:User for cockpit-ws instances:/nonexisting:/sbin/nologin
gnome-initial-setup:x:981:980::/run/gnome-initial-setup/:/sbin/nologin
rpcuser:x:29:29:RPC Service User:/var/lib/nfs:/sbin/nologin
sshd:x:74:74:Privilege-separated SSH:/usr/share/empty.sshd:/sbin/nologin
chrony:x:980:978:chrony system user:/var/lib/chrony:/sbin/nologin
dnsmasq:x:979:977:Dnsmasq DHCP and DNS server:/var/lib/dnsmasq:/sbin/nologin
tcpdump:x:72:72::/:/sbin/nologin
redhat:x:1000:1000:redhat:/home/redhat:/bin/bash
# 显示文件最后 3 行数据,这就需要使用 -n 选项
[root@bogon ~]# tail -n 3 /etc/passwd
dnsmasq:x:979:977:Dnsmasq DHCP and DNS server:/var/lib/dnsmasq:/sbin/nologin
tcpdump:x:72:72::/:/sbin/nologin
redhat:x:1000:1000:redhat:/home/redhat:/bin/bash

# 在 tail 命令中,指定负数的行数无效,它仍然显示最后指定的行数
[root@bogon ~]# tail -n -3 /etc/passwd
dnsmasq:x:979:977:Dnsmasq DHCP and DNS server:/var/lib/dnsmasq:/sbin/nologin
tcpdump:x:72:72::/:/sbin/nologin
redhat:x:1000:1000:redhat:/home/redhat:/bin/bash

# -n 选项可以省略
[root@bogon ~]# tail -3 /etc/passwd
dnsmasq:x:979:977:Dnsmasq DHCP and DNS server:/var/lib/dnsmasq:/sbin/nologin
tcpdump:x:72:72::/:/sbin/nologin
redhat:x:1000:1000:redhat:/home/redhat:/bin/bash

# -f 选项,用于获取文件中最新的数据,当使用这个选项后,文件会处于阻塞状态,
要退出按 ctrl + C
[root@bogon ~]# tail -f /etc/passwd
tcpdump:x:72:72::/:/sbin/nologin
redhat:x:1000:1000:redhat:/home/redhat:/bin/bash
ab:x:1001:1001::/home/ab:/bin/bash
admin:x:1002:10::/admin:/bin/bash
wang5:x:1003:1003:wang5,1330000:/home/wang5:/bin/bash
zhao6:x:1004:1004::/home/zhao6:/sbin/nologin
haha:x:1008:1008::/home/haha:/bin/bash


^C
[root@bogon ~]#
注意:如果指定的行数是正数,则 -n 选项需要带上;如果指定的行数是负数,则 -n 选项可以省略,行数前面的负号就等价于 -n
4.4.3.4 more 分页显示文件中的内容
[root@bogon ~]# cp /etc/passwd .
[root@bogon ~]# more passwd
root:x:0:0:root:/root:/bin/bash
bin:x:1:1:bin:/bin:/sbin/nologin
daemon:x:2:2:daemon:/sbin:/sbin/nologin
adm:x:3:4:adm:/var/adm:/sbin/nologin
lp:x:4:7:lp:/var/spool/lpd:/sbin/nologin
.
.
.
.
dnsmasq:x:979:977:Dnsmasq DHCP and DNS server:/var/lib/dnsmasq:/sbin/nologin
tcpdump:x:72:72::/:/sbin/nologin
redhat:x:1000:1000:redhat:/home/redhat:/bin/bash
ab:x:1001:1001::/home/ab:/bin/bash
admin:x:1002:10::/admin:/bin/bash
wang5:x:1003:1003:wang5,1330000:/home/wang5:/bin/bash
zhao6:x:1004:1004::/home/zhao6:/sbin/nologin
haha:x:1008:1008::/home/haha:/bin/bash
root:x:0:0:root:/root:/bin/bash
bin:x:1:1:bin:/bin:/sbin/nologin
daemon:x:2:2:daemon:/sbin:/sbin/nologin
adm:x:3:4:adm:/var/adm:/sbin/nologin
--More--(52%)

# 空格向下翻页,q 退出
more 显示到最后会自动退出。
注意:这个命令不能向前翻页。如果希望能够向前翻页,那么我们需要使用 less 命令
4.4.3.5 less 分页显示文件内容
分页显示文件内容,它的功能与 more 相同
可以按 enter 键来向下逐行滚动显示,也可以按空格键来向下翻一页,还可以按 b 键向上翻一页,如果要退出则按 q 键。
[root@localhost ~]# cat /etc/passwd >> passwd
[root@localhost ~]# cat /etc/passwd >> passwd
[root@localhost ~]# less passwd
推荐使用less而不是more来查看大文件的内容,因为 less 功能比more强
4.4.4 过滤文件内容 grep
使用格式:

- 说明:PATTERNS 表示是的要查找的关键字,严格来说应该是要查找的匹配字符
这个命令的功能是在指定的普通文件中查找并显示含有特定字符的行,也可以与管道符一起使用
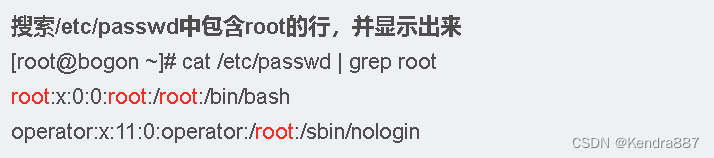
eg. 搜索/etc/passwd中包含root的行,并显示出来
[root@bogon ~]# cat /etc/passwd | grep root
root:x:0:0:root:/root:/bin/bash
operator:x:11:0:operator:/root:/sbin/nologin
效果图应该如下:
# 忽悠查找内容的大小写匹配
[root@localhost ~]# grep -i "root" passwd
Root:x:0:0:root:/root:/bin/bash
operator:x:11:0:operator:/root:/sbin/nologin
root:x:0:0:root:/root:/bin/bash
operator:x:11:0:operator:/root:/sbin/nologin
选项说明:
-c :仅显示找到的行数
-i :忽略大小写
-n :显示行号
-v:反向选择,它只会列出没有关键字的行
-A :-A 2 搜索时显示匹配到的那一行以及以下 2 行
-B :-B 2 搜索时显示匹配到的那一行以及以上 2 行
-C :-C 2 搜索时显示匹配到的那一行以及以上下 2 行
4.4.4.1当PATTERNS是普通字符时
# 1. 需求:在 /etc/passwd 文件中查找含有 root 关键字的所有行
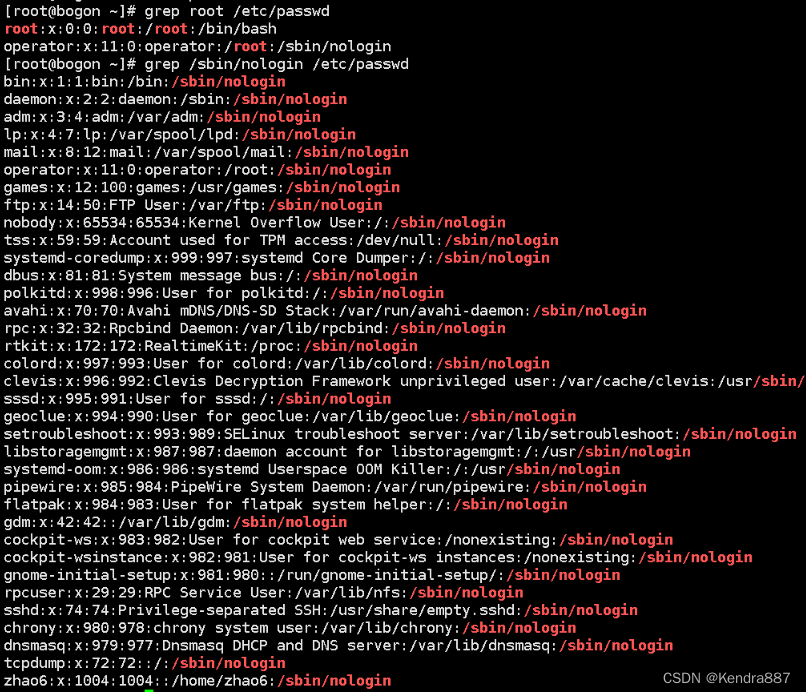
[root@bogon ~]# grep root /etc/passwd
root:x:0:0:root:/root:/bin/bash
operator:x:11:0:operator:/root:/sbin/nologin
# 2. 需求:在 /etc/passwd 文件中查找含有 /sbin/nologin 的所有行
[root@bogon ~]# grep /sbin/nologin /etc/passwd
bin:x:1:1:bin:/bin:/sbin/nologin
daemon:x:2:2:daemon:/sbin:/sbin/nologin
adm:x:3:4:adm:/var/adm:/sbin/nologin
# 3. 需求:在 /etc/passwd 文件中查找不包含有 /sbin/nologin 的所有行
[root@bogon ~]# grep -v /sbin/nologin /etc/passwd
root:x:0:0:root:/root:/bin/bash
sync:x:5:0:sync:/sbin:/bin/sync
shutdown:x:6:0:shutdown:/sbin:/sbin/shutdown
halt:x:7:0:halt:/sbin:/sbin/halt
redhat:x:1000:1000:redhat:/home/redhat:/bin/bash
# 4. 需求:在 /etc/passwd 文件中查找不包含有 /sbin/nologin 的所有行数
[root@bogon ~]# grep -vc /sbin/nologin /etc/passwd
5
# 5. 需求:在 /etc/passwd 文件中查找包含 libstoragemgmt 行及后面的 3 行内容
[root@bogon ~]# grep -A 3 libstoragemgmt /etc/passwd
libstoragemgmt:x:987:987:daemon account for
libstoragemgmt:/:/usr/sbin/nologin
systemd-oom:x:986:986:systemd Userspace OOM Killer:/:/usr/sbin/nologin
pipewire:x:985:984:PipeWire System Daemon:/var/run/pipewire:/sbin/nologin
flatpak:x:984:983:User for flatpak system helper:/:/sbin/nologin
# 6. 需求:在 /etc/passwd 文件中查找包含 libstoragemgmt 行及前面的 3 行内容
[root@bogon ~]# grep -B 3 libstoragemgmt /etc/passwd
sssd:x:995:991:User for sssd:/:/sbin/nologin
geoclue:x:994:990:User for geoclue:/var/lib/geoclue:/sbin/nologin
setroubleshoot:x:993:989:SELinux troubleshoot
server:/var/lib/setroubleshoot:/sbin/nologin
libstoragemgmt:x:987:987:daemon account for
libstoragemgmt:/:/usr/sbin/nologin
# 7. 需求:在 /etc/passwd 文件中查找包含 libstoragemgmt 行及前后的 3 行内容
[root@bogon ~]# grep -C 3 libstoragemgmt /etc/passwd
sssd:x:995:991:User for sssd:/:/sbin/nologin
geoclue:x:994:990:User for geoclue:/var/lib/geoclue:/sbin/nologin
setroubleshoot:x:993:989:SELinux troubleshoot
server:/var/lib/setroubleshoot:/sbin/nologin
libstoragemgmt:x:987:987:daemon account for
libstoragemgmt:/:/usr/sbin/nologin
systemd-oom:x:986:986:systemd Userspace OOM Killer:/:/usr/sbin/nologin
pipewire:x:985:984:PipeWire System Daemon:/var/run/pipewire:/sbin/nologin
flatpak:x:984:983:User for flatpak system helper:/:/sbin/nologin
# 8. 需求:在 /etc/passwd 文件中查找包含 Root 的所有行,不区分大小写
[root@bogon ~]# grep Root /etc/passwd
[root@bogon ~]# grep -i Root /etc/passwd
root:x:0:0:root:/root:/bin/bash
operator:x:11:0:operator:/root:/sbin/nologin
# 9. 需求:在 /etc/passwd 文件中查找包含 Root 的所有行及行号,不区分大小写
[root@bogon ~]# grep -in Root /etc/passwd
1:root:x:0:0:root:/root:/bin/bash
10:operator:x:11:0:operator:/root:/sbin/nologin
效果图应当如下:
注意:-A和-B选项不能同时使用。
4.4.4.2当PATTERNS是特殊符号时
 匹配模式                         说明
grep h 文件名             查找文件里有字符 h 的行
grep ^[q] 文件名          匹配以 q 开头的行
grep ^[qf] 文件名         匹配以 q 或者 f 开头行
grep ^[^qf] 文件名        匹配以 q 或者 f 开头以外的行
grep ^[0-9] 文件名        匹配以数字开头的行
grep h$ 文件名称          匹配以 h 结尾的所有行
grep ^h$ 文件名称         匹配只有 h 的行
使用示例:
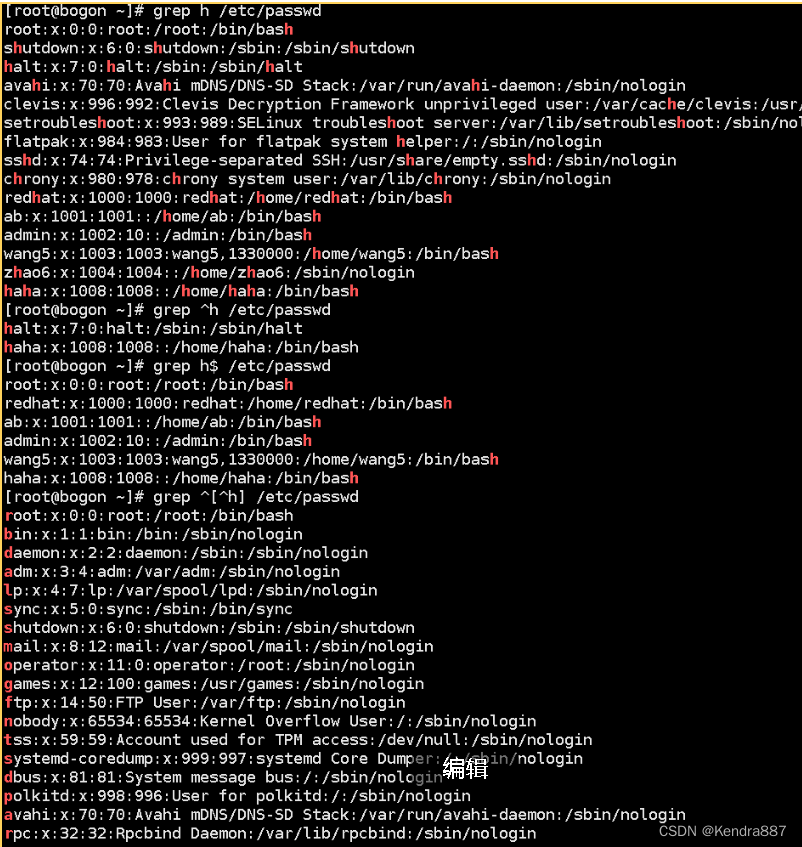
# 1. 需求:在 /etc/passwd 文件中查找包含 h 的行
[root@bogon ~]# grep h /etc/passwd
root:x:0:0:root:/root:/bin/bash
shutdown:x:6:0:shutdown:/sbin:/sbin/shutdown
halt:x:7:0:halt:/sbin:/sbin/halt
avahi:x:70:70:Avahi mDNS/DNS-SD Stack:/var/run/avahi-daemon:/sbin/nologin
clevis:x:996:992:Clevis Decryption Framework unprivileged
user:/var/cache/clevis:/usr/sbin/nologin
setroubleshoot:x:993:989:SELinux troubleshoot
server:/var/lib/setroubleshoot:/sbin/nologin
flatpak:x:984:983:User for flatpak system helper:/:/sbin/nologin
sshd:x:74:74:Privilege-separated SSH:/usr/share/empty.sshd:/sbin/nologin
chrony:x:980:978:chrony system user:/var/lib/chrony:/sbin/nologin
redhat:x:1000:1000:redhat:/home/redhat:/bin/bash
# 2. 需求:在 /etc/passwd 文件中查找以 h 开头的行
[root@bogon ~]# grep ^h /etc/passwd
halt:x:7:0:halt:/sbin:/sbin/halt
# 3. 需求:在 /etc/passwd 文件中查找以 h 结尾的行
[root@bogon ~]# grep h$ /etc/passwd
root:x:0:0:root:/root:/bin/bash
redhat:x:1000:1000:redhat:/home/redhat:/bin/bash
# 4. 需求:在 /etc/passwd 文件中查找以 h 开头的以外所有行
[root@bogon ~]# grep ^[^h] /etc/passwd
root:x:0:0:root:/root:/bin/bash
bin:x:1:1:bin:/bin:/sbin/nologin
daemon:x:2:2:daemon:/sbin:/sbin/nologin
adm:x:3:4:adm:/var/adm:/sbin/nologin
lp:x:4:7:lp:/var/spool/lpd:/sbin/nologin
sync:x:5:0:sync:/sbin:/bin/sync
.......
# 5. 需求:在 /etc/passwd 文件中查找包含数字的所有行
[root@bogon ~]# grep [0-5] /etc/passwd
root:x:0:0:root:/root:/bin/bash
bin:x:1:1:bin:/bin:/sbin/nologin
daemon:x:2:2:daemon:/sbin:/sbin/nologin
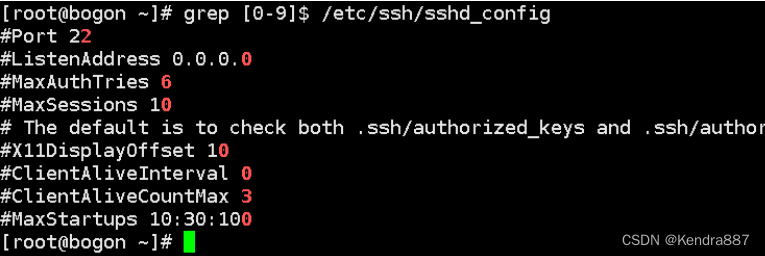
# 6. 需求:在 /etc/ssh/sshd_config 文件中查找以数字结尾的所有行
[root@bogon ~]# grep [0-9]$ /etc/ssh/sshd_config
#Port 22
#ListenAddress 0.0.0.0
#MaxAuthTries 6
#MaxSessions 10
# The default is to check both .ssh/authorized_keys and .ssh/authorized_keys2
#X11DisplayOffset 10
#ClientAliveInterval 0
#ClientAliveCountMax 3
#MaxStartups 10:30:100
效果图如下:
拓展示例:
# 在 /root/passwd 文件中查找以 a 开头的所有行
[root@localhost ~]# grep ^a passwd
adm:x:3:4:adm:/var/adm:/sbin/nologin
avahi:x:70:70:Avahi mDNS/DNS-SD Stack:/var/run/avahi-daemon:/sbin/nologin
adm:x:3:4:adm:/var/adm:/sbin/nologin
avahi:x:70:70:Avahi mDNS/DNS-SD Stack:/var/run/avahi-daemon:/sbin/nologin


# 在 /root/passwd 文件中查找以 h 结尾的所有行
[root@localhost ~]# grep h$ passwd
Root:x:0:0:root:/root:/bin/bash
redhat:x:1000:1000:redhat:/home/redhat:/bin/bash
root:x:0:0:root:/root:/bin/bash
redhat:x:1000:1000:redhat:/home/redhat:/bin/bash

# 在 /etc/ssh/sshd_config 查找所有带有数字的行
[root@localhost ~]# grep -n [0-9] /etc/ssh/sshd_config
1:#	$OpenBSD: sshd_config,v 1.104 2021/07/02 05:11:21 dtucker Exp $
4:# sshd_config(5) for more information.
21:#Port 22
23:#ListenAddress 0.0.0.0
28:#HostKey /etc/ssh/ssh_host_ed25519_key
39:#LoginGraceTime 2m
42:#MaxAuthTries 6
43:#MaxSessions 10
47:# The default is to check both .ssh/authorized_keys and .ssh/authorized_keys2
83:#GSSAPIEnablek5users no
101:#X11Forwarding no
102:#X11DisplayOffset 10
103:#X11UseLocalhost yes
110:#ClientAliveInterval 0
111:#ClientAliveCountMax 3
114:#MaxStartups 10:30:100
127:#	X11Forwarding no
4.4.5 文件内容统计 wc
如果希望统计一个 文件中的字符个数,我们需要使用 wc 命令
选项说明:
-c :统计文件大小
-m :统计字符个数
-w :统计单词个数
-l :统计行数
为了便于演示,我们给 file1 文件添加如下的内容:vim file1
执行这个命令后,按 i 键进行编辑模式,然后输入内容。输入完成后,按 esc 键,然后按 shift + : 来输入 冒号,然后输入 wq 保存,回车退出
hello word
redhat
centos
使用 wc 命令:
[root@bogon ~]# vim file1

hello word
redhat
centos

[root@bogon ~]# wc -lwc file1
3 4 25 file1

# -c 用于统计文件的大小
[root@bogon ~]# wc -c file1
25 file1

# -m 用于统计字符个数
[root@bogon ~]# wc -m file1
25 file1

h e l l o 空格 w o r d 换行 r e d h a t 换行 c e n t o s 换行
共25个字节,一个字符一个字节
# -w 统计文件中单词个数
[root@bogon ~]# wc -w file1
4 file1

# -l 统计文件中行数
[root@bogon ~]# wc -l file1
3 file1
4.4.6 文件显示
4.4.6.1 切割显示 cut
命令cut:按列提取文本内容
选项说明:
-d :指定分隔符,如果是空格需要使用引号引起来
-f :指定第几个字段
-c :指定获取第几个字符
使用示例:
[root@bogon ~]# cat /etc/passwd
root:x:0:0:root:/root:/bin/bash
从上面的显示内容可以发现,passwd 这个文件是通过冒号来进行分割的,一其有七列。
# 1. 需求:查看 /etc/passwd 文件中第1列内容
[root@bogon ~]# cut -d : -f 1 /etc/passwd
root
bin
daemon
adm
# 这个命令解析说明:cut -d 分隔符 -f 要获取的列数 文件
-d :指定分隔符,如果是空格需要使用引号引起来
-f :指定第几个字段
# 2. 需求:查看 /etc/passwd 文件用户家目录所在的列
[root@bogon ~]# head -n 5 /etc/passwd
root:x:0:0:root:/root:/bin/bash
bin:x:1:1:bin:/bin:/sbin/nologin
daemon:x:2:2:daemon:/sbin:/sbin/nologin
adm:x:3:4:adm:/var/adm:/sbin/nologin
lp:x:4:7:lp:/var/spool/lpd:/sbin/nologin
# 从上面的显示内容可以发现,用户的家目录( /root )在第6列
[root@bogon ~]# cut -d : -f 6 /etc/passwd
/root
/bin
/sbin
# 3. 需求:查看 /etc/passwd 文件第1列到第3列的内容
[root@bogon ~]# cut -d : -f 1-3 /etc/passwd
root:x:0
bin:x:1
daemon:x:2
adm:x:3
# 4. 需求:查看 /etc/passwd 文件中第1列和第6列的内容
[root@bogon ~]# cut -d : -f 1,6 /etc/passwd
root:/root
bin:/bin
daemon:/sbin
adm:/var/adm
-c :指定获取第几个字符
# 5. 需求:查看 /etc/passwd 文件中第2列的第4个字符
[root@bogon ~]# head -n 2 /etc/passwd
root:x:0:0:root:/root:/bin/bash
bin:x:1:1:bin:/bin:/sbin/nologin
[root@bogon ~]# cut -c 4 /etc/passwd
t
:
m
:
x
# 6. 需求:查看 /etc/passwd 文件中系列的第1到第4个字符
[root@bogon ~]# cut -c 1-4 /etc/passwd
root
bin:
daem
# 查看 /etc/passwd 文件的第一列内容
[root@localhost ~]# cut -d : -f 1 /etc/passwd
root
bin
daemon
adm
lp
sync
shutdown
halt
mail
operator
games
ftp
nobody
tss
systemd-coredump
.....

# 查看 /etc/passwd 文件中家目录
[root@localhost ~]# cut -d : -f 6 /etc/passwd
/root
/bin
/sbin
/var/adm
/var/spool/lpd
/sbin
/sbin
/sbin
/var/spool/mail
/root
/usr/games
.....

# 查看 /etc/passwd 文件中第一列和第六列的内容
[root@localhost ~]# cut -d : -f 1,6 /etc/passwd
root:/root
bin:/bin
daemon:/sbin
adm:/var/adm
lp:/var/spool/lpd
sync:/sbin
shutdown:/sbin
halt:/sbin
mail:/var/spool/mail
operator:/root
.....

# 查看 /etc/passwd 文件的第一列到第三列的内容
[root@localhost ~]# cut -d : -f 1-3 /etc/passwd
root:x:0
bin:x:1
daemon:x:2
adm:x:3
lp:x:4
sync:x:5
shutdown:x:6
halt:x:7
mail:x:8
operator:x:11
......
4.4.6.2 排序显示 sort
在 Linux 中可以使用 sort 命令来对文本内容进行排序显示
选项说明:
-b:忽略缩进与空格
-f :忽略大小写
-n :以数值型排序
-r :反向排序
-k :指定字段范围
-t :指定间隔符
-u :去除重复行
使用示例:
# 查看 /etc/passwd 文件第 3 列并排序
# 接合 cut 来实现
[root@localhost ~]# cut -d : -f 3 /etc/passwd | sort		# 得到的是自然顺序
[root@localhost ~]# cut -d : -f 3 /etc/passwd | sort -n		# 得到的是数值顺序
[root@localhost ~]# cut -d : -f 3 /etc/passwd | sort -nr	# 得到反序

# 使用 sort 独自实现
[root@localhost ~]# sort -t : -k 3 /etc/passwd
root:x:0:0:root:/root:/bin/bash
redhat:x:1000:1000:redhat:/home/redhat:/bin/bash
operator:x:11:0:operator:/root:/sbin/nologin
bin:x:1:1:bin:/bin:/sbin/nologin
games:x:12:100:games:/usr/games:/sbin/nologin
ftp:x:14:50:FTP User:/var/ftp:/sbin/nologin
rtkit:x:172:172:RealtimeKit:/proc:/sbin/nologin
[root@localhost ~]# sort -t : -k 3 -n /etc/passwd

# 也可以对文件的内容进行排序
[root@localhost ~]# sort /etc/passwd
adm:x:3:4:adm:/var/adm:/sbin/nologin
avahi:x:70:70:Avahi mDNS/DNS-SD Stack:/var/run/avahi-daemon:/sbin/nologin
bin:x:1:1:bin:/bin:/sbin/nologin
4.4.6.3 去重显示 uniq
使用 uniq 命令可以用于去除文本中连续的重复行
选项说明:
-c :可以统计重复行出现的次数
注意:这个命令是去掉文件中重复的内容。只有相邻相同的行才叫重复行,如果是隔开的两个相同行也 不算重复
编辑一个名叫 uniq.txt 的文件:vim uniq.txt
内容如下:
Welcome to openlab.cn
Welcome to openlab.cn
Welcome to openlab.cn
Welcome to openlab.cn
Welcome to openlab.cn
Red Hat certified
Professional guidance
Linux Course
使用示例:
# 文件完整内容
[root@bogon ~]# cat uniq.txt
Welcome to openlab.cn
Welcome to openlab.cn
Welcome to openlab.cn
Welcome to openlab.cn
Welcome to openlab.cn
Red Hat certified
Professional guidance
Linux Course

# 去掉重复行后的内容
[root@bogon ~]# uniq uniq.txt
Welcome to openlab.cn
Red Hat certified
Professional guidance
Linux Course
# 使用 -c 选项后会把重复行的数据统计显示
[root@bogon ~]# uniq -c uniq.txt
5 Welcome to openlab.cn
1 Red Hat certified
1 Professional guidance
1 Linux Course
4.5 编辑文件
4.5.1 数据流
对于数据流来说,可以分为标准输入,标准输出和标准错误输出
标准输入:standard input,简称stdin,默认情况下,标准输入是指从键盘获取的输入内容他的代码为0
标准输出:standard output,简称stdout,默认情况下,标准输出是指命令执行后把正确的信息输出在屏幕上他的代码为1
标准错误输出:standard error output,简称stderr,默认情况下,标准错误输出是指命令执行失败后将错误信息输出在屏幕上,他的代码为2
4.5.2 echo
作用:显示消息或输出其他命令的结果,终端设备上输出字符串或者变量取值后的值
使用格式:echo 字符串,或者 echo $变量名称 。
PS1 常用的参数含义介绍:
\d :表示日期,格式为 weekday month date,如:Sun 11 12
\t :表示时间,格式为 HH:MM:SS,24进制表示
\T : 表示时间,格式为 HH:MM:SS,12进制表示
\H :表示完整的主机名称
\h : 表示取主机名称的第一个名字 \u : 表示当前用户的账号名称
\w :表示完成的工作目录名称,如:/home/redhat/aa/bb
\W : 表示基本的工作目录,即它只会列出最后一个目录 如:bb
\ # : 表示下达的是第几个命令
\ $ : 表示提示符,如果是超级用户,提示符为 #,否则为 $
示例:
[root@bogon ~]# echo 123
123
[root@bogon ~]# echo hello
hello
[root@bogon ~]# echo a1
a1
[root@bogon ~]# echo $PWD //echo $PWD = pwd(获取路径)

/root
[root@bogon ~]# pwd
/root
[root@bogon ~]# echo $pwd
[root@bogon ~]# echo $SHELL
/bin/bash
[root@bogon ~]# echo $PS1 //(大写字母PS,数字1)
[\u@\h \W]\$

[root@bogon ~]# echo hello world > hello.txt
[root@bogon ~]# ls
hello.txt passwd passwd1
[root@bogon ~]# cat hello.txt
hello world
echo $PWD = pwd(获取路径)
4.5.3 重定向
重定向也通常称为重定向操作符,在Linux中,重定向操作符有以下几种:
输出重定向操作符:>、>>
输入重定向操作符:<、<<
对输出重定向操作符中 > 和 >> 的区别是:
[root@bogon ~]# echo 123456 > b.txt
[root@bogon ~]# ls
a.txt b.txt
[root@bogon ~]# cat b.txt
123456
[root@bogon ~]# echo abc > b.txt
[root@bogon ~]# cat b.txt
abc
[root@bogon ~]# echo hello >> b.txt
[root@bogon ~]# cat b.txt
abc
hello
从上面演示的代码可以得到: > 是以 覆盖 的形式来添加内容,而 >> 是以 追加 的形式来添加内容。
严格来说是:将左边命令执行的结果输出到右边的文件中。
对于标准输出的使用示例:
[root@bogon ~]# echo 'word' > c.txt  // 将 word 输入到文件 c.txt 里面去
[root@bogon ~]# cat < c.txt
word
[root@bogon ~]# cat c.txt
word


[root@bogon ~]# cat > d.txt << end
> hello
> end
[root@bogon ~]# cat d.txt
hello

[root@bogon ~]# cat > d.txt << end
> world
> redhat
> openlab
> chenke
> end
[root@bogon ~]# cat d.txt
world
redhat
openlab
chenke

//输入输出重定向符,end开头,end结尾
从上面的演示代码中可以得到: < 是以覆盖的形式来写入内容,而 << 是以追加的形式来写入内容。
4.5.4 vi编辑器
在 windows 中我们有记事本,word 等可视化的文本编辑工具可以使用,但在 Linux 中给我们内置的就只有 vi 编辑器,它的作用就类似于 windows 中的记事本。
在前面我们使用过 vim ,它和 vi 有什么关系?
vim 是 vi 的增强版,它支持关键字变色。(通过演示,发现在 9 版本中 vi 和 vim 的区别不大)
vim 最早发布于 1991 年,它的英文全称为 vi mproved。
使用 vim 来进行文件的编辑(包括创建、修改)。
在Vim编辑器中设置了三种模式:命令模式、末行模式 和 编辑模式
命令模式:
这是 vim 进入后的默认模式。在这个模式下,可以执行如下的命令:
- 光标跳转:
1. 通过上下左右键来进行移动
2. gg 用于回到文件开头(连续按两次 g 键)
3. G 用于回到文件的结尾(shift + g)
4. 将当前光标所在位置移动到行首和行尾按^(行首)和$(行尾)
5. 按单词进行向后移动,按 w,如果希望按单词几前则按 b - 复制:
1. yy表示复制,nyy表示复制 n 行(从光标所以位置向后计算)
2. p表示粘贴所复制的内容 - 删除:
1. u表示撤销当前的操作
2. dd表示删除光标所在行,ndd表示删除从光标所在行向后计算 n 行,dG 表示从当前光标删除后最后,dgg表示从当前光标删除到最前
编辑模式:
编辑模式也叫插入模式,当我们在命令模式下按 aios 或者 AIOS 这几个键时,就会从命令模式转换为编辑模式。
i:表示在将前插入
a:表示在光标后插入
I:表示在非空行前插入
A:表示在非空行后插入
o:表示在光标所在行的下一行插入
O:表示在光标所在行的上一行插入
s:表示删除插入
S:表示删除行插入
末行模式:
- 文档保存并退出 :wq shift+zz
- 文件保存 :w
- 退出 :q :q!
- 另存为 :w 文件路径
- 将指定的文件写入到该文件中 :r 文件路径
- 执行关键字搜索 /输入要搜索的关键字 找到后按 n 向后查找,按 N 向前查找
- 搜索替换 :%s/被替换的关键字/替换的内容/gi g表示全局替换,i表示不区分大小写
- 只替换某一行 :3,12s/root/admin/g 表示替换3到 12 行所有 root 为 admin
- 显示行号 :set nu
- 关闭行号 :set nonu
- 取消高亮 :noh
4.6 链接文件管理
在Linux中,链接文件分为两种:
软链接文件,它也叫符号链接
硬链接文件
创建链接文件的命令是 ln
使用示例:
# 我们为/root/passwd 文件创建一个符号链接,名称为 passwdln
[root@localhost ~]# ln -s /root/passwd passwdln
[root@localhost ~]# ll
total 12
-rw-r--r--. 1 root root   48 Feb 21 15:39 file1
-rw-r--r--. 1 root root    0 Feb 21 11:48 file11
-rw-r--r--. 1 root root    0 Feb 21 11:48 file12
-rw-r--r--. 1 root root    0 Feb 21 11:48 file13
-rw-r--r--. 1 root root    0 Feb 21 11:48 file2
-rw-r--r--. 1 root root    0 Feb 21 11:48 file3
-rw-r--r--. 1 root root    0 Feb 21 11:48 file4
-rw-r--r--. 1 root root 4456 Feb 21 16:18 passwd
lrwxrwxrwx. 1 root root   12 Feb 21 16:23 passwdln -> /root/passwd

# 符号链接文件和原文件的inode 值不一样
[root@localhost ~]# ll -i
total 12
34763139 -rw-r--r--. 1 root root   48 Feb 21 15:39 file1
34762525 -rw-r--r--. 1 root root    0 Feb 21 11:48 file11
34762529 -rw-r--r--. 1 root root    0 Feb 21 11:48 file12
34762530 -rw-r--r--. 1 root root    0 Feb 21 11:48 file13
34762521 -rw-r--r--. 1 root root    0 Feb 21 11:48 file2
34762523 -rw-r--r--. 1 root root    0 Feb 21 11:48 file3
34762524 -rw-r--r--. 1 root root    0 Feb 21 11:48 file4
34762544 -rw-r--r--. 1 root root 4456 Feb 21 16:18 passwd
34762516 lrwxrwxrwx. 1 root root   12 Feb 21 16:23 passwdln -> /root/passwd

# 删除源文件后,符号链接文件不可用
[root@localhost ~]# rm -f passwd
[root@localhost ~]# ll
total 4
-rw-r--r--. 1 root root 48 Feb 21 15:39 file1
-rw-r--r--. 1 root root  0 Feb 21 11:48 file11
-rw-r--r--. 1 root root  0 Feb 21 11:48 file12
-rw-r--r--. 1 root root  0 Feb 21 11:48 file13
-rw-r--r--. 1 root root  0 Feb 21 11:48 file2
-rw-r--r--. 1 root root  0 Feb 21 11:48 file3
-rw-r--r--. 1 root root  0 Feb 21 11:48 file4
lrwxrwxrwx. 1 root root 12 Feb 21 16:23 passwdln -> /root/passwd
[root@localhost ~]# cat passwdln
cat: passwdln: No such file or directory
创建硬链接文件:
[root@localhost ~]# ln /root/passwd passwd1
[root@localhost ~]# ll
total 12
-rw-r--r--. 1 root root   48 Feb 21 15:39 file1
-rw-r--r--. 1 root root    0 Feb 21 11:48 file11
-rw-r--r--. 1 root root    0 Feb 21 11:48 file12
-rw-r--r--. 1 root root    0 Feb 21 11:48 file13
-rw-r--r--. 1 root root    0 Feb 21 11:48 file2
-rw-r--r--. 1 root root    0 Feb 21 11:48 file3
-rw-r--r--. 1 root root    0 Feb 21 11:48 file4
-rw-r--r--. 2 root root 2224 Feb 21 16:26 passwd
-rw-r--r--. 2 root root 2224 Feb 21 16:26 passwd1
# 硬链接文件与源文件的 inode 值相同
[root@localhost ~]# ll -i
total 12
34763139 -rw-r--r--. 1 root root   48 Feb 21 15:39 file1
34762525 -rw-r--r--. 1 root root    0 Feb 21 11:48 file11
34762529 -rw-r--r--. 1 root root    0 Feb 21 11:48 file12
34762530 -rw-r--r--. 1 root root    0 Feb 21 11:48 file13
34762521 -rw-r--r--. 1 root root    0 Feb 21 11:48 file2
34762523 -rw-r--r--. 1 root root    0 Feb 21 11:48 file3
34762524 -rw-r--r--. 1 root root    0 Feb 21 11:48 file4
34762516 -rw-r--r--. 2 root root 2224 Feb 21 16:26 passwd
34762516 -rw-r--r--. 2 root root 2224 Feb 21 16:26 passwd1

# 删除原文件,链接文件也可以用,只是链接数减少
[root@localhost ~]# rm -f passwd
[root@localhost ~]# ll
total 8
-rw-r--r--. 1 root root   48 Feb 21 15:39 file1
-rw-r--r--. 1 root root    0 Feb 21 11:48 file11
-rw-r--r--. 1 root root    0 Feb 21 11:48 file12
-rw-r--r--. 1 root root    0 Feb 21 11:48 file13
-rw-r--r--. 1 root root    0 Feb 21 11:48 file2
-rw-r--r--. 1 root root    0 Feb 21 11:48 file3
-rw-r--r--. 1 root root    0 Feb 21 11:48 file4
-rw-r--r--. 1 root root 2224 Feb 21 16:26 passwd1
[root@localhost ~]# cat passwd1
4.6.1 软链接文件 ln -s
软链接文件也叫符号链接文件,它和原文件一样也是一种文件,它与Windows中的快捷方式功能一样,如果原文件删除,那么所创建(指向)的软链接文件也会被破坏,每一个软链接文件都有自己的node,node是Linux中特殊文件的一种,作为一个文件,它的数据是它所在链接文件的路径。软链接可以跨越文件系统,也可以为目录建立
# 将 /etc/passwd 文件复制到 /root/目录下
[root@bogon ~]# cat /etc/passwd > passwd
[root@bogon ~]# ls
passwd
[root@bogon ~]# ll
total 4
-rw-r--r--. 1 root root 2224 Nov 12 17:06 passwd
# 为 /root/passwd 文件创建软链接文件,文件的名称为 passwdlink
[root@bogon ~]# ln -s /root/passwd passwdlink
# 查询软链接文件
[root@bogon ~]# ll
total 4
-rw-r--r--. 1 root root 2224 Nov 12 17:06 passwd
lrwxrwxrwx. 1 root root 12 Nov 12 17:07 passwdlink -> /root/passwd
# 显示软链接文件对应的文件的内容
[root@bogon ~]# head -n 5 passwdlink
root:x:0:0:root:/root:/bin/bash
bin:x:1:1:bin:/bin:/sbin/nologin
daemon:x:2:2:daemon:/sbin:/sbin/nologin
adm:x:3:4:adm:/var/adm:/sbin/nologin
lp:x:4:7:lp:/var/spool/lpd:/sbin/nologin
# 删除原文件
[root@bogon ~]# rm -f passwd
# 查看链接文件已经无效
[root@bogon ~]# ll
total 0
lrwxrwxrwx. 1 root root 12 Nov 12 17:07 passwdlink -> /root/passwd
# 当原文件被删除后,软链接文件不能再使用了
[root@bogon ~]# head -3 passwdlink
head: cannot open 'passwdlink' for reading: No such file or directory
4.6.2 硬链接文件 ln
硬链接文件是相当于把原文件重新复制一份,它有自己的inode,当移除原文件后,硬链接文件还可以使用
[root@bogon ~]# touch 1.txt //创建一个名为1.txt的空文件
[root@bogon ~]# ls -il
total 8
34993921 -rw-r--r--. 1 root root    0 Nov 12 17:25 1.txt
34990033 -rw-r--r--. 2 root root 2224 Nov 12 17:18 passwd
34990033 -rw-r--r--. 2 root root 2224 Nov 12 17:18 passwd.hard
34993920 lrwxrwxrwx. 1 root root   12 Nov 12 17:19 passwd.lnk -> /root/passwd

[root@bogon ~]# ln -s /root/1.txt 2.txt //创建一个软链接文件
[root@bogon ~]# ls -il
total 8
34993921 -rw-r--r--. 1 root root    0 Nov 12 17:25 1.txt
34993922 lrwxrwxrwx. 1 root root   11 Nov 12 17:25 2.txt -> /root/1.txt
34990033 -rw-r--r--. 2 root root 2224 Nov 12 17:18 passwd
34990033 -rw-r--r--. 2 root root 2224 Nov 12 17:18 passwd.hard
34993920 lrwxrwxrwx. 1 root root   12 Nov 12 17:19 passwd.lnk -> /root/passwd

[root@bogon ~]# ln /root/1.txt 3.txt //创建一个硬链接文件
[root@bogon ~]# ls -il
total 8
34993921 -rw-r--r--. 2 root root    0 Nov 12 17:25 1.txt
34993922 lrwxrwxrwx. 1 root root   11 Nov 12 17:32 2.txt -> /root/1.txt
34993921 -rw-r--r--. 2 root root    0 Nov 12 17:25 3.txt
34990033 -rw-r--r--. 2 root root 2224 Nov 12 17:18 passwd
34990033 -rw-r--r--. 2 root root 2224 Nov 12 17:18 passwd.hard
34993920 lrwxrwxrwx. 1 root root   12 Nov 12 17:19 passwd.lnk -> /root/passwd
[root@bogon ~]#
4.6.3 软链接和硬链接的区别
- 软链接以路径的形式存在,而硬链接是以副本的方式存在,但不占用实际空间(inode 相同)。
- 软链接可以跨文件系统,而硬链接不可以。
- 软链接可以对一个不存在的文件进行创建,而硬链接只能对同一个文件系统中存在的文件进行创建。
- 软链接可以对目录进行链接,而硬链接不允许。
4.6.4 删除链接文件 rm -f
[root@bogon ~]# rm -f 3.txt

# 删除前面创建的软链接文件
[root@bogon ~]# rm -f passwdlink
[root@bogon ~]# ls
4.7 删除文件 rm -f(强制删除)
[root@localhost ~]# rm -f aa a.txt
[root@localhost ~]# ls
date.txt  error.txt  file1  file11  file12  file13  file2  file3  file4  passwd  success.txt
[root@localhost ~]# rm -f *.txt
[root@localhost ~]# ll
total 12
-rw-r--r--. 1 root root   48 Feb 21 15:39 file1
-rw-r--r--. 1 root root    0 Feb 21 11:48 file11
-rw-r--r--. 1 root root    0 Feb 21 11:48 file12
-rw-r--r--. 1 root root    0 Feb 21 11:48 file13
-rw-r--r--. 1 root root    0 Feb 21 11:48 file2
-rw-r--r--. 1 root root    0 Feb 21 11:48 file3
-rw-r--r--. 1 root root    0 Feb 21 11:48 file4
-rw-r--r--. 1 root root 4456 Feb 21 16:18 passwd
4.8复制移动文件
4.8.1复制(拷贝)文件 cp
选项说明:
-a :在拷贝文件的同时保留链接、文件属性
-d :拷贝时保留链接
-f :在覆盖已经存在的目标路径时不提示
-r :递归拷贝
使用示例:
[root@bogon ~]# ls
1.txt  2.txt  3.txt  passwd  passwd.hard  passwd.lnk

#将 3.txt 文件复制到当前目录下,并重命名为33.txt
[root@bogon ~]# cp 3.txt 33.txt
[root@bogon ~]# ls
1.txt  2.txt  33.txt  3.txt  passwd  passwd.hard  passwd.lnk

[root@bogon ~]# mkdir dir1
[root@bogon ~]# ls
1.txt  33.txt  dir1    passwd.hard
2.txt  3.txt   passwd  passwd.lnk

#将 3.txt 文件复制到当前目录下的dir1目录下,并重命名为5.txt
[root@bogon ~]# cp 3.txt dir1/5.txt
[root@bogon ~]# ls dir1
5.txt

[root@bogon ~]# mkdir dir2

# 复制文件但不重命名
[root@bogon ~]# cp 3.txt dir2/
[root@bogon ~]# ls dir2/
3.txt

# 带选项的复制
[root@bogon ~]# cp -a passwd passwd.bak

# 将 /tmp/file1 拷贝到当前目录
[root@bogon ~]# cp /tmp/file1 . //  .(点表示复制到当前目录)
[root@bogon ~]# ls
file1

##把 /root 目录下 所有文件 和 子目录 拷贝到 /a/b/c/d 目录下
[root@bogon ~]# ls /root
aaa.txt          Desktop    Downloads  install.log  Music     Public     Videos
anaconda-ks.cfg  Documents  install.h  install.s    Pictures  Templates

[root@bogon ~]# mkdir -p /a/b
[root@bogon ~]# ls /a
b
[root@bogon ~]# mkdir -p /a/b/c
[root@bogon ~]# ls /a/b
c
[root@bogon ~]# mkdir -p /a/b/c/d
[root@bogon ~]# ls /a/b/c
d
[root@bogon ~]# cp /root /a/b/c/d
cp: -r not specified; omitting directory '/root'
[root@bogon ~]# cp /root /a/b/c/d/
cp: -r not specified; omitting directory '/root'
[root@bogon ~]# cp -r /root /a/b/c/d/
[root@bogon ~]# ls /a/b/c/d
root
[root@bogon ~]# ls /a/b/c/d/root
aaa.txt          Desktop    Downloads  install.log  Music     Public     Videos
anaconda-ks.cfg  Documents  install.h  install.s    Pictures  Templates

 # 复制 /etc/passwd 文件到当前目录下
[root@bogon ~]# cat /etc/passwd > passwd
[root@bogon ~]# ls
passwd
4.8.2 移动或重命名 文件或目录 mv
[root@bogon ~]# ls
1.txt  33.txt  dir1    passwd.bak   passwd.lnk
2.txt  3.txt   passwd  passwd.hard

#以树形形式展开
[root@bogon ~]# tree
.
├── 1.txt
├── 2.txt -> /root/1.txt
├── 33.txt
├── 3.txt
├── dir1
│?? └── 5.txt
├── passwd
├── passwd.bak
├── passwd.hard
└── passwd.lnk -> /root/passwd

1 directory, 9 files

将目录dir1中的2.txt文件移动并重命名至
[root@bogon ~]# mv 2.txt dir1/22.txt
[root@bogon ~]# tree
.
├── 1.txt
├── 33.txt
├── 3.txt
├── dir1
│?? ├── 22.txt -> /root/1.txt
│?? └── 5.txt
├── passwd
├── passwd.bak
├── passwd.hard
└── passwd.lnk -> /root/passwd

1 directory, 9 files
[root@bogon ~]#
mv 命令可以移动文件或目录,它也具有重命名的功能。
将newdir目录改名为new
[root@bogon ~]# mv newdir new
[root@bogon ~]# ls
file1  file2  file3  filenew  host03  new

[root@localhost ~]# ls
anaconda-ks.cfg  Documents  file1  Pictures  Templates
Desktop          Downloads  Music  Public    Videos
[root@localhost ~]# mv file1 file2
[root@localhost ~]# ls
anaconda-ks.cfg  Documents  file2  Pictures  Templates
Desktop          Downloads  Music  Public    Videos
[root@localhost ~]#
把 /a 目录下 1.txt 改名为 1.c
[root@bogon ~]# ls /a
1.txt  b
[root@bogon ~]# mv /a/1.txt /a/1.c
[root@bogon ~]# ls /a
1.c  b
[root@bogon ~]# ## 4.9查看空间使用情况 du
4.9 查看空间使用情况du
选项说明:
-a :统计磁盘空间占用情况
-s :只统计每个文件的空间占用情况
-h:人类可读格式的打印尺寸(例如:1K 234M 2G)
使用示例:
[root@bogon ~]# du
0 ./.ssh
0 ./.cache/ibus
0 ./.cache/evolution/addressbook/trash
0 ./.cache/evolution
1976 ./.cache/gnome-software/appstream
[root@bogon ~]# du -a
0 ./.ssh
4 ./.bash_logout
4 ./.bash_profile
4 ./.bashrc
4 ./.cshrc
4 ./.tcshrc
4 ./anaconda-ks.cfg
[root@bogon ~]# du -s
229260 .

# 统计指定目录大小
[root@bogon ~]# du -s Videos/
0 Videos/

# 统计指定文件大小
[root@bogon ~]# du -s nohup.out
8 nohup.out
[root@bogon ~]# du -s grafana-enterprise-10.2.0-1.x86_64.rpm
105612 grafana-enterprise-10.2.0-1.x86_64.rpm
[root@bogon ~]# du -hs grafana-enterprise-10.2.0-1.x86_64.rpm
104M grafana-enterprise-10.2.0-1.x86_64.rpm

# 人类可读格式的打印尺寸(例如:1K 234M 2G)
[root@localhost ~]# du /tmp
0	/tmp/.X11-unix
0	/tmp/.ICE-unix
0	/tmp/.XIM-unix
0	/tmp/.font-unix
0	/tmp/systemd-private-1d55ed69d3644fdaa2b2940ac47be25b-dbus-broker.service-P7VqHJ/tmp
0	/tmp/systemd-private-1d55ed69d3644fdaa2b2940ac47be25b-dbus-broker.service-P7VqHJ
0	/tmp/systemd-private-1d55ed69d3644fdaa2b2940ac47be25b-chronyd.service-ViE8lo/tmp
0	/tmp/systemd-private-1d55ed69d3644fdaa2b2940ac47be25b-chronyd.service-ViE8lo
0	/tmp/systemd-private-1d55ed69d3644fdaa2b2940ac47be25b-rtkit-daemon.service-R2Ug69/tmp
0	/tmp/systemd-private-1d55ed69d3644fdaa2b2940ac47be25b-rtkit-daemon.service-R2Ug69
0	/tmp/systemd-private-1d55ed69d3644fdaa2b2940ac47be25b-switcheroo-control.service-nZ44Dx/tmp
0	/tmp/systemd-private-1d55ed69d3644fdaa2b2940ac47be25b-switcheroo-control.service-nZ44Dx
0	/tmp/systemd-private-1d55ed69d3644fdaa2b2940ac47be25b-systemd-logind.service-kHey4O/tmp
0	/tmp/systemd-private-1d55ed69d3644fdaa2b2940ac47be25b-systemd-logind.service-kHey4O
0	/tmp/systemd-private-1d55ed69d3644fdaa2b2940ac47be25b-upower.service-pJEtdK/tmp
0	/tmp/systemd-private-1d55ed69d3644fdaa2b2940ac47be25b-upower.service-pJEtdK
0	/tmp/vmware-root_875-4022308853
0	/tmp/systemd-private-1d55ed69d3644fdaa2b2940ac47be25b-ModemManager.service-SgZDgt/tmp
0	/tmp/systemd-private-1d55ed69d3644fdaa2b2940ac47be25b-ModemManager.service-SgZDgt
0	/tmp/systemd-private-1d55ed69d3644fdaa2b2940ac47be25b-power-profiles-daemon.service-PfwZnx/tmp
0	/tmp/systemd-private-1d55ed69d3644fdaa2b2940ac47be25b-power-profiles-daemon.service-PfwZnx
0	/tmp/systemd-private-1d55ed69d3644fdaa2b2940ac47be25b-colord.service-aZ0MsY/tmp
0	/tmp/systemd-private-1d55ed69d3644fdaa2b2940ac47be25b-colord.service-aZ0MsY
0	/tmp/systemd-private-1d55ed69d3644fdaa2b2940ac47be25b-fwupd.service-MsMrLt/tmp
0	/tmp/systemd-private-1d55ed69d3644fdaa2b2940ac47be25b-fwupd.service-MsMrLt
8	/tmp

[root@localhost ~]# du -h /tmp
0	/tmp/.X11-unix
0	/tmp/.ICE-unix
0	/tmp/.XIM-unix
0	/tmp/.font-unix
0	/tmp/systemd-private-1d55ed69d3644fdaa2b2940ac47be25b-dbus-broker.service-P7VqHJ/tmp
0	/tmp/systemd-private-1d55ed69d3644fdaa2b2940ac47be25b-dbus-broker.service-P7VqHJ
0	/tmp/systemd-private-1d55ed69d3644fdaa2b2940ac47be25b-chronyd.service-ViE8lo/tmp
0	/tmp/systemd-private-1d55ed69d3644fdaa2b2940ac47be25b-chronyd.service-ViE8lo
0	/tmp/systemd-private-1d55ed69d3644fdaa2b2940ac47be25b-rtkit-daemon.service-R2Ug69/tmp
0	/tmp/systemd-private-1d55ed69d3644fdaa2b2940ac47be25b-rtkit-daemon.service-R2Ug69
0	/tmp/systemd-private-1d55ed69d3644fdaa2b2940ac47be25b-switcheroo-control.service-nZ44Dx/tmp
0	/tmp/systemd-private-1d55ed69d3644fdaa2b2940ac47be25b-switcheroo-control.service-nZ44Dx
0	/tmp/systemd-private-1d55ed69d3644fdaa2b2940ac47be25b-systemd-logind.service-kHey4O/tmp
0	/tmp/systemd-private-1d55ed69d3644fdaa2b2940ac47be25b-systemd-logind.service-kHey4O
0	/tmp/systemd-private-1d55ed69d3644fdaa2b2940ac47be25b-upower.service-pJEtdK/tmp
0	/tmp/systemd-private-1d55ed69d3644fdaa2b2940ac47be25b-upower.service-pJEtdK
0	/tmp/vmware-root_875-4022308853
0	/tmp/systemd-private-1d55ed69d3644fdaa2b2940ac47be25b-ModemManager.service-SgZDgt/tmp
0	/tmp/systemd-private-1d55ed69d3644fdaa2b2940ac47be25b-ModemManager.service-SgZDgt
0	/tmp/systemd-private-1d55ed69d3644fdaa2b2940ac47be25b-power-profiles-daemon.service-PfwZnx/tmp
0	/tmp/systemd-private-1d55ed69d3644fdaa2b2940ac47be25b-power-profiles-daemon.service-PfwZnx
0	/tmp/systemd-private-1d55ed69d3644fdaa2b2940ac47be25b-colord.service-aZ0MsY/tmp
0	/tmp/systemd-private-1d55ed69d3644fdaa2b2940ac47be25b-colord.service-aZ0MsY
0	/tmp/systemd-private-1d55ed69d3644fdaa2b2940ac47be25b-fwupd.service-MsMrLt/tmp
0	/tmp/systemd-private-1d55ed69d3644fdaa2b2940ac47be25b-fwupd.service-MsMrLt
8.0K	/tmp
4.10 压缩和解压缩
在Linux中,压缩文件的命令有以下几种:
-
zip,对应的解压命令为 unzip
-
gzip,对应解压命令为 gunzip
-
bzip2,它对应的解压命令为 bunzip2
4.10.1 zip和unzip
4.10.1.1 zip
zip可以压缩文件和目录
选项说明:
-r:把指定目录下的所有内容压缩到文件中、递归压缩目录下的所有文件内容到一已知的压缩文件中
-m:把某些文件再次添加到已经存在的压缩文件中
-d:把压缩文件中某些文件删除
 将当前目录下的所有文件压缩为 my.zip 文件
[root@localhost ~]# zip my.zip ./*
adding: 1.txt (stored 0%)
adding: 2.txt (stored 0%)
adding: 3.txt (stored 0%)
adding: a.txt (stored 0%)
adding: b.txt (stored 0%)
adding: file1 (stored 0%)
adding: file2 (stored 0%)
adding: file3 (stored 0%)
adding: install.h (stored 0%)
adding: install.log (deflated 46%)
[root@localhost ~]# ls
1.txt 2.txt 3.txt a.txt b.txt file1 file2 file3 install.h
install.log my.zip
# 指定最高的压缩率
[root@localhost ~]# zip -9 txt.zip 1.txt 2.txt
adding: 1.txt (stored 0%)
adding: 2.txt (stored 0%)
# 准备工作
[root@localhost ~]# mkdir hello/world
[root@localhost ~]# echo hello > hello/a.txt
[root@localhost ~]# echo world > hello/world/b.txt
[root@localhost ~]# tree hello
hello
├── a.txt
└── world
└── b.txt

# 使用 -r 选项来递归压缩hello目录下的所有文件内容到 hello.zip 文件中
[root@localhost ~]# zip -r hello.zip hello/
adding: hello/ (stored 0%)
adding: hello/world/ (stored 0%)
adding: hello/world/b.txt (stored 0%)
adding: hello/a.txt (stored 0%)
[root@localhost ~]# zip hello1.zip hello/
adding: hello/ (stored 0%)
# 注意:如果要想把指定目录下的所有内容压缩到文件中,必须带上 -r 选项。否则只会把目录名称压缩到文件中,而内容没有。


# 如果希望把某些文件再次添加到已经存在的压缩文件中,则需要使用 -m 选项来完成。例如:将
1.txt 和 2.txt 添加到 hello.zip 压缩文件中。
[root@localhost ~]# zip -m hello.zip 1.txt 2.txt
adding: 1.txt (stored 0%)
adding: 2.txt (stored 0%)

# 如果希望把压缩文件中某些文件删除,则可以使用 -d 选项。例如:将 hello.zip 文件中的
2.txt 文件从压缩文件中删除
[root@localhost ~]# zip -d hello.zip 2.txt
deleting: 2.txt

# 如果希望在压缩指定目录下所有文件时,又需要排除一些文件,则可以使用 -x 选项来完成,它的语
法:zip xx.zip 在压缩的文件 -x 要排除的文件
# 例如:将 root 下的所有文件压缩为 root.zip,但排除 3.txt 文件。
[root@localhost ~]# ls
3.txt a.txt b.txt hello hello.zip
[root@localhost ~]# zip root.zip ./* -x 3.txt
adding: a.txt (stored 0%)
adding: b.txt (stored 0%)
adding: hello/ (stored 0%)
adding: hello.zip (stored 0%)
4.10.1.2 unzip
unzip:将 zip 压缩的文件进行解压。
选项说明:
-d:将压缩文件内容解压到指定目录下
-v:查看压缩文件中的内容,而不想解压文件
# 创建目录a
[root@localhost ~]# mkdir a
# 进入到目录a
[root@localhost ~]# cd a
# 将 hello.zip 文件复制到 a 目录下
[root@localhost a]# cp ../hello.zip .
# 查看a目录下的内容
[root@localhost a]# ls
hello.zip
# 将 a 目录下的 hello.zip 文件解压到当前目录
[root@localhost a]# unzip hello.zip
Archive: hello.zip
creating: hello/
creating: hello/world/
extracting: hello/world/b.txt
extracting: hello/a.txt
extracting: 1.txt
# 查看 a 目录下的内容
[root@localhost a]# ls
1.txt hello hello.zip

# 如果希望将压缩文件内容解压到指定目录下,则可以使用 -d 选项来指定目录。例如:将hello.zip
文件的内容解压到 b 目录下。
# 1. 回到上级目录,即 /root 目录下
[root@localhost a]# cd ..
# 2. 在 /root 目录下新建 b 目录
[root@localhost ~]# mkdir b
# 3. 将 hello.zip 文件解压到 b 目录下,注意:需要在命令中带上 -d 选项来指定目录
[root@localhost ~]# unzip hello.zip -d b/
Archive: hello.zip
creating: b/hello/
creating: b/hello/world/
extracting: b/hello/world/b.txt
extracting: b/hello/a.txt
extracting: b/1.txt

# 如果我们只是希望查看压缩文件中的内容,而不想解压文件,则可以使用 -v 选项。例如:查看
root.zip 文件的内容
[root@localhost ~]# unzip -v root.zip
Archive: root.zip
Length Method Size Cmpr Date Time CRC-32 Name
-------- ------ ------- ---- ---------- ----- -------- ----
25 Stored 25 0% 11-19-2023 14:55 db167373 a.txt
25 Stored 25 0% 11-19-2023 14:55 db167373 b.txt
0 Stored 0 0% 11-19-2023 15:49 00000000 hello/
801 Stored 801 0% 11-19-2023 16:02 966e1d03 hello.zip
-------- ------- --- -------
851 851 0% 4 files
4.10.2 gizp和gunzip
这两个命令的作用与 zip和unzip的作用相同,只是 压缩文件的格式 不一样
选项说明:
-d:将文件解压到指定的目录中
# gzip 用于压缩文件
[root@localhost ~]# ls
3.txt a b hello hello.zip root.zip
[root@localhost ~]# gzip 3.txt
[root@localhost ~]# ls
3.txt.gz a b hello hello.zip root.zip
# 注意:使用 gzip 压缩文件后,源文件会被删除

# 如果希望在使用 gzip 压缩文件时,保留源文件,则需要使用 -c 选项。
# 1. 在 /root 目录下新建 1.txt 文件
[root@localhost ~]# touch 1.txt
# 2. 查看 /root 目录下的内容
[root@localhost ~]# ls
1.txt 3.txt.gz a b hello hello.zip root.zip
# 3. 对 1.txt 文件进行 gzip 压缩并保留源文件
[root@localhost ~]# gzip -c 1.txt > 1.txt.gz
# 4. 查看 /root 目录下所有内容
[root@localhost ~]# ls
1.txt 1.txt.gz 3.txt.gz a b hello hello.zip root.zip


# gunzip 用于解压文件
# 将 3.txt.gz 文件解压到当前目录下,解压成功后,压缩文件会被删除
[root@localhost ~]# gunzip 3.txt.gz
[root@localhost ~]# ls
1.txt 1.txt.gz 3.txt a b hello hello.zip root.zip

# 将 1.txt.gz 文件解压到指定的目录中,需要使用 -d 选项
[root@localhost ~]# gunzip 1.txt.gz -d b/
gzip: 1.txt already exists; do you wish to overwrite (y or n)? y
gzip: b/ is a directory -- ignored
[root@localhost ~]# ls b
1.txt hello
4.10.3 bzip2和bunzip2
是更新的 Linux 压缩工具,比 gzip 有着更高的压缩率。
4.10 归档文件 tar
选项说明:
-c:等价于–create,创建一个新的归档文件(压缩文件)
-t:等价于–list,以列表的方式显示归档文件(压缩文件)中的内容,一般会和-v 选项合并使用
-v:等价于–verbose,显示
-x:等价于–extract,–get,作用是解压
-f:等价于–file=ARCHIVE 选项,作用是指定归档文件(压缩文件),此选项必须放到所有选项的最后,后面必须紧跟文件名称
-z:等价于 --gzip,–gunzip,–ungzip,将 zip 文件压缩/解压为归档文件
-C:等价于–directory=DIR,将压缩文件解压到指定的目录下
# 例如:将 /etc/passwd 文件压缩到当前目录下,文件名称为 passwd.tar
[root@localhost ~]# tar -cvf passwd.tar /etc/passwd
tar: Removing leading `/' from member names
/etc/passwd
[root@localhost ~]# tar -cvf tab.tar /etc/passwd /etc/crontab
tar: Removing leading `/' from member names
/etc/passwd
tar: Removing leading `/' from hard link targets
/etc/crontab
[root@localhost ~]# ls
1.txt 2.txt 3.txt passwd.tar txt.tar
1.txt.bak 2.txt.bak 3.txt.bak tab.tar
# 查看
[root@localhost ~]# tar -tvf tab.tar
-rw-r--r-- root/root 2224 2023-10-15 19:52 etc/passwd
-rw-r--r-- root/root 451 2022-03-23 18:19 etc/crontab
# 解压
[root@localhost ~]# tar -xvf tab.tar
etc/passwd
etc/crontab
# 解压到指定的目录下
[root@localhost ~]# mkdir tab
[root@localhost ~]# ls
1.txt 2.txt 3.txt etc tab txt.tar
1.txt.bak 2.txt.bak 3.txt.bak passwd.tar tab.tar
[root@localhost ~]# ls tab
[root@localhost ~]# tar -xvf tab.tar -C tab/
etc/passwd
etc/crontab
[root@localhost ~]# ls tab/
etc
# 将 /etc/passwd 文件压缩为 tar.gz 文件,在命令的选项中指定 -z 选项,来表示要使用 zip
压缩文件
[root@localhost ~]# tar -czvf passwd.tar.gz /etc/passwd
tar: Removing leading `/' from member names
/etc/passwd
[root@localhost ~]# ls
1.txt 1.txt.bak 2.txt 2.txt.bak 3.txt 3.txt.bak etc passwd.tar
passwd.tar.gz tab tab.tar txt.tar

# 解压缩 .tar.gz 的文件
[root@localhost ~]# tar -zxvf passwd.tar.gz
etc/passwd
示例:
# tar 命令的入门

# 1. 文件准备
[root@localhost ~]# touch 1.txt 2.txt 3.txt
[root@localhost ~]# ls
1.txt 2.txt 3.txt

# 2. 压缩文件,将以 .txt 结尾的文件压缩到 txt.tar 文件中
[root@localhost ~]# tar -cf txt.tar *.txt
//-c:等价于--create,创建一个新的归档文件(压缩文件)
//-f:指定归档文件(压缩文件)   #此选项必须放到所有选项的最后,后面必须紧跟文件名称
[root@localhost ~]# ls
1.txt 2.txt 3.txt txt.tar

# 3. 查看压缩文件中的内容
[root@localhost ~]# tar -tvf txt.tar
// -t : 以列表有方式显示规档文件(压缩文件)中的内容,一般会有 -v 选项结合使用
// -v : 等价于 --verbose 选项,作用是显示
-rw-r--r-- root/root 0 2023-11-19 17:08 1.txt
-rw-r--r-- root/root 0 2023-11-19 17:08 2.txt
-rw-r--r-- root/root 0 2023-11-19 17:08 3.txt

# 4. 解压文件,将 txt.tar 压缩文件解压到当前目录下。
[root@localhost ~]# tar -xf txt.tar
4.11 别名文件 alias
别名是命令的快捷方式。对于需要经常执行,并需要很长时间输入的长命令创建快捷方式很有用。
这个命令可以显示别名,也可以指定别名:
# 显示别名
[root@localhost bin]# alias ll
alias ll='ls -l --color=auto'
# 上面的示例表示 ll 命令就是 ls -l 这个命令的别名。

# 定义别名,我们重新把 ll 这个命令定义别名如下:
[root@localhost bin]# alias ll='ls -l'
[root@localhost bin]# openlab
bash: openlab: command not found...
[root@localhost bin]# alias openlab='ls'
[root@localhost bin]# openlab
appletviewer jar javadoc javapackager jconsole jhat jps
jstat orbd rmid servertool wsimport
ControlPanel jarsigner javafxpackager java-rmi.cgi jcontrol jinfo
jrunscript jstatd pack200 rmiregistry tnameserv xjc
extcheck java javah javaws jdb jjs
jsadebugd keytool policytool schemagen unpack200
idlj javac javap jcmd jdeps jmap
jstack native2ascii rmic serialver wsgen
[root@localhost bin]# alias build='mkdir -p'
[root@localhost bin]# build a/b/c/d/e
[root@localhost bin]# tree
.
├── a
│ └── b
│ └── c
│ └── d
│ └── e
4.12 命令历史 history
history 命令可以查阅命令历史记录 ,也可在命令行利用向上或向下光标键来进行查询。
选项说明:
number :显示最近 number 条命令历史
-c :清空当前历史命令
-a [file] :后面没跟文件时,默认将缓冲区中历史命令写入 ~/.bash_history 中
-r [file] :将历史命令文件中的命令读入当前历史命令缓冲区中
-w :将当前历史命令缓冲区命令写入历史命令文件中 ;
[root@localhost ~]# history
1 ip a
2 init 6
[root@node13 ~]# !1 将1871条命令再执行一遍
ip a
[root@node13 ~]# !! 执行上一条命令
五、 目录操作相关命令
5.1 创建目录 mkdir
在 linux 中创建目录需要使用 mkdir 命令
选项说明:
-p:创建多级目录
-v:在创建时显示提示信息
[root@bogon ~]# mkdir /root/dir1
[root@bogon ~]# mkdir dir2
[root@bogon ~]# mkdir dir3/dir4/dir5
mkdir: cannot create directory ‘dir3/dir4/dir5’: No such file or directory
[root@bogon ~]# mkdir -p dir3/dir4/dir5 # 使用 -p 选项可以创建多级目录
[root@bogon ~]# mkdir -v dir4 # 使用 -v 选项可以在创建时显示提示
信息
mkdir: created directory 'dir4'
# 可以同时创建多个目录
[root@bogon ~]# mkdir -pv dir11 dir12 dir13 dir14
mkdir: created directory 'dir11'
mkdir: created directory 'dir12'
mkdir: created directory 'dir13'
mkdir: created directory 'dir14'
# 创建多个目录的另一种写法
[root@bogon ~]# mkdir -pv dir{40..45}
mkdir: created directory 'dir40'
mkdir: created directory 'dir41'
mkdir: created directory 'dir42'
mkdir: created directory 'dir43'
mkdir: created directory 'dir44'
mkdir: created directory 'dir45'
# 创建多个目录的再一种方式
[root@bogon ~]# mkdir -pv my{6,8,10}
mkdir: created directory 'my6'
mkdir: created directory 'my8'
mkdir: created directory 'my10'
注意:在大括号中只能写数字
5.2 查看目录 ls 或 ll
查看目录的命令是 ls 或 ll
选项说明:
-d 选项是显示目录的本身,如果不带 -d 选项则会显示目录的内容
? :表示匹配任意一个字符
*:表示匹配任意多个字符
[ ] : 表示匹配中括号中指定的范围的内容
示例:
@bogon ~]# ls -d dir?
dir1 dir2 dir3 dir4
[root@bogon ~]# ls -d dir??
dir11 dir12 dir13 dir14 dir40 dir41 dir42 dir43 dir44 dir45
[root@bogon ~]# ls -d dir*
dir1 dir11 dir12 dir13 dir14 dir2 dir3 dir4 dir40 dir41 dir42
dir43 dir44 dir45
[root@bogon ~]# ls -d dir[1-3]
dir1 dir2 dir3
说明
不带 -d 选项是显示目录的内容
[root@bogon ~]# ls /

afs          bin   dev  home  lib64  mnt  opt   root  sbin  sys   tmp  var
autorelabel  boot  etc  lib   media  old  proc  run   srv   temp  usr  web
-d 选项是显示目录的本身
[root@bogon ~]# ls -d /
/
5.3 删除目录 rm
选项说明:
-f :表示 强制 删除
-r :表示 递归 删除,一般在删除目录时需要指定这个选项(大R,小 r 都可以)
-d :表示删除 空的目录
-v :表示删除时显示详细的过程
示例:
# 当我们删除一个目录时,它会提示不能删除
[root@bogon ~]# rm show{s,
rm: cannot remove 'show{s,': Is a directory

# 使用 -d 选项来删除一个空目录
[root@bogon ~]# rm -d show{s,
rm: remove directory 'show{s,'? y # 输入 y 来确认删除,如果输入 n 表示不删除

# -f 选项在删除时不会再有确认提示,而是直接删除,所以在使用这个选项时要小心
[root@bogon ~]# rm -df y, # 注意这里的逗号是文件名称的一部分,不是输入的逗号

# 删除多个空目录,多个目录之间用空格隔开
[root@bogon ~]# rm -fd t} my10
# 删除多个目录的另一种写法
[root@bogon ~]# rm -d dir{11..14}
rm: remove directory 'dir11'? y
rm: remove directory 'dir12'? y
rm: remove directory 'dir13'? y
rm: remove directory 'dir14'? y
# 删除多个目录的再一种写法
[root@bogon ~]# rm -df dir[3-4]
rm: cannot remove 'dir3': Directory not empty
[root@bogon ~]# rm -df dir[1-2]

# 在上面执行删除 dir3 时,报不能删除非空目录的错误,我们来查看
这个目录是否为非空目录
[root@bogon ~]# ls dir3
dir4
[root@bogon ~]# tree dir3
dir3
└── dir4
└── dir5
# 通过上面的命令,我们发现 dir3 这个目录确实不是空目录。对于 rm 这个命令来说,
默认只能删除空目录,不能删除非空目录,要想删除非空目录,我们需要带上 -r 选项
来进行递归删除。
[root@bogon ~]# rm -rf dir3 # 强制递归删除 dir3 目录及其内容

# 批量删除,使用通配符 * 来表示删除所有能匹配上的目录
[root@bogon ~]# rm -df dir*
[root@bogon ~]# ls
anaconda-ks.cfg my8
data node_exporter-1.6.1.linuxamd64.tar.gz
Desktop nohup.out
Documents Pictures
Downloads prometheus-2.47.2.linux-amd64.tar.gz
grafana-enterprise-10.2.0-1.x86_64.rpm Public
Music Templates
my6 Videos
5.4 重命名或移动目录 mv
将newdir目录改名为new
[root@bogon ~]# mv newdir new
[root@bogon ~]# ls
file1  file2  file3  filenew  host03  new
5.5 查看空间使用情况 du
选项说明:
-a:统计磁盘空间占用情况
-s:只统计每个文件的空间占用情况
-h:人类可读格式的打印尺寸(例如:1K 234M 2G)
[root@bogon ~]# du
0 ./.ssh
0 ./.cache/ibus
0 ./.cache/evolution/addressbook/trash
0 ./.cache/evolution
1976 ./.cache/gnome-software/appstream
[root@bogon ~]# du -a
0 ./.ssh
4 ./.bash_logout
4 ./.bash_profile
4 ./.bashrc
4 ./.cshrc
4 ./.tcshrc
4 ./anaconda-ks.cfg
[root@bogon ~]# du -s
229260 .

# 统计指定目录大小
[root@bogon ~]# du -s Videos/
0 Videos/

# 统计指定文件大小
[root@bogon ~]# du -s nohup.out
8 nohup.out
[root@bogon ~]# du -s grafana-enterprise-10.2.0-1.x86_64.rpm
105612 grafana-enterprise-10.2.0-1.x86_64.rpm
[root@bogon ~]# du -hs grafana-enterprise-10.2.0-1.x86_64.rpm
104M grafana-enterprise-10.2.0-1.x86_64.rpm

# 人类可读格式的打印尺寸(例如:1K 234M 2G)
[root@localhost ~]# du /tmp
0	/tmp/.X11-unix
0	/tmp/.ICE-unix
0	/tmp/.XIM-unix
0	/tmp/.font-unix
0	/tmp/systemd-private-1d55ed69d3644fdaa2b2940ac47be25b-dbus-broker.service-P7VqHJ/tmp
0	/tmp/systemd-private-1d55ed69d3644fdaa2b2940ac47be25b-dbus-broker.service-P7VqHJ
0	/tmp/systemd-private-1d55ed69d3644fdaa2b2940ac47be25b-chronyd.service-ViE8lo/tmp
0	/tmp/systemd-private-1d55ed69d3644fdaa2b2940ac47be25b-chronyd.service-ViE8lo
0	/tmp/systemd-private-1d55ed69d3644fdaa2b2940ac47be25b-rtkit-daemon.service-R2Ug69/tmp
0	/tmp/systemd-private-1d55ed69d3644fdaa2b2940ac47be25b-rtkit-daemon.service-R2Ug69
0	/tmp/systemd-private-1d55ed69d3644fdaa2b2940ac47be25b-switcheroo-control.service-nZ44Dx/tmp
0	/tmp/systemd-private-1d55ed69d3644fdaa2b2940ac47be25b-switcheroo-control.service-nZ44Dx
0	/tmp/systemd-private-1d55ed69d3644fdaa2b2940ac47be25b-systemd-logind.service-kHey4O/tmp
0	/tmp/systemd-private-1d55ed69d3644fdaa2b2940ac47be25b-systemd-logind.service-kHey4O
0	/tmp/systemd-private-1d55ed69d3644fdaa2b2940ac47be25b-upower.service-pJEtdK/tmp
0	/tmp/systemd-private-1d55ed69d3644fdaa2b2940ac47be25b-upower.service-pJEtdK
0	/tmp/vmware-root_875-4022308853
0	/tmp/systemd-private-1d55ed69d3644fdaa2b2940ac47be25b-ModemManager.service-SgZDgt/tmp
0	/tmp/systemd-private-1d55ed69d3644fdaa2b2940ac47be25b-ModemManager.service-SgZDgt
0	/tmp/systemd-private-1d55ed69d3644fdaa2b2940ac47be25b-power-profiles-daemon.service-PfwZnx/tmp
0	/tmp/systemd-private-1d55ed69d3644fdaa2b2940ac47be25b-power-profiles-daemon.service-PfwZnx
0	/tmp/systemd-private-1d55ed69d3644fdaa2b2940ac47be25b-colord.service-aZ0MsY/tmp
0	/tmp/systemd-private-1d55ed69d3644fdaa2b2940ac47be25b-colord.service-aZ0MsY
0	/tmp/systemd-private-1d55ed69d3644fdaa2b2940ac47be25b-fwupd.service-MsMrLt/tmp
0	/tmp/systemd-private-1d55ed69d3644fdaa2b2940ac47be25b-fwupd.service-MsMrLt
8	/tmp

[root@localhost ~]# du -h /tmp
0	/tmp/.X11-unix
0	/tmp/.ICE-unix
0	/tmp/.XIM-unix
0	/tmp/.font-unix
0	/tmp/systemd-private-1d55ed69d3644fdaa2b2940ac47be25b-dbus-broker.service-P7VqHJ/tmp
0	/tmp/systemd-private-1d55ed69d3644fdaa2b2940ac47be25b-dbus-broker.service-P7VqHJ
0	/tmp/systemd-private-1d55ed69d3644fdaa2b2940ac47be25b-chronyd.service-ViE8lo/tmp
0	/tmp/systemd-private-1d55ed69d3644fdaa2b2940ac47be25b-chronyd.service-ViE8lo
0	/tmp/systemd-private-1d55ed69d3644fdaa2b2940ac47be25b-rtkit-daemon.service-R2Ug69/tmp
0	/tmp/systemd-private-1d55ed69d3644fdaa2b2940ac47be25b-rtkit-daemon.service-R2Ug69
0	/tmp/systemd-private-1d55ed69d3644fdaa2b2940ac47be25b-switcheroo-control.service-nZ44Dx/tmp
0	/tmp/systemd-private-1d55ed69d3644fdaa2b2940ac47be25b-switcheroo-control.service-nZ44Dx
0	/tmp/systemd-private-1d55ed69d3644fdaa2b2940ac47be25b-systemd-logind.service-kHey4O/tmp
0	/tmp/systemd-private-1d55ed69d3644fdaa2b2940ac47be25b-systemd-logind.service-kHey4O
0	/tmp/systemd-private-1d55ed69d3644fdaa2b2940ac47be25b-upower.service-pJEtdK/tmp
0	/tmp/systemd-private-1d55ed69d3644fdaa2b2940ac47be25b-upower.service-pJEtdK
0	/tmp/vmware-root_875-4022308853
0	/tmp/systemd-private-1d55ed69d3644fdaa2b2940ac47be25b-ModemManager.service-SgZDgt/tmp
0	/tmp/systemd-private-1d55ed69d3644fdaa2b2940ac47be25b-ModemManager.service-SgZDgt
0	/tmp/systemd-private-1d55ed69d3644fdaa2b2940ac47be25b-power-profiles-daemon.service-PfwZnx/tmp
0	/tmp/systemd-private-1d55ed69d3644fdaa2b2940ac47be25b-power-profiles-daemon.service-PfwZnx
0	/tmp/systemd-private-1d55ed69d3644fdaa2b2940ac47be25b-colord.service-aZ0MsY/tmp
0	/tmp/systemd-private-1d55ed69d3644fdaa2b2940ac47be25b-colord.service-aZ0MsY
0	/tmp/systemd-private-1d55ed69d3644fdaa2b2940ac47be25b-fwupd.service-MsMrLt/tmp
0	/tmp/systemd-private-1d55ed69d3644fdaa2b2940ac47be25b-fwupd.service-MsMrLt
8.0K	/tmp
六、用户和组管理
6.1 用户和组的分类
6.1.1 用户分类
在Linux中,用于分以下三类:
1.超级用户(root):用于管理操作系统,它的权限极高,一般在创建用户等条件下才会使用,它的编号为0,简单来说,编号为0的用户就是超级用户,当要进行系统管理、维护任务的时候才会使用root账号
2.系统用户:用于系统能够正常运行时所需要的用户,这类用户不是用来登录的,但也不能删除,因为一旦删除,依赖这些用户运行的服务或程序就不能正常执行,会导致系统问题,它的编号在1-999之间
3.普通用户:用于能够让使用者使用Linux系统功能所创建的用户,大多数情况下,都是使用这类用户,它的编号1000-6000之间,日常事务,启动某个软件等,都使用普通用户。
对Linux中的用户类型,我们可以查看 /etc/login.defs 文件
[root@bogon ~]# vim /etc/login.defs
带 # 号的意味着注释掉的
MAIL_DIR         /var/spool/mail       创建用户时给用户所建立的邮箱地址的位置
UMASK            022                   用户的权限掩码
HOME_MODE        0700                  用户的家目录权限

PASS_MAX_DAYS    99999                 用户密码的最大有效期
PASS_MIN_DAYS    0                     用户密码的最小有效期,如果值为0,表示一直有效
PASS_WARN_AGE    7                     用户密码过期时的警告期限,即提前多少天发出警 告信息

UID_MIN          1000                  普通用户的 uid 最小值,即第一个普通用户 uid 值
UID_MAX          60000                 普通用户的 uid 最大值,即最后一个用户的 uid 值

SYS_UID_MIN      201                   系统用户的 uid 最小值
SYS_UID_MAX      999                   系统用户的 uid 最大值
GID_MIN          1000                  普通用户组的 gid 最小值
GID_MAX          60000                 普通用户组的 gid 最大值
SYS_GID_MIN      201                   系统用户组的 gid 最小值
SYS_GID_MAX      999                   系统用户组的 gid 最大值

ENCRYPT_METHOD   SHA512                用户密码的加密算法

USERGROUPS_ENAB  yes                   删除用户时,如果对应的组中还有其他成员,则不
能删除,否则可以删除

CREATE_HOME      yes                   默认在创建用户时,需要创建用户的家目录
6.1.2 用户组分类
在Linux中用户组也分为以下两类:
1.基本组:也叫私有组,它是建立用户时,如果没有指定的用户所属组,则系统自动建立一个与用户名相同名称的组名,这个组就是基本组
2.附加组:也叫公有组,它可容纳多个用户。组中的用户都具有所有组织拥有的权限
注意:一个用户只能有一个基本组,但是可以有零到多个附加组。
6.2 用户和组的配置文件
在Linux中,用户名、密码、用户组和用户密码都是保存在不同的文件配置文件中
/etc/passwd:保存用户账号文件

/etc/shadow:保存用户的密码文件

/etc/group:用于保存用户组的文件

/etc/gshadow:用于保存用户组密码的文件

/etc/skel:用户保存用户家目录文件

/etc/default/useradd:用户定义添加用户的信息文件
6.2.1 /etc/passwd 存储系统中所有用户的基本信息
/etc/passwd文件是系统用户配置文件,存储了系统中所有用户的基本信息,并且所有用户都可以对此文件执行读操作,passwd 是一个文本文件,用于定义系统的用户账号,由于这个文件是所有用户都需要读取的权限,所以文件中只定义该用户的账号,而不保存用户的密码
[root@bogon ~]# ll /etc/passwd
-rw-r--r--. 1 root root 2224 Oct 15 20:09 /etc/passwd

[root@bogon ~]# tail -3 /etc/passwd
dnsmasq:x:979:977:Dnsmasq DHCP and DNS server:/var/lib/dnsmasq:/sbin/nologin
tcpdump:x:72:72::/:/sbin/nologin
redhat:x:1000:1000:redhat:/home/redhat:/bin/bash
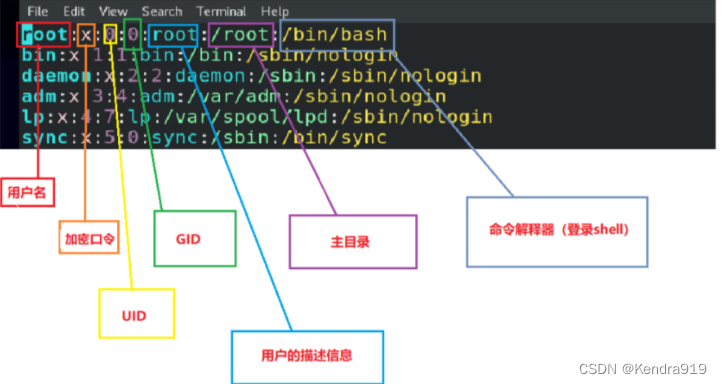
在这个文件中,每一行记录了一个用户信息,而用户信息是以:英文冒号来进行分隔的7个部分组成
root      :    x    :    0    :    0     :  root   : /root       :  /bin/bash
redhat    :    x    :    1000 :    1000  :  redhat : /home/redhat:  /bin/bash
1              2         3         4        5        6              7

1  用户名
2  用户登录密码的占位符,如果为 x 表示有密码,如果为空或 * 表示没有密码
3  用户的 ID,即 uid
4  用户所属组 ID,即 gid
5  用户的个人次数,如果用户的完整名称、地址、办公电话、家庭住址等个人信息
6  用户的家目录
7  用户的默认登录所能使用的 shell 脚本
用户名:密码:UID(用户ID):GID(组ID):描述性信息:主目录:默认Shell
用户名
就是一串代表用户身份的字符串。
用户登录密码的占位符
“x” 表示此用户设有密码,但不是真正的密码,真正的密码保存在 /etc/shadow 文件中
在早期的 UNIX 中,这里保存的就是真正的加密密码串,但由于所有用户都能读取此文件,非常容易造成用户数据被窃取。
现在 Linux 系统把真正的加密密码串放置在 /etc/shadow 文件中,此文件只有 root
用户可以浏览和操作,这样就最大限度地保证了密码的安全。
UID:
UID,也就是用户 ID。每个用户都有唯一的一个 UID,Linux 系统通过 UID 来识别不同的用户。
GID:
全称“Group ID”,简称“组ID”,表示用户初始组的组 ID 号。
描述性信息
这个字段并没有什么重要的用途,只是用来解释这个用户的意义而已。
主目录
也就是用户登录后有操作权限的访问目录,通常称为用户的主目录。例如:root 超级管理员账户的主目录为 /root,普通用户的主目录为 /home/yourIDname,即在 /home/ 目录下建立和用户名相同的目录作为主目录
默认Shell
Shell 就是 Linux 的命令解释器,是用户和 Linux 内核之间沟通的桥梁。Shell 命令解释器的功能就是将用户输入的命令转换成系统可以识别的机器语言。通常情况下,Linux 系统默认的解释器是 bash(/bin/bash),当然还有其他命令解释器,例如 sh、csh 等。
6.2.2 /etc/shadow 保存用户密码
这个文件是用户保存 用户密码的文件,可以通过以下命令来查看这个文件
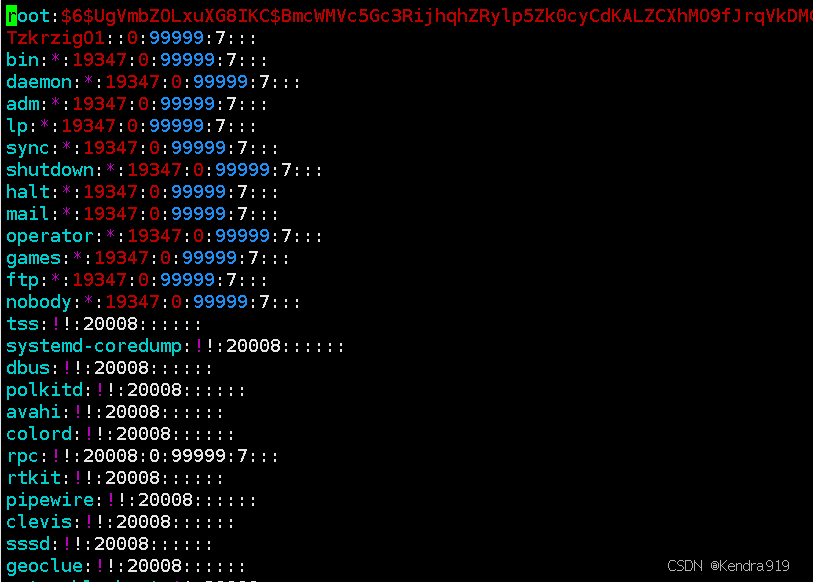
[root@bogon ~]# ll /etc/shadow
----------. 1 root root 1192 Nov  3 22:43 /etc/shadow

[root@bogon ~]# tail -3 /etc/shadow
dnsmasq:!!:19645::::::
tcpdump:!!:19645::::::
redhat:$6$rc5bTNJF.sOd3aBV$COJBcIMOyIGX2cMYSNaWujsCxR1Utj1OAH73cbP0nr6zkdK/KW21TXKp.jwCkoJnqoLf0Kf3pW1qu7cFndoQO0:19645:0:99999:7:::
这个文件每一行记录了一个用户的密码信息,一共有9个字段,分别如下表示:
redhat :
1
**$6$mPvxn$yHk9Lqu5DdB**/30WmRM272dY6GxzFPSmfeUZz/DikNVfYO8tPPTalLnksxcj
7KjU2.4SG MG5HLIWwqK6GqLYwu.    :    19645    :    0    :    99999    :    7    :    :    :
2                                    3             4         5             6      7    8    9

1  用户名,它与 /etc/passwd 文件中第一个字段相同
2  用户的密码,它包括算法、盐和密文。在这个字段中 **$id$** 表示的就是算法(id为1表示 md5加密, id为5表示sha256加密,id为6表示sha512加密)。如果这个字段的值为 !! 则表示账号已被锁定不能 登录,如果这个字段为 * 号表示该用户无须登录
3  最后一次修改密码时间,单位为天,是从 1970 年 1 月 1 日 开始到创建账号时的天数差
4  最小时间间隔,即经过多小天后才可以再次修改密码,单位也是天,如果值为 0,则表示没有限制
5  最大时间间隔,密码经过多少天后必须修改,否则不能登录。默认值为 999999(237年),表示不限制
6  警告时间,在密码失效之前多少天会有提示信息,默认值为 7 天。如果值为 0 表示不限制
7  不活动时间,密码过期后多少天就禁用该账号,0 表示过期后立即失效;-1 表示密码永远不过期;正数 表示往后宽限多少天。
8  密码失效时间,以距离 1970 年 1 月 1 日的天数来表示,如果值为空表示永久可用
9  保留字段,目前暂无使用
6.2.3 /etc/group 储存用户组信息
这个文件中存储的用户组信息
[root@bogon ~]# ll /etc/group
-rw-r--r--. 1 root root 856 Oct 15 20:09 /etc/group

[root@bogon ~]# tail -3  /etc/group
dnsmasq:x:977:
tcpdump:x:72:
redhat:x:1000:
在这个文件中每一行记录一个组信息,使用:英文冒号分隔成4个字段
redhat       :      x     :     1000     :
1                   2            3               4

1 表示组名称
2 表示组的密码占位符,真正的密码保存在 /etc/gshadow 文件中
3 表示组的 id 值
4 表示附加组中的用户列表,以英文逗号分隔,如果为空表示没有附加用户
6.2.4 /etc/gshadow 保存组的密码信息
这个文件是用于保存组的密码信息,存放组群的加密口令,组管理员等信息,只对root用户可读
[root@bogon ~]# ll /etc/gshadow
----------. 1 root root 690 Oct 15 20:09 /etc/gshadow

[root@bogon ~]# tail -3 /etc/gshadow   显示文件最后 3 行数据
dnsmasq:!::
tcpdump:!::
redhat:!::
在这个文件中每一行代表一个组的密码信息,通过:英文冒号分隔成4段
redhat      :     !     :   :
1                 2       3    4

1 组名称,与 /etc/group 文件中第一列相同
2 组密码,如果值为 ! 表示没有密码
3 组管理的用户名,很少使用
4 组中附加用户,也 /etc/group 中第 4 列相同
6.2.5 /etc/skel 用户家目录下的相关隐藏文件
这个文件中记录是用户家目录下的相关隐藏文件。默认情况下,当新创建好一个用户后,会在这个用户 的家目录下新建一个隐藏文件,而这些隐藏文件就是从这个文件中拷贝过来的。
6.2.6 /etc/default/useradd 创建用户的相关信息
在这个文件中记录了创建用户的相关信息
vim /etc/default/useradd

# useradd defaults file
GROUP=100                 这个选项用于建立用户的默认组,它是公有组,而目录使用的是私有组,所以它无效
HOME=/home                用于指定所创建的用户所在的家目录,它是创建普通用户的家目录
INACTIVE=-1               用于指定密码过期的宽限时间,如果值为 -1 表示不限制,它与 /etc/shadow 文件中第 7 个字段对应
EXPIRE=                   用于指定密码的过期时间,它与 /etc/shadow 文件中的第 8 个字段对应,如果值为空表示永久有效
SHELL=/bin/bash           用于指定用户登录后的操作,它与 /etc/passwd 文件中第 7 个字段对应
SKEL=/etc/skel            用于指定用户所在家目录下的隐藏文件的拷贝来源
CREATE_MAIL_SPOOL=yes     用于给新建的用户指定邮箱地址,它 /etc/login.defs 文件中
MAIL_DIR 指向的地址相同
6.2.7 /etc/login.defs

[root@localhost ~]# ll /etc/login.defs
-rw-r--r--. 1 root root 7778 Jul 12  2023 /etc/login.defs
[root@localhost ~]# vim /etc/login.defs
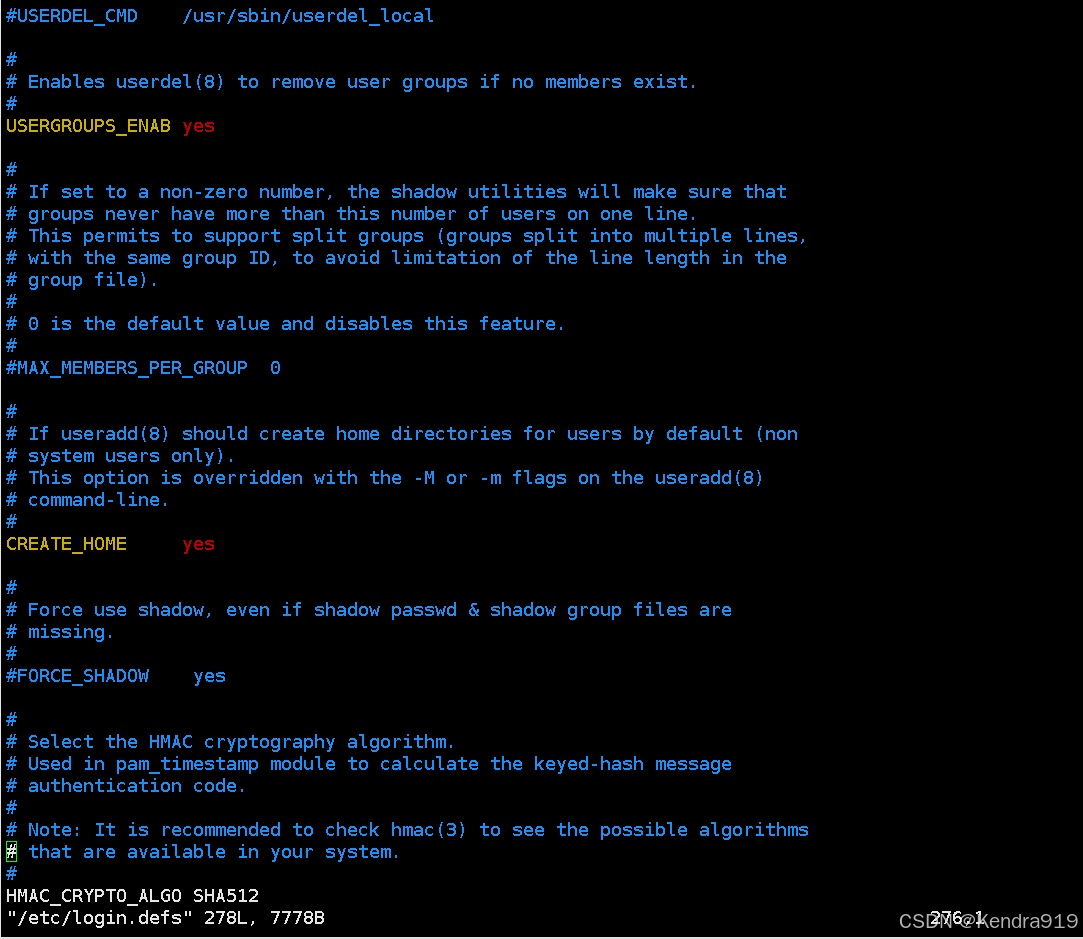
6.2.8 /var/spool/mail
[root@localhost ~]# ll /var/spool/mail
total 0
-rw-rw----. 1 redhat mail 0 Oct 12 14:17 redhat
-rw-rw----. 1 rpc    mail 0 Oct 12 14:06 rpc
[root@localhost ~]# vim /var/spool/mail
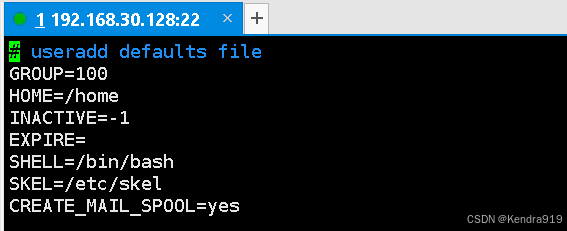
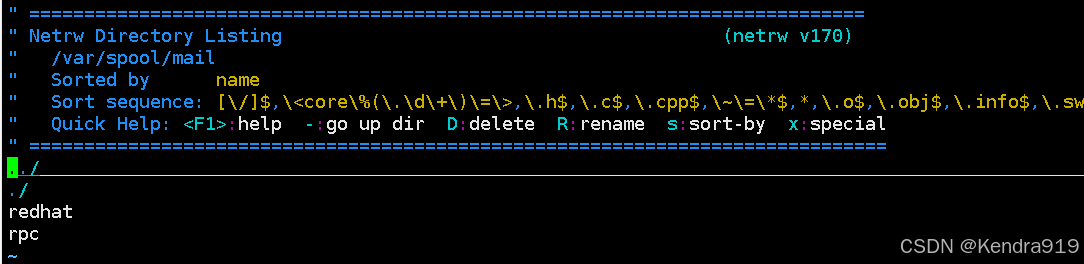
6.3 用户管理*****
6.3.1 添加用户 useradd
添加用户需要使用 useradd
选项说明:
-c:设定与用户相关的说明信息,如:用户的邮箱、电话、真实姓名等,它的值会记录在 /etc/passwd 文件中的第5个字段中
-d:用户指定在创建用户时的家目录,默认情况下是在 /home/用户名目录下
-e:
-f:用户指定密码的宽限期,它的值会记录在 /etc/shadow 文件中的第7个字段中
-g:为所创建的用户指定基本组的 id .如果该组 id 不存在会报错,如果存在则创建成功
-G:为所创建的用户指定附加组的 id .可以指定多个,用逗号分离
-M:在创建用户时不创建用户的家目录,一般用于创建系统用户,创建普通用户时,不指定这个选项
-N:不创建与用户名相同的组名称
-p:指定用户的登录密码
-s:用于指定所创建用户可操作的脚本
-u:设置账号的 uid .默认情况下是已有普通用户的最大值加1后的值
示例1:新建一个用户名叫 zhangsan 的用户。
# 查看 /etc/passwd 文件的最后2行
[root@bogon ~]# tail -2 /etc/passwd
tcpdump:x:72:72::/:/sbin/nologin
redhat:x:1000:1000:redhat:/home/redhat:/bin/bash

# 查看 /etc/shadow 文件最后 2 行
[root@bogon ~]# tail -2 /etc/shadow
tcpdump:!!:19645::::::
redhat:$6$mPvxn$yHk9Lqu5DdB/30WmRM272dY6GxzFPSmfeUZz/DikNVfYO8tPPTalLnksxc
j7K jU2.4SGMG5HLIWwqK6GqLYwu.:19645:0:99999:7:::

# 查看 /etc/group 文件最后 2 行
[root@bogon ~]# tail -2 /etc/group
tcpdump:x:72:
redhat:x:1000:

# 查看 /etc/gshadow 文件最后 2 行
[root@bogon ~]# tail -2 /etc/gshadow
tcpdump:!::
redhat:!::

# 查看 /var/spool/mail 目录信息
[root@bogon ~]# ls /var/spool/mail/
redhat rpc

# 创建 zhangsan 用户
[root@bogon ~]# useradd zhangsan

# 查看 /etc/passwd 文件的最后2行
[root@bogon ~]# tail -2 /etc/passwd
redhat:x:1000:1000:redhat:/home/redhat:/bin/bash
zhangsan:x:1001:1001::/home/zhangsan:/bin/bash

# 查看 /etc/shadow 文件最后 2 行
[root@bogon ~]# tail -2 /etc/shadow
redhat:$6$mPvxn$yHk9Lqu5DdB/30WmRM272dY6GxzFPSmfeUZz/DikNVfYO8tPPTalLnksxc
j7K jU2.4SGMG5HLIWwqK6GqLYwu.:19645:0:99999:7:::
zhangsan:!!:19687:0:99999:7:::

# 查看 /etc/group 文件最后 2 行
[root@bogon ~]# tail -2 /etc/group
redhat:x:1000:
zhangsan:x:1001:

# 查看 /etc/gshadow 文件最后 2 行
[root@bogon ~]# tail -2 /etc/gshadow
redhat:!::
zhangsan:!::

# 查看 /var/spool/mail 目录信息
[root@bogon ~]# ls /var/spool/mail/
redhat rpc zhangsan
总结:从上面创建用户可以看出,当一个用户创建好后,需要在
/etc/passwd、/etc/shadow、/etc/group、/etc/gshadow、/var/spool/mail 以及 /home 等文件
或目录下添加内容。
示例2:新建一个用户名为 list,并指定它的 uid 为1002,登录的shell
[root@bogon ~]# useradd -u 1002 -s /bin/bash -e -1 lisi
示例3:新建一个名为 admin 的账号,并将其家目录指定为 /admin,
[root@bogon ~]# useradd -d /admin -g wheel -G adm,root admin


[root@bogon ~]# useradd -d /admin -g wheel -G adm,root admin

# 查看 /etc/group
[root@bogon ~]# cat /etc/passwd
root:x:0:admin
adm:x:4:admin
.......

# 查看 /etc/gshadow
[root@bogon ~]# cat /etc/gshadow
root:::admin
adm:::admin
.......
示例4:新建一个名为wang5的账号,账号过期时间为2023-12-12,账号
[root@bogon ~]# useradd -e "2023-12-12" -c "wang5,1330000" wang5


[root@bogon ~]# useradd -e "2023-12-12" -c "wang5,133000000" wang5

[root@bogon ~]# tail -1 /etc/passwd
wang5:x:1004:1004:wang5,133000000:/home/wang5:/bin/bash
[root@bogon ~]# tail -1 /etc/shadow
wang5:!!:19687:0:99999:7::19703:
示例5:新建一个名为zhao6的账号,并禁止登录且不创建家目录
[root@bogon ~]# useradd -M -s /sbin/nologin zhao6
6.3.2 修改用户 usermod
修改用户用usermod命令
选项说明:
-l 更改用户的名称,该用户名未登录的情况下才能使用
-L 锁定当前账号,即当前账号不能登录
-U 解锁当前账号,即恢复当前账号登录
-g 强制使用GROUP作为新的主组
uesradd选项都可用
示例1:修改账号 zhangsan 的有效期为 2023-12-20,宽限期为 8 天
[root@bogon ~]# cat /etc/shadow | grep zhangsan
zhangsan:!!:19687:0:99999:7:::

[root@bogon ~]# usermod -e "2023-12-20" -f 8 zhangsan

[root@bogon ~]# cat /etc/shadow | grep zhangsan
zhangsan:!!:19687:0:99999:7:8:19711:
示例2:修改 lisi 的 shell 为 /bin/sh
[root@bogon ~]# cat /etc/passwd | grep lisi
lisi:x:1002:1002::/home/lisi:/bin/bash

[root@bogon ~]# usermod -s /bin/sh lisi

[root@bogon ~]# cat /etc/passwd | grep lisi
lisi:x:1002:1002::/home/lisi:/bin/sh
示例3:将 admin 账号的家目录移至 /home 目录下
[root@bogon ~]# cat /etc/passwd | grep admin
admin:x:1003:10::/admin:/bin/bash

[root@bogon ~]# usermod -d /home admin

[root@bogon ~]# cat /etc/passwd | grep admin
admin:x:1003:10::/home:/bin/bash
示例4:将 wang5 账号修改为 wangwu,并暂停
[root@bogon ~]# usermod -L -l wangwu wang5

[root@bogon ~]# cat /etc/passwd | grep wangwu
wangwu:x:1004:1004:wang5,133000000:/home/wang5:/bin/bash
示例5:将 wangwu 账号解锁
[root@bogon ~]# usermod -U wangwu
6.3.3 修改密码 passwd
当使用 uesradd 命令来添加用户后,该用户还不能登录,因为没有为该用户设置密码 ,只有设置密码后,才可以登录,
选项说明:
-k, --keep-tokens 保持身份验证不过期
-d, --delete 删除账号的密码,也可以删除锁
-l, --lock 锁定当前账号密码
-u, --unlock 解锁当前账号密码
-e, --expire 指定账号的过期时间
-x, --maximum=DAYS 密码最长有效期
-n, --minimum=DAYS 密码最短有效期
-w, --warning=DAYS 密码过期前多少天开始提示
-i, --inactive=DAYS 密码过期后多少天后该账号会被禁用
修改账号的密码有两种方式
交互式:
示例1:修改 wangwu 的密码为 123456
[root@bogon ~]# cat /etc/shadow | grep wangwu
wangwu:!!:19687:0:99999:7::19703:

[root@bogon ~]# passwd wangwu
Changing password for user wangwu.
New password:
BAD PASSWORD: The password is shorter than 8 characters
Retype new password:
passwd: all authentication tokens updated successfully.

[root@bogon ~]# cat /etc/shadow | grep wangwu
wangwu:$6$JgS.UMHSmnkMc/ut$X81Wi9Pebh9uuPuS7KnZMRyGbR4zN3r8DxHxjXLuBurn97
Sg/oz.gP4UudffXNvLgLu/M5usOYnWD0rt14dHm.:19687:0:99999:7::19703:
#注意:在指定密码时,直接输入密码即可,因为没有提示信息
非交互式:
示例2:修改 lisi 的密码为 123456
[root@bogon ~]# echo 123456 | passwd --stdin lisi
Changing password for user lisi.
passwd: all authentication tokens updated successfully.
6.3.4 删除用户 userdel
选项说明:
-r 在删除账号的同时删除家目录和邮箱目录
示例1:删除 zhangsan,但保留家目录和邮件目录
[root@bogon ~]# ls /home
20_pass.txt lisi redhat wang5 zb zhangsan

[root@bogon ~]# ls /var/spool/mail/
admin lisi redhat rpc wangwu zhangsan zhao6 zhao7

# 删除zhangsan 用户
[root@bogon ~]# userdel zhangsan

[root@bogon ~]# ls /var/spool/mail/
admin lisi redhat rpc wangwu zhangsan zhao6 zhao7

[root@bogon ~]# ls /home
20_pass.txt lisi redhat wang5 zb zhangsan

[root@bogon ~]# cat /etc/passwd | grep zhangsan
示例2:删除 zhao6,同时删除家目录和邮件目录
[root@bogon ~]# ls /var/spool/mail/
admin lisi redhat rpc wangwu zhangsan zhao6 zhao7

[root@bogon ~]# userdel -r zhao6
[root@bogon ~]# userdel -r zhao7

[root@bogon ~]# ls /var/spool/mail/
admin lisi redhat rpc wangwu zhangsan
[root@bogon ~]#
6.3.5 用户提议 sudo
大部分情况下,我们都是在使用普通用户来进行管理操作,如果这个普通用户想查看超级用户的某些权限,此时就需要对这个普通用户进行提权(提升权利)
CSDN首页

消息
简单使用Linux
9 / 100

我们以查看/roo目录下的所有文件的详细信息为例,来说明普通权限。total 4在上面的命令输出结果中包括了如下部分:-rw-r--r--10Dec3   20:28   aa1这个部分包括文件类型、所属者权限、所属组权限、其它人权限、控制列表权限2文件的链接数3文件所属者,即文件的创建者4文件所属组5文件的大小,单位为字节6文件的最后一次修改时间7文件名目录名称接下来我们重点来说第一个部分,即:1:表示文件的类型普通文件d目录l。
218/256
共 192438 字
快捷键:Ctrl/⌘ + Y 或点击此键回退撤销操作
历史

发布文章
创作助手
创作活动


TypeScript
# 从 root 用户切换到 lisi 这个普通用户
[root@bogon ~]# su -l lisi
[lisi@bogon ~]$
# 使用lisi来查看/root目录,发现没有查看权限
[lisi@bogon ~]$ ls -l /root
ls: cannot open directory '/root': Permission denied

# 使用 sudo 来提升 lisi 的权限,以便于能够查看 /root 目录,但提示在 sudoers 文件中没有
lisi 这个账号的信息,无法实现这个功能
[lisi@bogon ~]$ sudo -u lisi ls -l /root
lisi is not in the sudoers file. This incident will be reported.
换句说话,要想 lisi 拥有 root 用户的某些权限,我们就需要把 lisi 这个账号添加到 /etc/sudoers 这个文 件中。
vim /etc/sudoers

然后在这个文件中添加如下内容

## Allow root to run any commands anywhere
root            ALL=(ALL)          ALL
lisi            ALL=(ALL)          ALL
1                2    3             4
[lisi@bogon ~]$ sudo -u root ls -l /root
We trust you have received the usual lecture from the local System
Administrator. It usually boils down to these three things:
  #1) Respect the privacy of others.
  #2) Think before you type.
  #3) With great power comes great responsibility.

[sudo] password for lisi:
Sorry, try again.
[sudo] password for lisi:
total 12
-rw-r--r--. 1 root root 44 Nov 22 19:31 a
-rw-r--r--. 1 root root 365 Nov 22 19:12 access.log
drwxr-xr-x. 4 root root 34 Nov 19 20:42 mydir
-rw-r--r--. 1 root root 19 Nov 22 19:24 num
1 表示要对那一个账号提权
2 ALL 表示任意的主机名
3 ALL 表示任意的用户
4 ALL 表示任意的指令
注意:输入的是当前登录用户的密码,而不是 root 用户的密码。
如果希望 lisi 只能执行 ls 命令时才会提权,则在 /etc/sudoers 文件中配置如下:
## Allow root to run any commands anywhere
root        ALL=(ALL)       ALL
lisi          ALL=(ALL)     /bin/ls
也就是对第三个 ALL 的地方修改为需要执行的命令的绝对路径即可。
除了对用户可以提权以外,还可以对组进行提权。当对组进行提权后,那么这个组下的所有用户都拥有了这个提权的功能。配置如下:
## Allows people in group wheel to run all commands
%wheel          ALL=(ALL)          ALL
%lisi           ALL=(ALL)          ALL
配置好的使用方式与前面的用户提权的使用方式一样。
现有如下问题:
[root@bogon ~]# su -l lisi
[lisi@bogon ~]$ sudo -u root ls /root
[sudo] password for lisi:
a access.log mydir num
发现执行这个命令时,需要输入当前的登录用户的密码,而当前用户已经登录了,为啥还需要再次输入 密码呢?能否省掉?
答案是可以的,我们需要在配置的第三个 ALL 的地方指定不需要密码的配置即可。如下:
[root@bogon ~]# vim /etc/sudoers
## Allow root to run any commands anywhere

root ALL=(ALL) ALL
lisi ALL=(ALL) NOPASSWD: ALL # 添加了 NOPASSWD 的前缀,表示执行命令时不
需要输入密码

[root@bogon ~]# su - lisi
[lisi@bogon ~]$ sudo -u root ls /root
a access.log mydir num
6.4 用户组管理****
6.4.1 添加用户组 groupadd
添加新的组而不是新的用户时,可以用 groupadd 来实现(必须用超级用户)
选项说明:
-g:GID 指定新的用户组的标识号,默认是已有组的最大标识号加1
-r:建立一个系统组账号,与 -g 不能同时使用,他会分配的值是1-999之间
示例1:向系统中添加一个组ID为 1009,组名为 sunqi 的新组
[root@bogon ~]# groupadd -g 1009 sunqi

[root@bogon ~]# tail -3 /etc/group
wang5:x:1004:
zhangsan:x:1007:
sunqi:x:1009:
示例2:创建一个名为 openlab 的组
[root@bogon ~]# groupadd openlab
[root@bogon ~]# tail -3 /etc/group
zhangsan:x:1007:
sunqi:x:1009:
openlab:x:1010:
6.4.2 修改用户组 groupmod
对已存在的组进行修改,
使用格式:
选项说明:
-n:新组名 : 将用户组的名称修改为新组名
示例:将组名为 openlab 修改为 xianoupeng
[root@bogon ~]# groupmod -n xianoupeng openlab
[root@bogon ~]# tail -3 /etc/group
zhangsan:x:1007:
sunqi:x:1009:
xianoupeng:x:1010:
6.4.3 删除用户组 groupdel
示例:删除 xianoupeng
[root@bogon ~]# groupdel xianoupeng
[root@bogon ~]# tail -3 /etc/group
wang5:x:1004:
zhangsan:x:1007:
sunqi:x:1009:

# 删除组名为 lisi 的组,结果发现不能删除,原因在于 lisi 这个组中有 lisi 这个用户存在
[root@bogon ~]# groupdel lisi
groupdel: cannot remove the primary group of user 'lisi'
注意:使用 groupdel 命令来删除组时,只能删除空组。
6.4.4 给组设置密码 gpasswd
选项说明:
-a, --add USER 将用户添加到组中
-d, --delete USER 将用户从组中删除
-r, --delete-password 删除组密码
-R, --restrict 访问组中成员
-M, --members USER,… 将多个用户添加到组
-A, --administrators ADMIN,…给组指派管理员
示例1:给 sunqi 组设置密码为123456
[root@bogon ~]# cat /etc/gshadow | grep sunqi
sunqi:!::


[root@bogon ~]# gpasswd sunqi
Changing the password for group sunqi
New Password:
Re-enter new password:


[root@bogon ~]# cat /etc/gshadow | grep sunqi
sunqi:$6$Ch0pXKZkjA/RQKC.$ybwbiB0awBto7M1yR3DvHG.nk38esR2Uqe6er4ixQIzApBoRMKCtuCTIGyqdgvF1j9oqX71OVaZ60vacRszJw1::
示例2:将 wangwu 添加到 zhangsan 组中去
[root@bogon ~]# gpasswd -a wangwu zhangsan

adding user wangwu to group zhangsan
示例3:将 wangwu 从 zhangsan 删除
[root@bogon ~]# gpasswd -d wangwu zhangsan

Removing user wangwu from group zhagnsan
示例4:将 wangwu 添加到 zhangsan 组中,并设置为组管理员
[root@bogon ~]#  gpasswd -a wangwu zhangsan

Adding user wangwu to group zhangsan

[root@bogon ~]# gpasswd  -A wangwu zhangsan
示例5:将 lisi、sunqi 添加到 zhangsan 组
[root@bogon ~]# gpasswd -M sunqi,lisi zhangsan
示例6:访问 zhangsan 组中的用户
[root@bogon ~]# gpasswd -R zhangsan
示例7:删除 sunqi 组密码
[root@bogon ~]# gpasswd -r sunqi
6.5 查看用户和组 id
可以通过 id 命令来查看用户和组的信息
// 查看用户的详细信息
[root@bogon ~]# id wang5
uid=1003(wang5) gid=1003(wang5) groups=1003(wang5)
// 查看用户组的信息
[root@bogon ~]# groups wang5
wang5 : wang5
6.6 查看用户登录
6.6.1 查看当前系统登录用户 user
这个命令用来查看当前系统的登录用户
[root@bogon ~]# users
root
[root@bogon ~]# su -l lisi
[lisi@bogon ~]$ users
root
6.6.2 目前与过去登录到系统中的用户相关信息 last
列出目前与过去登录到系统中的用户相关信息,该命令默认读取 /var/log/wtmp 文件,并
# 显示最近登录的两条信息
[root@bogon ~]# last -2
lisi          pts/1          192.168.72.1       Sun Nov 26 21:00    still logged in
root        pts/0          192.168.72.1       Sun Nov 26 19:31    still logged in

wtmp begins Sun Oct 15 19:45:11 2023

# 直接显示 /var/log/wtmp 文件中的最近 4 条登录信息
[root@bogon ~]# last -f /var/log/wtmp -n 4
lisi           pts/1                192.168.72.1          Sun Nov 26 21:00     still logged in
root         pts/0                192.168.72.1          Sun Nov 26 19:31     still logged in
reboot    system boot    5.14.0-284.11.1.     Sun Nov 26 19:31     still running
root         pts/1                192.168.72.1          Sun Nov 26 15:15 - 16:03 (00:48)

wtmp begins Sun Oct 15 19:45:11 2023
6.6.3 每个账号的最近登录时间 lastlog
想要知道每个账号的最近登录时间,可以使用 lastlog 命令来查看,这个命令会读取 /var/log/lastlog 文件
[root@bogon ~]# lastlog
Username  Port                From                                       Latest
root             pts/0              192.168.72.1                         Sun Nov
26  19:31:55 +0800 2023
bin                                                                                      **Never
logged in**
daemon                                                                             **Never
logged in**
adm                                                                                    **Never
logged in**
lp                                                                                        **Never
logged in**
sync                                                                                    **Never
logged in**
....................

[root@bogon ~]# lastlog | grep lisi
lisi                         pts/1      192.168.72.1                       Sun Nov
26 21:00:02 +0800 2023

[root@bogon ~]# lastlog | grep root
root                       pts/0      192.168.72.1                       Sun Nov
26 19:31:55 +0800 2023
6.6.4 显示登录到系统的信息 w
显示登录到系统的信息
[root@bogon ~]# w
 21:08:01 up  1:35,  1 user,  load average: 0.00, 0.01, 0.00
USER     TTY        LOGIN@   IDLE   JCPU   PCPU WHAT
root     pts/0     19:33    0.00s  0.41s  0.03s w


// 第一行:显示当前系统时间。开机多久、登录的用户数和、系统平均负载(它是在1分钟、5分钟和15分钟内系统负载情况)

// 第二行:各个项的说明:

        USER       表示登录的系统用户

        TTY            表示用户所使用的终端名称

        FROM       表示来源

        LOGIN@  用户登录的日期和时间

        IDLE         表示空闲时间

        JCPU        某段时间内所有与该终端相关的进程任务所耗费的 CPU 时间

        PCPU        当前活动进程所使用的系统时间

        WHAT       表示当前用户执行的进程名称和选项
第三行以后,每一行代表一个用户登录的信息
6.6.5 显示当前登录系统的用户 who
这个命令用于显示当前登录系统的用户,这个命令是通过 /var/run/tump 文件来获取的信息
[root@bogon ~]# who
root    pts/0   2023-11-26 19:31 (192.168.72.1)
lisi    pts/1   2023-11-26 21:00 (192.168.72.1)
6.7 手动添加用户和组
手动创建一个名为 haha 的用户来了解在Linux中通过useradd 命令来创建用户的过程
# 1、编辑 /etc/passwd 文件
vim /etc/passwd

# 在这个文件的最后添加如下信息
haha:x:1008:1008::/home/haha:/bin/bash

# 2、在/home 目录下新建 haha 目录
[root@bogon home]# mkdir -p /home/haha

# 3、编辑 /etc/group 文件
vim /etc/group
# 在这个文件最后添加如下信息
haha:x:1008:

# 4、修改haha用户的家目录权限
[root@bogon home]# chown haha:haha /home/haha
[root@bogon home]# ll
total 4
-rw-r--r--. 1 root root 939 Nov 12 20:45 20_pass.txt
drwxr-xr-x. 2 haha haha 6 Nov 26 21:21 haha

# 5、从 /etc/skel 目录中复制文件到 /home/haha 目录下
[root@bogon home]# cp /etc/skel/.bash* /home/haha
[root@bogon home]# cp -r /etc/skel/.mozilla/ /home/haha

# 6、修改haha用户的家目录权限
[root@bogon home]# chown -R haha:haha /home/haha

# 7、在 /var/spool/mail 目录下新建名为 haha 的文件
[root@bogon home]# touch /var/spool/mail/haha

# 8、修改所属用户和所属组
[root@bogon mail]# chown haha:mail haha

# 9、给haha用户指定密码
[root@bogon mail]# passwd haha
Changing password for user haha.
New password:
BAD PASSWORD: The password is shorter than 8 characters
Retype new password:
passwd: all authentication tokens updated successfully.
七、 文件系统权限
7.1 查找文件
7.1.1 whereis
用来定位一个命令的二进制文件、源文件和手册文件
选项:
-b:只搜索二进制文件
-m:只搜索手册文件
-s:只搜索源文件
-l:输出 whereis 使用的有效查找路径
使用:
- whereis 来搜索二进制文件、源文件和手册文件位置
[root@localhost ~]# whereis ls
ls: /usr/bin/ls /usr/share/man/man1/ls.1.gz /usr/share/man/man1p/ls.1p.gz

# 如果把这个命令拆开就会报错
[root@localhost ~]# where is ls
bash: where: command not found...

[root@localhost ~]# whereis whereis
whereis: /usr/bin/whereis /usr/share/man/man1/whereis.1.gz
- whereis -b/m/s:只显示二进制文件、源文件和手册文件
# 只显示二进制文件路径
[root@localhost ~]# whereis -b ls
ls: /usr/bin/ls

# 只显示手册文件
[root@localhost ~]# whereis -m ls
ls: /usr/share/man/man1/ls.1.gz /usr/share/man/man1p/ls.1p.gz

# 只显示源文件
[root@localhost ~]# whereis -s ls
ls:

# 多个选项组合使用
[root@localhost ~]# whereis -bm ls
ls: /usr/bin/ls /usr/share/man/man1/ls.1.gz /usr/share/man/man1p/ls.1p.gz
- 还可以用whereis-B/M/S 来限定查找目录,但它必须与 -f 选项一起使用,否则 whereis 会把这个命令当前目录下使用
[root@localhost ~]# whereis -S /usr/src ls
whereis: option -f is missing
[root@localhost ~]# whereis -S /usr/src ls -f
[root@localhost ~]# whereis -S /usr/src -f ls
ls: /usr/bin/ls /usr/share/man/man1/ls.1.gz /usr/share/man/man1p/ls.1p.gz

[root@localhost ~]# whereis -m -M /usr/share/man/man1 -f ls
ls: /usr/share/man/man1/ls.1.gz
- 使用 whereis -l 来输出有效的查找路径
[root@localhost ~]# whereis -l
bin: /usr/bin
bin: /usr/sbin
bin: /usr/lib
bin: /usr/lib64
bin: /etc
bin: /usr/games
bin: /usr/local/bin
bin: /usr/local/sbin
bin: /usr/local/etc
bin: /usr/local/lib
bin: /usr/local/games
bin: /usr/include
bin: /usr/local
bin: /usr/libexec
.....省略
7.1.2 which
用于查找并显示给定命令/文件的绝对路径,它可能会根据 $PATH 这个变量的设置来进行查找
选项:
-a:查找全部内容,而不仅仅是第一个文件
-n:<文件名长度>:指定文件名长度,这个长度必须大于或等于所有文件中最长的文件名
-p:<文件名长度>:作用与 -n 相同。只是包括了文件路径
-w:指定输出时栏位的宽度
-v:显示版本信息
1.显示命令 find 的绝对路径
[root@bogon ~]# whereis -b find
find: /usr/bin/find
[root@bogon ~]# which find
/usr/bin/find
2.显示命令 rm 的别名
[root@bogon ~]# which rm
alias rm='rm -i'
	/usr/bin/rm
[root@bogon ~]# which ll
alias ll='ls -l --color=auto'
	/usr/bin/ls
3.普通用户和 root 用户查找路径不同
# 对于 root
[root@bogon ~]# which cd
/usr/bin/cd

[redhat@localhost ~]$ which ip
/bin/cd
记住:这个命令的作用就是显示被查找文件/命令的绝对路径。
7.1.3 locate 查找符合条件的文档
用于查找符合条件的文档,会去保存文档的目录名的数据库内查找
特点:
-
由于它是基于数据库查询,所以它的查询速度很快,但它不是实时查询到
-
它是模糊查询
-
需要对文件的目录有 rx 权限
其中,模式是用于要搜索的文件名或路径的匹配方式,它支持通配符
选项:
-i:忽略大小写
-c:只返回匹配到的文件数量而不返回匹配到的文件路径
-n:不输出文件路径,仅显示匹配的文件数量
-r:REGEXP:使用正则表达式来匹配文件
-w:仅匹配完整的单词
使用:
1.使用 locate 命令搜索名为 myfile.txt
[redhat@localhost ~]$ locate myfile.txt
[redhat@localhost ~]$ ls
Desktop Documents Downloads Music Pictures Public Templates Videos
[redhat@localhost ~]$ touch myfile.txt
[redhat@localhost ~]$ ls
Desktop Documents Downloads Music myfile.txt Pictures Public Templates
Videos
[redhat@localhost ~]$ cd Pictures/
[redhat@localhost Pictures]$ ls
[redhat@localhost Pictures]$ touch myfile.txt
[redhat@localhost Pictures]$ cd ..
[redhat@localhost ~]$ ls
Desktop Documents Downloads Music myfile.txt Pictures Public Templates
Videos
[redhat@localhost ~]$ mkdir test
[redhat@localhost ~]$ ls
Desktop Documents Downloads Music myfile.txt Pictures Public Templates
test Videos
[redhat@localhost ~]$ cd test
[redhat@localhost test]$ touch myfile.txt
[redhat@localhost test]$ cd ..
[redhat@localhost ~]$ ls
Desktop Documents Downloads Music myfile.txt Pictures Public Templates
test Videos
[redhat@localhost ~]$ locate myfile.txt
2.使用 locate 命令搜索以 .conf 结尾的配置文件,并显示文件路径
[redhat@localhost ~]$ locate *.conf
/usr/share/wireplumber/main.conf
/usr/share/wireplumber/policy.conf
/usr/share/wireplumber/wireplumber.conf
/usr/share/xfsprogs/mkfs/rhel8.0.conf
.....省略

[redhat@localhost ~]$ locate "*.conf" | head -n 5
/etc/anthy-unicode.conf
/etc/appstream.conf
/etc/asound.conf
/etc/brltty.conf
/etc/chrony.conf
3.使用 locate 命令搜索包含关键字 example 的文件,并显示文件路径
[redhat@localhost ~]$ locate example | head -n 5
/etc/samba/smb.conf.example
/etc/udisks2/mount_options.conf.example
/etc/vmware-tools/tools.conf.example
/usr/share/cups/examples
/usr/share/cups/examples/color.drv

[redhat@localhost ~]$ locate -c example
378
[redhat@localhost ~]$ locate -c Example
16
[redhat@localhost ~]$ locate -ci Example
385
4.使用 locate 命令搜索包含关键字 example 的文件,并限制返回的结果数据为 3
[redhat@bogon ~]$ locate -l 3 example
/etc/samba/smb.conf.example
/etc/udisks2/mount_options.conf.example
/etc/vmware-tools/tools.conf.example
7.1.4 find***** 通过条件匹配在指定的目录下查找对应文件或目录
通过条件匹配在指定的目录下查找对应文件或目录,匹配的条件可以是文件名称、类型、大小、权限属性、时间等
特点:
-
精确查找
-
查找速度较慢
-
实时查询
使用格式:find [path…] [expression] 。
其中, [path…] 为需要查找文件所指定的路径。如果不指定,则默认只在当前目录及其子目录中查找。[expressin] 它是匹配的条件或表达式,如果没有设置匹配条件,则默认查询指定目录及子目录下的所有文件
7.1.4.1 指定搜索目录层级/深度
当我们在查找摸个文件时,如果我们不希望搜索所有的子目录,我们可以指定搜索目录的深度。可以通过 -maxdepth 和 -mindepth 选项来指定
例如,在家目录下搜索文件名为myfile.txt文件,搜索深度为 1
# 未指定深度
[redhat@localhost ~]$ find /home/redhat -name myfile.txt
/home/redhat/Pictures/myfile.txt
/home/redhat/myfile.txt
/home/redhat/test/myfile.txt

# 指定深度
[redhat@localhost ~]$ find /home/redhat -maxdepth 1 -name myfile.txt
/home/redhat/myfile.txt
7.1.4.2 根据文件名和 inode 查找
例如,查找 /etc 目录下所有文件以 host 开头的文件
[root@bogon ~]# find /etc -name host* // host*:以 host 开头,host$:以 host 结尾
/etc/host.conf
/etc/hosts
/etc/avahi/hosts
/etc/nvme/hostnqn
/etc/nvme/hostid
/etc/hostname

# 查找 /etc 目录下所有路径中包含有 ssh/ssh 的文件
[root@bogon ~]# find /etc -path "*ssh/ssh*"
/etc/ssh/ssh_config
/etc/ssh/ssh_config.d
/etc/ssh/ssh_config.d/50-redhat.conf
/etc/ssh/sshd_config
/etc/ssh/sshd_config.d
/etc/ssh/sshd_config.d/50-redhat.conf
/etc/ssh/sshd_config.d/01-permitrootlogin.conf
/etc/ssh/ssh_host_ed25519_key
/etc/ssh/ssh_host_ed25519_key.pub
/etc/ssh/ssh_host_ecdsa_key
/etc/ssh/ssh_host_ecdsa_key.pub
/etc/ssh/ssh_host_rsa_key
/etc/ssh/ssh_host_rsa_key.pub

# 在当前目录下查找 anaconda-ks.cfg
[root@localhost ~]# find . -name anaconda-ks.cfg
./anaconda-ks.cfg

# 在当前目录下查找 anaconda-ks.cfg 文件并排除其自身
[root@localhost ~]# find . ! -name anaconda-ks.cfg
.
./.ssh
./.bash_logout
./.bash_profile
7.1.4.3 根据主/属组查找
根据文件的属主及属组,我们可以查找符合指定属主、属组的文件,可以使用以下选项来实现:
-user username:查找属主为指定用户(UID)的文件
-group groupname:查找属组为指定用户组(GID)的文件
-uid UserId:查找属主为指定 UID 的文件
-gid GroupId:查找属组为指定 gid 的文件
示例 1:在根目录下查找用户为 redhat 创建的文件
# 使用 -user 来查找
[root@bogon ~]# find / -maxdepth 3 -user redhat
/home/redhat/myfile.txt
/home/redhat/test
/home/redhat/test/myfile.txt
/home/redhat/.bash_history

# 或者使用 -uid 来查找
[root@bogon ~]# find / -maxdepth 3 -uid 1000
/home/redhat/Templates
/home/redhat/Public
/home/redhat/Documents
/home/redhat/Music
/home/redhat/Pictures
/home/redhat/Videos
/home/redhat/.cache
/home/redhat/myfile.txt
/home/redhat/test
示例2:在根目录下查找组为 redhat 创建的文件
[root@bogon ~]# find / -maxdepth 3 -group redhat
/home/redhat
/home/redhat/.mozilla
/home/redhat/.bash_logout
/home/redhat/.bash_profile

[root@bogon ~]# id redhat
uid=1000(redhat) gid=1000(redhat) groups=1000(redhat),10(wheel)

[root@bogon ~]# find / -maxdepth 3 -gid 1000
/home/redhat
/home/redhat/.mozilla
/home/redhat/.bash_logout
/home/redhat/.bash_profile
7.1.4.4 根据文件类型查找
在 Linux 中文件类型有 7 种,分别如下所示
-f 普通文件,它是使用短横线(-)表示
-d 目录文件,它是使用(d)表示
-l 链接文件,它是使用(l)表示
-s 套接字文件,它是使用(s)表示
-b 块设备文件,它是使用(b)表示
-c 字符设备文件,它是使用(c)表示
-p 管道文件,它是使用(p)表示
这个查找的语法格式为: find [paht] -type 文件的类型
示例1:搜索 /dev 目录下的所有块设备文件
[root@bogon ~]# find /dev -type b
/dev/dm-1
/dev/dm-0
/dev/sr0
/dev/nvme0n1p2
/dev/nvme0n1p1
/dev/nvme0n1
示例2:搜索根目录下所有目录,深度为 1
[root@bogon ~]# find / -maxdepth 1 -type d
/
/boot
/dev
/proc
.......省略
示例3:搜索 /etc 目录下所有链接文件,深度为 2
[root@bogon ~]# find /etc -maxdepth 2 -type l
/etc/mtab
/etc/favicon.png
/etc/issue.d/cockpit.issue
/etc/os-release
/etc/system-release
/etc/pam.d/system-auth
/etc/pam.d/password-auth
/etc/pam.d/fingerprint-auth
/etc/pam.d/smartcard-auth
.....省略
7.1.4.5 根据文件大小查找
对于根据文件大小来进行查找,它的语法格式为: find [path] [选项] -size [+|-] n 。其中 n 为文件的大小,单位为 c/k/M/G/T。
[+|-] n 的具体含义如下: 50k:搜索文件大小为 49k ~ 50k 之间的文件,即 n-1 ~ n
+50k:搜索大于 50k 的文件,即 n ~ …
-50k:搜索小于 49k 的文件,即 0 ~ n-1
示例1:在 /root 目录下查找大小为 1k 的文件
[root@bogon ~]# find . -size 1k | grep cfg
./anaconda-ks.cfg
#
bit = 8
byte = 1024 bit
kb = 1024byte
mb = 1024kb
gb = 1024mb
示例2:在根目录下查找文件大小大于 100k 的文件
[root@bogon ~]# find / -size +100k
/boot/initramfs-0-rescue-5c5bb57619564f628a3f3f51cb63f773.img
/proc/kcore
find: ‘/proc/2342/task/2342/fd/5’: No such file or directory
find: ‘/proc/2342/task/2342/fdinfo/5’: No such file or directory
find: ‘/proc/2342/fd/6’: No such file or directory
find: ‘/proc/2342/fdinfo/6’: No such file or directory
/sys/devices/pci0000:00/0000:00:0f.0/resource1
/sys/devices/pci0000:00/0000:00:0f.0/resource1_wc
/var/lib/rpm/rpmdb.sqlite
/usr/lib/locale/locale-archive
/usr/lib/locale/locale-archive.real
7.1.4.6 根据时间戳查找
文件创建时会在元数据中生成访问时间(access time)、修改时间(modify time)以及创建时间(create time),它们分别简写为:atime、mtime 和 ctime。
选项:
以天为单位(time)的查找。
-atime [+|-]时间:按照文件的访问时间搜索
+:表示(+1)天之外被访问的文件
-:表示 1 天之内被访问的文件
-mtime [+|-]时间:按照文件的修改时间搜索
-ctime [+|-]时间:按照文件的创建时间搜索 以分钟为单位(min)的查找:
-amin [+|-]:按照文件的访问时间搜索
-mmin [+|-]:按照文件的修改时间搜索
-cmin [+|-]:按照文件的创建时间搜索
-newer file:把比 file 文件修改时间更新的文件搜索出来
示例1:搜索根目录下所有在 1 天之外被访问过的文件
[root@bogon ~]# find / -atime +1

[root@bogon ~]# find / -atime +1 | wc -l
find: ‘/proc/2349/task/2349/fd/5’: No such file or directory
find: ‘/proc/2349/task/2349/fdinfo/5’: No such file or directory
find: ‘/proc/2349/fd/6’: No such file or directory
find: ‘/proc/2349/fdinfo/6’: No such file or directory
125678
示例2:搜索根目录下所有在 1 天之内被访问过的文件
[root@bogon ~]# find / -atime -1 | wc -l
find: ‘/proc/2352/task/2352/fd/5’: No such file or directory
find: ‘/proc/2352/task/2352/fdinfo/5’: No such file or directory
find: ‘/proc/2352/fd/6’: No such file or directory
find: ‘/proc/2352/fdinfo/6’: No such file or directory
233889
示例3:查找根据目录下 5 分钟以内创建的文件
[root@bogon ~]# find / -cmin -5

[root@bogon ~]# touch aa
[root@bogon ~]# find . -cmin -5
.
./aa
示例4:查找当前目录下比 2023-12-4 20:30 分之前创建的文件
[root@bogon ~]# find . -type f -newerct '2023-12-3 20:28'
./aa
# 命令说明:
# -type f 表示搜索文件
# -newerct 表示搜索比指定时间更早创建的文件,其中 c 表示创建,这个位置还可以是 m、a。t 表
示后面要跟具体的时间格式
7.1.4.7 根据权限查找
我们可以根据文件的三类访问对象的三种权限来查找对应的文件,命令的语法格式为:
find [path] -perm [+|-] MODE MODE:表示精确匹配三类对象(u,g,o)的权限
+MODE:表示三类对象只要有一类对象中的三个权限匹配一位即
-MODE:表示三类对象分别有对应权限 简单来说:
-perm 权限模式:查找文件的权限刚好等于指定的权限的文件
-perm +权限模式:查找文件的权限包含“权限模式”的任意一个权限的文件
-perm -权限模式:查找文件的权限全部包含“权限模式”的文件
示例1:如果要在整个文件系统搜索权限中包括 SUID 权限的所有文件,只需要使用 -400 即可
[root@bogon ~]# find / -perm -400
/usr/lib/python3.9/site-packages/tracer/hooks.py
/usr/lib/python3.9/site-packages/tracer/main.py
.....省略
示例2:在当前目录下搜索文件名称以 f 开头,并且权限为 311 的所有文件
[root@bogon ~]# find . -name 'f*' -perm -311
./.cache/gnome-software/flatpak-system-default
./.cache/gnome-software/flatpak-user-user
./.local/share/flatpak
7.2 普通权限*****
7.2.1 权限介绍
我们以查看 /root 目录下的所有文件的详细信息为例,来说明普通权限。
[root@bogon ~]# ll
total 4
-rw-r--r--. 1 root root 0 Dec 3 20:28 aa
在上面的命令输出结果中包括了如下部分:
-rw-r--r--.   1   root   root   0   Dec   3   20:28   aa
1             2   3      4      5   6                 7

1 这个部分包括文件类型、所属者权限、所属组权限、其它人权限、控制列表权限
2 文件的链接数
3 文件所属者,即文件的创建者
4 文件所属组
5 文件的大小,单位为字节
6 文件的最后一次修改时间
7 文件名/目录名称
接下来我们重点来说第一个部分,即:
-   rw  -   r--   r-- .
1    2  3   4     5

1:表示文件的类型
  - 普通文件
  d 目录
  l 链接文件(硬链接和软链接)
  c 字符设备文件
  b 块设备文件
  p 管道文件
  s 套接字文件

2:表示文件 所属者 权限,可以用 u(user) 表示
  - 表示无权限
  r 表示读
  w 表示写
  x 表示可执行

3:表示文件 所属组 权限,可以用 g(group) 表示
  - 表示无权限
  r 表示读
  w 表示写
  x 表示可执行

4:表示其它用户(既不是所属者,也不是所属组中的用户)的权限,可以用 o(other) 表示
  - 表示无权限
  r 表示读
  w 表示写
  x 表示可执行

5:表示访问控制列表
  . 表示没有设置访问控制列表
  + 表示设置了访问控制列表
注意:root 账户不受文件权限的读写限制,执行权限受限制。
对文件和目录来说,它们对于 r、w、x 的表现形式是不一样的。
对于文件的影响:
   r(read):表示可以读取文件的内容
   w(write):表示可以修改文件的内容
   x(eXecute):表示可以执行这个文件

对于文件来说可能出现的权限有:
  ---:没有权限
  r--:表示只读
  r-x:表示可读可执行
  rw-:表示可读写
  rwx:所有权限都有
                 总结:文件权限中包括 r 权限

对于目录的影响:
   r:表示可以列出目录下的内容,即可以查看目录下的文件名称
   w:表示可以创建、删除目录中的任意文件(但是要注意:如果只有 w 权限,是不能删除文件的,它需要和 x 权限一起使用)
   x:表示可以切换目录

对于目录来说可能出现的权限:
   ---:表示没有权限
   r-x:表示可读可进入
   rwx:表示所有权限
                总结:目录权限中包括 r 和 x 权限
权限的数字表示法:
 权限              二进制                 八进制
 ---                000                     0
 --x                001                     1
 -w-                010                     2
 -wx                011                     3
 r--                100                     4
 r-x                101                     5
 rw-                110                     6
 rwx                111                     7
7.2.2 修改文件或目录权限 chmod
修改文件或目录的权限需要使用 chmod(change mode)命令来实现
它的语法格式为:

示例1:修改某一类人【所属者、所属组、其他人】的权限,我们分别演示对文件和目录的权限
chmod [选项] [ugoa][+-=][rwx] 文件或目录.....
或者
chmod [选项] nnn 文件或目录.......
# 为了演示这些功能,我们以 root 用户在 /opt 目录下新建一个file1文件和test目录
[root@bogon ~]# cd /opt
[root@bogon opt]# ll
total 0
[root@bogon opt]# touch file1  //创建文件
[root@bogon opt]# ll
total 0
-rw-r--r--. 1 root root 0 Dec 9 19:37 file1
[root@bogon opt]# mkdir -p test  //创建多级目录
[root@bogon opt]# ll
total 0
-rw-r--r--. 1 root root 0 Dec 9 19:37 file1
drwxr-xr-x. 2 root root 6 Dec 9 19:37 test
[root@bogon opt]# cd test
[root@bogon test]# touch file2
[root@bogon test]# ll
total 0
-rw-r--r--. 1 root root 0 Dec 9 19:38 file2
[root@bogon test]#
#----- 然后切换到 redhat 用户
[root@bogon test]# su - redhat
[redhat@bogon ~]$ ll /opt
total 0
-rw-r--r--. 1 root root 0 Dec 9 19:37 file1
drwxr-xr-x. 2 root root 19 Dec 9 19:38 test
[redhat@bogon ~]$ cd /opt
[redhat@bogon opt]$ ls
file1 test
[redhat@bogon opt]$ echo 123 > file1
-bash: file1: Permission denied
[redhat@bogon opt]$ cat file1
[redhat@bogon opt]$
# 切换后,可以发现,redhat 这个用户对于 /opt/file1 文件只具有可读的权限,而其他权限不是具备的。
# 现在我们让 redhat 用户具有对 /opt/file1 文件具有可写的权限
# 我们以 root 用户来为 file1 文件的其他用户赋予可读可写权限
[root@bogon opt]# chmod o=rw- file1
[root@bogon opt]#
# 赋值成功后,切换到 redhat 用户
[redhat@bogon opt]$ ll
total 0
-rw-r--r--. 1 root root 0 Dec 9 19:37 file1
drwxr-xr-x. 2 root root 19 Dec 9 19:38 test
[redhat@bogon opt]$ ll
total 0
-rw-r--rw-. 1 root root 0 Dec 9 19:37 file1
drwxr-xr-x. 2 root root 19 Dec 9 19:38 test
[redhat@bogon opt]$ echo 123 > file1
[redhat@bogon opt]$ cat file1
# 从上面的结果可以发现,redhat 用户已经对 file1 文件具有了可读可写的权限了。
# 注意:在赋予权限时,= 号表示给它刚好这个权限,如果希望在原有的权限基础上添加某个权限,需要使用 + 号
[root@bogon opt]# chmod o+r file1
[redhat@bogon opt]$ ll
total 4
-rw-r--rw-. 1 root root 8 Dec 9 19:48 file1
drwxr-xr-x. 2 root root 19 Dec 9 19:38 test
# 如果希望给某个用户取消某个权限,则需要使用 - 号,例如,我们对 /opt/file1 文件的其他用户权限可写权限,则操作如下:
[root@bogon opt]# chmod o-w file1
[redhat@bogon opt]$ ll
total 4
-rw-r--r--. 1 root root 8 Dec 9 19:48 file1
drwxr-xr-x. 2 root root 19 Dec 9 19:38 test
#-----------------------------
# 当然,我们还可以使用数字的方式来设置权限。例如,我们给 /opt/file1 文件的其他用户设置权限为可读可写
[root@bogon opt]# chmod 644 file1 # 这是设置整个 file1 的权限,而我们的需求是对其他用户,所以这个不能满足我们的题目要求。而能满足题目要求如下所示:
[root@bogon opt]# chmod 646 file1
#--------------------------------
# r w - r - - r w -
# 4 2 0 4 0 0 4 2 0
# 6 4 6
# 646
#----------------------------
# 1. 使用 root 用户对 /opt/test 目录的其他用户的可执行权限取消
[root@bogon opt]# chmod o-x test
# 2. 使用 redhat 用户来切换这个目录
[redhat@bogon opt]$ ll
total 4
-rw-r--rw-. 1 root root 8 Dec 9 19:48 file1
drwxr-xr--. 2 root root 19 Dec 9 19:38 test
[redhat@bogon opt]$ cd test
-bash: cd: test: Permission denied
# 发现已经不能成功切换了,说明权限设置成功。
# 需求:给 /opt/test 目录及子目录和文件都添加 w 权限
[root@bogon opt]# chmod -R o+w test
[redhat@bogon opt]$ ll
total 4
-rw-r--rw-. 1 root root 8 Dec 9 19:48 file1
drwxr-xrwx. 2 root root 19 Dec 9 19:38 test
[redhat@bogon opt]$ cd test
[redhat@bogon test]$ ll
total 0
-rw-r--rw-. 1 root root 0 Dec 9 19:38 file2
7.2.3 修改文件或目录的属组和属主
修改文件或目录的所属者以及所属组的权限的语法为:
# 1. 修改文件或目录的所属者权限
 chmod [选项] 新所属者[:[新所属组] ] 文件或目录....
   选项:
               -R:对目录来说表示递归
# 2. 修改文件或目录所属组权限
chmod [选项]  :新所属组 文件或目录....
或者
chgrp [选项] 新所属组 文件或目录....
使用示例:修改/opt/目录下的所有文件和目录权限
# 1. 将 /opt/filt1 文件的所属者修改为 redhat
# 查看当前所属者权限,目前为 root
[root@bogon opt]# chown redhat file1

[root@bogon opt]# ll
total 0
-rw-r--rw-. 1 root root 0 Dec  9 20:24 file1
drwxr-xrw-. 2 root root 6 Dec  9 20:24 test

# 2.将 /opt/filt1 文件的所属组修改为 redhat
[root@bogon opt]# chown :redhat file1

[redhat@bogon opt]$ ll
total 0
-rw-r--rw-. 1 root redhat 0 Dec  9 20:24 file1
drwxr-xrw-. 2 root root   6 Dec  9 20:24 test

#-------------对目录--------------------
# 3. 修改 /opt/test 目录所属者为 redhat
[root@bogon opt]# chown -R redhat test
[redhat@bogon opt]$ ll test
total 0
-rw-r--rw-. 1 root root 0 Dec 9 19:38 file2
[redhat@bogon opt]$ ll
total 4
-rw-r--rw-. 1 redhat redhat 8 Dec 9 19:48 file1
drwxr-xrwx. 2 redhat root 19 Dec 9 19:38 test
[redhat@bogon opt]$ ll test
total 0
-rw-r--rw-. 1 redhat root 0 Dec 9 19:38 file2
# 4. 修改 /opt/test 目录所属组为 redhat
[root@bogon opt]# chown -R :redhat test
[redhat@bogon opt]$ ll
total 4
-rw-r--rw-. 1 redhat redhat 8 Dec 9 19:48 file1
drwxr-xrwx. 2 redhat redhat 19 Dec 9 19:38 test
[redhat@bogon opt]$ ll test
total 0
-rw-r--rw-. 1 redhat redhat 0 Dec 9 19:38 file2
总结:
- chmod 命令是用于给文件或目录设置权限,如果是目录,我们需要使用 -R 选项,如果是文件这个选项可以不用指定。使用这个命令我们可以使用 rwx 或者数字来表示权限,还可以通过 u、g、o、a 来表示对那个部分设置权限。
- chown 命令是用于给文件或目录修改所属者和所属组权限。如果只修改所属者则使用 chown新所属者 文件或目录… ,如果只修改所属组则使用 chown :新所属组 文件或目录…`。
- 如果我们希望同时给文件或目录修改所属者和所属组,则使用 chown 新所属者:新所属组 文件或目录… 。
例如:将 /opt/test 目录的所属者和所属组都改为root,则命令如下
[root@bogon opt]# chown -R root:root test

[redhat@bogon opt]$ ll
total 0
-rw-r--rw-. 1 root redhat 0 Dec  9 20:24 file1
drwxr-xrw-. 2 root root   6 Dec  9 20:24 test
注意:如果单纯的就只希望修改所属组,则可以使用 chgrp 命令
[root@bogon opt]# chgrp -R redhat test

[redhat@bogon opt]$ ll
total 0
-rw-r--rw-. 1 root redhat 0 Dec  9 20:24 file1
drwxr-xrw-. 2 root redhat 6 Dec  9 20:24 test
7.3 ACL权限
为什么需要有 ACL 权限,原因是我们现在只能对所属者、所属组以及其他用户来进行统一设置。
通过 ACL 可给指定的用户指定的目录分配指定的权限
对于 ACL权限来说,它有设置 ACL 权限、查看 ACL权限和删除 ACL 权限
7.3.1 设置 ACL 权限 setfacl
使用格式:setfacl [选项] 文件名
选项:
-n:设置 ACL 权限
如果是给用户ACL 权限,则使用的格式为:‘u:用户名:权限’
如果是给组ACL 权限,则使用的格式为:‘g:组名:权限’
-x:删除指定 ACL 权限
-b:删除所有的 ACAL 权限
-d:设定默认的 ACL 权限,且只对目录生效,指目录中新建的文件拥有此默认的权限
-k:删除设置的默认 ACL 权限
-R:递归设置AACL 权限,当指定后会对当前目录及子目录生效
文件访问控制列表 FACL: filename access control list
setfacl -m u:username:mode filename # -m 修改
setfacl -m g:groupname:mode filename # -m 修改
setfacl -x u:username:mode filename # -x 删除
setfacl -x g:groupname:mode filename # -x 删除
setfacl -b filename # -b 删除/恢复
使用示例:
1)首先我们使用 root 用户在根目录下新建一个文件目录名为 /project,此文件上当的权限是 770
2)然后创建一个 QQ 群所属组,所属组里面创建两个用户 zhangsan 和 lisi,并把这个组设置为/project 的所属组
3)接着创建一个旁听用户 pt,给他设定 /project 目录的 acl 权限为 r-x
4)最后再创建一个叫 xiaowu 组,并将 xiaowu 组设置为 /project 组 acl 权限为 rwx 权限
首先我们使用 root 用户在根目录下新建一个文件目录名为 /project,此文件上当的权限是770
[root@bogon opt]# mkdir -p /project
[root@bogon opt]# ll -d /project
drwxr-xr-x. 2 root root 6 Dec 9 21:12 /project
[root@bogon opt]# chmod -R 770 /project
[root@bogon opt]# ll -d /project
drwxrwx---. 2 root root 6 Dec 9 21:12 /project
然后创建一个 QQ 群所属组,所属组里面创建两个用户 zhangsan 和 lisi,并把这个组设置为/project 的所属组
[root@bogon opt]# groupadd QQ
[root@bogon opt]# useradd -g QQ zhangsan
[root@bogon opt]# id zhangsan
uid=1001(zhangsan) gid=1001(QQ) groups=1001(QQ)
[root@bogon opt]# useradd -g QQ lisi
[root@bogon opt]# id lisi
uid=1002(lisi) gid=1001(QQ) groups=1001(QQ)
[root@bogon opt]# ll -d /project
drwxrwx---. 2 root root 6 Dec 9 21:12 /project
[root@bogon opt]# chown -R :QQ /project
[root@bogon opt]# ll -d /project
drwxrwx---. 2 root QQ 6 Dec 9 21:12 /project
接着创建一个旁听用户 pt,给他设定 /project 目录的 acl 权限为 r-x
[root@bogon opt]# useradd pt
[root@bogon opt]# ll -d /project
drwxrwx---. 2 root QQ 6 Dec 9 21:13 /project
# 设置acl权限
[root@bogon opt]# setfacl -m u:pt:r-x /project
[root@bogon opt]# ll -d /project
drwxrwx---+ 2 root QQ 6 Dec 9 21:13 /project
# 可以发现,acl 权限设置成功
为了验证 acl 权限是否设置成功,我们给 pt 用户设置登录密码(123):
[root@bogon opt]# passwd pt
Changing password for user pt.
New password:
BAD PASSWORD: The password is shorter than 8 characters
Retype new password:
passwd: all authentication tokens updated successfully.
然后再切换到 pt 用户,并访问 /project 目录
[pt@bogon ~]$ ll /project
total 0
[pt@bogon ~]$
发现可以访问,说明给 pt 用户设置/project目录的 acl 权限成功。
最后再创建一个叫 xiaowu 组,并将 xiaowu 组设置为 /project 组 acl 权限为 rwx 权限
# 创建 xiaowu 组
[root@bogon project]# groupadd xiaowu
# 设置组 acl 权限
[root@bogon project]# setfacl -m g:xiaowu:rwx /project
[root@bogon project]# ll -d /project
drwxrwx---+ 2 root QQ 6 Dec 9 21:13 /project
# 验证这个 acl 权限是否设置成功
[root@bogon project]# useradd haha
[root@bogon project]# id haha
uid=1004(haha) gid=1005(haha) groups=1005(haha)
# 切换 haha 用户
[root@bogon project]# su - haha
[haha@bogon ~]$
# 在 haha 用户下切换到 /project 目录
[haha@bogon ~]$ cd /project
-bash: cd: /project: Permission denied
[haha@bogon ~]$ exit
logout
# 设置用户组
[root@bogon project]# usermod -g xiaowu haha
[root@bogon project]# id haha
uid=1004(haha) gid=1004(xiaowu) groups=1004(xiaowu)
# 切换用户
[root@bogon project]# su - haha
# 进入 /project
[haha@bogon ~]$ cd /project
[haha@bogon project]$ touch file1
[haha@bogon project]$ mkdir test
[haha@bogon project]$ ll
total 0
-rw-r--r--. 1 haha xiaowu 0 Dec 10 19:23 file1
drwxr-xr-x. 2 haha xiaowu 6 Dec 10 19:23 test
[haha@bogon project]$ rm -rf test
[haha@bogon project]$ ll
total 0
-rw-r--r--. 1 haha xiaowu 0 Dec 10 19:23 file1
7.3.2 查看 ACL 权限 getfacl
使用示例:查看 /project 的ACL权限
[haha@bogon project]$ getfacl /project
getfacl: Removing leading '/' from absolute path names
# file: project
# owner: root
# group: QQ
user::rwx
group::rwx
group:xiaowu:rwx
mask::rwx
other::---
7.3.3 删除 ACL 权限 setfacl - x
使用格式: setfacl -x | -b u:用户名: 文件或目录
或者 setfacl -x | -b g:组名: 文件或目录
使用示例:
- 删除 /project 目录对 pt 用户的 acl 权限
[haha@bogon project]$ setfacl -x U:pt /project
setfacl: Option -x: Invalid argument near character 1
[haha@bogon project]$ exit
logout
[root@bogon ~]# setfacl -x U:pt /project
setfacl: Option -x: Invalid argument near character 1
[root@bogon ~]# setfacl -x u:pt /project
[root@bogon ~]# getfacl /project
getfacl: Removing leading '/' from absolute path names
# file: project
# owner: root
# group: QQ
user::rwx
group::rwx
group:xiaowu:rwx
mask::rwx
other::---
- 删除 xiaowu 组的 acl 权限
[root@bogon ~]# setfacl -x g:xiaowu /project
[root@bogon ~]# getfacl /project
getfacl: Removing leading '/' from absolute path names
# file: project
# owner: root
# group: QQ
user::rwx
group::rwx
mask::rwx
other::---
- 删除 /project 目录的所有 acl 权限
[root@bogon ~]# setfacl -b /project
[root@bogon ~]# getfacl /project
getfacl: Removing leading '/' from absolute path names
# file: project
# owner: root
# group: QQ
user::rwx
group::rwx
other::---
7.3.4 ACL 权限使用场景
当所有权限都不能动,但又希望给其他某个人或组设置一定权限时,就可使用 ACL 访问控制列表
7.4 特殊权限
在Linux中,用户对文件或目录的访问权限除了r,x,w这三种一般权限以外,还有 SUID (Set User Id)、SGID(Set Group Id)、Sticky Bit(粘滞位)三种特殊权限,用于对文件或目录进行更加灵活且 方便的访问控制。
7.4.1 SUID 权限(适用于可执行文件)
SUID 特殊权限仅适用于可执行文件
所具有的功能是:只要用户设有 SUID 的文件有可执行权限,那么当用户执行此文件时,会以文件所有者身份去执行这个文件,一旦文件执行结束,身份的切换也随之消失
示例:Linux中的所有的用户密码数据都记录在 /etc/shadow 文件中,通过 ll 命令查看可以发现,这个文件所有用户都没有权限。因为都为0,也就是说,普通用户原则是没办法修改密码的
[root@project ~]# ll /etc/shadow
----------. 1 root root 1302 Dec 10 19:20 /etc/shadow
[root@bogon ~]# passwd pt
Changing password for user pt.
New password:
BAD PASSWORD: The password is shorter than 8 characters
Retype new password:
passwd: all authentication tokens updated successfully.
通过上面示例,root 虽然看上去没有对 /etc/shadow 这个文件有任何的操作权限,但是它却可以修改用户的密码,并且可以成功,原因在于 passwd 命令具有 SUID 权限
[root@bogon ~]# which passwd
/usr/bin/passwd
[root@bogon ~]# ll /usr/bin/passwd
-rwsr-xr-x. 1 root root 32648 Aug 10 2021 /usr/bin/passwd
/usr/bin/passwd,即 passwd 命令具有 SUID 权限,s 是标记在 x 所在位置,表示执行这个命令时,可以具有这个文件创建者的权限
注意:在 Linux 系统中,绝大多数命令的文件所属者默认都是 root
为了方便大家理解,我们把 文件的 /usr/bin/passwd 文件的 SUID 权限取消
[root@bogon ~]# chmod u-s /usr/bin/passwd
[root@bogon ~]# ll /usr/bin/passwd
-rwxr-xr-x. 1 root root 32648 Aug 10 2021 /usr/bin/passwd
[root@bogon ~]# passwd pt
Changing password for user pt.
New password:
BAD PASSWORD: The password is a palindrome
Retype new password:
passwd: all authentication tokens updated successfully.
[root@bogon ~]# su - pt
[pt@bogon ~]$ passwd
Changing password for user pt.
Current password:
Current Password:
passwd: Authentication token manipulation error
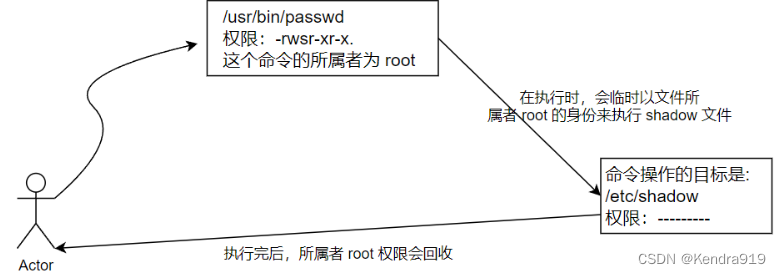
我们来为 cat 命令设置 SUID 权限,从而让普通用户也具有查看 /rtc/shadow 文件内容的权限
为 /usr/bin/cat 命令设置 SUID 权限
# 为 /usr/bin/cat 命令设置 suid 权限
[root@bogon ~]# chmod u+s /usr/bin/cat
# 查看权限是否设置成功
[root@bogon ~]# ll /usr/bin/cat
-rwsr-xr-x. 1 root root 36320 Jan 6 2023 /usr/bin/cat
# 切换为普通用户
[root@bogon ~]# su - pt
# 使用普通用户来使用 cat 命令,此时,由于 cat ,命令具有 SUID 权限,它在执行时,会以这个命令的所属者(root)的身份来执行这个命令
[pt@bogon ~]$ cat /etc/shadow
root:$6$Xp.hGdBRoAqLjxZM$3V7.91KAWGX/JJVdvDUz/jIHdtoWrDYNvP/KqfT0yzDwEryLHxe
bin:*:19347:0:99999:7:::
daemon:*:19347:0:99999:7:::
.....
在 Linux 中,哪些命令具有 SUID 权限:
[root@bogon ~]# find / -perm /4000
0 表示没有权限
4 表示拥有者具有 s 权限
/4000 表示权限至少是具有 s 权限
7.4.2 SGID 权限(针对所属组具有 s 权限)
与 SUID 不同,SUID是针对所属者具有 s 权限,SGID是针对所属组具有 s 权限
·对于文件:只针对可执行文件,会以文件所属组中用户的身份进行执行
·对于目录:当一个目录被赋予 SGID 权限后,进入此目录的普通用户,其有效群组会变为该目录所属组权限
使用示例:
# 查看 /tmp 目录权限
[root@bogon ~]# ls /
afs boot etc lib media opt project run srv tmp var
bin dev home lib64 mnt proc root sbin sys usr
[root@bogon ~]# ll -d /tmp
drwxrwxrwt. 16 root root 4096 Dec 10 20:17 /tmp
# 在 /tmp 目录下创建 dtest 目录
[root@bogon ~]# cd /tmp
[root@bogon tmp]# mkdir dtest
[root@bogon tmp]# ll
total 0
drwxr-xr-x. 2 root root 6 Dec 10 20:38 dtest // 所属组是root
# 给 dtest 目录设置 sgid 权限
[root@bogon tmp]# chmod g+s dtest // 加了sgid 权限
[root@bogon tmp]# ll -d dtest
drwxr-sr-x. 2 root root 6 Dec 10 20:38 dtest
[root@bogon tmp]#
# 通过上面的命令执行后,会在目录所属组的 x 位置设置为 s 权限
# 给测试上赋予 777 权限,让普通用户可以写
[root@bogon tmp]# chmod 777 dtest
[root@bogon tmp]# ll -d dtest
drwxrwsrwx. 2 root root 6 Dec 10 20:38 dtest
# 切换为 redhat 普通用户,由于这个用户的所属组是 redhat,所以我们通过它来进行测试
[root@bogon tmp]# su - redhat
[redhat@bogon ~]$ grep redhat /etc/passwd /etc/group
/etc/passwd:redhat:x:1000:1000:redhat:/home/redhat:/bin/bash
/etc/group:wheel:x:10:redhat
/etc/group:redhat:x:1000:
# 用这个普通用户进入到 /tmp/dtest 目录
[redhat@bogon ~]$ cd /tmp/dtest
[redhat@bogon dtest]$
# 然后使用这个普通用户在 /tmp/dtest 目录下新建 adb 文件和 zimulu 子目录
[redhat@bogon dtest]$ touch abc
[redhat@bogon dtest]$ mkdir zimulu
[redhat@bogon dtest]$ ll
total 0
-rw-r--r--. 1 redhat root 0 Dec 10 20:47
drwxr-sr-x. 2 redhat root 6 Dec 10 20:47 zimulu
// 注意看所属者和所属组,SUID 的作用导致所示的不同
可以看到,虽然是 redhat 这个普通用户创建的 abc 文件和zimulu 目录,但它们的所属组都不是 redhat,而是 dtest 这个目录所创建时的所属组
7.4.3 SBIT 权限
这个权限只针对目录有效,对文件无效。对目录的作用是:在具有 SBIT 权限的目录下,用户若在该目录下具有 w 及 x 权限,则当用户在该目录下建立文件或目录时,只有文件拥有者与 root 才有权力删除
演示:SBIT 权限对 /data 目录的作用
# 创建要操作的 /data 目录
[root@project ~]# mkdir /data
# 对这个目录设置 777 权限
[root@project ~]# cd /data
[root@project data]# chmod 777 /data
[root@project data]# chmod a+rwx /data // 这两种方式得到的效果一样
[root@project data]# ll -d /data
drwxrwxrwx. 2 root root 6 Dec 10 21:00 /data
# 创建两个用户: lamp1 和 lamp2
[root@project data]# useradd lamp1
[root@project data]# useradd lamp2
# 切换到 lamp1 用户
[root@project data]# su - lamp1
[lamp1@bogon ~]$ cd /data
# 在这个目录下新建 ftest 文件
[lamp1@bogon data]$ touch ftest
[lamp1@bogon data]$ ll ftest
-rw-r--r--. 1 lamp1 lamp1 0 Dec 10 21:04 ftest
# 切换到 lamp2 用户
[lamp1@bogon data]$ exit
logout
[root@project data]# su - lamp2
[lamp2@bogon ~]$ cd /data
# 使用 lamp2 用户来删除 ftest 文件
[lamp2@bogon data]$ rm -f ftest
[lamp2@bogon data]$ ll
total 0
# 发现可以删除
当前需求:不希望别的用户能够删除 lamp1用户所创建的 ftest 文件
执行:
# 1.切换回 root 用户
[lamp2@bogon data]$ exit
logout
[root@bogon data]#
# 2. 通过 root 用户给 /data 目录设置 SBIT 权限,设置这个权限有以下两种方式
1) chmod +t 目录
2) chmod o+t 目录
3) chmod a+t 目录
无论使用的是哪种方式,最终都只会给其他用户所在的权限位置的最后,即 x 位置上设置为 t
[root@project data]# ll -d /data
drwxrwxrwx. 2 root root 6 Dec 10 21:05 /data
[root@project data]# chmod +t /data
[root@project data]# ll -d /data
drwxrwxrwt. 2 root root 6 Dec 10 21:05 /data
[root@project data]#
# 3. 切换到lamp1 用户,并在 /data 目录下创建ftest 文件
[root@project data]# su - lamp1
[lamp1@bogon ~]$ cd /data
[lamp1@bogon data]$ ll
total 0
[lamp1@bogon data]$ touch ftest
[lamp1@bogon data]$ ll
total 0
-rw-r--r--. 1 lamp1 lamp1 0 Dec 10 21:11 ftest
# 4. 切换家 root 用户后再切换到 lamp2 用户,并使用这个用户来删除 ftest 文件
[lamp1@bogon data]$ exit
logout
[root@project data]# su - lamp2
[lamp2@bogon ~]$ cd /data
[lamp2@bogon data]$ rm -f ftest
rm: cannot remove 'ftest': Operation not permitted
# 5. 使用 root 用户来删除 ftest 文件
[lamp2@bogon data]$ exit
logout
[root@project data]# rm -f ftest
[root@project data]# ll
total 0
发现:当我们为 /data 目录设置了 SBIT 权限后,那么,某个用户所
创建的文件,只能是创建这个文件的所属者或 root 用户才可以删除,其他用户不能删除
7.5 权限掩码 umask(了解)
7.5.1 新建文件或目录的默认权限
在 Linux中,创建文件或目录时,会去 /etc/login.defs 文件中查找默认的掩码:
UMASK 0022
作用:在创建新文件或目录时 屏蔽掉新文件或目录不应有的访问允许权限。
文件的访问允许权限共有9种,分别是:rwxrwxrwx
它们分别代表:用户读 用户写 用户执行 组读 组写 组执行 其它读 其它写 其它执行
除了可以通过查看 /etc/login.defs 文件外,还可使用 umask 命令来查看默认掩码
[root@project data]# umask
0022
问题:我们说权限不应该是 3 个数字吗?为啥是 4 个?
回答:这是因为掩码做的是 4 个八进制数 来表示的。
- 第 1 个数表示的文件所具有的 SUD、SGID、SBIT 权限。
- 后面 3 位才表示 umask 权限。将其转换为字母就是 ----w–w-
文件和目录的真正初始权限,可通过以下的计算得到:
文件(或目录)的初始权限 = 文件(或目录)的最大默认权限 - umask权限(022)
显然,如果想最终得到文件或目录的初始权限值,我们还需要了解文件和目录的最大默认权限值。在 Linux 系统中,文件和目录的最大默认权限是不一样的:
- 对文件来讲,其可拥有的最大默认权限是 666,即 rw-rw-rw-。也就是说,使用文件的任何用户都 没有执行(x)权限。原因很简单,执行权限是文件的最高权限,赋予时绝对要慎重,因此绝不能在 新建文件的时候就默认赋予,只能通过用户手工赋予。
- 对目录来讲,其可拥有的最大默认权限是 777,即 rwxrwxrwx。
接下来,我们利用字母权限的方式计算文件或目录的初始权限。以 umask 值为 022 为例,分别计算新 建文件和目录的初始权限:
文件的最大默认权限是 666,换算成字母就是 “-rw-rw-rw-”,umask 的值是 022,换算成字母为 “-----w–w-”。把两个字母权限相减,得到 (-rw-rw-rw-) - (-----w–w-) = (-rw-r–r–),这就是新建文件的初始权限。我们测试一下:
[root@localhost ~]# umask
0022
# 默认umask的值是0022
# 新建file空文件
[root@localhost ~]# touch file
[root@localhost ~]# ll -d file
-rw-r--r--. 1 root root 0 Apr 18 02:36 file
7.5.2 权限修改
umask 权限值可以通过如下命令直接修改:
#修改shell umask值(临时)
[root@localhost ~]# umask 002
[root@localhost ~]# umask
0002
[root@localhost ~]# mkdir dir8
[root@localhost ~]# touch file8
[root@localhost ~]# ll -d dir8 file8
drwxrwxrwx. 2 root root 4096 3月 11 19:44 dir8
-rw-rw-rw-. 1 root root 0 3月 11 19:44 file8
[root@localhost ~]# umask 033
[root@localhost ~]# umask
0033
[root@localhost ~]# mkdir dir9
[root@localhost ~]# touch file9
[root@localhost ~]# ll -d dir9 file9
drwxrwxrwx. 2 root root 4096 3月 11 19:44 dir9
-rw-rw-rw-. 1 root root 0 3月 11 19:44 file9
不过,这种方式修改的 umask 只是临时有效,一旦重启或重新登陆系统,就会失效。如果想让修改永久 生效,则需要修改对应的环境变量配置文件 /etc/profile。例如:
# 修改shell umask值(永久)
[root@localhost ~]# vim /etc/profile
...省略部分内容...
if [ $UID -gt 199 ] && [ "`id -gn`" = "`id -un`" ]; then
umask 002
# 如果UID大于199(普通用户),则使用此umask值
else
umask 022
# 如果UID小于199(超级用户),则使用此umask值
fi
…省略部分内容…
[root@localhost ~]# source /etc/profile //立即在当前shell中生效
八、 网络管理
网络接口(interface):网络中,计算机的网络设备或者其他设备进行数据交互或通信(平时我们泛指网络设备)
en:以太网
w l:无线广域网
www:万维网
8.1 ip 命令
查看 ip 信息
ifconfig(Linux)、ip addr、ip a、
ipconfig(Windows)
[root@bogon ~]# ifconfig
ens160: flags=4163<UP,BROADCAST,RUNNING,MULTICAST> mtu 1500 //网卡:ens160
inet 192.168.142.130 netmask 255.255.255.0 broadcast 192.168.142.255
//netmask(子网掩码) broadcast (广播)
inet6 fe80::20c:29ff:fecd:c634 prefixlen 64 scopeid 0x20<link>
ether 00:0c:29:cd:c6:34 txqueuelen 1000 (Ethernet)
RX packets 96 bytes 11100 (10.8 KiB)
RX errors 0 dropped 0 overruns 0 frame 0
TX packets 130 bytes 15080 (14.7 KiB)
TX errors 0 dropped 0 overruns 0 carrier 0 collisions 0
lo: flags=73<UP,LOOPBACK,RUNNING> mtu 65536
inet 127.0.0.1 netmask 255.0.0.0
inet6 ::1 prefixlen 128 scopeid 0x10<host>
loop txqueuelen 1000 (Local Loopback)
RX packets 19 bytes 2154 (2.1 KiB)
RX errors 0 dropped 0 overruns 0 frame 0
TX packets 19 bytes 2154 (2.1 KiB)
TX errors 0 dropped 0 overruns 0 carrier 0 collisions 0
使用 ip 命令可以 配置临时网络的连接信息
ip link:显示网络设备运行状态
ip -s link:显示更详细设备信息
ip link show:[网络设备名]:仅显示指定的网络设备名的信息
ip link show up:仅显示当前处于激活状态的设备信息
ip link set [网络设备名] down :将指定的网络设备下载
ip addr / a [网络设备名]:查看指定**网络设备(网卡名称)**的配置信息,如果加了-s 选项,则会添加相关的统计信息,如接收到或传送的数据包等
ip -4 a add IP地址[/掩码] dev [网络设备名]:添加一个临时的 IPv4 的地址(重启后失效)eg.ip -4 a add 192.168.142.130/24 dev ens160
ip -6 a add IP地址[/掩码] dev [网络设备名]:添加一个临时的 IPv6 的地址
ip -4 a del IP地址[/掩码] dev [网络设备名]:删除网卡的临时的 IPv4 的地址
[root@bogon ~]# ip -4 a del 192.168.142.130/24 dev ens160
使用示例:
显示网络设备运行状态
[root@bogon ~]# ip link
1: lo(本地回环): <LOOPBACK,UP,LOWER_UP> mtu 65536 qdisc noqueue state UNKNOWN mode DEFAULT group default qlen 1000
link/loopback 00:00:00:00:00:00 brd 00:00:00:00:00:00
2: ens160: <BROADCAST,MULTICAST,UP,LOWER_UP> mtu 1500 qdisc mq state UP mode DEFAULT group default qlen 1000
link/ether 00:0c:29:96:ab:3f brd ff:ff:ff:ff:ff:ff
altname enp3s0
显示更详细设备信息
[root@bogon ~]# ip -s link
1: lo: <LOOPBACK,UP,LOWER_UP> mtu 65536 qdisc noqueue state UNKNOWN mode DEFAULT group default qlen 1000
link/loopback 00:00:00:00:00:00 brd 00:00:00:00:00:00
RX: bytes packets errors dropped missed mcast
2039 17 0 0 0 0
TX: bytes packets errors dropped carrier collsns
2039 17 0 0 0 0
2: ens160: <BROADCAST,MULTICAST,UP,LOWER_UP> mtu 1500 qdisc mq state UP mode DEFAULT group default qlen 1000
link/ether 00:0c:29:96:ab:3f brd ff:ff:ff:ff:ff:ff
RX: bytes packets errors dropped missed mcast
128267 1513 0 0 0 256
TX: bytes packets errors dropped carrier collsns
69523 715 0 0 0 0
仅显示指定的网络设备名的信息
[root@bogon ~]# ip link show ens160
2: ens160: <BROADCAST,MULTICAST,UP,LOWER_UP> mtu 1500 qdisc mq state UP mode DEFAULT group default qlen 1000
link/ether 00:0c:29:96:ab:3f brd ff:ff:ff:ff:ff:ff
altname enp3s0
[root@bogon ~]# ip -s link show ens160
2: ens160: <BROADCAST,MULTICAST,UP,LOWER_UP> mtu 1500 qdisc mq state UP mode DEFAULT group default qlen 1000
link/ether 00:0c:29:96:ab:3f brd ff:ff:ff:ff:ff:ff
RX: bytes packets errors dropped missed mcast
136665 1621 0 0 0 256
TX: bytes packets errors dropped carrier collsns
77425 792 0 0 0 0
altname enp3s0
查看指定网络设备(网卡名称)的配置信息,如果加了-s 选项,则会添加相关的统计信息,如接收到或传送的数据包等
[root@bogon ~]# ip a
1: lo: <LOOPBACK,UP,LOWER_UP> mtu 65536 qdisc noqueue state UNKNOWN group default qlen 1000
link/loopback 00:00:00:00:00:00 brd 00:00:00:00:00:00
inet 127.0.0.1/8 scope host lo
valid_lft forever preferred_lft forever
inet6 ::1/128 scope host
valid_lft forever preferred_lft forever
2: ens160: <BROADCAST,MULTICAST,UP,LOWER_UP> mtu 1500 qdisc mq state UP group default qlen 1000
link/ether 00:0c:29:96:ab:3f brd ff:ff:ff:ff:ff:ff
altname enp3s0
inet 192.168.142.130/24 brd 192.168.142.255 scope global dynamic noprefixroute ens160
valid_lft 1172sec preferred_lft 1172sec
inet6 fe80::20c:29ff:fe96:ab3f/64 scope link noprefixroute
valid_lft forever preferred_lft forever
[root@bogon ~]# ip -s a
1: lo: <LOOPBACK,UP,LOWER_UP> mtu 65536 qdisc noqueue state UNKNOWN group default qlen 1000
link/loopback 00:00:00:00:00:00 brd 00:00:00:00:00:00
inet 127.0.0.1/8 scope host lo
valid_lft forever preferred_lft forever
inet6 ::1/128 scope host
valid_lft forever preferred_lft forever
RX: bytes packets errors dropped missed mcast
2039 17 0 0 0 0
TX: bytes packets errors dropped carrier collsns
2039 17 0 0 0 0
2: ens160: <BROADCAST,MULTICAST,UP,LOWER_UP> mtu 1500 qdisc mq state UP group default qlen 1000
link/ether 00:0c:29:96:ab:3f brd ff:ff:ff:ff:ff:ff
altname enp3s0
inet 192.168.142.130/24 brd 192.168.142.255 scope global dynamic noprefixroute ens160
valid_lft 1153sec preferred_lft 1153sec
inet6 fe80::20c:29ff:fe96:ab3f/64 scope link noprefixroute
valid_lft forever preferred_lft forever
RX: bytes packets errors dropped missed mcast
139353 1655 0 0 0 256
TX: bytes packets errors dropped carrier collsns
80619 815 0 0 0 0
[root@bogon ~]# ip -s a show ens160
2: ens160: <BROADCAST,MULTICAST,UP,LOWER_UP> mtu 1500 qdisc mq state UP group default qlen 1000
link/ether 00:0c:29:96:ab:3f brd ff:ff:ff:ff:ff:ff
altname enp3s0
inet 192.168.142.130/24(子网掩码) brd 192.168.142.255 scope global dynamic noprefixroute ens160
valid_lft 1075sec preferred_lft 1075sec
inet6 fe80::20c:29ff:fe96:ab3f/64 scope link noprefixroute
valid_lft forever preferred_lft forever
RX: bytes packets errors dropped missed mcast
144263 1718 0 0 0 260
TX: bytes packets errors dropped carrier collsns
84303 845 0 0 0 0
ip -4 a add IP地址[/掩码] dev [网络设备名]:添加一个临时的 IPv4 的地址(重启后失效)
[root@bogon ~]# ip -4 a add 192.168.142.130/24 dev ens160
删除网卡的临时的 IPv4 的地址
[root@bogon ~]# ip -4 a del 192.168.142.130/24 dev ens160
8.2 修改配置文件
在 redhat 9 中,已经不推荐修改配置文件了,而推荐使用命令的方式来进行配置
要修改配置文件,我们需要编辑 /etc/NetworkManager/system-connections 目录下的 ens160.nmconnection 文件中
注意:不同的电脑,这个文件的名称可能不同
[root@bogon ~]# cd /etc/NetworkManager/system-connections
[root@bogon system-connections]# pwd
/etc/NetworkManager/system-connections
[root@bogon system-connections]# ll
total 4
-rw-------. 1 root root 297 Dec 17 21:32 ens160.nmconnection
[root@bogon system-connections]#
[root@bogon system-connections]# cat ens160.nmconnection
[connection] #网络连接配置
id=ens160 #网卡标识,这个名称可以和网卡名称不一致,只要唯一即可
uuid=8d5fe594-0bf6-3b49-a4eb-3f919addee94 # 网络的标识
type=ethernet # 网络类型,默认情况下是以太网
autoconnect-priority=-999 # 自动链接策略
interface-name=ens160 #指定网卡名称
timestamp=1697580965
[ethernet]
[ipv4] # ipv4 的配置
method=auto
[ipv6] # ipv6 的配置
addr-gen-mode=eui64
method=auto
[proxy]
下面我们把这个文件编辑一下,把固定 ip 写到这个文件中,并指定 dns 和网关
[root@bogon system-connections]# cd /etc/NetworkManager/system-connections/
[root@bogon system-connections]# ll
total 4
-rw-------. 1 root root 229 Oct 17 22:36 ens160.nmconnection
[root@bogon system-connections]# vim ens160.nmconnection
编辑这个文件如下:

修改如下:

子网掩码,网关
method=manual(手册:手动的去指定 ip )
:wq保存/shift+zz
查看网关方式:


重启查看是否改变
[root@bogon system-connections]# reboot
8.3 nmcli 命令**
8.3.1 查看网卡设备 nmcli d
使用格式:nmcli device 或者 简写为nmcli d
# 查看当前连接设备信息
[root@bogon system-connections]# nmcli d connect ens160
Device 'ens160' successfully activated with '8d5fe594-0bf6-3b49-a4eb-3f919addee94'.
#断开网络,也就是吧网卡禁用了
[root@bogon system-connections]# nmcli d disconnect ens160
# 执行完上面的命令后,xshell会断掉,重新连接:在虚拟机中执行此命令:
[root@bogon ~]# nmcli d connect ens160
8.3.2 查看网卡配置 nmcli c
使用格式: nmcli connection 或简写为 nmcli c
#查看网卡信息
[root@bogon ~]# nmcli connection
NAME UUID TYPE DEVICE
ens160 8d5fe594-0bf6-3b49-a4eb-3f919addee94 ethernet ens160
lo 4d03e2ee-ffe3-4b68-ab38-a227fb96543d loopback lo
[root@bogon ~]# nmcli c
NAME UUID TYPE DEVICE
ens160 8d5fe594-0bf6-3b49-a4eb-3f919addee94 ethernet ens160
lo 4d03e2ee-ffe3-4b68-ab38-a227fb96543d loopback lo
# 查看自动获取的网关地址
[root@bogon ~]# nmcli c show ens160 | grep -i gateway
connection.gateway-ping-timeout: 0
ipv4.gateway: 192.168.142.2
ipv6.gateway: --
IP4.GATEWAY: 192.168.142.2
IP6.GATEWAY: --
# 查看当前网卡的 dns 配置
[root@bogon ~]# nmcli c show ens160 | grep -i dns
connection.mdns: -1 (default)
connection.dns-over-tls: -1 (default)
ipv4.dns: 8.8.8.8,192.168.142.2
ipv4.dns-search: --
ipv4.dns-options: --
ipv4.dns-priority: 0
ipv4.ignore-auto-dns: no
ipv6.dns: --
ipv6.dns-search: --
ipv6.dns-options: --
ipv6.dns-priority: 0
ipv6.ignore-auto-dns: no
IP4.DNS[1]: 8.8.8.8
IP4.DNS[2]: 192.168.142.2
#
8.3.3 配置网卡 ip
1)非交互式*
需求:修改 ens160 的 ip 地址为192.168.142.130,并且是 ipv4,自动连接,dns 为114.114.114.114,网关为192.168.142.2,子网掩码为255.255.255.0(代表24),然后再添加一个 ip 地址:192.168.142.125
2)交互式
8.3.4 测试网络是否畅通 ping
使用格式:ping [options]
# 测试本机的网卡是否可用,按 Ctrl + C 退出
[root@bogon ~]# ping 192.168.142.121
PING 192.168.142.121 (192.168.142.121) 56(84) bytes of data.
64 bytes from 192.168.142.121: icmp_seq=1 ttl=64 time=0.290 ms
64 bytes from 192.168.142.121: icmp_seq=2 ttl=64 time=0.168 ms
64 bytes from 192.168.142.121: icmp_seq=3 ttl=64 time=0.207 ms
^C
--- 192.168.142.121 ping statistics ---
3 packets transmitted, 3 received, 0% packet loss, time 2084ms
rtt min/avg/max/mdev = 0.168/0.221/0.290/0.050 ms
# 测试网络是否申通
[root@bogon ~]# ping www.baidu.com
PING www.wshifen.com (104.193.88.123) 56(84) bytes of data.
64 bytes from 104.193.88.123 (104.193.88.123): icmp_seq=1 ttl=128 time=234 ms
64 bytes from 104.193.88.123 (104.193.88.123): icmp_seq=2 ttl=128 time=202 ms
64 bytes from 104.193.88.123 (104.193.88.123): icmp_seq=3 ttl=128 time=192 ms
64 bytes from 104.193.88.123 (104.193.88.123): icmp_seq=4 ttl=128 time=201 ms
^C
--- www.wshifen.com ping statistics ---
4 packets transmitted, 4 received, 0% packet loss, time 3003ms
rtt min/avg/max/mdev = 191.940/207.303/234.484/16.163 ms
# 指定发送包的次数,通过 -c选项来指定,后面跟上发包的次数
[root@bogon ~]# ping -c2 www.baidu.com
PING www.wshifen.com (104.193.88.123) 56(84) bytes of data.
64 bytes from 104.193.88.123 (104.193.88.123): icmp_seq=1 ttl=128 time=192 ms
64 bytes from 104.193.88.123: icmp_seq=2 ttl=128 time=199 ms
--- www.wshifen.com ping statistics ---
2 packets transmitted, 2 received, 0% packet loss, time 5246ms
rtt min/avg/max/mdev = 191.651/195.156/198.661/3.505 ms
[root@bogon ~]#
8.3.5 连接、断开和删除设备
连接设备,即让设备可用
[root@bogon ~]# nmcli c up ens160
Connection successfully activated (D-Bus active path: /org/freedesktop/NetworkManager/ActiveConnection/6)
断开网络
[root@bogon ~]# nmcli c down ens160
删除网络,注意这个命令不要执行
[root@bogon ~]# nmcli c delete ens160
8.4 可视化进行配置 numtui
启用 cockpit 服务
[root@bogon ~]# systemctl start cockpit
8.5 从网站下载文件
8.5.1 wget
MySQL源码安装代码示例:
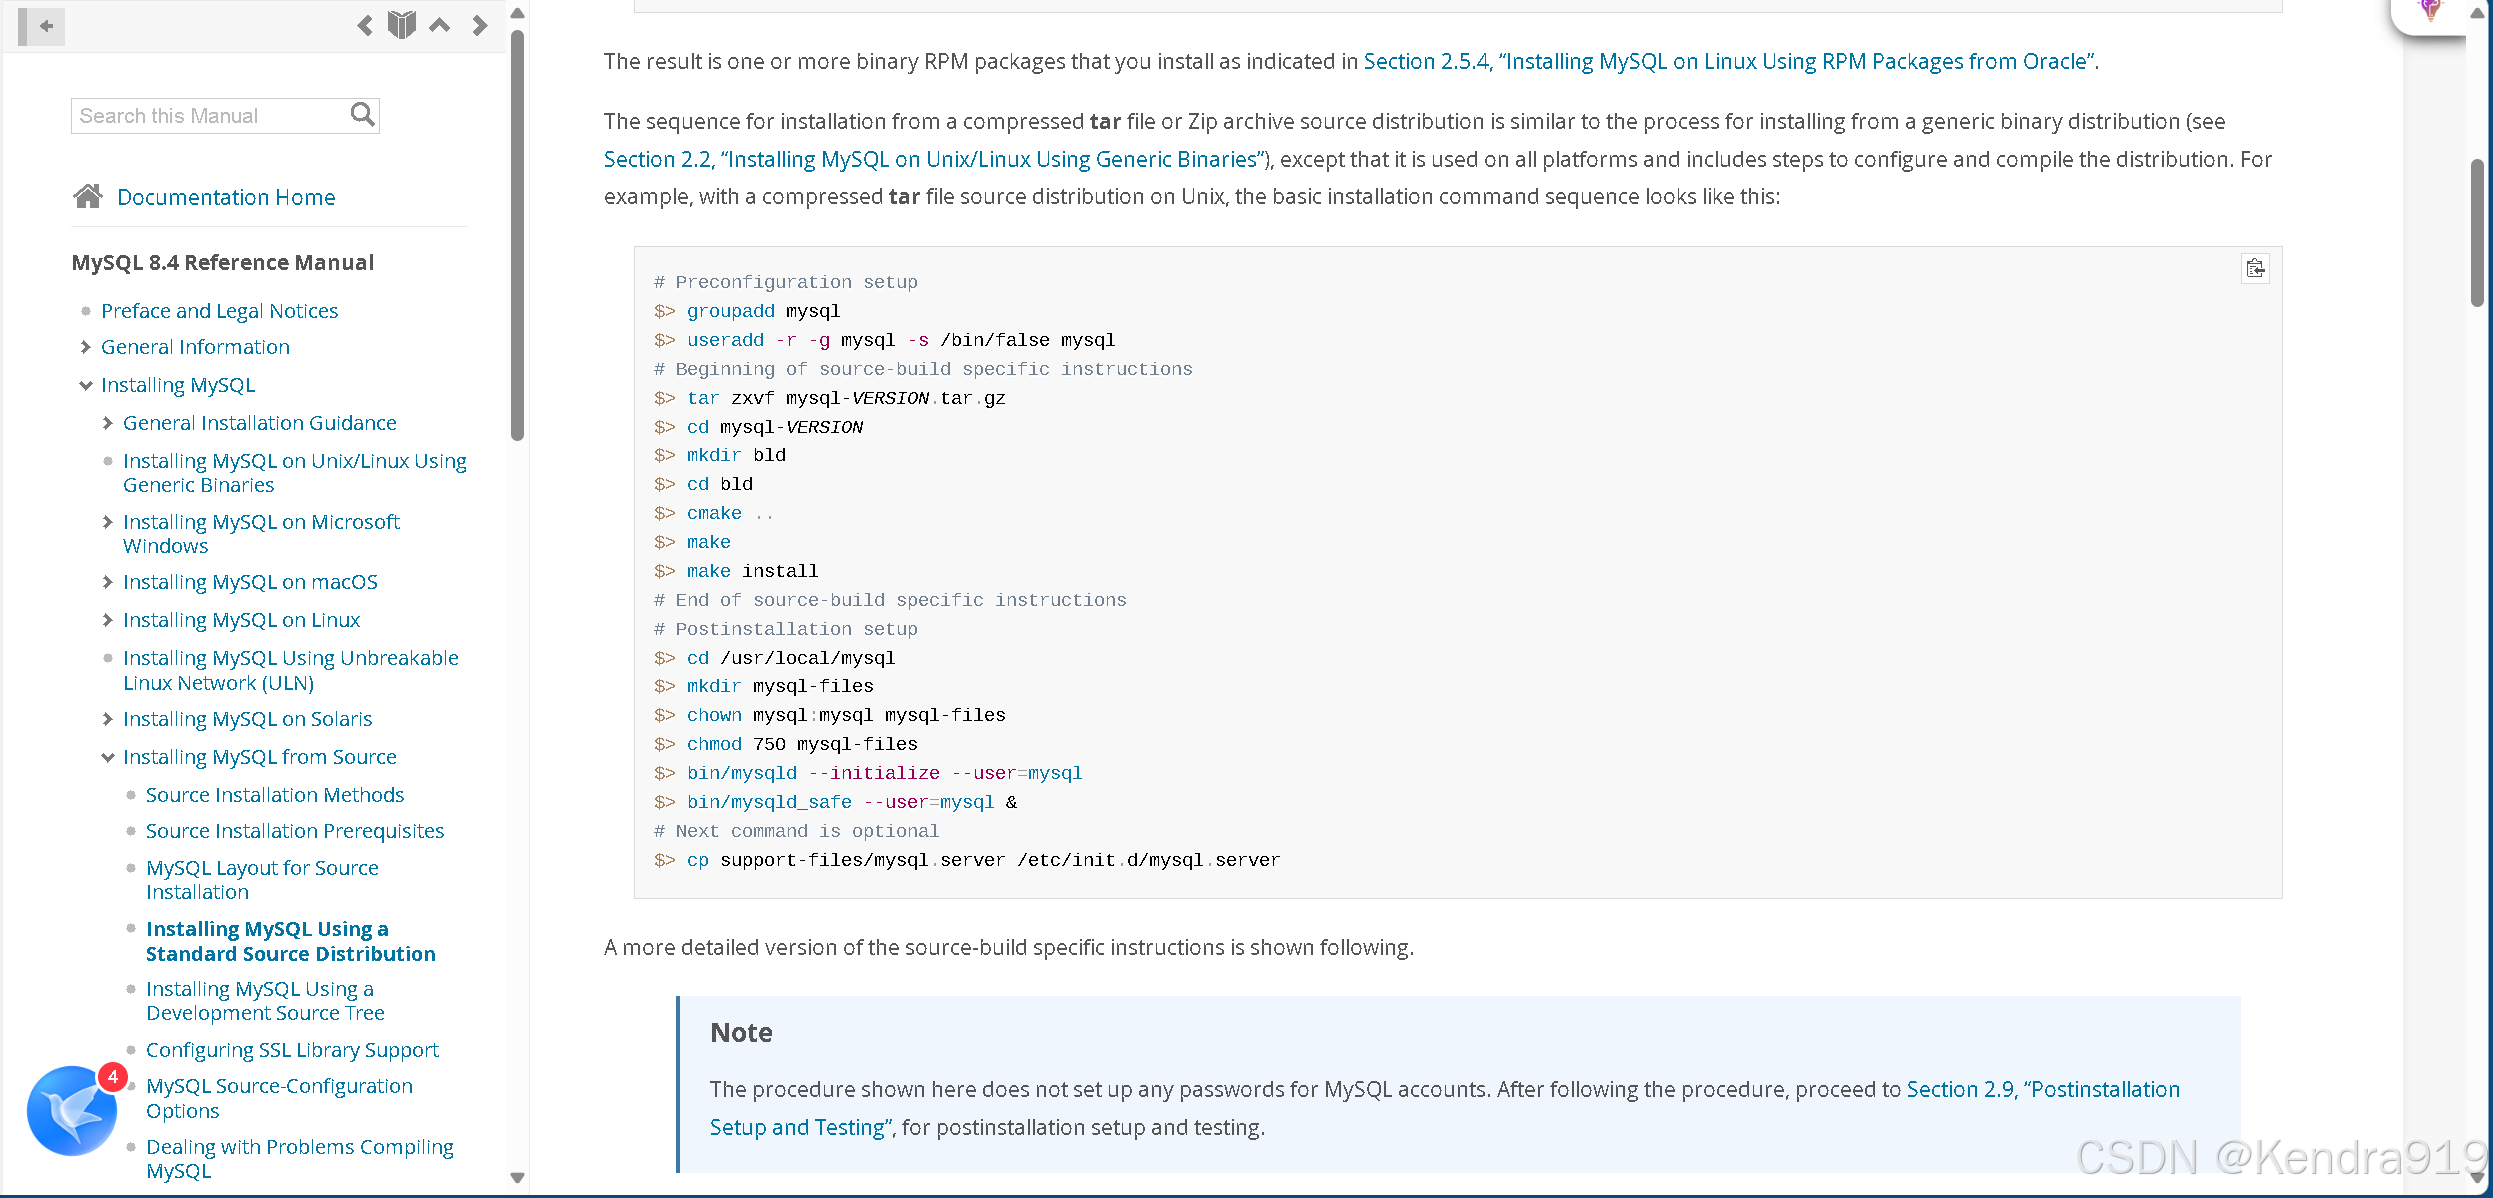
8.5.2 curl
九、 磁盘管理
9.1 标准磁盘管理
9.1.1 两种分区格式
- MBR(Master Boot Record,主引导分区),支持 4 个主分区或者 3 个主分区 1 个扩展分区,分区的空间最大支持 2.2 TB。
- GPT(GUID Partition Table,全局唯一标识分区表),最多可支持 128 个分区,且大小支持 2.2TB 到 18 EB,并向后兼容 MBR。
9.1.2 查看磁盘信息 lsblk
[root@bogon ~]# lsblk
NAME MAJ:MIN RM SIZE RO TYPE MOUNTPOINTS
sr0 11:0 1 8.9G 0 rom /run/media/root/RHEL-9-2-0-
BaseOS-x86_64
nvme0n1 259:0 0 50G 0 disk
├─nvme0n1p1 259:1 0 1G 0 part /boot
└─nvme0n1p2 259:2 0 49G 0 part
├─rhel_bogon-root 253:0 0 44G 0 lvm /
└─rhel_bogon-swap 253:1 0 5G 0 lvm [SWAP]
接下来看为了演示后续的功能,我们添加一个 20G 的 Sata 类型的磁盘一个 30G 的 NVME 类型的磁盘。
注意:要添加磁盘,我们先关闭虚拟机。
[root@bogon ~]# systemctl poweroff
添加好上面的两个磁盘后,我们启动虚拟机,然后再查看磁盘信息:
[root@bogon ~]# lsblk
NAME MAJ:MIN RM SIZE RO TYPE MOUNTPOINTS
sda 8:0 0 20G 0 disk
sr0 11:0 1 8.9G 0 rom
nvme0n1 259:0 0 50G 0 disk
├─nvme0n1p1 259:1 0 1G 0 part /boot
└─nvme0n1p2 259:2 0 49G 0 part
├─rhel_bogon-root 253:0 0 44G 0 lvm /
└─rhel_bogon-swap 253:1 0 5G 0 lvm [SWAP]
nvme0n2 259:3 0 30G 0 disk
上面的结果说明:
- sda:表示第一块 Sata 硬盘,如果是第二块则名称为 sdb,第三块为 sdc,依次类推
- sr0:表示第一块光盘,如果是 sr1 则表示第二块光盘
- nvme0n1:表示第一块 nvme 类型的硬盘,nvme0n2 表示第二块 nvme 类型的硬盘,依次类推
- nvme0n1p1:表示第一块 nvme 类型的硬盘的第一个分区,nvme0n1p2 表示第一块硬盘的第二个分区
9.1.3 磁盘分区
在使用磁盘之前,我们需要对磁盘进行分区并格式化后,才可以使用。而对磁盘进行分区,需要使用到 fdisk 命令工具,这个工具默认分区格式为 mdr 格式。
使用格式: fdisk 磁盘设备名(如/dev/sda)
9.1.3.1 MBR 格式
首先我们对 Sata 磁盘进行分区,分为 3 个主分区,1 个扩展分区,1 个逻辑分区
[root@bogon ~]# fdisk /dev/sda
Welcome to fdisk (util-linux 2.37.4).
Changes will remain in memory only, until you decide to write them.
Be careful before using the write command.
Device does not contain a recognized partition table.
Created a new DOS disklabel with disk identifier 0xf0b8875a.
Command (m for help): # 提示按 m 键来查看帮助信息
# 输入 m 后
Generic
d delete a partition # 删除分区
F list free unpartitioned space # 列出未分区的剩余空间,一般不用
l list known partition types # 列出已有的分区类型
n add a new partition # 添加一个新分区
p print the partition table # 打印分区表
t change a partition type # 修改分区类型
v verify the partition table # 确认分区表,一般不用
i print information about a partition # 打印分区信息,一般不用
Misc
m print this menu # 显示帮助信息
u change display/entry units
x extra functionality (experts only)
Script
I load disk layout from sfdisk script file
O dump disk layout to sfdisk script file
Save & Exit
w write table to disk and exit # 保存分区表并退出
q quit without saving changes # 退出且不保存分区
Create a new label
g create a new empty GPT partition table # 创建一个空的 GPT 分区表
G create a new empty SGI (IRIX) partition table # 创建一个空的 SGI 分区表
o create a new empty DOS partition table # 创建一个空的 DOS 分区表
s create a new empty Sun partition table # 创建一个空的 Sun 分区表
Command (m for help):
#---------- Sata 磁盘进行分区,分为 3 主分区,1 个扩展分区,1 个逻辑分区。-----------
-------
Command (m for help): n # 输入 n 后回来来创建一个新的分区表
Partition type
p primary (0 primary, 0 extended, 4 free) # 输入 p 来创建主分区
e extended (container for logical partitions) # 输入 e 来创建扩展分区
Select (default p): p # 输入 p 或者直接回来来创建一个主分区
Partition number (1-4, default 1): # 输入 1 或者直接回来表示这是第一个主分区
First sector (2048-41943039, default 2048): # 直接回车,表示当前第 2048 个扇区开始分区
Last sector, +/-sectors or +/-size{K,M,G,T,P} (2048-41943039, default 41943039): +2G # 指定第一个分区大小为 2G
Created a new partition 1 of type 'Linux' and of size 2 GiB.
Command (m for help):
# 创建第二个和第三个主分区则重复上面的操作。
Command (m for help): n # 输入 n 后回车
Partition type
p primary (1 primary, 0 extended, 3 free)
e extended (container for logical partitions)
Select (default p): # 直接回车来创建第二个主分区
Using default response p.
Partition number (2-4, default 2): # 直接回车
First sector (4196352-41943039, default 4196352): # 直接回车
Last sector, +/-sectors or +/-size{K,M,G,T,P} (4196352-41943039, default 41943039): +10G # 指定大小为 10G
Created a new partition 2 of type 'Linux' and of size 10 GiB.
Command (m for help): n # 创建第三个分区
Partition type
p primary (2 primary, 0 extended, 2 free)
e extended (container for logical partitions)
Select (default p):
Using default response p.
Partition number (3,4, default 3):
First sector (25167872-41943039, default 25167872):
Last sector, +/-sectors or +/-size{K,M,G,T,P} (25167872-41943039, default 41943039): # 直接回车即使用所有剩余空间
Created a new partition 3 of type 'Linux' and of size 8 GiB.
Command (m for help):
Command (m for help): w # 分好后,输入 w 来保存分区表并退出
The partition table has been altered.
Calling ioctl() to re-read partition table.
Syncing disks.
执行完上面操作后,我们再次来查看磁盘信息:
[root@bogon ~]# lsblk
NAME MAJ:MIN RM SIZE RO TYPE MOUNTPOINTS
sda 8:0 0 20G 0 disk
├─sda1 8:1 0 2G 0 part # 表示第一块 Sata 硬盘的第一
个分区
├─sda2 8:2 0 10G 0 part # 表示第一块 Sata 硬盘的第二
个分区
└─sda3 8:3 0 8G 0 part # 表示第一块 Sata 硬盘的第三
个分区
sr0 11:0 1 8.9G 0 rom
nvme0n1 259:0 0 50G 0 disk
├─nvme0n1p1 259:1 0 1G 0 part /boot
└─nvme0n1p2 259:2 0 49G 0 part
├─rhel_bogon-root 253:0 0 44G 0 lvm /
└─rhel_bogon-swap 253:1 0 5G 0 lvm [SWAP]
nvme0n2 259:3 0 30G 0 disk
9.1.3.2 GPT 格式
我们对磁盘一个 30 G 的 NVME 类型的磁盘做 GPT 格式分区。
# /dev/nvme0n2 格式化为 gpt 格式,且包含 2 个分区
[root@bogon ~]# fdisk /dev/nvme0n2 # 对 nvme0n2 硬盘进行分区
Welcome to fdisk (util-linux 2.37.4).
Changes will remain in memory only, until you decide to write them.
Be careful before using the write command.
Device does not contain a recognized partition table.
Created a new DOS disklabel with disk identifier 0x79c4832e.
Command (m for help): g # 创建一个空的 gpt 分区表
Created a new GPT disklabel (GUID: 00922DA5-3E66-F644-B5EA-A92B796BD8F2).
Command (m for help): n # 创建第一个分区
Partition number (1-128, default 1): # 直接回车
First sector (2048-62914526, default 2048): # 直接回车
Last sector, +/-sectors or +/-size{K,M,G,T,P} (2048-62914526, default 62914526): +15G # 指定第一个分区大小为 15G
Created a new partition 1 of type 'Linux filesystem' and of size 15 GiB.
Command (m for help): n # 创建第二个分区
Partition number (2-128, default 2): # 直接回车
First sector (31459328-62914526, default 31459328): # 直接回车
Last sector, +/-sectors or +/-size{K,M,G,T,P} (31459328-62914526, default62914526): # 直接回车
Created a new partition 2 of type 'Linux filesystem' and of size 15 GiB.
Command (m for help): w # 保存分区表并退出
The partition table has been altered.
Calling ioctl() to re-read partition table.
Syncing disks.
执行完上面的操作后, 我们再次查看磁盘信息:
[root@bogon ~]# lsblk
NAME MAJ:MIN RM SIZE RO TYPE MOUNTPOINTS
sda 8:0 0 20G 0 disk
├─sda1 8:1 0 2G 0 part
├─sda2 8:2 0 10G 0 part
└─sda3 8:3 0 8G 0 part
sr0 11:0 1 8.9G 0 rom
nvme0n1 259:0 0 50G 0 disk
├─nvme0n1p1 259:1 0 1G 0 part /boot
└─nvme0n1p2 259:2 0 49G 0 part
├─rhel_bogon-root 253:0 0 44G 0 lvm /
└─rhel_bogon-swap 253:1 0 5G 0 lvm [SWAP]
nvme0n2 259:3 0 30G 0 disk
├─nvme0n2p1 259:6 0 15G 0 part # 第一个分区
└─nvme0n2p2 259:7 0 15G 0 part # 第二个分区
9.1.4 分区格式化 mkfs
对磁盘进行格式化的目的:是为了形成文件系统,文件系统是操作系统用于明确存储设备或分区的文 件的方法和数据结构。
对于不同的操作系统,对磁盘进行格式化后所体现的文件系统类型不一样:
- windowns:fat(这种格式不支持大于 4G 的文件)、NTFS(这是从 window7的默认格式)
- linux:ext系统格式(ext3、ext4)、xfs
对磁盘分区格式化的命令为:
mkfs | mkfs.xfs | mkfs.ext4 [选项] 分区的设备名
选项:
-t 文件系统类型,如果 ext4、xfs
-c 建立文件系统前先检查坏块
-V 输出建立的文件系统的详细信息
接下来我们对 /dev/sda1、/dev/sda2、/dev/sda3 进行格式化,我们把 /dev/sda1 格式化为 ext4,把另外两个格式化为 xfs。
[root@bogon ~]# mkfs.ext4 /dev/sda1
mke2fs 1.46.5 (30-Dec-2021)
Creating filesystem with 524288 4k blocks and 131072 inodes
Filesystem UUID: 603c056b-0097-4999-87ee-9d34c09713fb
Superblock backups stored on blocks:
32768, 98304, 163840, 229376, 294912
Allocating group tables: done
Writing inode tables: done
Creating journal (16384 blocks): done
Writing superblocks and filesystem accounting information: done
[root@bogon ~]# mkfs -t xfs /dev/sda2
meta-data=/dev/sda2 isize=512 agcount=4, agsize=655360 blks
= sectsz=512 attr=2, projid32bit=1
= crc=1 finobt=1, sparse=1, rmapbt=0
= reflink=1 bigtime=1 inobtcount=1
data = bsize=4096 blocks=2621440, imaxpct=25
= unit=0 swidth=0 blks
naming =version 2 bsize=4096 ascii-ci=0, ftype=1
log =internal log bsize=4096 blocks=2560, version=2
= sectsz=512 sunit=0 blks, lazy-count=1
realtime =none extsz=4096 blocks=0, rtextents=0
[root@bogon ~]# mkfs.xfs /dev/sda3
meta-data=/dev/sda3 isize=512 agcount=4, agsize=524224 blks
= sectsz=512 attr=2, projid32bit=1
= crc=1 finobt=1, sparse=1, rmapbt=0
= reflink=1 bigtime=1 inobtcount=1
data = bsize=4096 blocks=2096896, imaxpct=25
= sunit=0 swidth=0 blks
naming =version 2 bsize=4096 ascii-ci=0, ftype=1
log =internal log bsize=4096 blocks=2560, version=2
= sectsz=512 sunit=0 blks, lazy-count=1
realtime =none extsz=4096 blocks=0, rtextents=0
我们格式化完成后,可以使用 blkid 命令来查看分区 id 号
[root@bogon ~]# blkid
/dev/mapper/rhel_bogon-swap: UUID="c40a1d4e-8acc-4aa6-af02-773c878f5588"
TYPE="swap"
/dev/nvme0n1p1: UUID="98e55bfe-116c-411f-956c-d3e925b515c5" TYPE="xfs"
PARTUUID="d366e00e-01"
/dev/nvme0n1p2: UUID="gklf44-wXFJ-G8dL-qAtd-eo50-onCK-5qz24M"
TYPE="LVM2_member" PARTUUID="d366e00e-02"
/dev/sr0: UUID="2023-04-13-16-58-02-00" LABEL="RHEL-9-2-0-BaseOS-x86_64"
TYPE="iso9660" PTUUID="d3d1f9a5" PTTYPE="dos"
/dev/nvme0n2p1: PARTUUID="dc85fe38-0242-dc40-a40c-7b43fc204293"
/dev/nvme0n2p2: PARTUUID="496fa0c0-e85c-9045-b06e-439bf9dfc79d"
/dev/mapper/rhel_bogon-root: UUID="a673e989-57a6-4257-be10-bb807f7153d7"
TYPE="xfs"
/dev/sda2: UUID="e5f2e914-2b96-4bbe-b767-7083f15bc9f8" TYPE="xfs"
PARTUUID="f0b8875a-02"
/dev/sda3: UUID="94a14f34-042d-4aeb-93d0-a085ab7d066f" TYPE="xfs"
PARTUUID="f0b8875a-03"
/dev/sda1: UUID="603c056b-0097-4999-87ee-9d34c09713fb" TYPE="ext4"
PARTUUID="f0b8875a-01"
9.1.5 分区挂载 mount
挂载就是将一个分区或者设备挂载到指定的挂载目录。简单来说就是使用这个分区。
挂载的命令格式:
# mount [-t 文件系统类型] 设备名 挂载目录
mount [-t vfstype] [-o options] device dir
1、-t vfstype:用于指定文件系统的类型,通常无须指定,mount 会自动选择正确的类型,有以下几种类型:
iso9660:光盘或光盘镜像类型(记住)
nfs:linux中文件网络共享
2、-o options:主要用于描述设备或档案的挂载方式
ro:采用只读的方式进行挂载
rw:采用读写的方式进行挂载
loop:用来把一个文件当成硬盘分区挂载上系统
3、device:要挂载的设备
4、dir:设置在系统上的挂载点(目标),必须存在
接下来我们把 /dev/sda1 挂载到 /guazai 目录。注意挂载的目录必须存在。
# 创建挂载目录
[root@bogon ~]# mkdir -pv /guazai{1..3}
mkdir: created directory '/guazai1'
mkdir: created directory '/guazai2'
mkdir: created directory '/guazai3'
# 将 /dev/sda1 设备挂载到 /guazai1 目录
[root@bogon ~]# mount /dev/sda1 /guazai1
# 将 /dev/sda2 设备挂载到 /guazai2 目录
[root@bogon ~]# mount /dev/sda2 /guazai2
# 将 /dev/sda3 设备挂载到 /guazai3 目录
[root@bogon ~]# mount /dev/sda3 /guazai3
9.1.6 查看磁盘空间
查看磁盘空间的使用情况有两个命令:du、df
· df:列出文件系统的磁盘空间占用情况
使用格式为: df [-ahikHTm] [目录或文件名称]
[root@bogon guazai2]# df -h
Filesystem Size Used Avail Use% Mounted on
devtmpfs 4.0M 0 4.0M 0% /dev
tmpfs 3.8G 0 3.8G 0% /dev/shm
tmpfs 1.5G 9.6M 1.5G 1% /run
/dev/mapper/rhel_bogon-root 44G 4.6G 40G 11% /
/dev/nvme0n1p1 1014M 293M 722M 29% /boot
tmpfs 767M 56K 767M 1% /run/user/42
tmpfs 767M 40K 767M 1% /run/user/0
/dev/sda1 2.0G 28K 1.8G 1% /guazai1
/dev/sda2 10G 104M 9.9G 2% /guazai2
/dev/sda3 8.0G 90M 8.0G 2% /guazai3
· du:显示磁盘空间的使用量,默认情况下是以 KB 为单位
使用格式为: du [-ahskm] 文件或目录
[root@bogon guazai2]# du -h /dev/sda1
0 /dev/sda1
9.2 逻辑卷管理
9.2.1 逻辑卷结构
在对磁盘进行分区大小规划时,往往不能合理的利用磁盘空间,这里我们可以使用逻辑卷(Logic Volume Manager)来进行管理。

逻辑卷由以下几个部分组成:
- 物理设备,一般指的是系统存储设备,如:/dev/sda1、/dev/sda2等
- 物理卷(physical volume, PV),它是由多个分区或整个硬盘组成
- 卷组(Volume Group),简称 VG,它可以看成单独的逻辑磁盘,一个卷组中至少包括一个 PV,
- 在卷组创建好后,可以动态添加 PV 到卷组中。
- 逻辑卷(Logical Volume),简称 LV,相当于物理分区,它是建立在卷组之上。
9.2.2 部署逻辑卷
常用的 LVM 部署命令如下:
| 功能 | 物理卷管理 | 卷组管理 | 逻辑卷管理 |
|---|---|---|---|
| 扫描 | pvscan | vgscan | lvscan |
| 建立 | pvcreate | vgcreate | lvcreate |
| 显示 | pvdisplay | vgdisplay | lvdisplay |
| 删除 | pvremove | vgremove | lvremove |
部署逻辑卷步骤:
1、首先我们先把之前挂载的信息删除(删除 /etc/fstab中挂载信息,umount卸载)
# 卸载的格式:umount 设备名称
[root@bogon /]# umount /dev/sda1
[root@bogon /]# umount /dev/sda2
[root@bogon /]# umount /dev/sda3
2、然后执行 fdisk 设备名称 来进行分区删除
d delete a partition # 删除分区
# 首先删除 /dev/sda 设备的分区信息
[root@bogon /]# fdisk /dev/sda
Welcome to fdisk (util-linux 2.37.4).
Changes will remain in memory only, until you decide to write them.
Be careful before using the write command.
Command (m for help): d
Partition number (1-3, default 3):
Partition 3 has been deleted.
Command (m for help): d
Partition number (1,2, default 2):
Partition 2 has been deleted.
Command (m for help): d
Selected partition 1
Partition 1 has been deleted.
Command (m for help): w
The partition table has been altered.
Calling ioctl() to re-read partition table.
Syncing disks.
# 删除 /dev/nvme0n2设备的分区信息
[root@bogon /]# fdisk /dev/nvme0n2
Welcome to fdisk (util-linux 2.37.4).
Changes will remain in memory only, until you decide to write them.
Be careful before using the write command.
Command (m for help): d
Partition number (1,2, default 2):
Partition 2 has been deleted.
Command (m for help): d
Selected partition 1
Partition 1 has been deleted.
Command (m for help): w
The partition table has been altered.
Calling ioctl() to re-read partition table.
Syncing disks.
[root@bogon /]# lsblk
NAME MAJ:MIN RM SIZE RO TYPE MOUNTPOINTS
sda 8:0 0 20G 0 disk
sr0 11:0 1 8.9G 0 rom
nvme0n1 259:0 0 50G 0 disk
├─nvme0n1p1 259:1 0 1G 0 part /boot
└─nvme0n1p2 259:2 0 49G 0 part
├─rhel_bogon-root 253:0 0 44G 0 lvm /
└─rhel_bogon-swap 253:1 0 5G 0 lvm [SWAP]
nvme0n2 259:3 0 30G 0 disk
3、最后用 /dev/sda 和 /dev/nvme0n2 来做逻辑卷
9.2.2.1 物理卷管理(PV)
# 创建物理卷的命令为 `pvcreate 要创建物理卷的设备或分区`
[root@bogon /]# pvcreate /dev/sda
Physical volume "/dev/sda" successfully created.
[root@bogon /]# pvcreate /dev/nvme0n2
Cannot use /dev/nvme0n2: device is partitioned
# 查看 pv
[root@bogon /]# pvs
PV VG Fmt Attr PSize PFree
/dev/nvme0n1p2 rhel_bogon lvm2 a-- <49.00g 0
/dev/sda lvm2 --- 20.00g 20.00g
# 如果希望查看详细的物理卷信息,我们使用 pvdisplay
[root@bogon /]# pvdisplay
--- Physical volume ---
PV Name /dev/nvme0n1p2
VG Name rhel_bogon
PV Size <49.00 GiB / not usable 3.00 MiB
Allocatable yes (but full)
PE Size 4.00 MiB
Total PE 12543
Free PE 0
Allocated PE 12543
PV UUID gklf44-wXFJ-G8dL-qAtd-eo50-onCK-5qz24M
"/dev/sda" is a new physical volume of "20.00 GiB"
--- NEW Physical volume ---
PV Name /dev/sda
VG Name
PV Size 20.00 GiB
Allocatable NO
PE Size 0
Total PE 0
Free PE 0
Allocated PE 0
PV UUID auPcsf-q5mU-bvuP-U6D0-FMwC-xRio-7Y7kV8
9.2.2.2 卷组管理(VG)
# 卷组创建的命令是:`vgcreage 物理卷名称`
[root@bogon /]# vgcreate vgtest /dev/sda
# 查看卷组信息
[root@bogon /]# vgs
VG #PV #LV #SN Attr VSize VFree
rhel_bogon 1 2 0 wz--n- <49.00g 0
vgtest 1 0 0 wz--n- <20.00g <20.00g
#如果希望查看详细信息,则需要使用 vgdisplay
[root@bogon /]# vgdisplay
--- Volume group ---
VG Name rhel_bogon
System ID
Format lvm2
Metadata Areas 1
Metadata Sequence No 3
VG Access read/write
VG Status resizable
MAX LV 0
Cur LV 2
Open LV 2
Max PV 0
Cur PV 1
Act PV 1
VG Size <49.00 GiB
PE Size 4.00 MiB
Total PE 12543
Alloc PE / Size 12543 / <49.00 GiB
Free PE / Size 0 / 0
VG UUID WaQIKz-ye0E-MaPw-jtra-a7rH-CyIK-FGZfHp
--- Volume group ---
VG Name vgtest
System ID
Format lvm2
Metadata Areas 1
Metadata Sequence No 1
VG Access read/write
VG Status resizable
MAX LV 0
Cur LV 0
Open LV 0
Max PV 0
Cur PV 1
Act PV 1
VG Size <20.00 GiB
PE Size 4.00 MiB
Total PE 5119
Alloc PE / Size 0 / 0
Free PE / Size 5119 / <20.00 GiB
VG UUID GKc8v2-FMAm-MMOY-eUQa-MwDA-z2a3-IIqKk8
9.2.2.3 逻辑卷管理(LV)
# 逻辑卷的创建命令为:lvcreate -n 逻辑卷名称 -L 逻辑卷大小 卷组名称
[root@bogon /]# lvcreate -n lvtest -L 10G vgtest
WARNING: ext4 signature detected on /dev/vgtest/lvtest at offset 1080. Wipe it? [y/n]: y
Wiping ext4 signature on /dev/vgtest/lvtest.
Logical volume "lvtest" created.
# 查看逻辑卷信息
[root@bogon /]# lvs
LV VG Attr LSize Pool Origin Data% Meta% Move Log
Cpy%Sync Convert
root rhel_bogon -wi-ao---- <44.00g
swap rhel_bogon -wi-ao---- 5.00g
lvtest vgtest -wi-a----- 10.00g
# 如果希望查看 lvtest 的详细信息
[root@bogon /]# lvdisplay
--- Logical volume ---
LV Path /dev/rhel_bogon/swap
LV Name swap
VG Name rhel_bogon
LV UUID 6B9VPA-sOSR-LqOA-lCP2-dNOo-DpMG-SaqdDU
LV Write Access read/write
LV Creation host, time bogon, 2023-10-15 19:35:54 +0800
LV Status available
# open 2
LV Size 5.00 GiB
Current LE 1280
Segments 1
Allocation inherit
Read ahead sectors auto
- currently set to 256
Blbock device 253:1
--- Logical volume ---
LV Path /dev/rhel_bogon/root
LV Name root
VG Name rhel_bogon
LV UUID aVkuFm-8Irw-PQ4a-qy07-R4Pv-LTFs-228OFd
LV Write Access read/write
LV Creation host, time bogon, 2023-10-15 19:35:54 +0800
LV Status available
# open 1
LV Size <44.00 GiB
Current LE 11263
Segments 1
Allocation inherit
Read ahead sectors auto
- currently set to 256
Block device 253:0
--- Logical volume ---
LV Path /dev/vgtest/lvtest
LV Name lvtest
VG Name vgtest
LV UUID XTBjin-FOC4-w6FQ-C52w-TxuT-ItzA-K78InY
LV Write Access read/write
LV Creation host, time bogon, 2023-12-24 17:17:00 +0800
LV Status available
# open 0
LV Size 10.00 GiB
Current LE 2560
Segments 1
Allocation inherit
Read ahead sectors auto
- currently set to 256
Block device 253:2
9.2.2.4 格式化逻辑卷
# 我们将 /dev/vgtest/lvtest 逻辑卷格式化为 xfs 类型的文件系统
[root@bogon /]# mkfs.xfs /dev/vgtest/lvtest
meta-data=/dev/vgtest/lvtest isize=512 agcount=4, agsize=655360 blks
= sectsz=512 attr=2, projid32bit=1
= crc=1 finobt=1, sparse=1, rmapbt=0
= reflink=1 bigtime=1 inobtcount=1
data = bsize=4096 blocks=2621440, imaxpct=25
= sunit=0 swidth=0 blks
naming =version 2 bsize=4096 ascii-ci=0, ftype=1
log =internal log bsize=4096 blocks=2560, version=2
= sectsz=512 sunit=0 blks, lazy-count=1
realtime =none extsz=4096 blocks=0, rtextents=0
9.2.2.5 挂载逻辑卷
# 我们将格式化好的 /dev/vgtest/lvtest 逻辑卷挂载到 /mnt/mount1 目录上
# 查看目录是否存在
[root@bogon /]# ls -d /mnt/mount1
ls: cannot access '/mnt/mount1': No such file or directory
# 创建挂载点(即目标目录)
[root@bogon /]# mkdir -pv /mnt/mount1
mkdir: created directory '/mnt/mount1'
# 挂载
[root@bogon /]# mount /dev/vgtest/lvtest /mnt/mount1
# 验证是否挂载成功
[root@bogon /]# cp /etc/passwd /mnt/mount1
[root@bogon /]# cat /mnt/mount1/passwd | head -3
root:x:0:0:root:/root:/bin/bash
bin:x:1:1:bin:/bin:/sbin/nologin
daemon:x:2:2:daemon:/sbin:/sbin/nologin
9.2.2.6 删除逻辑卷
# 查看
[root@bogon /]# df -h
Filesystem Size Used Avail Use% Mounted on
devtmpfs 4.0M 0 4.0M 0% /dev
tmpfs 3.8G 0 3.8G 0% /dev/shm
tmpfs 1.5G 9.6M 1.5G 1% /run
/dev/mapper/rhel_bogon-root 44G 4.6G 40G 11% /
/dev/nvme0n1p1 1014M 293M 722M 29% /boot
tmpfs 767M 56K 767M 1% /run/user/42
tmpfs 767M 40K 767M 1% /run/user/0
/dev/mapper/vgtest-lvtest 10G 104M 9.9G 2% /mnt/mount1
# 卸载
[root@bogon /]# umount /dev/mapper/vgtest-lvtest # umount 设备 或者umount 挂载点(目标)
# 验证是否卸载成功
[root@bogon /]# df -h
Filesystem Size Used Avail Use% Mounted on
devtmpfs 4.0M 0 4.0M 0% /dev
tmpfs 3.8G 0 3.8G 0% /dev/shm
tmpfs 1.5G 9.6M 1.5G 1% /run
/dev/mapper/rhel_bogon-root 44G 4.6G 40G 11% /
/dev/nvme0n1p1 1014M 293M 722M 29% /boot
tmpfs 767M 56K 767M 1% /run/user/42
tmpfs 767M 40K 767M 1% /run/user/0
# 删除逻辑卷,命令的格式为:lvremove 逻辑卷路径
[root@bogon /]# lvremove /dev/vgtest/lvtest
Do you really want to remove active logical volume vgtest/lvtest? [y/n]: y
# 输入 y 来确认删除
Logical volume "lvtest" successfully removed.
# 删除卷组,命令的格式为:vgremove 卷组名称
[root@bogon /]# vgremove vgtest
Volume group "vgtest" successfully removed
# 删除物理卷
[root@bogon /]# pvremove /dev/sda
Labels on physical volume "/dev/sda" successfully wiped.
9.3 交换分区管理
在 Linux 执行某个程序时,会把这个程序加载到内存在中,以便于快速的执行。

在这个过程中,并不是所有的程序都是常用的,将常用的加载到内存在,而将不常用的功能放到 swap (交换空间),而这个交换空间就是硬盘划分出来的一小块区域。这个区域的大小可以是物理内存的 2~4 倍,一般我们指定为 2G 即可。因为此部分基本不会用到。
交换分区管理也有相应的命令:
· mkswap 分区设备名:将指定的分区格式化为 swap 交换文件系统(交换分区)
· swapon 交换分区设备名:启用指定的交换分区
· swapoff 交换分区设备名:禁用指定的交换分区
· swapon -s:查看交换分区的使用情况
· free -m:以兆字节为单位显示物理内存、交换分区的使用情况
[root@bogon /]# swapon -s
Filename Type Size Used Priority
/dev/dm-1 partition 5242876 0 -2
[root@bogon /]# free -m
total used free shared buff/cache
available
Mem: 7661 998 6300 15 618
6662
Swap: 5119 0 5119
十、 包和进程管理
10.1 软件安装
在 Linux 中安装软件分为以下三种方式:
- 源码安装
- rpm包安装
- yum/dnf安装
10.1.1源码安装
10.1.1.1 软件准备
我们接下通过一个源码程序来演示如何安装这种软件。
[root@jock ~]# ll
total 60
-rw-r--r--. 1 root root 59172 Feb 22 15:43 tree-2.0.4.tgz
# 创建一个目录
[root@jock ~]# mkdir /test
# 将上传的文件移动到此目录中
[root@jock ~]# mv tree-2.0.4.tgz /test
# 切换到创建的目录
[root@jock ~]# cd /test
[root@jock test]# ll
total 60
-rw-r--r--. 1 root root 59172 Feb 22 15:43 tree-2.0.4.tgz
# 解压上传的文件
[root@jock test]# tar -xzvf tree-2.0.4.tgz
tree-2.0.4/CHANGES
tree-2.0.4/INSTALL
.....
# 验证解压
[root@jock test]# ll
total 64
drwxr-xr-x. 3 root root 4096 Feb 22 15:45 tree-2.0.4
-rw-r--r--. 1 root root 59172 Feb 22 15:43 tree-2.0.4.tgz
# 进入到解压目录中
[root@jock test]# cd tree-2.0.4/
[root@jock tree-2.0.4]# ll
total 204
-rw-r--r--. 1 4437 users 18101 Sep 6 2022 CHANGES
-rw-r--r--. 1 4437 users 15968 Jun 16 2022 color.c
drwxr-xr-x. 2 root root 71 Feb 22 15:45 doc
-rw-r--r--. 1 4437 users 5241 Jun 16 2022 file.c
-rw-r--r--. 1 4437 users 4531 Aug 27 2022 filter.c
-rw-r--r--. 1 4437 users 3118 Jun 16 2022 hash.c
-rw-r--r--. 1 4437 users 6283 Jun 16 2022 html.c
-rw-r--r--. 1 4437 users 4610 Jun 16 2022 info.c
-rw-r--r--. 1 4437 users 597 Jan 4 2018 INSTALL
-rw-r--r--. 1 4437 users 5877 Aug 30 2022 json.c
-rw-r--r--. 1 4437 users 18009 Aug 13 2004 LICENSE
-rw-r--r--. 1 4437 users 7009 Aug 27 2022 list.c
-rw-r--r--. 1 4437 users 2918 Sep 6 2022 Makefile
-rw-r--r--. 1 4437 users 8372 Aug 27 2022 README
-rw-r--r--. 1 4437 users 5346 Apr 14 2021 strverscmp.c
-rw-r--r--. 1 4437 users 853 Dec 21 2021 TODO
-rw-r--r--. 1 4437 users 38706 Sep 5 2022 tree.c
-rw-r--r--. 1 4437 users 8646 Jun 16 2022 tree.h
-rw-r--r--. 1 4437 users 3166 Jun 16 2022 unix.c
-rw-r--r--. 1 4437 users 5207 Aug 27 2022 xml.c
由于系统中自带了 tree 命令,我们通过 dnf 命令来把它删除掉。
[root@jock tree-2.0.4]# dnf remove tree -y # remove 表示删除文件 -y 表示删除时不提示确认
Updating Subscription Management repositories.
Unable to read consumer identity
This system is not registered with an entitlement server. You can use subscription-manager to register.
Dependencies resolved.
============================================================================================================================================================
Package Architecture Version Repository Size
============================================================================================================================================================
Removing:
tree x86_64 1.8.0-10.el9 @anaconda 113 k
Transaction Summary
============================================================================================================================================================
Remove 1 Package
Freed space: 113 k
Running transaction check
Transaction check succeeded.
Running transaction test
Transaction test succeeded.
Running transaction
Preparing : 1/1
Erasing : tree-1.8.0-10.el9.x86_64 1/1
Running scriptlet: tree-1.8.0-10.el9.x86_64 1/1
Verifying : tree-1.8.0-10.el9.x86_64 1/1
Installed products updated.
Removed:
tree-1.8.0-10.el9.x86_64
Complete!
# 验证删除是否成功
[root@jock tree-2.0.4]# tree
-bash: /usr/bin/tree: No such file or directory
安装 tree-2.0.4 软件:
# 由于程序是使用 c 语言编写的,我们在进行源码安装时,需要先进行编译,而编译 c 语言时需要有它的环境,因此我们需要先安装 c 语言的编译环境。通过执行如下的命令来安装这个环境。
[root@jock tree-2.0.4]# dnf install -y make gcc*
# dnf install 这个命令表示要安装软件
# dnf remove 表示删除软件
# -y 表示安装时不提示确认,直接安装
# make 表示要安装的软件
# gcc* 表示要安装以 gcc 开头的所有软件
注意:执行上面的命令时,出现了如下的错误:
[root@jock tree-2.0.4]# dnf install -y make gcc*
Updating Subscription Management repositories.
Unable to read consumer identity
This system is not registered with an entitlement server. You can use subscription-manager to register.
Error: There are no enabled repositories in "/etc/yum.repos.d", "/etc/yum/repos.d", "/etc/distro.repos.d".
这个错误是告诉我们,没有仓库地址。因此,我们就需要去配置一个仓库。需要在 /etc/yum.repos.d 目录下去新一个后缀为 .repo 的文件。
10.1.1.2 配置仓库
# vim /etc/yum.repos.d/base.repo
文件的内容如下:
[base]
name=base
baseurl=/mnt/BaseOS
gpgcheck=0
[app]
name=app
baseurl=/mnt/AppStream
gpgcheck=0
base.repo 文件内容说明如下:
[base] ---------- 名称,在整个文件中要唯一
name=base ---------- 仓库名称,一般设置为上面的名称,因为唯一
baseurl=/mnt/BaseOS ---------- # 这个仓库对应的地址
gpgcheck=0 ---------- # 是否需要校验,0 表示不校验,如果为 1 则表示要校验,需要指定文件的校验地址[app]
name=app
baseurl=/mnt/AppStream
gpgcheck=0
然后再把光盘挂载到 /mnt 目录下:
[root@jock yum.repos.d]# mount /dev/sr0 /mnt
mount: /mnt: WARNING: source write-protected, mounted read-only.
[root@jock yum.repos.d]# ls /mnt
AppStream BaseOS EFI EULA extra_files.json GPL images isolinux media.repo RPM-GPG-KEY-redhat-beta RPM-GPG-KEY-redhat-release
也可以修改 /etc/fstab 文件,在这个文件中进行自动挂载。
[root@jock yum.repos.d]# vim /etc/fstab
/dev/mapper/rhel_bogon-root / xfs defaults 0 0
UUID=98e55bfe-116c-411f-956c-d3e925b515c5 /boot xfs defaults 0 0
/dev/mapper/rhel_bogon-swap none swap defaults 0 0
/dev/nvme0n2p2 /opt/mydisk2 xfs defaults 0 0
/dev/sr0 /mnt iso9660 defaults 0 0
10.1.1.3 安装编译环境
执行完上面的仓库配置后,我们再次来安装 c 语言的运行环境:
[root@jock yum.repos.d]# dnf install -y make gcc*
Updating Subscription Management repositories.
Unable to read consumer identity
This system is not registered with an entitlement server. You can use subscription-manager to register.
base 106 MB/s | 1.7 MB 00:00
app 77 MB/s | 6.3 MB 00:00
Dependencies resolved.
============================================================================================================================================================
Package Architecture Version Repository Size
============================================================================================================================================================
Installing:
gcc x86_64 11.3.1-4.3.el9 app 32 M
gcc-c++ x86_64 11.3.1-4.3.el9 app 13 M
gcc-gfortran x86_64 11.3.1-4.3.el9 app 13 M
gcc-offload-nvptx x86_64 11.3.1-4.3.el9 app 15 M
gcc-plugin-annobin x86_64 11.3.1-4.3.el9 app 66 k
gcc-toolset-12 x86_64 12.0-6.el9 app 11 k
gcc-toolset-12-annobin-annocheck x86_64 11.08-2.el9 app 181 k
gcc-toolset-12-annobin-docs noarch 11.08-2.el9 app 95 k
gcc-toolset-12-annobin-plugin-gcc x86_64 11.08-2.el9 app 894 k
gcc-toolset-12-binutils x86_64 2.38-16.el9 app 5.5 M
gcc-toolset-12-binutils-devel x86_64 2.38-16.el9 app 12 M
gcc-toolset-12-binutils-gold x86_64 2.38-16.el9 app 781 k
gcc-toolset-12-build x86_64 12.0-6.el9 app 9.1 k
gcc-toolset-12-dwz x86_64 0.14-4.el9 app 130 k
gcc-toolset-12-gcc x86_64 12.2.1-7.4.el9 app 43 M
gcc-toolset-12-gcc-c++ x86_64 12.2.1-7.4.el9 app 13 M
gcc-toolset-12-gcc-gfortran x86_64 12.2.1-7.4.el9 app 14 M
gcc-toolset-12-gcc-plugin-annobin x86_64 12.2.1-7.4.el9 app 43 k
gcc-toolset-12-gcc-plugin-devel x86_64 12.2.1-7.4.el9 app 1.6 M
gcc-toolset-12-gdb x86_64 11.2-4.el9 app 4.3 M
gcc-toolset-12-libasan-devel x86_64 12.2.1-7.4.el9 app 495 k
gcc-toolset-12-libatomic-devel x86_64 12.2.1-7.4.el9 app 33 k
gcc-toolset-12-libgccjit x86_64 12.2.1-7.4.el9 app 9.8 M
gcc-toolset-12-libgccjit-devel x86_64 12.2.1-7.4.el9 app 39 k
gcc-toolset-12-libgccjit-docs x86_64 12.2.1-7.4.el9 app 609 k
gcc-toolset-12-libitm-devel x86_64 12.2.1-7.4.el9 app 69 k
gcc-toolset-12-liblsan-devel x86_64 12.2.1-7.4.el9 app 259 k
gcc-toolset-12-libquadmath-devel x86_64 12.2.1-7.4.el9 app 187 k
gcc-toolset-12-libstdc++-devel x86_64 12.2.1-7.4.el9 app 3.3 M
gcc-toolset-12-libstdc++-docs x86_64 12.2.1-7.4.el9 app 13 M
gcc-toolset-12-libtsan-devel x86_64 12.2.1-7.4.el9 app 455 k
gcc-toolset-12-libubsan-devel x86_64 12.2.1-7.4.el9 app 240 k
gcc-toolset-12-offload-nvptx x86_64 12.2.1-7.4.el9 app 16 M
gcc-toolset-12-runtime x86_64 12.0-6.el9 app 62 k
make x86_64 1:4.3-7.el9 base 542 k
Installing dependencies:
annobin x86_64 11.05-1.el9 app 978 k
boost-regex x86_64 1.75.0-8.el9 app 279 k
dwz x86_64 0.14-3.el9 app 130 k
efi-srpm-macros noarch 6-2.el9_0 app 24 k
environment-modules x86_64 5.0.1-2.el9 base 496 k
fonts-srpm-macros noarch 1:2.0.5-7.el9.1 app 29 k
ghc-srpm-macros noarch 1.5.0-6.el9 app 9.0 k
glibc-devel x86_64 2.34-60.el9 app 54 k
glibc-headers x86_64 2.34-60.el9 app 556 k
gmp-c++ x86_64 1:6.2.0-10.el9 app 21 k
gmp-devel x86_64 1:6.2.0-10.el9 app 177 k
go-srpm-macros noarch 3.2.0-1.el9 app 29 k
kernel-headers x86_64 5.14.0-284.11.1.el9_2 app 5.0 M
kernel-srpm-macros noarch 1.0-12.el9 app 17 k
libasan8 x86_64 12.2.1-7.4.el9 app 431 k
libbabeltrace x86_64 1.5.8-10.el9 app 194 k
libgfortran x86_64 11.3.1-4.3.el9 base 821 k
libgomp-offload-nvptx x86_64 11.3.1-4.3.el9 app 59 k
libipt x86_64 2.0.4-5.el9 app 58 k
libitm x86_64 11.3.1-4.3.el9 app 97 k
liblsan x86_64 11.3.1-4.3.el9 app 215 k
libmpc-devel x86_64 1.2.1-4.el9 app 13 k
libquadmath x86_64 11.3.1-4.3.el9 base 216 k
libquadmath-devel x86_64 11.3.1-4.3.el9 app 56 k
libstdc++-devel x86_64 11.3.1-4.3.el9 app 2.4 M
libtsan2 x86_64 12.2.1-7.4.el9 app 399 k
libubsan x86_64 11.3.1-4.3.el9 app 207 k
libxcrypt-devel x86_64 4.4.18-3.el9 app 32 k
lua-srpm-macros noarch 1-6.el9 app 10 k
mpfr-devel x86_64 4.1.0-7.el9 app 23 k
ocaml-srpm-macros noarch 6-6.el9 app 9.1 k
openblas-srpm-macros noarch 2-11.el9 app 8.6 k
perl-srpm-macros noarch 1-41.el9 app 9.4 k
pyproject-srpm-macros noarch 1.6.2-1.el9 app 15 k
python-srpm-macros noarch 3.9-52.el9 app 24 k
qt5-srpm-macros noarch 5.15.3-1.el9 app 9.9 k
redhat-rpm-config noarch 199-1.el9 app 76 k
rust-srpm-macros noarch 17-4.el9 app 11 k
scl-utils x86_64 1:2.0.3-4.el9 app 41 k
scl-utils-build x86_64 1:2.0.3-4.el9 app 17 k
source-highlight x86_64 3.1.9-11.el9 app 685 k
zlib-devel x86_64 1.2.11-39.el9 app 47 k
Transaction Summary
============================================================================================================================================================
Install 77 Packages
Total size: 227 M
Installed size: 784 M
Downloading Packages:
Running transaction check
Transaction check succeeded.
Running transaction test
Transaction test succeeded.
Running transaction
Preparing : 1/1
Installing : libquadmath-11.3.1-4.3.el9.x86_64 1/77
Installing : libgfortran-11.3.1-4.3.el9.x86_64 2/77
Installing : libgomp-offload-nvptx-11.3.1-4.3.el9.x86_64 3/77
Installing : make-1:4.3-7.el9.x86_64 4/77
Installing : zlib-devel-1.2.11-39.el9.x86_64 5/77
Installing : rust-srpm-macros-17-4.el9.noarch 6/77
Installing : qt5-srpm-macros-5.15.3-1.el9.noarch 7/77
Installing : pyproject-srpm-macros-1.6.2-1.el9.noarch 8/77
Installing : perl-srpm-macros-1-41.el9.noarch 9/77
Installing : openblas-srpm-macros-2-11.el9.noarch 10/77
Installing : ocaml-srpm-macros-6-6.el9.noarch 11/77
Installing : lua-srpm-macros-1-6.el9.noarch 12/77
Installing : libubsan-11.3.1-4.3.el9.x86_64 13/77
Installing : libtsan2-12.2.1-7.4.el9.x86_64 14/77
Running scriptlet: libtsan2-12.2.1-7.4.el9.x86_64 14/77
Installing : libstdc++-devel-11.3.1-4.3.el9.x86_64 15/77
Installing : liblsan-11.3.1-4.3.el9.x86_64 16/77
Installing : libitm-11.3.1-4.3.el9.x86_64 17/77
Installing : libipt-2.0.4-5.el9.x86_64 18/77
Installing : libbabeltrace-1.5.8-10.el9.x86_64 19/77
Installing : libasan8-12.2.1-7.4.el9.x86_64 20/77
Running scriptlet: libasan8-12.2.1-7.4.el9.x86_64 20/77
Installing : kernel-srpm-macros-1.0-12.el9.noarch 21/77
Installing : kernel-headers-5.14.0-284.11.1.el9_2.x86_64 22/77
Installing : gmp-c++-1:6.2.0-10.el9.x86_64 23/77
Installing : gmp-devel-1:6.2.0-10.el9.x86_64 24/77
Installing : mpfr-devel-4.1.0-7.el9.x86_64 25/77
Installing : libmpc-devel-1.2.1-4.el9.x86_64 26/77
Installing : glibc-headers-2.34-60.el9.x86_64 27/77
Installing : libxcrypt-devel-4.4.18-3.el9.x86_64 28/77
Installing : glibc-devel-2.34-60.el9.x86_64 29/77
Installing : gcc-11.3.1-4.3.el9.x86_64 30/77
Installing : annobin-11.05-1.el9.x86_64 31/77
Installing : gcc-plugin-annobin-11.3.1-4.3.el9.x86_64 32/77
Installing : libquadmath-devel-11.3.1-4.3.el9.x86_64 33/77
Installing : ghc-srpm-macros-1.5.0-6.el9.noarch 34/77
Installing : efi-srpm-macros-6-2.el9_0.noarch 35/77
Installing : dwz-0.14-3.el9.x86_64 36/77
Installing : fonts-srpm-macros-1:2.0.5-7.el9.1.noarch 37/77
Installing : go-srpm-macros-3.2.0-1.el9.noarch 38/77
Installing : python-srpm-macros-3.9-52.el9.noarch 39/77
Installing : redhat-rpm-config-199-1.el9.noarch 40/77
Running scriptlet: redhat-rpm-config-199-1.el9.noarch 40/77
Installing : scl-utils-build-1:2.0.3-4.el9.x86_64 41/77
Installing : boost-regex-1.75.0-8.el9.x86_64 42/77
Installing : source-highlight-3.1.9-11.el9.x86_64 43/77
Installing : environment-modules-5.0.1-2.el9.x86_64 44/77
Running scriptlet: environment-modules-5.0.1-2.el9.x86_64 44/77
Installing : scl-utils-1:2.0.3-4.el9.x86_64 45/77
Installing : gcc-toolset-12-runtime-12.0-6.el9.x86_64 46/77
Running scriptlet: gcc-toolset-12-runtime-12.0-6.el9.x86_64 46/77
Installing : gcc-toolset-12-binutils-2.38-16.el9.x86_64 47/77
Running scriptlet: gcc-toolset-12-binutils-2.38-16.el9.x86_64 47/77
Installing : gcc-toolset-12-binutils-gold-2.38-16.el9.x86_64 48/77
Running scriptlet: gcc-toolset-12-binutils-gold-2.38-16.el9.x86_64 48/77
Installing : gcc-toolset-12-gcc-12.2.1-7.4.el9.x86_64 49/77
Installing : gcc-toolset-12-annobin-docs-11.08-2.el9.noarch 50/77
Installing : gcc-toolset-12-annobin-plugin-gcc-11.08-2.el9.x86_64 51/77
Running scriptlet: gcc-toolset-12-annobin-plugin-gcc-11.08-2.el9.x86_64 51/77
Installing : gcc-toolset-12-libgccjit-12.2.1-7.4.el9.x86_64 52/77
Running scriptlet: gcc-toolset-12-libgccjit-12.2.1-7.4.el9.x86_64 52/77
Installing : gcc-toolset-12-libquadmath-devel-12.2.1-7.4.el9.x86_64 53/77
Installing : gcc-toolset-12-gcc-gfortran-12.2.1-7.4.el9.x86_64 54/77
Running scriptlet: gcc-toolset-12-gcc-gfortran-12.2.1-7.4.el9.x86_64 54/77
Installing : gcc-toolset-12-dwz-0.14-4.el9.x86_64 55/77
Installing : gcc-toolset-12-gdb-11.2-4.el9.x86_64 56/77
Installing : gcc-toolset-12-libgccjit-docs-12.2.1-7.4.el9.x86_64 57/77
Running scriptlet: gcc-toolset-12-libgccjit-docs-12.2.1-7.4.el9.x86_64 57/77
Installing : gcc-toolset-12-libstdc++-devel-12.2.1-7.4.el9.x86_64 58/77
Installing : gcc-toolset-12-gcc-c++-12.2.1-7.4.el9.x86_64 59/77
Installing : gcc-toolset-12-12.0-6.el9.x86_64 60/77
Installing : gcc-toolset-12-libgccjit-devel-12.2.1-7.4.el9.x86_64 61/77
Installing : gcc-toolset-12-annobin-annocheck-11.08-2.el9.x86_64 62/77
Installing : gcc-toolset-12-gcc-plugin-annobin-12.2.1-7.4.el9.x86_64 63/77
Running scriptlet: gcc-toolset-12-gcc-plugin-annobin-12.2.1-7.4.el9.x86_64 63/77
Installing : gcc-toolset-12-gcc-plugin-devel-12.2.1-7.4.el9.x86_64 64/77
Installing : gcc-toolset-12-libitm-devel-12.2.1-7.4.el9.x86_64 65/77
Installing : gcc-toolset-12-binutils-devel-2.38-16.el9.x86_64 66/77
Installing : gcc-toolset-12-build-12.0-6.el9.x86_64 67/77
Installing : gcc-toolset-12-libasan-devel-12.2.1-7.4.el9.x86_64 68/77
Installing : gcc-toolset-12-libatomic-devel-12.2.1-7.4.el9.x86_64 69/77
Installing : gcc-toolset-12-liblsan-devel-12.2.1-7.4.el9.x86_64 70/77
Installing : gcc-toolset-12-libstdc++-docs-12.2.1-7.4.el9.x86_64 71/77
Installing : gcc-toolset-12-libtsan-devel-12.2.1-7.4.el9.x86_64 72/77
Installing : gcc-toolset-12-libubsan-devel-12.2.1-7.4.el9.x86_64 73/77
Installing : gcc-toolset-12-offload-nvptx-12.2.1-7.4.el9.x86_64 74/77
Installing : gcc-gfortran-11.3.1-4.3.el9.x86_64 75/77
Installing : gcc-c++-11.3.1-4.3.el9.x86_64 76/77
Installing : gcc-offload-nvptx-11.3.1-4.3.el9.x86_64 77/77
Running scriptlet: gcc-offload-nvptx-11.3.1-4.3.el9.x86_64 77/77
Verifying : environment-modules-5.0.1-2.el9.x86_64 1/77
Verifying : libgfortran-11.3.1-4.3.el9.x86_64 2/77
Verifying : libquadmath-11.3.1-4.3.el9.x86_64 3/77
Verifying : make-1:4.3-7.el9.x86_64 4/77
Verifying : annobin-11.05-1.el9.x86_64 5/77
Verifying : boost-regex-1.75.0-8.el9.x86_64 6/77
Verifying : dwz-0.14-3.el9.x86_64 7/77
Verifying : efi-srpm-macros-6-2.el9_0.noarch 8/77
Verifying : fonts-srpm-macros-1:2.0.5-7.el9.1.noarch 9/77
Verifying : gcc-11.3.1-4.3.el9.x86_64 10/77
Verifying : gcc-c++-11.3.1-4.3.el9.x86_64 11/77
Verifying : gcc-gfortran-11.3.1-4.3.el9.x86_64 12/77
Verifying : gcc-offload-nvptx-11.3.1-4.3.el9.x86_64 13/77
Verifying : gcc-plugin-annobin-11.3.1-4.3.el9.x86_64 14/77
Verifying : gcc-toolset-12-12.0-6.el9.x86_64 15/77
Verifying : gcc-toolset-12-annobin-annocheck-11.08-2.el9.x86_64 16/77
Verifying : gcc-toolset-12-annobin-docs-11.08-2.el9.noarch 17/77
Verifying : gcc-toolset-12-annobin-plugin-gcc-11.08-2.el9.x86_64 18/77
Verifying : gcc-toolset-12-binutils-2.38-16.el9.x86_64 19/77
Verifying : gcc-toolset-12-binutils-devel-2.38-16.el9.x86_64 20/77
Verifying : gcc-toolset-12-binutils-gold-2.38-16.el9.x86_64 21/77
Verifying : gcc-toolset-12-build-12.0-6.el9.x86_64 22/77
Verifying : gcc-toolset-12-dwz-0.14-4.el9.x86_64 23/77
Verifying : gcc-toolset-12-gcc-12.2.1-7.4.el9.x86_64 24/77
Verifying : gcc-toolset-12-gcc-c++-12.2.1-7.4.el9.x86_64 25/77
Verifying : gcc-toolset-12-gcc-gfortran-12.2.1-7.4.el9.x86_64 26/77
Verifying : gcc-toolset-12-gcc-plugin-annobin-12.2.1-7.4.el9.x86_64 27/77
Verifying : gcc-toolset-12-gcc-plugin-devel-12.2.1-7.4.el9.x86_64 28/77
Verifying : gcc-toolset-12-gdb-11.2-4.el9.x86_64 29/77
Verifying : gcc-toolset-12-libasan-devel-12.2.1-7.4.el9.x86_64 30/77
Verifying : gcc-toolset-12-libatomic-devel-12.2.1-7.4.el9.x86_64 31/77
Verifying : gcc-toolset-12-libgccjit-12.2.1-7.4.el9.x86_64 32/77
Verifying : gcc-toolset-12-libgccjit-devel-12.2.1-7.4.el9.x86_64 33/77
Verifying : gcc-toolset-12-libgccjit-docs-12.2.1-7.4.el9.x86_64 34/77
Verifying : gcc-toolset-12-libitm-devel-12.2.1-7.4.el9.x86_64 35/77
Verifying : gcc-toolset-12-liblsan-devel-12.2.1-7.4.el9.x86_64 36/77
Verifying : gcc-toolset-12-libquadmath-devel-12.2.1-7.4.el9.x86_64 37/77
Verifying : gcc-toolset-12-libstdc++-devel-12.2.1-7.4.el9.x86_64 38/77
Verifying : gcc-toolset-12-libstdc++-docs-12.2.1-7.4.el9.x86_64 39/77
Verifying : gcc-toolset-12-libtsan-devel-12.2.1-7.4.el9.x86_64 40/77
Verifying : gcc-toolset-12-libubsan-devel-12.2.1-7.4.el9.x86_64 41/77
Verifying : gcc-toolset-12-offload-nvptx-12.2.1-7.4.el9.x86_64 42/77
Verifying : gcc-toolset-12-runtime-12.0-6.el9.x86_64 43/77
Verifying : ghc-srpm-macros-1.5.0-6.el9.noarch 44/77
Verifying : glibc-devel-2.34-60.el9.x86_64 45/77
Verifying : glibc-headers-2.34-60.el9.x86_64 46/77
Verifying : gmp-c++-1:6.2.0-10.el9.x86_64 47/77
Verifying : gmp-devel-1:6.2.0-10.el9.x86_64 48/77
Verifying : go-srpm-macros-3.2.0-1.el9.noarch 49/77
Verifying : kernel-headers-5.14.0-284.11.1.el9_2.x86_64 50/77
Verifying : kernel-srpm-macros-1.0-12.el9.noarch 51/77
Verifying : libasan8-12.2.1-7.4.el9.x86_64 52/77
Verifying : libbabeltrace-1.5.8-10.el9.x86_64 53/77
Verifying : libgomp-offload-nvptx-11.3.1-4.3.el9.x86_64 54/77
Verifying : libipt-2.0.4-5.el9.x86_64 55/77
Verifying : libitm-11.3.1-4.3.el9.x86_64 56/77
Verifying : liblsan-11.3.1-4.3.el9.x86_64 57/77
Verifying : libmpc-devel-1.2.1-4.el9.x86_64 58/77
Verifying : libquadmath-devel-11.3.1-4.3.el9.x86_64 59/77
Verifying : libstdc++-devel-11.3.1-4.3.el9.x86_64 60/77
Verifying : libtsan2-12.2.1-7.4.el9.x86_64 61/77
Verifying : libubsan-11.3.1-4.3.el9.x86_64 62/77
Verifying : libxcrypt-devel-4.4.18-3.el9.x86_64 63/77
Verifying : lua-srpm-macros-1-6.el9.noarch 64/77
Verifying : mpfr-devel-4.1.0-7.el9.x86_64 65/77
Verifying : ocaml-srpm-macros-6-6.el9.noarch 66/77
Verifying : openblas-srpm-macros-2-11.el9.noarch 67/77
Verifying : perl-srpm-macros-1-41.el9.noarch 68/77
Verifying : pyproject-srpm-macros-1.6.2-1.el9.noarch 69/77
Verifying : python-srpm-macros-3.9-52.el9.noarch 70/77
Verifying : qt5-srpm-macros-5.15.3-1.el9.noarch 71/77
Verifying : redhat-rpm-config-199-1.el9.noarch 72/77
Verifying : rust-srpm-macros-17-4.el9.noarch 73/77
Verifying : scl-utils-1:2.0.3-4.el9.x86_64 74/77
Verifying : scl-utils-build-1:2.0.3-4.el9.x86_64 75/77
Verifying : source-highlight-3.1.9-11.el9.x86_64 76/77
Verifying : zlib-devel-1.2.11-39.el9.x86_64 77/77
Installed products updated.
Installed:
annobin-11.05-1.el9.x86_64 boost-regex-1.75.0-8.el9.x86_64
dwz-0.14-3.el9.x86_64 efi-srpm-macros-6-2.el9_0.noarch
environment-modules-5.0.1-2.el9.x86_64 fonts-srpm-macros-1:2.0.5-7.el9.1.noarch
gcc-11.3.1-4.3.el9.x86_64 gcc-c++-11.3.1-4.3.el9.x86_64
gcc-gfortran-11.3.1-4.3.el9.x86_64 gcc-offload-nvptx-11.3.1-4.3.el9.x86_64
gcc-plugin-annobin-11.3.1-4.3.el9.x86_64 gcc-toolset-12-12.0-6.el9.x86_64
gcc-toolset-12-annobin-annocheck-11.08-2.el9.x86_64 gcc-toolset-12-annobin-docs-11.08-2.el9.noarch
gcc-toolset-12-annobin-plugin-gcc-11.08-2.el9.x86_64 gcc-toolset-12-binutils-2.38-16.el9.x86_64
gcc-toolset-12-binutils-devel-2.38-16.el9.x86_64 gcc-toolset-12-binutils-gold-2.38-16.el9.x86_64
gcc-toolset-12-build-12.0-6.el9.x86_64 gcc-toolset-12-dwz-0.14-4.el9.x86_64
gcc-toolset-12-gcc-12.2.1-7.4.el9.x86_64 gcc-toolset-12-gcc-c++-12.2.1-7.4.el9.x86_64
gcc-toolset-12-gcc-gfortran-12.2.1-7.4.el9.x86_64 gcc-toolset-12-gcc-plugin-annobin-12.2.1-7.4.el9.x86_64
gcc-toolset-12-gcc-plugin-devel-12.2.1-7.4.el9.x86_64 gcc-toolset-12-gdb-11.2-4.el9.x86_64
gcc-toolset-12-libasan-devel-12.2.1-7.4.el9.x86_64 gcc-toolset-12-libatomic-devel-12.2.1-7.4.el9.x86_64
gcc-toolset-12-libgccjit-12.2.1-7.4.el9.x86_64 gcc-toolset-12-libgccjit-devel-12.2.1-7.4.el9.x86_64
gcc-toolset-12-libgccjit-docs-12.2.1-7.4.el9.x86_64 gcc-toolset-12-libitm-devel-12.2.1-7.4.el9.x86_64
gcc-toolset-12-liblsan-devel-12.2.1-7.4.el9.x86_64 gcc-toolset-12-libquadmath-devel-12.2.1-7.4.el9.x86_64
gcc-toolset-12-libstdc++-devel-12.2.1-7.4.el9.x86_64 gcc-toolset-12-libstdc++-docs-12.2.1-7.4.el9.x86_64
gcc-toolset-12-libtsan-devel-12.2.1-7.4.el9.x86_64 gcc-toolset-12-libubsan-devel-12.2.1-7.4.el9.x86_64
gcc-toolset-12-offload-nvptx-12.2.1-7.4.el9.x86_64 gcc-toolset-12-runtime-12.0-6.el9.x86_64
ghc-srpm-macros-1.5.0-6.el9.noarch glibc-devel-2.34-60.el9.x86_64
glibc-headers-2.34-60.el9.x86_64 gmp-c++-1:6.2.0-10.el9.x86_64
gmp-devel-1:6.2.0-10.el9.x86_64 go-srpm-macros-3.2.0-1.el9.noarch
kernel-headers-5.14.0-284.11.1.el9_2.x86_64 kernel-srpm-macros-1.0-12.el9.noarch
libasan8-12.2.1-7.4.el9.x86_64 libbabeltrace-1.5.8-10.el9.x86_64
libgfortran-11.3.1-4.3.el9.x86_64 libgomp-offload-nvptx-11.3.1-4.3.el9.x86_64
libipt-2.0.4-5.el9.x86_64 libitm-11.3.1-4.3.el9.x86_64
liblsan-11.3.1-4.3.el9.x86_64 libmpc-devel-1.2.1-4.el9.x86_64
libquadmath-11.3.1-4.3.el9.x86_64 libquadmath-devel-11.3.1-4.3.el9.x86_64
libstdc++-devel-11.3.1-4.3.el9.x86_64 libtsan2-12.2.1-7.4.el9.x86_64
libubsan-11.3.1-4.3.el9.x86_64 libxcrypt-devel-4.4.18-3.el9.x86_64
lua-srpm-macros-1-6.el9.noarch make-1:4.3-7.el9.x86_64
mpfr-devel-4.1.0-7.el9.x86_64 ocaml-srpm-macros-6-6.el9.noarch
openblas-srpm-macros-2-11.el9.noarch perl-srpm-macros-1-41.el9.noarch
pyproject-srpm-macros-1.6.2-1.el9.noarch python-srpm-macros-3.9-52.el9.noarch
qt5-srpm-macros-5.15.3-1.el9.noarch redhat-rpm-config-199-1.el9.noarch
rust-srpm-macros-17-4.el9.noarch scl-utils-1:2.0.3-4.el9.x86_64
scl-utils-build-1:2.0.3-4.el9.x86_64 source-highlight-3.1.9-11.el9.x86_64
zlib-devel-1.2.11-39.el9.x86_64
Complete!
看到以上的信息表示 c 语言的编译环境就已经安装好了。
10.1.1.4 源码安装软件
安装 tree-2.0.4 软件:
[root@jock yum.repos.d]# cd /test/tree-2.0.4/
[root@jock tree-2.0.4]# ll
total 204
-rw-r--r--. 1 4437 users 18101 Sep 6 2022 CHANGES
-rw-r--r--. 1 4437 users 15968 Jun 16 2022 color.c
drwxr-xr-x. 2 root root 71 Feb 22 15:45 doc
-rw-r--r--. 1 4437 users 5241 Jun 16 2022 file.c
-rw-r--r--. 1 4437 users 4531 Aug 27 2022 filter.c
-rw-r--r--. 1 4437 users 3118 Jun 16 2022 hash.c
-rw-r--r--. 1 4437 users 6283 Jun 16 2022 html.c
-rw-r--r--. 1 4437 users 4610 Jun 16 2022 info.c
-rw-r--r--. 1 4437 users 597 Jan 4 2018 INSTALL
-rw-r--r--. 1 4437 users 5877 Aug 30 2022 json.c
-rw-r--r--. 1 4437 users 18009 Aug 13 2004 LICENSE
-rw-r--r--. 1 4437 users 7009 Aug 27 2022 list.c
-rw-r--r--. 1 4437 users 2918 Sep 6 2022 Makefile
-rw-r--r--. 1 4437 users 8372 Aug 27 2022 README
-rw-r--r--. 1 4437 users 5346 Apr 14 2021 strverscmp.c
-rw-r--r--. 1 4437 users 853 Dec 21 2021 TODO
-rw-r--r--. 1 4437 users 38706 Sep 5 2022 tree.c
-rw-r--r--. 1 4437 users 8646 Jun 16 2022 tree.h
-rw-r--r--. 1 4437 users 3166 Jun 16 2022 unix.c
-rw-r--r--. 1 4437 users 5207 Aug 27 2022 xml.c
# 在解压目录中执行 make 命令来进行编译
[root@jock tree-2.0.4]# make
gcc -O3 -pedantic -Wall -D_LARGEFILE64_SOURCE -D_FILE_OFFSET_BITS=64 -c -o tree.o tree.c
gcc -O3 -pedantic -Wall -D_LARGEFILE64_SOURCE -D_FILE_OFFSET_BITS=64 -c -o list.o list.c
gcc -O3 -pedantic -Wall -D_LARGEFILE64_SOURCE -D_FILE_OFFSET_BITS=64 -c -o hash.o hash.c
gcc -O3 -pedantic -Wall -D_LARGEFILE64_SOURCE -D_FILE_OFFSET_BITS=64 -c -o color.o color.c
gcc -O3 -pedantic -Wall -D_LARGEFILE64_SOURCE -D_FILE_OFFSET_BITS=64 -c -o file.o file.c
gcc -O3 -pedantic -Wall -D_LARGEFILE64_SOURCE -D_FILE_OFFSET_BITS=64 -c -o filter.o filter.c
gcc -O3 -pedantic -Wall -D_LARGEFILE64_SOURCE -D_FILE_OFFSET_BITS=64 -c -o info.o info.c
gcc -O3 -pedantic -Wall -D_LARGEFILE64_SOURCE -D_FILE_OFFSET_BITS=64 -c -o unix.o unix.c
gcc -O3 -pedantic -Wall -D_LARGEFILE64_SOURCE -D_FILE_OFFSET_BITS=64 -c -o xml.o xml.c
gcc -O3 -pedantic -Wall -D_LARGEFILE64_SOURCE -D_FILE_OFFSET_BITS=64 -c -o json.o json.c
gcc -O3 -pedantic -Wall -D_LARGEFILE64_SOURCE -D_FILE_OFFSET_BITS=64 -c -o html.o html.c
gcc -O3 -pedantic -Wall -D_LARGEFILE64_SOURCE -D_FILE_OFFSET_BITS=64 -c -o strverscmp.o strverscmp.c
gcc -o tree tree.o list.o hash.o color.o file.o filter.o info.o unix.o xml.o json.o html.o strverscmp.o
# 在解压目录中执行 make install 命令来进行安装
[root@jock tree-2.0.4]# make install
install -d /usr/local/bin
install -d /usr/local/man/man1
install tree /usr/local/bin/tree; \
install -m 644 doc/tree.1 /usr/local/man/man1/tree.1
# 清空 hash 表
[root@jock tree-2.0.4]# hash -r
# 验证安装
[root@jock ~]# cd /test
[root@jock test]# tree
.
├── tree-2.0.4
│ ├── CHANGES
│ ├── color.c
│ ├── color.o
│ ├── doc
│ │ ├── global_info
│ │ ├── tree.1
│ │ ├── tree.fr.1
│ │ └── xml.dtd
│ ├── file.c
│ ├── file.o
│ ├── filter.c
│ ├── filter.o
│ ├── hash.c
│ ├── hash.o
│ ├── html.c
│ ├── html.o
│ ├── info.c
│ ├── info.o
│ ├── INSTALL
│ ├── json.c
从上面的结果可以发现:源码安装 tree 命令是成功的。
10.1.1.5 源码安装总结
-
需要有 c 语言编译环境
1. 配置本地仓库,需要在 /etc/yum.repos.d 目录下新建一个创建文件,如: base.repo,并在这个文件中配置 BaseOS 和 AppStream 路径 2. 挂载光盘 3. 安装环境,执行 dnf install -y make gcc* -
源码安装
1. 在解压目录下执行 make 命令来进行编译 2. 在解压目录下执行 make install 命令来进行安装
10.1.2 rpm 包安装
RPM是红帽包管理(Redhat Package Manager)的缩写,由Red Hat公司提出的一种软件包管理标准,是Linux各发行版中应用最广泛的软件包格式之一。
RPM软件包的典型命名格式:软件名-版本号-发行号.操作系统版本.硬件平台的类型.rpm,比如 zsh-5.0.2-14.el7.x86_64.rpm
| zsh | -5 | 0 | 2 | 14 | el7 | x86 | 64 |
|---|---|---|---|---|---|---|---|
| 软件名 | 主版本号 | 次版本号 | 修订号 | 软件发布次数 | 发行商RHEL7 | CPU架构平台 | 支持系统位数 |
命令执行格式:
rpm -i install # 安装
-e erase # 删除
-u update # 更新
-q query # 查询
--nodeps # 不验证软件包依赖
-v, --verbose # 提供更多的详细信息输出
下面我们以安装 qq 软件为例来演示 rpm 包软件的操作:
[root@jock test]# cd ~
# 下载 qq 软件安装包
[root@jock ~]# curl https://dldir1.qq.com/qqfile/qq/QQNT/ad5b5393/linuxqq_3.1.2-13107_x86_64.rpm -o ./linuxqq_3.1.2-13107_x86_64.rpm
# 查看
[root@jock ~]# ll
total 122204
-rw-r--r--. 1 root root 125136548 Feb 22 16:22 linuxqq_3.1.2-13107_x86_64.rpm
# 安装
[root@jock ~]# rpm -ivh linuxqq_3.1.2-13107_x86_64.rpm
error: Failed dependencies:
libXScrnSaver is needed by linuxqq-3.1.2_13107-1.x86_64
# 安装时报错了,说安装 linuxqq-3.1.2_13107-1.x86_64 软件需要依赖 libXScrnSaver
# 我们从本地仓库中去搜索所依赖的 libXScrnSaver 软件所在位置
[root@jock ~]# find /mnt -name libXScrnSaver
[root@jock ~]# find /mnt/AppStream/Packages/ -name "libXScrnSaver*"
/mnt/AppStream/Packages/libXScrnSaver-1.2.3-10.el9.i686.rpm
/mnt/AppStream/Packages/libXScrnSaver-1.2.3-10.el9.x86_64.rpm
/mnt/AppStream/Packages/libXScrnSaver-devel-1.2.3-10.el9.i686.rpm
/mnt/AppStream/Packages/libXScrnSaver-devel-1.2.3-10.el9.x86_64.rpm
# 安装所需要的依赖
[root@jock ~]# rpm -ivh /mnt/AppStream/Packages/libXScrnSaver-1.2.3-10.el9.x86_64.rpm
warning: /mnt/AppStream/Packages/libXScrnSaver-1.2.3-10.el9.x86_64.rpm: Header V3 RSA/SHA256 Signature, key ID fd431d51: NOKEY
Verifying... ################################# [100%]
Preparing... ################################# [100%]
Updating / installing...
1:libXScrnSaver-1.2.3-10.el9 ################################# [100%]
# 当依赖的软件安装好后,我们再来安装 qq
[root@jock ~]# rpm -ivh linuxqq_3.1.2-13107_x86_64.rpm
Verifying... ################################# [100%]
Preparing... ################################# [100%]
Updating / installing...
1:linuxqq-3.1.2_13107-1 ################################# [100%]
# 此时,QQ 就已经安装成功了
# 搜索qq安装的位置
[root@jock ~]# rpm -ql linuxqq
/opt/QQ/LICENSE.electron.txt
/opt/QQ/LICENSES.chromium.html
/opt/QQ/chrome-sandbox
/opt/QQ/chrome_100_percent.pak
/opt/QQ/chrome_200_percent.pak
/opt/QQ/chrome_crashpad_handler
/opt/QQ/icudtl.dat
/opt/QQ/libEGL.so
/opt/QQ/libGLESv2.so
/opt/QQ/libffmpeg.so
.......
# 卸载QQ
[root@jock ~]# rpm -evh linuxqq
Preparing... ################################# [100%]
Cleaning up / removing...
1:linuxqq-3.1.2_13107-1 ################################# [100%]
下面再次演示安装一个在屏幕上显示字母的软件:
wget https://rpmfind.net/linux/fedora/linux/releases/38/Everything/x86_64/os/Packages/c/cmatrix-2.0-5.fc38.x86_64.rpm
# 安装cmatrix软件
[root@jock ~]# rpm -ivh cmatrix-2.0-5.fc38.x86_64.rpm
warning: cmatrix-2.0-5.fc38.x86_64.rpm: Header V4 RSA/SHA256 Signature, key ID eb10b464: NOKEY
Verifying... ################################# [100%]
Preparing... ################################# [100%]
Updating / installing...
1:cmatrix-2.0-5.fc38 ################################# [100%]
# 使用软件
[root@jock ~]# cmatrix
[root@jock ~]# cmatrix -C red
[root@jock ~]# cmatrix -C blue
# 删除
[root@jock ~]# rpm -evh cmatrix
Preparing... ################################# [100%]
Cleaning up / removing...
1:cmatrix-2.0-5.fc38 ################################# [100%]
通过上面两个软件的安装,我发现一个问题?
有些 rpm 包安装时比较方便,一下子就安装好了;而另一个软件安装时会有依赖,我们必须先把依赖的软件安装好后,才能安装我们真正要使用的软件。这就很麻烦。
10.1.3 yum/dnf 安装
YUM (Yellow dog Updater,Modified) ,RHEL8中默认使用的软件批量管理工具由原版本的yum换成了速度更快的dnf(DNF = Dandified YUM),原有的yum命令仅为dnf的软链接,当然依旧可以使用。
[root@jock ~]# ll `which yum`
lrwxrwxrwx. 1 root root 5 Mar 15 2023 /usr/bin/yum -> dnf-3
这个命令可以实现下载、安装、卸载、更新。而且它还可以自动去搜索被安装的软件所需要的依赖,并一起下载安装。
下面我们以安装 httpd 服务来演示如何通过 yum/dnf 来安装所需要的软件。
# 1. 确保本地仓库或网络仓库可用
# 2. 安装 httpd 服务软件
[root@jock ~]# dnf install httpd
Updating Subscription Management repositories.
Unable to read consumer identity
This system is not registered with an entitlement server. You can use subscription-manager to register.
Last metadata expiration check: 0:40:19 ago on Fri 23 Feb 2024 09:24:03 AM CST.
Dependencies resolved.
============================================================================================================================================================
Package Architecture Version Repository Size
============================================================================================================================================================
Installing:
httpd x86_64 2.4.53-11.el9_2.4 app 54 k
Installing dependencies:
apr x86_64 1.7.0-11.el9 app 127 k
apr-util x86_64 1.6.1-20.el9 app 98 k
apr-util-bdb x86_64 1.6.1-20.el9 app 15 k
httpd-core x86_64 2.4.53-11.el9_2.4 app 1.5 M
httpd-filesystem noarch 2.4.53-11.el9_2.4 app 17 k
httpd-tools x86_64 2.4.53-11.el9_2.4 app 88 k
redhat-logos-httpd noarch 90.4-1.el9 app 18 k
Installing weak dependencies:
apr-util-openssl x86_64 1.6.1-20.el9 app 17 k
mod_http2 x86_64 1.15.19-4.el9_2.4 app 153 k
mod_lua x86_64 2.4.53-11.el9_2.4 app 63 k
Transaction Summary
============================================================================================================================================================
Install 11 Packages
Total size: 2.1 M
Installed size: 5.9 M
Is this ok [y/N]:
# 在此处输入 y 来安装
Is this ok [y/N]: y
Downloading Packages:
Running transaction check
Transaction check succeeded.
Running transaction test
Transaction test succeeded.
Running transaction
Preparing : 1/1
Installing : apr-1.7.0-11.el9.x86_64 1/11
Installing : apr-util-bdb-1.6.1-20.el9.x86_64 2/11
Installing : apr-util-openssl-1.6.1-20.el9.x86_64 3/11
Installing : apr-util-1.6.1-20.el9.x86_64 4/11
Installing : httpd-tools-2.4.53-11.el9_2.4.x86_64 5/11
Installing : redhat-logos-httpd-90.4-1.el9.noarch 6/11
Running scriptlet: httpd-filesystem-2.4.53-11.el9_2.4.noarch 7/11
Installing : httpd-filesystem-2.4.53-11.el9_2.4.noarch 7/11
Installing : httpd-core-2.4.53-11.el9_2.4.x86_64 8/11
Installing : mod_http2-1.15.19-4.el9_2.4.x86_64 9/11
Installing : mod_lua-2.4.53-11.el9_2.4.x86_64 10/11
Installing : httpd-2.4.53-11.el9_2.4.x86_64 11/11
Running scriptlet: httpd-2.4.53-11.el9_2.4.x86_64 11/11
Verifying : apr-1.7.0-11.el9.x86_64 1/11
Verifying : apr-util-1.6.1-20.el9.x86_64 2/11
Verifying : apr-util-bdb-1.6.1-20.el9.x86_64 3/11
Verifying : apr-util-openssl-1.6.1-20.el9.x86_64 4/11
Verifying : httpd-2.4.53-11.el9_2.4.x86_64 5/11
Verifying : httpd-core-2.4.53-11.el9_2.4.x86_64 6/11
Verifying : httpd-filesystem-2.4.53-11.el9_2.4.noarch 7/11
Verifying : httpd-tools-2.4.53-11.el9_2.4.x86_64 8/11
Verifying : mod_http2-1.15.19-4.el9_2.4.x86_64 9/11
Verifying : mod_lua-2.4.53-11.el9_2.4.x86_64 10/11
Verifying : redhat-logos-httpd-90.4-1.el9.noarch 11/11
Installed products updated.
Installed:
apr-1.7.0-11.el9.x86_64 apr-util-1.6.1-20.el9.x86_64 apr-util-bdb-1.6.1-20.el9.x86_64 apr-util-openssl-1.6.1-20.el9.x86_64
httpd-2.4.53-11.el9_2.4.x86_64 httpd-core-2.4.53-11.el9_2.4.x86_64 httpd-filesystem-2.4.53-11.el9_2.4.noarch httpd-tools-2.4.53-11.el9_2.4.x86_64
mod_http2-1.15.19-4.el9_2.4.x86_64 mod_lua-2.4.53-11.el9_2.4.x86_64 redhat-logos-httpd-90.4-1.el9.noarch
Complete!
# 安装好后,我们来启动 httpd 服务
[root@jock ~]# systemctl enable --now httpd
Created symlink /etc/systemd/system/multi-user.target.wants/httpd.service → /usr/lib/systemd/system/httpd.service.
服务启动好后,我们打开浏览器,在地址栏中输入 http://192.168.72.120 发现不能显示页面,原因是我们的防火墙是处于运行中。我们可以执行如下的命令来查看防火墙的状态:
[root@jock ~]# systemctl status firewalld
● firewalld.service - firewalld - dynamic firewall daemon
Loaded: loaded (/usr/lib/systemd/system/firewalld.service; enabled; preset: enabled)
Active: active (running) since Fri 2024-02-23 09:00:07 CST; 1h 7min ago
Docs: man:firewalld(1)
Main PID: 997 (firewalld)
Tasks: 2 (limit: 48630)
Memory: 41.8M
CPU: 655ms
CGroup: /system.slice/firewalld.service
└─997 /usr/bin/python3 -s /usr/sbin/firewalld --nofork --nopid
Feb 23 09:00:07 jock systemd[1]: Starting firewalld - dynamic firewall daemon...
Feb 23 09:00:07 jock systemd[1]: Started firewalld - dynamic firewall daemon.
从这个状态上可以发现,目前防火墙是开启并运行的。我们需要执行如下的命令来关闭防火墙:
[root@jock ~]# systemctl stop firewalld
[root@jock ~]# systemctl status firewalld
○ firewalld.service - firewalld - dynamic firewall daemon
Loaded: loaded (/usr/lib/systemd/system/firewalld.service; enabled; preset: enabled)
Active: inactive (dead) since Fri 2024-02-23 10:09:33 CST; 4s ago
Duration: 1h 9min 25.928s
Docs: man:firewalld(1)
Process: 997 ExecStart=/usr/sbin/firewalld --nofork --nopid $FIREWALLD_ARGS (code=exited, status=0/SUCCESS)
Main PID: 997 (code=exited, status=0/SUCCESS)
CPU: 716ms
Feb 23 09:00:07 jock systemd[1]: Starting firewalld - dynamic firewall daemon...
Feb 23 09:00:07 jock systemd[1]: Started firewalld - dynamic firewall daemon.
Feb 23 10:09:33 jock systemd[1]: Stopping firewalld - dynamic firewall daemon...
Feb 23 10:09:33 jock systemd[1]: firewalld.service: Deactivated successfully.
Feb 23 10:09:33 jock systemd[1]: Stopped firewalld - dynamic firewall daemon.
此时,防火墙已经关闭了,我们再次刷新浏览器来查看。
此时,我们发现可以看到一个测试页面了,说明服务是 OK 的。如果大家在做这个实验时还看不到,那么我们就需要执行如下的命令来查看 selinux 的是否关闭。
[root@jock ~]# getenforce
Enforcing
然后就可以执行如下的命令来关闭 enfore
[root@jock ~]# setenforce 0
[root@jock ~]# getenforce
Permissive
执行完后,我们再次刷新浏览器就应该可以看到界面了。
我们还可以把显示的页面修改为我们自己的页面:
# 进入到页面所在目录
[root@jock ~]# cd /var/www/html/
[root@jock html]# ll
total 0
# 创建一个首页页面文件并输入显示内容
[root@jock html]# echo welcome to http > index.html
配置本地源
在 /etc/yum.repos.d 目录下新建一个仓库文件,如 base.repo,然后在这个文件中添加如下内容:
[base]
name=base
baseurl=/mnt/BaseOS
gpgcheck=0
[app]
name=app
baseurl=/mnt/AppStream
gpgcheck=0
然后将光盘挂载到 /mnt 目录下:
[root@jock html]# mount /dev/sr0 /mnt
至此,本地仓库就建立好了。
配置网络源
建立网络源(Redhat9暂时无公开的网络源,暂不可配置,其他发行版本可自行选择对应网源仓库)
- 阿里云网络源,aliyun的镜像站点为https://mirrors.aliyun.com/
- 清华源镜像站点为https://mirrors.tuna.tsinghua.edu.cn/
- 中国科技大学镜像站点https://mirrors.ustc.edu.cn/
- 网易开源镜像站http://mirrors.163.com/
查看系统内核版本信息:
[root@jock html]# cat /etc/os-release
NAME="Red Hat Enterprise Linux"
VERSION="9.2 (Plow)"
ID="rhel"
ID_LIKE="fedora"
VERSION_ID="9.2"
PLATFORM_ID="platform:el9"
PRETTY_NAME="Red Hat Enterprise Linux 9.2 (Plow)"
ANSI_COLOR="0;31"
LOGO="fedora-logo-icon"
CPE_NAME="cpe:/o:redhat:enterprise_linux:9::baseos"
HOME_URL="https://www.redhat.com/"
DOCUMENTATION_URL="https://access.redhat.com/documentation/en-us/red_hat_enterprise_linux/9"
BUG_REPORT_URL="https://bugzilla.redhat.com/"
REDHAT_BUGZILLA_PRODUCT="Red Hat Enterprise Linux 9"
REDHAT_BUGZILLA_PRODUCT_VERSION=9.2
REDHAT_SUPPORT_PRODUCT="Red Hat Enterprise Linux"
REDHAT_SUPPORT_PRODUCT_VERSION="9.2"
[root@jock html]# cat /etc/redhat-release
Red Hat Enterprise Linux release 9.2 (Plow)
下面我们来配置一个网络源(仓库),我们以阿里的网络源为例来进行演示:
首先我们在 /etc/yum.repos.d 目录下新建一个名为 aliyun.repo 仓库文件:
[root@jock yum.repos.d]# touch aliyun.repo
[root@jock yum.repos.d]# ll
total 8
-rw-r--r--. 1 root root 0 Feb 23 10:23 aliyun.repo
-rw-r--r--. 1 root root 98 Feb 22 15:59 base.repo
-rw-r--r--. 1 root root 358 Jan 25 15:05 redhat.repo
然后在这个文件中添加如下的内容:
[baseOS]
name=baseOS
baseurl=https://mirrors.aliyun.com/redhat/rhel/rhel-9-beta/baseos/x86_64/
gpgcheck=0
[appStream]
name=appStream
baseurl=https://mirrors.aliyun.com/redhat/rhel/rhel-9-beta/appstream/x86_64/
gpgcheck=0
下面配置一个网易网络仓库:
[tunaBaseOS]
name=tunaBaseOS
baseurl=http://mirrors.163.com/rocky/9.3/BaseOS/x86_64/os/
gpgcheck=0
[tunaAppStream]
name=tunaAppStream
baseurl=http://mirrors.163.com/rocky/9.3/AppStream/x86_64/os/
gpgcheck=0
配置好后,我们可以来测试一个软件,例如安装 bind 软件:
[root@jock yum.repos.d]# dnf install -y bind
Updating Subscription Management repositories.
Unable to read consumer identity
This system is not registered with an entitlement server. You can use subscription-manager to register.
aliyuBaseOS 1.3 MB/s | 1.0 MB 00:00
aliyuAppStream 7.3 MB/s | 5.6 MB 00:00
tunaBaseOS 915 kB/s | 2.2 MB 00:02
tunaAppStream 569 kB/s | 7.4 MB 00:13
Dependencies resolved.
======================================================================================================================
Package Architecture Version Repository Size
======================================================================================================================
Installing:
bind x86_64 32:9.16.23-14.el9_3.0.1 tunaAppStream 487 k
Upgrading:
bind-libs x86_64 32:9.16.23-14.el9_3.0.1 tunaAppStream 1.2 M
bind-license noarch 32:9.16.23-14.el9_3.0.1 tunaAppStream 12 k
bind-utils x86_64 32:9.16.23-14.el9_3.0.1 tunaAppStream 199 k
Installing dependencies:
bind-dnssec-doc noarch 32:9.16.23-14.el9_3.0.1 tunaAppStream 44 k
python3-bind noarch 32:9.16.23-14.el9_3.0.1 tunaAppStream 60 k
python3-ply noarch 3.11-14.el9.0.1 tunaBaseOS 103 k
Installing weak dependencies:
bind-dnssec-utils x86_64 32:9.16.23-14.el9_3.0.1 tunaAppStream 112 k
Transaction Summary
======================================================================================================================
Install 5 Packages
Upgrade 3 Packages
Total download size: 2.2 M
Downloading Packages:
(1/8): python3-ply-3.11-14.el9.0.1.noarch.rpm 222 kB/s | 103 kB 00:00
(2/8): python3-bind-9.16.23-14.el9_3.0.1.noarch.rpm 206 kB/s | 60 kB 00:00
(3/8): bind-dnssec-utils-9.16.23-14.el9_3.0.1.x86_64.rpm 128 kB/s | 112 kB 00:00
(4/8): bind-dnssec-doc-9.16.23-14.el9_3.0.1.noarch.rpm 196 kB/s | 44 kB 00:00
(5/8): bind-9.16.23-14.el9_3.0.1.x86_64.rpm 368 kB/s | 487 kB 00:01
(6/8): bind-license-9.16.23-14.el9_3.0.1.noarch.rpm 86 kB/s | 12 kB 00:00
(7/8): bind-utils-9.16.23-14.el9_3.0.1.x86_64.rpm 297 kB/s | 199 kB 00:00
(8/8): bind-libs-9.16.23-14.el9_3.0.1.x86_64.rpm 450 kB/s | 1.2 MB 00:02
----------------------------------------------------------------------------------------------------------------------
Total 601 kB/s | 2.2 MB 00:03
Running transaction check
Transaction check succeeded.
Running transaction test
Transaction test succeeded.
Running transaction
Preparing : 1/1
Upgrading : bind-license-32:9.16.23-14.el9_3.0.1.noarch 1/11
Upgrading : bind-libs-32:9.16.23-14.el9_3.0.1.x86_64 2/11
Upgrading : bind-utils-32:9.16.23-14.el9_3.0.1.x86_64 3/11
Installing : bind-dnssec-doc-32:9.16.23-14.el9_3.0.1.noarch 4/11
Installing : python3-ply-3.11-14.el9.0.1.noarch 5/11
Installing : python3-bind-32:9.16.23-14.el9_3.0.1.noarch 6/11
Installing : bind-dnssec-utils-32:9.16.23-14.el9_3.0.1.x86_64 7/11
Running scriptlet: bind-32:9.16.23-14.el9_3.0.1.x86_64 8/11
Installing : bind-32:9.16.23-14.el9_3.0.1.x86_64 8/11
Running scriptlet: bind-32:9.16.23-14.el9_3.0.1.x86_64 8/11
Cleanup : bind-utils-32:9.16.23-11.el9.x86_64 9/11
Cleanup : bind-libs-32:9.16.23-11.el9.x86_64 10/11
Cleanup : bind-license-32:9.16.23-11.el9.noarch 11/11
Running scriptlet: bind-license-32:9.16.23-11.el9.noarch 11/11
Verifying : python3-ply-3.11-14.el9.0.1.noarch 1/11
Verifying : bind-dnssec-utils-32:9.16.23-14.el9_3.0.1.x86_64 2/11
Verifying : bind-32:9.16.23-14.el9_3.0.1.x86_64 3/11
Verifying : python3-bind-32:9.16.23-14.el9_3.0.1.noarch 4/11
Verifying : bind-dnssec-doc-32:9.16.23-14.el9_3.0.1.noarch 5/11
Verifying : bind-utils-32:9.16.23-14.el9_3.0.1.x86_64 6/11
Verifying : bind-utils-32:9.16.23-11.el9.x86_64 7/11
Verifying : bind-libs-32:9.16.23-14.el9_3.0.1.x86_64 8/11
Verifying : bind-libs-32:9.16.23-11.el9.x86_64 9/11
Verifying : bind-license-32:9.16.23-14.el9_3.0.1.noarch 10/11
Verifying : bind-license-32:9.16.23-11.el9.noarch 11/11
Installed products updated.
Upgraded:
bind-libs-32:9.16.23-14.el9_3.0.1.x86_64 bind-license-32:9.16.23-14.el9_3.0.1.noarch
bind-utils-32:9.16.23-14.el9_3.0.1.x86_64
Installed:
bind-32:9.16.23-14.el9_3.0.1.x86_64 bind-dnssec-doc-32:9.16.23-14.el9_3.0.1.noarch
bind-dnssec-utils-32:9.16.23-14.el9_3.0.1.x86_64 python3-bind-32:9.16.23-14.el9_3.0.1.noarch
python3-ply-3.11-14.el9.0.1.noarch
Complete!
可以发现,我们配置的 aliyun.repo 和 tuna.repo 都是生效的,说明配置是 OK 的。
删除所安装的软件
[root@jock yum.repos.d]# dnf remove bind
# 删除 httpd 服务
[root@jock yum.repos.d]# dnf remove -y httpd
# 查看端口占用情况
[root@jock yum.repos.d]# netstat -nltup
Active Internet connections (only servers)
Proto Recv-Q Send-Q Local Address Foreign Address State PID/Program name
tcp 0 0 127.0.0.1:6010 0.0.0.0:* LISTEN 5433/sshd: root@pts
tcp 0 0 0.0.0.0:22 0.0.0.0:* LISTEN 1154/sshd: /usr/sbi
tcp 0 0 0.0.0.0:111 0.0.0.0:* LISTEN 1/systemd
tcp 0 0 127.0.0.1:631 0.0.0.0:* LISTEN 1150/cupsd
tcp6 0 0 :::22 :::* LISTEN 1154/sshd: /usr/sbi
tcp6 0 0 :::111 :::* LISTEN 1/systemd
tcp6 0 0 ::1:631 :::* LISTEN 1150/cupsd
tcp6 0 0 ::1:6010 :::* LISTEN 5433/sshd: root@pts
udp 0 0 0.0.0.0:44729 0.0.0.0:* 927/avahi-daemon: r
udp 0 0 0.0.0.0:111 0.0.0.0:* 1/systemd
udp 0 0 127.0.0.1:323 0.0.0.0:* 984/chronyd
udp 0 0 0.0.0.0:5353 0.0.0.0:* 927/avahi-daemon: r
udp6 0 0 :::111 :::* 1/systemd
udp6 0 0 ::1:323 :::* 984/chronyd
udp6 0 0 :::5353 :::* 927/avahi-daemon: r
udp6 0 0 :::38789 :::* 927/avahi-daemon: r
[root@jock yum.repos.d]# netstat -nltup | grep 80
yum/dnf命令用法
yum repolist [all] # 查看系统中 yum 的资源配置信息
yum list all # 列出仓库里可安装的软件包
yum list installed [包名] # 列出已经安装的软件
yum info 包名 # 查看指定软件包的详细信息
yum grouplist # 查看仓库中所有包组
yum groupinfo 包组名 #查看指定包组的信息
yum install [-y] 包名 # 安装指定的包
yum update [-y] 包名 # 更新指定的包
yum groupinstall 组名 # 安装指定的组名包
yum remove [-y] 包名 # 删除指定的包名
yum provides 包名 # 查找指定的包名是由哪个提供的
yum search 包名 # 查看包名在哪个软件中
yum clean packages all # 清除下载到本机的指定的软件包或yum的缓存文件
10.2 进程管理
10.2.1 概念
程序: 二进制文件,文件存储在磁盘中,例如/usr/bin/目录下
进程:进程是已启动的可执行程序的运行实例。
- 进程和程序并不是一一对应的关系,相同的程序运行在不同的数据集上就是不同的进程
- 进程还具有并发性和交往性,而程序却是封闭的
线程:是操作系统能够进行运算调度的最小单位。它被包含在进程之中,是进程中的实际运作单位。一条线程指的是进程中一个单一顺序的控制流,一个进程中可以并发多个线程,每条线程并行执行不同的任务。
- 一个进程可以拥有多个线程,而一个线程同时只能被一个进程所拥有
- 线程不能单独执行,但是每一个线程都有程序的入口、执行序列以及程序出口,它必须组成进程才能被执行。
10.2.2 进程分类

10.2.3 运行程序
# 安装 httpd 包
[root@jock yum.repos.d]# dnf install -y httpd
# 查看 httpd 的服务状态
[root@jock yum.repos.d]# systemctl status httpd
○ httpd.service - The Apache HTTP Server
Loaded: loaded (/usr/lib/systemd/system/httpd.service; disabled; preset: disabled)
Active: inactive (dead) # 未启用状态
Docs: man:httpd.service(8)
Feb 23 10:06:15 jock systemd[1]: Starting The Apache HTTP Server...
Feb 23 10:06:15 jock httpd[6337]: AH00558: httpd: Could not reliably determine the server's fully qualified domain na>
Feb 23 10:06:15 jock httpd[6337]: Server configured, listening on: port 80
Feb 23 10:06:15 jock systemd[1]: Started The Apache HTTP Server.
Feb 23 10:51:37 jock systemd[1]: Stopping The Apache HTTP Server...
Feb 23 10:51:38 jock systemd[1]: httpd.service: Deactivated successfully.
Feb 23 10:51:38 jock systemd[1]: Stopped The Apache HTTP Server.
Feb 23 10:51:38 jock systemd[1]: httpd.service: Consumed 3.056s CPU time.
# 启用 httpd 服务
[root@jock yum.repos.d]# systemctl start httpd
# 查看服务的进程
[root@jock yum.repos.d]# netstat -lntup | grep httpd
tcp6 0 0 :::80 :::* LISTEN 8148/httpd
# 或者查看服务的状态
[root@jock yum.repos.d]# systemctl status httpd
● httpd.service - The Apache HTTP Server
Loaded: loaded (/usr/lib/systemd/system/httpd.service; disabled; preset: disabled)
Active: active (running) since Fri 2024-02-23 11:27:34 CST; 44s ago # 启用状态
Docs: man:httpd.service(8)
Main PID: 8148 (httpd)
Status: "Total requests: 0; Idle/Busy workers 100/0;Requests/sec: 0; Bytes served/sec: 0 B/sec"
Tasks: 213 (limit: 48630)
Memory: 37.1M
CPU: 94ms
CGroup: /system.slice/httpd.service
├─8148 /usr/sbin/httpd -DFOREGROUND
├─8151 /usr/sbin/httpd -DFOREGROUND
├─8152 /usr/sbin/httpd -DFOREGROUND
├─8153 /usr/sbin/httpd -DFOREGROUND
└─8154 /usr/sbin/httpd -DFOREGROUND
Feb 23 11:27:34 jock systemd[1]: Starting The Apache HTTP Server...
Feb 23 11:27:34 jock httpd[8148]: AH00558: httpd: Could not reliably determine the server's fully qualified domain na>
Feb 23 11:27:34 jock httpd[8148]: Server configured, listening on: port 80
Feb 23 11:27:34 jock systemd[1]: Started The Apache HTTP Server.
# 停止httpd服务
[root@jock yum.repos.d]# systemctl stop httpd
# 查看进程
[root@jock yum.repos.d]# netstat -lntup | grep httpd
# 查看服务状态
[root@jock yum.repos.d]# systemctl status httpd
○ httpd.service - The Apache HTTP Server
Loaded: loaded (/usr/lib/systemd/system/httpd.service; disabled; preset: disabled)
Active: inactive (dead)
Docs: man:httpd.service(8)
Feb 23 10:51:38 jock systemd[1]: httpd.service: Deactivated successfully.
Feb 23 10:51:38 jock systemd[1]: Stopped The Apache HTTP Server.
Feb 23 10:51:38 jock systemd[1]: httpd.service: Consumed 3.056s CPU time.
Feb 23 11:27:34 jock systemd[1]: Starting The Apache HTTP Server...
Feb 23 11:27:34 jock httpd[8148]: AH00558: httpd: Could not reliably determine the server's fully qualified domain na>
Feb 23 11:27:34 jock httpd[8148]: Server configured, listening on: port 80
Feb 23 11:27:34 jock systemd[1]: Started The Apache HTTP Server.
Feb 23 11:29:43 jock systemd[1]: Stopping The Apache HTTP Server...
Feb 23 11:29:44 jock systemd[1]: httpd.service: Deactivated successfully.
Feb 23 11:29:44 jock systemd[1]: Stopped The Apache HTTP Server.
# 重启 httpd 服务
[root@jock yum.repos.d]# systemctl restart httpd
# 将 httpd 服务加入到开机启动列表,即系统一运行程序就运行
[root@jock yum.repos.d]# systemctl enable --now httpd
Created symlink /etc/systemd/system/multi-user.target.wants/httpd.service → /usr/lib/systemd/system/httpd.service.
# 将 httpd 服务从开机列表中删除
[root@jock yum.repos.d]# systemctl disable --now httpd
Removed "/etc/systemd/system/multi-user.target.wants/httpd.service".
10.2.4 查看进程
10.2.4.1 ps
ps显示某个时间点的程序运行情况*
-a :显示所有用户的进程
-u :显示用户名和启动时间
-x :显示没有控制终端的进程
-e :显示所有进程,包括没有控制终端的进程
-l :长格式显示
-w:宽行显示,可以使用多个 w 进行加宽显示
-f:做一个更完整的输出
使用示例:
# 查看当前用户的进程
[root@jock yum.repos.d]# ps -l
F S UID PID PPID C PRI NI ADDR SZ WCHAN TTY TIME CMD
0 S 0 5442 5433 0 80 0 - 56188 do_wai pts/0 00:00:00 bash
4 R 0 8917 5442 0 80 0 - 56370 - pts/0 00:00:00 ps
命令结果说明:
F:代表这个程序的标示(Flag),常见的值有:4表示此程序的权限为root;1表示此子程序仅进行复制(fork)而没有实际执行(exec)
S:代表这个程序的状态(Stat),主要有如下的状态:
- R(Running):该程序处于运行状态
- S(Sleep):该程序处理眨眼状态,但是可以唤醒
- D:该程序处于不可唤醒的状态
- T(Stop):该程序处于停止状态
- Z(Zomb


 3685
3685

 被折叠的 条评论
为什么被折叠?
被折叠的 条评论
为什么被折叠?
 到【灌水乐园】发言


