


实验所需要工具
- 安装 git
- 图形化工具sourceTree,这个可以帮助我们更直观的观察每种merge方式的过程
实验步骤
1. 创建git测试目录并进行初始化
# 创建并进入目录
temp % mkdir git_test && cd git_test

# 初始化git
git_test % git init
Initialized empty Git repository in /Users/domino/temp/git_test/.git/

# 创建并切换 master分支
git_test % git checkout -b master
Switched to a new branch 'master'

# 创建分支初始化文件并提交master分支
git_test % echo hello1 > file1.txt
git_test % git add . && git commit -am master
[master (root-commit) 1d777ea] master
 1 file changed, 1 insertion(+)
 create mode 100644 file1.txt
2. 开始
-
git merge --no-ff
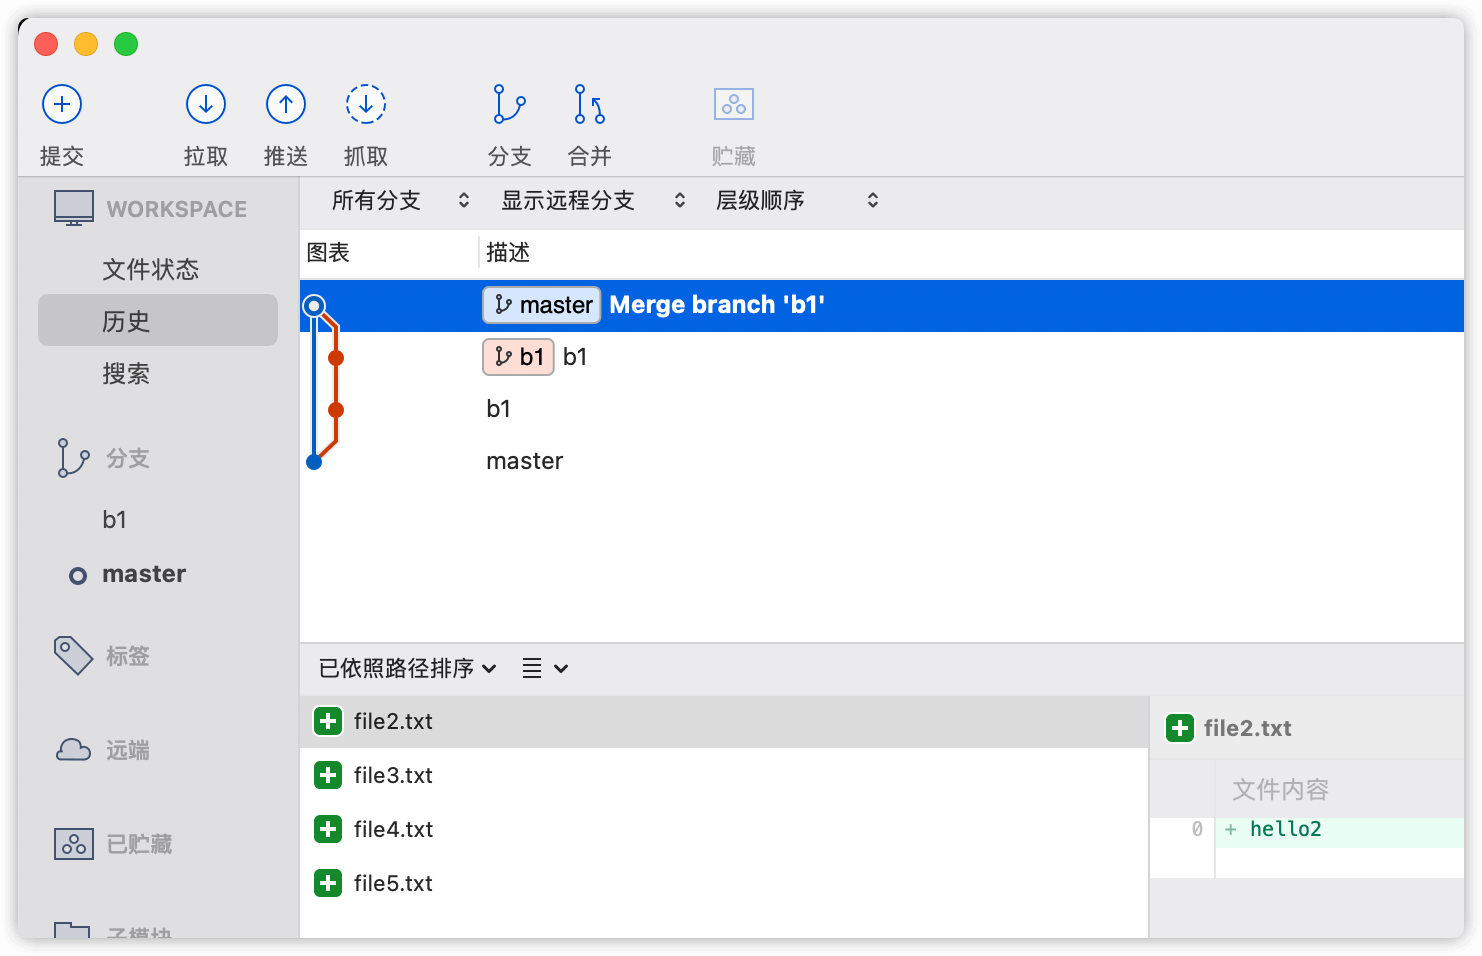
 # 从master分支 切出 b1分支
 git_test % git checkout -b b1 master
 Switched to a new branch 'b1'

 # 制造两次提交
 git_test % echo hello2 > file2.txt
 git_test % echo hello3 > file3.txt
 git_test % git add . && git commit -am b1
 [b1 faeb213] b1
  2 files changed, 2 insertions(+)
  create mode 100644 file2.txt
  create mode 100644 file3.txt

 git_test % echo hello4 > file4.txt
 git_test % echo hello5 > file5.txt
 git_test % git add . && git commit -am b1
 [b1 dbb7416] b1
  2 files changed, 2 insertions(+)
  create mode 100644 file4.txt
  create mode 100644 file5.txt

 # 将b1分支使用 --no-ff 方式merge到master分支
 git_test % git checkout master && git merge --no-ff b1 -m "Merge branch b1"
 Switched to branch 'master'
 Merge made by the 'recursive' strategy.
  file2.txt | 1 +
  file3.txt | 1 +
  file4.txt | 1 +
  file5.txt | 1 +
  4 files changed, 4 insertions(+)
  create mode 100644 file2.txt
  create mode 100644 file3.txt
  create mode 100644 file4.txt
  create mode 100644 file5.txt
我们可以看到,以
git merge --no-ff方式进行合并以后,git的节点图表是如下图所示的。1、2两个节点是每次提交后创建的提交节点,3节点是使用--no-diff进行合并时,创建的提交节点。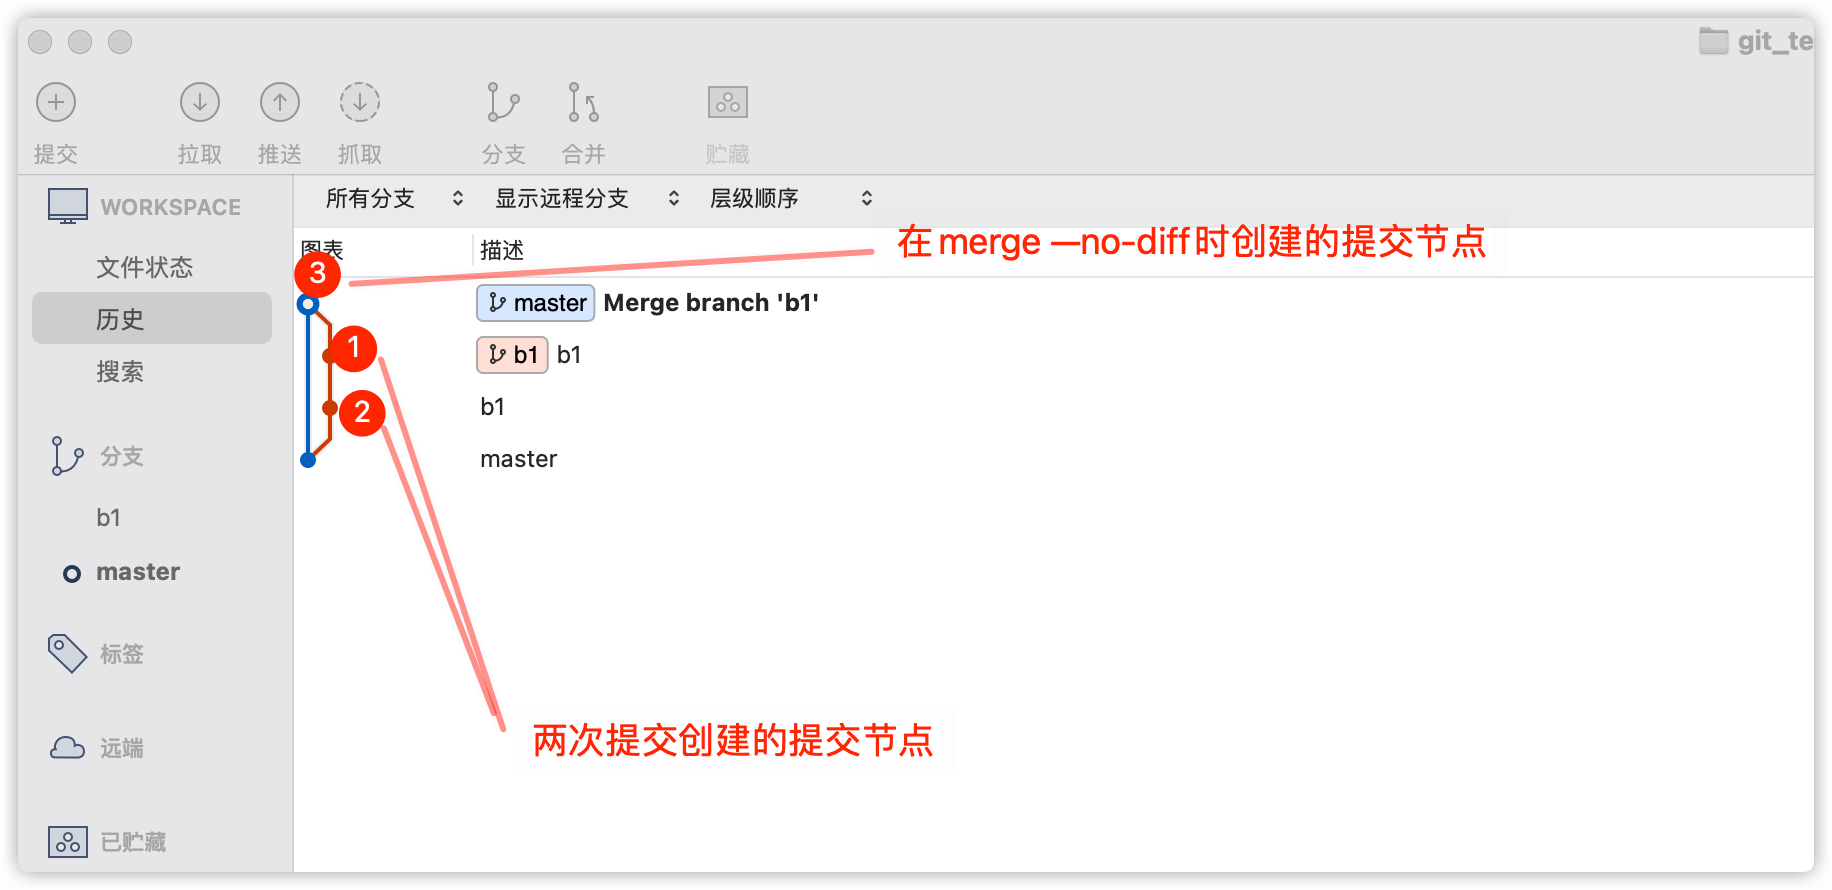
从文件上面看,最后的这个节点的变更,是每次提交的变更的一个汇总,是将分支
b1的所有的变更,都汇总到一起形成了一个新的提交节点,然后将这个节点提交到master分支上面去。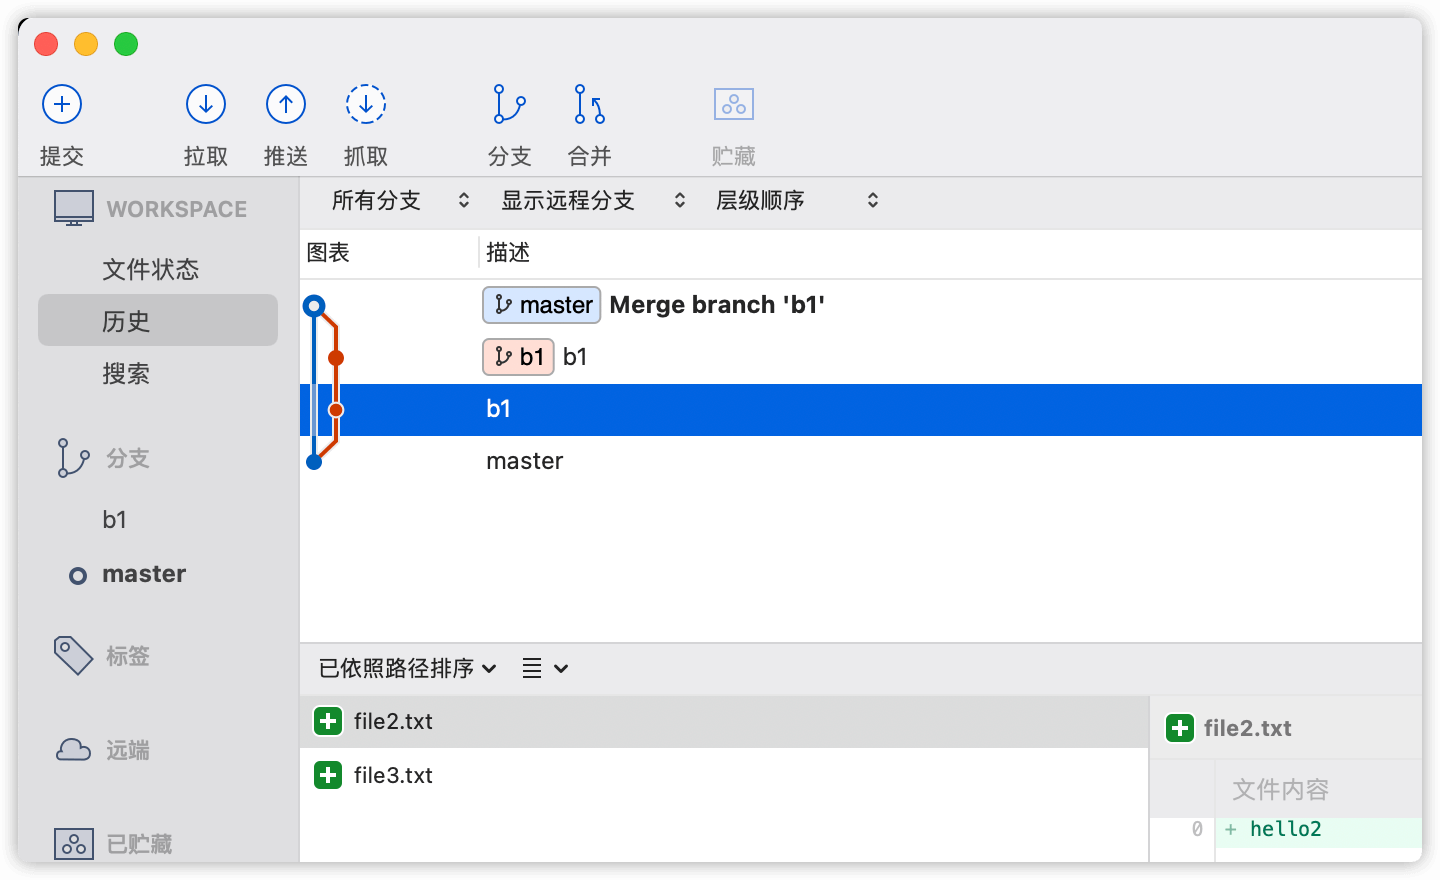
-
git merge
git merge是默认带--ff参数的,也就是fast forward的意思。我们先以实验进行举例,来说明fast forward是什么意思。# 从master创建一个新分支b2,并切换到b2分支上 git_test % git checkout -b b2 master Switched to a new branch 'b2' # 创建两次提交文件到b2分支 git_test % echo hello5 > file5.txt git_test % echo hello6 > file6.txt git_test % git add . && git commit -am b2 [b2 79cb433] b2 1 file changed, 1 insertion(+) create mode 100644 file6.txt git_test % echo hello7 > file7.txt git_test % echo hello8 > file8.txt git_test % git add . && git commit -am b2 [b2 6901550] b2 2 files changed, 2 insertions(+) create mode 100644 file7.txt create mode 100644 file8.txt # 将b2分支直接merge到master分支上面 git_test % git checkout master && git merge b2 -m "merge branch b2" Switched to branch 'master' Updating c72e661..6901550 Fast-forward (no commit created; -m option ignored) file6.txt | 1 + file7.txt | 1 + file8.txt | 1 + 3 files changed, 3 insertions(+) create mode 100644 file6.txt create mode 100644 file7.txt create mode 100644 file8.txt我们可以看到,直接使用
git merge,会将整个b2的所有的提交节点,都直接汇入到master分支中。比如说,我有一个开发分支,开发了两周,中间的大大小小的提交有上百次,如果我直接将这个开发分支通过git merge的方式进行提交到master分支的话,那master分支将会被我这个分支中的琐碎的提交所淹没。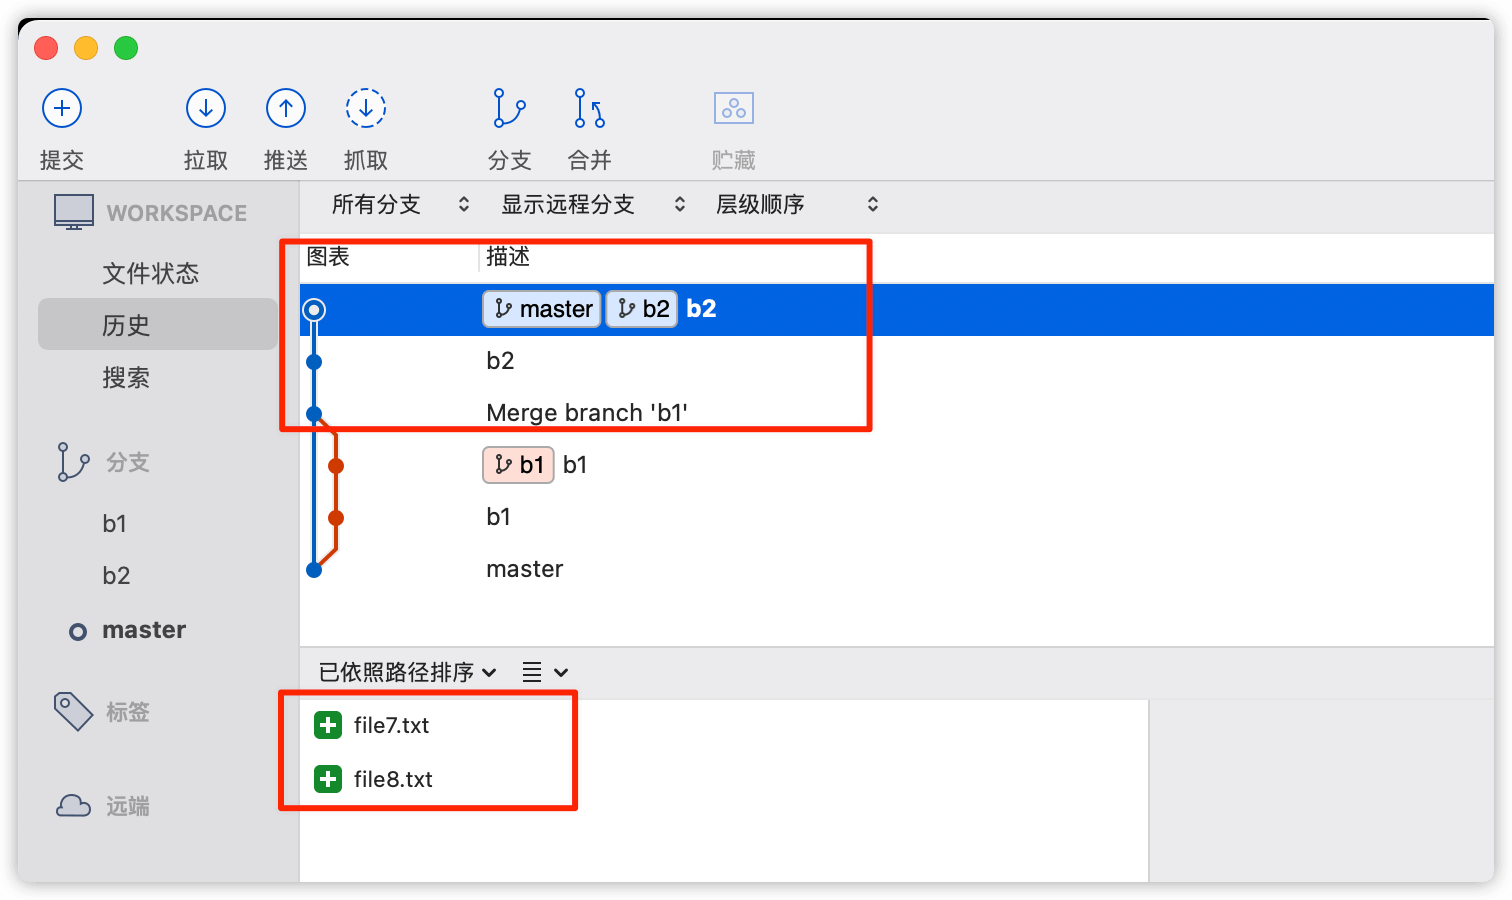
拿图中的
merge --no-ff与直接merge相比较,我们可以看到,merge --no-ff的合并方式,会合并提交,并保留有原来的提交记录,也不会将原来的提交记录汇入到被合并的分支中,保证了被合并分支的提交记录的整洁,如果有需要进行回滚的点,也可以很方便的从历史提交记录中找到相应的提交点。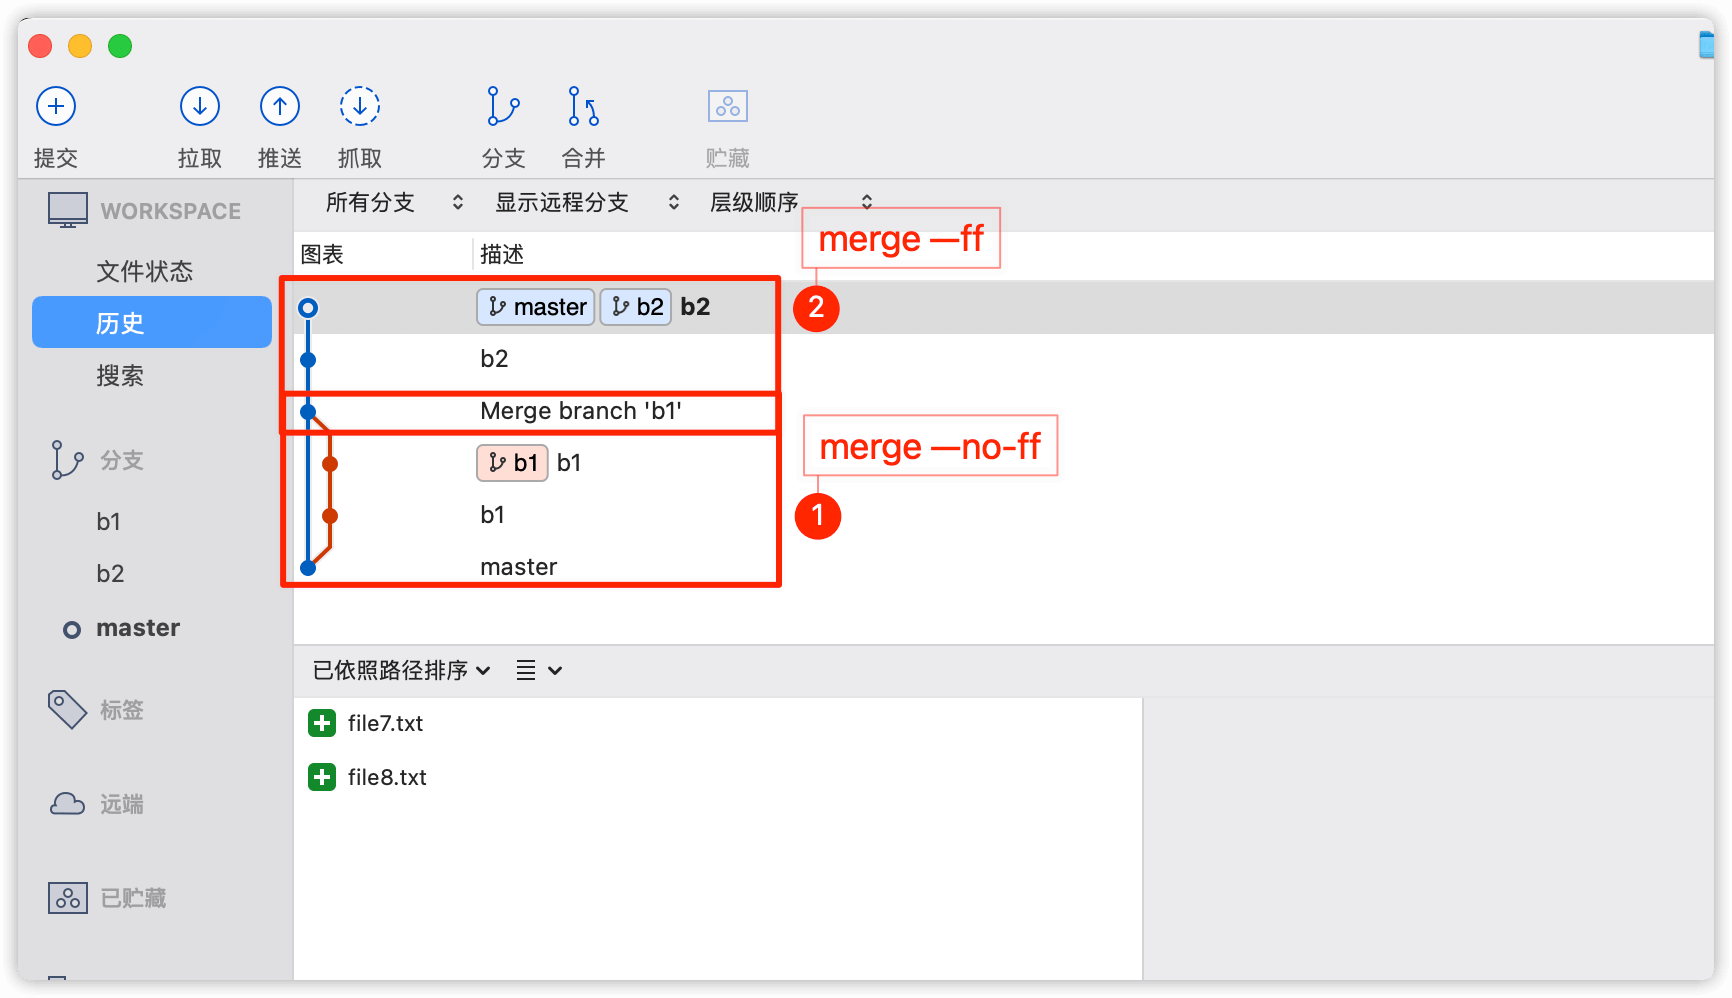
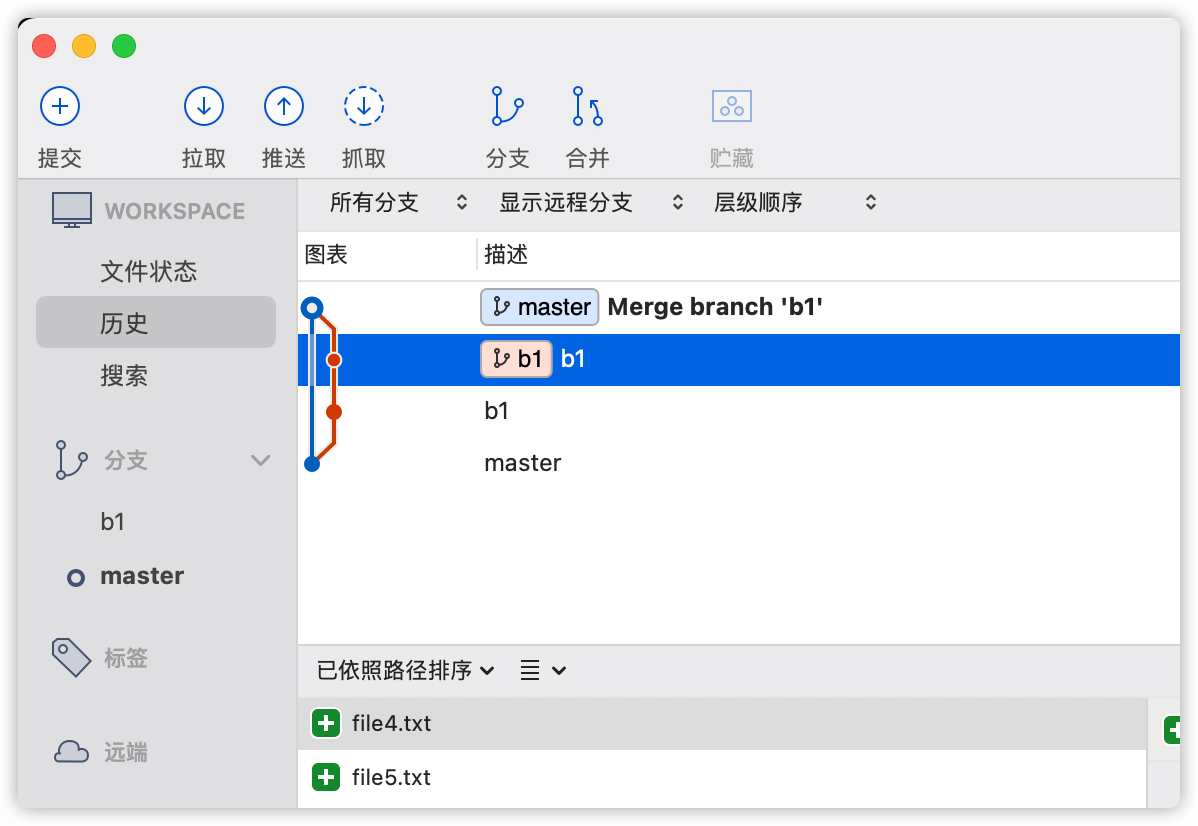
而且,就算我们将b1这个分支删除掉,这个记录也不会消失。
# 删除b1分支
git_test % git branch -d b1
Deleted branch b1 (was dbb7416).
我们执行完删除操作以后,可以从下图中看到,分支中的b1分支已经没了,但是历史的提交节点并没有受到影响。

-
merge --squash
merge --squash会将分支的所有的提交压缩到一次提交中,并且不会自动提交,需要merge的操作人手动进行提交。# 从master分支中创建b3分支,并切换到b3分支上 git_test % git checkout -b b3 master Switched to a new branch 'b3' # 创建两次文件提交操作 git_test % echo hello9 > file9.txt git_test % echo hello10 > file10.txt git_test % git add . && git commit -am b3 [b3 c6aa3bc] b3 2 files changed, 2 insertions(+) create mode 100644 file10.txt create mode 100644 file9.txt git_test % echo hello11 > file11.txt git_test % echo hello12 > file12.txt git_test % git add . && git commit -am b3 [b3 fae0d95] b3 2 files changed, 2 insertions(+) create mode 100644 file11.txt create mode 100644 file12.txt # 使用 --squash 方式合并b3分支到master git_test % git checkout master && git merge --squash b3 Switched to branch 'master' Updating 6901550..fae0d95 Fast-forward Squash commit -- not updating HEAD file10.txt | 1 + file11.txt | 1 + file12.txt | 1 + file9.txt | 1 + 4 files changed, 4 insertions(+) create mode 100644 file10.txt create mode 100644 file11.txt create mode 100644 file12.txt create mode 100644 file9.txt #查看文件状态为未提交状态 git_test % git status On branch master Changes to be committed: (use "git restore --staged <file>..." to unstage) new file: file10.txt new file: file11.txt new file: file12.txt new file: file9.txt进行了以上的
merge --squash操作以后,如下图,我们可以看到,merge --squash后b3分支与master分支间的关联是中断的,b3分支中提交的文件,在新创建的节点中,也是未提交的状态,在这个步骤操作之前我们说了,merge --squash操作,会将要合并的分支的所有的提交进行合并压缩到一次提交上。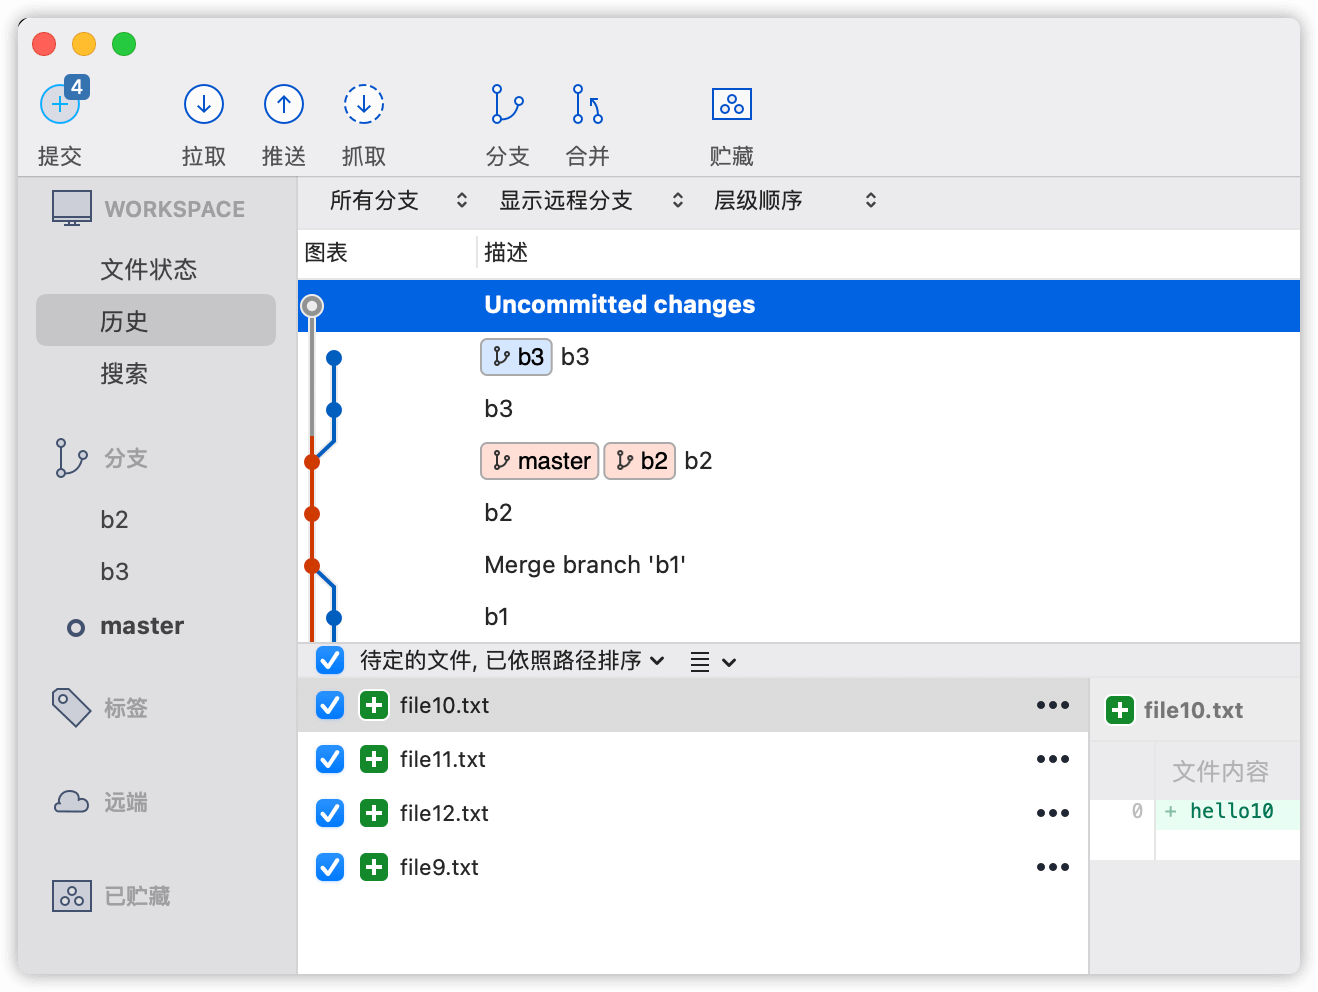
在我们将合并提交以后,我们可以看到,这次提交以后,
merge --squash新创建的提交点,与原来的b3分支是断开的,是无法溯源的,如果此时我们将b3这个分支删除掉,那这次提交就变成了git_test % git commit -am master [master ad862bd] master 4 files changed, 4 insertions(+) create mode 100644 file10.txt create mode 100644 file11.txt create mode 100644 file12.txt create mode 100644 file9.txt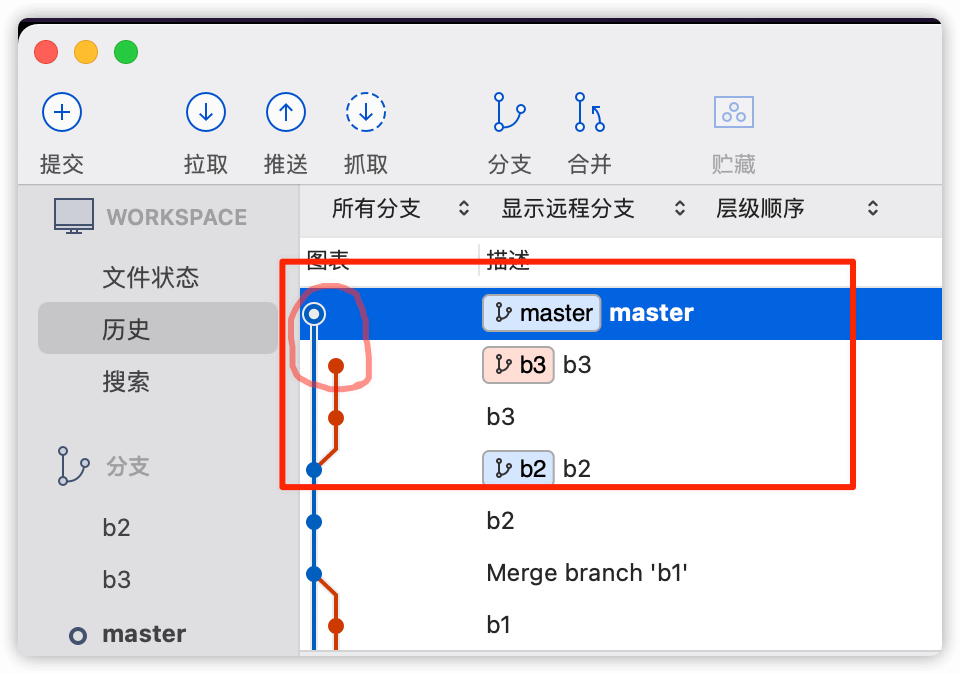
-
merge --no-ff --no-commit
在合并分支时使用--no-commit参数,可以只执行合并代码的操作,不进行提交操作。--no-ff配合--no-commit效果,我们执行一下看看。# 从master分支创建b4分支,并切换到b4分支 git_test % git checkout -b b4 master Switched to a new branch 'b4' # 创建变更并进行提交 git_test % echo hello13 > file13.txt git_test % echo hello14 > file14.txt git_test % git add . && git commit -am b4 [b4 08f9caf] b4 2 files changed, 2 insertions(+) create mode 100644 file13.txt create mode 100644 file14.txt # 切换到master分支并使用 --no-ff 和--no-commit进行合并 b4分支到master git_test % git checkout master && git merge --no-commit --no-ff b4 Already on 'master' Automatic merge went well; stopped before committing as requested # 查看文件状态 git_test % git status On branch master All conflicts fixed but you are still merging. (use "git commit" to conclude merge) Changes to be committed: new file: file13.txt new file: file14.txt从上面的命令的结果和下图,我们可以直观的看到,使用
--no-ff --no-commit的方式进行提交以后,合并是并没有提交的。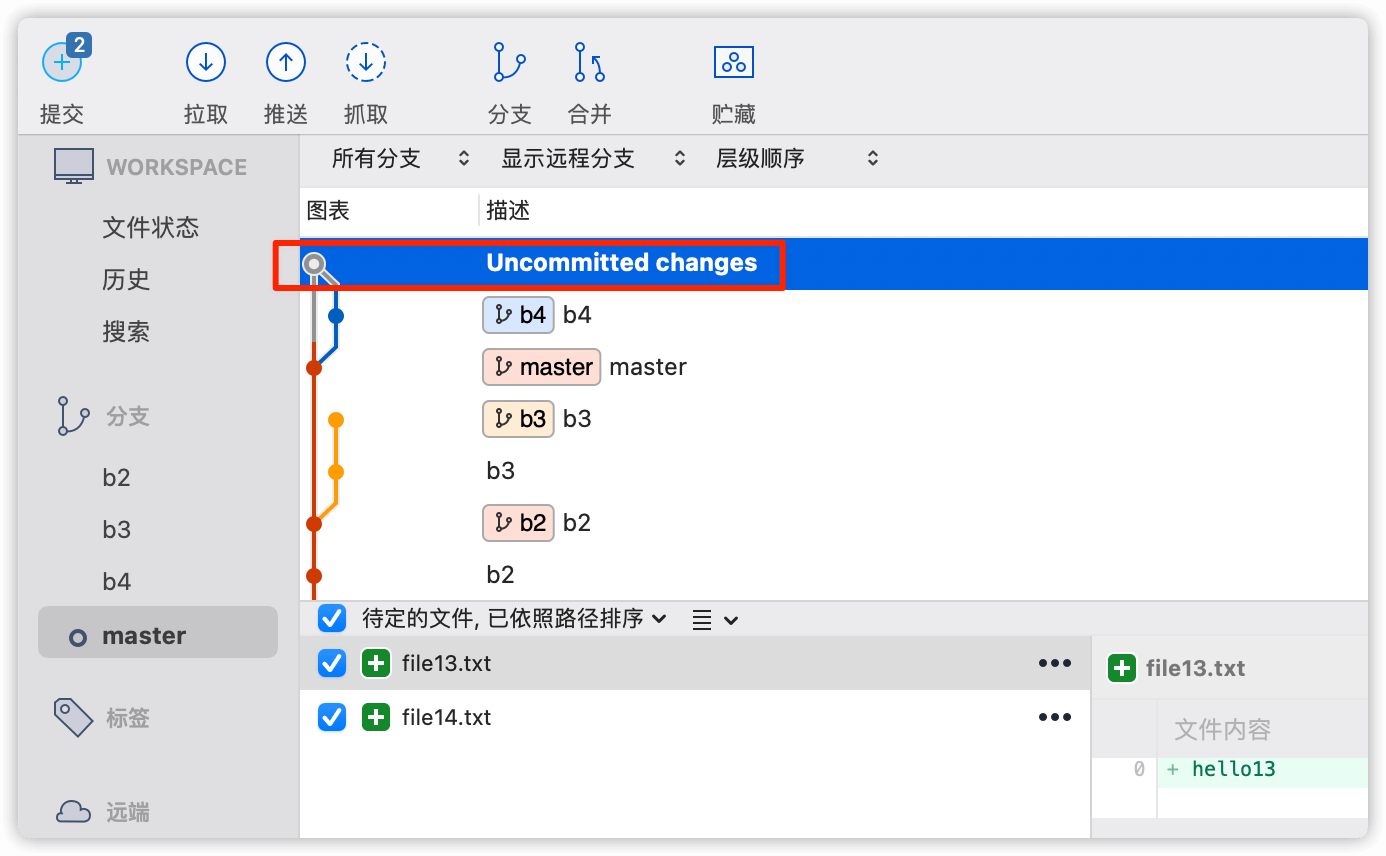
我们手动进行提交以后,才提交上去,如下图
 git_test % git commit -am master
 [master 8108939] master
3.结论
merge --no-ff 与 merge --ff 和merge --squash 相比,拥有可以保持分支整洁,而且可追溯的优点,所以在开发中,推荐使用 merge --no-ff 方式进行分支合并,而且在合并时,配合 --no-commit 进行合并,待检查合并完毕的文件以后再进行提交的方式为最佳方案。


 3220
3220


 被折叠的 条评论
为什么被折叠?
被折叠的 条评论
为什么被折叠?
 到【灌水乐园】发言


