


一.通知(Notification)的相关概念
Notification是一种具有全局效果的通知,它展示在屏幕的顶端,首先会表现为一个图标的形式,当用户向下滑动的时候,展示出通知具体的内容。
它是一种让你的应用程序在没有开启情况下或在后台运行警示用户。它是看不见的程序组件(Broadcast Receiver,Service和不活跃的Activity)警示用户有需要注意的事件发生的最好途径。
(一)一个Notification传送的信息有:
1.一个状态条图标
2.在拉伸的状态栏窗口中显示带有大标题,小标题,图标的信息,并且有处理该点击事件:
比如调用该程序的入口类;
闪光,LED,或者震动;
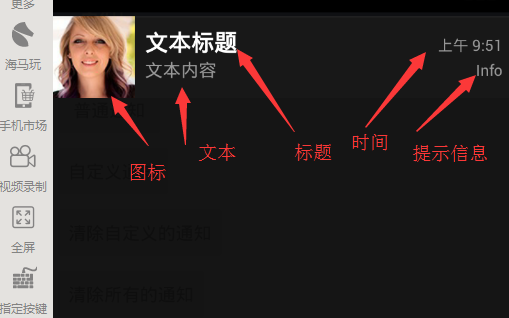
(二)内容信息,如图所示:
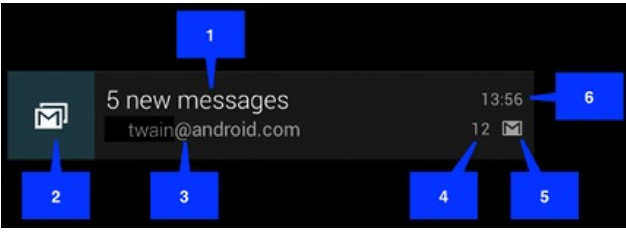
1.内容标题 2.大图标 3.内容 4.内容附加信息 5.小图标 6.时间
(三)Notification类中的一些常量,字段,方法简单介绍一下:
1.通知模式的设置值
(1) DEFAULT_ALL 使用所有默认值,比如声音,震动,闪屏等等
(2) DEFAULT_LIGHTS 使用默认闪光提示
(3) DEFAULT_SOUNDS 使用默认提示声音
(4)DEFAULT_VIBRATE 使用默认手机震动
以上的效果常量可以叠加,即通过mNotifaction.defaults =DEFAULT_SOUND |DEFAULT_VIBRATE;
(最好在真机上测试,震动效果模拟器上没有)
注意: 加入手机震动,一定要在manifest.xml中加入权限:
2.设置flag属性
(1) FLAG_AUTO_CANCEL 该通知能被状态栏的清除按钮给清除掉
(2) FLAG_NO_CLEAR 该通知不能被状态栏的清除按钮给清除掉
(3) FLAG_ONGOING_EVENT 通知放置在正在运行
(4) FLAG_INSISTENT 是否一直进行,比如音乐一直播放,知道用户响应
3.常用字段:
(1) contentIntent 设置PendingIntent对象,点击时发送该Intent,
(2) defaults 添加默认效果
(3) flags 设置flag位,例如FLAG_NO_CLEAR等
(4)icon 设置图标
(5)sound 设置声音
(6) tickerText 显示在状态栏中的文字
(7) when 发送此通知的时间戳
(四)Notification基本设置要求
一个notification不必对上面所有的选项都进行设置,但有3项是必须的:
小图标 setSmallIcon()
内容标题 setContentTitle()
内容 setContentText()
(五)NotificationManager
通知一般通过NotificationManager服务来发送一个Notification对象来完成,NotificationManager是一个重要的系统级服务,该对象位于应用程序的框架层中,应用
程序可以通过它像系统发送全局的通知。这个时候需要创建一个Notification对象,用于承载通知的内容。
通知的清除也可以通过NotificationManager服务完成。
(六)Notification的步骤简单可以分为以下四步:
1.实例化一个Notification.Builder对象;
注意:在 android:minSdkVersion <16以下时,可以使用
NotificationCompat.Builder创建。
2.调用builder的相关方法对notification进行上面提到的各种字段;
3.调用builder.build()方法此方法返回一个notification对象(实例化一个NotificationManager对象);
4.调用manager的notify方法。
注意: 所有的系统服务都是使用Context.getService()方法获取,如通知管理器,音量管理器,传感器管理器等等
更新与移除通知在使用NotificationManager.notify()发送通知的时候,需要传递一个标识符,用于唯一标识这个通知。对于有些场景,并不是无限的添加新的通知,有时候需要更新原有通知的信息,这个时候可以重写构建Notification,而使用与之前通知相同标识符来发送通知,这个时候旧的通知就被被新的通知所取代,起到更新通知的效果对于一个通知,当展示在状态栏之后,但是使用过后,如何取消呢?
Android为我们提供两种方式移除通知,一种是Notification自己维护,使用setAutoCancel()方法设置是否维护,传递一个boolean类型的数据。另外一种方式使用NotificationManager通知管理器对象来维护,它通过notify()发送通知的时候,指定的通知标识Id来操作通知,可以使用cancel(int)来移除一个指定的通知,也可以使用cancelAll()移除所有的通知。
(七)NotificationManager常用方法
1.移除所有通知 (只是针对当前Context下的Notification) public void cancelAll()
2.移除标记为id的通知 (只是针对当前Context下的所有Notification)
public void cancel(int id)
3. 将通知加入状态栏,标签为tag,标记为id
public void notify(String tag ,int id, Notification notification)
4.将通知加入状态栏,,标记为id
public void notify(int id, Notification notification)
(八)PendingIntent
对于一个通知而言,它显示的消息是有限的,一般仅用于提示一些概要信息。但是一般简短的消息,并不能表达需要告诉用户的全部内容,所以需要绑定一个意图,当用户点击通知的时候,调用一个意图展示出一个Activity用来显示详细的内容。而Notification中,并不使用常规的Intent去传递一个意图,而是使用PendingIntent。
根据字面意思就知道是延迟的intent,主要用来在某个事件完成后执行特定的Action。
PendingIntent包含了Intent及Context,所以就算Intent所属程序结束,PendingIntent依然有效,可以在其他程序中使用。
1.PendingIntent的flag参数,用于标识PendingIntent的
构造选择:
(1)FLAG_CANCEL_CURRENT: 如果构建的PendingIntent已经存在,则取消前一个,重新构建一个。
(2)FLAG_NO_CREATE: 如果前一个PendingIntent已经不存在了,将不再构建它。
(3)FLAG_ONE_SHOT: 表明这里构建的PendingIntent只能使用一次。
(4)FLAG_UPDATE_CURRENT: 如果构建的PendingIntent已经存在,则替换它,常用。
(九)RemoteViews类
自定义布局notification和Toast一样,通知也可以使用自定义的XML来自定义样式,但是对于通知而言,因为它的全局性,并不能简单的通过inflate膨胀出一个View,因为可能触发通知的时候,响应的App已经关闭,无法获取当指定的XML布局文件。所以需要使用单独的一个RemoteViews类来操作。
RemoteViews 类描述了一个View对象能够显示在其他进程中,可以融合从一个layout资源文件实现布局。
如何实例化一个RemoteViews
1. 构造方法
RemoteViews(String packageName, int layoutId)
通过指定的布局文件新建一个RemoteViews对象。
RemoteViews可以使用它的一系列setXxx()方法通过控件的Id设置控件的属性。
2.为控件设置监听
public void setOnClickPendingIntent (int viewId, PendingIntent pendingIntent)
//viewId 当点击时将要触发PendingIntent的视图的id
//pendingIntent 当点击时传过去的PendingIntent
最后使用Notification.Builder.setContent(RemoteViews)方法设置它到一个Notification中。
二.Notification的使用
本示例演示同样通知的显示和清除;
(一)布局文件的简单设计
1.activity_main.xml显示页面的设计
<?xml version="1.0" encoding="utf-8"?>
<LinearLayout xmlns:android="http://schemas.android.com/apk/res/android"
android:id="@+id/activity_main"
android:layout_width="match_parent"
android:layout_height="match_parent"
android:orientation="vertical">
<TextView
android:layout_width="wrap_content"
android:layout_height="wrap_content"
android:text="Android通知的使用" />
<Button
android:layout_width="wrap_content"
android:layout_height="wrap_content"
android:onClick="btn1"
android:text="普通通知"
/>
<Button
android:layout_width="wrap_content"
android:layout_height="wrap_content"
android:onClick="btn2"
android:text="自定义通知"
/>
<Button
android:layout_width="wrap_content"
android:layout_height="wrap_content"
android:onClick="btn3"
android:text="清除自定义的通知"
/>
<Button
android:layout_width="wrap_content"
android:layout_height="wrap_content"
android:onClick="btn4"
android:text="清除所有的通知"
/>
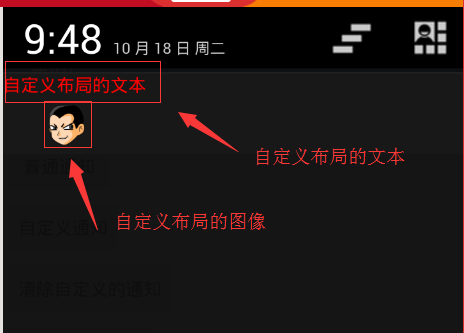
</LinearLayout>2.自定义布局文件activity_notification.xml的设计
<?xml version="1.0" encoding="utf-8"?>
<LinearLayout xmlns:android="http://schemas.android.com/apk/res/android"
    android:layout_width="match_parent"
    android:layout_height="match_parent"
    android:orientation="vertical">

    <TextView
        android:id="@+id/notification_tv"
        android:layout_width="wrap_content"
        android:layout_height="wrap_content"
        android:text="自定义布局的文本" />

    <ImageView
        android:id="@+id/notification_iv"
        android:layout_width="wrap_content"
        android:layout_height="wrap_content"
        android:src="@mipmap/img09" />


</LinearLayout>
(二)java代码的设计
1.MainActivity.java的代码
package com.example.myapplication;
import android.app.Notification;
import android.app.NotificationManager;
import android.app.PendingIntent;
import android.content.Intent;
import android.graphics.Color;
import android.os.Bundle;
import android.support.v7.app.AppCompatActivity;
import android.view.View;
import android.widget.RemoteViews;
public class MainActivity extends AppCompatActivity {
@Override
protected void onCreate(Bundle savedInstanceState) {
super.onCreate(savedInstanceState);
setContentView(R.layout.activity_main);
}
//创建普通的通知
public void btn1(View v) {
//这里的通知要使用Builder对象来创建
Notification.Builder builder = new Notification.Builder(this);
//显示在通知栏上的图标是必须的
builder.setSmallIcon(R.mipmap.a12);
//在通知栏上显示文字信息,可以不写
builder.setTicker("你有一条新信息!");
//这是状态栏上的信息
builder.setContentTitle("文本标题");//标题信息
builder.setContentText("文本内容");//文本信息
builder.setWhen(System.currentTimeMillis());//显示发送的时间
builder.setContentInfo("Info");//文本的其他信息
//设置通知模式,参数如下
//Notification.DEFAULT_LIGHTS闪光模式
// Notification.DEFAULT_SOUND声音模式
// Notification.DEFAULT_VIBRATE震动模式
//Notification.DEFAULT_ALL以上三中模式都选
builder.setDefaults(Notification.DEFAULT_ALL);
//创建Notification对象,生成对象 16API以上,支持低版本需要使用v4包中的notificationCompat
Notification notify = builder.build();
//设置消息不能清除
notify.flags = Notification.FLAG_NO_CLEAR;
//利用系统的Manage发送消息
NotificationManager manager = (NotificationManager) getSystemService(NOTIFICATION_SERVICE);
//发送消息
//第一个参数是通知的一个唯一标识值,
manager.notify((int) (Math.random() * 100), notify);
}
//创建自定义的通知
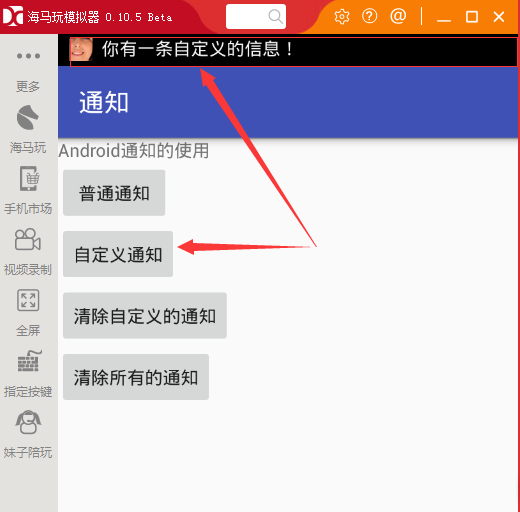
public void btn2(View v) {
//这里的通知要使用Builder对象来创建
Notification.Builder builder = new Notification.Builder(this);
//显示在通知栏上的图标是必须的
builder.setSmallIcon(R.mipmap.a12);
//在通知栏上显示文字信息,可以不写
builder.setTicker("你有一条自定义的信息!");
//这是状态栏上的信息
/* builder.setContentTitle("文本标题");//标题信息
builder.setContentText("文本内容");//文本信息
builder.setWhen(System.currentTimeMillis());//显示发送的时间
builder.setContentInfo("Info");//文本的其他信息*/
//设置通知模式
//Notification.DEFAULT_ALL以上三中模式都选
builder.setDefaults(Notification.DEFAULT_ALL);
//给通知设置自定义布局
//这里的View布局是RemoteViews类的布局,第一个参数是包名,第二个参数是布局文件名
RemoteViews view = new RemoteViews(getPackageName(), R.layout.activity_notification);
//给自定义布局中的文本设置红色颜色
view.setTextColor(R.id.notification_tv, Color.RED);
//给builder对象添加布局
builder.setContent(view);
//给view里面的文本控件添加监听事件
//点击文本后要跳转去的页面
Intent intent = new Intent(this, MyTextView.class);
//下面的方法有四个参数:
// 第一个参数代表的是上下文
//第二个参数是一个请求码
//第三个参数是是代表意图对象
//第四个参数是是代表跳转页面的形式
PendingIntent intent_tv = PendingIntent.getActivity(this, 11, intent, PendingIntent.FLAG_UPDATE_CURRENT);
view.setOnClickPendingIntent(R.id.notification_tv, intent_tv);
//给布局里的图像控件添加点击监听事件,跟上面文本监听事件一样的
//点击文本后要跳转去的页面
Intent intent2 = new Intent(this, MyImageView.class);
//下面的方法有四个参数:
// 第一个参数代表的是上下文
//第二个参数是一个请求码
//第三个参数是是代表意图对象
//第四个参数是是代表跳转页面的形式
PendingIntent intent_iv = PendingIntent.getActivity(this, 12, intent2, PendingIntent.FLAG_UPDATE_CURRENT);
view.setOnClickPendingIntent(R.id.notification_iv, intent_iv);
//创建Notification对象,生成对象 16API以上,支持低版本需要使用v4包中的notificationCompat
Notification notify = builder.build();
//设置消息可以使用通知栏上的清除按钮清除消息
notify.flags = Notification.FLAG_AUTO_CANCEL;
//利用系统的Manage发送消息
NotificationManager manager = (NotificationManager) getSystemService(NOTIFICATION_SERVICE);
//发送消息
//第一个参数是通知的一个唯一标识值,
manager.notify(11, notify);
}
//清除自定义的通知
public void btn3(View v) {
//清除消息也用到manager对象
NotificationManager manager = (NotificationManager) getSystemService(NOTIFICATION_SERVICE);
//清除某一条通知,必须知道它的通知的标识值
manager.cancel(11);
}
//清除所有的通知
public void btn4(View v) {
//清除消息也用到manager对象
NotificationManager manager = (NotificationManager) getSystemService(NOTIFICATION_SERVICE);
//清除所有的通知
manager.cancelAll();
}
}
2.点击自定义布局文件的文本跳转页面的MyTextView.java代码
package com.example.myapplication;
import android.app.Activity;
import android.os.Bundle;
import android.widget.TextView;
/**
* Created by Administrator on 2016/10/17 0017.
*/
public class MyTextView extends Activity {
@Override
protected void onCreate(Bundle savedInstanceState) {
super.onCreate(savedInstanceState);
TextView tv = new TextView(this);
tv.setText("这通过文本跳转过来的页面");
//显示只有一个文本布局的View
setContentView(tv);
}
}
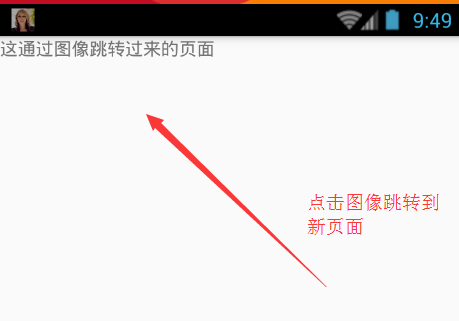
2.点击自定义布局文件的图像跳转页面的MyImageView.java代码
package com.example.myapplication;
import android.app.Activity;
import android.os.Bundle;
import android.widget.TextView;
/**
* Created by Administrator on 2016/10/17 0017.
*/
public class MyImageView extends Activity {
@Override
protected void onCreate(Bundle savedInstanceState) {
super.onCreate(savedInstanceState);
TextView tv = new TextView(this);
tv.setText("这通过图像跳转过来的页面");
//显示只有一个文本布局的View
setContentView(tv);
}
}
上面程序添加了两个Activity,所以要在AndroidManifest里面注册一下。
(三)运行程序的效果
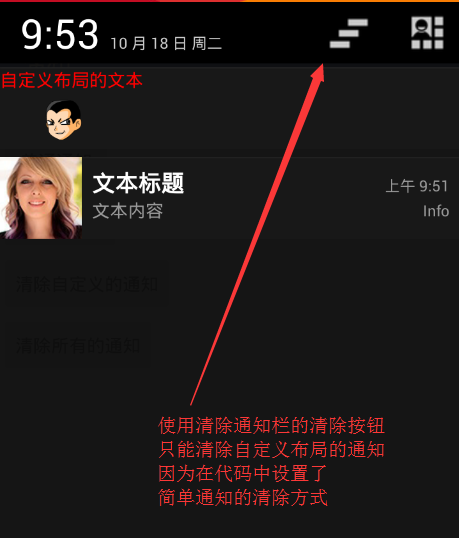
1.点击自定义通知后显示的结果
2.向下滑动显示自定义布局通知的结果:
3.点击自定义布局通知的头像后显示的结果:
4.添加并展开普通通知的结果:
5.关于清除通知的按钮
以上就是Android通知相关介绍。
自定义布局的通知一般用于音乐控制,结合Service来使用。其余情况基本使用的是普通的通知。


 621
621

 被折叠的 条评论
为什么被折叠?
被折叠的 条评论
为什么被折叠?
 到【灌水乐园】发言


