


Tuscany SCA在运行的时候进行各种服务的装配,根据XML格式的SCA元素的定义,从SCDL和其他格式的文件中读取装配的信息。
一、装配过程
主要分成三个步骤:
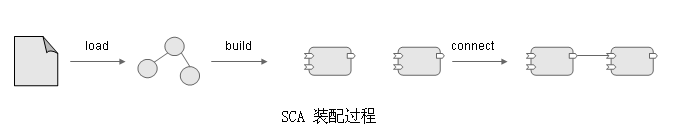
1、载入(load)阶段从SCDL读取配置信息处理后,生成内存中的模型。
2、创建(build)阶段评估模型并将模型组成单独的组件元素,如Service,Reference,Component。
3、连接(connect)阶段连接Reference到相应的Service。
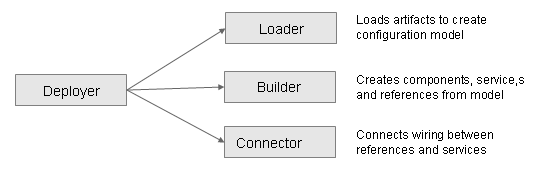
二、装配过程由部署发起,按照顺序逐步执行。
三个步骤包含在部署当中,由部署发起。
这是代码的片段:
.
.
// load the model
load(parent, componentDefinition, deploymentContext);
// resolve autowires
resolver.resolve( null , componentDefinition);
// build runtime artifacts
build(parent, componentDefinition, deploymentContext);
Collection < Component > components = deploymentContext.getComponents().values();
connector.connect(componentDefinition);
.
.
.
三、Loader通过Loader接口实现。
有两种类型的loader:ComponentTypeLoader和StAXElementTypeLoader,通过Loader接口来实现对两中类型的loaer进行载入。

1、ComponentTypeLoader 类型loader负责载入和运行环境相关的信息,即系统环境的实现
2、StAXElementLoader 类型loader负责载入在系统环境运行的应用相关的信息
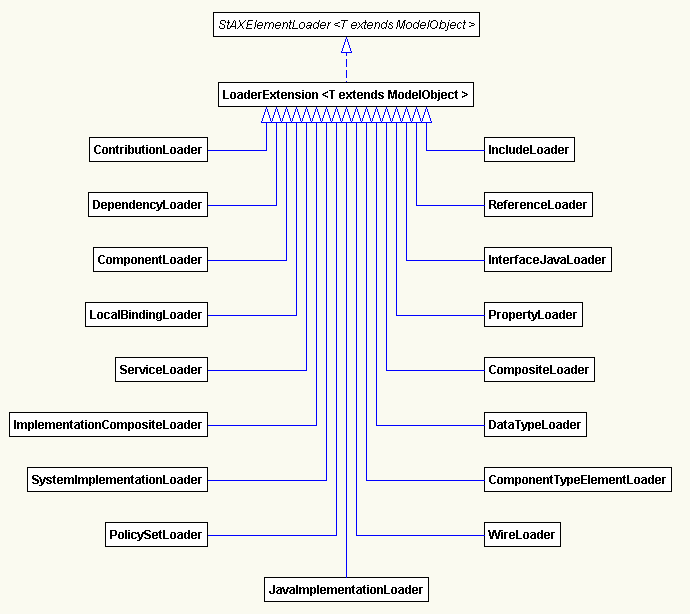
A) Loader的继承关系图:

B) ComponentTypeLoader的继承关系图:

C) StAXElementLoader的继承关系图:
D) 相关代码片段如下:
loaderRegistry.registerLoader(SystemImplementation. class , new SystemComponentTypeLoader(introspector));
loaderRegistry.registerLoader(SystemCompositeImplementation. class ,
new SystemCompositeComponentTypeLoader(loaderRegistry));
// register element loaders
registerLoader(loaderRegistry, new ComponentLoader(loaderRegistry, propertyFactory));
registerLoader(loaderRegistry, new ComponentTypeElementLoader(loaderRegistry));
registerLoader(loaderRegistry, new CompositeLoader(loaderRegistry, null ));
四、宿主环境的引导
SCA是在主机环境下引导,所谓宿主环境就是引导SCA环境所在的系统环境。
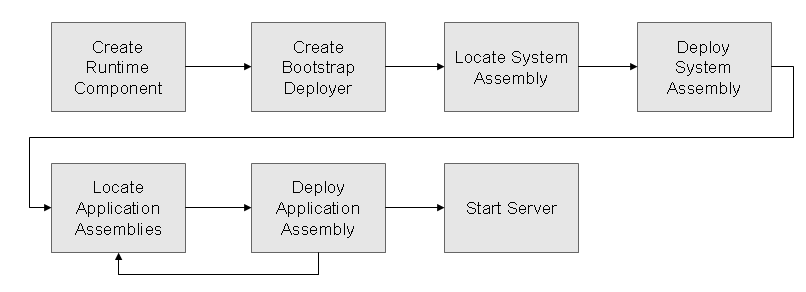
默认的引导过程是在 DefaultBootstrapper 中实现的,过程如下:
相对应的代码片段:
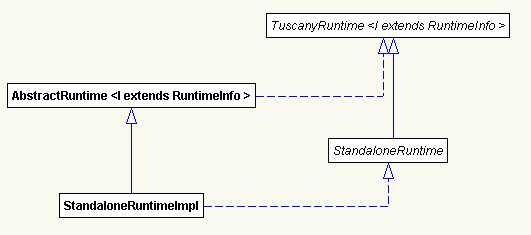
1、Create Runtime Component
StandaloneRuntime runtime = (StandaloneRuntime)DirectoryHelper.createRuntime(runtimeInfo);
TuscanyRuntime继承关系图:
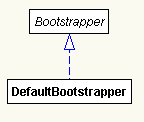
2、Create Bootstrap Deployer
.
.
Bootstrapper bootstrapper = createBootstrapper();
.
.
.
bootstrapper.createDeployer()
.
.
.
Bootstrapper的继承关系图:
3、Locate System Assembly和Deploy System Assembly
就是前面提到的load、build和connect处理过程,这部分在前面已经说过,不再重复。
4、Locate Application Assemblies、Deploy Application Assembly和Start Server
从当前CVS下载的版本,这一部分是临时实现。在后面的开发过程中可能还会有变化。
.
.
int status = runtime.deployAndRun(applicationScdlURL, applicationClassLoader, appArgs);
.
.
.
后面结合实际的例子逐步细化。


 1215
1215


 被折叠的 条评论
为什么被折叠?
被折叠的 条评论
为什么被折叠?
 到【灌水乐园】发言


