


1.vue create的配置项
源码目录: packages/@vue/cli/lib/create.js 。
作用: create a new project powered by vue-cli-service 。
vue create 命令的入口在 packages/@vue/cli/bin/vue.js 中:
program
  .command('create <app-name>')
  .description('create a new project powered by vue-cli-service')
  // 跳过提示并使用已保存或远程预置
  .option('-p, --preset <presetName>', 'Skip prompts and use saved or remote preset')
  // 跳过提示并使用默认预设
  .option('-d, --default', 'Skip prompts and use default preset')
  // 跳过提示并使用内联JSON字符串作为预设
  .option('-i, --inlinePreset <json>', 'Skip prompts and use inline JSON string as preset')
  // 安装依赖时使用指定的npm客户端
  .option('-m, --packageManager <command>', 'Use specified npm client when installing dependencies')
  // 在安装依赖项时使用指定的npm注册表(仅针对npm)
  .option('-r, --registry <url>', 'Use specified npm registry when installing dependencies (only for npm)')
  // 使用初始化提交消息强制git初始化
  .option('-g, --git [message]', 'Force git initialization with initial commit message')
  // 跳过git初始化
  .option('-n, --no-git', 'Skip git initialization')
  // 如果目标目录存在,覆盖目标目录
  .option('-f, --force', 'Overwrite target directory if it exists')
  // 如果目标目录存在,合并目标目录
  .option('--merge', 'Merge target directory if it exists')
  // 获取远程预设, 使用git克隆时
  .option('-c, --clone', 'Use git clone when fetching remote preset')
  // 创建项目时使用指定的代理
  .option('-x, --proxy <proxyUrl>', 'Use specified proxy when creating project')
  // 创建项目时省略默认组件中的新手指导信息
  .option('-b, --bare', 'Scaffold project without beginner instructions')
  // 跳过显示Get started说明
  .option('--skipGetStarted', 'Skip displaying "Get started" instructions')
  .action((name, options) => {
    if (minimist(process.argv.slice(3))._.length > 1) {
      console.log(chalk.yellow('\n Info: You provided more than one argument. The first one will be used as the app\'s name, the rest are ignored.'))
    }
    // --git makes commander to default git to true
    if (process.argv.includes('-g') || process.argv.includes('--git')) {
      options.forceGit = true
    }
    require('../lib/create')(name, options)
  })
2.整体流程
lib/create主要导出了create函数。其中create函数接收两个参数,一个是项目名称,一个是配置项
//vue create <项目名称> <上述配置项>
//如
vue create project -p
3.基础校验
当执行 vue create 命令的时候会加载 cli/lib/create.js 中的 create 函数。在 create 函数里会先定义以下几个变量:
const cwd = options.cwd || process.cwd() // 当前目录
const inCurrent = projectName === '.' // 是否在当前目录
const name = inCurrent ? path.relative('../', cwd) : projectName // 项目名称
const targetDir = path.resolve(cwd, projectName || '.') // 生成项目的目录
比较重要的就是 name 和 targetDir 这两个,在下面函数运行过程中会使用到。接下来执行函数 validateProjectName 利用 npm 包 validate-npm-package-name 判断项目名称是否符合 npm 包名规范,并输出相应的 errors 或者 warnings。
在验证包名之后,会判断项目目录是否与当前已有目录重复。
if (fs.existsSync(targetDir)) {
  if (options.force) {
    await fs.remove(targetDir)
  } else {
    await clearConsole()
    if (inCurrent) {
      const { ok } = await inquirer.prompt([
        {
          name: 'ok',
          type: 'confirm',
          message: `Generate project in current directory?`
        }
      ])
      if (!ok) {
        return
      }
    } else {
      const { action } = await inquirer.prompt([
        {
          name: 'action',
          type: 'list',
          message: `Target directory ${chalk.cyan(targetDir)} already exists. Pick an action:`,
          choices: [
            { name: 'Overwrite', value: 'overwrite' },
            { name: 'Merge', value: 'merge' },
            { name: 'Cancel', value: false }
          ]
        }
      ])
      if (!action) {
        return
      } else if (action === 'overwrite') {
        console.log(`\nRemoving ${chalk.cyan(targetDir)}...`)
        await fs.remove(targetDir)
      }
    }
  }
}
存在相同项目目录的时候调用 inquirer.prompt 来询问是否要 Overwrite || Merge || Cancel。
当带有
-f || --force的时候会跳过这些交互,即options.force = true。
4.获取预设选项 vue-cli-preset
一个 Vue CLI preset 是一个包含创建新项目所需预定义选项和插件的 JSON 对象,让用户无需在命令提示中选择它们
{
  "useConfigFiles": true,
  "router": true,
  "vuex": true,
  "cssPreprocessor": "sass",
  "plugins": {
    "@vue/cli-plugin-babel": {},
    "@vue/cli-plugin-eslint": {
      "config": "airbnb",
      "lintOn": ["save", "commit"]
    }
  }
}
更多关于 preset 可以前往 vue-cli 官网 插件和 Preset#。
在基础验证完成以后会创建一个 Creator 实例:
const creator = new Creator(name, targetDir, getPromptModules())getPromptModules
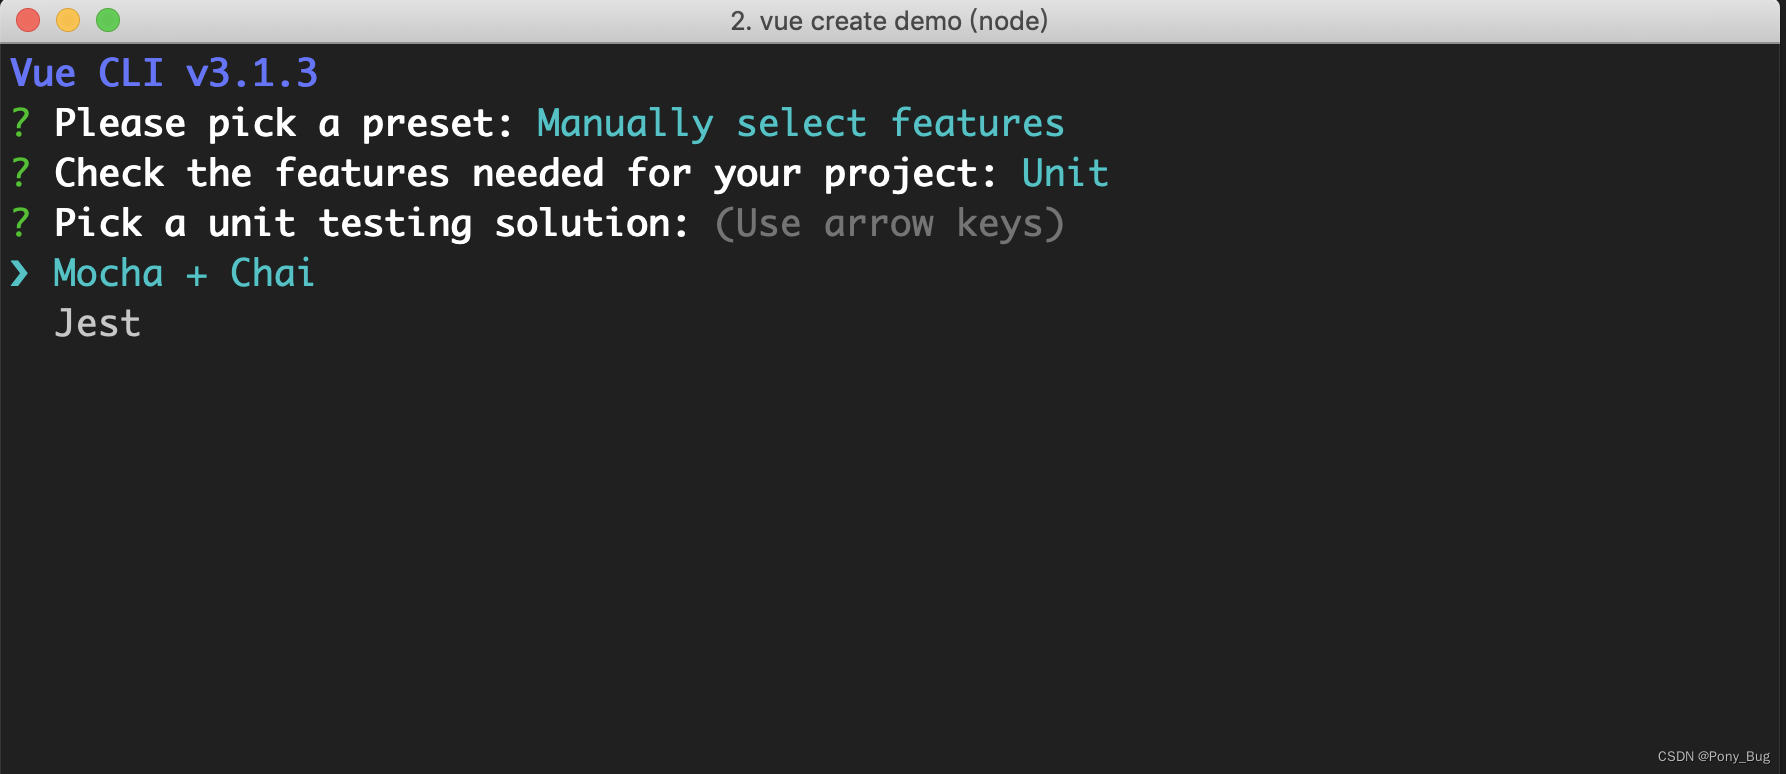
在分析 Creator 之前先看下 getPromptModules() 获取到的是什么。getPromptModules() 获取了 babel,typescript,pwa,router,vuex, cssPreprocessors,linter,unit,e2e 的 Prompt 的配置信息,以 unit 为例:
module.exports = cli => {
  cli.injectFeature({
    name: 'Unit Testing',
    value: 'unit',
    short: 'Unit',
    description: 'Add a Unit Testing solution like Jest or Mocha',
    link: 'https://cli.vuejs.org/config/#unit-testing',
    plugins: ['unit-jest', 'unit-mocha']
  })

  cli.injectPrompt({
    name: 'unit',
    when: answers => answers.features.includes('unit'),
    type: 'list',
    message: 'Pick a unit testing solution:',
    choices: [
      {
        name: 'Mocha + Chai',
        value: 'mocha',
        short: 'Mocha'
      },
      {
        name: 'Jest',
        value: 'jest',
        short: 'Jest'
      }
    ]
  })

  cli.onPromptComplete((answers, options) => {
    if (answers.unit === 'mocha') {
      options.plugins['@vue/cli-plugin-unit-mocha'] = {}
    } else if (answers.unit === 'jest') {
      options.plugins['@vue/cli-plugin-unit-jest'] = {}
    }
  })
}
cli.injectFeature
cli.injectFeature 是注入 featurePrompt,即初始化项目时选择 babel,typescript,pwa 等等,如下
cli.injectPrompt
cli.injectPrompt 是根据选择的 featurePrompt 然后注入对应的 prompt,当选择了 unit,接下来会有以下的 prompt,选择 Mocha + Chai 还是 Jest:
cli.onPromptComplete
cli.onPromptComplete 就是一个回调,会根据选择来添加对应的插件, 当选择了 mocha ,那么就会添加 @vue/cli-plugin-unit-mocha 插件。
new Creator()
搞清楚了 getPromptModules 之后,下面开始看一下初始化 Creator 实例发生了什么
constructor (name, context, promptModules) {
    super()
    this.name = name
    this.context = process.env.VUE_CLI_CONTEXT = context
    const { presetPrompt, featurePrompt } = this.resolveIntroPrompts() // 获取了 presetPrompt list,在初始化项目的时候提供选择
    this.presetPrompt = presetPrompt // presetPrompt list
    this.featurePrompt = featurePrompt // babal, pwa, e2e etc.
    this.outroPrompts = this.resolveOutroPrompts() //  存放项目配置的文件(package.json || congfig.js) 以及是否将 presetPrompts 存放起来
    this.injectedPrompts = [] // 对应 feature 的 Prompts
    this.promptCompleteCbs = [] // injectedPrompts 的回调
    this.createCompleteCbs = []

    this.run = this.run.bind(this)

    const promptAPI = new PromptModuleAPI(this)

    /**
     * 1. 将 babel, e2e, pwa 等 push 到 featurePrompt.choices 中,在选择项目需要配置哪些时显示出来 (checkbox);
     * 2. 将 babel, e2e, pwa 等 push 到 injectedPrompts 中,当设置了 feature 会对应通过 Prompts 来进一步选择哪种模式,比如当选择了 E2E Testing ,然后会再次让你
     *    选择哪种 E2E Testing,即, Cypress (Chrome only) ||  Nightwatch (Selenium-based);
     * 3. 将每中 feature 的 onPromptComplete push 到 promptCompleteCbs,在后面会根据选择的配置来安装对应的 plugin。
     */
    promptModules.forEach(m => m(promptAPI))
  }
这段代码主要看下 PromptModuleAPI,源码如下:
module.exports = class PromptModuleAPI {
  constructor (creator) {
    this.creator = creator
  }

  injectFeature (feature) {
    this.creator.featurePrompt.choices.push(feature)
  }

  injectPrompt (prompt) {
    this.creator.injectedPrompts.push(prompt)
  }

  injectOptionForPrompt (name, option) {
    this.creator.injectedPrompts.find(f => {
      return f.name === name
    }).choices.push(option)
  }

  onPromptComplete (cb) {
    this.creator.promptCompleteCbs.push(cb)
  }
}
PromptModuleAPI 实例会调用它的实例方法,然后将 injectFeature, injectPrompt, injectOptionForPrompt, onPromptComplete保存到 Creator实例对应的变量中。
最后遍历 getPromptModules 获取的 promptModules,传入实例 promptAPI,初始化 Creator 实例中 featurePrompt, injectedPrompts, promptCompleteCbs 变量
getPreset
在创建一个 Creator 实例后,然后调用了 create 方法
await creator.create(options)create 开始是获取 preset ,源码如下:
const isTestOrDebug = process.env.VUE_CLI_TEST || process.env.VUE_CLI_DEBUG
console.log('before creating......')
// name: demo
// context: targetDir
const { run, name, context, createCompleteCbs } = this

if (!preset) {
  if (cliOptions.preset) {
    // vue create foo --preset bar
    preset = await this.resolvePreset(cliOptions.preset, cliOptions.clone)
  } else if (cliOptions.default) {
    // vue create foo --default
    preset = defaults.presets.default // 使用默认预设选项
  } else if (cliOptions.inlinePreset) { // 使用内联的 JSON 字符串预设选项
    // vue create foo --inlinePreset {...}
    try {
      preset = JSON.parse(cliOptions.inlinePreset)
    } catch (e) {
      error(`CLI inline preset is not valid JSON: ${cliOptions.inlinePreset}`)
      exit(1)
    }
  } else {
    // eg: vue create demo
    preset = await this.promptAndResolvePreset()
  }
}

// clone before mutating
preset = cloneDeep(preset)
// inject core service
preset.plugins['@vue/cli-service'] = Object.assign({ // 注入核心 @vue/cli-service
  projectName: name
}, preset, {
  bare: cliOptions.bare
})
先判断 vue create 命令是否带有 -p 选项,如果有的话会调用 resolvePreset 去解析 preset。resolvePreset 函数会先获取 ~/.vuerc 中保存的 preset, 然后进行遍历,如果里面包含了 -p 中的 <presetName>,则返回~/.vuerc 中的 preset。如果没有则判断是否是采用内联的 JSON 字符串预设选项,如果是就会解析 .json 文件,并返回 preset,还有一种情况就是从远程获取 preset(利用 download-git-repo 下载远程的 preset.json)并返回。
上面的情况是当 vue create 命令带有 -p 选项的时候才会执行,如果没有就会调用 promptAndResolvePreset 函数利用 inquirer.prompt 以命令后交互的形式来获取 preset,下面看下 promptAndResolvePreset 函数的源码:
async promptAndResolvePreset (answers = null) {
  // prompt
  if (!answers) {
    await clearConsole(true)
    answers = await inquirer.prompt(this.resolveFinalPrompts())
  }
  debug('vue-cli:answers')(answers)

  if (answers.packageManager) {
    saveOptions({
      packageManager: answers.packageManager
    })
  }

  let preset
  if (answers.preset && answers.preset !== '__manual__') { // 如果是选择使用本地保存的 preset (~/.vuerc)
    preset = await this.resolvePreset(answers.preset)
  } else {
    // manual
    preset = {
      useConfigFiles: answers.useConfigFiles === 'files',
      plugins: {}
    }
    answers.features = answers.features || []
    // run cb registered by prompt modules to finalize the preset
    this.promptCompleteCbs.forEach(cb => cb(answers, preset))
  }

  // validate
  validatePreset(preset)

  // save preset
  if (answers.save && answers.saveName) {
    savePreset(answers.saveName, preset)
  }

  debug('vue-cli:preset')(preset)
  return preset
}
在调用 inquirer.prompt 之前利用 this.resolveFinalPrompts() 获取了最后的 prompts,到这里有些同学可能就有点晕了,到底有多少个 prompt,别急,下面将 简单介绍下,查看 this.resolveFinalPrompts() 源码:
resolveFinalPrompts () {
  // patch generator-injected prompts to only show in manual mode
  // 将所有的 Prompt 合并,包含 preset,feature,injected,outro,只有当选择了手动模式的时候才会显示 injectedPrompts
  this.injectedPrompts.forEach(prompt => {
    const originalWhen = prompt.when || (() => true)
    prompt.when = answers => {
      return isManualMode(answers) && originalWhen(answers)
    }
  })
  const prompts = [
    this.presetPrompt,
    this.featurePrompt,
    ...this.injectedPrompts,
    ...this.outroPrompts
  ]
  debug('vue-cli:prompts')(prompts)
  return prompts
}
比较容易的就可以看出作用就是将 presetPrompt, featurePrompt, injectedPrompts, outroPrompts 合并成一个数组进行返回,这几个 Prompt 的含义如下:
- presetPrompt: 预设选项 prompt,当上次以 Manually 模式进行了预设选项,并且保存到了 ~/.vuerc 中,那么在初始化项目时就会列出已经保存的 preset,并提供选择。
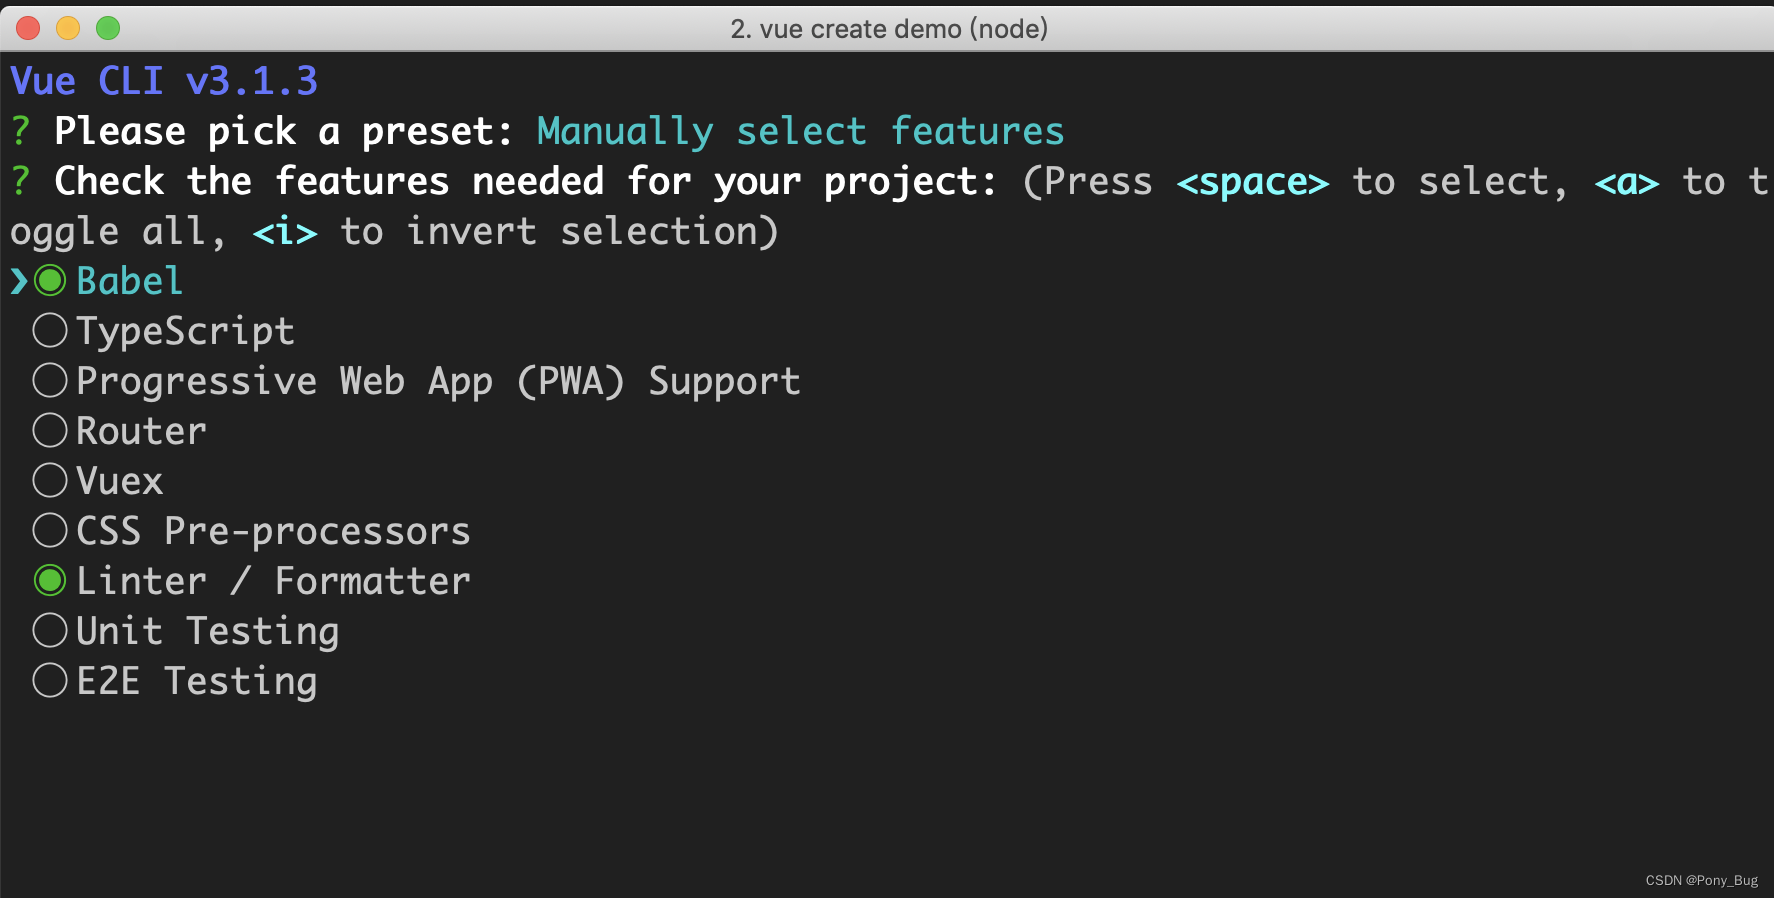
- featurePrompt:项目的一些 feature,就是选择 babel,typescript,pwa,router,vuex,cssPreprocessors,linter,unit,e2e。
- injectedPrompts:当选择了 feature 后,就会为对应的 feature 注入 prompts,比如你选择了 unit,那么就会让你选择模式:
Mocha + Chai还是Jest - outroPrompts: 其他的 prompt,包含:
- 将 Babel, PostCSS, ESLint 等等的配置文件存放在 package.json 中还是存放在 config 文件中;
- 是否需要将这次设置的 preset 保存到本地,如果需要则会进一步让你输入名称进行保存;
- 安装依赖是选择 npm 还是 yarn。
inquirer.prompt 执行完成后会返回 answers,如果选择了本地保存的 preset 或者 default,则调用 resolvePreset 进行解析 preset,否则遍历 promptCompleteCbs 执行 injectFeature 和 injectPrompt 的回调,将对应的插件赋值到 options.plugins 中,以 unit 为例:
cli.onPromptComplete((answers, options) => {
  if (answers.unit === 'mocha') {
    options.plugins['@vue/cli-plugin-unit-mocha'] = {}
  } else if (answers.unit === 'jest') {
    options.plugins['@vue/cli-plugin-unit-jest'] = {}
  }
})
如果 feature 选择了 unit,并且 unit 模式选择的是 Mocha + Chai,则添加 @vue/cli-plugin-unit-mocha 插件,如果选择的是 Jest 则添加 @vue/cli-plugin-unit-jest 插件。
在获取到 preset 之后,还会向 preset 的插件里面注入核心插件 @vue/cli-service, 它是调用 vue-cli-service <command> [...args] 时创建的类。 负责管理内部的 webpack 配置、暴露服务和构建项目的命令等。
5.依赖安装
通过 preset 我们可以知道每个 feature 的配置以及整个项目所需的一些插件,接下来我们继续看源码。
const packageManager = (
  cliOptions.packageManager ||
  loadOptions().packageManager ||
  (hasYarn() ? 'yarn' : 'npm')
)

await clearConsole() // 清空控制台
logWithSpinner(`✨`, `Creating project in ${chalk.yellow(context)}.`)
this.emit('creation', { event: 'creating' })

// get latest CLI version
const { latest } = await getVersions()
// generate package.json with plugin dependencies
const pkg = {
  name,
  version: '0.1.0',
  private: true,
  devDependencies: {}
}
const deps = Object.keys(preset.plugins)
deps.forEach(dep => {
  if (preset.plugins[dep]._isPreset) {
    return
  }
  pkg.devDependencies[dep] = (
    preset.plugins[dep].version ||
    ((/^@vue/.test(dep) && latest[dep]) ? `^${latest[dep]}` : `latest`)
  )
})
// write package.json
await writeFileTree(context, {
  'package.json': JSON.stringify(pkg, null, 2)
})这段代码主要有两个作用:获取最新 CLI (包含插件)的版本 和 生成 package.json,接下来一个一个地看。
getVersions
getVersions 的代码不多,看下比较核心的代码:
module.exports = async function getVersions () {
  if (sessionCached) {
    return sessionCached
  }

  let latest
  const local = require('vue-cli-version-marker').devDependencies
  if (process.env.VUE_CLI_TEST || process.env.VUE_CLI_DEBUG) {
    return (sessionCached = {
      current: local,
      latest: local
    })
  }

  if (!fs.existsSync(fsCachePath)) {
    // if the cache file doesn't exist, this is likely a fresh install
    // then create a cache file with the bundled version map
    await fs.writeFile(fsCachePath, JSON.stringify(local))
  }

  const cached = JSON.parse(await fs.readFile(fsCachePath, 'utf-8'))
  const lastChecked = (await fs.stat(fsCachePath)).mtimeMs
  const daysPassed = (Date.now() - lastChecked) / (60 * 60 * 1000 * 24)
  if (daysPassed > 1) { // 距离上次检查更新超过一天
    // if we haven't check for a new version in a day, wait for the check
    // before proceeding
    latest = await getAndCacheLatestVersions(cached)
  } else {
    // Otherwise, do a check in the background. If the result was updated,
    // it will be used for the next 24 hours.
    getAndCacheLatestVersions(cached) // 后台更新
    latest = cached
  }

  return (sessionCached = {
    current: local,
    latest
  })
}
这段代码按顺序读下应该就知道其中的作用了,简单说下就注意两个变量:
- local:本地 CLI 以及插件的版本
- latest:远程 CLI 以及插件的版本
local 和 latest 包含了 CLI 以及相关插件的版本,它们可以用于判断 @vue/cli 是否需要更新以及初始化项目中相关插件的版本。还有点需要注意的是,获取 CLI 的版本并不是直接获取, 而是通过 vue-cli-version-marker npm 包获取的 CLI 版本,为什么会这样做,主要原因有两点:
- vue-cli 从 3.0(@vue/cli) 开始就放在了 @vue 下面,即是一个 scoped package, 而 scoped package 又不支持通过
npm registry来获取 latest 版本信息。比如 vue-cli-version-marker/latest可以正常访问,而 @vue/cli/latest 则不可以。 - 获取 scoped packages 的数据比获取 unscoped package 通常要慢 300ms。
正是由于上述两个原因,因此通过 unscoped package vue-cli-version-marker 来获取 CLI 版本,vue-cli-version-marker 的内容比较简单,就是一个 package.json,通过获取里面 devDependencies 的版本信息,从而获取 @vue/cli 以及一些插件的版本号。获取了插件版本之后遍历 preset 中所有 plugin 为其初始化版本号,并调用 writeFileTree 生成 package.json 。
installDeps
在生成 package.json 之后,我们再继续看下面的代码:
exports.installDeps = async function installDeps (targetDir, command, cliRegistry) {
  const args = []
  if (command === 'npm') {
    args.push('install', '--loglevel', 'error')
  } else if (command === 'yarn') {
    // do nothing
  } else {
    throw new Error(`Unknown package manager: ${command}`)
  }

  await addRegistryToArgs(command, args, cliRegistry)

  debug(`command: `, command) // DEBUG=vue-cli:install vue create demo
  debug(`args: `, args)

  await executeCommand(command, args, targetDir)
}
源码很简洁,里面又先调用了 addRegistryToArgs 函数,它的作用就是安装依赖是指定安装源,如果 vue create 还有 -r 选项则采用设置的安装源,否则调用 shouldUseTaobao 函数来判断是否需要使用淘宝 NPM 镜像源。实现原理就是发送两个 Promise 使用默认安装源和淘宝镜像源去请求同一个 npm 包,然后利用 Promise.race 看在哪种源下返回结果更快就将此 设置为安装源,另外如果 ~/.vuerc 中设置了useTaobaoRegistry,则使用设置的安装源。设置了安装源之后则调用 executeCommand 函数利用 execa 执行 npm 或者 yarn 安装命令。
6.Generator
在安装完依赖以后,就会调用 resolvePlugins,作用就是加载每个插件的 generator ,并且如果插件需要进行命令行交互的话会执行 inquirer.prompt 获取 option。 在此之后会实例化一个 Generator ,看代码:
const generator = new Generator(context, {
  pkg,
  plugins,
  completeCbs: createCompleteCbs
})
在实例化一个 Generator 的时候会初始化一些成员变量,最重要的就是调用插件的 generators,不同于 1.x/2.x 基于模板的脚手架,Vue-cli3.0 采用了一套 基于插件的架构,到这里就会交给各个插件去执行了,看一下 Generator 实例化的代码:
module.exports = class Generator {
  constructor (context, {
    pkg = {},
    plugins = [],
    completeCbs = [],
    files = {},
    invoking = false
  } = {}) {
    this.context = context
    this.plugins = plugins
    this.originalPkg = pkg
    this.pkg = Object.assign({}, pkg)
    this.imports = {}
    this.rootOptions = {}
    this.completeCbs = completeCbs
    this.configTransforms = {} // 插件通过 GeneratorAPI 暴露的 addConfigTransform 方法添加如何提取配置文件
    this.defaultConfigTransforms = defaultConfigTransforms // 默认的配置文件
    this.reservedConfigTransforms = reservedConfigTransforms // 保留的配置文件 vue.config.js
    this.invoking = invoking
    // for conflict resolution
    this.depSources = {}
    // virtual file tree
    this.files = files
    this.fileMiddlewares = [] // receives the virtual files tree object, and an ejs render function
    this.postProcessFilesCbs = []
    // exit messages
    this.exitLogs = []

    const cliService = plugins.find(p => p.id === '@vue/cli-service')

    const rootOptions = cliService
      ? cliService.options
      : inferRootOptions(pkg)
    // apply generators from plugins
    // 调用插件的 generators
    plugins.forEach(({ id, apply, options }) => {
      // 每个插件对应生成一个 GeneratorAPI 实例,并将实例 api 传入插件暴露出来的 generator 函数
      const api = new GeneratorAPI(id, this, options, rootOptions)
      apply(api, options, rootOptions, invoking)
    })
  }
}
GeneratorAPI
GeneratorAPI 是一个比较重要的部分了,前面说过 vue-cli 3.0 是基于一套插件架构的,那么如果插件需要自定义项目模板、修改模板中的一些文件或者添加一些依赖 的话怎么处理呢。方法是 @vue/cli 插件所提供的 generator 向外暴露一个函数,接收的第一个参数 api,然后通过该 api 提供的方法去完成应用的拓展工作,这里所说 的 api 就是 GeneratorAPI,下面看一下 GeneratorAPI 提供了哪些方法。
- hasPlugin:判断项目中是否有某个插件
- extendPackage:拓展 package.json 配置
- render:利用 ejs 渲染模板文件
- onCreateComplete:内存中保存的文件字符串全部被写入文件后的回调函数
- exitLog:当 generator 退出的时候输出的信息
- genJSConfig:将 json 文件生成为 js 配置文件
- injectImports:向文件当中注入import语法的方法
- injectRootOptions:向 Vue 根实例中添加选项
- ...
下面就以 @vue/cli-service 为例,来简单熟悉下 GeneratorAPI。首先看一下 @vue/cli-service/generator/index.js
module.exports = (api, options) => {
  /* 渲染 ejs 模板 */
  api.render('./template', {
    doesCompile: api.hasPlugin('babel') || api.hasPlugin('typescript')
  })

  // 扩展 package.json
  api.extendPackage({
    scripts: {
      'serve': 'vue-cli-service serve',
      'build': 'vue-cli-service build'
    },
    dependencies: {
      'vue': '^2.5.17'
    },
    devDependencies: {
      'vue-template-compiler': '^2.5.17'
    },
    'postcss': {
      'plugins': {
        'autoprefixer': {}
      }
    },
    browserslist: [
      '> 1%',
      'last 2 versions',
      'not ie <= 8'
    ]
  })
  // 如果 preset 中包含 vue-router
  if (options.router) {
    require('./router')(api, options)
  }

  // 如果 preset 中包含 vuex
  if (options.vuex) {
    require('./vuex')(api, options)
  }

  // 如果 preset 中包含 cssPreprocessor,即选择了 css 预处理器
  if (options.cssPreprocessor) {
    const deps = {
      sass: {
        'node-sass': '^4.9.0',
        'sass-loader': '^7.0.1'
      },
      less: {
        'less': '^3.0.4',
        'less-loader': '^4.1.0'
      },
      stylus: {
        'stylus': '^0.54.5',
        'stylus-loader': '^3.0.2'
      }
    }

    api.extendPackage({
      devDependencies: deps[options.cssPreprocessor]
    })
  }

  // additional tooling configurations
  if (options.configs) {
    api.extendPackage(options.configs)
  }
}
看一下 @vue/cli-service generator 代码,然后结合 GeneratorAPI 所暴露的方法,自己再感悟下,大概就可以明白插件利用 GeneratorAPI 暴露的方法 做了一些什么事情,也可以初步感受到 vue-cli 3.0 的插件机制,将所有功能都交给插件去完成。对于 vue-cli 3.0 内置的插件,比如:@vue/cli-plugin-eslint 、@vue/cli-plugin-pwa 等等,以及其他第三方插件,他们的 generator 作用都是一样都可以向项目的 package.json 中注入额外的依赖或字段,并向项目中添加文件。
在实例化 Generator 之后,就会调用实例的 generate 放在,此时就差不多进入到了生成项目文件的阶段了。大致可以分为三部分,extractConfigFiles(提取配置文件), resolveFiles(模板渲染)和 writeFileTree(在磁盘上生成文件)。
extractConfigFiles
提取配置文件指的是将一些插件(比如 eslint,babel)的配置从 package.json 的字段中提取到专属的配置文件中。下面以 eslint 为例进行分析: 在初始化项目的时候,如果选择了 eslint 插件,在调用 @vue/cli-plugin-eslint 的 generator 的时候,就会向 package.json 注入 eslintConfig 字段:
module.exports = (api, { config, lintOn = [] }, _, invoking) => {
  if (typeof lintOn === 'string') {
    lintOn = lintOn.split(',')
  }

  const eslintConfig = require('../eslintOptions').config(api)

  const pkg = {
    scripts: {
      lint: 'vue-cli-service lint'
    },
    eslintConfig,
    // TODO:
    // Move these dependencies to package.json in v4.
    // Now in v3 we have to add redundant eslint related dependencies
    // in order to keep compatibility with v3.0.x users who defaults to ESlint v4.
    devDependencies: {
      'babel-eslint': '^10.0.1',
      'eslint': '^5.8.0',
      'esliint-plugin-vue': '^5.0.0-0'
    }
  }

  const injectEditorConfig = (config) => {
    const filePath = api.resolve('.editorconfig')
    if (fs.existsSync(filePath)) {
      // Append to existing .editorconfig
      api.render(files => {
        const configPath = path.resolve(__dirname, `./template/${config}/_editorconfig`)
        const editorconfig = fs.readFileSync(configPath, 'utf-8')

        files['.editorconfig'] += `\n${editorconfig}`
      })
    } else {
      api.render(`./template/${config}`)
    }
  }

  if (config === 'airbnb') {
    eslintConfig.extends.push('@vue/airbnb')
    Object.assign(pkg.devDependencies, {
      '@vue/eslint-config-airbnb': '^4.0.0'
    })
    injectEditorConfig('airbnb')
  } else if (config === 'standard') {
    eslintConfig.extends.push('@vue/standard')
    Object.assign(pkg.devDependencies, {
      '@vue/eslint-config-standard': '^4.0.0'
    })
    injectEditorConfig('standard')
  } else if (config === 'prettier') {
    eslintConfig.extends.push('@vue/prettier')
    Object.assign(pkg.devDependencies, {
      '@vue/eslint-config-prettier': '^4.0.0'
    })
    // prettier & default config do not have any style rules
    // so no need to generate an editorconfig file
  } else {
    // default
    eslintConfig.extends.push('eslint:recommended')
  }

  api.extendPackage(pkg)

}
这是 @vue/cli-plugin-eslint/generator/index.js 中的一部分代码,从代码中可以看出,利用 GeneratorAPI 的 extendPackage 方法向 package.josn 里面注入了 scripts,eslintConfig 以及 devDependencies 字段,另外也会根据选择的 eslint 模式添加对应的依赖和修改对应的配置文件,例如选择了 airbnb 模式,就会向 eslintConfig.extends 添加 @vue/airbnb 配置,并且添加 @vue/eslint-config-airbnb 依赖和修改 .editorconfig 配置文件。此时 项目 package.json 中 eslintConfig 字段内容如下:
{
"eslintConfig": {
    "root": true,
    "env": {
      "node": true
    },
    "extends": [
      "plugin:vue/essential",
      "@vue/airbnb"
    ],
    "rules": {},
    "parserOptions": {
      "parser": "babel-eslint"
    }
  }
}
如果 preset 的 useConfigFiles 为 true ,或者以 Manually 模式初始化 preset 的时候选择 In dedicated config files 存放配置文件:
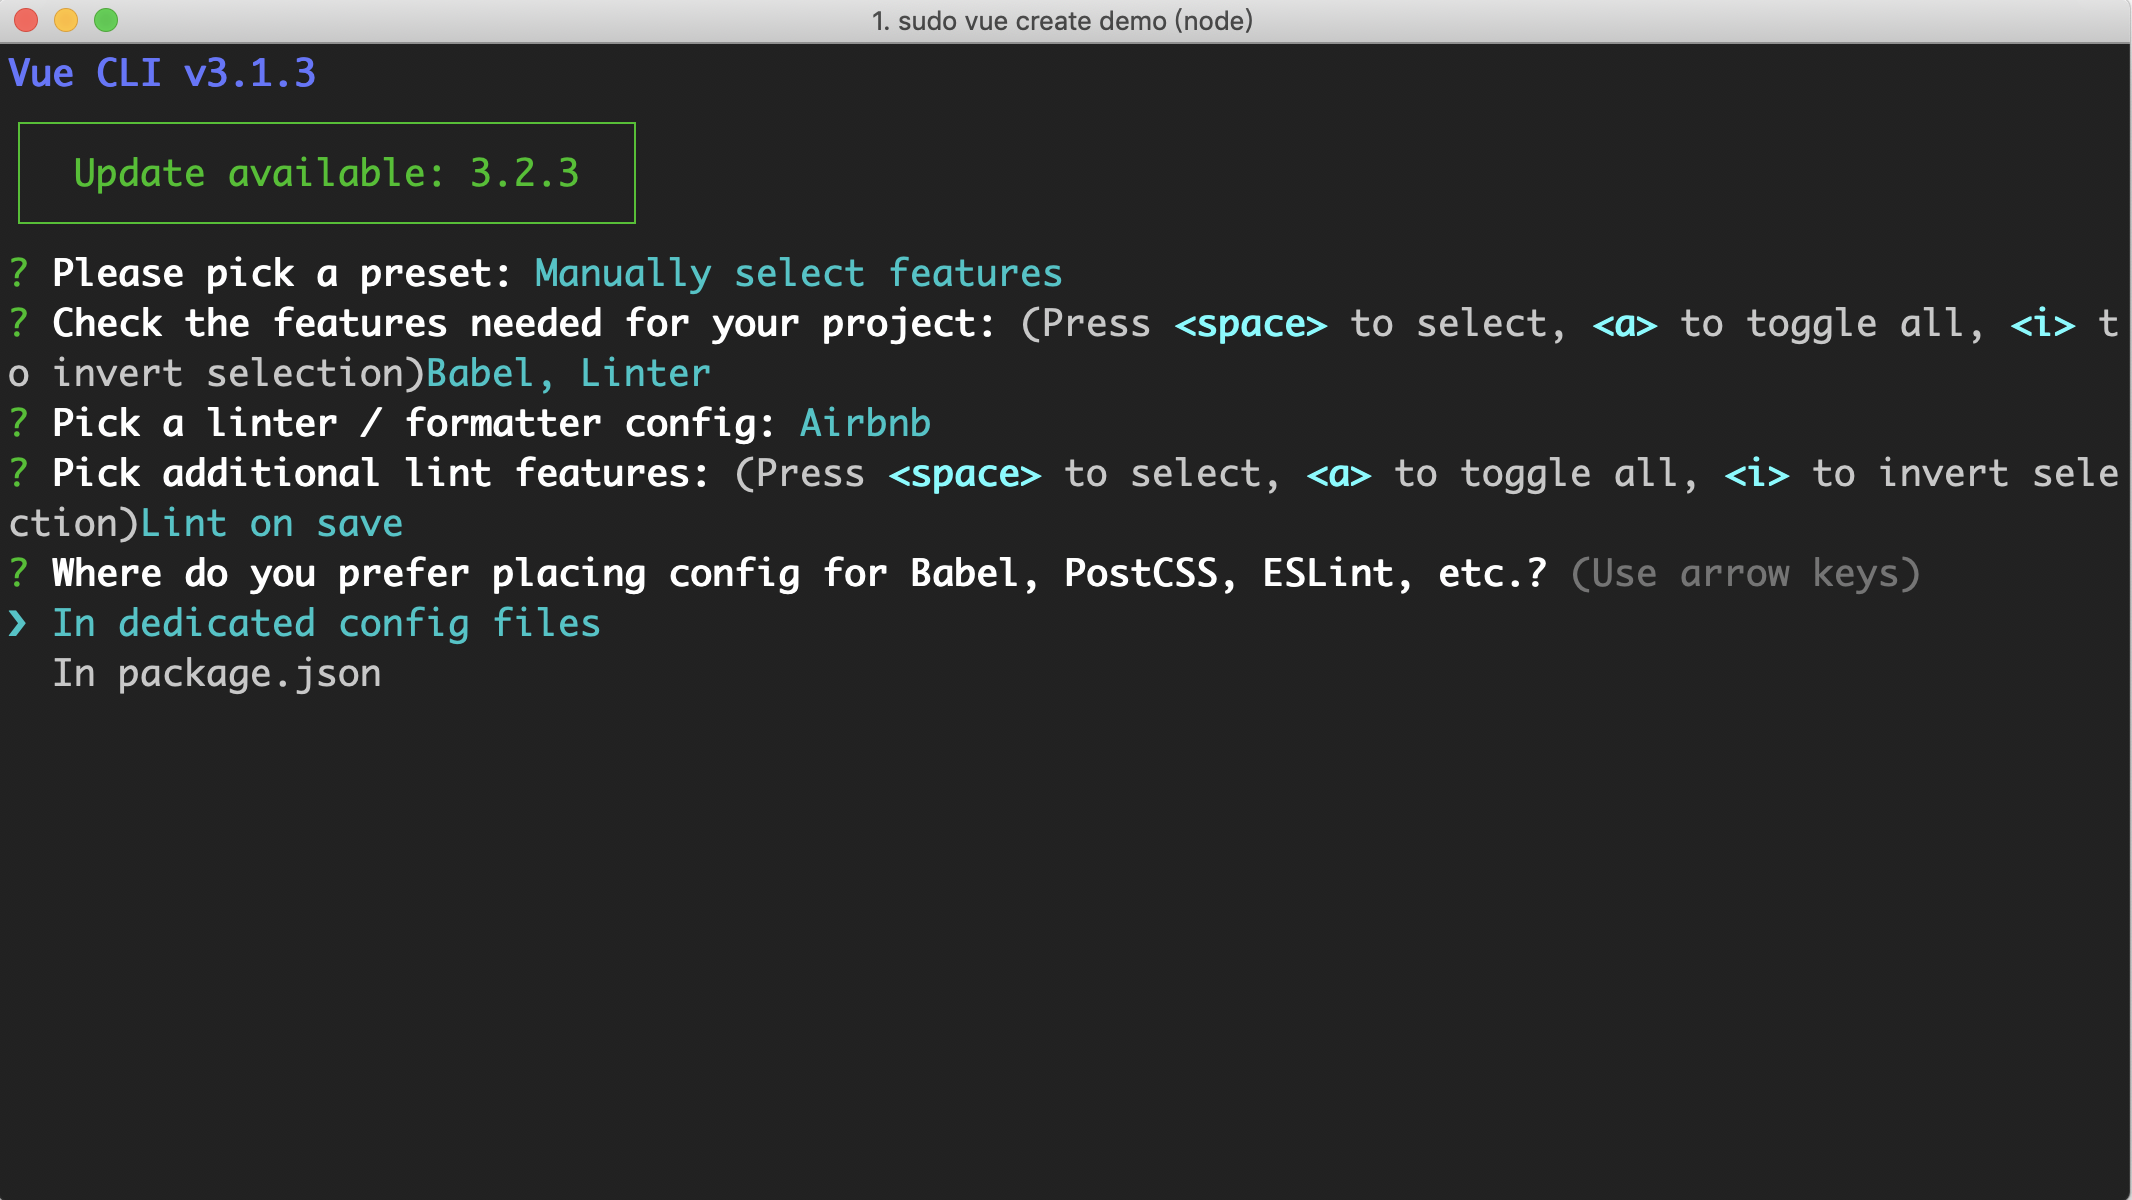
那么 extractConfigFiles 方法就会将 package.json 中 eslintConfig 字段内容提取到 .eslintrc.js 文件中,内存中 .eslintrc.js 内容如下:
module.exports = {
  root: true,
  env: {
    node: true,
  },
  extends: [
    'plugin:vue/essential',
    '@vue/airbnb',
  ],
  rules: {
    'no-console': process.env.NODE_ENV === 'production' ? 'error' : 'off',
    'no-debugger': process.env.NODE_ENV === 'production' ? 'error' : 'off',
  },
  parserOptions: {
    parser: 'babel-eslint',
  },
};
extractConfigFiles 方法的具体实现主要是调用 ConfigTransform 实例的 transform 方法,代码实现的比较清晰,各位同学可以自己看下。这里就不做详细 分析了,在配置文件提取完了以后接下来就是执行 resolveFiles 函数了。
resolveFiles
resolveFiles 主要分为以下三个部分执行:
- fileMiddlewares
- injectImportsAndOptions
- postProcessFilesCbs
fileMiddlewares 里面包含了 ejs render 函数,所有插件调用 api.render 时候只是把对应的渲染函数 push 到了 fileMiddlewares 中,等所有的 插件执行完以后才会遍历执行 fileMiddlewares 里面的所有函数,即在内存中生成模板文件字符串。
injectImportsAndOptions 就是将 generator 注入的 import 和 rootOption 解析到对应的文件中,比如选择了 vuex, 会在 src/main.js 中添加 import store from './store',以及在 vue 根实例中添加 router 选项。
postProcessFilesCbs 是在所有普通文件在内存中渲染成字符串完成之后要执行的遍历回调。例如将 @vue/cli-service/generator/index.js 中的 render 是放在了 fileMiddlewares 里面,而将 @vue/cli-service/generator/router/index.js 中将替换 src/App.vue 文件的方法放在了 postProcessFiles 里面,原因是对 src/App.vue 文件的一些替换一定是发生在 render 函数之后,如果在之前,修改后的 src/App.vue 在之后 render 函数执行时又会被覆盖,这样显然不合理。
writeFileTree
在提取了配置文件和模板渲染之后调用了 sortPkg 对 package.json 的字段进行了排序并将 package.json 转化为 json 字符串添加到项目的 files 中。 此时整个项目的文件已经在内存中生成好了(在源码中就是对应的 this.files),接下来就调用 writeFileTree 方法将内存中的字符串模板文件生成在磁盘中。


 1万+
1万+

 被折叠的 条评论
为什么被折叠?
被折叠的 条评论
为什么被折叠?
 到【灌水乐园】发言


