


1.elasticsearch和elasticsearch-head的安装
elasticsearch:存储+全文检索+分析的一个数据库
elasticsearch-head-master:可视化插件,可在浏览器直接访问数据库
2.elasticsearch安装
1)jdk安装(详见其他文章)
2)把安装包放入linux系统文件下(如:/opt/)
3)解压文件
tar -zxf elasticsearch-6.2.2.tar.gz
4)移动并修改文件夹名
mv elasticsearch-6.2.2 soft/elasticsearch622
6)修改配置(当前在opt目录下)
vi soft/elasticsearch622/config/elasticsearch.yml
修改内容如下:
集群名称:cluster.name: wsq-es
节点名称:node.name: node-1
本机ip:network.host: 192.168.56.110
端口:http.port: 9200
文章末尾添加:
http.cors.enabled:  true 				#设置跨域
http.cors.allow-origin:  “*” 			#设置访问权限
7)修改系统最大文件数
vi /etc/security/limits.conf
在文件末尾追加
wsq soft nofile 65536
wsq hard nofile 131072
wsq soft nproc 4096
wsq hard nproc 4096
8)修改虚拟内存
vi /etc/sysctl.conf
在文章末尾追加
vm.max_map_count=655360
9)激活文件
sysctl -p
10)修改权限
chown 用户名 elasticsearch622/ -R
11)因elasticsearch不能在root用户下启动,需切换用户
新增用户:useradd wsq
切换用户:su wsq
12)启动elasticsearch
进入elasticsearch622/bin目录下
启动elasticsearch:./elasticsearch
13)浏览器验证(输入网址:192.168.56.110:9200)

elasticsearch安装成功
3.elasticsearch-head-master安装
安装elasticsearch-head作为web展示(利用nodejs里的npm命令)
1)下载nodejs
安装包node-v11.0.0.tar.gz‘
2)解压文件
tar -zxf node-v11.0.0.tar.gz
3)进入文件目录
cd soft/node-v11.0.0/
4)安装
yum install gcc gcc-c++ -y
5)执行
./configure
6)make(时间过长)
7)make install
8)node -v
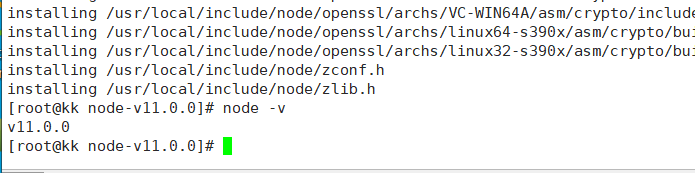
表示安装成功
9)安装unzip压缩包
yum install unzip
10)压缩文件
unzip elasticsearch-head-master.zip
11)npm install
12)npm run start

成功!!!


 440
440


 被折叠的 条评论
为什么被折叠?
被折叠的 条评论
为什么被折叠?
 到【灌水乐园】发言


