


android布局分为:
LinearLayout 线性布局
RelativeLayout 相对布局
AbsoluteLayout 绝对布局
TableLayout 表格布局
FrameLayout 帧布局
其中绝对布局在Android2.0中被标记为已过期,可用帧布局或相对布局代替。
android:layout_width属性控制组件宽度
android:layout_height属性控制组件高度
它们有3个可选值:
wrap_content 表示组件恰好包裹它的内容
match_content 与fill_parent 完全相同,自android2.2开始推荐使用
fill_parent 与match_content 完全相同
android:gravity 设置布局管理器内组件的对齐方式。也可设置组件内文本对齐方式
android:layout_gravity 当前控件在父元素的位置
1.线性布局
线性布局分为水平和垂直排列由属性android:orientation="horizontal"、android:orientation="vertical"控制
水平排列:每一列只允许放一个组件。如果超出范围将不显示。
垂直排列:每一行只允许放一个组件。如果超出范围将不显示。
效果图:
按钮宽高属性都设为wrap_content
水平排列:按钮6未显示

垂直排列:

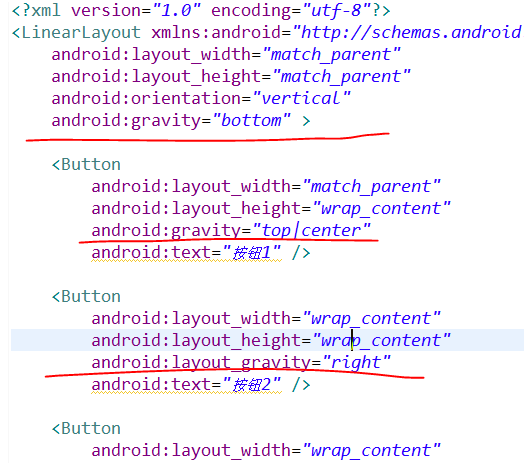
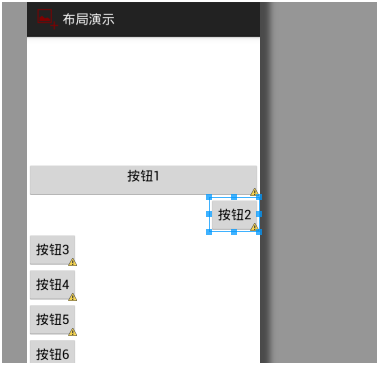
android:gravity展示
在布局管理器中的gravity为其中的组件决定排列方式
在组件中的gravity为其文本排列方式
Layout_gravity相对父元素位置
效果如下:
Layout_weightSum和Layout_weight额外空间分配(权重)

将红线包裹的剩余空间分为两份,设置按钮7占其中一份,代码及效果如下:
<LinearLayout
        android:layout_width="match_parent"
        android:layout_height="match_parent"
        android:orientation="horizontal"
        <strong>android:weightSum="2"</strong> >

        <Button
            android:layout_width="wrap_content"
            android:layout_height="wrap_content"
            android:text="按钮7"
            <strong>android:layout_weight="1"</strong>
             />

        <Button
            android:layout_width="wrap_content"
            android:layout_height="wrap_content"
            android:text="按钮8" />
Ps:若未指定android:weightSum的值,它将自动获取需要的值
android:visibility属性
包含3中可选值invisible、visible、gone
其中invisible、gone都为使其组件不可见、invisible有保留空间、gone不保留空间
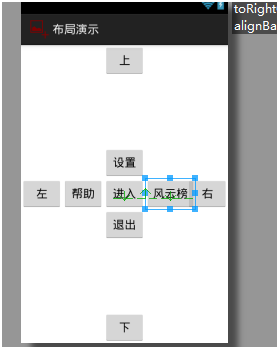
2.相对布局
相对布局:Relativelayout
android:layout_toRightOf 在指定控件的右边
android:layout_toLeftOf 在指定控件的左边
android:layout_above 在指定控件的上边
android:layout_below 在指定控件的下边
android:layout_alignBaseline 跟指定控件水平对齐
android:layout_alignLeft 跟指定控件左对齐
android:layout_alignRight 跟指定控件右对齐
android:layout_alignTop 跟指定控件顶部对齐
android:layout_alignBottom 跟指定控件底部对齐
android:layout_alignParentLeft 是否跟父布局左对齐
android:layout_alignParentTop 是否跟父布局顶部对齐
android:layout_alignParentRight 是否跟父布局右对齐
android:layout_alignParentBottom 是否跟父布局底部对齐
android:layout_centerVertical 在父布局中垂直居中
android:layout_centerHorizontal 在父布局中水平居中
android:layout_centerInParent 在父布局中居中
效果演示如下:
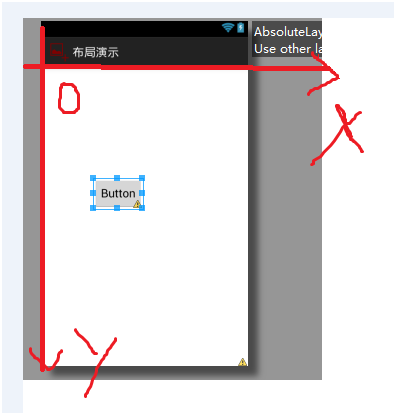
3.绝对布局
绝对布局:absolutelayout
4.帧布局
帧布局:Framelayout
在帧布局管理器中,每加入一个组件,都将创建一个空白的区域,通常称为一帧,这些帧可用gravity对齐。后面的组件将会覆盖前面的组件
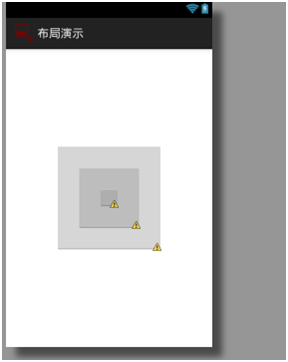
代码如下:
<FrameLayout xmlns:android="http://schemas.android.com/apk/res/android"
    android:layout_width="match_parent"
    android:layout_height="match_parent" >
    <Button
        android:layout_width="250px"
        android:layout_height="250px"
        android:layout_gravity="center"/>

    <Button
        android:layout_width="150px"
        android:layout_height="150px"
        android:layout_gravity="center"/>
    <Button
        android:layout_width="50px"
        android:layout_height="50px"
        android:layout_gravity="center"/>
</FrameLayout>
5.表格布局
表格布局:
android:shrinkColumns 收缩列
android:stretchColumns 拉伸列
android:collapseColumns 隐藏列
android:layout_column 指定列(作用在列的身上)
android:layout_span 合并列(作用在列的身上)
<?xml version="1.0"encoding="utf-8"?>

<TableLayout xmlns:android="http://schemas.android.com/apk/res/android"

    android:layout_width="match_parent"

    android:layout_height="match_parent"

    android:gravity="center_vertical"

    android:stretchColumns="0,3" >


   <!-- 第一行 -->


   <TableRow android:layout_height="wrap_content" >

        <TextView />

        <TextView

           android:layout_width="wrap_content"

           android:layout_height="wrap_content"

           android:text="用户名:" />

        <EditText

           android:layout_width="wrap_content"

           android:layout_height="wrap_content"

           android:minWidth="200px"

           android:textSize="24px"/>

        <TextView />

   </TableRow>

   <!-- 第二行 -->

   <TableRow android:layout_height="wrap_content" >

        <TextView />

        <TextView

           android:layout_width="wrap_content"

           android:layout_height="wrap_content"

           android:text="密    码:" />

        <EditText

           android:layout_width="wrap_content"

           android:layout_height="wrap_content"

           android:inputType="textPassword"

           android:minWidth="200px"

           android:textSize="24px"/>

        <TextView />

   </TableRow>

   <!-- 第三行 -->

   <TableRow android:layout_height="wrap_content" >

        <TextView />

        <Button

           android:layout_width="wrap_content"

           android:layout_height="wrap_content"

           android:text="登陆"/>

        <Button

           android:layout_width="wrap_content"

           android:layout_height="wrap_content"

           android:text="退出"/>

        <TextView />

   </TableRow>

</TableLayout>
效果图如下:
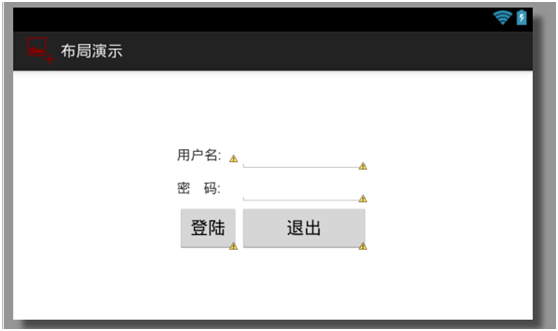
设置 第0列和第3列为允许拉伸,这是为了让用户登录表单在水平方向上居中显示而设置的。


 2025
2025

 被折叠的 条评论
为什么被折叠?
被折叠的 条评论
为什么被折叠?
 到【灌水乐园】发言


