


OS: Windows 7
1. 从 [url]www.cywin.com[/url] 下载 setup.exe 安装引导程序
2. 双击 setup.exe 开始安装
3. 选择安装源 Install for Internet ( 如果有上次从 Internet 下载的软件包,可以选择 Install for Local Directory 选择存放的目录即可)
4. 定义安装目录 C:/cygwin (1) Install for : All Users (2) Default Text File Type: Unix/binary
5. 定义下载软件所存放目录,(下次可以使用下载包从本地硬盘进行安装) .G:/Download/cywin
6. 选择连接 Internet 的类型,根据自己的实际情况选择
7. 选择一个镜像下载站点
8. 选择安装软件包
(1) Admini 中选择: cygrunsrv
(2) DOC 中选择: cygwin-doc
(3) Net 中选择:openssh
9. cywin 自动下载选择的软件包,并进行安装。
10. 在我的电脑->属性->高级->环境变量中配置加入变量CYGWIN=ntsec,
在path环境变量中加入cygwin/bin路径, 例如: ;c:/cygwin/bin
11. 双击Windows上安装好的 Cywin快捷图标,启动 Cywin
Copying skeleton files.
These files are for the user to personalise
their cygwin experience.
These will never be overwritten.
`./.bashrc' -> `/home/Administrator//.bashrc'
`./.bash_profile' -> `/home/Administrator//.bash_profile'
`./.inputrc' -> `/home/Administrator//.inputrc'
12. 给文件授权,以完成sshd 服务的安装
chmod +r /etc/group
chmod +r /etc/passwd
chmod +rwx /var
13. 安装 sshd 服务
$ ssh-host-config
详细的安装步骤,以及输入的参数,如下所例:
Copying skeleton files.
These files are for the user to personalise
their cygwin experience.
These will never be overwritten.
`./.bashrc' -> `/home/Administrator//.bashrc'
`./.bash_profile' -> `/home/Administrator//.bash_profile'
`./.inputrc' -> `/home/Administrator//.inputrc'
Administrator@backup ~
$ chmod +r /etc/group # 对文件权限
Administrator@backup ~
$ chmod +r /etc/passwd # 对文件权限
Administrator@backup ~
$ chmod +rwx /var/ # 对文件权限
Administrator@backup ~
$ ssh-host-config # 引导SSH服务配置
*** Info: Generating /etc/ssh_host_key
*** Info: Generating /etc/ssh_host_rsa_key
*** Info: Generating /etc/ssh_host_dsa_key
*** Info: Creating default /etc/ssh_config file
*** Info: Creating default /etc/sshd_config file
*** Info: Privilege separation is set to yes by default since OpenSSH 3.3.
*** Info: However, this requires a non-privileged account called 'sshd'.
*** Info: For more info on privilege separation read /usr/share/doc/openssh/README.privsep.
*** Query: Should privilege separation be used? (yes/no) yes #输入yes
*** Info: Updating /etc/sshd_config file
*** Warning: The following functions require administrator privileges!
*** Query: Do you want to install sshd as a service?
*** Query: (Say "no" if it is already installed as a service) (yes/no) yes #输入yes
*** Info: Note that the CYGWIN variable must contain at least "ntsec"
*** Info: for sshd to be able to change user context without password.
*** Query: Enter the value of CYGWIN for the daemon: [ntsec] ntsec #输入ntsec
*** Info: On Windows Server 2003, Windows Vista, and above, the
*** Info: SYSTEM account cannot setuid to other users -- a capability
*** Info: sshd requires. You need to have or to create a privileged
*** Info: account. This script will help you do so.
*** Info: You appear to be running Windows 2003 Server or later. On 2003 and
*** Info: later systems, it's not possible to use the LocalSystem account
*** Info: for services that can change the user id without an explicit password
*** Info: (such as passwordless logins [e.g. public key authentication] via sshd).
*** Info: If you want to enable that functionality, it's required to create a new
*** Info: account with special privileges (unless a similar account already exists).
*** Info: This account is then used to run these special servers.
*** Info: Note that creating a new user requires that the current account have
*** Info: Administrator privileges itself.
*** Info: No privileged account could be found.
*** Info: This script plans to use 'cyg_server'.
*** Info: 'cyg_server' will only be used by registered services.
*** Query: Do you want to use a different name? (yes/no) no #输入no,不指定启动用户
*** Query: Create new privileged user account 'cyg_server'? (yes/no) no #输入no,不指定启动用户
*** ERROR: There was a serious problem creating a privileged user.
*** Query: Do you want to proceed anyway? (yes/no) yes #输入yes
*** Warning: Expected privileged user 'cyg_server' does not exist.
*** Warning: Defaulting to 'SYSTEM'
*** Info: The sshd service has been installed under the LocalSystem
*** Info: account (also known as SYSTEM). To start the service now, call
*** Info: `net start sshd' or `cygrunsrv -S sshd'. Otherwise, it
*** Info: will start automatically after the next reboot.
*** Info: Host configuration finished. Have fun!
Administrator@backup ~
$ cygrunsrv.exe -S sshd # 启动 SSH服务
14. 安装完成后,检查一下系统服务中是否有 CYGWIN sshd 服务, 无启动帐号.
15. 检查系统用户 sshd 是否已启用, 并属于管理员组.
16. 一切正常,即可启动ssh服务. 登录的用户名是sshd, 密码是 sshd用户的密码.
注意: 使用 windows 用户本地认证
mkpasswd -l > /etc/passwd 使用windows 用户的密码
mkgroup -l > /etc/group 使用windows 用户组
原文链接:http://nails.blog.51cto.com/640492/144025
CYGWin:http://www.cygwin.cn/site/install/
【最新更新 2011-12-10】 如何利用cygwin在windows下学习linux编程。
有两种方式比较好,一种是直接装上linux操作系统如ubuntu,另一种是在windows下安装cygwin。
有的人会觉得前者很难,因为现在很多东西还是必须在windows下进行的。但是,我觉得,只要你习惯了,linux同样很好用,大不了用vbox安装一个虚拟机,偶尔拿出来用用,挺好的。(为了让自己习惯linux,更推荐这种方式)
另外,有人觉得在windows下在虚拟机里安装ubuntu不也可以吗?我试验的结果是,需要比较大的内存。在同样小的内存情况下,在虚拟机里安装windows xp要比ubuntu11.10运行得更加流畅。
下面介绍步骤:
安装cygwin,注意,如果选择用它来开发,要选一些库,如gcc,make,gdb等常用库。一个更为简单的方法是完整安装,免得以后某些包会用到。如下图所示:
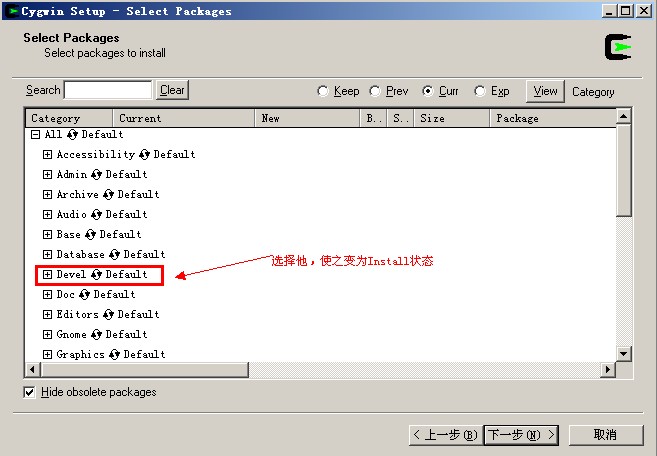
这个包最全,所以下载之后大概有800M,需要等上一会儿。
安装好cygwin之后,就可以在命令行下测试 gcc -v
在windows下,可以在eclipse的官网上下载集成好C++开发环境的Eclipse,使用起来非常方便!推荐!


 2587
2587


 被折叠的 条评论
为什么被折叠?
被折叠的 条评论
为什么被折叠?
 到【灌水乐园】发言


