


TableLayout和Fragment结合下的ListView中多按钮响应方法
前段时间在做一个项目,在项目里面需要用户使用Android的app,对某一机器进行相关操作,由于模式和按钮都很多,让我对如何集成在一个小小的手机界面里绞尽脑汁,后来我选择了使用tablelayout和fragment结合的顶部导航栏的方法对几种模式进行分类,在使用list view将几种操作方法进行适配,这样子可以不用每个按钮都写一个方法,这篇文章主要介绍如何对list view里面的按钮实现点击方法。
一、实现步骤:
步骤1:添加依赖
步骤2:创建需要的Fragment布局文件(需要多少个Tab选项,就建多少个Fragment)
步骤3:创建Fragment对应的Activity类
步骤4:定义适配器Adapter
步骤5:定义主布局activity_main.xml文件
步骤6:定义MainActivity类
步骤7:在SimpleAdapter适配器中编写相应方法
步骤8:在相应Fragment中编写调用适配器写入数据
二、实际开发:
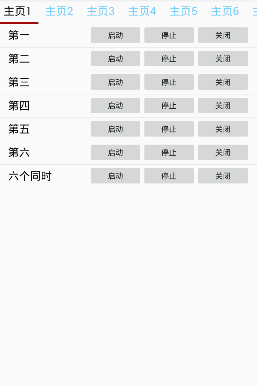
项目演示
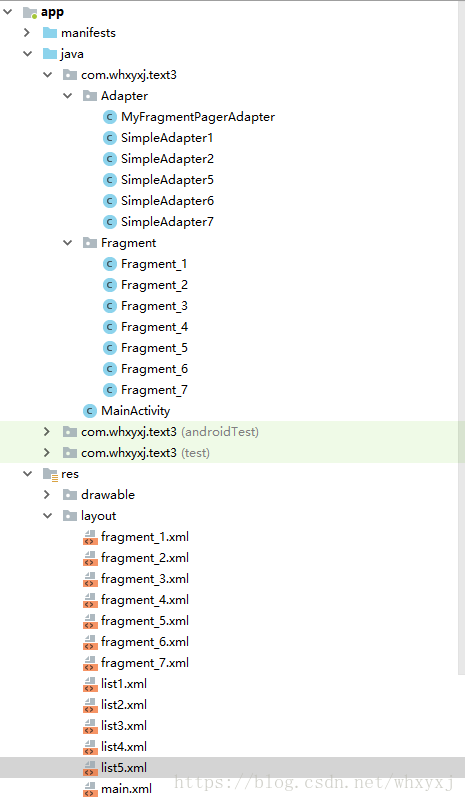
工程目录:
三、具体实现
1、在Gradle中添加依赖
dependencies {
    implementation fileTree(include: ['*.jar'], dir: 'libs')
    implementation 'com.android.support:appcompat-v7:28.0.0-rc01'
    implementation 'com.android.support.constraint:constraint-layout:1.1.2'
    testImplementation 'junit:junit:4.12'
    androidTestImplementation 'com.android.support.test:runner:1.0.2'
    androidTestImplementation 'com.android.support.test.espresso:espresso-core:3.0.2'
    implementation 'com.android.support:design:28.0.0-rc01'
}
2、 创建需要的Fragment布局文件(需要多少个Tab选项,就建多少个Fragment,这里以7个举例)
为了节省篇幅,这里只写出两个,剩下的可以在demo源码中查看。
fragment1_xml
<RelativeLayout xmlns:android="http://schemas.android.com/apk/res/android"
    xmlns:tools="http://schemas.android.com/tools"
    android:layout_width="match_parent"
    android:layout_height="match_parent"
    android:orientation="vertical">

    <ListView
        android:id="@+id/lv_qwk"
        android:layout_width="match_parent"
        android:layout_height="match_parent"/>
</RelativeLayout>
在这个fragment里面,我主要是写了一个listview,里面的所有控件有list来写入,下面给出这个list的代码。
List1.xml
<?xml version="1.0" encoding="utf-8"?>
<LinearLayout xmlns:android="http://schemas.android.com/apk/res/android"
    xmlns:app="http://schemas.android.com/apk/res-auto"
    android:layout_width="match_parent"
    android:layout_height="match_parent"
    android:orientation="vertical">

    <LinearLayout
        android:layout_width="match_parent"
        android:layout_height="40dp"
        android:layout_marginLeft="20dp"
        android:layout_marginRight="20dp"
        android:layout_marginBottom="2dp"
        android:orientation="horizontal">

        <TextView
            android:id="@+id/tv_title"
            android:layout_width="0dp"
            android:layout_height="match_parent"
            android:layout_weight="1.5"
            android:gravity="center_vertical"
            android:text="TextView"
            android:textColor="#000000"
            android:textSize="20sp" />

        <Button
            android:id="@+id/bt_up"
            android:layout_width="0dp"
            android:layout_height="match_parent"
            android:layout_weight="1"
            android:focusable="false" />

        <Button
            android:id="@+id/bt_pa"
            android:layout_width="0dp"
            android:layout_height="match_parent"
            android:layout_weight="1"
            android:focusable="false" />

        <Button
            android:id="@+id/bt_do"
            android:layout_width="0dp"
            android:layout_height="match_parent"
            android:layout_weight="1"
            android:focusable="false" />


    </LinearLayout>
</LinearLayout>

上面是list的界面代码,主要是一个文本框和“启动“,”停止“,”关闭“三个按钮。对于按钮中要使用android:focusable=”false”语句使其失去焦点,才能实现listview点击相应。
fragment3_xml
(这个fragment不适用listview,直接在布局里面实现三个按钮)
<LinearLayout xmlns:android="http://schemas.android.com/apk/res/android"
    xmlns:tools="http://schemas.android.com/tools"
    android:layout_width="match_parent"
    android:layout_height="match_parent"
    android:orientation="vertical">

    <LinearLayout
        android:layout_width="match_parent"
        android:layout_height="wrap_content"
        android:orientation="vertical">

        <LinearLayout
            android:layout_width="match_parent"
            android:layout_height="50dp"
            android:layout_marginLeft="20dp"
            android:layout_marginRight="20dp"
            android:orientation="horizontal">

            <Button
                android:id="@+id/bt_cdz"
                android:layout_width="wrap_content"
                android:layout_height="match_parent"
                android:layout_marginRight="2dp"
                android:layout_weight="1"
                android:text="启动"
                android:onClick="Qidong"
                android:textSize="20sp" />

            <Button
                android:id="@+id/bt_cdf"
                android:layout_width="wrap_content"
                android:layout_height="match_parent"
                android:layout_marginLeft="2dp"
                android:layout_weight="1"
                android:text="停止"
                android:onClick="Tingzhi"
                android:textSize="20sp" />

        </LinearLayout>

        <Button
            android:id="@+id/bt_cdt"
            android:layout_width="match_parent"
            android:layout_height="50dp"
            android:layout_marginLeft="20dp"
            android:layout_marginRight="20dp"
            android:layout_marginTop="5dp"
            android:layout_weight="1"
            android:text="关闭"
            android:onClick="Guanbi"
            android:textSize="20sp" />
    </LinearLayout>


</LinearLayout>

3、 创建Fragment对应的Activity类
(一共7个,这里只写出1个)
Fragment_1
package com.whxyxj.text3.Fragment;
import android.os.Bundle;
import android.support.annotation.Nullable;
import android.support.v4.app.Fragment;
import android.view.LayoutInflater;
import android.view.View;
import android.view.ViewGroup;
public class Fragment_1 extends Fragment {
       @Nullable
    @Override
    public View onCreateView(LayoutInflater inflater, @Nullable ViewGroup container, @Nullable Bundle savedInstanceState) {
        View view = inflater.inflate(R.layout.fragment_1, container, false);
                    return view;
    }
}
这里先写出主要框架,我们待会在实现适配器时再把代码写完整.
4、 定义适配器Adapter类
这里的适配的作用是将Fragment与ViewPager进行适配
MyFragmentPagerAdapter.java
package com.whxyxj.text3.Adapter;

import android.support.v4.app.Fragment;
import android.support.v4.app.FragmentManager;
import android.support.v4.app.FragmentPagerAdapter;

import com.whxyxj.text3.Fragment.Fragment_1;
import com.whxyxj.text3.Fragment.Fragment_2;
import com.whxyxj.text3.Fragment.Fragment_3;
import com.whxyxj.text3.Fragment.Fragment_4;
import com.whxyxj.text3.Fragment.Fragment_5;
import com.whxyxj.text3.Fragment.Fragment_6;
import com.whxyxj.text3.Fragment.Fragment_7;

public class MyFragmentPagerAdapter extends FragmentPagerAdapter {
    private String[] mTitles = new String[]{"主页1", "主页2", "主页3", "主页4","主页5","主页6","主页7"};

    public MyFragmentPagerAdapter(FragmentManager fm) {
        super(fm);
    }

    @Override
    public Fragment getItem(int position) {
        if (position == 1) {
            return new Fragment_2();
        } else if (position == 2) {
            return new Fragment_3();
        }
        else if (position == 3) {
            return new Fragment_4();
        }
        else if (position == 4) {
            return new Fragment_5();
        }
        else if (position == 5) {
            return new Fragment_6();
        }
        else if (position == 6) {
            return new Fragment_7();
        }
        return new Fragment_1();
    }

    @Override
    public int getCount() {
        return mTitles.length;
    }

    //用来设置tab的标题
    @Override
    public CharSequence getPageTitle(int position) {
        return mTitles[position];
    }
}
5、 定义主布局activity_main.xml
main.xml
<?xml version="1.0" encoding="utf-8"?>
<LinearLayout xmlns:android="http://schemas.android.com/apk/res/android"
    xmlns:app="http://schemas.android.com/apk/res-auto"
    android:layout_width="match_parent"
    android:layout_height="match_parent"
    android:orientation="vertical">

    <android.support.design.widget.TabLayout
        android:id="@+id/tab_main"
//定义选中下划线颜色
        app:tabIndicatorColor="#f00"
        app:tabIndicatorHeight="4dp"
//定义标题栏模式可滚动
        app:tabMode="scrollable"
//定义选中字体颜色
        app:tabSelectedTextColor="#000000"
//定义字体颜色
        app:tabTextColor="#66ccff"
        android:layout_width="match_parent"
        android:layout_height="wrap_content">
</android.support.design.widget.TabLayout>

    <android.support.v4.view.ViewPager
        android:id="@+id/vp_main"
        android:layout_width="match_parent"
        android:layout_height="0dp"
        android:layout_weight="1">

    </android.support.v4.view.ViewPager>
</LinearLayout>
在代码中有一个 app:tabMode=”scrollable”,这个tabMode有两种选择,fixed和scrollable。
fixed为不可滑动,适用于标题栏较少的情况,由于我设定标题有7个,使用滑动比较合理。
关于标题栏字体大小,我们可以使用style进行设置,其代码如下:
在Tablayout中添加代码 app:tabTextAppearance=”@style/TabLayoutTextStyle”

values/styles.xml中添加代码:
<style name="TabLayoutTextStyle">
    <item name="android:textSize">@dimen/textsizi</item>
</style>
values/dimens中添加代码代码:
<dimen name="textsizi">20sp</dimen>文件位置如下:

实现效果如下:

6、 定义MainActivity
MainActivity.java
package com.whxyxj.text3;
import android.support.design.widget.TabLayout;
import android.support.v4.view.ViewPager;
import android.support.v7.app.AppCompatActivity;
import android.os.Bundle;
import android.support.v7.widget.Toolbar;
import com.whxyxj.text3.Adapter.MyFragmentPagerAdapter;


public class MainActivity extends AppCompatActivity {
    private TabLayout mTabLayout;
    private ViewPager mViewPager;
    private MyFragmentPagerAdapter myFragmentPagerAdapter;
    private TabLayout.Tab one;
    private TabLayout.Tab two;
    private TabLayout.Tab three;
    private TabLayout.Tab four;
    private TabLayout.Tab five;
    private TabLayout.Tab six;
    private TabLayout.Tab seven;
    private Toolbar mToolBar;
    @Override
    protected void onCreate(Bundle savedInstanceState) {
        super.onCreate(savedInstanceState);
        setContentView(R.layout.main);
        mTabLayout = (TabLayout) findViewById(R.id.tab_main);
        mViewPager = (ViewPager) findViewById(R.id.vp_main);
        myFragmentPagerAdapter = new MyFragmentPagerAdapter(getSupportFragmentManager());
        mViewPager.setAdapter(myFragmentPagerAdapter);


        //将TabLayout和ViewPager绑定在一起,使双方各自的改变都能直接影响另一方,解放了开发人员对双方变动事件的监听
        mTabLayout.setupWithViewPager(mViewPager);

        //指定Tab的位置
        one = mTabLayout.getTabAt(0);
        two = mTabLayout.getTabAt(1);
        three = mTabLayout.getTabAt(2);
        four = mTabLayout.getTabAt(3);
        five = mTabLayout.getTabAt(4);
        six = mTabLayout.getTabAt(5);
        seven = mTabLayout.getTabAt(6);
    }
}
7、 创建SimpleAdapter适配器、编写相应方法
(一共有5个适配器,这里指写出1个)
package com.whxyxj.text3.Adapter;
import java.util.List;
import java.util.Map;

import android.content.Context;
import android.util.Log;
import android.view.View;
import android.view.View.OnClickListener;
import android.view.ViewGroup;
import android.widget.Button;
import android.widget.SimpleAdapter;
import android.widget.Toast;
import com.whxyxj.text3.R;
public class SimpleAdapter1 extends SimpleAdapter{
    Context context;
    public SimpleAdapter1(Context context, List<? extends Map<String, ?>> data,
                          int resource, String[] from, int[] to) {
        super(context, data, resource, from, to);
        this.context = context;
        // TODO Auto-generated constructor stub
    }
    public View getView(int position, View convertView, ViewGroup parent) {
        // TODO Auto-generated method stub
        View v = super.getView(position, convertView, parent);
        final Button up=(Button) v.findViewById(R.id.bt_up);
        final Button pa=(Button) v.findViewById(R.id.bt_pa);
        final Button down=(Button) v.findViewById(R.id.bt_do);
//用于判断点击了listview的第几行,其中position=0时点击了第一行,赋予相对应指令。
        final int p = position;
        String no=null;
        switch (p) {
               case 0:
                   no="000001";
                   break;
               case 1:
                   no="000010";
                   break;
               case 2:
                   no="000011";
                   break;
               case 3:
                    no="000100";
                    break;
               case 4:
                    no="000101";
                    break;
               case 5:
                    no="000110";
                    break;
                case 6:
                    no="000111";
                     break;
            default:
                     break;
                }
        final String finalNo = no;
        Log.d("Position", Integer.toString(position));
//对启动按钮进行响应
        up.setOnClickListener(new OnClickListener() {
            @Override
            public void onClick(View v) {
                // TODO Auto-generated method stub
                String act ="01";
//结合字符串,形成2进制字符
                String acb= finalNo +act;
                up.setText("正启动");
                down.setText("关闭");
                Toast.makeText(context, "指令为"+acb,Toast.LENGTH_LONG).show();
            }
        });

        pa.setOnClickListener(new OnClickListener() {
            @Override
            public void onClick(View v) {
                String act ="10";
                String acb= finalNo +act;
                up.setText("启动");
                down.setText("关闭");
                // TODO Auto-generated method stub
                Toast.makeText(context, "指令为"+acb,Toast.LENGTH_LONG).show();
            }
        });
        down.setOnClickListener(new OnClickListener() {
            @Override
            public void onClick(View v) {
                String act ="11";
                String acb= finalNo +act;
                up.setText("启动");
                down.setText("正关闭");
                // TODO Auto-generated method stub
                Toast.makeText(context, "指令为"+acb,Toast.LENGTH_LONG).show();
            }
        });
        return v;
    }

}
8、 在相应Fragment中编写调用适配器写入数据
此步骤为Fragment中的实现方法,我这里因为有些Fragment使用了listview,有些没有,我这里分开来讲。提两个例子进行讲解。
Fragment_1.java
package com.whxyxj.text3.Fragment;
import android.os.Bundle;
import android.support.annotation.Nullable;
import android.support.v4.app.Fragment;
import android.view.LayoutInflater;
import android.view.View;
import android.view.ViewGroup;
import android.widget.AdapterView;
import android.widget.ListAdapter;
import android.widget.ListView;
import android.widget.AdapterView.OnItemClickListener;

import com.whxyxj.text3.Adapter.SimpleAdapter1;
import com.whxyxj.text3.R;

import java.util.ArrayList;
import java.util.HashMap;
import java.util.List;
import java.util.Map;

public class Fragment_1 extends Fragment {
    private String[] hudong = { "第一", "第二", "第三", "第四", "第五","第六","六个同时" };
//这个数组用于测试输出,可以不用,删除后下面的适配写入listview也要删除
    private String[] xuhao = { "001", "010", "011", "100", "101","110","111" };
    private ListView actlist;
    private List<HashMap<String, Object>> data;
    private final String title = "title";
    private final String ima_up = "ima_up";
    private final String ima_pa = "ima_pa";
    private final String ima_do = "ima_do";
    private final String id = "id";
    @Nullable
    @Override
    public View onCreateView(LayoutInflater inflater, @Nullable ViewGroup container, @Nullable Bundle savedInstanceState) {
        View view = inflater.inflate(R.layout.fragment_1, container, false);
        actlist=view.findViewById(R.id.lv_qwk);
        ListAdapter adapter = null;
        ArrayList<Map<String,Object>> data= new ArrayList<Map<String,Object>>();;
        for (int i = 0; i < hudong.length; i++) {
            Map<String,Object> mapItem = new HashMap<String,Object>();
//将活动和序号数组中数据写入列表
            mapItem.put(title, hudong[i]);
            mapItem.put(id, xuhao[i]);
            mapItem.put(ima_up, "启动");
            mapItem.put(ima_pa, "停止");
            mapItem.put(ima_do, "关闭");
            data.add(mapItem);
            }
//启动适配器写入list布局中的各个控件
        adapter= new SimpleAdapter1(
                getActivity(), data, R.layout.list1,
                new String[] { title,ima_up,ima_pa,ima_do,id }, new int[] {
                R.id.tv_title,R.id.bt_up,R.id.bt_pa,R.id.bt_do});
        actlist.setAdapter(adapter);
        actlist.setOnItemClickListener(new itemClick());
            return view;
    }
//这个是对listview每一行进行相应方法
    class itemClick implements OnItemClickListener{

        @Override
        public void onItemClick(AdapterView<?> parent, View view, int position, long id) {
            // TODO Auto-generated method stub
            Map<String, String> infoMap = (Map<String, String>) parent.getItemAtPosition(position);
            System.out.println(infoMap.get("title"));
            System.out.println(infoMap.get("id"));
        }

    }
}
对于之间在Fragment中添加按钮,实现方法的。
Fragment_3.java
package com.whxyxj.text3.Fragment;
import android.content.Intent;
import android.os.Bundle;
import android.support.annotation.Nullable;
import android.support.v4.app.Fragment;
import android.view.LayoutInflater;
import android.view.View;
import android.view.ViewGroup;
import android.widget.Button;
import android.widget.Toast;
import com.whxyxj.text3.R;
public class Fragment_3 extends Fragment {
    @Nullable
    @Override
    public View onCreateView(LayoutInflater inflater, @Nullable ViewGroup container, @Nullable Bundle savedInstanceState) {
        View view = inflater.inflate(R.layout.fragment_3, container, false);
        Button qd=view.findViewById(R.id.bt_cdz);
        Button tz=view.findViewById(R.id.bt_cdf);
        Button gb=view.findViewById(R.id.bt_cdt);
//因为 Fragment不是布局器,不具备渲染视图的能力,所以不能直接在布局中添加使用onclick方法,需采用以下形式设置对三个按钮的监听。
        qd.setOnClickListener(new View.OnClickListener(){

            @Override
            public void onClick(View view) {
                Toast.makeText(getActivity(), "你点击了启动",Toast.LENGTH_LONG).show();
            }
        });
        tz.setOnClickListener(new View.OnClickListener(){

            @Override
            public void onClick(View view) {
                Toast.makeText(getActivity(), "你点击了停止",Toast.LENGTH_LONG).show();
            }
        });
        gb.setOnClickListener(new View.OnClickListener(){

            @Override
            public void onClick(View view) {
                Toast.makeText(getActivity(), "你点击了关闭",Toast.LENGTH_LONG).show();
            }
        });
        return view;
    }

}
以上便是这个demo的主要代码,采用tablelayout和fragment结合的顶部导航栏的方法对几种模式所用按钮进行分类,可以点击listview中的按钮输出2进制指令,这样子就可以直接在SimpleAdapter中直接调用后台的service,将指令传入后台处理后对机器进行相应操作,不过注意要在多线程中实现,不然会返回不了结果。
最后吐槽一下,后面由于需求更改,这样子直接显示出太多的按钮也不好,改成了下拉框的形式,不过这个方法也还是有一定的意义,可以直接进行多操作,或者是从后台获取数据进行操作的模式,比如购物车物品数量的增删查改等。
如果对怎样处理为16进制与后台进行连接,下拉框表现形式有兴趣,我可以下次再写一下。
最后,附上源码。


 1261
1261

 被折叠的 条评论
为什么被折叠?
被折叠的 条评论
为什么被折叠?
 到【灌水乐园】发言


