


对象的序列化和反序列化
前一段时间,在项目的需求下我使用了Java中的序列化机制将数据信息保存在一个文件中,在下一次程序启动的时候,再从该文件中读取上次存储的数据信息。我们一般使用序列化来将数据缓存在本地中,当然前提是要缓存的数据量比较少的时候较适用。那么什么是序列化哪?
序列化和反序列化机制:对于序列化概念的引进是为了在网络传输不同数据类型的时候,将传输的数据类型转化为二进制的数据形式,这样才能在网络间进行传输。而将对象类型转化为二进制数据的过程就叫做“序列化”;同样,接收端需要将转化的二进制数据转换为对象的形式,这个过程即为”反序列化”。对于序列化和反序列化,我们需要使用文件流和对象流来在二进制和对象两种类型间进行转换。下面我们在Android中举个例子,当我们点击write按钮的时候,将文本框中的数据写入到文件(文件默认保存在程序安装目录中)中,而当我们点击read按钮的时候,我们将从文件中读取上次写入的数据信息显示在文本框中。
首先,我自己封装了一个序列化工具类,用来进行序列化和反序列化,代码如下:
public class ObjectSeriatUtil {
public static void writeObjToFile(Context context,List<SearchRecord> records,String fileName){
FileOutputStream fos;
ObjectOutputStream oos;
try {
String filePath = context.getFilesDir().getAbsolutePath()+File.separator + fileName;
File file = new File(filePath);
if(!file.exists()) {
file.createNewFile();
}
fos = context.openFileOutput(fileName, Context.MODE_PRIVATE);
oos = new ObjectOutputStream(fos);
Iterator<?> item = records.iterator();
while(item.hasNext()) {
Object obj = item.next();
oos.writeObject(obj);
}
fos.flush();
fos.close();
} catch (FileNotFoundException e) {
e.printStackTrace();
} catch (IOException e) {
e.printStackTrace();
}
}
public static List<SearchRecord> readObjFromFile(Context context,String fileName) {
List<SearchRecord> records = new ArrayList<SearchRecord>();
try {
String filePath = context.getFilesDir().getAbsolutePath()+File.separator + fileName;
File file = new File(filePath);
if(!file.exists()) {
file.createNewFile();
}
FileInputStream fis = context.openFileInput(fileName);
ObjectInputStream ois = new ObjectInputStream(fis);
while(fis.available() > 0) {
records.add((SearchRecord)ois.readObject());
}
fis.close();
ois.close();
} catch (FileNotFoundException e) {
e.printStackTrace();
} catch (ClassNotFoundException e) {
e.printStackTrace();
} catch (IOException e) {
e.printStackTrace();
}
return records;
}
}
接下来,我们新建一个类Person来封装我们要保存的数据信息,代码如下:
public class Person implements Serializable{
/**
*
*/
private static final long serialVersionUID = 1L;
private String name;
private String tel;
public String getName() {
return name;
}
public void setName(String name) {
this.name = name;
}
public String getTel() {
return tel;
}
public void setTel(String tel) {
this.tel = tel;
}
}
注意:这里的对象必须实现接口Serializable,否者不能进行序列化。
在接下来,就是XML文件了,代码如下:
<RelativeLayout xmlns:android="http://schemas.android.com/apk/res/android"
xmlns:tools="http://schemas.android.com/tools"
android:layout_width="match_parent"
android:layout_height="match_parent"
android:paddingBottom="@dimen/activity_vertical_margin"
android:paddingLeft="@dimen/activity_horizontal_margin"
android:paddingRight="@dimen/activity_horizontal_margin"
android:paddingTop="@dimen/activity_vertical_margin"
tools:context=".ObjSeriatAct" >
<EditText
android:id="@+id/obj_name"
android:layout_width="200dp"
android:layout_height="wrap_content"
android:hint="输入姓名"/>
<EditText
android:id="@+id/obj_tel"
android:layout_width="200dp"
android:layout_height="wrap_content"
android:hint="输入年龄"
android:layout_below="@id/obj_name"/>
<Button
android:id="@+id/obj_write"
android:layout_width="wrap_content"
android:layout_height="wrap_content"
android:text="write"
android:layout_below="@id/obj_tel"/>
<Button
android:id="@+id/obj_read"
android:layout_width="wrap_content"
android:layout_height="wrap_content"
android:text="read"
android:layout_below="@id/obj_tel"
android:layout_toRightOf="@id/obj_write"/>
</RelativeLayout>
最后,我们在Activity中来操作对象的序列化和反序列化,代码如下:
public class ObjSeriatAct extends Activity {
private EditText mName;
private EditText mAge;
private Button mWrite;
private Button mRead;
@Override
protected void onCreate(Bundle savedInstanceState) {
super.onCreate(savedInstanceState);
setContentView(R.layout.main);
initView();
}
private void initView() {
mName = (EditText) findViewById(R.id.obj_name);
mAge = (EditText) findViewById(R.id.obj_age);
mWrite = (Button) findViewById(R.id.obj_write);
mRead = (Button) findViewById(R.id.obj_read);
final Person person = new Person();
OnClickListener c = new OnClickListener() {
public void onClick(View v) {
person.setName(mName.getText().toString().trim());
person.setAge(Integer.parseInt(mAge.getText().toString().trim()));
if(v == mWrite) {// 序列化
ObjSeriateUtil.writeObjToFile(ObjSeriatAct.this, person,"person.out");
mName.setText("");
mAge.setText("");
}
else if(v == mRead) {// 反序列化
Person p = new Person();
p = ObjSeriateUtil.readObjFromFile(ObjSeriatAct.this, "person.out");
mName.setText(p.getName());
mAge.setText(p.getAge());
}
}
};
mWrite.setOnClickListener(c);
mRead.setOnClickListener(c);
}
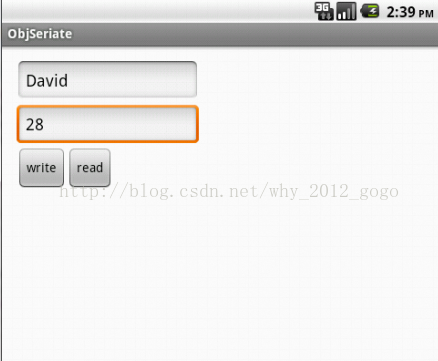
序列化效果图:

如上图,当我们点击write进行序列化的时候,在程序的安装目录中生成了我们指定的文件person.out,这就说明序列化已经完成。
反序列化效果图:
当我们点击read的时候,就会将刚刚存入文件的信息读取出来。
至此,对象的序列化和反序列化就介绍完了,对于上面的例子有兴趣的读者可以进行改进,比如将Person对象集合化,即List<Person>,那么在进行序列化和反序列化的时候,分别对其中的Person进行序列化,同时也可以将反序列化的集合Person对象显示在L;istView等空间中,这个在实际开发中也是经常遇到的。
技术交流群:179914858


 21万+
21万+


 被折叠的 条评论
为什么被折叠?
被折叠的 条评论
为什么被折叠?
 到【灌水乐园】发言


