


-
首先声明版本
- CentOS7_Minimal
- Nginx-1.16.1
- fastdfs-6.06
- fastdfs-nginx-module-1.22
- libfastcommon-1.0.43
一、安装libfastcommon
1、下载安装包,并解压
执行下载命令
wget https://github.com/happyfish100/libfastcommon/archive/V1.0.43.tar.gz
解压 tar -zxvf V1.0.43.tar.gz
2、编译、安装
依次执行以下命令
cd libfastcommon-1.0.43
./make.sh
./make.sh install
可能出现的问题
- 问题一
-bash: wget: command not found - 解决方案
yum -y install wget - 问题二
./make.sh: line 14: gcc: command not found ./make.sh: line 15: ./a.out: No such file or directory cc -Wall -D_FILE_OFFSET_BITS=64 -D_GNU_SOURCE -g -O3 -c -o hash.o hash.c make: cc: Command not found make: *** [hash.o] Error 127 - 解决方案
yum -y install gcc
二、安装fastdfs
1、下载安装包、并解压
执行下载命令
wget https://github.com/happyfish100/fastdfs/archive/V6.06.tar.gz
解压 tar -zxvf V6.06.tar.gz
2、编译、安装
依次执行以下命令
cd fastdfs-6.06
./make.sh
./make.sh install
3、查看是否安装成功
ls -la /usr/bin/fdfs*
安装成功的截图如下

可能出现的问题
- 问题一
./make.sh: line 154: perl: command not found - 解决方案
yum -y install perl - 问题二
/root/fastdfs-6.06/storage/fdfs_storaged.c:151: undefined reference to `g_exe_name' storage_dump.o: In function `fdfs_dump_global_vars': /root/fastdfs-6.06/storage/storage_dump.c:44: undefined reference to `g_exe_name' collect2: error: ld returned 1 exit status make: *** [fdfs_storaged] Error 1 make: Nothing to be done for `all'. - 解决方案
./make.sh clean
三、配置Tracker服务
1、修改tracker.conf
切换到/etc/fdfs目录,cp一个tracker.conf.sample,删除.sample后缀作为正式文件。
使用如下命令编辑tracker.conf文件
vim tracker.conf
要修改的内容为
base_path=/usr/local/fastdfs/tracker
port=22122
http.server_port=80
注:base_path的路径需要提前创建好,存储的是tracker的data和log文件,
默认port为22122
2、启动tracker(支持start|stop|restart)
/usr/bin/fdfs_trackerd /etc/fdfs/tracker.conf start
3、查看日志
进入/usr/local/fastdfs/tracker的logs目录,查看tracker.log文件

4、查看端口
netstat -apn|grep fdfs

可能出现的问题
- 问题一
-bash: netstat: command not found - 解决方案
yum -y install net-tools
四、配置Storage服务
1、修改storage.conf
切换到/etc/fdfs目录,cp一个storage.conf.sample,删除.sample后缀作为正式文件。
使用如下命令编辑storage.conf文件
vim storage.conf
要修改的内容为
base_path=/usr/local/fastdfs/storage
port=23000
group_name=group1
store_path_count=1
store_path0=/usr/local/fastdfs/storage/file
tracker_server=192.168.32.128:22122
注:
- base_path的路径需要提前创建好,存储的是storage的data和log文件,
- 默认port为23000
- group_name可根据实际情况修改
- store_path_count需要和store_path的数量相同
- store_path如果为空,则使用base_path
- tracker_server是该storage监听tracker的ip和port
2、启动storage(支持start|stop|restart)
/usr/bin/fdfs_storaged /etc/fdfs/storage.conf start
3、查看日志
进入/usr/local/fastdfs/storage的logs目录,查看storage.log文件

4、查看端口
netstat -apn|grep fdfs

5、通过monitor查看storage是否绑定成功
/usr/bin/fdfs_monitor /etc/fdfs/storage.conf

五、安装Nginx和fastdfs-nginx-module模块
1、下载安装包,并解压
执行下载命令
wget http://nginx.org/download/nginx-1.16.1.tar.gz
wget https://github.com/happyfish100/fastdfs-nginx-module/archive/V1.22.tar.gz
解压 tar -zxvf nginx-1.16.1.tar.gz
解压 tar -zxvf V1.22.tar.gz
2、编译、安装
依次执行以下命令
cd nginx-1.16.1
./configure --prefix=/usr/local/nginx --add-module=/root/fastdfs-nginx-module-1.22/src
make
make install
注:- -add-module的值为fastdfs-nginx-module的路径
3、启动、验证是否启动成功
查看nginx的安装路径
whereis nginx

切换到nginx的sbin目录
cd /usr/local/nginx/sbin/
启动命令
./nginx
停止命令
./nginx -s quit
验证启动状态
wget "http://127.0.0.1"

4、查看fastdfs模块是否安装成功
/usr/local/nginx/sbin/nginx -V

可能出现的问题
-
问题一

-
解决方案
yum -y install pcre-devel -
问题二

-
解决方案
yum -y install zlib-devel -
问题三
执行wget "http://127.0.0.1"未响应
查看nginx目录下的log文件

-
解决方案
cp /root/fastdfs-nginx-module-1.22/src/mod_fastdfs.conf /etc/fdfs/ -
问题四
执行wget "http://127.0.0.1"未响应
查看nginx目录下的log文件

-
解决方案
cp /root/fastdfs-6.06/conf/http.conf /etc/fdfs/ -
问题五
执行wget "http://127.0.0.1"未响应
查看nginx目录下的log文件

-
解决方案
cp /root/fastdfs-6.06/conf/mime.types /etc/fdfs/ -
问题六
执行wget "http://127.0.0.1"未响应
查看nginx目录下的log文件

解决方案base_path=/tmp
tracker_server=192.168.32.128:22122
url_have_group_name=true
storage_server_port=23000
store_path_count=1
store_path0=/usr/local/fastdfs/storage/file注:
- base_path 默认为/tmp
- tracker_server 为tracker的地址
- url_have_group_name url 是否包含group名称
- storage_server_port 需要和storage配置的相同
- store_path_count 存储路径个数,需要和store_path个数匹配
- store_path0 文件存储的位置
六、配置Nginx
切换到nginx目录
cd /usr/local/nginx/conf/
编辑nginx.conf文件,增加一个location
location ~/M00{
    root /usr/local/fastdfs/storage/file;
    ngx_fastdfs_module;
}
七、fastdfs常用命令测试
1、上传文件
(1). 进入/etc/fdfs目录,cp一个client.conf.sample,去掉.sample后缀作为正式文件
(2).修改client.conf配置
- base_path=/usr/local/fastdfs/client
- tracker_server=192.168.32.128:22122
- http.tracker_server_port=80
注:
- base_path client的日志文件存储位置
- tracker_server tracker的IP和port
- http.tracker_server_port tracker服务器的http端口号,必须和tracker的设置对应起来
(3).上传文件
/usr/bin/fdfs_upload_file /etc/fdfs/client.conf a.txt

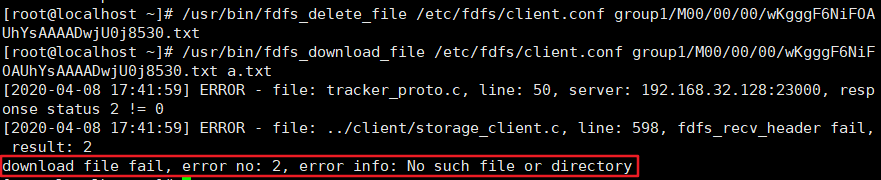
2、下载文件
/usr/bin/fdfs_download_file /etc/fdfs/client.conf group1/M00/00/00/wKgggF6NiFOAUhYsAAAADwjU0j8530.txt a.txt

3、删除文件
/usr/bin/fdfs_delete_file /etc/fdfs/client.conf group1/M00/00/00/wKgggF6NiFOAUhYsAAAADwjU0j8530.txt
八、配置外网访问fastdfs
1、修改tracker.conf文件
修改/etc/fdfs/下的tracker.conf的tracker_server 的ip为公网IP
2、修改mod_fastdfs.conf文件
修改/etc/fdfs/下的mod_fastdfs.conf的tracker_server 的ip为公网IP


 967
967


 被折叠的 条评论
为什么被折叠?
被折叠的 条评论
为什么被折叠?
 到【灌水乐园】发言


