


pytest 断言 使用Python 原生assert
def  test_assert():
    assert  1==1
pytest结合allure-pytest 生成allure 报告
第一步
下载allure文件
下载地址1 https://github.com/allure-framework/allure2/releases
下载地址2 https://repo.maven.apache.org/maven2/io/qameta/allure/allure-commandline/
下载之后解压到非中文目录
将bin路径配置到环境变量
第二步
安装allure pip install allure-pytest
查看安装版本 allure --version
可能需要重启pycharm
第三步
[pytest]
#配置文件
addopts = -vs --alluredir=report/temps --clean-alluredir
testpaths= report/
python_files= test_demo4.py
python_classes=Test*
python_functions=test_*
#用例分组
markers=
    smoke
    product_mange:商品管理
第四步
import os
import time

import pytest

if __name__ == '__main__':
    pytest.main()
    time.sleep(3)
    os.system("allure generate report/temps -o report/allure --clean")
第四步 实现allure报告log定制
1、打开allure文件的config (刚才配置到环境变量的路径)
2、在allure.yml 文件中最后加一行
- custom-logo-plugin

3 编辑 plugins\custom-logo-plugin\static\styles.css
.side-nav__brand {
	background: url('logo.jpg') no-repeat left center !important;;
	margin-left: 10px;
	background-size: contain !important;
}

/* 是否显示allure */
.side-nav__brand-text{
	display:none;
}
.side-nav__brand:after {
	content: "felicia";
	margin-left: 18px;
	height: 20px;
	font-family: Arial;
	font-size: 13px;
}
url 改为定义的图标
问题:修改css文件后 还是使用旧样式 重启pycharm 也无效
解决方案:安装的是allure-pytest 2.9.45版本 卸载后重新安装allure-pytest 版本 再去下载对应的allure文件
修改文件之后需要重新运行用例 生成allure报告
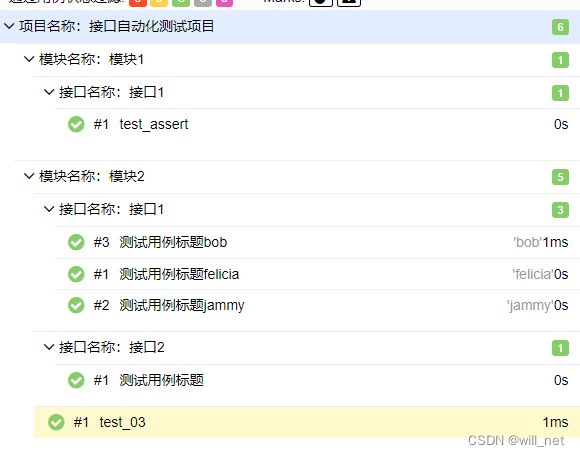
企业级allure报告定制
左边定制:
1、史诗(项目名称)
2、特性(模块名称)
3、分组(接口名称)
4、测试用例标题有两种方式
1、allure.dynamic.title("测试用例标题"+jiaju) 如果是需要做数据驱动就需要用该方式
2、@allure.title("测试用例标题")
import allure
import pytest
@pytest.fixture()
def sql():
    print("查询数据库 验证数据")
    yield '成功'
    print("关闭数据库连接")
@allure.epic("项目名称:接口自动化测试项目")
@allure.feature("模块名称:模块2")
class Test3Api:

    @allure.story("接口名称:接口1")

    def test_01(self,jiaju):
        print("felicia")
        allure.dynamic.title("测试用例标题"+jiaju)
        print(type(jiaju))
        print(jiaju)


    @allure.story("接口名称:接口2")
    @allure.title("测试用例标题")
    def test_02(self):
        print("jammy")
    def test_03(self):
        print("test")
import allure


@allure.epic("项目名称:接口自动化测试项目")
@allure.feature("模块名称:模块1")
class Test4Api:
    @allure.story("接口名称:接口1")
    def  test_assert(self):
        assert  1==1
右边定制
用例的严重程度
blocker 中断缺陷:致命bug、内存泄漏、数据泄露、系统崩溃
critical 临界缺陷:严重bug、功能未实现、重复提交
normal 一般缺陷:查询有误、大数据查询无响应
minor 次要缺陷:错别字、提示bug、颜色搭配不当、排列不整齐
trivial 轻微缺陷:必填项无提示
可以在用例上设置或者类上设置(如果整个类都是同一级别就在类上设置)
  @allure.story("接口名称:接口1")
    @allure.severity(allure.severity_level.BLOCKER)
    def test_01(self,jiaju):
        print("felicia")
        allure.dynamic.title("测试用例标题"+jiaju)
        print(type(jiaju))
        print(jiaju)
测试用例描述有两种方式
1、allure.dynamic.description(f"测试用例描述{jiaju}") 如果是需要做数据驱动就需要用该方式
2、@allure.description("用例描述")
测试用例链接定制
接口地址:
bug地址:
测试用例地址:
  @allure.story("接口名称:接口1")
    @allure.severity(allure.severity_level.BLOCKER)
    @allure.link(name="接口地址",url="")
    @allure.issue(name="bug地址",url="")
    @allure.testcase(name="测试用例地址",url="")
    def test_01(self,jiaju):
        print("felicia")
        allure.dynamic.title("测试用例标题"+jiaju)
        allure.dynamic.description(f"测试用例描述{jiaju}")
        print(type(jiaju))
        print(jiaju)
测试用例步骤定制
@allure.story("接口名称:接口1")
@allure.severity(allure.severity_level.BLOCKER)
@allure.link(name="接口地址",url="")
@allure.issue(name="bug地址",url="")
@allure.testcase(name="测试用例地址",url="")

def test_01(self,jiaju):
    print("felicia")
    allure.dynamic.title("测试用例标题"+jiaju)
    allure.dynamic.description(f"测试用例描述{jiaju}")
    for a in range(1,10):
        with allure.step(f"测试用例步骤{a}"):
            print(f"测试用例步骤{a}执行脚本")
    print(type(jiaju))
    print(jiaju)
测试用例附件的定制
web自动化附件定制
   # 附件定制 body 附件的内容, name = 附件的名称, attachment_type = 文件扩张名
        with open(r"C:\Users\Administrator\Desktop\1.jpg",mode="rb") as f:
            allure.attach(body=f.read(),name="错误截图",attachment_type=allure.attachment_type.JPG)
接口自动化附件定制
@allure.story("接口名称:接口1")
    @allure.severity(allure.severity_level.BLOCKER)
    @allure.link(name="接口地址",url="")
    @allure.issue(name="bug地址",url="")
    @allure.testcase(name="测试用例地址",url="")

    def test_01(self,jiaju):
        print("felicia")
        allure.dynamic.title("测试用例标题"+jiaju)
        allure.dynamic.description(f"测试用例描述{jiaju}")
        for a in range(1,10):
            with allure.step(f"测试用例步骤{a}"):
                print(f"测试用例步骤{a}执行脚本")
        print(type(jiaju))
        print(jiaju)
        # 附件定制 body 附件的内容, name = 附件的名称, attachment_type = 文件扩张名
        # web附件
        # with open(r"C:\Users\Administrator\Desktop\1.jpg",mode="rb") as f:
        #     allure.attach(body=f.read(),name="错误截图",attachment_type=allure.attachment_type.JPG)

        # 接口附件
        allure.attach(body="https://api.weixin.gg.com/cqi-bin/token", name="请求连接",attachment_type=allure.attachment_type.TEXT)

        allure.attach(body="get", name="请求方式", attachment_type=allure.attachment_type.TEXT)
        data={
            "grant type": "xxx",
            "appid": "xxx",
            "secret": "xxx"
        }

        allure.attach(body=json.dumps(data), name="请求参数", attachment_type=allure.attachment_type.TEXT)
        res=requests.get(url="https://api.weixin.gq.com/cgi-bin/token",params=data)
        allure.attach(body=res.text, name="响应数据", attachment_type=allure.attachment_type.TEXT)
allure 如何在本地访问
pycharm 自带容器服务
allure使用了两种方式来渲染页面。分别是 allure open 和 allure serve
在Terminal运行命令 allure open report/result(report/result为alluer报告地址),如果不想每次都写命令,直接在main函数中执行 如下:
os.system("allure open report/allure")
allure 数据驱动装饰器
第一种
    @allure.story("接口名称:接口2")
    @allure.title("测试用例标题")
    @allure.description("用例描述")
    @pytest.mark.parametrize("name",["felicia","jammy"])
    def test_02(self,name):
        print(name)
        allure.dynamic.description(name)
第二种
    @pytest.mark.parametrize("name,age", [["felicia",18], ["jammy",18]])
    def test_03(self,name,age):
        print(name,age)
yaml 只有两种数据
-开头是list
键值对 key:value
-
  name: "获取token接口"
  request:
      method: get
      url: "https://api.weixin.gg.com/cqi-bin/token"
      data:
        grant_type: "client_credential"
        appid: "xxx"
        secret: "xxx"
  validata: None
-
  name: "grant_type为空"
  request:
      method: get
      url: "https://api.weixin.qq.com/cgi-bin/token"
      data:
        grant_type:
        appid: "wx6b11b3efd1cdc290"
        secret: "106a9c6157c4db5f6029918738f9529d"
  validata: None
def read_yaml(path):
    with open(path,mode="r",encoding="utf-8") as f:
       return yaml.load(f,Loader=yaml.FullLoader)
@pytest.mark.parametrize("data", read_yaml("./testcases/date.yml"))

    def test_get_token(self,data):
        allure.dynamic.story(data["name"])
        allure.dynamic.title(data["name"])
        allure.dynamic.description(data["name"])
        allure.attach(data["request"]["url"],name="请求地址",attachment_type=allure.attachment_type.TEXT)
        allure.attach(data["request"]["method"], name="请求方式", attachment_type=allure.attachment_type.TEXT)
        allure.attach(json.dumps(data["request"]["data"]), name="请求数据", attachment_type=allure.attachment_type.TEXT)
        res=requests.get(data["request"]["url"])
        allure.attach(res.text, name="响应数据", attachment_type=allure.attachment_type.TEXT)
        print(data)


 5498
5498


 被折叠的 条评论
为什么被折叠?
被折叠的 条评论
为什么被折叠?
 到【灌水乐园】发言


