


文章目录
前言
单链表是一种物理存储结构上非连续、非顺序的存储结构,数据元素的逻辑顺序是通过链表中的指针链接次序实现的 。因为是由指针链接起来的,所以链表是由一个一个的结点链接起来。并且有带头结点和不带头结点的链表。既然要通过指针链接起来,所以我们需要结点中有一个指针来指向下一个结点,并且我们还需要存储数据,所以结点中还需要有存储数据的地方。因此就可以总结出,一个结点需要有:指针域 + 数据域。当每个结点链接起来就形成了单链表。
(1)不带头结点的单链表:

(2)带头结点的单链表:

总结:
1、观察我们会发现其实不管带不带头结点,都有一个指针指向第一个结点的,而这个指针我们也称之为头指针,即指向第一个结点的指针。
2、头结点的数据域不存储数据(也可存储链表长度),并且头结点的下一个结点才是我们真正要存储数据的结点,所以头结点的next指针域指向的才是真正的第一个存储数据的结点。
3、通过上面的图我们可以看出,每个结点的next都是指向下一个结点的地址的,只有当为最后一个结点时,我们通常才会使next指向NULL,这样可以很好的避免野指针的问题。
ps1:带不带头结点都可以,有时候带头结点是为了在有些场景下方便操作而已。
ps2:本文章将采用不带头的链表进行讲解!
1、单链表的定义
使用结构体来构造结点的结构。
typedef struct SListLink
{
	int data;//数据域
	struct SListLink* next;//指针域
}SLNode;
我们使用结构体来定义每个结点都需要的指针域和数据域。要想使指针能够指向下一个结点,指针的类型要与结构体一致。
2、结点的申请
我们需要在堆上来申请结点,所以我们使用malloc动态开辟出一块空间以表示一个结点。我们申请结点我们需要存储数据,所以我们可以给一个x形参以表示想要存储的数据。并且我们不想开辟出来的结点只能在Buy Node函数使用,所以我们把所申请好的结点返回。
SLNode* BuyNode(int x)//申请结点
{
	SLNode* newnode = (SLNode*)malloc(sizeof(SLNode));//动态开辟一个结点
	newnode->data = x;//把x数据存入结点的数据域
	newnode->next = NULL;//并且使该结点先指向NULL
	return newnode;//返回结点
}
3、单链表的插入
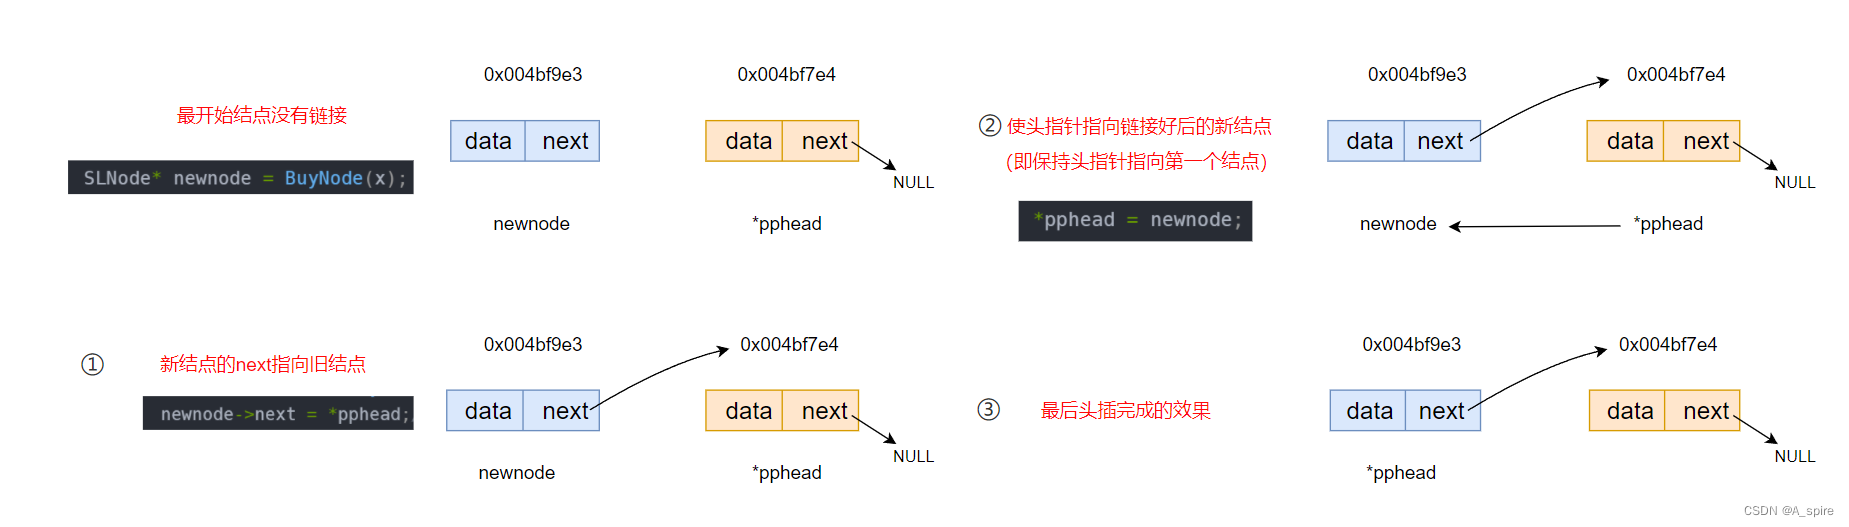
3.1、头插
void SListPushFront(SLNode** pphead, int x)//头插
{
	SLNode* newnode = BuyNode(x);
	newnode->next = *pphead;//无论链表空不空都可行
	*pphead = newnode;
}
3.2、尾插
void  SListPushBack(SLNode** pphead, int x)
{
	SLNode* newnode = BuyNode(x);
	if (*pphead==NULL)//如果本来就没有结点,那就将*pphead指向刚刚申请好的结点
	{
		*pphead = newnode;
	}
	else
	{
		SLNode* tail = *pphead;//保证*pphead一直指向头
		while (tail->next)//与(tail->next!=NULL)是一个意思,都是让tail到尾结点
		{
			tail = tail->next;
		}
		tail->next = newnode;
	}
}

3.3、在第i位插入
因为该功能的实现需要考虑的情况比较多,所以代码量的实现比较多,但这些都是不可缺少的,每一步我都会备注好,让大家尽可能的容易理解。
思路:
1、插入的位置要保证最少是第一位,不能出现第0位或小于0位的情况。
2、插入的位置要保证不能大于链表的长度。
3、插入的位置是第一位或最后一位,则我们只需要调用头插和尾插去实现即可。
4、插入的位置>1并且<链表长度的这个区间时:
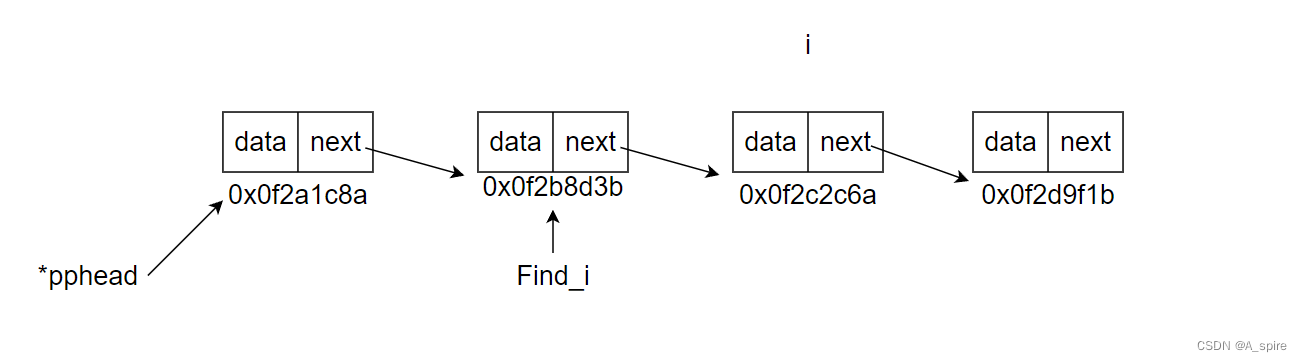
(1)我们要尽可能的不通过 *pphead 去改变链表,使 *pphead一直指向头结点。 所以我们定义一个 Find_i 指针让它和 *pohead 一样指向第一个头结点,之后我们就使用 Find_i 指针来改变链表。
(2)单链表可以很容易的往后找结点,但是无法往前找结点(这也是单链表的缺点)。
-
所以我们可以利用循环让刚刚定义的 Find_i 指针走到第 i-1位置,然后在定义一个tempnode指针指向待插入的第 i 位置(这样做是为了能够找到后面的结点)。
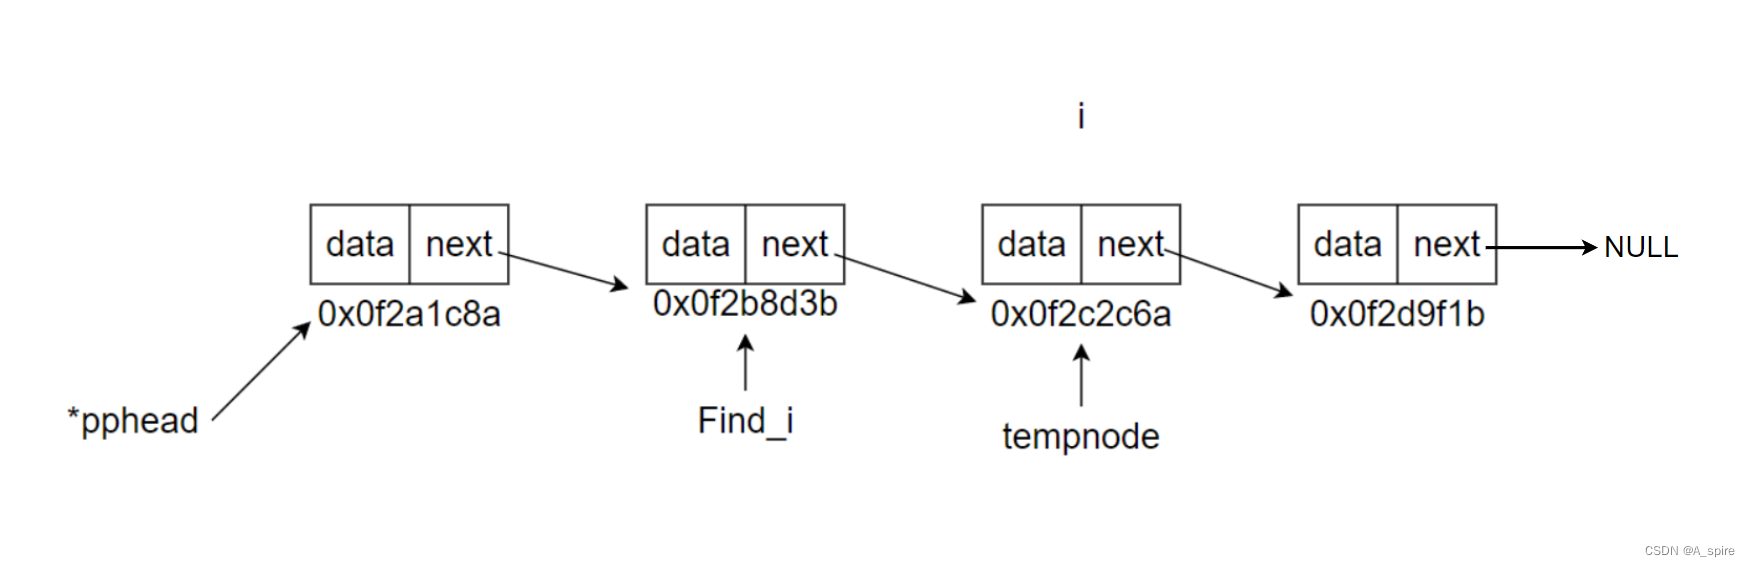
-
之后我们在定义一个newnode指针指向新结点,然后使在第i-1位的Find_i 指针中的next指向newnode(新结点)。
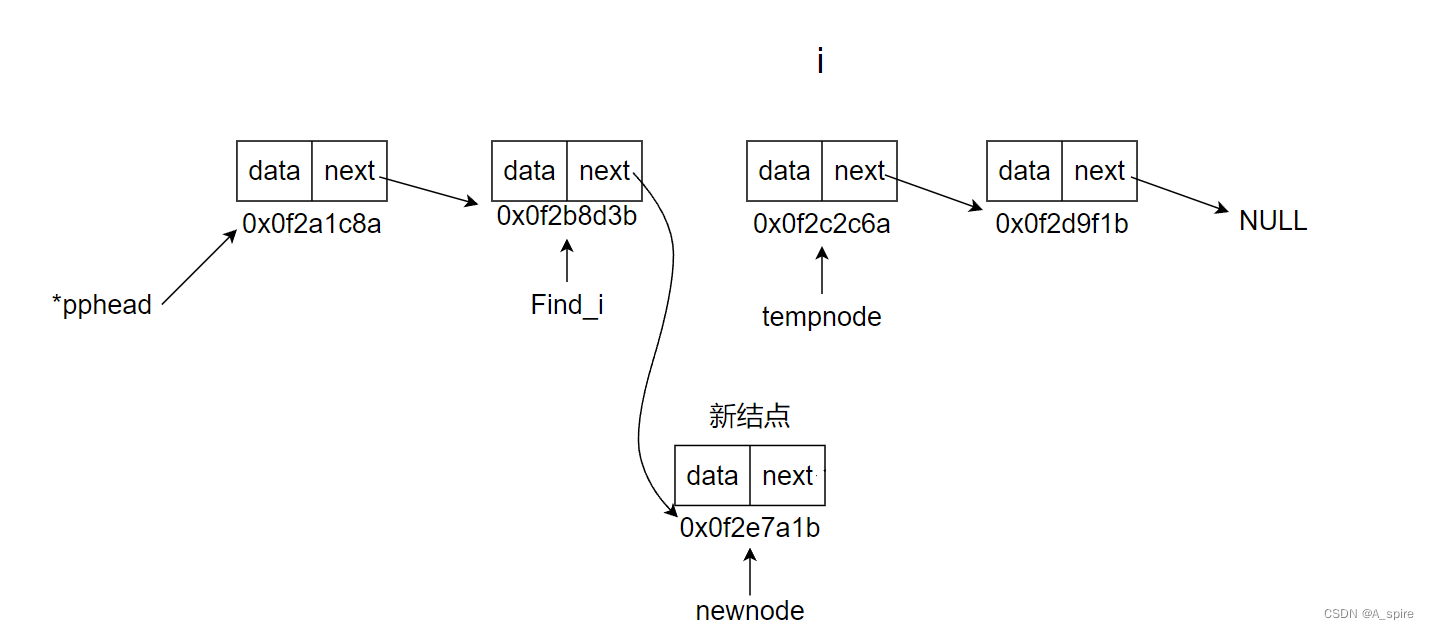
-
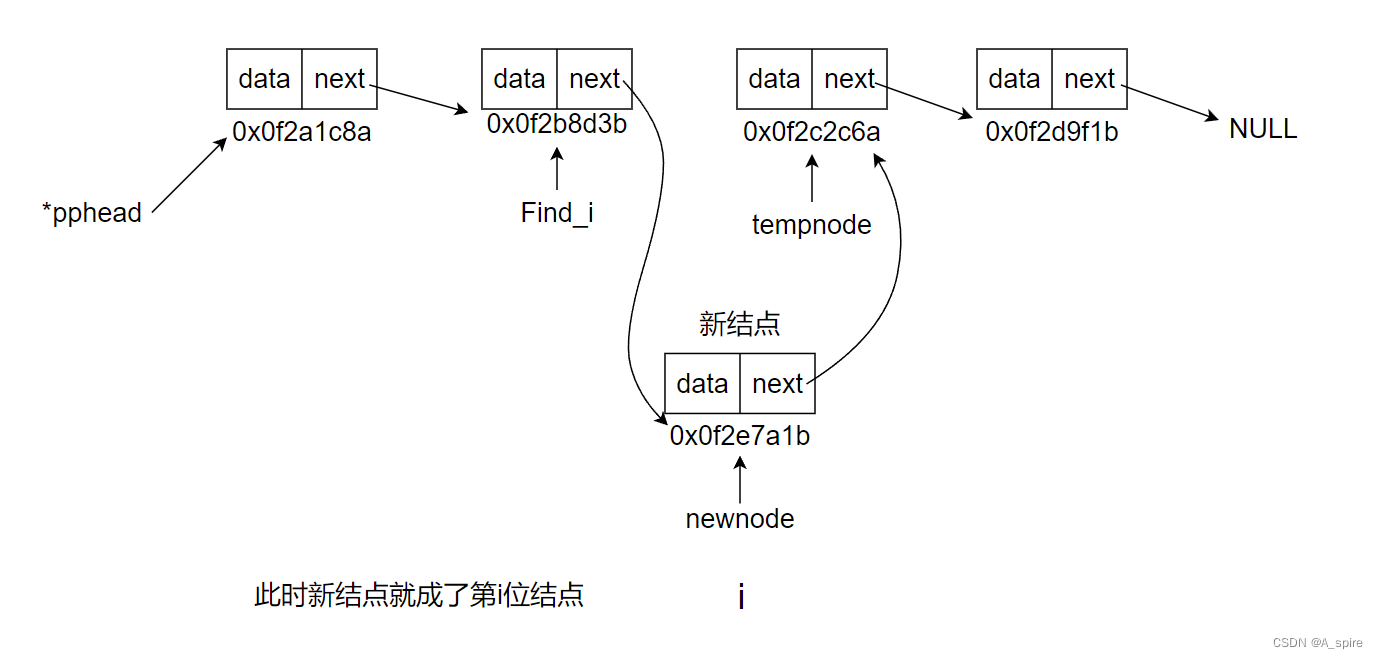
最后我们把newnode中的next指向我们之前定义的tempnode。这样就完成了整个过程!
void SListInsertI(SLNode** pphead,int i,int x)//在第i位插入
{
	int len = SListLength(*pphead);//获取链表长度
	assert( i > 0 && i < len);//如果i小于1或大于链表长度则报错

	if (i == 1)//如果要插入的是最后一位,则调头插。
	{
		SListPushFront(pphead, x);
	}
	else if (i == len)如果要插入的是最后一位,则调用尾插。
	{
		SListPushBack(pphead, x);
	}
	else
	{
		SLNode* Find_i = *pphead;
		for (int j = 1; j < i - 1; j++)//i-1是为了让Find_i在前一位,以方便链接。
		{
			Find_i = Find_i->next;
		}
		SLNode* tempnode = Find_i->next;
		SLNode* newnode = BuyNode(x);
		Find_i->next = newnode;
		newnode->next = tempnode;
	}
}
4、单链表的删除
4.1、头删
void SListPopFront(SLNode** pphead)
{
	assert(*pphead);
	SLNode* Next = (*pphead)->next;
	free(*pphead);
	*pphead = Next;
}

4.2、尾删
void SListPopBack(SLNode** pphead)
{
assert(*pphead!=NULL);//如果链表为空就不能在删了
SLNode* tail = *pphead;
if (tail->next==NULL)
{
free(tail);
tail = NULL;
}
else
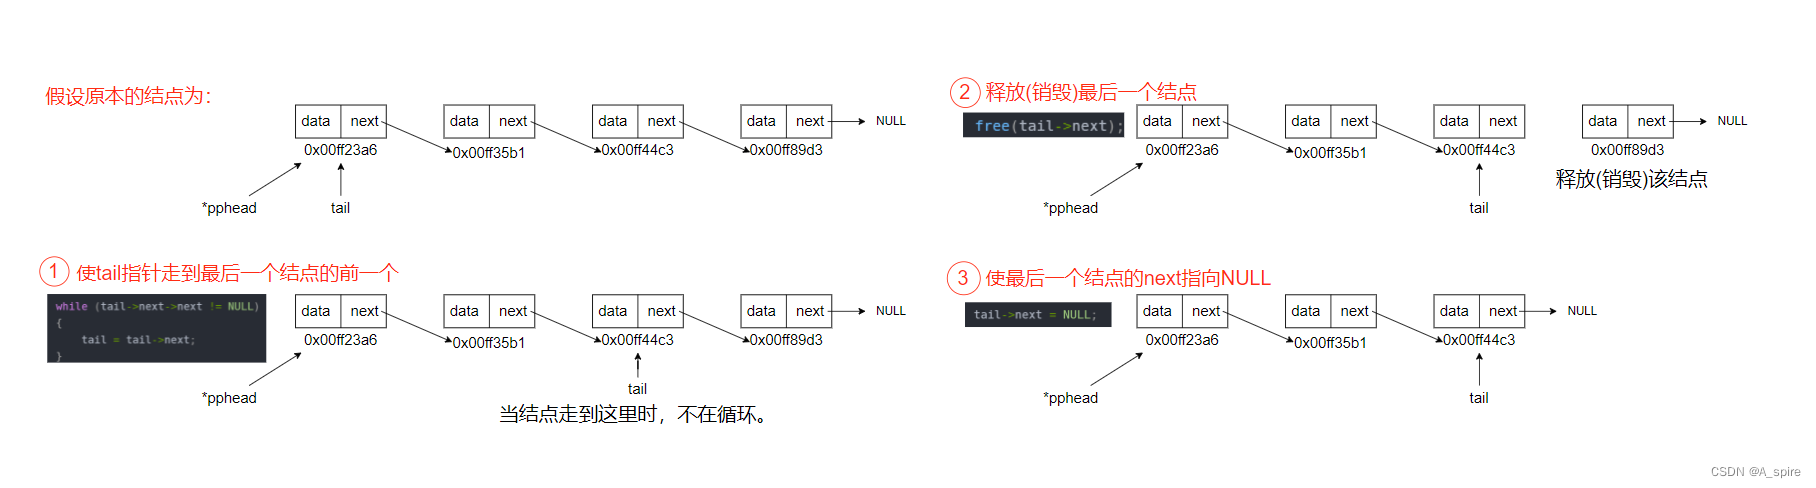
{
while (tail->next->next != NULL)
{
tail = tail->next;
}
free(tail->next);//释放最后一个结点
tail->next = NULL;
}
}
4.3、在第i位删除
该功能的实现大部分的思路都和前面的在第 i 位插入是差不多的。
思路:
1、删除的位置要保证最少是第一位,不能出现第0位或小于0位的情况。
2、删除的位置要保证不能大于链表的长度。
3、删除的位置是第一位或最后一位,则我们只需要调用头删和尾删去实现即可。
4、删除的位置>1并且<链表长度的这个区间时:
(1)同样的,我们可以先定义一个 Find_i 指针让它和 *pohead 一样指向第一个头结点,之后我们就使用 Find_i 指针来改变链表。
(2)同样的,因为单链表很容易往后找结点,但无法往前找结点(这也是单链表的缺点)。
-
所以我们可以利用循环让刚刚定义的 Find_i 指针走到第 i-1位置。
-
此时Find_i ->next就是待删除的第i位置的结点,我们在定义一个tempnode指针指向它,此时tempnode就指向了待删除的结点了。

-
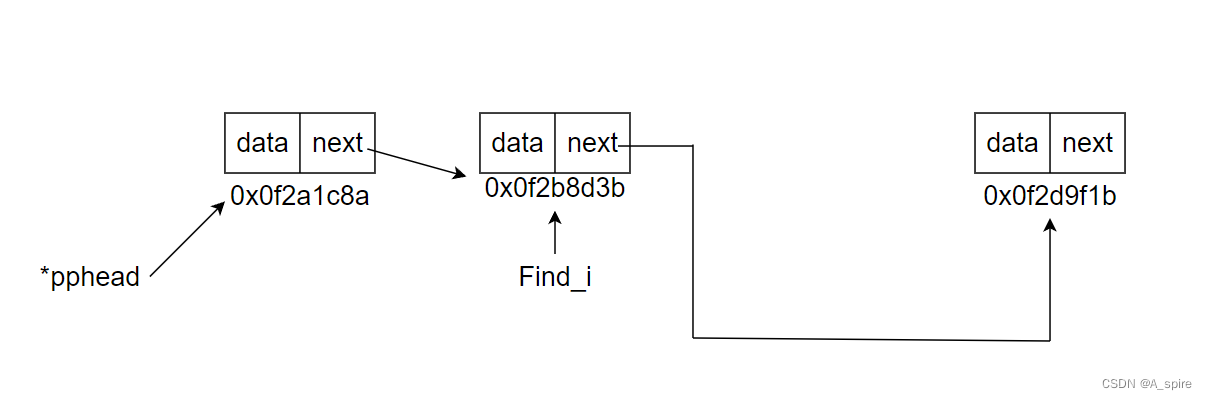
然后在使Find_i ->next指向待删除结点的下一个结点,即tempnode->next,这样就完成了链接。
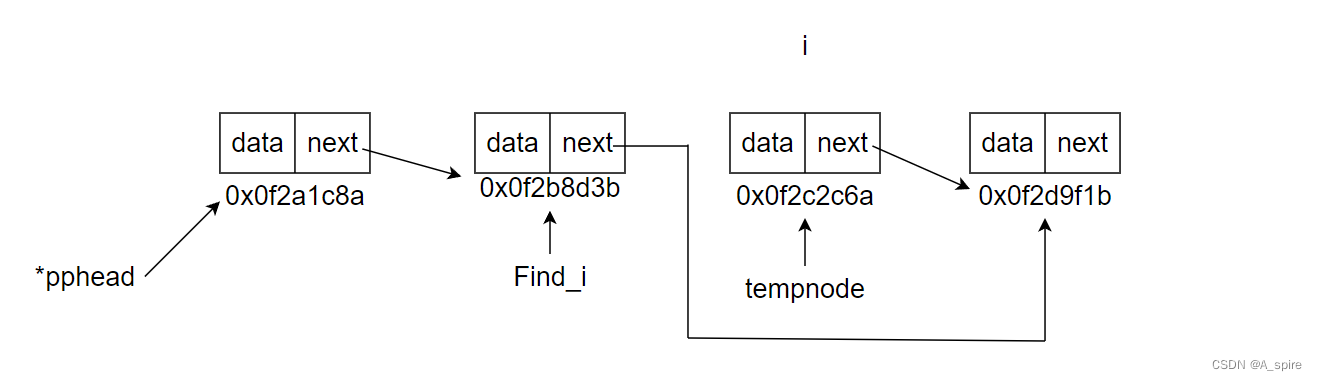
-
因为结点都是malloc出来的,所以最后我们使用free释放要删除的tempnode结点。
void SListDeleteI(SLNode** pphead,int i)//在第i位删除
{
	int len = SListLength(*pphead);//获取链表长度
	assert(i > 0 && i < len);//如果i小于1或大于链表长度则报错
	assert(*pphead != NULL);//链表为空时就报错。

	if (i == 1)//如果要插入的是第一位,则调用头删。
	{
		SListPopFront(pphead);
	}
	else if (i == len)//如果要插入的是最后一位,则调用尾删。
	{
		SListPopBack(pphead);
	}
	else
	{
		SLNode* Find_i = *pphead;
		for (int j = 1; j < i - 1; j++)
		{
			Find_i = Find_i->next;
		}
		SLNode* tempnode = Find_i->next;
		Find_i->next = tempnode->next;
		free(tempnode);
	}
}
6、单链表的查找
6.1、按值查找
SLNode* SListFindValue(SLNode* phead, int value)//按值查找
{
	SLNode* cur = phead;//使cur也指向头结点
	while (cur != NULL)
	{
		if (cur->data == value)
		{
			printf("查找pos:找到了pos是%d\n",cur->data);
			printf("\n");
			return cur;//返回找到的结点
		}
		cur = cur->next;
	}
		printf("没找到\n");
		printf("\n");
		return NULL;//没找到则返回空
}
6.2、按位查找
SLNode* SListFindBit(SLNode* phead, int bit)//按位查找
{
	int len = SListLength(phead);//获取链表长度
	assert(bit >= 1 && bit <= len);//要找的位置小于1或大于链表长度则报错。
	SLNode* Find_bit = phead;//使Find_i也指向头结点

	for (int i = 1; i < bit; i++)//遍历找到第bit位结点
	{
		Find_bit = Find_bit->next;
	}
	printf("按位查找:第%d位的值为%d\n", bit, Find_bit->data);
	return Find_bit;//返回第bit位的结点
}
6.3、两者查找到后的更多的操作:
说明:
我们查找完返回的值我们外面用pos指针来接收,接下来的操作对pos的要求就是必须是一个有效结点,即pos不能等于NULL,这也意味着只有在“按值查找” 中才有可能返回NULL,而如果返回的是NULL,这也说明我们刚刚所要查找的值并不在链表中。所以我们接下来的操作,第一步就是对pos进行有效判断。
插入操作:
6.3.1、在第pos - 1位置插入
思路:
1、当pos等于头结点时,我们可以直接调用头插。
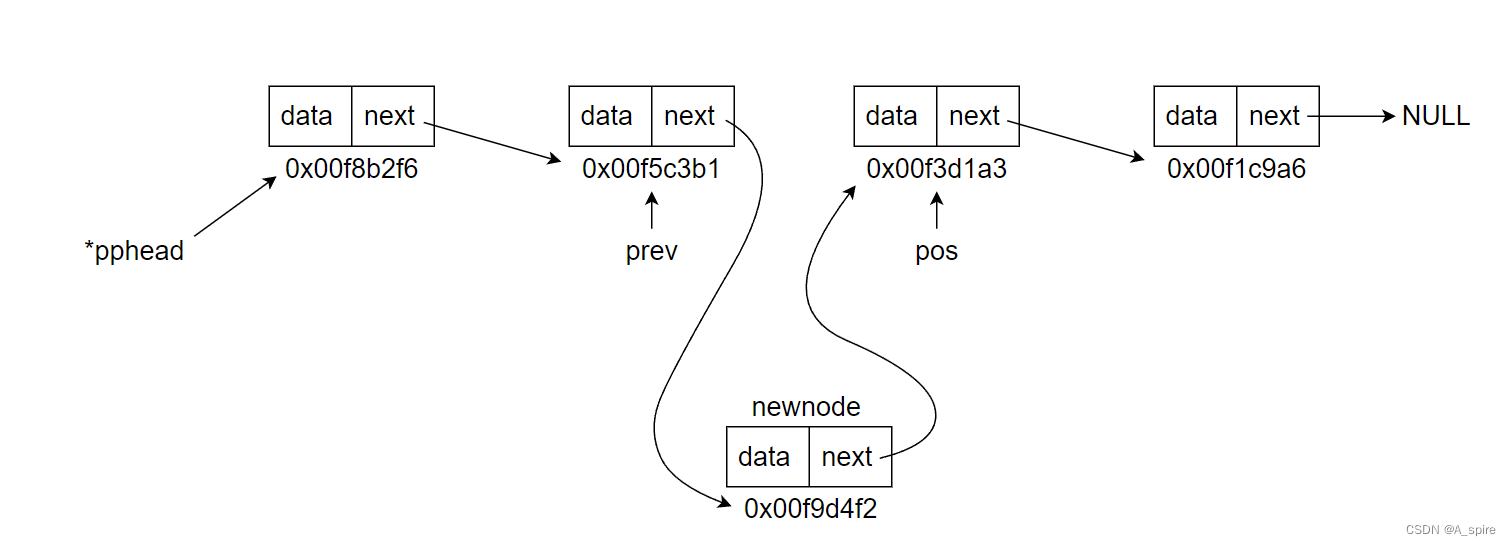
2、我们定义一个prev指针指向头结点,在利用循环使prev走到pos结点的前一个结点。

3、接着我们在定义一个newnode指针指向新结点,然后使prev中的next指向newnode新结点。

4、最后我们把newnode新结点中的next指向pos,这样就完成了在第pos-1位置插入了。
注意点:
(1)当pos等于最后一个结点时,我们不可以直接调用尾插,因为我们要插入的位置是pos-1的位置。
(2)pos指针如果是NULL,那么就说明我们在 “按值查找” 时,要查找的值并不存在于链表中,所以才返回NULL。也进一步说明pos并不指向一个有效的结点,所以我们需要pos进行有效判断。
void SListInsertFront(SLNode** pphead, SLNode* pos, int x)//在第pos - 1位置插入
{
	assert(pos != NULL);//pos==NULL时程序就报错
	if (*pphead == pos)
	{
		SListPushFront(pphead, x);
	}
	else
	{
		SLNode* prev = *pphead;
		while (prev->next != pos)
		{
			prev = prev->next;
		}
		SLNode* newnode = BuyNode(x);
		prev->next = newnode;
		newnode->next = pos;
	}
}
6.3.2、在第pos +1位置插入
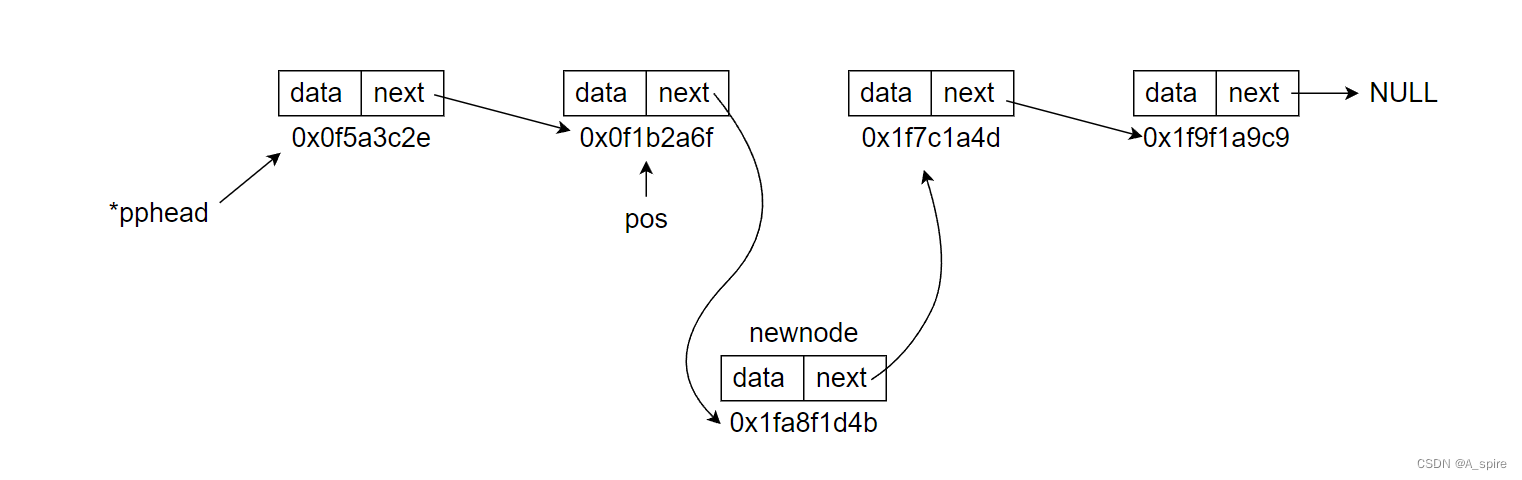
思路:
1、先使newnode新结点中的next指向pos的下一个结点。
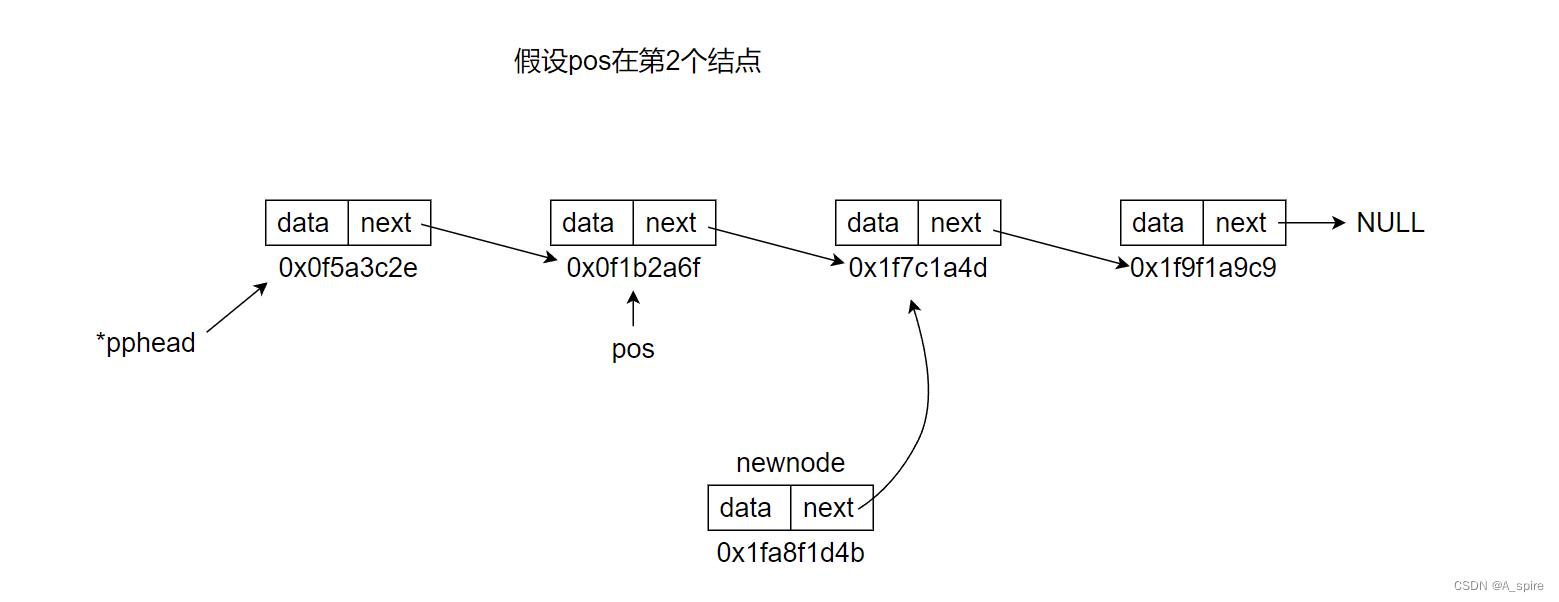
2、然后在使pos中的next指向newnode新结点。
void SListInsertAfter(SLNode* pos, int x)//在第pos +1位置插入
{
	assert(pos != NULL);//同样的需要对pos进行有效判断
	SLNode* newnode = BuyNode(x);
	newnode->next = pos->next;
	pos->next = newnode;
}
删除操作:
6.3.3、删除pos +1的位置
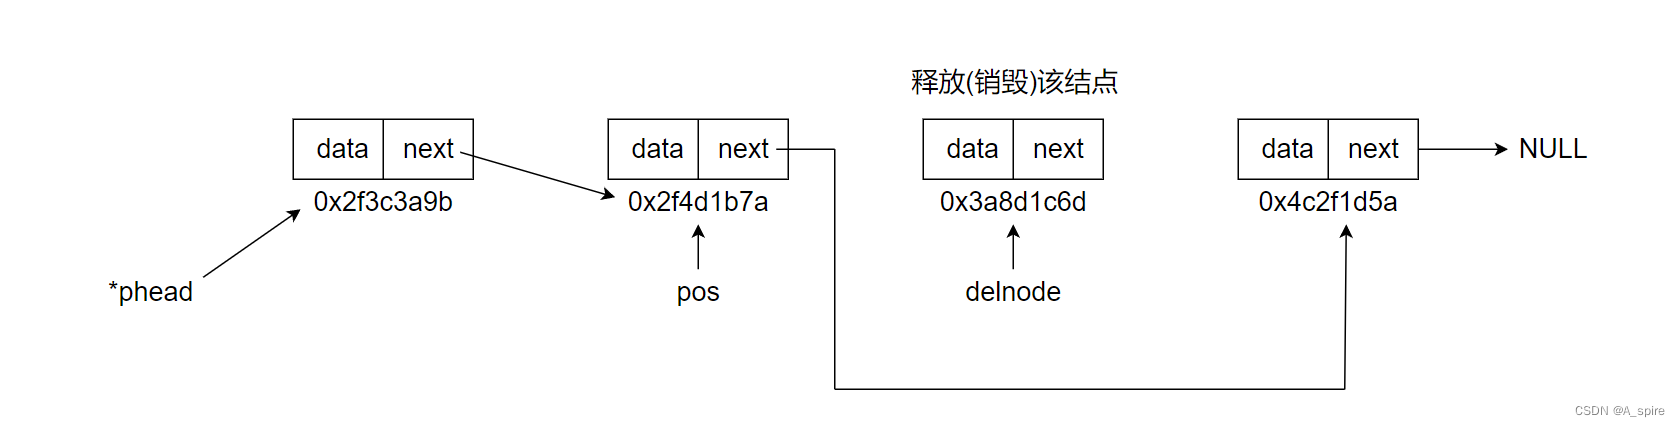
思路:
1、我们可以定义一个delnode指针先指向pos结点的下一个结点。

2、然后在使pos中的next指向delnode的下一个结点。
void SListDeleteAfter(SLNode* pos)//删除pos +1的位置
{
	assert(pos != NULL);
	if (pos->next == NULL)//如果pos是最后一个则不用删了。
	{
		return;
	}
	else
	{
		SLNode* delnode = pos->next;
		pos->next = delnode->next;
		free(delnode);
	}
}
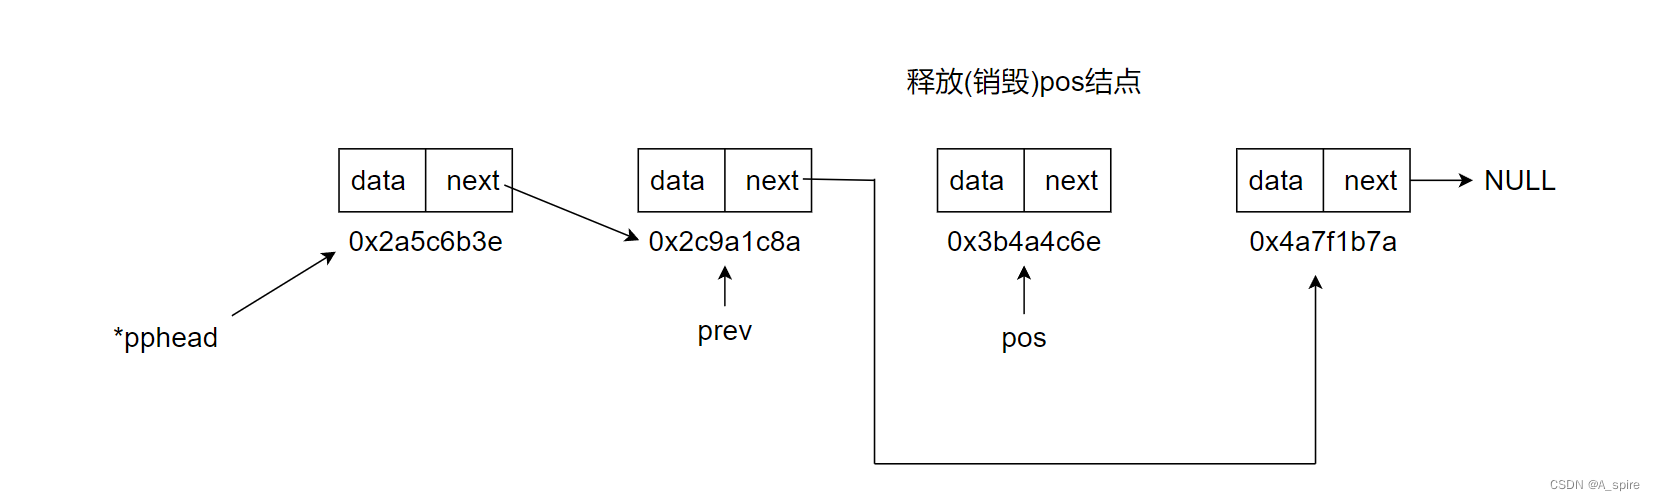
6.3.4、删除pos的位置
思路:
1、如果pos等于头结点,我们可以直接调用头删即可。
2、同样的,我们定义一个prev指针指向头结点,接着利用循环使prev走到pos结点的前一个结点。

3、接着我们使prev中的next指向pos的下一个结点。
void SListDeletePos(SLNode** pphead, SLNode* pos)//删除pos的位置
{
	assert(pos);//与pos!=NULL等价,如果pos为NULL则报错。
	if (*pphead==pos)
	{
		SListPopFront(pphead);
	}
	else
	{
		SLNode* prev = *pphead;
		while (prev->next != pos)
		{
			prev = prev->next;
		}
		prev->next = pos->next;
		free(pos);
	}
}
7、求链表的长度
int SListLength(SLNode* pphead)//求链表的长度
{
	int count = 0;
	SLNode* Len = pphead;
	while (Len!=NULL)//每遍历一个结点就conut+1
	{
		count++;
		Len = Len->next;
	}
	return count;
}
8、单链表的打印
void SListPrint(SLNode* pphead)//打印单链表
{
	while (pphead != NULL)
	{
		printf("%d->", pphead->data);
		pphead = pphead->next;
	}
	printf("NULL\n");
	printf("\n");
}
9、单链表的销毁
void SListDestroy(SLNode** pphead)//单链表销毁
{
	SLNode* cur = *pphead;
	while (cur != NULL)
	{
		SLNode* next = cur->next;
		free(cur);
		cur = next;
	}
	*pphead = NULL;
}
10、完整代码
10.1、SList.h
头文件:声明函数
#include<stdio.h>
#include<stdlib.h>
#include<assert.h>
//定义结点的结构
typedef struct SListLink
{
	int data;
	struct SListLink* next;
}SLNode;

SLNode* BuyNode(int x);//申请结点
void SListPushFront(SLNode** pphead, int x);//头插
void SListPushBack(SLNode** pphead, int x);//尾插
void SListInsertI(SLNode** pphead, int i, int x);//在第i位插入
void SListPopFront(SLNode** phead);//头删
void SListPopBack(SLNode** pphead);//尾删
void SListDeleteI(SLNode** pphead, int i);//删除第i位
SLNode* SListFindValue(SLNode* pphead, int value);//按值查找
SLNode* SListFindBit(SLNode* pphead, int bit);//按位查找
void SListInsertAfter(SLNode* pos, int x);//在第pos+1位置插入
void SListInsertFront(SLNode** pphead, SLNode* pos, int x);//在第pos-1位置插入
void SListDeleteAfter(SLNode* pos);//删除pos+1的位置
void SListDeletePos(SLNode** pphead, SLNode* pos);//删除pos的位置
int SListLength(SLNode* pphead);//求链表长度
void SListPrint(SLNode* p);//打印链表
void SListDestroy(SLNode** pphead);//链表的销毁
10.2、SList.c
源文件:函数功能实现
SLNode* BuyNode(int x)//申请结点
{
	SLNode* newnode = (SLNode*)malloc(sizeof(SLNode));//动态开辟一个结点
	newnode->data = x;//把x数据存入结点的数据域
	newnode->next = NULL;//并且使该结点先指向NULL
	return newnode;//返回结点
}


void SListPushFront(SLNode** pphead, int x)//头插
{
	SLNode* newnode = BuyNode(x);
	newnode->next = *pphead;//无论链表空不空都可行
	*pphead = newnode;
}


void  SListPushBack(SLNode** pphead, int x)//尾插
{
	SLNode* newnode = BuyNode(x);
	if (*pphead == NULL)//如果本来就没有结点,那就将*pphead指向刚刚申请好的结点
	{
		*pphead = newnode;
	}
	else
	{
		SLNode* tail = *pphead;//保证*pphead一直指向头
		while (tail->next)//与(tail->next!=NULL)是一个意思,都是让tail到尾结点
		{
			tail = tail->next;
		}
		tail->next = newnode;
	}
}


void SListInsertI(SLNode** pphead, int i, int x)//在第i位插入
{
	int len = SListLength(*pphead);//获取链表长度
	assert(i > 0 && i <= len);//如果i小于1或大于链表长度则报错

	if (i == 1)//如果要插入的是最后一位,则调头插。
	{
		SListPushFront(pphead, x);
	}
	else if (i == len)如果要插入的是最后一位,则调用尾插。
	{
		SListPushBack(pphead, x);
	}
	else
	{
		SLNode* Find_i = *pphead;
		for (int j = 1; j < i - 1; j++)//i-1是为了让Find_i在前一位,以方便链接。
		{
			Find_i = Find_i->next;
		}
		SLNode* tempnode = Find_i->next;
		SLNode* newnode = BuyNode(x);
		Find_i->next = newnode;
		newnode->next = tempnode;
	}
}


void SListPopFront(SLNode** pphead)//头删
{
	assert(*pphead);
	SLNode* Next = (*pphead)->next;
	free(*pphead);
	*pphead = Next;
}


void SListPopBack(SLNode** pphead)//尾删
{
	assert(*pphead != NULL);//如果链表为空就不能在删了

	SLNode* tail = *pphead;
	if (tail->next == NULL)
	{
		free(tail);
		tail = NULL;
	}
	else
	{
		while (tail->next->next != NULL)
		{
			tail = tail->next;
		}
		free(tail->next);//释放最后一个结点
		tail->next = NULL;
	}
}


void SListDeleteI(SLNode** pphead, int i)//在第i位删除
{
	int len = SListLength(*pphead);//获取链表长度
	assert(i > 0 && i <= len);//如果i小于1或大于链表长度则报错
	assert(*pphead != NULL);//链表为空时就报错。

	if (i == 1)//如果要插入的是第一位,则调用头删。
	{
		SListPopFront(pphead);
	}
	else if (i == len)//如果要插入的是最后一位,则调用尾删。
	{
		SListPopBack(pphead);
	}
	else
	{
		SLNode* Find_i = *pphead;
		for (int j = 1; j < i - 1; j++)
		{
			Find_i = Find_i->next;
		}
		SLNode* tempnode = Find_i->next;
		Find_i->next = tempnode->next;
		free(tempnode);
	}
}


SLNode* SListFindValue(SLNode* phead, int value)//按值查找
{
	SLNode* cur = phead;//使cur也指向头结点
	while (cur != NULL)
	{
		if (cur->data == value)
		{
			printf("查找pos:找到了pos是%d\n", cur->data);
			printf("\n");
			return cur;//返回找到的结点
		}
		cur = cur->next;
	}
	printf("没找到\n");
	printf("\n");
	return NULL;//没找到则返回空
}


SLNode* SListFindBit(SLNode* phead, int bit)//按位查找
{
	int len = SListLength(phead);//获取链表长度
	assert(bit >= 1 && bit <= len);//要找的位置小于1或大于链表长度则报错。
	SLNode* Find_bit = phead;//使Find_i也指向头结点

	for (int i = 1; i < bit; i++)//遍历找到第bit位结点
	{
		Find_bit = Find_bit->next;
	}
	printf("按位查找:第%d位的值为%d\n", bit, Find_bit->data);
	return Find_bit;//返回第bit位的结点
}


void SListInsertFront(SLNode** pphead, SLNode* pos, int x)//在第pos - 1位置插入
{
	assert(pos != NULL);//pos==NULL时程序就报错
	if (*pphead == pos)
	{
		SListPushFront(pphead, x);
	}
	else
	{
		SLNode* prev = *pphead;
		while (prev->next != pos)
		{
			prev = prev->next;
		}
		SLNode* newnode = BuyNode(x);
		prev->next = newnode;
		newnode->next = pos;
	}
}


void SListInsertAfter(SLNode* pos, int x)//在第pos +1位置插入
{
	assert(pos != NULL);//同样的需要对pos进行有效判断
	SLNode* newnode = BuyNode(x);
	newnode->next = pos->next;
	pos->next = newnode;
}


void SListDeleteAfter(SLNode* pos)//删除pos +1的位置
{
	assert(pos != NULL);
	if (pos->next == NULL)//如果pos是最后一个则不用删了。
	{
		return;
	}
	else
	{
		SLNode* delnode = pos->next;
		pos->next = delnode->next;
		free(delnode);
	}
}


void SListDeletePos(SLNode** pphead, SLNode* pos)//删除pos的位置
{
	assert(pos);//与pos!=NULL等价,如果pos为NULL则报错。
	if (*pphead == pos)
	{
		SListPopFront(pphead);
	}
	else
	{
		SLNode* prev = *pphead;
		while (prev->next != pos)
		{
			prev = prev->next;
		}
		prev->next = pos->next;
		free(pos);
	}
}


int SListLength(SLNode* pphead)//求链表的长度
{
	int count = 0;
	SLNode* Len = pphead;
	while (Len != NULL)//每遍历一个结点就conut+1
	{
		count++;
		Len = Len->next;
	}
	return count;
}


void SListPrint(SLNode* pphead)//打印单链表
{
	while (pphead != NULL)
	{
		printf("%d->", pphead->data);
		pphead = pphead->next;
	}
	printf("NULL\n");
	printf("\n");
}


void SListDestroy(SLNode** pphead)//单链表销毁
{
	SLNode* cur = *pphead;
	while (cur != NULL)
	{
		SLNode* next = cur->next;
		free(cur);
		cur = next;
	}
	*pphead = NULL;
}
10.3、Test.c
源文件:功能测试
int main()
{
	SLNode* plist = BuyNode(2);//创建一个结点

	printf("头插:\n");
	SListPushFront(&plist, 12);//头插
	SListPushFront(&plist, 8);//头插
	SListPrint(plist);//打印

	printf("尾插:\n");
	SListPushBack(&plist, 4);//尾插
	SListPushBack(&plist,19);//尾插
	SListPrint(plist);//打印


	printf("在第i位插入:\n");
	SListInsertI(&plist, 2,97);//在第i位插入数据97
	SListPrint(plist);//打印


	printf("头删:\n");
	SListPopFront(&plist);//头删
	SListPrint(plist);//打印


	printf("尾删:\n");
	SListPopBack(&plist);
	SListPrint(plist);//打印


	printf("在第i位删除:\n");
	SListDeleteI(&plist, 4);//在第i位删除
	SListPrint(plist);//打印


	printf("按值查找:\n");
	SLNode* pos = SListFindValue(plist, 97);

	//printf("按位查找:\n");
	//SLNode* pos = SListFindBit(plist, 2);


	printf("在第pos+1位置插入:\n");
	SListInsertAfter(pos, 32);//在第pos+1位置插入
	SListPrint(plist);//打印


	printf("在第pos-1位置插入:\n");
	SListInsertFront(&plist, pos, 14);//在第pos-1位置插入
	SListPrint(plist);//打印

	printf("删除pos+1位置");
	SListDeleteAfter(pos);//删除pos+1位置
	SListPrint(plist);//打印

	printf("删除pos位置:");
	SListDeletePos(&plist, pos);//删除pos的位置
	SListPrint(plist);//打印


	printf("链表长度为:%d\n", SListLength(plist));//求链表长度


	printf("\n");
	printf("已成功销毁链表!\n");
	SListDestroy(&plist);//销毁链表

	return 0;
}
10.4、效果图


 3961
3961


 被折叠的 条评论
为什么被折叠?
被折叠的 条评论
为什么被折叠?
 到【灌水乐园】发言


