


前言
这里提供Spring的几个网站,都是官方的,感觉需要以后好好啃一啃的源码,里面也有很多配置、写法可以借鉴
Spring-framework官网http://projects.spring.io/spring-framework
例子showcase,里面有很多可借鉴配置https://github.com/spring-projects/spring-mvc-showcase
官方宠物医院例子https://github.com/spring-projects/spring-petclinic
绿房子应用https://github.com/spring-projects/greenhouse
Spring-boot https://github.com/spring-projects/spring-boot
配置文件
web.xml
说明都写在注释里面了
<?xml version="1.0" encoding="UTF-8"?>
<web-app xmlns:xsi="http://www.w3.org/2001/XMLSchema-instance"
         xmlns="http://java.sun.com/xml/ns/javaee"
         xsi:schemaLocation="http://java.sun.com/xml/ns/javaee http://java.sun.com/xml/ns/javaee/web-app_2_5.xsd"
         id="WebApp_ID" version="2.5">

  <display-name>Archetype Created Web Application</display-name>

  <!--转码用的过滤器,直接使用Spring自带的转码过滤器,过滤的url设置为所有-->
  <filter>
    <filter-name>characterEncodingFilter</filter-name>
    <filter-class>org.springframework.web.filter.CharacterEncodingFilter</filter-class>
    <init-param>
      <param-name>encoding</param-name>
      <param-value>UTF-8</param-value>
    </init-param>
    <init-param>
      <param-name>forceEncoding</param-name>
      <param-value>true</param-value>
    </init-param>
  </filter>
  <filter-mapping>
    <filter-name>characterEncodingFilter</filter-name>
    <url-pattern>/*</url-pattern>
  </filter-mapping>

  <!--负责监听web容器启动和关闭的事件,可以看类的源码-->
  <listener>
    <listener-class>org.springframework.web.context.request.RequestContextListener</listener-class>
  </listener>

  <!--将web容器和spring容器进行整合的一个监听器,
  通过这个监听器加载applicationContext.xml-->
  <listener>
    <listener-class>org.springframework.web.context.ContextLoaderListener</listener-class>
  </listener>
  <context-param>
    <param-name>contextConfigLocation</param-name>
    <param-value>classpath:applicationContext.xml</param-value>
  </context-param>

  <!--配置SpringMVC的servlet,根据mapping配置,springMVC会拦截所有*.do的请求-->
  <servlet>
    <servlet-name>dispatcher</servlet-name>
    <servlet-class>org.springframework.web.servlet.DispatcherServlet</servlet-class>
    <!--load-on-startup表示优先级,大于等于0就是容器启动时就会初始化这个servlet,
    不配置或者小于0只有在调用的时候才初始化-->
    <load-on-startup>1</load-on-startup>
  </servlet>

  <servlet-mapping>
    <servlet-name>dispatcher</servlet-name>
    <url-pattern>*.do</url-pattern>
  </servlet-mapping>

</web-app>
applicationContext.xml
Spring主配置
这个文件没什么好说的,copy过来,根据我自己的情况稍作修改
<?xml version="1.0" encoding="UTF-8"?>
<beans xmlns="http://www.springframework.org/schema/beans"
       xmlns:xsi="http://www.w3.org/2001/XMLSchema-instance" xmlns:aop="http://www.springframework.org/schema/aop"
       xmlns:tx="http://www.springframework.org/schema/tx" xmlns:jdbc="http://www.springframework.org/schema/jdbc"
       xmlns:context="http://www.springframework.org/schema/context"
       xsi:schemaLocation="
     http://www.springframework.org/schema/context http://www.springframework.org/schema/context/spring-context.xsd
     http://www.springframework.org/schema/beans http://www.springframework.org/schema/beans/spring-beans.xsd
     http://www.springframework.org/schema/tx http://www.springframework.org/schema/tx/spring-tx.xsd
     http://www.springframework.org/schema/aop http://www.springframework.org/schema/aop/spring-aop.xsd">

    <!--自动扫描这个包的注解,方便使用注解注入-->
    <context:component-scan base-package="top.winxblast.happymall" annotation-config="true"/>

    <!--<context:annotation-config/>-->
    <!--aop的配置-->
    <aop:aspectj-autoproxy/>

    <!--将当前spring配置文件进行分离,分离成几个不同的文件,使有条理-->
    <import resource="applicationContext-datasource.xml"/>

</beans>
applicationContext-datasource.xml
这里也能复用到一个在4-9中用到的文件datasource.properties,不过还需要额外再添加一些内容
# 连接池启动时的初始值
db.initialSize = 20
#连接池的最大值
db.maxActive = 50
# 最大空闲值,当经过一个高峰时间后,连接池可以慢慢将已经用不到的连接慢慢释放一部分,一直减小到maxIdle为止
db.maxIdle = 20
# 最小空闲值,当空闲的连接数少于阈值时,连接池就会预申请一些连接,以免洪峰来时来不及申请
db.minIdle = 10
# 最大建立连接等待时间。如果超过此时间将接到异常。设为1表示无限制
db.maxWait = 10
# 自动提交事务
db.defaultAutoCommit = true
# 连接的超时时间,默认为半小时
db.minEvictableIdleTimeMillis = 3600000
以下是applicationContext-datasource.xml
<?xml version="1.0" encoding="UTF-8"?>
<beans xmlns="http://www.springframework.org/schema/beans"
       xmlns:xsi="http://www.w3.org/2001/XMLSchema-instance"
       xmlns:aop="http://www.springframework.org/schema/aop"
       xmlns:tx="http://www.springframework.org/schema/tx"
       xmlns:jdbc="http://www.springframework.org/schema/jdbc"
       xmlns:context="http://www.springframework.org/schema/context"
       xsi:schemaLocation="
     http://www.springframework.org/schema/context
     http://www.springframework.org/schema/context/spring-context.xsd
     http://www.springframework.org/schema/beans
     http://www.springframework.org/schema/beans/spring-beans.xsd
     http://www.springframework.org/schema/tx
     http://www.springframework.org/schema/tx/spring-tx.xsd
     http://www.springframework.org/schema/aop
     http://www.springframework.org/schema/aop/spring-aop.xsd">

    <context:component-scan base-package="top.winxblast.happymall" annotation-config="true"/>

    <!--将配置Spring的一些常量分离到配置文件中-->
    <bean id="propertyConfigurer"
          class="org.springframework.beans.factory.config.PropertyPlaceholderConfigurer">
        <property name="order" value="2"/>
        <property name="ignoreUnresolvablePlaceholders" value="true"/>
        <property name="locations">
            <list>
                <value>classpath:datasource.properties</value>
            </list>
        </property>
        <property name="fileEncoding" value="utf-8"/>
    </bean>

    <!--dbcp连接池-->
    <bean id="dataSource" class="org.apache.commons.dbcp.BasicDataSource"
          destroy-method="close">
        <property name="driverClassName" value="${db.driverClassName}"/>
        <property name="url" value="${db.url}"/>
        <property name="username" value="${db.username}"/>
        <property name="password" value="${db.password}"/>
        <!--连接池启动时的初始值-->
        <property name="initialSize" value="${db.initialSize}"/>
        <!--连接池的最大值-->
        <property name="maxActive" value="${db.maxActive}"/>
        <!--最大空闲值,当经过一个高峰时间后,连接池可以慢慢将已经用不到的
        连接慢慢释放一部分,一直减小到maxIdle为止-->
        <property name="maxIdle" value="${db.maxIdel}"/>
        <!--最小空闲值,当空闲的连接数少于阈值时,连接池就会预申请一些连接,
        以免洪峰来时来不及申请-->
        <property name="minIdle" value="${db.minIdel}"/>
        <!--最大建立连接等待时间。如果超过此时间将接到异常。设为1表示无限制-->
        <property name="maxWait" value="${db.maxWait}"/>
        <!--#给出一条简单的sql语句进行验证 -->
        <!--<property name="validationQuery" value="select getdate()" />-->

        <!--自动提交事务-->
        <property name="defaultAutoCommit" value="${db.defaultAutoCommit}"/>

        <!-- 回收被遗弃的(一般是忘了释放的)数据库连接到连接池中 -->
        <!--<property name="removeAbandoned" value="true" />-->
        <!-- 数据库连接过多长时间不用将被视为被遗弃而收回连接池中 -->
        <!--<property name="removeAbandonedTimeout" value="120" />-->

        <!--连接的超时时间,默认为半小时-->
        <property name="minEvictableIdleTimeMillis"
                  value="${db.minEvictableIdleTimeMillis}"/>

        <!--失效检查线程运行时间间隔,要小于MySQL默认-->
        <property name="timeBetweenEvictionRunsMillis" value="40000"/>
        <!--检查连接是否有效的SQL语句-->
        <property name="testWhileIdle" value="true"/>
        <!--检查连接有效性的SQL语句-->
        <property name="validationQuery" value="SELECT 1 FROM dual"/>
    </bean>

    <bean id="sqlSessionFacory" class="org.mybatis.spring.SqlSessionFactoryBean">
        <!--把上面那个bean装入-->
        <property name="dataSource" ref="dataSource"/>
        <!--关于classpath classpath*:的出现是为了从多个jar文件中加载相同的文件
        classpath:只能加载找到的第一个文件,具体的请再次搜索-->
        <!--把mybatis配置都读到-->
        <property name="mapperLocations" value="classpath*:mappers/*Mapper.xml"/>

        <!--分页插件-->
        <property name="plugins">
            <array>
                <bean class="com.github.pagehelper.PageHelper">
                    <property name="properties">
                        <!--配置方言-->
                        <value>dialect=mysql</value>
                    </property>
                </bean>
            </array>
        </property>
    </bean>

    <!--扫描dao层接口的包-->
    <bean name="mapperScannerConfigurer"
          class="org.mybatis.spring.mapper.MapperScannerConfigurer">
        <property name="basePackage" value="top.winxblast.happymall.dao"/>
    </bean>

    <!--使用@Transactional进行声明式事务管理需要声明下面这行-->
    <tx:annotation-driven transaction-manager="transactionManager"
                          proxy-target-class="true"/>
    <!--事务管理-->
    <bean id="transactionManager" class="org.springframework.jdbc.datasource.DataSourceTransactionManager">
        <property name="dataSource" ref="dataSource"/>
        <property name="rollbackOnCommitFailure" value="true"/>
    </bean>

</beans>
logback.xml
logback的配置详解请自行百度···我自己也不能记到,每次都查看一下以前的文件吧,这里随手搜了一个http://blog.csdn.net/haidage/article/details/6794509
<?xml version="1.0" encoding="UTF-8"?>
<configuration scan="true" scanPeriod="60 seconds" debug="false">
    <!--console 意味着会打印到catalina.out这个文件上-->
    <appender name="console" class="ch.qos.logback.core.ConsoleAppender">
        <encoding>UTF-8</encoding>
        <!--encoder是实际日志的格式-->
        <encoder>
            <pattern>[%d{HH:mm:ss.SSS}][%p][%c{40}][%t] %m%n</pattern>
        </encoder>
        <filter class="ch.qos.logback.classic.filter.ThresholdFilter">
            <!--大于debug的级别都会打印,这里的配置好像跟log4j不太一样,
            通过配置filter来确定级别-->
            <!--可以方便看到之后的mybatis的SQL语句,因为那些是debug级别的-->
            <level>DEBUG</level>
        </filter>
    </appender>

    <!--项目的日志,是可以自动rolling,通过日期rolling-->
    <appender name="happymall" class="ch.qos.logback.core.rolling.RollingFileAppender">
        <!--路径-->
        <File>/developer/apache-tomcat-9.0.0.M26/logs/happymall.log</File>
        <rollingPolicy class="ch.qos.logback.core.rolling.TimeBasedRollingPolicy">
            <fileNamePattern>/developer/apache-tomcat-9.0.0.M26/logs/happymall.log.%d{yyyy-MM-dd.gz}</fileNamePattern>
            <append>true</append>
            <!--最大存储时间,这里是10天-->
            <maxHistory>10</maxHistory>
        </rollingPolicy>
        <encoder>
            <pattern>[%d{HH:mm:ss.SSS}][%p][%c{40}][%t] %m%n</pattern>
        </encoder>
    </appender>


    <appender name="error" class="ch.qos.logback.core.rolling.RollingFileAppender">
        <!--<File>d:/mmalllog/error.log</File>-->
        <File>/developer/apache-tomcat-9.0.0.M26/logs/error.log</File>
        <rollingPolicy class="ch.qos.logback.core.rolling.TimeBasedRollingPolicy">
            <fileNamePattern>/developer/apache-tomcat-9.0.0.M26/logs/error.log.%d{yyyy-MM-dd}.gz</fileNamePattern>
            <!--<fileNamePattern>d:/mmalllog/error.log.%d{yyyy-MM-dd}.gz</fileNamePattern>-->
            <append>true</append>
            <maxHistory>10</maxHistory>
        </rollingPolicy>
        <encoder>
            <pattern>[%d{HH:mm:ss.SSS}][%p][%c{40}][%t] %m%n</pattern>
        </encoder>
        <filter class="ch.qos.logback.classic.filter.LevelFilter">
            <!--是error则接受,不匹配则拒绝的filter-->
            <level>ERROR</level>
            <onMatch>ACCEPT</onMatch>
            <onMismatch>DENY</onMismatch>
        </filter>
    </appender>

    <logger name="top.winxblast" additivity="false" level="INFO">
        <appender-ref ref="happymall"/>
        <appender-ref ref="console" />
    </logger>


    <!--mybatis log 日志-->
    <!--输出dao包中的日志-->
    <logger name="top.winxblast.happymall.dao" level="DEBUG"/>

    <!--<logger name="com.ibatis.sqlmap.engine.impl.SqlMapClientDelegate" level="DEBUG" >-->
    <!--<appender-ref ref="console"/>-->
    <!--</logger>-->

    <!--<logger name="java.sql.Connection" level="DEBUG">-->
    <!--<appender-ref ref="console"/>-->
    <!--</logger>-->
    <!--<logger name="java.sql.Statement" level="DEBUG">-->
    <!--<appender-ref ref="console"/>-->
    <!--</logger>-->

    <!--<logger name="java.sql.PreparedStatement" level="DEBUG">-->
    <!--<appender-ref ref="console"/>-->
    <!--</logger>-->

    <root level="DEBUG">
        <appender-ref ref="console"/>
        <appender-ref ref="error"/>
    </root>

</configuration>
happymall.properties
这个是FTP服务器的配置
ftp.server.ip=xxx.xxx.xxx.xxx
ftp.user=happymall
ftp.pass=123456
# 图片服务器的前缀
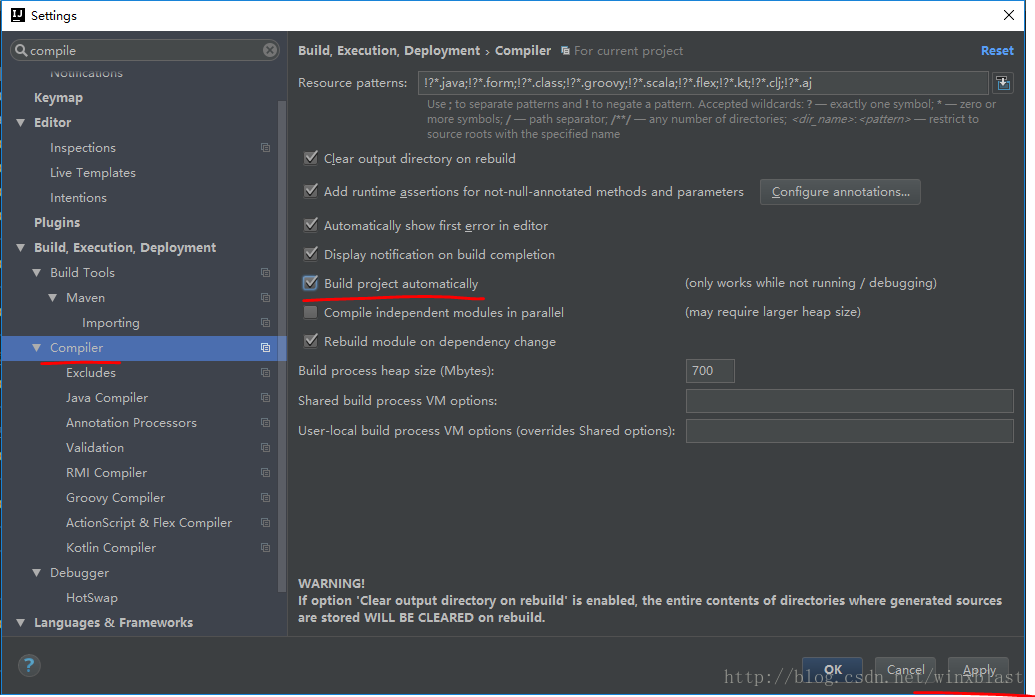
ftp.server.http.prefix=http://img.happymall.winxblast.top/其他一点IDEA的配置
一个是自动编译,这样就可以在写程序的过程中看到一些错误
如图所示
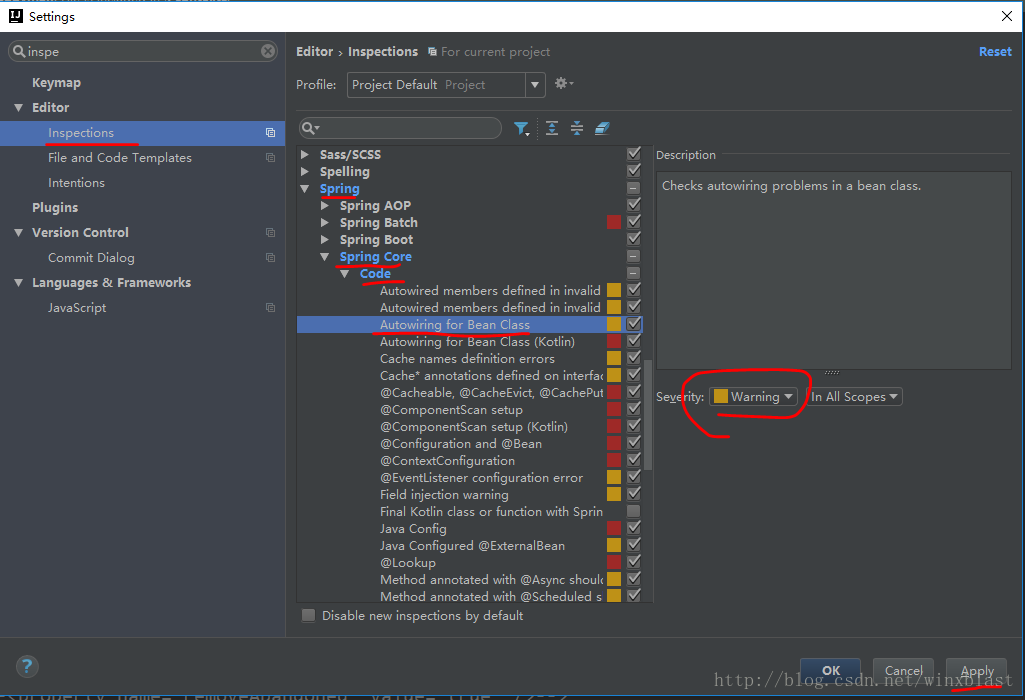
第二个是当使用autowired注解,当注入到一个类里时,因为用的mybatis,默认的IDEA会认为是个错误,会提示找不到对应的bean。但是项目时能正常运行的,因为用的Spring的auto scan的方法
修改内容如下图所示,把error改成warning
项目初始化及代码提交
总算到了这一部分,虽然功能没有实现,但是总的大框架还是有了。
现在把现有的代码提交到git上
#先查看一下
git status
#再把所有文件添加上,注意add后加一个空格再加点
git add .
#commit提交,-a是全部,m指直接在后面添加内容,注意在windows下使用双引号
git commit -am "project init commit"
#最后推送到远程仓库
git push
两个实用浏览器插件
再把老师安利的两个chrome插件给出来,其实我还是很喜欢火狐的操作习惯的,不太想完全转移到chrome上啊····
可是火狐上没有,可能有替代品吧,不过暂时没有精力找了····
第一个叫fe助手,这里主要用到json格式化,当然还有其他小功能
第二个叫restlet client ,这里用于模拟http请求
鉴于chrome插件需要番羽墙安装,还是不行的小伙伴就百度一下下载安装吧···
最后
配置文件说是简单,但是总是想不起来该怎么写,每次都要查以前的文件还是蛮让人沮丧的,就是会有一种不会用感觉,这些东西还是要孰能生巧啊,不知道自己以后要被这些东西虐多少遍才能牢记于心啊···
下一篇就可以开始写业务代码了,好激动~~


 249
249


 被折叠的 条评论
为什么被折叠?
被折叠的 条评论
为什么被折叠?
 到【灌水乐园】发言


