


contents
Java语言概述
Java语言是学习JavaEE、大数据、Android开发的基石。
软件:即一系列按照特定顺序组织的计算机数据和指令的集合。有系统软件和应用软件之分。
人机交互方式
1、图形化界面(Graphical User Interface GUI):这种方式简单直观,使用者易于接受,容易上手操作。
2、命令行方式(Command Line Interface CLI):需要有一个控制台,输入特定的指令,让计算机完成一些操作。较为麻烦,需要记录住一些
命令。
Pascal之父Nicklaus Wirth:“Algorithms+Data Structures=Programs”。
常用的DOS命令
dir 列出当前目录下的文件以及文件夹
md 创建目录
rd 删除目录
cd 进入指定目录
cd… 退回到上一级目录
cd\ 退回到根目录
del 删除文件
exit 退出 dos 命令行
echo javase>1.doc
常用快捷键
← → 移动光标
↑ ↓ 调阅历史操作命令
Delete、Backspace 删除字符
Java技术体系平台
1、Java SE(Java Standard Edition)标准版
支持面向桌面级应用(如Windows下的应用程序)的Java平台,提供了完整的Java核心API,此版本以前称为J2SE。
2、Java EE(Java Enterprise Edition)企业版
是为开发企业环境下的应用程序提供的一套解决方案。该技术体系中包含的技术如Servlet 、Jsp等,主要针对于Web应用程序开发。版本以前称为J2EE。
3、Java ME(Java Micro Edition)小型版
支持Java程序运行在移动终端(手机、PDA)上的平台,对Java API有所精简,并加入了针对移动终端的支持,此版本以前称为J2ME。
4、Java Card
支持一些Java小程序(Applets)运行在小内存设备(如智能卡)上的平台。
Java在各领域的应用
从Java的应用领域来分,Java语言的应用方向主要表现在以下几个方面:
1、企业级应用:主要指复杂的大企业的软件系统、各种类型的网站。Java的安全机制以及它的跨平台的优势,使它在分布式系统领域开发中有广泛应用。应用领域包括金融、电信、交通、电子商务等。
2、Android平台应用:Android应用程序使用Java语言编写。Android开发水平的高低很大程度上取决于Java语言核心能力是否扎实。
3、大数据平台开发:各类框架有Hadoop,spark,storm,flink等,就这类技术生态圈来讲,还有各种中间件如flume,kafka,sqoop等,这些框架以及工具大多数是用Java编写而成,但提供诸如Java,scala,Python,R等各种语言API供编程。
4、移动领域应用:主要表现在消费和嵌入式领域,是指在各种小型设备上的应用,包括手机、PDA、机顶盒、汽车通信设备等。
Java语言的诞生
Java之父James Gosling团队在开发”Green”项目时,发现C缺少垃圾回收系统,还有可移植的安全性、分布程序设计和多线程功能。最后,他们想要一种易于移植到各种设备上的平台。Java确实是从C语言和C++语言继承了许多成份,甚至可以将Java看成是类C语言发展和衍生的产物。比如Java语言的变量声明,操作符形式,参数传递,流程控制等方面和C语言、C++语言完全相同。但同时,Java是一个纯粹的面向对象的程序设计语言,它继承了C++语言面向对象技术的核心。Java舍弃了C语言中容易引起错误的指针(以引用取代)、运算符重载(operator overloading)、多重继承(以接口取代)等特性,增加了垃圾回收器功能用于回收不再被引用的对象所占据的内存空间。JDK1.5又引入了泛型编程(Generic Programming)、类型安全的枚举、不定长参数和自动装/拆箱。
主要特性
1、Java语言是易学的。Java语言的语法与C语言和C++语言很接近,使得大多数程序员很容易学习和使用Java。
2、Java 语言是强制面向对象的。Java语言提供类、接口和继承等,为了简单起见,只支持类之间的单继承,但支持接口之间的多继承,并支持类与接口之间的实现机制(关键字为implements)。
3、Java 语言是分布式的。Java语言支持Internet应用的开发,在基本的Java应用编程接口中有一个网络应用编程接口(java net),它提供了用于网络应用编程的类库,包括URL、URLConnection、Socket、ServerSocket等。Java的RMI(远程方法激活)机制也是开发分布式应用的重要手段。
4、Java 语言是健壮的。Java的强类型机制、异常处理、垃圾的自动收集等是Java程序健壮性的重要保证。对指针的丢弃是Java的明智选择。
5、Java 语言是安全的。Java通常被用在网络环境中,为此,Java提供了一个安全机制以防恶意代码的攻击。如:安全防范机制(类ClassLoader),如分配不同的名字空间以防替代本地的同名类、字节代码检查。
6、Java 语言是体系结构中立的。Java程序(后缀为java的文件)在Java平台上被编译为体系结构中立的字节码格式(后缀为class的文件),然后可以在实现这个Java平台的任何系统中运行。
7、Java 语言是解释型的。如前所述,Java程序在Java平台上被编译为字节码格式,然后可以在实现这个Java平台的任何系统的解释器中运行。
8、Java 是性能略高的。与那些解释型的高级脚本语言相比,Java的性能还是较优的。
9、Java 语言是原生支持多线程的。在Java语言中,线程是一种特殊的对象,它必须由Thread类或其子(孙)类来创建。
Java语言运行机制及运行过程
Java语言的特点
1、面向对象
两个基本概念:类、对象
三大特性:封装、继承、多态
2、健壮性
吸收了C/C++语言的优点,但去掉了其影响程序健壮性的部分(如指针、内存的申请与释放等),提供了一个相对安全的内存管理和访问机制。
3、跨平台性
跨平台性:通过Java语言编写的应用程序在不同的系统平台上都可以运行。 “Writeonce,Run Anywhere”
原理:只要在需要运行java应用程序的操作系统上,先安装一个Java虚拟机 (JVM Java Virtual Machine) 即可。由JVM来负责Java程序在该系统中的运行。
Java语言跨平台原理图:
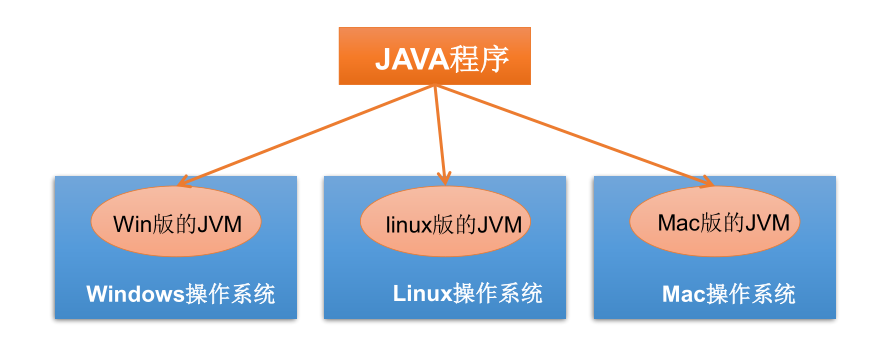
因为有了JVM,同一个Java程序在三个不同的操作系统中都可以执行。这样就实现了Java程序的跨平台性。
Java两种核心机制
1、Java虚拟机 (Java Virtal Machine)
2、垃圾收集机制 (Garbage Collection)
Java虚拟机
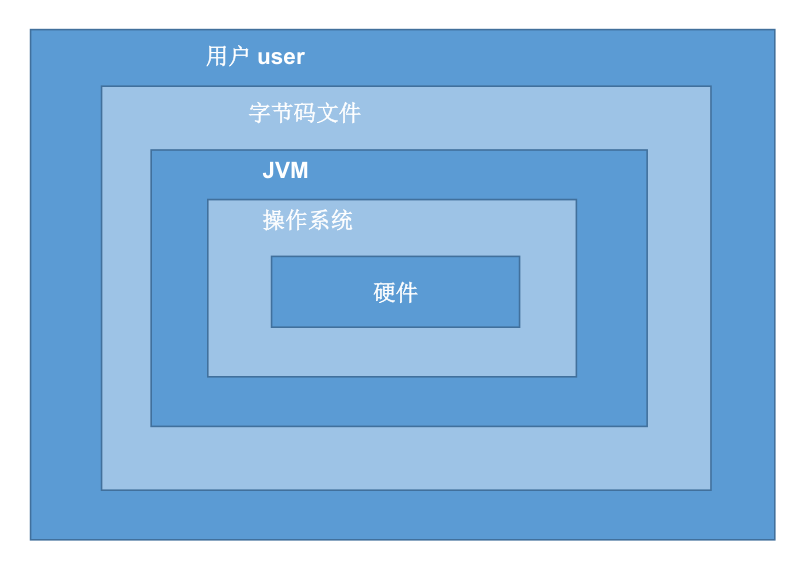
1、JVM是一个虚拟的计算机,具有指令集并使用不同的存储区域。负责执行指令,管理数据、内存、寄存器。
2、对于不同的平台,有不同的虚拟机。
3、只有某平台提供了对应的java虚拟机,java程序才可在此平台运行。
4、Java虚拟机机制屏蔽了底层运行平台的差别,实现了“一次编译,到处运行”。
Java虚拟机原理图:
垃圾回收:不再使用的内存空间应回收。
1、在C/C++等语言中,由程序员负责回收无用内存。
2、Java语言消除了程序员回收无用内存空间的责任:它提供一种系统级线程跟踪存储空间的分配情况。并在JVM空闲时,检查并释放那些可被释放的存储空间。
3、垃圾回收在Java程序运行过程中自动进行,程序员无法精确控制和干预。
4、即使如此,Java程序还是会出现内存泄漏和内存溢出问题。
使用记事本开发Java程序
步骤:
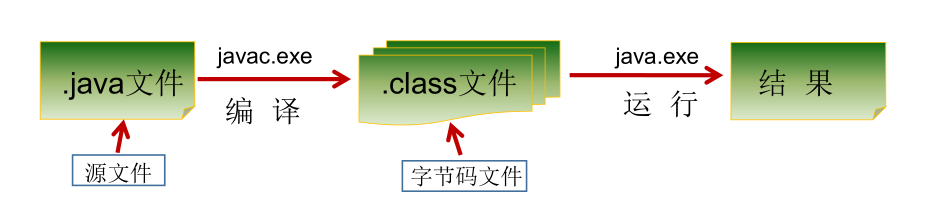
- 将Java代码编写到扩展名为.java的文件中。
- 通过javac命令对该java文件进行编译。
- 通过java命令对生成的class文件进行运行。
步骤一:编写代码
1、选择记事本、编辑器,代码如下:
public class Test {

	public static void main(String[] args) {

		System.out.println("Hello, World");

	}

}
2、将文件保存成Test.java,这个文件是存放java代码的文件,称为源文件。
步骤二:编译
有了java源文件,通过编译器将其编译成JVM可以识别的字节码文件。
1、在该源文件目录下,通过javac编译工具对Test.java文件进行编译。
2、如果程序没有错误,没有任何提示,但在当前目录下会出现一个Test.class文件,该文件称为字节码文件,也是可以执行的java的程序。
步骤三:运行
有了可执行的java程序(Test.class字节码文件),通过运行工具java.exe对字节码文件进行执行。
注释(Comment)
用于注解说明解释程序的文字就是注释。
Java中的注释类型:
1、单行注释
2、多行注释
3、文档注释
单行注释
格式: //注释文字
多行注释
格式: /* 注释文字 */
对于单行和多行注释,被注释的文字,不会被JVM(java虚拟机)解释执行。
多行注释里面不允许有多行注释嵌套。
文档注释
格式:
/**
@author 指定java 程序的作者
@version 指定源文件的版本
*/
注释内容可以被JDK提供的工具javadoc所解析,生成一套以网页文件形式体现的该程序的说明文档。
小结
- Java源文件以“java”为扩展名。源文件的基本组成部分是类(class),如本例中的HelloWorld类。
- Java应用程序的执行入口是main()方法。它有固定的书写格式:public static void main(String[] args) {…}
- Java语言严格区分大小写。
- Java方法由一条条语句构成,每个语句以“;”结束。
- 大括号都是成对出现的,缺一不可。
- 一个源文件中最多只能有一个public类。其它类的个数不限,如果源文件包含一个public类,则文件名必须按该类名命名。
Java API文档
API(Application Programming Interface,应用程序编程接口)是Java提供的基本编程接口。
Java语言提供了大量的基础类,因此Oracle也为这些基础类提供了相应的API文档,用于告诉开发者如何使用这些类,以及这些类里包含的方法。
循环
	@Test
	public void test0003() {

		Scanner scanner = new Scanner(System.in);
		System.out.print("请输入行数:");
		int row = scanner.nextInt();
		System.out.print("请输入列数:");
		int column = scanner.nextInt();

		scanner.close();

		for(int i=1; i<=row; i++) { //行

			for(int j=1; j<=column; j++) { //列

				System.out.print("*");

			}

			System.out.println();

		}

	}
print:
请输入行数:4
请输入列数:6
******
******
******
******
	@Test
	public void test0003() {

		Scanner scanner = new Scanner(System.in);
		System.out.print("请输入行数:");
		int row = scanner.nextInt();
		scanner.close();

		for(int i=1; i<=row; i++) {

			for(int j=1; j<=2*i-1; j++) {
				System.out.print("*");
			}

			System.out.println();

		}

	}
print:
请输入行数:5
*
***
*****
*******
*********
	@Test
	public void test0003() {

		Scanner scanner = new Scanner(System.in);
		System.out.print("请输入行数:");
		int row = scanner.nextInt();
		scanner.close();

		for(int i=1; i<=row; i++) {

			for(int j=1; j<=row-i; j++) {
				System.out.print(" ");
			}

			for(int j=1; j<=2*i-1; j++) {
				System.out.print("*");
			}

			System.out.println();

		}

	}
print:
请输入行数:5
*
***
*****
*******
*********
打印乘法表:
	@Test
	public void test0003() {

		for(int i=1; i<=9; i++) {

			for(int j=1; j<=i; j++) {
				System.out.print(i + " * " + j + " = " + (i * j) + "\t");
			}

			System.out.println();

		}

	}
数组
数组概述
- 数组(Array)是多个相同类型数据按一定顺序排列的集合,并使用一个名字命名,通过编号的方式对这些数据进行统一管理。
- 数组的常见概念:数组名、下标(索引)、元素、数组的长度。
- 数组本身是引用数据类型,而数组中的元素可以是任何数据类型,包括基本数据类型和引用数据类型。
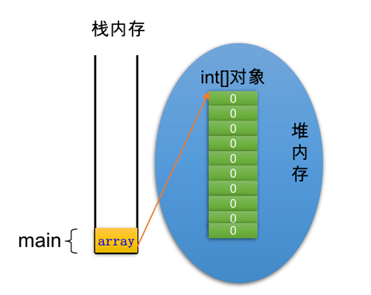
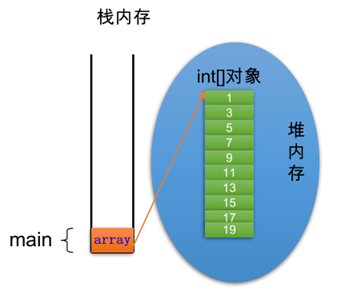
- 创建数组对象会在内存中开辟一整块连续的空间,而数组名中引用的是这块连续空间的首地址。
- 数组的长度一旦确定,就不能修改。
- 可以直接通过下标(索引)的方式调用指定位置的元素,速度很快。
- 数组的分类:
按照维度:一维数组、二维数组、三维数组、……
按照元素的数据类型:基本数据类型元素的数组、引用数据类型元素的数组(即对象数组)
一维数组
一维数组的声明
一维数组的声明方式:type[] var 或 type var[]
例如:
int[] array;
int array[];
double[] array;
double array[];
String[] strings; //引用数据类型数组
Java语言中声明数组时不能指定其长度(数组中元素的个数),例如:int array[5]; //错误的声明方式
一维数组的初始化
动态初始化:数组声明且为数组元素分配空间与赋值的操作分开进行。
int[] array = new int[3];
array[0] = 3;
array[1] = 5;
array[2] = 7;
String names[];
names = new String[3];
names[0] = “宋江”;
names[1] = “吴用”;
names[2] = “卢俊义”;
静态初始化:在定义数组的同时就为数组元素分配空间并赋值。
int[] array = {1, 2, 3};或int[] array = new int[]{1, 2, 3};
String[] names = {“宋江”, “吴用”, “卢俊义”};
数组元素的引用
- 声明并为之分配空间(使用运算符new)后,才可以引用数组中的每个元素。
- 数组元素的引用方式:数组名[数组元素下标]
- 数组元素下标可以是整型常量或整型表达式。如arr[3]、arr[i]、arr[6*i]
- 数组元素下标从0开始。长度为length的数组,下标合法取值范围: 0 —>length-1。如int arr[] = new int[3];可引用的数组元素为arr[0]、arr[1]、arr[2]。
- 每个数组都有一个属性length指明它的长度。例如:arr.length指明数组arr的长度(元素个数)。
- 数组一旦初始化,其长度是不可变的。
数组元素的默认初始化值
public class Test {
	public static void main(String[] args){

		int[] array = new int[5];
		System.out.println(array[3]); //array[3]的默认值为0

	}
}
对于基本数据类型而言,默认初始化值各有不同。
对于引用数据类型而言,默认初始化值为null( 注意与0不同)。
| 数组元素类型 | 元素默认初始值 |
|---|---|
| byte | 0 |
| short | 0 |
| int | 0 |
| long | 0L |
| float | 0.0F |
| double | 0.0 |
| boolean | false |
| char | 0或写为:‘\u0000’(表现为空) |
| 引用类型 | null |
public class Test0000 {

	public static void main(String[] args) {

		long[] array = new long[5];

		int array0 = (int)array[3]; //此处要强制类型转换
		long array1 = array[3];


		System.out.println(array0);
		System.out.println(array1);

	}
}
public class Test0000 {

	public static void main(String[] args) {

		float[] array = new float[5];

		float array0 = array[3];
		double array1 = array[3];


		System.out.println(array0); //print:0.0
		System.out.println(array1); //print:0.0

	}
}
public class Test17 {

	public static void main(String[] args) {

		int a = 1;
		int b = 2;

		int c, d;
		c = 3;
		d = 4;

		int e = 5, f = 6;

		//数组声明
		int[] array;
		//分配空间并赋初始值
		array = new int[]{1, 2, 3, 4, 5};
		/*
		 数组名:array
		元素
		下标(索引)
		长度:假如数组的长度为length,那么下标的最大值:length-1
		*/
		int length = array.length;
		System.out.println("数组的长度:" + length);

		//数组声明
		int[] array1; //正确,推荐写法
		int array11[]; //正确
		int [] array12; //正确
		int array13 []; //正确

		//数组初始化:静态初始化
		int[] array2 = {1, 2, 3, 4, 5};
		int[] array21 = new int[] {1, 2, 3, 4, 5};
		//数组初始化:动态初始化
		int[] array22 = new int[5];
		array22[0] = 1;
		array22[1] = 2;
		array22[2] = 3;
		array22[3] = 4;
		array22[4] = 5;

		System.out.println(array22[0]);
		System.out.println(array22[1]);
		System.out.println(array22[2]);
		System.out.println(array22[3]);
		System.out.println(array22[4]);

		System.out.println("======================");

		//遍历数组输出
		for(int i=0; i<array.length; i++) {
			System.out.println(array22[i]);
		}

		//错误写法
		//int[] array30 = new int[]; //new后面要指定大小
		//int[5] array31 = new int[5]; //数组声明时不能指定大小
		//int[5] array32 = new int[]; //数组声明时不能指定大小
		//int[] array33 = new int[5]{1, 2, 3, 4, 5}; //因为大括号内已经指定了具体的元素,当然元素个数(数组长度)就确定了,如果在指定数组长度,则错误。

		//复习
		//数组的静态初始化
		int[] array4 = {1, 2, 3};
		int[] array41 = new int[] {1, 2, 3};

		//数组的动态初始化
		int[] array42;
		array42 = new int[5];
		array42[0] = 1;
		array42[1] = 1;
		array42[3] = 1;

		System.out.println("********************************");

		//引用数据类型String
		String[] strings = {"one", "two", "three"};
		for(int i=0; i<strings.length; i++) {
			System.out.println(strings[i]);
		}

		//数组元素的初始化值
		double[] array50; 声明数组
		array50 = new double[3]; //给数组分配空间并指定其长度

		double number0 = array50[0];
		System.out.println(number0); //默认值为0.0

		System.out.println("****************************");

		char[] array60 = new char[3];
		System.out.println(array60[0]);

		boolean[] array70;
		array70 = new boolean[3];
		System.out.println(array70[0]);

		String[] array80 = new String[3];
		System.out.println(array80[0]);

		//下标含有变量
		int[] array90 = {1, 2, 3, 4, 5};
		int i = 2;
		System.out.println(array90[2*i]);
	}

}
public class Test0000 {

	public static void main(String[] args) {

		float[] array = new float[] {1.1f, 2.2f, 3.3f, 4.4f, 5.5f};

		float array0 = array[3];
		double array1 = array[3];


		System.out.println(array0); //print:4.4
		System.out.println(array1); //print:4.400000095367432

	}
}
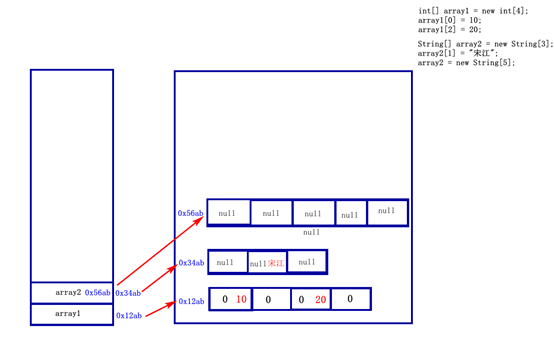
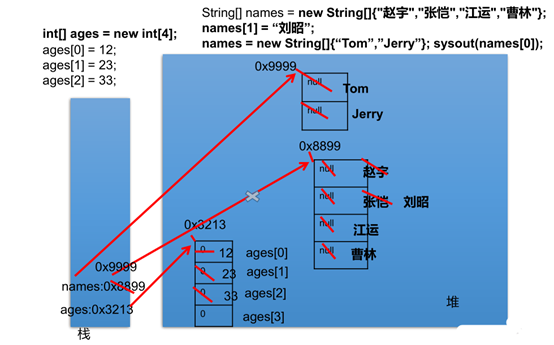
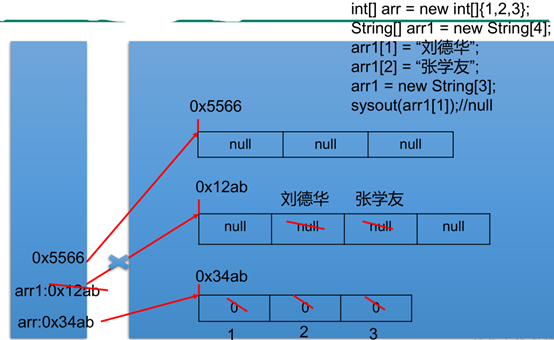
一维数组的内存解析
一维数组练习题
以下代码输出结果是什么?
public class Test19 {

	public static void main(String[] args) {

		int[] array = new int[] { 8, 2, 1, 0, 3 };
		int[] array1 = new int[] { 2, 0, 3, 2, 4, 0, 1, 3, 2, 3, 3 };

		String telephone = "";

		for (int i = 0; i < array1.length; i++) {

			telephone += array[array1[i]];
			//telephone = telephone + array1[array[i]]
			/*
			array[array1[0]]  array[2]  1
			array[array1[1]]  array[0]  8
			array[array1[2]]  array[3]  0
			array[array1[3]]  array[2]  1
			array[array1[4]]  array[4]  3
			array[array1[5]]  array[0]  8
			array[array1[6]]  array[1]  2
			array[array1[7]]  array[3]  0
			array[array1[8]]  array[2]  1
			array[array1[9]]  array[3]  0
			array[array1[10]] array[3]  0
*/
		}

		System.out.println(telephone);

	}

}
二维数组
如果说可以把一维数组当成几何中的线性图形,那么二维数组就相当于是一个表格。
对于二维数组的理解,可以看成是一维数组array又作为另一个一维数组array1的元素而存在。其实从数组底层的运行机制来看,没有多维数组。
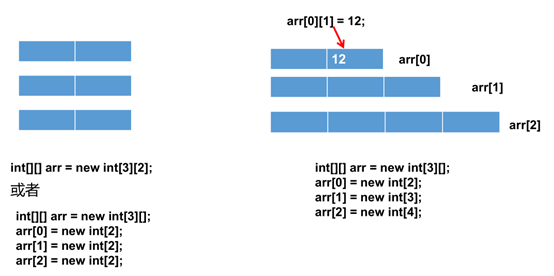
二维数组的初始化
格式1(动态初始化):
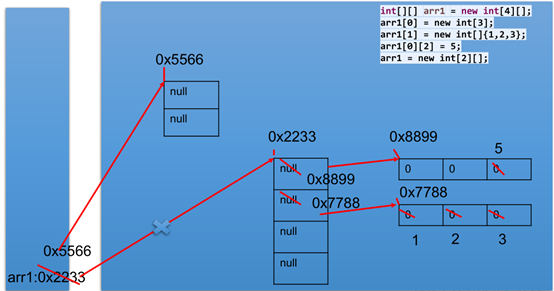
int[][] array = new int[3][2];
定义了名称为array的二维数组,二维数组中有3个一维数组,每一个一维数组中有2个元素。
一维数组的名称分别为array[0], array[1], array[2]。
给第一个一维数组1号角标赋值为2的写法是:array[0][1] = 2;
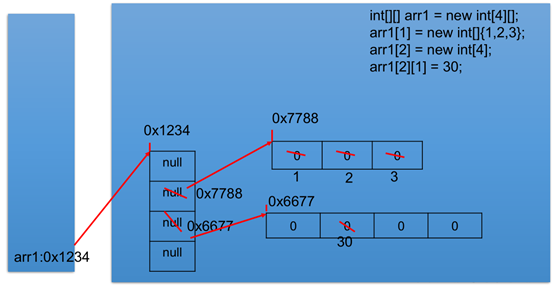
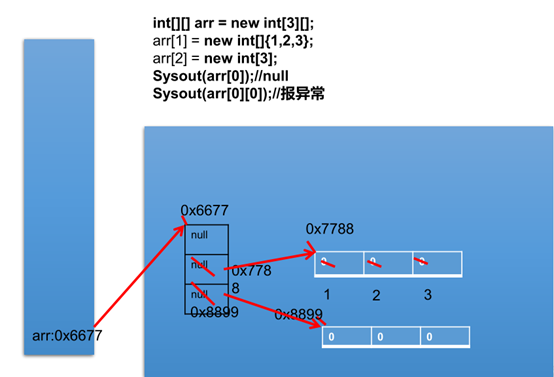
格式2(动态初始化):
int[][] array = new int[3][];
二维数组中有3个一维数组,每个一维数组都是默认初始化值null (注意:区别于格式1)
可以对这个三个一维数组分别进行初始化
array[0] = new int[3];
array[1] = new int[1];
array[2] = new int[2];
注意:
int[][] array = new int[][3]; //是错误写法
格式3(静态初始化):
int[][] array = new int[][]{{3, 8, 2}, {2, 7}, {9, 0, 1, 6}};
定义一个名称为array的二维数组,二维数组中有三个一维数组
每一个一维数组中具体元素也都已初始化。
第一个一维数组array[0] {3, 8, 2};
第二个一维数组array[1] {2, 7};
第三个一维数组array[2] {9, 0, 1, 6};
第三个一维数组的长度表示方式:array[2].length;
注意特殊写法情况:
		int[] x;
		int[] y[];
		int[][] z;
		int[]x1, y1[]; //x1是一维数组,y1是二维数组。
Java中多维数组不必都是规则矩阵形式。
public class Test19 {

	public static void main(String[] args) {

		//二维数组的声明;
		int[][] array = new int[5][5];
		int[][] array1 = new int[5][];

		//错误的写法
		//int[][] array2 = new int[][];
		//int[][] array3 = new int[][5];
		//int[5][] array = new int[][];

		//赋值
		array[0][1] = 2;
		System.out.println(array[0][1]);

		array1[0] = new int[5];
		array1[1] = new int[5];
		array1[2] = new int[5];
		array1[3] = new int[5];
		array1[4] = new int[5];

		//二维数组的静态初始化
		int[][] array2 = new int[][]{{1, 2, 3 ,4 ,5}, {1, 2, 3, 4, 5}, {1, 2, 3, 4, 5}, {1, 2, 3, 4, 5}, {1, 2, 3, 4, 5}};

		array2[0] = new int[3];

	    System.out.println(array2[2].length);

	    //int[] x, y[];
	    int[] x;
	    int[] y[];
	    int[][] z;

	}

}
/*
1 2 3 4 4 5
1 2 3 4 4 5
1 2 3 4 4 5
1 2 3 4 4 5
1 2 3 4 4 5

0 2 0 0 0
0 0 0 0 0
0 0 0 0 0
0 0 0 0 0
0 0 0 0 0
*/
二维数组的使用
二维数组的遍历
	@Test
	public void test0004() {

		Scanner scanner = new Scanner(System.in);

		int[][] array = new int[5][5]; //5个班的成绩

		//i:班级  j:各班级的学生
		for(int i=0; i<array.length; i++) {

			System.out.println("**********第" + (i+1) + "个班**********");

			for(int j=0;j<array[i].length;j++){

				System.out.print("请输入第" + (j+1) + "个学生的成绩:");

				array[i][j] = scanner.nextInt();

			}

		}

		scanner.close();

		System.out.println("***********成绩统计************");

		int total; //保存总成绩

		for(int i = 0; i < array.length; i++) {

	        String str = (i+1) + "班";

	        total = 0; //每次循环到此都将其归0

	        for(int j = 0; j < array[i].length; j++) {

	        	total += array[i][j]; //成绩叠加

	        }

	        System.out.println(str+"总成绩:" + total);

		}

	}
/*
print:
**********第1个班**********
请输入第1个学生的成绩:10
请输入第2个学生的成绩:20
请输入第3个学生的成绩:30
请输入第4个学生的成绩:40
请输入第5个学生的成绩:50
**********第2个班**********
请输入第1个学生的成绩:20
请输入第2个学生的成绩:30
请输入第3个学生的成绩:40
请输入第4个学生的成绩:50
请输入第5个学生的成绩:60
**********第3个班**********
请输入第1个学生的成绩:30
请输入第2个学生的成绩:40
请输入第3个学生的成绩:50
请输入第4个学生的成绩:60
请输入第5个学生的成绩:70
**********第4个班**********
请输入第1个学生的成绩:40
请输入第2个学生的成绩:50
请输入第3个学生的成绩:60
请输入第4个学生的成绩:70
请输入第5个学生的成绩:80
**********第5个班**********
请输入第1个学生的成绩:50
请输入第2个学生的成绩:60
请输入第3个学生的成绩:70
请输入第4个学生的成绩:80
请输入第5个学生的成绩:90
***********成绩统计************
1班总成绩:150
2班总成绩:200
3班总成绩:250
4班总成绩:300
5班总成绩:350
*/
内存解析

数组中涉及到的常见算法
冒泡排序
import java.util.Arrays;

//冒泡排序
public class Test17 {

	public static void main(String[] args) {

		int[] array = {3, -6, 2, 7, -1};

		for(int i=0; i<array.length-1; i++) {
			for(int j=0; j<array.length-i-1; j++) {

				if(array[j] < array[j+1]) {
					int temp = array[j];
					array[j] = array[j+1];
					array[j+1] = temp;
				}

			}
		}

		System.out.println(Arrays.toString(array));

	}

}
/*
-1   -1   -1  -1  7
7    7    7   7   -1
2    2    3   3   3
-6   3    2   2   2
3    -6   -6  -6  -6


7   7   7     7   7
-1  -1  -1    3   3
3   3   3     -1  -1
2   2   2     2   2
-6  -6  -6    -6  -6
*/
Arrays类的使用
public class Arrays extends Object
java.util.Arrays类即为操作数组的工具类,包含了用来操作数组(比如排序和搜索)的各种方法。
- 输出数组信息:toString方法
public static String toString(byte[] a)
public static String toString(short[] a)
public static String toString(int[] a)
public static String toString(long[] a)
public static String toString(float[] a)
public static String toString(double[] a)
public static String toString(boolean[] a)
public static String toString(char[] a)
public static String toString(Object[] a)
- 判断两个数组是否相等:equals方法
public static boolean equals(byte[] a, byte[] a2)
public static boolean equals(short[] a, short[] a2)
public static boolean equals(int[] a, int[] a2)
public static boolean equals(long[] a, long[] a2)
public static boolean equals(float[] a, float[] a2)
public static boolean equals(double[] a, double[] a2)
public static boolean equals(boolean[] a, boolean[] a2)
public static boolean equals(char[] a, char[] a2)
public static boolean equals(Object[] a, Object[] a2)
- 对数组进行排序:sort方法
public static void sort(byte[] a)
public static void sort(byte[] a, int fromIndex, int toIndex)
public static void sort(short[] a)
public static void sort(short[] a, int fromIndex, int toIndex)
public static void sort(int[] a)
public static void sort(int[] a, int fromIndex, int toIndex)
public static void sort(long[] a)
public static void sort(long[] a, int fromIndex, int toIndex)
public static void sort(float[] a)
public static void sort(float[] a, int fromIndex, int toIndex)
public static void sort(double[] a)
public static void sort(double[] a, int fromIndex, int toIndex)
public static void sort(char[] a)
public static void sort(char[] a, int fromIndex, int toIndex)
public static void sort(Object[] a)
public static void sort(Object[] a, int fromIndex, int toIndex)
public static void sort(T[] a, Comparator<? super T> c)
public static void sort(T[] a, int fromIndex, int toIndex, Comparator<? super T> c)
- 将数组array复制成一个长度为length的新数组,返回类型与复制的数组一致:copyOf方法
public static byte[] copyOf(byte[] original, int newLength)
public static short[] copyOf(short[] original, int newLength)
public static int[] copyOf(int[] original, int newLength)
public static long[] copyOf(long[] original, int newLength)
public static float[] copyOf(float[] original, int newLength)
public static double[] copyOf(double[] original, int newLength)
public static boolean[] copyOf(boolean[] original, int newLength)
public static char[] copyOf(char[] original, int newLength)
public static T[] copyOf(T[] original, int newLength)
public static <T,U> T[] copyOf(U[] original, int newLength, Class<? extends T[]> newType)
- copyOfRange方法
public static byte[] copyOfRange(byte[] original, int from, int to)
public static short[] copyOfRange(short[] original, int from, int to)
public static int[] copyOfRange(int[] original, int from, int to)
public static long[] copyOfRange(long[] original, int from, int to)
public static float[] copyOfRange(float[] original, int from, int to)
public static double[] copyOfRange(double[] original, int from, int to)
public static boolean[] copyOfRange(boolean[] original, int from, int to)
public static char[] copyOfRange(char[] original, int from, int to)
public static T[] copyOfRange(T[] original, int from, int to)
public static <T,U> T[] copyOfRange(U[] original, int from, int to, Class<? extends T[]> newType)
- 将指定值填充到数组之中:fill方法
public static void fill(byte[] a, byte val)
public static void fill(byte[] a, int fromIndex, int toIndex, byte val)
public static void fill(short[] a, short val)
public static void fill(short[] a, int fromIndex, int toIndex, short val)
public static void fill(int[] a, int val)
public static void fill(int[] a, int fromIndex, int toIndex, int val)
public static void fill(long[] a, long val)
public static void fill(long[] a, int fromIndex, int toIndex, long val)
public static void fill(float[] a, float val)
public static void fill(float[] a, int fromIndex, int toIndex, float val)
public static void fill(long[] a, long val)
public static void fill(long[] a, int fromIndex, int toIndex, long val)
public static void fill(boolean[] a, boolean val)
public static void fill(boolean[] a, int fromIndex, int toIndex, boolean val)
public static void fill(char[] a, char val)
public static void fill(char[] a, int fromIndex, int toIndex, char val)
public static void fill(Object[] a, Object val)
public static void fill(Object[] a, int fromIndex, int toIndex, Object val)
- 对排序(升序)后的数组进行二分法检索指定的值:binarySearch方法
public static int binarySearch(byte[] a, byte key)
public static int binarySearch(byte[] a, int fromIndex, int toIndex, byte key)
public static int binarySearch(short[] a, short key)
public static int binarySearch(short[] a, int fromIndex, int toIndex, short key)
public static int binarySearch(int[] a, int key)
public static int binarySearch(int[] a, int fromIndex, int toIndex, int key)
public static int binarySearch(long[] a, long key)
public static int binarySearch(long[] a, int fromIndex, int toIndex, long key)
public static int binarySearch(float[] a, float key)
public static int binarySearch(float[] a, int fromIndex, int toIndex, float key)
public static int binarySearch(double[] a, double key)
public static int binarySearch(double[] a, int fromIndex, int toIndex, double key)
public static int binarySearch(char[] a, char key)
public static int binarySearch(char[] a, int fromIndex, int toIndex, char key)
public static int binarySearch(Object[] a, Object key)
public static int binarySearch(Object[] a, int fromIndex, int toIndex, Object key)
public static int binarySearch(T[] a, T key, Comparator<? super T> c)
public static int binarySearch(T[] a, int fromIndex, int toIndex, T key, Comparator<? super T> c)
import java.util.Arrays;
public class Test16 {
public static void main(String[] args) {
// public static boolean equals(int[] a, int[] a2) 判断两个数组是否相等。
int[] array1 = new int[] { 1, 2, 3, 4 };
int[] array2 = new int[] { 1, 2, 3, 4 };
boolean isEquals = Arrays.equals(array1, array2);
System.out.println(isEquals);
int[] array11 = new int[] { 1, 2, 3, 4 };
int[] array21 = new int[] { 1, 2, 3, 4, 5 };
boolean isEquals1 = Arrays.equals(array11, array21);
System.out.println(isEquals1);
// public static String toString(int[] a) 输出数组的所有元素
String stringArray = Arrays.toString(array1);
System.out.println(stringArray);
// public static void fill(int[] a, int val) 将数组中所有元素替换成指定值
Arrays.fill(array1, 8);
System.out.println(Arrays.toString(array1));
// public static void sort(int[] a) 对数组进行排序。
int[] array3 = {2, 4, -5, 9, 3};
Arrays.sort(array3);
System.out.println(Arrays.toString(array3));
// public static int binarySearch(int[] a, int key) //查找元素key的索引
int[] array4 = new int[] { 1, 2, 2, 4, 5, 6, 7, 1, 2, 3 };
int index = Arrays.binarySearch(array4, 10);
System.out.println(index);
if (index >= 0) {
System.out.println(index);
} else {
System.out.println("未找到");
}
}
}
数组使用中的常见异常
-
数组角越界异常:ArrayIndexOutOfBoundsException
int[] array = new int[2];
System.out.println(array[2]);
System.out.println(array[-1]);
访问到了数组中不存在的角标时发生。 -
空指针异常:NullPointerException
int[] array = null;
System.out.println(array[0]);
array引用没有指向实体,却操作实体中的元素时发生。
ArrayIndexOutOfBoundsException和NullPointerException在编译时不报错。
import java.util.Arrays;

public class Test9 {

	public static void main(String[] args) {

		// 数组角标越界异常:ArrayIndexOutOfBoundsException
		int[] array = new int[] { 1, 2, 3, 4, 5 };

		// 输出数组
		System.out.println(Arrays.toString(array));

		// 遍历输出数组
		for (int i = 0; i <= array.length; i++) {
			//System.out.println(array[i]); // 此处异常:ArrayIndexOutOfBoundsException
		}

		//System.out.println(array[-1]); // 此处异常:ArrayIndexOutOfBoundsException

		System.out.println("hello"); // 上面异常,此处代码执行不到

		// 空指针异常:NullPointerException
		// example one
		int[] array1 = new int[] { 1, 2, 3 };
		array1 = null;
		//System.out.println(array1[0]); //此处异常 :NullPointerException

		// example two
		int[][] array2 = new int[4][];
		//System.out.println(array2[0][0]); //此处异常:NullPointerException

		// example three
		String[] array3 = new String[] { "one", "two", "three" };
		array3[0] = null;

		System.out.println(array3[0]); // 此处输出null

		System.out.println(array3[0].toString()); // 此处报异常:NullPointerException

	}

}
输入/输出
File类的使用
java.io.File
public class File
extends Object
implements Serializable, Comparable
- File类的一个对象,代表一个文件或一个文件目录(文件夹)。
- File类声明在java.io包下。
- File类中涉及到关于文件或文件目录的创建、删除、重命名、修改时间、文件大小等方法,并未涉及到写入或读取文件内容的操作。如果需要读取或写入文件内容,必须使用IO流来完成。
- File类的对象常会作为参数传递到流的构造器中,指明读取或写入的"终点"。
- File类:文件和文件目录路径的抽象表示形式,与平台无关。
- File类能新建、删除、重命名文件和目录,但File不能访问文件内容本身。如果需要访问文件内容本身,则需要使用输入/输出流。
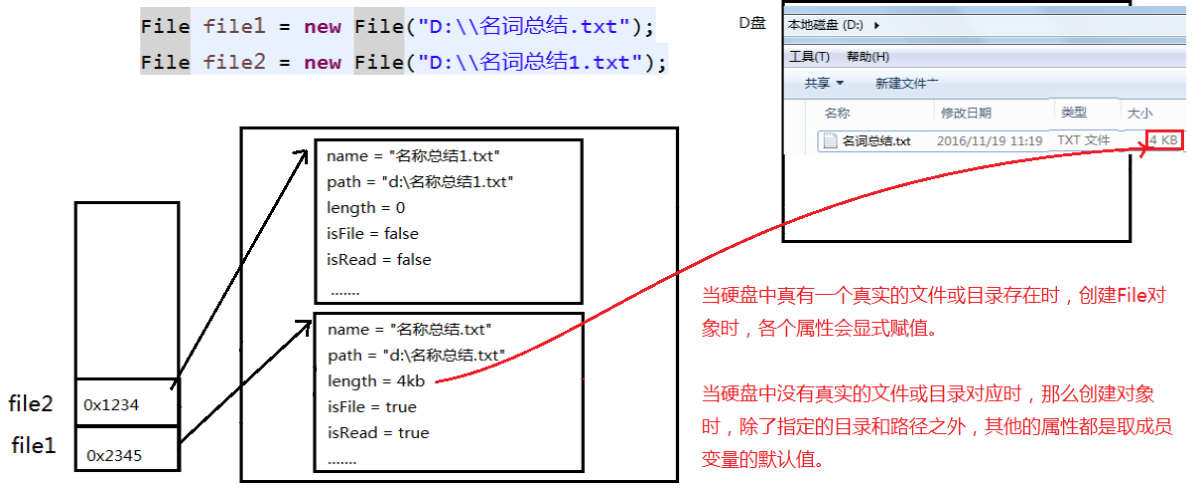
- 想要在Java程序中表示一个真实存在的文件或目录,那么必须有一个File对象。但是Java程序中的一个File对象,可能没有一个真实存在的文件或目录。
- File对象可以作为参数传递给流的构造器。
File类的常用构造器
- File(String pathname) 以pathname为路径创建File对象,可以是绝对路径也可以是相对路径。
- File(String parent, String child) 以parent为父路径,child为子路径创建File对象。
- File(File parent, String child) 根据一个父File对象和子文件路径创建File对象。
绝对路径:是一个固定的路径,从盘符开始。
相对路径:是相对于某个位置开始。
路径中的每级目录之间用一个路径分隔符隔开。
路径分隔符和系统有关:
Windows和DOS系统默认使用“\”来表示。UNIX和URL使用“/”来表示
Java程序支持跨平台运行,因此路径分隔符要慎用。
为了解决这个隐患,File类提供了一个静态常量:public static final String separator。根据操作系统,动态的提供路径分隔符。
	/*
    相对路径:相较于某个路径下,指明的路径。
    绝对路径:包含盘符在内的文件或文件目录的路径

    路径分隔符:
    Windows:\\
    unix:/
    public static final String separator  Java中为了跨平台方便提供了一个静态常量表示路径分隔符
    */
    @Test
    public void test1(){

        //构造器:File(String pathname)
        File file = new File("hello.txt"); //在idea开发工具中相对于当前的module路径
        File file1 =  new File("D:\\workspace\\one\\two\\hello.txt");

        System.out.println(file);
        System.out.println(file1);

        //构造器:File(String parent, String child)
        File file2 = new File("D:\\workspace\\one","two");
        System.out.println(file2);

        //构造器:File(File parent, String child)
        File file3 = new File(file2,"hello.txt");
        System.out.println(file3);

        //public static final String separator  Java中为了跨平台方便提供了一个静态常量表示路径分隔符
        File file4 = new File("D:" + File.separator + "workspace" + File.separator + "one" + File.separator + "two" + File.separator + "hello.txt");
        System.out.println(file4);
        /*
        输出结果:
hello.txt
D:\workspace\one\two\hello.txt
D:\workspace\one\two
D:\workspace\one\two\hello.txt
D:\workspace\one\two\hello.txt
        */
    }
说明:
idea中:开发使用JUnit中的单元测试方法测试,相对路径即为当前Module下。
使用main()测试,相对路径即为当前的Project下。
eclipse中:不管使用单元测试方法还是使用main()测试,相对路径都是当前的Project下。
File类的常用方法
获取功能
- public String getAbsolutePath():获取绝对路径。
- public String getPath():获取路径。
- public String getName():获取名称。
- public String getParent():获取上层文件目录路径。若无,返回null。
- public long length():获取文件长度(即:字节数)。不能获取目录的长度。
- public long lastModified():获取最后一次的修改时间,毫秒值。
- public String[] list():获取指定目录下的所有文件或者文件目录的名称数组。
- public File[] listFiles():获取指定目录下的所有文件或者文件目录的File数组。
	@Test
    public void test2() {

        File file = new File("hello.txt");
        File file1 = new File("d:" + File.separator + "one" + File.separator + "two" + "hi.txt");

        System.out.println(file.getAbsolutePath()); //public String getAbsolutePath() 获取绝对路径
        System.out.println(file.getPath()); //public String getPath() 获取路径
        System.out.println(file.getName()); //public String getName() 获取名称
        System.out.println(file.getParent()); //public String getParent() 获取上层文件目录路径。若无,返回null
        System.out.println(file.length()); //public long length() 获取文件长度(即:字节数)。不能获取目录的长度。
        System.out.println(new Date(file1.lastModified())); //public long lastModified() 获取最后一次的修改时间,毫秒值

        System.out.println();

        System.out.println(file1.getAbsolutePath());
        System.out.println(file1.getPath());
        System.out.println(file1.getName());
        System.out.println(file1.getParent());
        System.out.println(file1.length());
        System.out.println(file1.lastModified());

    }

    @Test
    public void test3() {

         /*
        如下的两个方法适用于文件目录:
        public String[] list() 获取指定目录下的所有文件或者文件目录的名称数组
        public File[] listFiles() 获取指定目录下的所有文件或者文件目录的File数组
        */
        File file = new File("d:" + File.separator + "one" + File.separator + "two" + "hi.txt");

        String[] strings = file.list();
        for (String s : strings) {
            System.out.println(s);
        }

        System.out.println();

        File[] files = file.listFiles();
        for (File f : files) {
            System.out.println(f);
        }

    }
重命名功能
public boolean renameTo(File dest) 把文件重命名为指定的文件路径
/*
    public boolean renameTo(File dest):把文件重命名为指定的文件路径
    比如:file.renameTo(file1)为例:
    要想保证返回true,需要file在硬盘中是存在的,且file1不能在硬盘中存在。
    */
    @Test
    public void test4() {
        File file = new File("hello.txt");
        File file1 = new File("d:" + File.separator + "one" + File.separator + "two" + "hi.txt");

        boolean renameTo = file.renameTo(file1);
        System.out.println(renameTo);

    }
判断功能
- public boolean isDirectory() 判断是否是文件目录
- public boolean isFile() 判断是否是文件
- public boolean exists() 判断是否存在
- public boolean canRead() 判断是否可读
- public boolean canWrite() 判断是否可写
- public boolean isHidden() 判断是否隐藏
 	@Test
    public void test5() {

        File file = new File("hello.txt"); //文件
        //file = new File("hello1.txt");

        System.out.println(file.isDirectory()); //public boolean isDirectory() 判断是否是文件目录
        System.out.println(file.isFile()); //public boolean isFile() 判断是否是文件
        System.out.println(file.exists()); //public boolean exists() 判断是否存在
        System.out.println(file.canRead()); //public boolean canRead() 判断是否可读
        System.out.println(file.canWrite()); //public boolean canWrite() 判断是否可写
        System.out.println(file.isHidden()); //public boolean isHidden() 判断是否隐藏

        System.out.println();

        File file1 = new File("d:" + File.separator + "one" + File.separator + "two"); //文件目录
        //file1 = new File("d:" + File.separator + "one" + File.separator + "two1");
        System.out.println(file1.isDirectory());
        System.out.println(file1.isFile());
        System.out.println(file1.exists());
        System.out.println(file1.canRead());
        System.out.println(file1.canWrite());
        System.out.println(file1.isHidden());

    }
创建、删除功能
- public boolean createNewFile() throws IOException 创建文件。若文件存在,则不创建,返回false.
- public boolean mkdir() 创建文件目录。如果此文件目录存在,就不创建了。如果此文件目录的上层目录不存在,也不创建。
- public boolean mkdirs() 创建文件目录。如果上层文件目录不存在,一并创建。
注意事项:如果创建文件或者文件目录没有写盘符路径 ,那么默认在项目路径下 。 - public boolean delete() 删除文件或者文件夹。
删除注意事项:Java中的删除不走回收站。
要删除一个文件目录,请注意该文件目录内不能包含文件或者文件目录。
	@Test
    public void test6() throws IOException {

        File file = new File("hello.txt");

        if (!file.exists()) {
            //文件的创建
            file.createNewFile(); //public boolean createNewFile() 创建文件。若文件存在,则不创建,返回false。
            System.out.println("创建成功");
        } else {//文件存在
            file.delete(); //public boolean delete() 删除文件或者文件夹
            System.out.println("删除成功");
        }

    }

    @Test
    public void test7() {

        //文件目录的创建
        File file = new File("d:" + File.separator + "one" + File.separator + "two");
        boolean mkdir = file.mkdir(); //public boolean mkdir() 创建文件目录。如果此文件目录存在,就不创建了。如果此文件目录的上层目录不存在,也不创建。
        if (mkdir) {
            System.out.println("创建成功1");
        }

        File file1 = new File("d:" + File.separator + "one" + File.separator + "two1");

        boolean mkdir1 = file1.mkdirs(); //public boolean mkdirs() 创建文件目录。如果此文件目录存在,就不创建了。如果上层文件目录不存在,一并创建。
        if (mkdir1) {
            System.out.println("创建成功2");
        }

        //要想删除成功,two文件目录下不能有子目录或文件
        File file2 = new File("d:" + File.separator + "one" + File.separator + "two");
        //file2 = new File("d:" + File.separator + "one" + File.separator + "two1");
        System.out.println(file2.delete());

    }
File dir1 = new File(“D:/IOTest/dir1”);
if (!dir1.exists()) { // 如果D:/IOTest/dir1不存在,就创建为目录
dir1.mkdir();
}
// 创建以dir1为父目录,名为"dir2"的File对象
File dir2 = new File(dir1, “dir2”);
if (!dir2.exists()) { // 如果还不存在,就创建为目录
dir2.mkdirs();
}
File dir4 = new File(dir1, “dir3/dir4”);
if (!dir4.exists()) {
dir4.mkdirs();
}
// 创建以dir2为父目录,名为"test.txt"的File对象
File file = new File(dir2, “test.txt”);
if (!file.exists()) { // 如果还不存在,就创建为文件
file.createNewFile();
}
案例分析
案例一
	@Test
    public void test1() throws IOException {

        File file = new File("d:" + File.separator + "one" + File.separator + "two" + File.separator + "hello.txt");

        //创建一个与file同目录下的另外一个文件,文件名为:hi.txt
        File destFile = new File(file.getParent(),"hi.txt");

        boolean newFile = destFile.createNewFile();

        if(newFile){
            System.out.println("创建成功!");
        }

    }
案例二
判断指定目录下是否有后缀名为.jpg的文件,如果有,就输出该文件名称。
	//方法1
	@Test
	public void test1() {

		File file = new File("d:" + File.separator + "code");

		String[] fileNames = file.list();

		for(String fileName : fileNames){

			if(fileName.endsWith(".jpg")){
				System.out.println(fileName);
			}

		}

	}

	//方法二
	@Test
	public void test2() {

		File file = new File("d:" + File.separator + "code");

		File[] listFiles = file.listFiles();

		for(File file1 : listFiles){

			if(file1.getName().endsWith(".jpg")){
				System.out.println(file.getAbsolutePath());
			}
		}

	}

	/*
	方法3
	File类提供了两个文件过滤器方法
	public String[] list(FilenameFilter filter)
	public File[] listFiles(FileFilter filter)
	*/
	@Test
	public void test3() {

		File srcFile = new File("d:" + File.separator + "code");

		File[] subFiles = srcFile.listFiles(new FilenameFilter() {

			@Override
			public boolean accept(File dir, String name) {
				return name.endsWith(".jpg");
			}
		});

		for(File file : subFiles){

			System.out.println(file.getAbsolutePath());

		}

	}

	/*
	方法3:lambda表达式
	 File类提供了两个文件过滤器方法
	 public String[] list(FilenameFilter filter)
	 public File[] listFiles(FileFilter filter)
	*/
	@Test
	public void test4() {

		File srcFile = new File("d:" + File.separator + "code");

		File[] subFiles = srcFile.listFiles((dir, name) -> name.endsWith(".jpg"));

		for(File file : subFiles){

			System.out.println(file.getAbsolutePath());

		}

	}
案例三
遍历指定目录所有文件名称,包括子文件目录中的文件。
拓展1:并计算指定目录占用空间的大小
拓展2:删除指定文件目录及其下的所有文件
public class ListFilesTest {

	public static void main(String[] args) {

		// 递归:文件目录
		/** 打印出指定目录所有文件名称,包括子文件目录中的文件 */

		// 1.创建目录对象
		File dir = new File("E:\\teach\\01_javaSE\\Java编程语言\\3_软件");

		// 2.打印目录的子文件
		printSubFile(dir);

	}

	public static void printSubFile(File dir) {

		// 打印目录的子文件
		File[] subfiles = dir.listFiles();

		for (File f : subfiles) {
			if (f.isDirectory()) { //文件目录
				printSubFile(f);
			} else { //文件
				System.out.println(f.getAbsolutePath());
			}

		}

	}

	//方式二:循环实现
	//列出file目录的下级内容,仅列出一级的话
	//使用File类的String[] list()比较简单
	public void listSubFiles(File file) {

		if (file.isDirectory()) {
			String[] all = file.list();
			for (String s : all) {
				System.out.println(s);
			}
		} else {
			System.out.println(file + "是文件!");
		}

	}

	//列出file目录的下级,如果它的下级还是目录,接着列出下级的下级,依次类推
	//建议使用File类的File[] listFiles()
	public void listAllSubFiles(File file) {

		if (file.isFile()) {
			System.out.println(file);
		} else {
			File[] all = file.listFiles();
			//如果all[i]是文件,直接打印
			//如果all[i]是目录,接着再获取它的下一级
			for (File f : all) {
				listAllSubFiles(f);// 递归调用:自己调用自己就叫递归
			}
		}

	}

	//拓展1:求指定目录所在空间的大小
	//求任意一个目录的总大小
	public long getDirectorySize(File file) {
		// file是文件,那么直接返回file.length()
		// file是目录,把它的下一级的所有大小加起来就是它的总大小
		long size = 0;
		if (file.isFile()) {
			size += file.length();
		} else {
			File[] all = file.listFiles();// 获取file的下一级
			// 累加all[i]的大小
			for (File f : all) {
				size += getDirectorySize(f);// f的大小;
			}
		}
		return size;
	}

	// 拓展2:删除指定的目录
	public void deleteDirectory(File file) {
		// 如果file是文件,直接delete
		// 如果file是目录,先把它的下一级干掉,然后删除自己
		if (file.isDirectory()) {
			File[] all = file.listFiles();
			// 循环删除的是file的下一级
			for (File f : all) {// f代表file的每一个下级
				deleteDirectory(f);
			}
		}
		// 删除自己
		file.delete();
	}

}
I/O流原理及流的分类
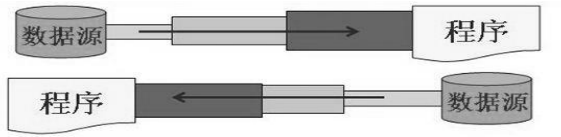
输入(input):读取外部数据(磁盘、光盘等存储设备的数据)到程序(内存)中。
输出(output):将程序(内存)数据输出到磁盘、光盘等存储设备中。
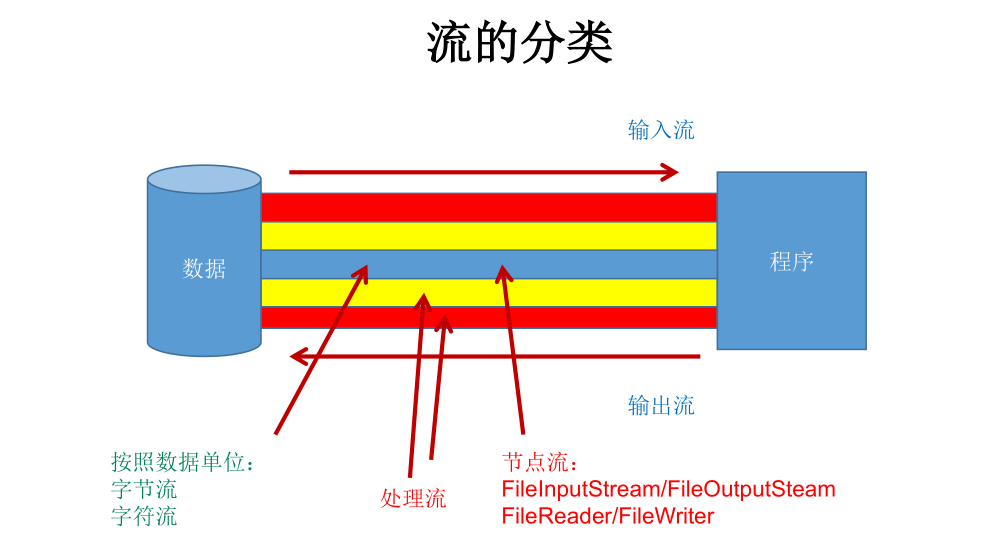
- 按操作数据单位不同分为:字节流(8 bit) 、字符流(16 bit)
- 按数据流的流向不同分为: 输入流、输出流
- 按流的角色的不同分为: 节点流、处理流
| (抽象基类) | 字节流 | 字符流 |
|---|---|---|
| 输入流 | InputStream | Reader |
| 输出流 | OutputStream | Writer |
- Java的IO流共涉及40多个类,实际上非常规则,都是从如下4个抽象基类派生的。
- 由这四个类派生出来的子类名称都是以其父类名作为子类名后缀。
| 分类 | 字节输入流 | 字节输出流 | 字符输入流 | 字符输出流 |
|---|---|---|---|---|
| 抽象基类 | InputStream | OutputStream | Reader | Writer |
| 访问文件 | FileInputStream | FileOutputStream | FileReader | FileWriter |
| 访问数组 | ByteArrayInputStream | ByteArrayOutputStream | CharArrayReader | CharArrayWriter |
| 访问管道 | PipedInputStream | PipedOutputStream | PipedReader | PipedWriter |
| 访问字符串 | StringReader | StringWriter | ||
| 缓冲流 | BufferedInputStream | BufferedOutputStream | BufferedReader | BufferedWriter |
| 转换流 | InputStreamReader | OutStreamWriter | ||
| 对象流 | ObjectInputStream | ObjectOutputStream | ||
| FilterInputStream | FilterOutputStream | FilterReader | FilterWriter | |
| 打印流 | PrintStream | PrintWriter | ||
| 推回输入流 | PushbackInputStream | PushbackReader | ||
| 特殊流 | DataInputStream | DataOutputStream | ||
| 节点流和处理流 |
- 节点流:直接从数据源或目的地读写数据

- 处理流:不直接连接到数据源或目的地,而是“连接”在已存在的流(节点流或处理流)之上,通过对数据的处理为程序提供更为强大的读写功能。
流的体系结构
| 抽象基类 | 节点流(或文件流) | 缓冲流(处理流的一种) |
|---|---|---|
| InputStream | FileInputStream (read(byte[] buffer)) | BufferedInputStream (read(byte[] buffer)) |
| OutputStream | FileOutputStream (write(byte[] buffer,0,len) | BufferedOutputStream (write(byte[] buffer,0,len) / flush() |
| Reader | FileReader (read(char[] cbuf)) | BufferedReader (read(char[] cbuf) / readLine()) |
| Writer | FileWriter (write(char[] cbuf,0,len) | BufferedWriter (write(char[] cbuf,0,len) / flush() |
字符流
FileReader
read()
/*
    将XXX(模块)下的hello.txt文件内容读入程序中,并输出到控制台

    说明点:
    1、read()的理解:返回读入的一个字符。如果达到文件末尾,返回-1。
    2、异常处理:为了保证流资源一定可以执行关闭操作,需要使用try-catch-finally处理。
    3、读入的文件一定要存在,否则就会报FileNotFoundException异常。
    */
    @Test
    public void testFileReader(){

        FileReader fileReader = null;

        try {

            //1、实例化File类的对象,指明要操作的文件
            File file = new File("hello.txt"); //相对于当前Module

            //2、提供具体的流
            fileReader = new FileReader(file);

            //3、数据的读入;read():返回读入的一个字符。如果达到文件末尾,返回-1

            //写法一:
            /*int data = fileReader.read();
            while(data != -1){
                System.out.print((char)data);
                data = fileReader.read();
        }*/

            //写法二:语法上针对于写法一的修改
            int data;
            while((data = fileReader.read()) != -1){
                System.out.print((char)data);
            }

        } catch (IOException e) {
            e.printStackTrace();
        } finally {

            //4、流的关闭操作
            /*try {
                if(fileReader != null)
                    fileReader.close();
            } catch (IOException e) {
                e.printStackTrace();
            }*/

            //或
            if(fileReader != null){
                try {
                    fileReader.close();
                } catch (IOException e) {
                    e.printStackTrace();
                }
            }

        }

    }
read(char[] cbuf)
@Test
    public void testFileReader1() {

        FileReader fileReader = null;

        try {

            //1、File类的实例化
            File file = new File("hello.txt");

            //2、FileReader流的实例化
            fileReader = new FileReader(file);

            //3、读入的操作;//read(char[] cbuf):返回每次读入cbuf数组中的字符的个数。如果达到文件末尾,返回-1
            char[] cbuf = new char[5];
            int length;
            while((length = fileReader.read(cbuf)) != -1){

                //方式一:
                //错误的写法
                /*for(int i = 0;i < cbuf.length;i++){
                    System.out.print(cbuf[i]);
                }*/

                //正确的写法
                /*for(int i=0; i<length; i++){
                    System.out.print(cbuf[i]);
                }*/

                //方式二:
                //错误的写法,对应着方式一的错误的写法
                /*String str = new String(cbuf);
                System.out.print(str);*/

                //正确的写法
                String str = new String(cbuf,0, length);
                System.out.print(str);

            }

        } catch (IOException e) {
            e.printStackTrace();
        } finally {
            if(fileReader != null){
                //4、资源的关闭
                try {
                    fileReader.close();
                } catch (IOException e) {
                    e.printStackTrace();
                }

            }
        }

    }
FileWriter
/*
    从内存中写出数据到硬盘的文件里。

    说明:
    1、输出操作,对应的File可以不存在,不会报异常。
    2、public FileWriter(File file) throws IOException
       public FileWriter(File file, boolean append) throws IOException
           File对应的硬盘中的文件如果存在:
               如果流使用的构造器是:FileWriter(file, false)/FileWriter(file):对原有文件的覆盖
               如果流使用的构造器是:FileWriter(file, true) 不会对原有文件覆盖,而是在原有文件基础上追加内容
    */
    @Test
    public void testFileWriter() {

        FileWriter fileWriter = null;

        try {

            //1、提供File类的对象,指明写出到的文件
            File file = new File("hello1.txt");

            //2、提供FileWriter的对象,用于数据的写出。
            fileWriter = new FileWriter(file,false);

            //3、写出的操作
            fileWriter.write("I have a dream!\n");
            fileWriter.write("You need to have a dream!");

        } catch (IOException e) {
            e.printStackTrace();
        } finally {
            //4、流资源的关闭
            if(fileWriter != null){
                try {
                    fileWriter.close();
                } catch (IOException e) {
                    e.printStackTrace();
                }
            }
        }

    }
FileRead与FileWriter实现文本文件的复制
@Test
    public void testFileReaderAndFileWriter() {

        FileReader fileReader = null;
        FileWriter fileWriter = null;

        try {
            //1、创建File类的对象,指明读入和写出的文件
            File srcFile = new File("hello.txt");
            File destFile = new File("hello2.txt");

            //不能使用字符流来处理图片等字节数据
            //File srcFile = new File("a.jpg");
            //File destFile = new File("one.jpg");

            //2、创建输入流和输出流的对象
            fileReader = new FileReader(srcFile);
            fileWriter = new FileWriter(destFile);

            //3、数据的读入和写出操作
            char[] cbuf = new char[5];
            int length;//记录每次读入到cbuf数组中的字符的个数
            while((length = fileReader.read(cbuf)) != -1){

                fileWriter.write(cbuf, 0, length); //每次写出length个字符

            }

        } catch (IOException e) {
            e.printStackTrace();
        } finally {
            //4.关闭流资源
            //方式一:
            /*try {
                if(fileWriter != null)
                    fileWriter.close();
            } catch (IOException e) {
                e.printStackTrace();
            }finally{
                try {
                    if(fileReader != null)
                        fileReader.close();
                } catch (IOException e) {
                    e.printStackTrace();
                }
            }*/

            //方式二:
            try {
                if(fileWriter != null)
                    fileWriter.close();
            } catch (IOException e) {
                e.printStackTrace();
            }
            try {
                if(fileReader != null)
                    fileReader.close();
            } catch (IOException e) {
                e.printStackTrace();
            }

        }

    }
字节流
FileInputStream和FileOutputStream
1、对于文本文件(.txt、.java、.c、.cpp),使用字符流处理
2、对于非文本文件(.jpg、.mp3、.mp4、.avi、.doc、.ppt、...),使用字节流处理
使用字节流FileInputStream处理文本文件,可能出现乱码(比如文本文件中有中文)。
 @Test
    public void testFileInputStream() {

        FileInputStream fileInputStream = null;

        try {

            File file = new File("hello.txt");

            fileInputStream = new FileInputStream(file);

            //读数据
            byte[] buffer = new byte[5];
            int length; //记录每次读取的字节的个数
            while((length = fileInputStream.read(buffer)) != -1){

                String str = new String(buffer,0, length);
                System.out.print(str);

            }
        } catch (IOException e) {
            e.printStackTrace();
        } finally {
            if(fileInputStream != null){
                //关闭资源
                try {
                    fileInputStream.close();
                } catch (IOException e) {
                    e.printStackTrace();
                }

            }
        }

    }
实现对图片的复制操作
@Test
    public void testFileInputStreamAndFileOutputStreamCopyPicture() {

        FileInputStream fileInputStream = null;
        FileOutputStream fileOutputStream = null;

        try {

            File srcFile = new File("a.jpg");
            File destFile = new File("one.jpg");


            fileInputStream = new FileInputStream(srcFile);
            fileOutputStream = new FileOutputStream(destFile);

            //复制的过程
            byte[] buffer = new byte[5];
            int length;
            while ((length = fileInputStream.read(buffer)) != -1) {
                fileOutputStream.write(buffer, 0, length);
            }

        } catch (IOException e) {
            e.printStackTrace();
        } finally {
            close(fileInputStream, fileOutputStream);
        }

    }

    //关闭资源
    public void close(FileInputStream fileInputStream, FileOutputStream fileOutputStream) {
        if (fileOutputStream != null) {

            try {
                fileOutputStream.close();
            } catch (IOException e) {
                e.printStackTrace();
            }
        }
        if (fileInputStream != null) {
            try {
                fileInputStream.close();
            } catch (IOException e) {
                e.printStackTrace();
            }
        }
    }
指定路径下文件的复制
package com.jack.java;

import org.junit.Test;

import java.io.File;
import java.io.FileInputStream;
import java.io.FileOutputStream;
import java.io.IOException;

public class FileInputStreamAndFileOutputStreamTest {

    @Test
    public void testCopyFile() {

        long start = System.currentTimeMillis();

        String srcPath = "C:\\Users\\Administrator\\Desktop\\01-视频.avi";
        String destPath = "C:\\Users\\Administrator\\Desktop\\02-视频.avi";


        //String srcPath = "hello.txt";
        //String destPath = "hello3.txt";

        copyFile(srcPath, destPath);

        long end = System.currentTimeMillis();

        System.out.println("复制操作花费的时间为:" + (end - start));

    }


    //指定路径下文件的复制
    public void copyFile(String srcPath, String destPath) {

        FileInputStream fileInputStream = null;
        FileOutputStream fileOutputStream = null;

        try {
            File srcFile = new File(srcPath);
            File destFile = new File(destPath);

            fileInputStream = new FileInputStream(srcFile);
            fileOutputStream = new FileOutputStream(destFile);

            //复制的过程
            byte[] buffer = new byte[1024];
            int length;
            while ((length = fileInputStream.read(buffer)) != -1) {
                fileOutputStream.write(buffer, 0, length);
            }

        } catch (IOException e) {
            e.printStackTrace();
        } finally {
            close(fileInputStream, fileOutputStream);
        }

    }

    //关闭资源
    public void close(FileInputStream fileInputStream, FileOutputStream fileOutputStream) {
        if (fileOutputStream != null) {

            try {
                fileOutputStream.close();
            } catch (IOException e) {
                e.printStackTrace();
            }
        }
        if (fileInputStream != null) {
            try {
                fileInputStream.close();
            } catch (IOException e) {
                e.printStackTrace();
            }
        }
    }

}
缓冲流
处理流之一:缓冲流
- BufferedInputStream 处理字节
- BufferedOutputStream 处理字节
- BufferedReader 处理字符
- BufferedWriter 处理字符
作用:提供流的读取、写入的速度。
提高读写速度的原因:内部提供了一个缓冲区。
处理流,就是“套接”在已有的流的基础上。
BufferedInputStream和BufferedOutputStream
实现非文本文件的复制
@Test
    public void BufferedStreamTest() throws FileNotFoundException {

        BufferedInputStream bufferedInputStream = null;
        BufferedOutputStream bufferedOutputStream = null;

        try {

            //1 造文件
            File srcFile = new File("a.jpg");
            File destFile = new File("one.jpg");

            //2 造流
            //2.1 造节点流
            FileInputStream fileInputStream = new FileInputStream((srcFile));
            FileOutputStream fileOutputStream = new FileOutputStream(destFile);

            //2.2 造缓冲流
            bufferedInputStream = new BufferedInputStream(fileInputStream);
            bufferedOutputStream = new BufferedOutputStream(fileOutputStream);

            //3 复制的细节:读取、写入
            byte[] buffer = new byte[10];
            int length;
            while((length = bufferedInputStream.read(buffer)) != -1){
                bufferedOutputStream.write(buffer,0, length);
                //bufferedOutputStream.flush(); //刷新缓冲区
            }

        } catch (IOException e) {
            e.printStackTrace();
        } finally {

            //4.资源关闭
            //要求:先关闭外层的流,再关闭内层的流
            close(bufferedInputStream, bufferedOutputStream);

            //说明:关闭外层流的同时,内层流也会自动的进行关闭。关于内层流的关闭,我们可以省略.
            //fileOutputStream
            //fileInputStream
        }

    }

    private void close(BufferedInputStream bufferedInputStream, BufferedOutputStream bufferedOutputStream) {

        if(bufferedOutputStream != null){
            try {
                bufferedOutputStream.close();
            } catch (IOException e) {
                e.printStackTrace();
            }

        }
        if(bufferedInputStream != null){
            try {
                bufferedInputStream.close();
            } catch (IOException e) {
                e.printStackTrace();
            }

        }
    }
指定路径文件的复制
package com.jack.java;

import org.junit.Test;

import java.io.*;

public class BufferedTest {

    @Test
    public void testCopyFileWithBuffered() {

        long start = System.currentTimeMillis();

        String srcPath = "C:\\Users\\Administrator\\Desktop\\01-视频.avi";
        String destPath = "C:\\Users\\Administrator\\Desktop\\03-视频.avi";


        copyFileWithBuffered(srcPath, destPath);


        long end = System.currentTimeMillis();

        System.out.println("复制操作花费的时间为:" + (end - start));

    }

    //实现文件复制的方法
    public void copyFileWithBuffered(String srcPath, String destPath) {

        BufferedInputStream bufferedInputStream = null;
        BufferedOutputStream bufferedOutputStream = null;

        try {
            //1 造文件
            File srcFile = new File(srcPath);
            File destFile = new File(destPath);
            //2 造流
            //2.1 造节点流
            FileInputStream fileInputStream = new FileInputStream((srcFile));
            FileOutputStream fileOutputStream = new FileOutputStream(destFile);
            //2.2 造缓冲流
            bufferedInputStream = new BufferedInputStream(fileInputStream);
            bufferedOutputStream = new BufferedOutputStream(fileOutputStream);

            //3 复制的细节:读取、写入
            byte[] buffer = new byte[1024];
            int length;
            while ((length = bufferedInputStream.read(buffer)) != -1) {
                bufferedOutputStream.write(buffer, 0, length);
            }
        } catch (IOException e) {
            e.printStackTrace();
        } finally {
            //4.资源关闭
            //要求:先关闭外层的流,再关闭内层的流
            close(bufferedInputStream, bufferedOutputStream);

            //说明:关闭外层流的同时,内层流也会自动的进行关闭。关于内层流的关闭,可以省略。
            //fileOutputStream
            //fileInputStream

        }

    }

    private void close(BufferedInputStream bufferedInputStream, BufferedOutputStream bufferedOutputStream) {

        if (bufferedOutputStream != null) {
            try {
                bufferedOutputStream.close();
            } catch (IOException e) {
                e.printStackTrace();
            }

        }
        if (bufferedInputStream != null) {
            try {
                bufferedInputStream.close();
            } catch (IOException e) {
                e.printStackTrace();
            }

        }
    }

}
BufferedReader和BufferedWriter
使用BufferedReader和BufferedWriter实现文本文件的复制
package com.jack.java;

import org.junit.Test;

import java.io.*;

public class BufferedTest {

    @Test
    public void testBufferedReaderAndBufferedWriter(){

        BufferedReader bufferedReader = null;
        BufferedWriter bufferedWriter = null;

        try {

            //创建文件和相应的流
            bufferedReader = new BufferedReader(new FileReader(new File("dbcp.txt")));
            bufferedWriter = new BufferedWriter(new FileWriter(new File("dbcp1.txt")));

            //读写操作
            //方式一:使用char[]数组
            /*char[] cbuf = new char[1024];
            int length;
            while((length = bufferedReader.read(cbuf)) != -1){
                bufferedWriter.write(cbuf, 0, length);
                //bufferedWriter.flush();
            }*/

            //方式二:使用String
            String data;
            while((data = bufferedReader.readLine()) != null){

                //方法一:
                //bufferedWriter.write(data + "\n"); //data中不包含换行符

                //方法二:
                bufferedWriter.write(data); //data中不包含换行符
                bufferedWriter.newLine(); //提供换行的操作

            }

        } catch (IOException e) {
            e.printStackTrace();
        } finally {
            //关闭资源
            close(bufferedWriter, bufferedReader);
        }

    }

    private void close(BufferedWriter bufferedWriter, BufferedReader bufferedReader) {

        if (bufferedWriter != null) {

            try {
                bufferedWriter.close();
            } catch (IOException e) {
                e.printStackTrace();
            }

        }
        if (bufferedReader != null) {

            try {
                bufferedReader.close();
            } catch (IOException e) {
                e.printStackTrace();
            }

        }

    }

}
案例
案例一:图片的加密、解密
package com.jack.exer;

import org.junit.Test;

import java.io.FileInputStream;
import java.io.FileOutputStream;
import java.io.IOException;

public class PicTest {

    //图片的加密
    @Test
    public void test1() {

        FileInputStream fileInputStream = null;
        FileOutputStream fileOutputStream = null;

        try {

            fileInputStream = new FileInputStream("a.jpg");
            fileOutputStream = new FileOutputStream("secret.jpg");

            byte[] buffer = new byte[20];
            int length;
            while ((length = fileInputStream.read(buffer)) != -1) {

                //字节数组进行修改
                //错误的
                /*for(byte b : buffer){
                    b = (byte) (b ^ 5);
                }*/

                //正确的
                for (int i = 0; i < length; i++) {
                    buffer[i] = (byte)(buffer[i] ^ 5);
                }


                fileOutputStream.write(buffer, 0, length);
            }

        } catch (IOException e) {
            e.printStackTrace();
        } finally {
            close(fileInputStream, fileOutputStream);
        }

    }

    //图片的解密
    @Test
    public void test2() {

        FileInputStream fileInputStream = null;
        FileOutputStream fileOutputStream = null;

        try {
            fileInputStream = new FileInputStream("secret.jpg");
            fileOutputStream = new FileOutputStream("a.jpg");

            byte[] buffer = new byte[20];
            int length;
            while ((length = fileInputStream.read(buffer)) != -1) {

                //字节数组进行修改
                //错误的
                for(byte b : buffer){
                    b = (byte) (b ^ 5);
                }

                //正确的
                for (int i = 0; i < length; i++) {
                    buffer[i] = (byte)(buffer[i] ^ 5);
                }

                fileOutputStream.write(buffer, 0, length);

            }

        } catch (IOException e) {
            e.printStackTrace();
        } finally {
            close(fileInputStream, fileOutputStream);
        }

    }

    public void close(FileInputStream fileInputStream, FileOutputStream fileOutputStream) {

        if (fileOutputStream != null) {
            try {
                fileOutputStream.close();
            } catch (IOException e) {
                e.printStackTrace();
            }

        }
        if (fileInputStream != null) {
            try {
                fileInputStream.close();
            } catch (IOException e) {
                e.printStackTrace();
            }

        }

    }

}
案例二:获取文本上每个字符出现的次数
提示:遍历文本的每一个字符;字符及出现的次数保存在Map中;将Map中数据写入文件
package com.jack.exer;

import org.junit.Test;

import java.io.*;
import java.util.HashMap;
import java.util.Map;
import java.util.Set;

/**
 * 获取文本上字符出现的次数,把数据写入文件
 * <p>
 * 思路:
 * 1.遍历文本每一个字符
 * 2.字符出现的次数存在Map中
 * <p>
 * Map<Character,Integer> map = new HashMap<Character,Integer>();
 * map.put('a',18);
 * map.put('你',2);
 * <p>
 * 3.把map中的数据写入文件
 */
public class WordCount {
    /*
    说明:如果使用单元测试,文件相对路径为当前module
          如果使用main()测试,文件相对路径为当前工程
     */
    @Test
    public void testWordCount() {
        FileReader fr = null;
        BufferedWriter bw = null;
        try {
            //1.创建Map集合
            Map<Character, Integer> map = new HashMap<Character, Integer>();

            //2.遍历每一个字符,每一个字符出现的次数放到map中
            fr = new FileReader("dbcp.txt");
            int c = 0;
            while ((c = fr.read()) != -1) {
                //int 还原 char
                char ch = (char) c;
                // 判断char是否在map中第一次出现
                if (map.get(ch) == null) {
                    map.put(ch, 1);
                } else {
                    map.put(ch, map.get(ch) + 1);
                }
            }

            //3.把map中数据存在文件count.txt
            //3.1 创建Writer
            bw = new BufferedWriter(new FileWriter("wordcount.txt"));

            //3.2 遍历map,再写入数据
            Set<Map.Entry<Character, Integer>> entrySet = map.entrySet();
            for (Map.Entry<Character, Integer> entry : entrySet) {
                switch (entry.getKey()) {
                    case ' ':
                        bw.write("空格=" + entry.getValue());
                        break;
                    case '\t'://\t表示tab 键字符
                        bw.write("tab键=" + entry.getValue());
                        break;
                    case '\r'://
                        bw.write("回车=" + entry.getValue());
                        break;
                    case '\n'://
                        bw.write("换行=" + entry.getValue());
                        break;
                    default:
                        bw.write(entry.getKey() + "=" + entry.getValue());
                        break;
                }
                bw.newLine();
            }
        } catch (IOException e) {
            e.printStackTrace();
        } finally {
            //4.关流
            if (fr != null) {
                try {
                    fr.close();
                } catch (IOException e) {
                    e.printStackTrace();
                }

            }
            if (bw != null) {
                try {
                    bw.close();
                } catch (IOException e) {
                    e.printStackTrace();
                }

            }
        }

    }
}
转换流
InputStreamReader、OutputStreamWriter
处理流的一种,属于字符流
- InputStreamReader:将一个字节的输入流转换为字符的输入流
- OutputStreamWriter:将一个字符的输出流转换为字节的输出流
作用:提供字节流与字符流之间的转换
解码:字节、字节数组 —>字符数组、字符串
编码:字符数组、字符串 —> 字节、字节数组
字符集
- ASCII:美国标准信息交换码。用一个字节的7位可以表示。
- ISO8859-1:拉丁码表。欧洲码表,用一个字节的8位表示。
- GB2312:中国的中文编码表。最多两个字节编码所有字符
- GBK:中国的中文编码表升级,融合了更多的中文文字符号。最多两个字节编码
- Unicode:国际标准码,融合了目前人类使用的所有字符。为每个字符分配唯一的字符码。所有的文字都用两个字节来表示。
- UTF-8:变长的编码方式,可用1-4个字节来表示一个字符。
InputStreamReader的使用:实现字节的输入流到字符的输入流的转换
    @Test
    public void test1() throws IOException { //此时处理异常的话,仍然应该使用try-catch-finally

        FileInputStream fileInputStream = new FileInputStream("dbcp.txt");

        InputStreamReader inputStreamReader = new InputStreamReader(fileInputStream); //使用系统默认的字符集
        //参数2指明了字符集,具体使用哪个字符集,取决于文件dbcp.txt保存时使用的字符集
        //InputStreamReader inputStreamReader = new InputStreamReader(fileInputStream, "UTF-8"); //使用系统默认的字符集

        char[] cbuf = new char[20];
        int length;
        while((length = inputStreamReader.read(cbuf)) != -1){
            String str = new String(cbuf,0, length);
            System.out.print(str);
        }

        inputStreamReader.close();

    }
InputStreamReader和OutputStreamWriter的综合使用:复制功能
    @Test
    public void test2() throws Exception { //此时处理异常的话,仍然应该使用try-catch-finally

        //1、文件、造流
        File file = new File("dbcp.txt");
        File file1 = new File("dbcp_gbk.txt");

        FileInputStream fileInputStream = new FileInputStream(file);
        FileOutputStream fileOutputStream = new FileOutputStream(file1);

        InputStreamReader inputStreamReader = new InputStreamReader(fileInputStream, StandardCharsets.UTF_8);
        OutputStreamWriter outputStreamWriter = new OutputStreamWriter(fileOutputStream, "gbk");

        //2、读写过程
        char[] cbuf = new char[20];
        int length;
        while((length = inputStreamReader.read(cbuf)) != -1){
            outputStreamWriter.write(cbuf, 0, length);
        }

        //3.关闭资源
        outputStreamWriter.close();
        inputStreamReader.close();

    }
其他流的使用
标准的输入、输出流
- System.in 标准的输入流,默认从键盘输入
- System.out标准的输出流,默认从控制台输出
System类的setIn(InputStream is) / setOut(PrintStream ps)方式重新指定输入和输出的流。
/*
    从键盘输入字符串,要求将读取到的整行字符串转成大写输出。然后继续进行输入操作,直至当输入“e”或者“exit”时,退出程序。
    方法一:使用Scanner实现,调用next()返回一个字符串。(代码略)
    方法二:使用System.in实现。System.in  --->  转换流 ---> BufferedReader的readLine()
    注意:在idea中使用单元测试时,无法从键盘输入字符。在eclipse中可以。所以使用idea测试输入时要写在main方法中。
    */
    public static void main(String[] args) {

        BufferedReader bufferedReader = null;

        try {
            InputStreamReader inputStreamReader = new InputStreamReader(System.in);
            bufferedReader = new BufferedReader(inputStreamReader);

            while (true) {
                System.out.print("请输入字符串:");
                String data = bufferedReader.readLine();
                if ("e".equalsIgnoreCase(data) || "exit".equalsIgnoreCase(data)) {
                    System.out.println("程序结束!");
                    break;
                }

                String upperCase = data.toUpperCase();

                System.out.println(upperCase);

            }
        } catch (IOException e) {
            e.printStackTrace();
        } finally {
            if (bufferedReader != null) {
                try {
                    bufferedReader.close();
                } catch (IOException e) {
                    e.printStackTrace();
                }

            }
        }
    }
    /*
print:
请输入字符串:one
ONE
请输入字符串:two
TWO
请输入字符串:three
THREE
请输入字符串:e
程序结束!
*/
package com.jack.exer;
// MyInput.java: Contain the methods for reading int, double, float, boolean, short, byte and string values from the keyboard

import java.io.*;

public class MyInput {

    // Read a string from the keyboard
    public static String readString() {
        BufferedReader br = new BufferedReader(new InputStreamReader(System.in));

        // Declare and initialize the string
        String string = "";

        // Get the string from the keyboard
        try {
            string = br.readLine();

        } catch (IOException ex) {
            ex.printStackTrace();
            //System.out.println(ex);
        }

        // Return the string obtained from the keyboard
        return string;
    }

    // Read an int value from the keyboard
    public static int readInt() {
        return Integer.parseInt(readString());
    }

    // Read a double value from the keyboard
    public static double readDouble() {
        return Double.parseDouble(readString());
    }

    // Read a byte value from the keyboard
    public static double readByte() {
        return Byte.parseByte(readString());
    }

    // Read a short value from the keyboard
    public static double readShort() {
        return Short.parseShort(readString());
    }

    // Read a long value from the keyboard
    public static double readLong() {
        return Long.parseLong(readString());
    }

    // Read a float value from the keyboard
    public static double readFloat() {
        return Float.parseFloat(readString());
    }

}
打印流
PrintStream和PrintWriter
提供了一系列重载的print() 和 println()
@Test
    public void test2() {

        PrintStream printStream = null;

        try {

            FileOutputStream fileOutputStream = new FileOutputStream(new File("D:\\IO\\text.txt"));

            // 创建打印输出流,设置为自动刷新模式(写入换行符或字节 '\n' 时都会刷新输出缓冲区)
            printStream = new PrintStream(fileOutputStream, true);
            // 把标准输出流(控制台输出)改成文件
            System.setOut(printStream);

            for (int i = 0; i <= 255; i++) { // 输出ASCII字符
                System.out.print((char) i);
                if (i % 50 == 0) { // 每50个数据一行
                    System.out.println(); // 换行
                }
            }
        } catch (FileNotFoundException e) {
            e.printStackTrace();
        } finally {
            if (printStream != null) {
                printStream.close();
            }
        }

    }
数据流
DataInputStream 和 DataOutputStream
作用:用于读取或写出基本数据类型的变量或字符串
    //将内存中的字符串、基本数据类型的变量写出到文件中。
	@Test
    public void test3() throws IOException {

        DataOutputStream dataOutputStream = new DataOutputStream(new FileOutputStream("data.txt"));

        dataOutputStream.writeUTF("宋江");
        dataOutputStream.flush(); //刷新操作,将内存中的数据写入文件
        dataOutputStream.writeInt(23);
        dataOutputStream.flush();
        dataOutputStream.writeBoolean(true);
        dataOutputStream.flush();

        dataOutputStream.close(); //注意:处理异常的话,仍然应该使用try-catch-finally

    }

	/*
    将文件中存储的基本数据类型变量和字符串读取到内存中,保存在变量中。

    注意点:读取不同类型的数据的顺序要与当初写入文件时,保存的数据的顺序一致!
    */
    @Test
    public void test4() throws IOException {

        DataInputStream dataInputStream = new DataInputStream(new FileInputStream("data.txt"));

        String name = dataInputStream.readUTF();
        int age = dataInputStream.readInt();
        boolean isMale = dataInputStream.readBoolean();

        System.out.println("name = " + name);
        System.out.println("age = " + age);
        System.out.println("isMale = " + isMale);

        dataInputStream.close(); //注意:处理异常的话,仍然应该使用try-catch-finally

    }
案例
获取指定目录下的所有子目录和子文件。
package a_00001_save;

import java.io.File;
import java.util.ArrayList;
import java.util.List;

public class Test00005 {

	public static void main(String[] args) {

		List<String> listString = Test00005.getAllSubDirectoryOrFile("E:\\cooperate");

		if(listString != null) {
			for(String string : listString) {
				System.out.println(string);
			}
		}

	}

	/**
	 * 获取指定目录下的所有子目录和子文件
	 */
	public static List<String> getAllSubDirectoryOrFile(String directoryPath){

		//1、判断目标目录是否为null或空。
		if(directoryPath ==null || directoryPath.trim().length()==0){
			return null;
		}

		List<String> allSubDirectoryOrFileList = new ArrayList<String>();

		File file = new File(directoryPath);

		//2、判断目标目录是否存在。
		if(!file.exists()){
			System.out.println("指定目录不存在!");
			return null;
		}

		//如果是目录则递归,如果是文件则直接加入集合。
		//如果是目录
		if(file.isDirectory()){

			File[] fileArray = file.listFiles();

			//遍历目标目录下的所有子目录和子文件。
			for(File subDirectoryOrFile : fileArray){

				if(subDirectoryOrFile.isDirectory()){ //如果是子目录,则继续遍历。

					allSubDirectoryOrFileList.addAll(getAllSubDirectoryOrFile(subDirectoryOrFile.toString()));

					//将子目录也添加进集合
					allSubDirectoryOrFileList.add(subDirectoryOrFile.toString());

				//如果是文件,则直接添加到集合。
				}else{
					allSubDirectoryOrFileList.add(subDirectoryOrFile.toString());
				}
			}

		//如果是文件。
		}else{
			allSubDirectoryOrFileList.add(file.toString());
		}

		return allSubDirectoryOrFileList;

	}

}
递归
public static int sum(int n) {

		/*
		 * 1 + 2 + 3 + 4 + 5 + ...... + n
		 * 1 + 2 + 3 + 4 + 5 + ...... + (n-1) + n    sum(n-1) + n
		 *
		 * n = 1   1
		 * n = 2   1 + 2 = 3
		 * n = 3   1 + 2 + 3 = 6
		 *
		 * 1、递归出口,2、递归表达式(规律)
		 * */
		//递归出口为1。
		/*if(n==1) {
			return 1;
		}else {
			return sum(n-1) + n;
		}*/

		//递归出口为4。
		if(n==4) {
			return 10;
		}else {
			return sum(n-1) + n;
		}

	}
多线程
基本概念:程序、进程、线程
一、程序、进程、线程
1、程序(program)是为完成特定任务、用某种语言编写的一组指令的集合。即指一段静态的代码,静态对象。
2、进程(process)是程序的一次执行过程,或是正在运行的一个程序。是一个动态的过程:有它自身的产生、存在和消亡的过程(生命周期)。
(1)例如:运行中的QQ,运行中的MP3播放器。
(2)程序是静态的,进程是动态的。
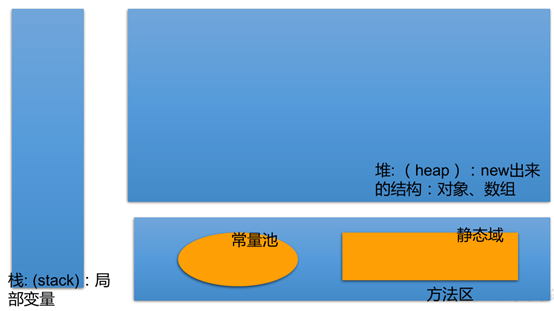
(3)进程作为资源分配的单位,系统在运行时会为每个进程分配不同的内存区域。
3、 线程(thread),进程可进一步细化为线程,是一个程序内部的一条执行路径。
(1)若一个进程同一时间并行执行多个线程,就是支持多线程的。
(2)线程作为调度和执行的单位,每个线程拥有独立的运行栈和程序计数器(pc),线程切换的开销小。
(3)一个进程中的多个线程共享相同的内存单元/内存地址空间,它们从同一堆中分配对象,可以访问相同的变量和对象。这就使得线程间通信更简便、高效。但多个线程操作共享的系统资源可能就会带来安全的隐患。
二、单核CPU和多核CPU的理解
1、单核CPU,其实是一种假的多线程,因为在一个时间单元内,也只能执行一个线程的任务。例如:虽然有多车道,但是收费站只有一个工作人员在收费,只有收了费才能通过,那么CPU就好比收费人员。如果有某个人不想交钱,那么收费人员可以把他“挂起”(晾着他,等他想通了,准备好了钱,再去收费)。因为CPU时间单元特别短,因此感觉不出来。
2、如果是多核的话,才能更好的发挥多线程的效率。(现在的服务器都是多核的)
3、一个Java应用程序java.exe,其实至少有三个线程:main()主线程,gc()垃圾回收线程,异常处理线程。当然如果发生异常,会影响主线程。
三、并行与并发
并行:多个CPU同时执行多个任务。比如:多个人同时做不同的事。
并发:一个CPU(采用时间片)同时执行多个任务。比如:秒杀、多个人做同一件事。
四、使用多线程的优点
背景:以单核CPU为例,只使用单个线程先后完成多个任务(调用多个方法),肯定比用多个线程来完成用的时间更短,为何仍需多线程呢?
多线程程序的优点:
1、多线程可以提高应用程序的响应。对图形化界面更有意义,可增强用户体验。
2.、提高计算机系统CPU的利用率。
3、改善程序结构。将既长又复杂的进程分为多个线程,独立运行,利于理解和修改。
五、何时需要多线程?
1、程序需要同时执行两个或多个任务。
2、程序需要实现一些需要等待的任务时,如用户输入、文件读写操作、网络操作、搜索等。
3、需要一些后台运行的程序时。
线程的创建和使用
以下程序不是多线程:
package multithreading_demo;

public class Student {

	public static void main(String[] args) {

		Student student = new Student();
		student.method2("hello");

	}

	public void method1(String string) {
		System.out.println("method1");
		System.out.println(string);
	}

	public void method2(String string) {
		System.out.println("method2");
		method1(string);
	}

}
/*
print:
method2
method1
hello
*/
多线程的创建方式一:继承Thread类
public class Thread extends Object implements Runnable
创建步骤:
1、创建一个继承Thread类的子类。
2、重写Thread类的run()方法。将此线程执行的操作声明在run()方法中。
3、创建Thread类的子类的对象。
4、通过此子类的对象调用父类的start()方法。
code:
package multithreading;

public class TestThread {

	public static void main(String[] args) {

		//3、创建Thread类的子类的对象。
		MyThread myThread = new MyThread();

		//4、通过此对象调用start();start()有两个作用:(1)启动当前线程(2)调用当前线程的run()
		myThread.start();

		/*
		问题1、不能通过直接调用run()的方式启动线程
		myThread.run();

		问题2、不能让已经启动的线程再次调用start(),会抛出异常IllegalThreadStateException
		Thread类中start()中源码:
		if (threadStatus != 0)
            throw new IllegalThreadStateException();
		myThread.start();
		*/

		//需要重新创建一个线程的对象
		MyThread myThread1 = new MyThread();
		myThread1.start();

		//如下仍然是在main线程中执行的
		for(int i=0; i<100; i++) {
			if(i%2!=0) {
				System.out.println(Thread.currentThread().getName()+ ":" + i);
			}
		}

	}

}

//1、创建一个继承于Thread类的子类。
class MyThread extends Thread {

	//2、重写Thread类的run方法。
	@Override
	public void run() {
		for(int i=0; i<100; i++) {
			if(i%2==0) {
				System.out.println(Thread.currentThread().getName() + ":" + i); //Thread.currentThread().getName() 获取当前线程的线程名称
			}
		}
	}

}
创建两个分线程,其中一个线程遍历100以内的偶数,另一个线程遍历100以内的奇数。
code:
package multithreading_demo;

//创建两个分线程,其中一个线程遍历100以内的偶数,另一个线程遍历100以内的奇数
public class TestThread {

	public static void main(String[] args) {

		MyThread myThread = new MyThread();
		MyThread1 myThread1 = new MyThread1();

		myThread.start();
		myThread1.start();

		for(int i=0; i<100; i++) {
		    if(i%2!=0) {
				System.out.println(Thread.currentThread().getName() + ":" + i + "***********************");
		    }

		}

	}

}

class MyThread extends Thread{

	@Override
	public void run() {

		for(int i=0; i<100; i++) {
			if(i%2==0) {
				System.out.println(Thread.currentThread().getName() + ":" + i);
			}

		}

	}

}

class MyThread1 extends Thread{

	@Override
	public void run() {

		for(int i=0; i<100; i++) {
			if(i%2!=0) {
				System.out.println(Thread.currentThread().getName() + ":" + i);
			}

		}

	}

}
匿名子类
code:
package multithreading_demo;

//创建两个分线程,其中一个线程遍历100以内的偶数,另一个线程遍历100以内的奇数
public class TestThread {

	public static void main(String[] args) {

		new Thread() {

			@Override
			public void run() {
				for(int i=0; i<100; i++) {
					if(i%2==0) {
						System.out.println(Thread.currentThread().getName() + ":" + i);
					}

				}
			};
		}.start();

		new Thread() {

			@Override
			public void run() {
				for(int i=0; i<100; i++) {
					if(i%2!=0) {
						System.out.println(Thread.currentThread().getName() + ":" + i);
					}

				}
			};
		}.start();

		for(int i=0; i<100; i++) {
			System.out.println(Thread.currentThread().getName() + "**********************");
		}

	}

}
Thread类的有关方法
- start() 启动当前线程,调用当前线程的run()。
- run() 通常需要重写Thread类中的此方法,将创建的线程要执行的操作声明在此方法中。
- currentThread() 静态方法,返回执行当前代码的线程。public static Thread currentThread()
- getId()
public long getId() - getName() 获取当前线程的名字。
public final String getName() - setName() 设置当前线程的名字。
- yield() 释放当前CPU的执行权。
- join() 在线程A中调用线程B的join(),此时线程A进入阻塞状态,直到线程B完全执行完以后,线程A才结束阻塞状态。
- sleep(long millis) 让当前线程“睡眠”指定的millitime毫秒。 在指定的millitime毫秒时间内,当前线程是阻塞状态。
public static native void sleep(long millis) throws InterruptedException
public static void sleep(long millis) throws InterruptedException - isAlive() 判断当前线程是否存活。
- getPriority()
public final int getPriority() - setPriority(int newPriority)
public final void setPriority(int newPriority)
getName()
package multithreading_demo;

//演示给线程命名
public class TestThread {

	public static void main(String[] args) {

		MyThread myThread = new MyThread();
		MyThread1 myThread1 = new MyThread1();

		myThread.setName("线程一");
		myThread1.setName("线程二");

		myThread.start();
		myThread1.start();

		Thread.currentThread().setName("主线程");

		for(int i=0; i<100; i++) {
			System.out.println(Thread.currentThread().getName() + "**********************");
		}

	}

}

class MyThread extends Thread {

	@Override
	public void run() {
		for(int i=0; i<100; i++) {
			if(i%2==0) {
				System.out.println(Thread.currentThread().getName() + ":" + i);
			}

		}
	};

}

class MyThread1 extends Thread {

	@Override
	public void run() {
		for(int i=0; i<100; i++) {
			if(i%2!=0) {
				System.out.println(Thread.currentThread().getName() + ":" + i);
			}

		}
	};

}
Thread类的构造方法给线程命名
code:
package multithreading_demo;

//演示给线程命名
public class TestThread {

	public static void main(String[] args) {

		MyThread myThread = new MyThread("线程一");
		MyThread1 myThread1 = new MyThread1("线程二");

		myThread.start();
		myThread1.start();

		Thread.currentThread().setName("主线程");

		for(int i=0; i<100; i++) {
			System.out.println(Thread.currentThread().getName() + "**********************");
		}

	}

}

class MyThread extends Thread {

	public MyThread(String name) {
		super(name);
	}

	@Override
	public void run() {
		for(int i=0; i<100; i++) {
			if(i%2==0) {
				System.out.println(Thread.currentThread().getName() + ":" + i);
			}

		}
	};

}

class MyThread1 extends Thread {

	public MyThread1(String name) {
		super(name);
	}

	@Override
	public void run() {
		for(int i=0; i<100; i++) {
			if(i%2!=0) {
				System.out.println(Thread.currentThread().getName() + ":" + i);
			}

		}
	};

}
yield()
释放当前CPU的执行权
code:
package multithreading_demo;

public class TestThread {

	public static void main(String[] args) {

		MyThread myThread = new MyThread("线程一");
		MyThread1 myThread1 = new MyThread1("线程二");

		myThread.start();
		myThread1.start();

		Thread.currentThread().setName("主线程");

		for(int i=0; i<100; i++) {
			System.out.println(Thread.currentThread().getName() + "**********************");
		}

	}

}

class MyThread extends Thread {

	public MyThread(String name) {
		super(name);
	}

	@Override
	public void run() {
		for(int i=0; i<100; i++) {
			if(i%2==0) {
				System.out.println(Thread.currentThread().getName() + ":" + i);
			}

			if(i%20==0) {
				yield(); //释放当前CPU的执行权
			}

		}
	};

}

class MyThread1 extends Thread {

	public MyThread1(String name) {
		super(name);
	}

	@Override
	public void run() {
		for(int i=0; i<100; i++) {
			if(i%2!=0) {
				System.out.println(Thread.currentThread().getName() + ":" + i);
			}

		}
	};

}
join()
在线程A中调用线程B的join(),此时线程A进入阻塞状态,直到线程B完全执行完以后,线程A才结束阻塞状态。
package multithreading_demo;

public class TestThread {

	public static void main(String[] args) {

		MyThread myThread = new MyThread("Thread0");
		MyThread1 myThread1 = new MyThread1("Thread1");

		myThread.start();
		myThread1.start();

		Thread.currentThread().setName("主线程");

		for(int i=0; i<100; i++) {
			System.out.println(Thread.currentThread().getName() + ":" + i + "**********************");

			if(i==20) {
				try {
					myThread.join();
				} catch (InterruptedException e) {
					e.printStackTrace();
				}
			}
		}

	}

}

class MyThread extends Thread {

	public MyThread(String name) {
		super(name);
	}

	@Override
	public void run() {
		for(int i=0; i<100; i++) {
			if(i%2==0) {
				System.out.println(Thread.currentThread().getName() + ":" + i);
			}

		}
	};

}

class MyThread1 extends Thread {

	public MyThread1(String name) {
		super(name);
	}

	@Override
	public void run() {
		for(int i=0; i<100; i++) {
			if(i%2!=0) {
				System.out.println(Thread.currentThread().getName() + ":" + i);
			}

		}
	};

}
sleep()
sleep(long milli) 让当前线程“睡眠”指定的milli毫秒。 在指定的millitime毫秒时间内,当前线程是阻塞状态
package multithreading_demo;

public class TestThread {

	public static void main(String[] args) {

		MyThread myThread = new MyThread("Thread0");
		MyThread1 myThread1 = new MyThread1("Thread1");

		myThread.start();
		myThread1.start();

		Thread.currentThread().setName("main");

		for(int i=0; i<100; i++) {
			System.out.println(Thread.currentThread().getName() + ":" + i + "**********************");
		}

	}

}

class MyThread extends Thread {

	public MyThread(String name) {
		super(name);
	}

	@Override
	public void run() {
		for(int i=0; i<100; i++) {
			if(i%2==0) {

				try {
					sleep(1000);
				} catch (InterruptedException e) {
					e.printStackTrace();
				}
				System.out.println(Thread.currentThread().getName() + ":" + i);
			}

		}
	};

}

class MyThread1 extends Thread {

	public MyThread1(String name) {
		super(name);
	}

	@Override
	public void run() {
		for(int i=0; i<100; i++) {
			if(i%2!=0) {
				System.out.println(Thread.currentThread().getName() + ":" + i);
			}

		}
	};

}
isAlive()
判断当前线程是否存活
package multithreading_demo;

public class TestThread {

	public static void main(String[] args) {

		MyThread myThread = new MyThread("Thread0");
		MyThread1 myThread1 = new MyThread1("Thread1");

		myThread.start();
		myThread1.start();

		Thread.currentThread().setName("main");

		for(int i=0; i<100; i++) {
			try {
				myThread.join();
			} catch (InterruptedException e) {
				e.printStackTrace();
			}
			System.out.println(Thread.currentThread().getName() + ":" + i + "**********************");

		}

		System.out.println(myThread.isAlive());
	}

}

class MyThread extends Thread {

	public MyThread(String name) {
		super(name);
	}

	@Override
	public void run() {
		for(int i=0; i<100; i++) {
			if(i%2==0) {
				System.out.println(Thread.currentThread().getName() + ":" + i);
			}

		}
	};

}

class MyThread1 extends Thread {

	public MyThread1(String name) {
		super(name);
	}

	@Override
	public void run() {
		for(int i=0; i<100; i++) {
			if(i%2!=0) {
				System.out.println(Thread.currentThread().getName() + ":" + i);
			}

		}
	};

}
线程的优先级
线程的优先级:
MAX_PRIORITY :10 public static final int MAX_PRIORITY
MIN _PRIORITY :1 public static final int MIN_PRIORITY
NORM_PRIORITY :5 public static final int NORM_PRIORITY
如何获取和设置当前线程的优先级?
getPriority() public final int getPriority()
setPriority(int newPriority) public final void setPriority(int newPriority)
package multithreading_demo;

/*
线程的优先级
MAX_PRIORITY :10
MIN _PRIORITY :1
NORM_PRIORITY :5

如何获取和设置当前线程的优先级
getPriority()
setPriority(int newPriority)

高优先级的线程要抢占低优先级线程cpu的执行权,但是只是从概率上讲。高优先级的线程高概率的情况下被执行,
并不意味着只有当高优先级的线程执行完以后,低优先级的线程才执行。
*/
public class TestThread {

	public static void main(String[] args) {

		MyThread myThread = new MyThread();
		MyThread1 myThread1 = new MyThread1();

		myThread.setName("thread0");
		myThread1.setName("thread1");
		Thread.currentThread().setName("main");

		//设置分线程的优先级
		myThread.setPriority(Thread.MAX_PRIORITY);
		myThread1.setPriority(Thread.MIN_PRIORITY);

		myThread.start();
		myThread1.start();

		for(int i=0; i<100; i++) {

			System.out.println(Thread.currentThread().getName() + ":" + Thread.currentThread().getPriority() + ": " + i + "**********************");

		}

	}

}

class MyThread extends Thread {

	@Override
	public void run() {
		for(int i=0; i<100; i++) {
			if(i%2==0) {
				System.out.println(getName() + ":" + getPriority() + ": " + i);
			}

		}
	};

}

class MyThread1 extends Thread {

	@Override
	public void run() {
		for(int i=0; i<100; i++) {
			if(i%2!=0) {
				System.out.println(getName() + ":" + getPriority() + ": " + i);
			}

		}
	};

}
继承Thread类实现多窗口买票
package multithreading_demo;

public class TestThread1 {

	public static void main(String[] args) {

		MyThread2 myThread = new MyThread2();
		MyThread2 myThread1 = new MyThread2();
		MyThread2 myThread2 = new MyThread2();

		myThread.setName("窗口1");
		myThread1.setName("窗口2");
		myThread2.setName("窗口3");

		myThread.start();
		myThread1.start();
		myThread2.start();

	}

}

class MyThread2 extends Thread{

	private static int ticket = 100; //100张票

	@Override
	public void run() {

		while(true) {

			synchronized(MyThread2.class) {

				if(ticket>0) {
					System.out.println(getName() + ":" + "卖票号:" + ticket);
					ticket--;
				}else {
					break;
				}

			}

		}

	}

}
多线程的创建方式二:实现Runnable接口
创建多线程的方式二:实现Runnable接口。
创建步骤:
1、创建一个实现了Runnable接口的类。
2、实现类去实现Runnable中的抽象方法:run()。
3、创建实现类的对象。
4、将此对象作为参数传递到Thread类的构造器中,创建Thread类的对象。
5、通过Thread类的对象调用start()。
package multithreading;

/*
创建多线程的方式二:实现Runnable接口
1、创建一个实现了Runnable接口的类
2、实现类去实现Runnable中的抽象方法:run()
3、创建实现类的对象
4、将此对象作为参数传递到Thread类的构造器中,创建Thread类的对象
5、通过Thread类的对象调用start()

比较创建线程的两种方式:
开发中优先选用实现Runnable接口的方式
原因:1、实现的方式没有类的单继承性的局限性
2、实现的方式更适合处理多个线程有共享数据的情况

联系:public class Thread implements Runnable
相同点:两种方式都需要重写run(),将线程要执行的逻辑声明在run()中
*/
public class TestRunnable {

	public static void main(String[] args) {

		//3、创建实现类的对象
		MyRunnable myRunnable = new MyRunnable();

		//4、将此对象作为参数传递到Thread类的构造器中,创建Thread类的对象
		Thread thread = new Thread(myRunnable);
		//thread.setDaemon(true); 将用户线程变成守护线程
		//5、通过Thread类的对象调用start()
		thread.setName("线程1");
		thread.start();

		//在启动一个线程,遍历100以内的偶数
		Thread thread1 = new Thread(myRunnable);
		thread1.setName("线程2");
		thread1.start();
	}

}

//1、创建一个实现了Runnable接口的类
class MyRunnable implements Runnable {

	//2、实现类去实现Runnable接口中的抽象方法:run()
	@Override
	public void run() {
		for (int i = 0; i < 100; i++) {
			if(i % 2 == 0) {
				System.out.println(Thread.currentThread().getName() + ":" + i);
			}
		}

	}

}
实现Runnable接口实现多窗口买票
package multithreading;

/*3个窗口卖票,总票数为100

问题:卖票过程中,出现了重票和错票
原因:当某个线程操作车票的过程中,尚未操作完成时,其他线程参与进来,也操作车票。
解决方案:当一个线程A在操作ticket的时候,其他线程不能参与进来,直到线程A操作完ticket时,其他线程才可以开始操作ticket,这种情况即使线程A出现了阻塞,也不能被改变。

在Java中,通过同步机制来解决线程安全问题
方式一:同步代码块
synchronized(同步监视器) {
	//需要被同步的代码
}
说明:操作共享数据的代码,即为需要被同步的代码
      共享数据:多个线程共同操作的数据,比如ticket就是共享数据
    同步监视器(俗称:锁):任何一个类的对象,都可以充当锁
   要求:多个线程必须要共用同一把锁
   补充:在实现Runnable接口创建多线程的方式中,可以使用this充当监视器

方式二:同步方法
如果操作共享数据的代码正好完整的声明在一个方法中,将此方法声明同步的

同步的方式:
好处:解决了线程安全问题
局限性:操作同步代码时只能有一个线程参与,其他的线程等待,相当于是一个单线程的过程
*/
public class TestRunnable1 {

	public static void main(String[] args) {

		MyRunnable1 myRunnable = new MyRunnable1();

		Thread thread1 = new Thread(myRunnable);
		Thread thread2 = new Thread(myRunnable);
		Thread thread3 = new Thread(myRunnable);

		thread1.setName("窗口1");
		thread2.setName("窗口2");
		thread3.setName("窗口3");

		thread1.start();
		thread2.start();
		thread3.start();

	}

}

class MyRunnable1 implements Runnable {

	private int ticket = 100;

	@Override
	public void run() {
		while(true) {
			synchronized (this) { //此时的this是唯一的MyRunnable对象
				if(ticket>0) {

					try {
						Thread.sleep(100); //阻塞0.1s
					} catch (InterruptedException e) {
						e.printStackTrace();
					}

					System.out.println(Thread.currentThread().getName() + " : 卖票,票号为:" + ticket);

					ticket--;
				}else {
					break;
				}
			}

		}

	}

}
线程的生命周期
JDK中用Thread.State类定义了线程的几种状态
要想实现多线程,必须在主线程中创建新的线程对象。Java语言使用Thread类及其子类的对象来表示线程,在它的一个完整的生命周期中通常要经历如下的五种状态:
1、新建:当一个Thread类或其子类的对象被声明并创建时,新生的线程对象处于新建状态
2、就绪:处于新建状态的线程被start()后,将进入线程队列等待CPU时间片,此时它已具备了运行的条件,只是没分配到CPU资源
3、运行:当就绪的线程被调度并获得CPU资源时,便进入运行状态, run()方法定义了线程的操作和功能
4、阻塞:在某种特殊情况下,被人为挂起或执行输入输出操作时,让出 CPU 并临时中止自己的执行,进入阻塞状态
5、死亡:线程完成了它的全部工作或线程被提前强制性地中止或出现异常导致结束
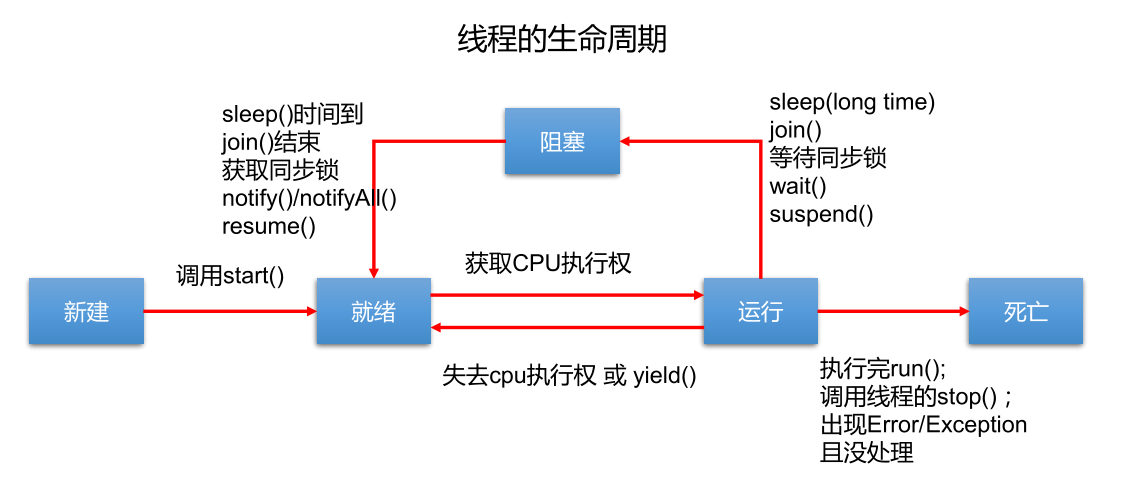
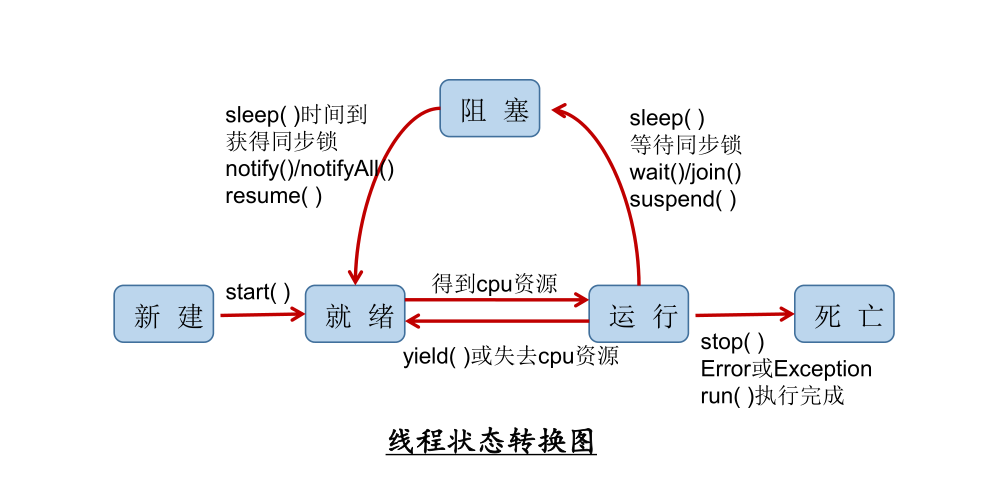
线程的同步
同步代码块
package a_00002.a_00000;

public class Test00000 {

	public static void main(String[] args) {

		DownloadFile downloadFile = new DownloadFile();

		//public Thread(Runnable target, String name)
		Thread thread = new Thread(downloadFile, "线程一(宋江)");
		Thread thread1 = new Thread(downloadFile, "线程二(卢俊义)");

		//thread.setName("线程一(宋江)");
		//thread1.setName("线程二(卢俊义)");

		thread.start();
		thread1.start();

	}

}

class DownloadFile implements Runnable{

	private static int size = 0;

	@Override
	public void run() {

		while(size<100) {

			//同步代码块
			synchronized(this) {

				if(size==100) {
					break;
				}

				size++;
				System.out.println(Thread.currentThread().getName() + "----下载了1mb......剩余下载大小:" + (100-size));

			}

		}

		System.out.println(Thread.currentThread().getName() + "下载完成。");

	}

}
Lock
package a_00002.a_00000;

import java.util.concurrent.locks.Lock;
import java.util.concurrent.locks.ReentrantLock;

public class Test00000 {

	public static void main(String[] args) {

		DownloadFile downloadFile = new DownloadFile();

		//public Thread(Runnable target, String name)
		Thread thread = new Thread(downloadFile, "线程一(宋江)");
		Thread thread1 = new Thread(downloadFile, "线程二(卢俊义)");

		//thread.setName("线程一(宋江)");
		//thread1.setName("线程二(卢俊义)");

		thread.start();
		thread1.start();

	}

}

class DownloadFile implements Runnable{

	private static int size = 0;

	//锁对象:唯一
	private static final Lock LOCK = new ReentrantLock();

	@Override
	public void run() {

		Thread thread = Thread.currentThread();

		while(size<100) {

			download(thread);

		}

		System.out.println(thread.getName() + "下载完成。");

	}

	public void download(Thread thread) {

		LOCK.lock();

		if(size>=100) {
			return;
		}

		size++;
		System.out.println(thread.getName() + "----下载了1mb......剩余下载大小:" + (100-size));

		LOCK.unlock();

	}

}
线程的通信
JDK5.0新增线程创建方式
线程池
package a;

import java.util.concurrent.ArrayBlockingQueue;
import java.util.concurrent.ThreadPoolExecutor;
import java.util.concurrent.TimeUnit;

/*
 * 线程池
 * */
public class TestThreadPool {

	public static void main(String[] args) {

		/*线程池的概念:

		     为什么需要线程池?
		          多线程的使用,每次都需要创建线程,释放线程资源等,增加了响应时间,降低了执行效率。
		     基本概念:1、将在缓存中,长期维护一组可用线程。线程在使用时,直接取出,在使用完成后,放回缓存中。减少了操作的时间,提高了效率。
		  		    2、在缓存中的线程, 使用如果达到峰值,线程池可提供更多的临时线程扩展使用。如果线程任务数量>已有线程总数,还可以借助任务缓存队列,临时存储任务,等待执行。

	         线程池的基本使用:

	       	方式一: 使用线程池管理器: ThreadPoolExecutor
	    */

		ArrayBlockingQueue<Runnable> arrayBlockingQueue = new ArrayBlockingQueue<>(5);
	    //参数:1、核心线程数量。2、最大支持线程池中容量(已有核心线程+扩展新线程)。 3、新线程的活跃周期。4、时间单位。5、任务队列。
		ThreadPoolExecutor threadPoolExecutor = new ThreadPoolExecutor( 5 , 10 , 30 , TimeUnit.SECONDS , arrayBlockingQueue);

		//模拟15个任务,交给线程池
		for (int i = 0; i < 15; i++) {

			Mytask myTask =new Mytask();

			/*
			 * 线程池处理任务的核心逻辑:
			 *     1、将任务分配给核心线程。
			 * 	   2、任务超出核心线程数量,将多余的任务缓存到队列中。
			 * 	   3、任务队列已满, 任务持续增加. 那么将触发线程池扩展新线程机制。
			 * 	   4、当核心线程+扩展线程=最大线程池容量时,且任务队列已满,任务依然增加:将触发默认的任务拒绝策略,不在接收新任务,直接抛弃新任务。
			 * */
			threadPoolExecutor.submit(myTask);

			//监控线程池中的数据:
			long taskCount = threadPoolExecutor.getTaskCount();
			int activeCount = threadPoolExecutor.getActiveCount();
			int size = threadPoolExecutor.getQueue().size();
			long completedTaskCount = threadPoolExecutor.getCompletedTaskCount();

			System.out.println(taskCount + "----" + completedTaskCount + " ------ " + activeCount + " ------ " + size );

		}

		//线程池释放:
		threadPoolExecutor.shutdown();

	}

}

//自定义线程任务:
class Mytask implements Runnable{

	@Override
	public void run() {

		//获取当前执行线程:
		String name = Thread.currentThread().getName();

		System.out.println(name + "模拟线程任务执行中");

		//模拟每个任务需要3秒钟才能执行结束:
		try {
			Thread.sleep(3000);
		} catch (InterruptedException e) {
			e.printStackTrace();
		}

	}

}
package a;

import java.util.concurrent.Callable;
import java.util.concurrent.ExecutionException;
import java.util.concurrent.ExecutorService;
import java.util.concurrent.Executors;
import java.util.concurrent.Future;

public class TestThreadPool1 {

	public static void main(String[] args) {

		// 直接构建线程池
		ExecutorService executorService = Executors.newFixedThreadPool(5);

		/*
		ExecutorService executorService = Executors.newCachedThreadPool();
		ExecutorService executorService = Executors.newWorkStealingPool();
		ExecutorService executorService = Executors.newScheduledThreadPool(5);
		ExecutorService executorService = Executors.newSingleThreadExecutor();
		*/

		// 执行某个Runnable实现类任务: executorService.execute(null);
		// 提交某个Runnable实现类任务: executorService.submit(null);
		// 提交某个Callable实现类任务(带返回值的任务): executorService.submit(null);

		MyCall myCall = new MyCall();

		Future<?> future = executorService.submit(myCall);

		try {

			Object result = future.get();
			System.out.println("返回值为: " + result);

		} catch (InterruptedException | ExecutionException e) {
			e.printStackTrace();
		}

	}

}

//自定义带线程任务返回值:
class MyCall implements Callable<Object> {

	@Override
	public Object call() throws Exception {

		System.out.println("模拟线程执行任务...........");

		// 模拟返回值:
		return 100;

	}

}
package a_00001_save.a_00000_multithreading.thread_pool;

import java.util.concurrent.ExecutorService;
import java.util.concurrent.Executors;

public class Test00000 {

	public static void main(String[] args) {

		//线程池
		//Executors:线程池管理器。

		//1、创建一个线程池。(明确初始线程数量)
		//public static ExecutorService newFixedThreadPool(int nThreads)
		ExecutorService executorService = Executors.newFixedThreadPool(10); //内部维护一个线程池:new ThreadPoolExecutor()

		//2、模拟线程任务处理。
		MyTask myTask = new MyTask();
		//Future<?> submit(Runnable task)
		executorService.submit(myTask);

		//3、释放资源。
		//void shutdown()
		executorService.shutdown();

	}

}

//模拟线程任务。
class MyTask implements Runnable{

	@Override
	public void run() {

		System.out.println("模拟线程任务1......");

	}

}
package a_00001_save.a_00000_multithreading.thread_pool;

import java.util.concurrent.ArrayBlockingQueue;
import java.util.concurrent.RejectedExecutionHandler;
import java.util.concurrent.ThreadPoolExecutor;
import java.util.concurrent.TimeUnit;

public class Test00001 {

	public static void main(String[] args) {

		//线程池的使用。

		ArrayBlockingQueue<Runnable> arrayBlockingQueue = new ArrayBlockingQueue<Runnable>(10);
		//1、线程池手动构建:五个参数:初始容量、最大扩展数量、活跃时间、时间单位、任务队列
		ThreadPoolExecutor threadPoolExecutor = new ThreadPoolExecutor(5, 10, 3, TimeUnit.MINUTES, arrayBlockingQueue);

		//任务拒绝:
		RejectedExecutionHandler rejectedExecutionHandler = new ThreadPoolExecutor.DiscardOldestPolicy();
		threadPoolExecutor.setRejectedExecutionHandler(rejectedExecutionHandler);

		//2.模拟任务处理:
		for (int i = 0; i < 50; i++) {
			threadPoolExecutor.submit( new MyTask1());
		}

	}

}

//模拟线程任务:
class MyTask1 implements Runnable{

	@Override
	public void run() {
		try {
			Thread.sleep(1000);
		} catch (InterruptedException e) {
			// TODO Auto-generated catch block
			e.printStackTrace();
		}
		System.out.println("模拟线程任务2......");

	}

}
网络编程
网络的基本概念
计算机网络:把分布在不同地理区域的计算机与专门的外部设备用通信线路互连成一个规模大、功能强的网络系统,从而使众多的计算机可以方便地互相传递信息、共享硬件、软件、数据信息等资源。
概念: 一组计算机通过物理线路进行连接后实现数据的资源共享。
分类:根据区域范围由小到大分为:局域网、城域网、广域网。
网络编程的目的:直接或间接地通过网络协议与其它计算机实现数据交换,进行通讯。
网络编程中有两个主要的问题:
1、如何准确地定位网络上一台或多台主机;定位主机上的特定的应用。
2、找到主机后如何可靠高效地进行数据传输。
如何实现网络中的主机互相通信
1、通信双方地址:IP、端口号。
2、一定的规则(即:网络通信协议。有两套参考模型)
(1)OSI参考模型:模型过于理想化,未能在因特网上进行广泛推广。
(2)TCP/IP参考模型(或TCP/IP协议):事实上的国际标准。
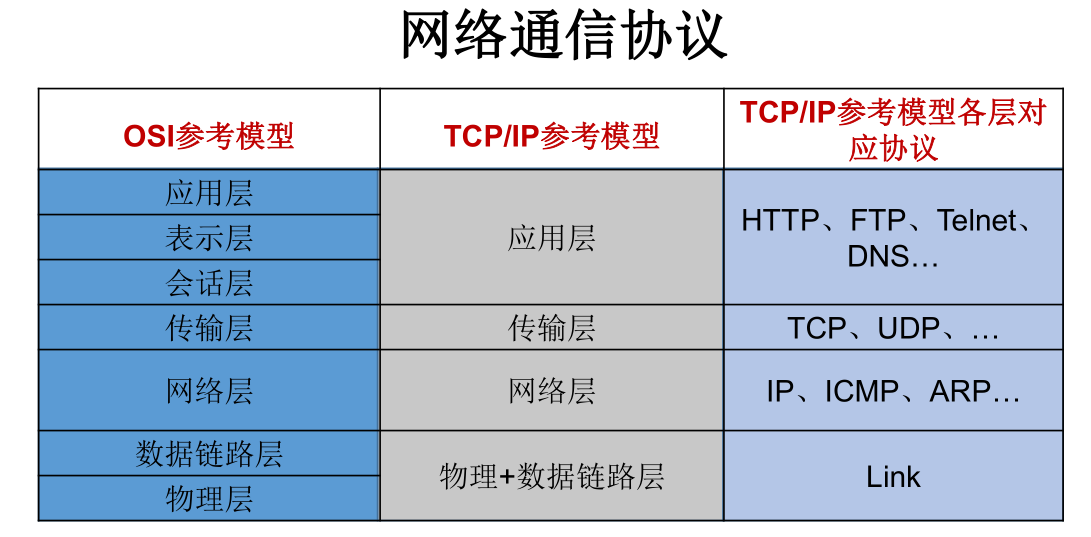
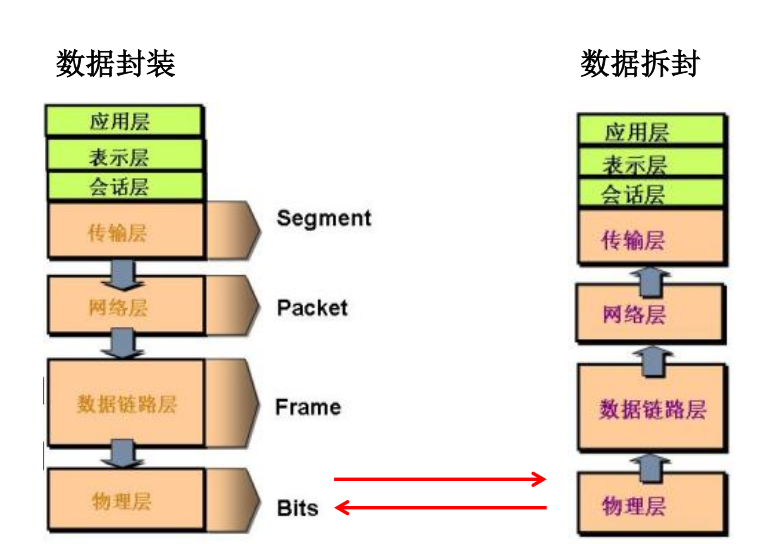
IP地址和端口号
IP地址
IP地址:指的是同一个网络中, 不同计算机设备之间用于区分彼此的数字地址,具有唯一性。
1、唯一的标识 Internet 上的计算机(通信实体)。
2、本地回环地址:127.0.0.1 主机名:localhost。
IP地址分类:
分类方式一:IPv4和IPv6
IPv4:
4个字节组成,4个0-255。以点分十进制表示,如192.168.0.1。
基本的表示形式:4个8位二进制数组成。点(.)分隔符隔开,共32位。写作:十进制表示形式,又称为点分十进制。
00000000.00000000.00000000.00000000~11111111.11111111.11111111.11111111
0.0.0.0~255.255.255.255
IPv6:
16个字节(128位),写成8个无符号整数,每个整数用四个十六进制位表示,数之间用冒号(:)分开,如:3ffe:3201:1401:1280:c8ff:fe4d:db39:1984。
特殊IP:127.0.0.1 表示本机回环地址。
分类方式2:公网地址(万维网使用)和私有地址(局域网使用)。以192.168.开头的就是私有址址,范围为192.168.0.0~192.168.255.255,专门为组织机构内部使用。
查看本机IP地址: 按快键键Windows+R弹出运行窗口,输入cmd,点击“确定”按钮,弹出命令行窗口,输入:ipconfig或者ipconfig /all命令。
测试网络通信的方式:ping对方的IP地址即可。
端口
端口号标识正在计算机上运行的进程(程序)。
不同的进程有不同的端口号。
规定为一个16位的整数,范围:0~65535。
端口的分类:
公认端口:0~1023。被预先定义的服务通信占用(如:HTTP占用端口80,FTP占用端口21,Telnet占用端口23)。
注册端口:1024~49151。分配给用户进程或应用程序。(如:Tomcat占用端口8080,MySQL占用端口3306,Oracle占用端口1521等)。
动态/私有端口:49152~65535。
端口号与IP地址的组合得出一个网络套:Socket
如何查看本机的程序对应的端口: 按快键键Windows+R弹出运行窗口,输入cmd,点击“确定”按钮,弹出命令行窗口,输入:netstat -ano
InetAdress类
java.net.InetAddress
public class InetAddress
extends Object
implements Serializable
Direct Known Subclasses:
Inet4Address, Inet6Address
Internet上的主机有两种方式表示地址:
1、域名(hostName):www.csdn.net
2、IP地址(hostAddress):202.108.35.210
InetAddress类主要表示IP地址。
InetAddress类对象含有一个Internet主机地址的域名和IP地址:www.csdn.net和202.108.35.210。
域名容易记忆,当在连接网络时输入一个主机的域名后,域名服务器(DNS)负责将域名转化成IP地址,这样才能和主机建立连接。即域名解析。
InetAddress类没有提供公共的构造器,而是提供了如下几个静态方法来获取InetAddress实例。
public static InetAddress getLocalHost() throws UnknownHostException
public static InetAddress getByName(String host) throws UnknownHostException
InetAddress提供了如下几个常用的方法:
public String getHostAddress() 返回IP地址字符串(以文本表现形式)。
public String getHostName() 获取此IP地址的主机名。
public boolean isReachable(int timeout) throws IOException 测试是否可以达到该地址。
package com.company.project.module.first;

import java.net.InetAddress;
import java.net.UnknownHostException;

public class InetAddressTest {

	public static void main(String[] args) {

		try {

			InetAddress inetAddress = InetAddress.getByName("39.106.226.142");
			System.out.println(inetAddress); //print:/39.106.226.142

			InetAddress inetAddress1 = InetAddress.getByName("www.csdn.net");
			System.out.println(inetAddress1); //print:www.csdn.net/39.106.226.142

			InetAddress inetAddress2 = InetAddress.getByName("127.0.0.1");
			System.out.println(inetAddress2); //print:/127.0.0.1

			// 获取本地IP地址
			InetAddress inetAddress3 = InetAddress.getLocalHost();
			System.out.println(inetAddress3); //print:jack/192.168.126.1

			// getHostName()
			System.out.println(inetAddress.getHostName()); //print:39.106.226.142
			// getHostAddress()
			System.out.println(inetAddress.getHostAddress()); //print:39.106.226.142

		} catch (UnknownHostException e) {
			e.printStackTrace();
		}

	}

}
网络通信协议
TCP/IP 协议簇
传输层协议中有两个非常重要的协议:
1、传输控制协议TCP(Transmission Control Protocol)。
2、用户数据报协议UDP(User Datagram Protocol)。
TCP/IP以其两个主要协议:传输控制协议(TCP)和网络互联协议(IP)而得名,实际上是一组协议,包括多个具有不同功能且互为关联的协议。
IP(Internet Protocol)协议是网络层的主要协议,支持网间互连的数据通信。
TCP/IP协议模型从更实用的角度出发,形成了高效的四层体系结构,即物理链路层、IP层、传输层和应用层。
TCP和UDP
TCP协议:
使用TCP协议前,须先建立TCP连接,形成传输数据通道。
传输前,采用“ 三次握手”方式,点对点通信,是可靠的。
TCP协议进行通信的两个应用进程:客户端、服务端。
在连接中可进行大数据量的传输。
传输完毕,需释放已建立的连接,效率低。
UDP协议:
将数据、源、目的封装成数据包,不需要建立连接。
每个数据报的大小限制在64K内。
发送不管对方是否准备好,接收方收到也不确认,故是不可靠的。
可以广播发送。
发送数据结束时无需释放资源,开销小,速度快。
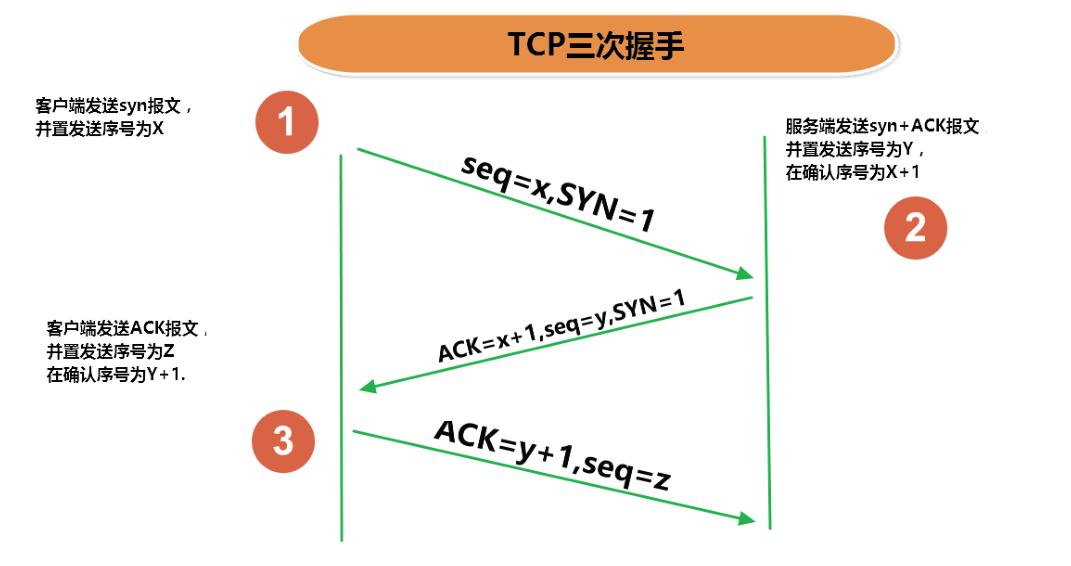
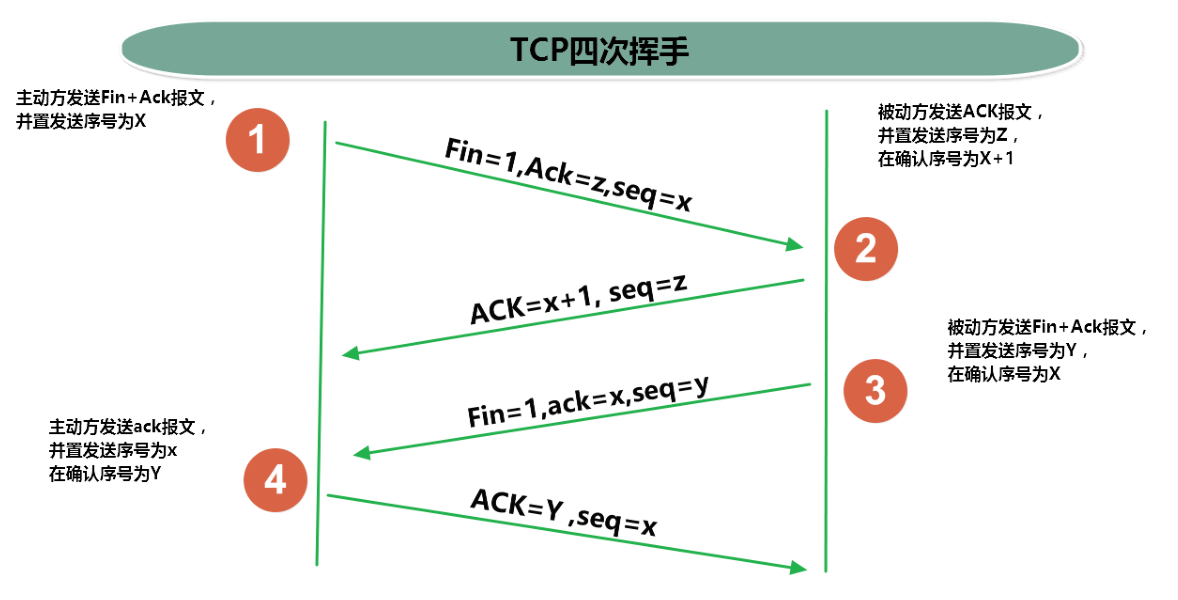
TCP协议下的Socket传输:
传输原理:可以基于IO流实现数据传输交互。
UDP协议下的Socket传输:
传输原理:可以基于数据包实现数据传输发送交互。
Socket
网络上具有唯一标识的IP地址和端口号组合在一起才能构成唯一能识别的标识符套接字。
通信的两端都要有Socket,是两台机器间通信的端点。
网络通信其实就是Socket间的通信。
Socket允许程序把网络连接当成一个流,数据在两个Socket间通过IO流传输。
一般主动发起通信的应用程序属客户端,等待通信请求的为服务端。
Socket的分类:
流套接字(stream socket):使用TCP提供可依赖的字节流服务。
数据报套接字(datagram socket):使用UDP提供“尽力而为”的数据报服务。
Socket类的常用构造器:
public Socket(InetAddress address, int port) 创建一个流套接字并将其连接到指定IP地址的指定端口号。
public Socket(String host, int port) 创建一个流套接字并将其连接到指定主机上的指定端口号。
Socket类的常用方法:
public InputStream getInputStream() 返回此套接字的输入流。可以用于接收网络消息。
public OutputStream getOutputStream() 返回此套接字的输出流。可以用于发送网络消息。
public InetAddress getInetAddress() 此套接字连接到的远程IP地址;如果套接字是未连接的,则返回null。
public InetAddress getLocalAddress() 获取套接字绑定的本地地址,即本端的IP地址。
public int getPort() 此套接字连接到的远程端口号;如果尚未连接套接字,则返回0。
public int getLocalPort() 返回此套接字绑定到的本地端口。如果尚未绑定套接字,则返回 -1,即本端的端口号。
public void close() 关闭此套接字。套接字被关闭后,便不可在以后的网络连接中使用(即无法重新连接或重新绑定)。需要创建新的套接字对象。关闭此套接字也将会关闭该套接字的InputStream和OutputStream。
public void shutdownInput() 如果在套接字上调用shutdownInput()后从套接字输入流读取内容,则流将返回EOF(文件结束符)。即不能在从此套接字的输入流中接收任何数据。
public void shutdownOutput() 禁用此套接字的输出流。对于TCP套接字,任何以前写入的数据都将被发送,并且后跟TCP 的正常连接终止序列。如果在套接字上调用shutdownOutput()后写入套接字输出流,则该流将抛出IOException。即不能通过此套接字的输出流发送任何数据。
基于Socket的TCP编程
Java语言的基于套接字编程分为服务端编程和客户端编程,其通信模型如图所示:
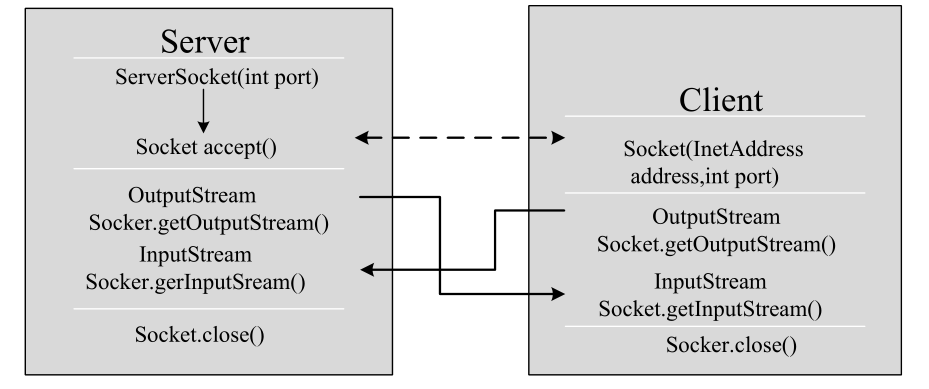
客户端Socket的工作过程包含以下四个基本的步骤 :
1、创建Socket:根据指定服务端的IP地址或端口号构造Socket类的对象。若服务器端响应,则建立客户端到服务器的通信线路。若连接失败,会出现异常。
2、打开连接到Socket的输入/出流:使用getInputStream()方法获得输入流,使用getOutputStream()方法获得输出流,进行数据传输。
3、按照一定的协议对Socket进行读/写操作:通过输入流读取服务器放入线路的信息(但不能读取自己放入线路的信息),通过输出流将信息写入线程。
4、关闭Socket:断开客户端到服务器的连接,释放线路。
客户端程序可以使用Socket类创建对象,创建的同时会自动向服务器方发起连接。
Socket的构造器是:
Socket(String host, int port) throws UnknownHostException, IOException 向服务器(域名是host。端口号为port)发起TCP连接,若成功,则创建Socket对象,否则抛出异常。
Socket(InetAddress address, int port) throws IOException 根据InetAddress对象所表示的IP地址以及端口号port发起连接。
客户端建立socketAtClient对象的过程就是向服务器发出套接字连接请求。
服务器程序的工作过程包含以下四个基本的步骤:
1、调用ServerSocket(int port):创建一个服务器端套接字,并绑定到指定端口上,用于监听客户端的请求。
2、调用 accept():监听连接请求,如果客户端请求连接,则接受连接,返回通信套接字对象。
3、调用该Socket类对象的getOutputStream() 和getInputStream ():获取输出流和输入流,开始网络数据的发送和接收。
4、关闭ServerSocket和Socket对象:客户端访问结束,关闭通信套接字。
服务器建立ServerSocket对象:
ServerSocket对象负责等待客户端请求建立套接字连接,类似邮局某个窗口中的业务员。也就是说,服务器必须事先建立一个等待客户请求建立套接字连接的ServerSocket对象。
所谓“接收”客户的套接字请求,就是accept()方法会返回一个Socket对象。
package com.company.project.module.first;

import java.io.ByteArrayOutputStream;
import java.io.IOException;
import java.io.InputStream;
import java.io.OutputStream;
import java.net.InetAddress;
import java.net.ServerSocket;
import java.net.Socket;

import org.junit.Test;

/**
 * 实现TCP的网络编程
 * 例:客户端发送信息给服务端,服务端将信息(数据)显示在控制台上。
 */
public class TCPTest {

	// 客户端
	@Test
	public void client() {

		Socket socket = null;
		OutputStream outputStream = null;

		try {

			// 1、创建Socket对象,指明服务器端的IP和端口号
			InetAddress inetAddress = InetAddress.getByName("127.0.0.1");

			System.out.println(inetAddress); //print:

			socket = new Socket(inetAddress, 8899);

			// 2、获取一个输出流,用于输出数据
			outputStream = socket.getOutputStream();

			// 3、写出数据的操作
			outputStream.write("你好,我是客户端。".getBytes());

		} catch (IOException e) {
			e.printStackTrace();
		} finally {
			// 4、关闭资源
			if (outputStream != null) {
				try {
					outputStream.close();
				} catch (IOException e) {
					e.printStackTrace();
				}

			}

			if (socket != null) {
				try {
					socket.close();
				} catch (IOException e) {
					e.printStackTrace();
				}

			}

		}

	}

	// 服务端
	@Test
	public void server() {

		ServerSocket serverSocket = null;
		Socket socket = null;
		InputStream inputStream = null;
		ByteArrayOutputStream byteArrayOutputStream = null;

		try {

			// 1、创建服务器端的ServerSocket,指明自己的端口号
			serverSocket = new ServerSocket(8899);

			// 2、调用accept()方法表示接收来自于客户端的socket
			socket = serverSocket.accept();

			// 3、获取输入流
			inputStream = socket.getInputStream();

			// 不建议这样写,可能会有乱码
			/*byte[] buffer = new byte[1024];
			int length;
			while((length = inputStream.read(buffer)) != -1){

				String str = new String(buffer, 0, length);
				System.out.print(str);

			}*/

			// 4、读取输入流中的数据
			byteArrayOutputStream = new ByteArrayOutputStream();

			byte[] buffer = new byte[5];

			int length;

			while ((length = inputStream.read(buffer)) != -1) {

				byteArrayOutputStream.write(buffer, 0, length);

			}

			System.out.println(byteArrayOutputStream.toString());

			System.out.println("收到了来自于:" + socket.getInetAddress().getHostAddress() + "的数据");

		} catch (IOException e) {
			e.printStackTrace();
		} finally {

			if (byteArrayOutputStream != null) {
				// 5、关闭资源
				try {
					byteArrayOutputStream.close();
				} catch (IOException e) {
					e.printStackTrace();
				}
			}
			if (inputStream != null) {
				try {
					inputStream.close();
				} catch (IOException e) {
					e.printStackTrace();
				}
			}
			if (socket != null) {
				try {
					socket.close();
				} catch (IOException e) {
					e.printStackTrace();
				}
			}
			if (serverSocket != null) {
				try {
					serverSocket.close();
				} catch (IOException e) {
					e.printStackTrace();
				}
			}

		}

	}

}
package com.company.project.module.first;

import org.junit.Test;

import java.io.*;
import java.net.InetAddress;
import java.net.ServerSocket;
import java.net.Socket;

/**
 * 实现TCP的网络编程
 * 例:客户端发送文件(图片)给服务端,服务端将文件(图片)保存在本地。
 */
public class TCPTest1 {

    @Test
    public void client(){

    	Socket socket = null;
    	OutputStream outputStream = null;
    	FileInputStream fileInputStream = null;

    	try {

    		socket = new Socket(InetAddress.getByName("127.0.0.1"), 9090);

    		outputStream = socket.getOutputStream();

    		fileInputStream = new FileInputStream(new File("beauty.jpg"));

    		byte[] buffer = new byte[1024];
    		int length;
    		while((length = fileInputStream.read(buffer)) != -1){
    			outputStream.write(buffer, 0, length);
    		}

    	}catch(IOException e) {
    		e.printStackTrace();
    	}finally {

    		if(fileInputStream !=null) {
	    		try {
					fileInputStream.close();
				} catch (IOException e) {
					e.printStackTrace();
				}
    		}
    	    if(outputStream != null) {
	            try {
					outputStream.close();
				} catch (IOException e) {
					e.printStackTrace();
				}
    	    }
    	    if(socket != null) {
	            try {
					socket.close();
				} catch (IOException e) {
					e.printStackTrace();
				}
    	    }

		}

    }

    @Test
    public void server() {

    	ServerSocket serverSocket = null;
    	Socket socket = null;
    	InputStream inputStream = null;
    	FileOutputStream fileOutputStream = null;

    	try{

    		serverSocket = new ServerSocket(9090);

            socket = serverSocket.accept();

            inputStream = socket.getInputStream();

            fileOutputStream = new FileOutputStream(new File("beauty1.jpg"));

            byte[] buffer = new byte[1024];
            int length;
            while((length = inputStream.read(buffer)) != -1){
            	fileOutputStream.write(buffer, 0, length);
            }

    	}catch (Exception e) {
    		e.printStackTrace();
		}finally {

			if(fileOutputStream != null) {
				try {
					fileOutputStream.close();
				} catch (IOException e) {
					e.printStackTrace();
				}
			}
			if(inputStream != null) {
				try {
					inputStream.close();
				} catch (IOException e) {
					e.printStackTrace();
				}
			}
			if(socket != null) {
				try {
					socket.close();
				} catch (IOException e) {
					e.printStackTrace();
				}
			}
			if(serverSocket != null) {
				try {
					serverSocket.close();
				} catch (IOException e) {
					e.printStackTrace();
				}

			}

		}

    }

}
package com.company.project.module.first;

import org.junit.Test;

import java.io.*;
import java.net.InetAddress;
import java.net.ServerSocket;
import java.net.Socket;

/**
 * 实现TCP的网络编程
 * 例:从客户端发送文件(图片)给服务端,服务端将文件(图片)保存到本地。并返回“发送成功”给客户端。并关闭相应的连接。
 */
public class TCPTest3 {

    @Test
    public void client() throws IOException {

        Socket socket = new Socket(InetAddress.getByName("127.0.0.1"), 9090);

        OutputStream outputStream = socket.getOutputStream();

        FileInputStream fileInputStream = new FileInputStream(new File("beauty.jpg"));

        byte[] buffer = new byte[1024];
        int length;
        while((length = fileInputStream.read(buffer)) != -1){
        	outputStream.write(buffer, 0, length);
        }

        //关闭数据的输出;read()方法是阻塞式方法。
        socket.shutdownOutput();

        //接收来自于服务器端的数据,并显示到控制台上
        InputStream inputStream = socket.getInputStream();
        ByteArrayOutputStream byteArrayOutputStream = new ByteArrayOutputStream();
        int length1;
        while((length1 = inputStream.read(buffer)) != -1){
        	byteArrayOutputStream.write(buffer, 0, length1);
        }

        System.out.println(byteArrayOutputStream.toString());

        byteArrayOutputStream.close();
        fileInputStream.close();
        outputStream.close();
        socket.close();

    }

    @Test
    public void server() throws IOException {

        ServerSocket serverSocket = new ServerSocket(9090);

        Socket socket = serverSocket.accept();

        InputStream inputStream = socket.getInputStream();

        FileOutputStream fileOutputStream = new FileOutputStream(new File("beauty1.jpg"));

        byte[] buffer = new byte[1024];
        int length;
        while((length = inputStream.read(buffer)) != -1){
        	fileOutputStream.write(buffer, 0, length);
        }

        System.out.println("图片传输完成!");

        //服务器端给予客户端反馈
        OutputStream outputStream = socket.getOutputStream();
        outputStream.write("您好,图片我已收到。".getBytes());

        outputStream.close();
        fileOutputStream.close();
        inputStream.close();
        socket.close();
        serverSocket.close();

    }

}
以上例子的代码没有进行异常处理,下面是异常处理之后的代码:
package com.company.project.module.first;

import org.junit.Test;

import java.io.*;
import java.net.InetAddress;
import java.net.ServerSocket;
import java.net.Socket;

/**
 * 实现TCP的网络编程
 * 例:从客户端发送文件(图片)给服务端,服务端将文件(图片)保存到本地。并返回“发送成功”给客户端。并关闭相应的连接。
 */
public class TCPTest3 {

    @Test
    public void client() {

    	Socket socket = null;
    	OutputStream outputStream = null;
    	FileInputStream fileInputStream = null;
    	InputStream inputStream = null;
    	ByteArrayOutputStream byteArrayOutputStream = null;

    	try {

    		socket = new Socket(InetAddress.getByName("127.0.0.1"), 9090);

            outputStream = socket.getOutputStream();

            fileInputStream = new FileInputStream(new File("beauty.jpg"));

            byte[] buffer = new byte[1024];
            int length;
            while((length = fileInputStream.read(buffer)) != -1){
            	outputStream.write(buffer, 0, length);
            }

            //关闭数据的输出;read()方法是阻塞式方法。
            socket.shutdownOutput();

            //接收来自于服务器端的数据,并显示到控制台上
            inputStream = socket.getInputStream();
            byteArrayOutputStream = new ByteArrayOutputStream();

            int length1;
            while((length1 = inputStream.read(buffer)) != -1){
            	byteArrayOutputStream.write(buffer, 0, length1);
            }

            System.out.println(byteArrayOutputStream.toString());

		} catch (Exception e) {
			e.printStackTrace();
		}finally {

			if(byteArrayOutputStream != null) {
				try {
					byteArrayOutputStream.close();
				} catch (IOException e) {
					e.printStackTrace();
				}
			}
			if(fileInputStream != null) {
				try {
					fileInputStream.close();
				} catch (IOException e) {
					e.printStackTrace();
				}
			}
			if(outputStream != null) {
				try {
					outputStream.close();
				} catch (IOException e) {
					e.printStackTrace();
				}
			}
			if(socket != null) {
				try {
					socket.close();
				} catch (IOException e) {
					e.printStackTrace();
				}
			}

		}

    }

    @Test
    public void server() {

    	ServerSocket serverSocket = null;
    	Socket socket = null;
    	InputStream inputStream = null;
    	FileOutputStream fileOutputStream = null;
    	OutputStream outputStream = null;

    	try {

    		serverSocket = new ServerSocket(9090);

            socket = serverSocket.accept();

            inputStream = socket.getInputStream();

            fileOutputStream = new FileOutputStream(new File("beauty1.jpg"));

            byte[] buffer = new byte[1024];
            int length;
            while((length = inputStream.read(buffer)) != -1){
            	fileOutputStream.write(buffer, 0, length);
            }

            System.out.println("图片传输完成!");

            //服务器端给予客户端反馈
            outputStream = socket.getOutputStream();
            outputStream.write("您好,图片我已收到。".getBytes());

    	}catch(IOException e) {
    		e.printStackTrace();
    	} finally {

    		if(outputStream != null) {
    			try {
					outputStream.close();
				} catch (IOException e) {
					e.printStackTrace();
				}
    		}
    		if(fileOutputStream != null) {
    			try {
					fileOutputStream.close();
				} catch (IOException e) {
					e.printStackTrace();
				}
    		}
    		if(inputStream != null) {
    			try {
					inputStream.close();
				} catch (IOException e) {
					e.printStackTrace();
				}
    		}
    		if(socket != null) {
    			try {
					socket.close();
				} catch (IOException e) {
					e.printStackTrace();
				}
    		}
    		if(serverSocket != null) {
    			try {
					serverSocket.close();
				} catch (IOException e) {
					e.printStackTrace();
				}
    		}

    	}

    }

}
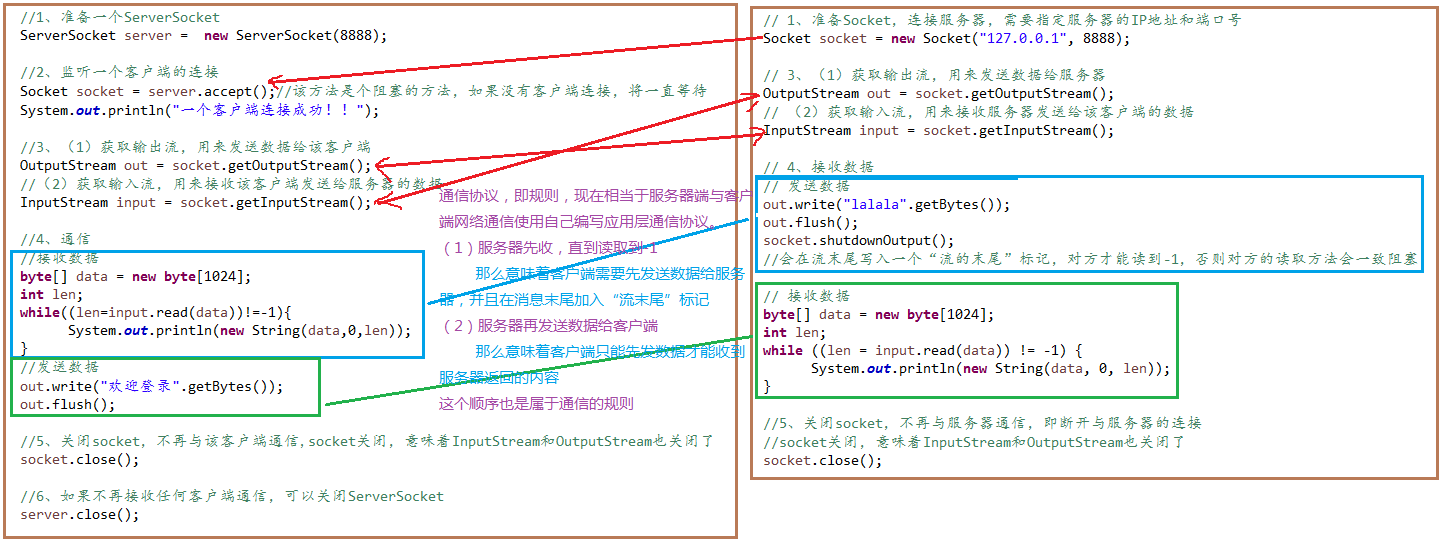
练习题:客户端给服务端发送文本,服务端会将文本转成大写在返回给客户端。
答案:略。
UDP网络通信
类DatagramSocket和DatagramPacket实现了基于UDP协议的网络程序。
UDP数据报通过数据报套接字DatagramSocket发送和接收,系统不保证UDP数据报一定能够安全送到目的地,也不能确定什么时候可以抵达。
DatagramPacket对象封装了UDP数据报,在数据报中包含了发送端的IP地址和端口号以及接收端的IP地址和端口号。
UDP协议中每个数据报都给出了完整的地址信息,因此无须建立发送方和接收方的连接。如同发快递包裹一样。
DatagramSocket 类的常用方法:
public DatagramSocket(int port) 创建数据报套接字并将其绑定到本地主机上的指定端口。套接字将被绑定到通配符地址,IP地址由内核来选择。
public DatagramSocket(int port, InetAddress laddr) 创建数据报套接字,将其绑定到指定的本地地址。本地端口必须在0到65535之间(包括两者)。如果IP地址为0.0.0.0,套接字将被绑定到通配符地址,IP地址由内核选择。
public void close() 关闭此数据报套接字。
public void send(DatagramPacket p) 从此套接字发送数据报包。DatagramPacket 包含的信息指示:将要发送的数据、其长度、远程主机的IP地址和远程主机的端口号。
public void receive(DatagramPacket p) 从此套接字接收数据报包。当此方法返回时,DatagramPacket的缓冲区填充了接收的数据。数据报包也包含发送方的IP地址和发送方机器上的端口号。此方法在接收到数据报前一直阻塞。数据报包对象的length字段包含所接收信息的长度。如果信息比包的长度长,该信息将被截短。
public InetAddress getLocalAddress() 获取套接字绑定的本地地址。
public int getLocalPort() 返回此套接字绑定的本地主机上的端口号。
public InetAddress getInetAddress() 返回此套接字连接的地址。如果套接字未连接,则返回null。
public int getPort() 返回此套接字的端口。如果套接字未连接,则返回-1。
DatagramPacket类的常用方法:
public DatagramPacket(byte[] buf, int length) 构造DatagramPacket,用来接收长度为length的数据包。length参数必须小于等于buf.length。
public DatagramPacket(byte[] buf, int length, InetAddress address, int port) 构造数据报包,用来将长度为length的包发送到指定主机上的指定端口号。length参数必须小于等于buf.length。
public InetAddress getAddress() 返回某台机器的IP地址,此数据报将要发往该机器或者是从该机器接收到的。
public int getPort() 返回某台远程主机的端口号,此数据报将要发往该主机或者是从该主机接收到的。
public byte[] getData() 返回数据缓冲区。接收到的或将要发送的数据从缓冲区中的偏移量offset处开始,持续length长度。
public int getLength() 返回将要发送或接收到的数据的长度。
流程:
1、DatagramSocket与DatagramPacket。
2、建立发送端,接收端。
3、建立数据包。
4、调用Socket的发送、接收方法。
5、关闭Socket。
发送端与接收端是两个独立的运行程序。
package com.company.project.module.first;

import org.junit.Test;

import java.io.IOException;
import java.net.DatagramPacket;
import java.net.DatagramSocket;
import java.net.InetAddress;
import java.net.SocketException;

/**
 * UDP协议的网络编程
 */
public class UDPTest {

    // 发送端
    @Test
    public void sender() {

        DatagramSocket datagramSocket = null;

		try {

			datagramSocket = new DatagramSocket();
			String str = "我是UDP方式发送的短信";
	        byte[] data = str.getBytes();
	        InetAddress inetAddress = InetAddress.getLocalHost();
	        DatagramPacket datagramPacket = new DatagramPacket(data, 0, data.length, inetAddress, 9090);

	        datagramSocket.send(datagramPacket);

		} catch (SocketException e) {
			e.printStackTrace();
		} catch (IOException e) {
			e.printStackTrace();
		} finally {

			if(datagramSocket != null) {
				datagramSocket.close();
			}

		}

    }

    // 接收端
    @Test
    public void receiver() {

        DatagramSocket datagramSocket = null;

        try {

        	datagramSocket = new DatagramSocket(9090);
        	byte[] buffer = new byte[100];

            DatagramPacket datagramPacket = new DatagramPacket(buffer, 0, buffer.length);

            datagramSocket.receive(datagramPacket);

            System.out.println(new String(datagramPacket.getData(), 0, datagramPacket.getLength()));


        }catch (IOException e) {
			e.printStackTrace();
		} finally {

			if(datagramSocket != null) {
				datagramSocket.close();
			}
		}

    }

}
URL网络编程
URL类
URL(Uniform Resource Locator):统一资源定位符,它表示Internet上某一资源的地址。它是一种具体的URI,即URL可以用来标识一个资源,而且还指明了如何locate这个资源。
通过URL可以访问Internet上的各种网络资源,比如最常见的www,ftp站点。浏览器通过解析给定的URL可以在网络上查找相应的文件或其他资源。
URL的基本结构由5部分组成:< 传输协议>://< 主机名>:< 端口号>/< 文件名># 片段名? 参数列表
例如:http://192.168.1.100:8080/helloworld/index.jsp#a?username=shkstart&password=123
#片段名:即锚点,例如看小说,直接定位到章节。
参数列表格式:参数名=参数值&参数名=参数值…
URL类的构造器:
为了表示URL,java.net中实现了类URL。可以通过下面的构造器来初始化一个URL对象:
public URL (String spec) 通过一个表示URL地址的字符串可以构造一个URL对象。例如:URL url = new URL (“http://www.csdn.net/”);。
public URL(URL context, String spec) 通过基URL和相对URL构造一个URL对象。例如:URL downloadUrl = new URL(url, “download.html");。
public URL(String protocol, String host, String file) 例如:new URL(“http”, “www.csdn.net”, “download. html");。
public URL(String protocol, String host, int port, String file) 例如:URL gamelan = new URL(“http”, “www.csdn.net”, 80, “download.html");。
URL类的常用方法:
一个URL对象生成后,其属性是不能被改变的,但可以通过它给定的方法来获取这些属性。
public String getProtocol( ) 获取该URL的协议名。
public String getHost( ) 获取该URL的主机名。
public String getPort( ) 获取该URL的端口号。
public String getPath( ) 获取该URL的文件路径。
public String getFile( ) 获取该URL的文件名。
public String getQuery( ) 获取该URL的查询名。
package com.company.project.module.first;

import java.net.MalformedURLException;
import java.net.URL;

/**
 * URL网络编程
 * 1、URL:统一资源定位符,对应着互联网的某一资源地址。
 * 2、格式:
 * http://localhost:8080/examples/beauty.jpg?username=Tom
 *   协议       主机名          端口号 资源地址                       参数列表
 */
public class URLTest {

	public static void main(String[] args) {

		try {

			URL url = new URL("http://localhost:8080/examples/beauty.jpg?username=Tom");

			// public String getProtocol() 获取该URL的协议名
			System.out.println(url.getProtocol()); //print:http

			// public String getHost() 获取该URL的主机名
			System.out.println(url.getHost()); //print:localhost

			// public String getPort() 获取该URL的端口号
			System.out.println(url.getPort()); //print:8080

			// public String getPath() 获取该URL的文件路径
			System.out.println(url.getPath()); //print:/examples/beauty.jpg

			// public String getFile() 获取该URL的文件名
			System.out.println(url.getFile()); //print:/examples/beauty.jpg?username=Tom

			// public String getQuery() 获取该URL的查询名
			System.out.println(url.getQuery()); //print:username=Tom

		} catch (MalformedURLException e) {
			e.printStackTrace();
		}

	}

}
package com.company.project.module.first;

import java.io.FileOutputStream;
import java.io.IOException;
import java.io.InputStream;
import java.net.HttpURLConnection;
import java.net.URL;

public class URLTest1 {

    public static void main(String[] args) {

        HttpURLConnection httpURLConnection = null;
        InputStream inputStream = null;
        FileOutputStream fileOutputStream = null;

        try {

            URL url = new URL("http://localhost:8080/examples/beauty.jpg");

            httpURLConnection = (HttpURLConnection)url.openConnection();

            httpURLConnection.connect();

            inputStream = httpURLConnection.getInputStream();
            fileOutputStream = new FileOutputStream("beauty1.jpg");

            byte[] buffer = new byte[1024];
            int length;
            while((length = inputStream.read(buffer)) != -1){
            	fileOutputStream.write(buffer, 0, length);
            }

            System.out.println("下载完成!");

        } catch (IOException e) {
            e.printStackTrace();
        } finally {

        	//关闭资源
            if(fileOutputStream != null){
                try {
                	fileOutputStream.close();
                } catch (IOException e) {
                    e.printStackTrace();
                }
            }
            if(inputStream != null){
                try {
                	inputStream.close();
                } catch (IOException e) {
                    e.printStackTrace();
                }
            }
            if(httpURLConnection != null){
            	httpURLConnection.disconnect();
            }

        }

    }

}
URLConnection类
针对HTTP协议的URLConnection类
URL的方法openStream()能从网络上读取数据。
若希望输出数据,例如向服务器端的CGI(公共网关接口-Common Gateway Interface-的简称,是用户浏览器和服务器端的应用程序进行连接的接口)程序发送一些数据,则必须先与URL建立连接,然后才能对其进行读写,此时需要使用URLConnection。
URLConnection:表示到URL所引用的远程对象的连接。当与一个URL建立连接时,首先要在一个URL对象上通过方法openConnection()生成对应的URLConnection对象。如果连接过程失败,将产生IOException。
URL netchinaren = new URL(“http://www.csdn.net/index.shtml”);
URLConnectonn u = netchinaren.openConnection( );
通过URLConnection对象获取的输入流和输出流,即可以与现有的CGI程序进行交互。
public Object getContent() throws IOException
public int getContentLength()
public String getContentType()
public long getDate()
public long getLastModified()
public InputStream getInputStream() throws IOException
public OutputSteram getOutputStream() throws IOException
URI 、URL和URN的区别
URI,是uniform resource identifier,统一资源标识符,用来唯一的标识一个资源。而URL是uniform resource locator,统一资源定位符,它是一种具体的URI,即URL可以用来标识一个资源,而且还指明了如何locate这个资源。而URN,uniform resource name,统一资源命名,是通过名字来标识资源,比如mailto:java-net@java.sun.com。也就是说,URI是以一种抽象的,高层次概念定义统一资源标识,而URL和URN则是具体的资源标识的方式。URL和URN都是一种URI。
在Java的URI中,一个URI实例可以代表绝对的,也可以是相对的,只要它符合URI的语法规则。而URL类则不仅符合语义,还包含了定位该资源的信息,因此它不能是相对的。

小结
位于网络中的计算机具有唯一的IP地址,这样不同的主机可以互相区分。
客户端-服务器是一种最常见的网络应用程序模型。服务器是一个为其客户端提供某种特定服务的硬件或软件。客户机是一个用户应用程序,用于访问某台服务器提供的服务。端口号是对一个服务的访问场所,它用于区分同一物理计算机上的多个服务。套接字用于连接客户
端和服务器,客户端和服务器之间的每个通信会话使用一个不同的套接字。TCP协议用于实现面向连接的会话。
Java中有关网络方面的功能都定义在java.net程序包中。Java用InetAddress对象表示IP地址,该对象里有两个字段:主机名(String)和IP地址(int)。
类Socket和ServerSocket实现了基于TCP协议的客户端-服务器程序。Socket是客户端和服务器之间的一个连接,连接创建的细节被隐藏了。这个连接提供了一个安全的数据传输通道,这是因为TCP协议可以解决数据在传送过程中的丢失、损坏、重复、乱序以及网络拥挤等问题,它保证数据可靠的传送。
类URL和URLConnection提供了最高级网络应用。URL的网络资源的位置来同一表示Internet上各种网络资源。通过URL对象可以创建当前应用程序和URL表示的网络资源之间的连接,这样当前程序就可以读取网络资源数据,或者把自己的数据传送到网络上去。
JDK 8
函数式接口
接口
接口案例:
package com.company.project.module.dom.third;

public class TestTest {

	public static void main(String[] args) {

		USB11 usb = new USBImplementsClass();

		usb.use();
		usb.use1();
		usb.use2();

	}

}

/*
 * 1、接口中的方法只能由public或default修饰。
 * 2、接口中的方法如果返回值前面没有任何关键字修饰则默认是public关键字修饰。
 * 3、接口中的方法如果返回值前面使用public关键字修饰,则不能有方法体。
 * 4、接口中的方法如果返回值前面使用default关键字修饰,则必须有方法体。
 * */
interface USB11 {

	void use();

	default void use1() {

		System.out.println("user1()方法使用了default关键字修饰");

	}

	default void use2() {

		System.out.println("use2()方法使用了default关键字修饰");

	}

}

class USBImplementsClass implements USB11 {

	@Override
	public void use() {

		System.out.println("接口USB的实现类USBImplementsClass实现USB接口中的use()方法");

	}

	/*public void use1() {

		System.out.println("重写了接口中的default修饰的方法");

	}*/

}
接口案例:
package com.company.project.module.dom.third;

public class TestTest {

	public static void main(String[] args) {

		USB use = new USB() {

			@Override
			public void use() {

				System.out.println("接口实现的方法。");

			}

		};

		use.use();

		new USB() {

			@Override
			public void use() {

				System.out.println("接口实现的方法1。");

			}

		}.use();

		A a = new A() {

			@Override
			public void t() {

				System.out.println("接口A");

			}

		};

		a.t();

		A a2 = () -> {

			System.out.println("接口A_1");

		};

		a2.t();

		B b = (String t) -> {
			System.out.println("void t(String s):" + t);
		};

		b.t("你好");

		B b1 = (t) -> {
			System.out.println("void t(String s):" + t);
		};

		b1.t("你好1");

		B b2 = t -> System.out.println("void t(String s):" + t);

		b2.t("你好2");

	    C c = (t1, t2) -> {
	    	int result = t1 + t2;
	    	return result;
	    };

	    int result = c.t(1, 2);
	    System.out.println("参数的和是:" + result);

	}

}

interface USB {

	void use();

}

interface A {
	void t();
}

interface B {
	void t(String s);
}

interface C {
	int t(int a, int b);
}
函数式接口
package com.cy.java8.interface1;

@FunctionalInterface
interface Fun {
	void doMethod01(); //函数式接口中只允许有一个方法是抽象方法
	default void doMethod02() {

	}
}

public class TestFunctionInterface01 {

	public static void main(String[] args) {
		new Fun() {

			@Override
			public void doMethod01() {
				System.out.println("doMethod01()");

			}
		}.doMethod01();

	}
}
package com.cy.java8.interface1;

import java.util.Arrays;
import java.util.List;
import java.util.function.Consumer;
import java.util.function.Function;
import java.util.function.Predicate;
import java.util.function.Supplier;

public class TestFunctionInterface02 {

	public static void main(String[] args) {
		//消费型接口
		new Consumer<String>() {

			@Override
			public void accept(String t) {
				System.out.println(t);

			};

		}.accept("hello");

		//函数式接口
	    Function<String, Integer> function = new Function<String, Integer>() {

			@Override
			public Integer apply(String t) {

				return Integer.parseInt(t);
			}
		};

		Integer result = function.apply("100");
		System.out.println(result);

		//判定型接口
		Predicate<String> predicate = new Predicate<String>() {
			List<String> list = Arrays.asList("A", "B", "C");
			@Override
			public boolean test(String t) {

				return list.contains(t);
			}
		};

		System.out.println(predicate.test("A"));

		//供给型接口
		Supplier<Object> supplier = new Supplier<Object>() {

			@Override
			public Object get() {

				return new Object();
			}
		};

		System.out.println(supplier.get());
	}
}
1.2 方法
package com.cy.java8.interface1;

interface IA {
	default void doMethod01() {
		System.out.println("doMethod01()");
	}
	default void doMethod02() {
		System.out.println("doMethod02()");
	}

	void doMethod03();

	default void doMethod04() {
		System.out.println("doMethod04()");
	}
}

class ClassA implements IA {

	public void doMethod01() {

		IA.super.doMethod01();
		System.out.println("ClassA.doMethod01()");
	}

	@Override
	public void doMethod03() {
		System.out.println("doMethod03()");

	}

}

public class TestInterfaceDefaultMethod01 {

	public static void main(String[] args) {
		IA a1 = new ClassA();
		a1.doMethod01();
		a1.doMethod03();
	}

}
package com.cy.java8.interface1;

interface IC {
	void doMethod01();
	void doMethod02();
}

@Deprecated
class AbstractICAdapter implements IC {

	@Override
	public void doMethod01() {
		// TODO Auto-generated method stub

	}

	@Override
	public void doMethod02() {
		// TODO Auto-generated method stub

	}

}

class ClassC extends AbstractICAdapter {
	public void doMethod01() {
		System.out.println("ClassC.doMethod01()");

	}
}


public class TestInterfaceDefaultMethod02 {

	public static void main(String[] args) {
		IC c1 = new ClassC();
		c1.doMethod01();
	}

}
package com.cy.java8.interface1;

interface IStatic {
	static void doPrint() {
		System.out.println("IStatic.doPrint()");
	}
}

class ClassStatic implements IStatic {
	static void doPrint() { //此处不是重写方法
		System.out.println("ClassStatic.doPrint()");
	}
}

public class TestInterfaceStaticMethod01 {

	public static void main(String[] args) {

		IStatic.doPrint();

		ClassStatic.doPrint();

	}
}
1.3 lambda表达式
package com.cy.java8.lambda;

import java.util.Arrays;
import java.util.List;
import java.util.function.Consumer;

public class TestLambda01 {

	public static void main(String[] args) {
		List<String> list = Arrays.asList("A", "B", "C");
		for(String s : list) {
			System.out.println(s);
		}

		System.out.println("=====");

		list.forEach(new Consumer<String>() { //匿名内部类

			@Override
			public void accept(String t) {
				System.out.println(t);

			}
		});

		System.out.println("==lambda==");

		list.forEach((s) -> System.out.println(s));

		System.out.println("====");

		list.forEach((s) -> {
			System.out.println(s);
			System.out.println(s+"-");
			});
	}

}
package com.cy.java8.lambda;

import java.util.Arrays;
import java.util.Comparator;
import java.util.List;

public class TestLambda02 {

	public static void main(String[] args) {
		List<String> list = Arrays.asList("C", "B", "A");

		list.sort(new Comparator<String>() {

			@Override
			public int compare(String o1, String o2) {

				return o1.compareTo(o2);
			}
		});

		System.out.println(list);

		list.sort((String o1, String o2) -> {

			return o1.compareTo(o2);
			});
		System.out.println(list);

		list.sort((o1, o2) -> o1.compareTo(o2));
		System.out.println(list);
	}

}
package com.cy.java8.lambda;

public class TestLambda03 {

	public static void main(String[] args) {
		new Thread(new Runnable() {

			@Override
			public void run() {
				System.out.println("execute task");

			}
		}).start();

		//lambda
		new Thread(() -> System.out.println("execute task")).start();

	}
}
package com.cy.java8.lambda;

import java.util.Arrays;
import java.util.Comparator;

public class TestLambda04 {

	public static void main(String[] args) {
		String[] strArray = {"b", "DEFL", "bcd"};
		Arrays.sort(strArray, new Comparator<String>() {

			@Override
			public int compare(String o1, String o2) {

				return o1.length()-o2.length();
			}
		});

		//lambda
		Arrays.sort(strArray, (o1, o2) -> o1.length()-o2.length());

		for(String s : strArray) {
			System.out.println(s);
		}
	}
}
1.4 方法(method reference)引用
方法引用是用来直接引用类方法、实例方法或者构造方法的一种新的方式。
方法引用提供的是一种对方法的引用而不是执行方法的方式。
可以将方法作为参数进行传递,可以将方法引用理解为lambda表达式的一种深层的表达。
package com.cy.java8.methodref;

import java.io.PrintStream;
import java.util.Arrays;
import java.util.List;
import java.util.function.Consumer;

import org.junit.Test;

public class TestObjectInstanceMethodRef01 {

	public static void main(String[] args) {
		List<String> list = Arrays.asList("a", "b", "c");

		//jdk8中的对象实例方法引用方式
		PrintStream ps = System.out;
		list.forEach(ps::println);

		list.forEach(System.out::println);

	}

	//使用forEach方法常规输出
	@Test
	public void testOne() {
		List<String> list = Arrays.asList("a", "b", "c");

		list.forEach(new Consumer<String>() {

			@Override
			public void accept(String t) {

				System.out.println(t);
			}

		});
	}

	//lambda表达式输出
	@Test
	public void testTwo() {
		List<String> list = Arrays.asList("a", "b", "c");

		list.forEach(t -> System.out.println(t));

	}

	//方法引用输出;当要访问的接口方法与要执行的方法引用参数相同,返回值也相同即可直接使用方法引用。
	@Test
	public void testThree() {
		List<String> list = Arrays.asList("a", "b", "c");
		list.forEach(System.out :: println);
	}

}
jdk8方法的引用可分为以下几类
(1)构造器引用
1.4.1 构造器方法引用
格式:Class :: new,引用默认构造函数
package com.cy.java8.methodref;

import java.util.Date;
import java.util.function.Supplier;

public class TestConstructorMethodRef01 {

	public static void main(String[] args) {
		//Supplier对象的传统应用方式
		Supplier<Object> supplier = new Supplier<Object>() {

			@Override
			public Object get() {

				return new Object();
			}
		};

		System.out.println(supplier.get());

		//lambda表达式方式
		Supplier<Object> supplier1 = () -> new Object();
		System.out.println(supplier1.get());

		//构造方法引用;类名 :: new
		Supplier<Object> supplier2 = Object::new;
		System.out.println(supplier2.get());

		Supplier<Object> supplier3 = Date::new;
		System.out.println(supplier3.get());

	}
}
1.4.2 类静态方法引用
@Test
	public void testFourth() {
		//传统应用方式
				Function<String, Integer> f1 = new Function<String, Integer>() {

					@Override
					public Integer apply(String t) {

						return Integer.parseInt(t);
					}

				};

				Integer result = f1.apply("100");
				System.out.println(result);

				//lambda表达式
				Function<String, Integer> f2 = (t) -> Integer.parseInt(t);
				System.out.println(f2.apply("200"));

				//类方法(静态方法)引用;“类名 :: 方法名”
				Function<String, Integer> f3 = Integer :: parseInt;
				System.out.println(f3.apply("300"));
	}
例子:比较两个整数的大小
package com.cy.java8.methodref;

import java.util.Comparator;

//比较两个整数的大小
public class TestClassMethodRef02 {

	public static void main(String[] args) {

		//传统方式
		Comparator<Integer> c = new Comparator<Integer>() {

			@Override
			public int compare(Integer o1, Integer o2) {

				return Integer.compare(o1, o2);
			}
		};
		System.out.println(c.compare(1, 2));

		//lambda表达式
		Comparator<Integer> c1 = (o1, o2) -> Integer.compare(o1, o2);
		System.out.println(c1.compare(1, 2));

		//类方法应用
		Comparator<Integer> c2 = Integer :: compare;
		System.out.println(c2.compare(1, 2));

	}

}
1.4.3 类实例方法引用
package com.cy.java8.methodref;

import java.io.File;
import java.util.function.Function;

public class TestClassInstanceMethodRef01 {

	public static void main(String[] args) {
		Function<File, String> f = new Function<File, String>() {

			@Override
			public String apply(File t) {

				return t.getAbsolutePath();
			}

		};
		System.out.println(f.apply(new File("pom.xml")));

		//lambda方式
		Function<File, String> f1 = t -> t.getAbsolutePath();
		System.out.println(f1.apply(new File("pom.xml")));

		//类实例方法引用“类名 :: 实例方法名”
		Function<File, String> f2 = File :: getAbsolutePath;
		System.out.println(f2.apply(new File("pom.xml")));

	}
}
例子:Arraya.sort(strArray, (s1, s2) -> s1.compareToIgnoreCase(s2));
Arrays.sort(strArray, StringToIgnoreCase);
package com.cy.java8.methodref;

import java.util.Arrays;
import java.util.Comparator;

public class TestClassInstanceMethodRef02 {

	public static void main(String[] args) {
		String[] strArray = {"abcd", "a", "abc"};

		//传统方式
		Arrays.sort(strArray, new Comparator<String>() {

			@Override
			public int compare(String o1, String o2) {

				return o1.compareToIgnoreCase(o2);
			}
		});
		System.out.println(Arrays.toString(strArray)); //print:[a, abc, abcd]

		//lambda
		Arrays.sort(strArray, (o1, o2) -> o1.compareToIgnoreCase(o2));

		//类实例方法
		Arrays.sort(strArray, String :: compareToIgnoreCase);
	}

}
1.4.4 对象实例方法引用
public static void main(String[] args) {
		List<String> list = Arrays.asList("a", "b", "c");

		//jdk8中的对象实例方法引用方式
		PrintStream ps = System.out;
		list.forEach(ps::println);

		list.forEach(System.out::println);

	}
练习:
List list = Arrays.asList(10, 20);
Supplier supplier = (list::size);
System.out.println(supplier.get());
package com.cy.java8.methodref;

import java.util.Arrays;
import java.util.List;
import java.util.function.Supplier;

public class TestObjectInstanceMethodRef02 {

	public static void main(String[] args) {
		List<Integer> list = Arrays.asList(100, 200, 300);

		//传统方式
		Supplier<Integer> s = new Supplier<Integer>() {

			@Override
			public Integer get() {

				return list.size();
			}
		};
		System.out.println(s.get());

		//lambda表达式
		Supplier<Integer> s1 = () -> list.size();
		System.out.println(s1.get());

		//对象实例方法
		Supplier<Integer> s2 = list :: size;
		System.out.println(s2.get());

	}

}
1.5 Stream
Java8中的Stream是对集合(Collection)对象功能的增强,它专注于对集合对象进行各种非常便利、高效的聚合操作,或者大批量数据操作。
它与java.io包里的InputStream和OutputStream是完全不同的概念。
我们在使用Stream对象时,一般会按照如下三个步骤进行操作:
第一步:创建Stream流对象。
第二步:Stream流中间操作。
第三步:Stream流终止操作。
案例:
package com.cy.java8.stream;

import java.util.Arrays;
import java.util.List;
import java.util.function.Predicate;

public class TestStream01 {

	public static void main(String[] args) {
		//lambda表达式;计算偶数个数
		List<Integer> list = Arrays.asList(1, 2, 3, 8, 7, 5, 9, 10);

		//list.stream() 创建Stream流
		long count = list.stream()
				    .filter(t -> t%2==0)
				    .count();

		System.out.println(count); //print:3

		/**
		 * 以下为传统方式编写
		 * 求偶数个数
		 */
		List<Integer> list1 = Arrays.asList(1, 2, 3, 4, 5, 6, 7, 8);
		long count1 = list1.stream().filter(new Predicate<Integer>() {

			@Override
			public boolean test(Integer t) {

				return t%2==0;
			}
		}).count();
		System.out.println(count1); //print:4

	}
}
1.5.1 Stream对象创建的方式
Stream对象的创建
Stream对象的创建,常见方式有如下几种:
1、借助Collection接口中的stream()或parallelStream()方法
2、借助Arrays类中的stream(…)方法
3、借助Stream类中的of(…)方法
4、借助Stream类中的iterator和generator方法(无限操作)
package com.cy.java8.stream;

import java.util.Arrays;
import java.util.List;
import java.util.UUID;
import java.util.stream.IntStream;
import java.util.stream.Stream;

public class TestStream02 {

	public static void main(String[] args) {

		List<Integer> list = Arrays.asList(1, 2, 3);
		//创建Stream流方式一:lambda表达式
		list.stream().forEach(t->System.out.println(t));
		//方法引用;顺序流
		list.stream().forEach(System.out::println);

		//并行流操作;可以充分利用多核cup,提高效率;不需要创建线程
		list.parallelStream().forEach(System.out :: println);

		//方式二:Arrays创建IntStream流对象
		IntStream is = Arrays.stream(new int[] {1, 2, 3});
		is.forEach(System.out :: println);

		//方式三
		Stream.of(4, 5, 6).forEach(System.out :: println);

		//方式四;无限操作,不断累加2
		Stream.iterate(2, t -> t+2).forEach(System.out :: println);

		//方式五;无限操作,随机生成小数
		Stream.generate(() -> Math.random()).forEach(System.out :: println);

		//方式五例子
		Stream.generate(() -> UUID.randomUUID().toString()).forEach(System.out :: println);

	}

}
1.5.2 Stream中间操作
Stream对象创建以后可以基于业务执行一些中间操作,但这些操作的结果需要借助终止操作进行输出。
package com.cy.java8.stream;

import java.util.Arrays;
import java.util.Comparator;
import java.util.List;
import java.util.stream.Stream;

/*
演示:
1、过滤操作:Stream<Integer> s2 = s1.filter(n -> n%2==0);
2、限定操作:
			list.stream() //创建流
				.filter(n -> n%2==0) //中间操作
				.limit(2) //限定操作:会对结果取前2条数据
3、跳过操作:
			list.stream() //创建流
				.filter(n -> n%2==0) //中间操作
				.skip(2) //跳过操作:会跳过结果的前2条数据
				.forEach(System.out :: println); //终止操作
4、去重操作:
		list.stream() //创建流
			.distinct() //去重操作
			.forEach(System.out :: println); //终止操作
5、排序操作:sorted;底层基于内部比较器Comparable或外部Comparator比较器进行比对
6、映射操作
*/
public class TestStream03 {

	public static void main(String[] args) {
		//初始条件:给定list集合作为Stream操作的对象
		List<Integer> list = Arrays.asList(1, -1, 1, -1, 3, 2);
		//对数据进行过滤;输出集合中所有的偶数
		//1、创建流
		Stream<Integer> s1 = list.stream();
		//2、中间操作(过滤)
		Stream<Integer> s2 = s1.filter(n -> n%2==0);
		//3、终止操作
		s2.forEach(System.out :: println);

		System.out.println("-----------------");

		//多个操作合在一起
		list.stream()
			.filter(n -> n%2==0)
			.forEach(System.out :: println);

		System.out.println("-----------------");

		list.stream() //创建流
			.filter(n -> n%2==0) //中间操作
			.limit(2) //限定操作:会对结果取前2条数据
			.forEach(System.out :: println); //终止操作

		System.out.println("-----------------");

		list.stream() //创建流
		.filter(n -> n%2==0) //中间操作
		.skip(2) //跳过操作:会跳过结果的前2条数据
		.forEach(System.out :: println); //终止操作

		System.out.println("-----------------");

		list.stream() //创建流
			.distinct() //去重操作
			.forEach(System.out :: println); //终止操作

		System.out.println("-------排序操作;传统方式输出----------");

		//传统写法
		list.stream().sorted(new Comparator<Integer>() {

			@Override
			public int compare(Integer o1, Integer o2) {
				return o1-o2;
			}
		}).forEach(System.out :: println);

		System.out.println("-------------排序操作;lambda表达式输出--------------");

		//lambda表达式
		list.stream().sorted((o1, o2) -> {return o1-o2;}).forEach(System.out :: println);

		System.out.println("-----------排序操作;lambda表达式;第二种写法-------------");
		list.stream().sorted((o1, o2) -> o1-o2).forEach(System.out :: println);


		System.out.println("--------------映射操作--------------");

		List<String> listStr = Arrays.asList("a", "def", "bc");
		//转成大写
		listStr.stream().map(x -> x.toUpperCase()).forEach(System.out :: println);
		//各个元素的长度
		listStr.stream().map(x -> x.length()).forEach(System.out :: println);
	}

}

/*print:
2
-----------------
2
-----------------
2
-----------------
-----------------
1
-1
3
2
-------排序操作;传统方式输出----------
-1
-1
1
1
2
3
-------------排序操作;lambda表达式输出--------------
-1
-1
1
1
2
3
-----------排序操作;lambda表达式;第二种写法-------------
-1
-1
1
1
2
3
--------------映射操作--------------
A
DEF
BC
1
3
2
*/
1.5.3 Stream终止操作
Stream终止操作是Stream的结束操作。
package com.cy.java8.stream;

import java.util.Arrays;
import java.util.List;
import java.util.Optional;

//练习终止操作
public class TestStream04 {

	public static void main(String[] args) {
		List<Integer> list = Arrays.asList(10, 11, 12, 13, 14, 15);

		//match操作;判断是否全部是偶数
		boolean flag = list.stream().allMatch(t -> t%2==0);
		System.out.println(flag); //print:false

		//判断是否有偶数
	    flag = list.stream().anyMatch(t -> t%2==0);
	    System.out.println(flag); //print:true

	    //判断是否全部都不是偶数
	    flag = list.stream().noneMatch(t -> t%2==0);
	    System.out.println(flag); //print:false

	    //find操作;找出第一个
	    Optional<Integer> optional = list.stream().sorted().findFirst();
	    System.out.println(optional.get());

	    //找出任意一个
	    optional = list.stream().filter(t -> t%2==0).findAny(); //print:10
	    System.out.println(optional.get()); //print:10

	    //count操作
	    long count = list.stream().count();
	    System.out.println(count);

	    //最大值
	    optional = list.stream().max((x, y) -> x-y);
	    System.out.println("最大值" + optional.get());
	    //最小值
	    optional = list.stream().min((x, y) -> x-y);
	    System.out.println("最小值" + optional.get());

	}

}
1.5.4 reduce(规约)操作
package com.cy.java8.stream;

import java.util.Arrays;
import java.util.List;

//reduce(规约)操作
public class TestStream05 {

	public static void main(String[] args) {
		//计算集合中所有元素的和,其中第一个参数0为初始值,然后与后面每个值累加
		List<Integer> list = Arrays.asList(1, 2);

		Integer sum = list.stream().reduce(0, (x, y) -> x+y);
		System.out.println(sum); //print:3
	}

}
1.5.5 Collection(收集)操作
package com.cy.java8.stream;

import java.util.Arrays;
import java.util.List;
import java.util.Map;
import java.util.Optional;
import java.util.Set;
import java.util.stream.Collectors;

//Collection(收集)操作
public class TestStream06 {

	public static void main(String[] args) {
		List<Integer> list = Arrays.asList(1, 2);

		//所有元素加1放入List集合中
		List<Integer> result = list.stream().map(x -> x+1).collect(Collectors.toList());
		System.out.println(result); //print:[2, 3]

		//所有元素加1放入Set集合中
		Set<Integer> result1 = list.stream().map(x -> x+1).collect(Collectors.toSet());
		System.out.println(result1); //print:[2, 3]

		//求平均值
		double avg = list.stream().collect(Collectors.averagingDouble(x -> x));
		System.out.println(avg); //print:1.5

		Optional<Integer> max = list.stream().collect(Collectors.maxBy((x, y) -> x-y));
		System.out.println(max.get()); //print:2

		Map<Object, List<Integer>> map = list.stream().collect(Collectors.groupingBy(x ->  x%2==0));
		System.out.println(map); //print:{false=[1], true=[2]}
	}
}
1.5.6 Stream练习
1.5.6.1 求和、求积
package com.cy.java8.stream;

import java.util.Arrays;
import java.util.List;
import java.util.Optional;
import java.util.function.BinaryOperator;

public class TestStream07 {

	public static void main(String[] args) {
		List<Integer> list = Arrays.asList(10, 20, 30);
		//1、求集合中所有元素的和;传统方式
		Optional<Integer> result = list.stream().reduce(new BinaryOperator<Integer>() {

			@Override
			public Integer apply(Integer t, Integer u) {

				return t+u;
			}
		});
		System.out.println(result.get()); //print:60

		//lambda表达式
		int result1 = list.stream().reduce((t, u) -> t+u).get();
		System.out.println(result1); //print:60

		//先求集合中所有元素的和,然后加10
		Integer result2 = list.stream().reduce(10, (a, b) -> a+b);
		System.out.println(result2); //print:70

		//2、求集合中所有元素的乘积,最后在将结果乘以10
		Integer result3 = list.stream().reduce(10, (a, b) -> a*b);
		System.out.println(result3); //print:60000

	    //3、对计算结果进行类型提升
		Long result4 = list.stream().reduce(10L, (a,b)->a+b, (a,b)->0L);
		System.out.println(result4); //print:70
	}

}
计算多个整数的和,假如和超出Integer的范围,则需要对其进行类型转换,假如求和或乘积之后的数值超过了Integer能够表示的范围,需要使用Long类型接收,这就用到reduce()方法的应用形式了。
static void doTestReduce03() {
List list = Arrays.asList(Integer.MAX_VALUE, Integer.MAX_VALUE);
long count = list.stream().reduce(0L, (a,b)->(a+b), (a+b)->0L);
System.out.println(count);
}
1.5.6.2 获取指定目录下所有目录文件的文件名
package com.cy.java8.stream;

import java.io.File;
import java.util.Arrays;
import java.util.stream.Collectors;

//获取指定目录下所有目录文件的文件名
public class TestStream08 {

	public static void main(String[] args) {
		//获取磁盘中所有目录
		Arrays.stream(new File("d:/").listFiles())
			.filter(File :: isDirectory)
			.map(f->f.getName())
			.collect(Collectors.toList())
			.forEach(System.out :: println);
	}
}
1.5.6.3 并行流的简易应用
并行流应用的目的主要借助多核处理器的优势,提高操作性能
package com.cy.java8.stream;

import java.util.Arrays;
import java.util.List;

public class TestStream09 {

	public static void main(String[] args) {
		//顺序流和并行流的应用
		List<Integer> list = Arrays.asList(10, 20, 30, 40, 50, 60);
		list.stream().forEach(t -> System.out.println(t));

		list.stream().forEach(t -> {
			System.out.println(Thread.currentThread().getName() + "->" + t);
		});

		System.out.println("----------------");

		//并行流应用;多处理器或多核处理器下有一定优势
		list.parallelStream().forEach(n -> {
			System.out.println(Thread.currentThread().getName()+ "->" + n);
		});
	}
}
1.6 时间日期对象应用
Java8中的事件处理API定义在java.time包中,这些API具备不可变且线程安全特性,具备准确和灵活特性。
1.6.1 时间对象
package com.cy.java8.time;

import java.time.Clock;
import java.time.Duration;
import java.time.Instant;
import java.time.ZoneId;
import java.time.ZonedDateTime;
import java.util.Set;
import java.util.concurrent.TimeUnit;

public class TestInstant {

	public static void main(String[] args) throws InterruptedException {
		//获取时钟对象
		Clock clock = Clock.systemUTC();
		System.out.println(clock);
		//获取时间戳对象
		Instant instant = clock.instant();
		System.out.println("instant:" + instant);

		System.out.println(System.currentTimeMillis()); //输出纳秒;与下面一行代码等效
		System.out.println(clock.millis()); //输出纳秒

		//获取瞬时对象(当前时间年月日时分秒),instant是绝对时间,没有时区的概念
		instant = Instant.now(); //等效于:Clock.systemUTC().instant();
		System.out.println("instant:" + instant);
		//通过这种方式获取的时间戳与北京时间相差8个时区,需要修正为北京时间
	    instant = instant.plusMillis(TimeUnit.HOURS.toMillis(8)); //正常时间,加8个小时
	    System.out.println(instant);

	    //获取时区对象;输出系统可用时区
	    Set<String> set = ZoneId.getAvailableZoneIds();
	    System.out.println(set);

	    //获取默认时区;输出系统默认时区
	    System.out.println(ZoneId.systemDefault());
	    //获取系统默认时区时间;输出系统默认时区时间
	    ZonedDateTime zonedDateTime = Instant.now().atZone(ZoneId.systemDefault());
	    System.out.println(zonedDateTime);

	    //获取时间间隔
	    Instant start = Instant.now();
	    Thread.sleep(2000);
	    Instant end = Instant.now();
	    Duration duration = Duration.between(start, end);
	    System.out.println(duration.toMillis());

	}

}
1.6.2 日期对象
package com.cy.java8.time;

import java.time.LocalDate;
import java.time.format.DateTimeFormatter;

public class TestLocalDate01 {

	public static void main(String[] args) {
		LocalDate localDate = LocalDate.now();
		System.out.println(localDate);

		//输出自己指定的日期
		localDate = LocalDate.of(2019, 12, 15);
		System.out.println(localDate);

		//字符串转换为日期对象
		localDate = LocalDate.parse("2019-12-18");
		System.out.println(localDate);

		localDate = LocalDate.parse("2019/12/20", DateTimeFormatter.ofPattern("yyyy/MM/dd"));
		System.out.println(localDate);
	}

}
package com.cy.java8.time;

import java.time.Clock;
import java.time.LocalDate;
import java.time.LocalTime;
import java.time.ZoneId;
import java.time.temporal.ChronoUnit;

//LocalTime时间对象,不包含日期
public class TestLocalTime {

	public static void main(String[] args) {
		//输出日期
		LocalDate localDate = LocalDate.now();
		System.out.println(localDate);

		//输出时间
		LocalTime localTime = LocalTime.now();
		System.out.println(localTime);

		LocalTime t1 = LocalTime.now(Clock.systemUTC());
		System.out.println(t1);
		LocalTime t2 = LocalTime.now(ZoneId.systemDefault());
		System.out.println(t2);

		long result = ChronoUnit.HOURS.between(t1, t2);
		System.out.println(result);

	}

}
package com.cy.java8.time;

import java.time.DayOfWeek;
import java.time.LocalDateTime;
import java.time.Month;

//LocalDateTime包含了日期和时间对象,没有时区信息
public class TestLocalDateTime01 {

	public static void main(String[] args) {
		LocalDateTime dt1 = LocalDateTime.now();
		System.out.println(dt1);

		LocalDateTime dt2 = LocalDateTime.of(2019, Month.JULY, 20, 15, 12, 18);
		System.out.println(dt2);

		DayOfWeek dayOfWeek = dt2.getDayOfWeek();
		System.out.println(dayOfWeek);

	}

}
package com.cy.java8.time;

import java.time.ZoneId;
import java.time.ZonedDateTime;
import java.util.TimeZone;

public class TestZoneDateTime01 {

	public static void main(String[] args) {
		ZonedDateTime zonedDateTime = ZonedDateTime.now();
		System.out.println(zonedDateTime);

		//下面两行代码现在一般不用了
		ZoneId zoneId = TimeZone.getDefault().toZoneId();
		System.out.println(zoneId);

		System.out.println(ZoneId.systemDefault());
	}
}
1.6.3 例子
说明:jdk8之前的日期与字符串之间的转换通常会借助SimpleDateFormat对象,但是此对象线程不安全,通常要借助ThreadLocal对象,保证simpleDateFormat对象每个线程一份。
package com.cy.java8.time;

import java.time.LocalDateTime;
import java.time.format.DateTimeFormatter;

public class TestDateTimeFormatter01 {

	//日期类型转换
	public static void main(String[] args) {
		LocalDateTime ldt1 = LocalDateTime.now();
		System.out.println(ldt1);

		String dateTimeStr = ldt1.format(DateTimeFormatter.ofPattern("yyyy/MM/dd HH:mm:ss"));
		System.out.println(dateTimeStr);

		ldt1 = LocalDateTime.parse(dateTimeStr, DateTimeFormatter.ofPattern("yyyy/MM/dd HH:mm:ss"));
		System.out.println(ldt1);

	}

}
XML
XML(Extensible Markup Language,可扩展标记语言),是一种简单的数据存储语言,使用一系列简单的标记来描述数据。
XML技术应用广泛,最基本的如网站、应用程序的配置信息一般都采用XML文件描述。
XML的特点:
1、XML与操作系统、编程语言的开发平台都无关。
2、规范统一。
<?xml version="1.0" encoding="UTF-8"?>
<!DOCTYPE xml>

<books>

	<book id="bk101">
		<author>宋江</author>
		<title>Java编程思想</title>
		<description>包含Java基础和高级编程</description>
	</book>

	<book id="bk102">
		<author>卢俊义</author>
		<title>XML基础</title>
		<description>包含XML基础和用法</description>
	</book>

</books>
XML声明
<?xml version="1.0" encoding="UTF-8"?>表示XML声明,用以标明该文件是一个XML文档。XML文档总是以XML声明开始,它定义了XML的版本和使用的编码格式等信息。
XML声明由以下几个部分组成。
version:文档符合XML 1.0规范。
encoding:文档字符编码,默认为“UTF-8”。
对于任何一个XML文档,其声明部分都是固定的格式。
XML文件可以包含任意数量的标签。
根元素
每个XML文档必须有且仅有一个根标签,如:<books></books>
根元素的特点如下:
根元素是一个完全包括文档中其他所有元素的元素。
根元素的起始标签要放在所有其他元素的起始标签之前。
根元素的结束标签要放在所有其他元素的结束标签之后。
元素
XML文档的主要部分是元素,元素由开始标签、元素内容和结束标签组成。元素内容可以包含子元素、字符数据等。
元素的命名规则如下:
1、名称中可以包含字母、数字或者其他字符。
2、名称不能以数字或者标点符号开始。
3、名称不能以字符xml(或者XML、Xml)开始。
4、名称中不能包含空格。
属性
属性定义语法格式:<元素名 属性名=“属性值”>
属性值用一对双引号包含起来。
一个元素可以有多个属性,它的基本格式为:<元素名 属性名=“属性值” 属性名=“属性值” />,多个属性之间用空格隔开。
属性值中不能直接包含<、"、&等字符。
XML中的特殊字符的处理
在XML文档中,有时在元素的文本中会出现一些特殊字符(如<、>、"、'、&),而XML文档结构本身就用到了这几个特殊字符,有以下两种办法,可以正确的解析包含特殊字符的内容。
一、对这5个特殊字符进行转义,也就是使用XML中的预定义实体代替这些字符。
| 实体名称 | 字符 |
|---|---|
| < | < |
| > | > |
| & | & |
| " | " |
| ' | ’ |
二、如果在元素的文本中有大量的特殊字符,可以使用CDATA节处理。
CDATA节中的所有字符都会被当作元素字符数据的常量部分,而不是XML标签。
定义CDATA节的语法格式如下:<![CDATA[要显示的字符。]]>
格式良好的XML文档需要遵循如下规则:
1、必须有XML声明语句。
2、必须有且仅有一个根标签。
3、属性值用双引号包含起来。
4、标签成对出现。
5、元素正确嵌套。
XML中的命名空间
命名空间在XML文档中可以用作元素或属性名称的名称集合,它们用来标识来自特定域(标准组织、公司、行业)的名称。
命名空间的必要性:
XML解析器在解析XML文档时,对于重名的元素,可能出现解析冲突。命名空间有助于标准化元素和属性,并为它们加上唯一的标识。
声明命名空间:
声明命名空间的语法格式:xmlns:[prefix]=“[命名空间的URI]”
prefix是前缀名称,它用作命名空间的别名。
xmlns是保留属性。
属性和命名空间:
除非带有前缀,否则属性属于它们的元素所在的命名空间。
<?xml version="1.0" encoding="utf-8"?>
<!DOCTYPE xml>

<!-- xml文档中根标签:  有且仅有一对。-->
<a>
	<!-- 标签: 分为起始标签和结尾标签.
		 子文本: 在标签范围中提供的普通文本内容.
	 -->
	<name>宋江</name>

	<!--
		标签属性:  在起始标签中编写的属性;格式为:  属性名='属性值'。  可以为0~n个。
	 -->
	<subject name="java"></subject>

	<!--
		标签组成:  标签自身(student) + 标签属性(name="宋江") + 标签子元素(subject).

		标签之间的关系:
			student中包含子标签为:subject标签.
			subject标签所属父标签为:  student标签.
	 -->
	<student name="卢俊义">

		<subject>html</subject>

	</student>

</a>
<?xml version="1.0" encoding="utf-8"?>
<!DOCTYPE xml>

<!--
需求: 定义xml文件。在其中存储:
	3个部门(分别是: 编号1,财务部   编号2,研发部   编号3,市场部)
	财务部:模拟体现2名员工。
	研发部:模拟体现2名员工。
	市场部:模拟体现1名员工。
	所有员工:模拟体现工号,姓名,薪酬。
-->
<company>

	<department no="1" name="财务部">

		<employee>
			<name>宋江</name>
			<salary>1000</salary>
		</employee>

		<employee>
			<name>卢俊义</name>
			<salary>2000</salary>
		</employee>

	</department>

	<department no="2" name="研发部">

		<employee>
			<name>吴用</name>
			<salary>3000</salary>
		</employee>

		<employee>
			<name>呼延灼</name>
			<salary>4000</salary>
		</employee>

	</department>

	<department no="3" name="市场部">

		<employee>
			<name>潘巧云</name>
			<salary>5000</salary>
		</employee>

	</department>

</company>
XML解析
DOM解析XML
DOM(Document Object Model,文档对象模型)把XML文件映射成一颗倒挂的“树”,以根元素为根节点,每个>节点都以对象形式存在。通过存取这些对象就能够存取XML文档的内容。
Oracle公司提供了JAXP(Java API for XML Processing)来解析XML。JAXP会把XML文档转换成一个DOM树。JAXP包含3个包,这3个包都在JDK中:
org.w3c.dom:W3C推荐的用于使用DOM解析XML文档的接口。
org.xml.sax:用于使用SAX解析XML文档的接口。
javax.xml.parsers:解析器工厂工具,程序员获得并配置特殊的分析器。
1、Document对象
org.w3c.dom
public interface Document
extends Node
Document对象代表整个XML文档,所有其他的节点(Node)都以一定的顺序包含在Document对象之内,排列成一个树状结构,可以通过遍历这棵“树”来得到XML文档的所有内容。它也是对XML文档进行操作的起点,人们总是先通过解析XML源文件得到一个Document对象,然后再来执行后续的操作。
Document对象的主要方法:
NodeList getElementsByTagName(String tagname) 返回一个NodeList对象,它包含了所有指定标签名称的标签。
Element getDocumentElement() 返回一个代表这个DOM树的根节点的Element对象,也就是代表XML文档根元素的对象。
2、NodeList对象
org.w3c.dom
public interface NodeList
NodeList对象是指包含了一个或者多个节点的列表。可以简单地把它看成一个Node数组,也可以通过方法来获得列表中的元素。
NodeList对象的常用方法:
int getLength() 返回列表的长度。
Node item(int index) 返回指定位置的Node对象。
3、Node对象
org.w3c.dom
public interface Node
Node对象是DOM结构中最基本的对象,代表了文档树中的一个抽象节点。在实际使用时,很少会真正用到Node对象,一般会用Element、Text等Node对象的子对象来操作文档。
Node对象的主要方法:
NodeList getChildNodes() 此节点包含的所有子节点的NodeList。
Node getFirstChild() 如果节点存在子节点,则返回第一个子节点。
Node getLastChild() 如果节点存在子节点,则返回最后一个子节点。
Node getNextSibling() 返回DOM树中这个节点的下一个兄弟节点。
Node getPreviousSibling() 返回DOM树中这个节点的下一个兄弟节点。
String getNodeName() 返回节点的名称。
String getNodeValue() throws DOMException 返回节点的值。
short getNodeType() 返回节点的类型。
4、Element对象
org.w3c.dom
public interface Element
extends Node
Element对象代表XML文档中的标签元素,继承自Node,也是Node最主要的子对象。在标签中可以包含属性,因而Element对象中也有存取其属性的方法。
String getAttribute(String name) 返回标签中指定属性名称的属性的值。
NodeList getElementsByTagName(String name) 返回具有指定标记名称的所有后代Elements的NodeList。
DOM读取XML数据
package com.company.project.module.dom.first;

import java.io.File;

import javax.xml.parsers.DocumentBuilder;
import javax.xml.parsers.DocumentBuilderFactory;

import org.w3c.dom.Document;
import org.w3c.dom.NamedNodeMap;
import org.w3c.dom.Node;
import org.w3c.dom.NodeList;

public class Test1 {

	public static void main(String[] args) throws Exception {

		//xml:存储数据。


		//解析xml文件内部数据

		//方式一: dom解析方式。注: 原生的方式(jdk自带),过程比较繁琐。

		//1、创建解析器工厂对象。
		DocumentBuilderFactory documentBuilderFactory = DocumentBuilderFactory.newInstance();

		//2、使用解析器工厂对象创建解析器对象。
		DocumentBuilder documentBuilder = documentBuilderFactory.newDocumentBuilder();

		//3.使用解析器对象解析xml文件----->内存中的dom树对象。
		Document document = documentBuilder.parse(new File("resource/2.xml"));

		System.out.println("2.xml对应的dom对象为: " + document);

		//4、分别解析dom对象中的每个节点的元素。

		//根据department标签名称解析节点元素,多个节点封装到NodeList集合中。
		NodeList list = document.getElementsByTagName("department");

		//查看返回值NodeList集合中的元素个数。
		System.out.println("NodeList集合中的元素个数:" + list.getLength());

		System.out.println("**************************");

		//解析每个部门的编号和名称:注:都是属性形式。
		for(int i = 0 ; i < list.getLength(); i++) {

			//department节点为部门标签对象
			Node department = list.item(i);

			//部门标签中所有的属性对象
			NamedNodeMap namedNodeMap = department.getAttributes();

			//在namedNodeMap这个属性Map中:可根据属性名获取属性对象。
			Node no = namedNodeMap.getNamedItem("no");
			Node name = namedNodeMap.getNamedItem("name");

			//从属性对象中解析属性值。
			String noValue = no.getNodeValue();
			String nameValue = name.getNodeValue();

			System.out.println("部门的编号和名称分别为:" + noValue + "," + nameValue);

			System.out.println("=======================");

			//部门标签中所有子标签employee对象集合
			NodeList employees = department.getChildNodes(); //属于: 子标签 + 子空格文本
			System.out.println("部门的子节点的长度为:" + employees.getLength());

			//筛选出: 其中的子标签。
			for( int j = 0; j < employees.getLength(); j++ ) {

				Node node = employees.item(j); //可能是空格文本, 也可能是employee子标签。

				/*
				 * Node.TEXT_NODE 标识文本类型。
				 * Node.ELEMENT_NODE 标识子元素标签类型。
				 * Node.ATTRIBUTE_NODE 标识标签上的属性类型。
				 * */
				int type = node.getNodeType();

				if( type == Node.ELEMENT_NODE ) {

					//表示是子标签. 找到了employee标签。
					//解析员工标签中的:  姓名、工资。
					NodeList childNodes = node.getChildNodes();

					System.out.println(childNodes.getLength());

					for( int k = 0; k < childNodes.getLength(); k++) {

						Node child = childNodes.item(k);

						//找到姓名、工资标签
						if( child.getNodeType() == Node.ELEMENT_NODE ) {

							String textContent = child.getTextContent();
							System.out.println("员工的信息为:" + textContent);

						}

					}

				}

			}

		}

		//方式二: dom4j解析方式。注:第三方框架提供,过程比较方便。

	}

}
package com.company.project.module.xml.test;

import java.io.File;
import java.io.IOException;

import javax.xml.parsers.DocumentBuilder;
import javax.xml.parsers.DocumentBuilderFactory;
import javax.xml.parsers.ParserConfigurationException;

import org.junit.Test;
import org.w3c.dom.Document;
import org.w3c.dom.NamedNodeMap;
import org.w3c.dom.Node;
import org.w3c.dom.NodeList;
import org.xml.sax.SAXException;

public class TestXML {

	/*
	 * 没有处理异常
	 * */
	public static void main(String[] args) throws Exception {

		//1、创建解析器工厂对象。
		DocumentBuilderFactory documentBuilderFactory = DocumentBuilderFactory.newInstance();
		//2、根据解析器工厂对象创建解析器对象。
		DocumentBuilder documentBuilder = documentBuilderFactory.newDocumentBuilder();
		//3、使用解析器对象解析2.xml文件:内存中的DOM树对象。
		Document document = documentBuilder.parse(new File("2.xml"));

		System.out.println("2.xml对应的dom对象为: " + document);

		//4、分别解析DOM对象中的每个节点元素成员。
		//根据department标签名称解析节点元素,多个节点封装到NodeList集合中。
		NodeList nodeListDepartment = document.getElementsByTagName("department");
		//查看返回值NodeList集合中的元素个数:
		//System.out.println("NodeList nodeListDepartment = " + nodeListDepartment);
		System.out.println(nodeListDepartment.getLength());

		System.out.println("********************************");

		//解析每个部门的编号和名称:注:都是属性形式。
		for(int i = 0; i < nodeListDepartment.getLength(); i++) {

			//department节点为部门标签对象
			Node NodeDepartment = nodeListDepartment.item(i);

			//部门标签中所有的属性对象
			NamedNodeMap namedNodeMapDepartment = NodeDepartment.getAttributes();

			//在namedNodeMapDepartment这个属性Map中可以根据属性名获取属性对象。
			Node no = namedNodeMapDepartment.getNamedItem("no");
			Node name = namedNodeMapDepartment.getNamedItem("name");

			//从属性对象中解析属性值。
			String noValue = no.getNodeValue();
			String nameValue = name.getNodeValue();

			System.out.println("部门的编号和名称分别为:" + noValue + ":" + nameValue);

			//部门标签中所有子标签employee对象集合。
			NodeList nodeListEmployee = NodeDepartment.getChildNodes(); //属于:子标签+子空格文本。

			System.out.println("部门的子节点的长度为: " + nodeListEmployee.getLength());

			//筛选出:其中的子标签。
			for( int j = 0; j < nodeListEmployee.getLength(); j++ ) {

				Node nodeEmployee = nodeListEmployee.item(j); //可能是空格文本,也可能是employee子标签。

				/*
				 * Node.ATTRIBUTE_NODE 标识标签上的属性类型。
				 * Node.ELEMENT_NODE 标识子元素标签类型。
				 * Node.TEXT_NODE 标识文本类型。
				 * */
				short type = nodeEmployee.getNodeType();

				if(type == Node.ELEMENT_NODE) {
					//表示是子标签。找到了employee标签。
					//继续解析员工标签中的:姓名、工资。
					NodeList childNodes = nodeEmployee.getChildNodes();

					System.out.println("员工子节点的长度为:---------------" + childNodes.getLength());

 					for( int k = 0; k < childNodes.getLength(); k++) {

						Node child = childNodes.item(k);

						//找到姓名或工资标签
						if(child.getNodeType() == Node.ELEMENT_NODE) {

							String textContent = child.getTextContent();

							System.out.println("员工的信息为:" + textContent);

						}

					}

				}

			}

		}

	}

	/**
	 * 处理了异常
	 */
	@Test
	public void test0000() {

		DocumentBuilderFactory documentBuilderFactory = DocumentBuilderFactory.newInstance();

		try {

			DocumentBuilder documentBuilder = documentBuilderFactory.newDocumentBuilder();

			try {

				Document document = documentBuilder.parse(new File("2.xml"));
				//System.out.println(document);

				NodeList nodeListDepartment = document.getElementsByTagName("department");
				//System.out.println(nodeListDepartment.getLength());

				for(int i=0; i<nodeListDepartment.getLength(); i++) {

					Node nodeDepartment = nodeListDepartment.item(i);

					NamedNodeMap namedNodeMap = nodeDepartment.getAttributes();
					Node noNode = namedNodeMap.getNamedItem("no");
					Node nameNode = namedNodeMap.getNamedItem("name");
					String nodeValue = noNode.getNodeValue();
					String nameValue = nameNode.getNodeValue();

					System.out.println("部门的编号和名称分别为:" + nodeValue + ":" + nameValue);

					NodeList nodeListEmployee = nodeDepartment.getChildNodes();

					for(int j=0; j<nodeListEmployee.getLength(); j++) {

						Node nodeEmployee = nodeListEmployee.item(j);

						if(nodeEmployee.getNodeType() == Node.ELEMENT_NODE) {

							NodeList childs = nodeEmployee.getChildNodes();

							for (int k = 0; k < childs.getLength(); k++) {

								Node child = childs.item(k);

								if(child.getNodeType() == Node.ELEMENT_NODE) {

									String textContent = child.getTextContent();

									System.out.println("员工的信息为:" + textContent);

								}
							}

						}

					}

				}
			} catch (SAXException e) {
				e.printStackTrace();
			} catch (IOException e) {
				e.printStackTrace();
			}
		} catch (ParserConfigurationException e) {
			e.printStackTrace();
		}

	}

}
DOM添加、修改、删除XML数据
package com.company.project.module.dom.first;

import java.io.File;

import javax.xml.parsers.DocumentBuilder;
import javax.xml.parsers.DocumentBuilderFactory;
import javax.xml.transform.Transformer;
import javax.xml.transform.TransformerFactory;
import javax.xml.transform.dom.DOMSource;
import javax.xml.transform.stream.StreamResult;

import org.w3c.dom.Document;
import org.w3c.dom.Node;
//import org.w3c.dom.NodeList;

public class Test2 {

	public static void main(String[] args) throws Exception {

		DocumentBuilderFactory documentBuilderFactory = DocumentBuilderFactory.newInstance();
		DocumentBuilder documentBuilder = documentBuilderFactory.newDocumentBuilder();
		Document document = documentBuilder.parse(new File("resource/2.xml"));

		//需求:借助dom方式,新增一位员工小丽到市场部。
		/*Element employee = document.createElement("employee");
		Element name = document.createElement("name");
		name.setTextContent("小丽");
		Element salary = document.createElement("salary");
		salary.setTextContent("888");
		employee.appendChild(name);
		employee.appendChild(salary);

		Node department = document.getElementsByTagName("department").item(2);
		department.appendChild(employee);*/

		//需求:借助dom方式,调整财务部姓名为小抠的员工工资为:600。
		/*Node department1 = document.getElementsByTagName("department").item(0);
		NodeList nodeListEmployee = department1.getChildNodes();
		Node employee1 = nodeListEmployee.item(1);
		Node employeeSalary1 = employee1.getChildNodes().item(3);
		employeeSalary1.setTextContent("222");*/

		//需求:借助dom方式,调整编号为1的部门名称为:优秀财务部。
		/*Node department2 = document.getElementsByTagName("department").item(0);
		Node attributeName = department2.getAttributes().getNamedItem("name");
		attributeName.setNodeValue("优秀财务部");*/

		//需求:借助dom方式,删除市场部的新员工:小丽。
		Node department3 = document.getElementsByTagName("department").item(2);
		Node emp_XL = department3.getChildNodes().item(1);
		//删除方式一:emp_XL.getParentNode().removeChild(emp_XL);
		//删除方式二:
		department3.removeChild(emp_XL);

		//存储dom对象
		TransformerFactory transformerFactory = TransformerFactory.newInstance();
		Transformer transformer = transformerFactory.newTransformer();

		DOMSource domSource = new DOMSource(document);
		StreamResult streamResult = new StreamResult(new File("resource/2.xml"));

		transformer.transform(domSource, streamResult);

	}

}
DOM4J解析XML
略


 1万+
1万+


 被折叠的 条评论
为什么被折叠?
被折叠的 条评论
为什么被折叠?
 到【灌水乐园】发言


