


Android中Canvas绘图知识的基础学习
最近几天在学习Android中绘图部分基础的API和使用方法,今天就记录一下方便以后查询(其实查文档是最快的)。
基本API的介绍
绘制的核心三大类就是:Canvas、Paint、Path
1. Canvas类的介绍
| API | 方法说明 |
|---|---|
| drawText( String text, float x, float y, Paint paint) | 绘制字符串 |
| drawRoundRect(float left, float top, float right, float bottom, float rx, float ry, Paint paint); | 画圆角矩形 drawRect(float left, float top, float right, float bottom, Paint paint) |
| drawPoint(float x, float y, Paint paint) | 画一个点 |
| drawPath( Path path, Paint paint) | 根据path画图 |
| drawOval( RectF oval, Paint paint) | 画椭圆 |
| drawLine(float startX, float startY, float stopX, float stopY, Paint paint) | 画一条直线 |
| drawCircle(float cx, float cy, float radius, Paint paint) | 画圆 |
| drawBitmap(Bitmap bitmap, Rect src, Rect dst, Paint paint) | 从一张bitmap上的指定区域扣一块出来 |
| drawArc(RectF oval, float startAngle, float sweepAngle, boolean useCenter, Paint paint) | 画圆弧 |
2.Paint类的介绍
| Paint 类下面的API | 方法说明 |
|---|---|
| setTextSize(float textSize) | 设置绘制文本字体大小 |
| setTextAlign(Align align) | 设置绘制文本时的文字对齐方式 |
| setStyle(Style style) | 设置Paint的填充风格 |
| setStrokeJoin(Join join) | 设置画笔转弯处的连接风格 |
| setStrokeWidth(float width) | 设置画笔的宽度 |
| setShadowLayer(float radius, float dx, float dy, int shadowColor) | 设置阴影 |
| setShader(Shader shader) | 设置画笔额填充效果 |
| setColor(int color) | 设置颜色 |
| setAntiAlias(boolean aa) | 设置是否抗锯齿 |
| setARGB(int a, int r, int g, int b) | 设置颜色 |
| setAlpha(int a) | 设置透明度 |
上面介绍了这些方法,下面就通过几个简单的例子来看看实际显示的效果
Demo代码和显示效果
1、Demo1 常用方法的调用
首先先创建一个View的子类,然后在这个类中编写自己的代码,最后添加到Activity中显示出来
@Override
protected void onDraw(Canvas canvas) {
super.onDraw(canvas);
// 把整张画布绘制成白色
canvas.drawColor(Color.WHITE);
// 创建画笔
Paint paint = new Paint();
// 去锯齿
paint.setAntiAlias(true);
// 设置画笔颜色
paint.setColor(Color.BLUE);
// 设置填充风格
paint.setStyle(Paint.Style.STROKE);
// 设置填充宽度
paint.setStrokeWidth(4);
int viewWidth = this.getWidth();
// 绘制圆形
canvas.drawCircle(viewWidth / 10 + 10, viewWidth / 10 + 10, viewWidth / 10, paint);
// 绘制正方形
canvas.drawRect(10, viewWidth / 5 + 20, viewWidth / 5 + 10, viewWidth * 2 / 5 + 20, paint);
// 绘制矩形
canvas.drawRect(10, viewWidth * 2 / 5 + 30, viewWidth / 5 + 10, viewWidth / 2 + 30, paint);
// 绘制圆角矩形
RectF rectF1 = new RectF(10, viewWidth / 2 + 40, 10 + viewWidth / 5, viewWidth * 3 / 5 + 40);
canvas.drawRoundRect(rectF1, 15, 15, paint);
// 定义path对象,封闭成一个三角形
Path path1 = new Path();
path1.moveTo(10, viewWidth * 9 / 10 + 60);
path1.lineTo(viewWidth / 5 + 10, viewWidth * 9 / 10 + 60);
path1.lineTo(viewWidth / 10 + 10, viewWidth * 7 / 10 + 60);
path1.close();
// 根据path进行绘制,绘制三角形
canvas.drawPath(path1, paint);
paint.setStyle(Paint.Style.FILL);
// 设置渐变器后绘制
// 为paint设置渐变器
Shader mShader = new LinearGradient(0 , 0, 40, 60, new int[] {Color.RED, Color.GREEN, Color.BLUE, Color.YELLOW},
null, Shader.TileMode.REPEAT);
paint.setShader(mShader);
// 设置阴影
paint.setShadowLayer(25, 20, 20, Color.GRAY);
// 绘制圆形
canvas.drawCircle(viewWidth / 2 + 30, viewWidth / 10 + 10, viewWidth / 10, paint);
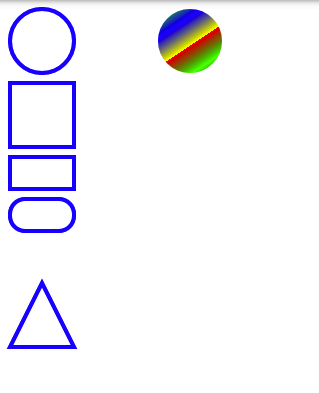
}演示效果:
2、Demo2 绘画板的编写
- 自定义View代码
public class DrawBoardView extends View {
    // 记录前一个拖动事件发生点的坐标
    private float preX;
    private float preY;
    private Path path;
    public Paint paint = null;
    // 定义内存中的图片,作为缓冲区
    Bitmap cachaeBitmap = null;
    Canvas cacheCanvas = null;

    public DrawBoardView(Context context, int width, int height) {
        super(context);
        initView(width, height);
    }

    private void initView(int width, int height) {
        // 创建一个与View具有相同大小额缓冲区
        cachaeBitmap = Bitmap.createBitmap(width, height, Bitmap.Config.ARGB_8888);
        cacheCanvas = new Canvas();
        path = new Path();
        // 设置cacheCanvas将会绘制到内存中的cachaBitmap上
        cacheCanvas.setBitmap(cachaeBitmap);
        // 设置画笔的颜色
        paint = new Paint(Paint.DITHER_FLAG);
        paint.setColor(Color.RED);
        // 设置画笔风格
        paint.setStyle(Paint.Style.STROKE);
        paint.setStrokeWidth(1);
        // 反锯齿
        paint.setAntiAlias(true);
        paint.setDither(true);
    }

    @Override
    public boolean onTouchEvent(MotionEvent event) {
        // 获取拖动事件的发生位置
        float x = event.getX();
        float y = event.getY();
        switch (event.getAction()) {
            case MotionEvent.ACTION_DOWN:
                // 把当前点设置为起始点
                path.moveTo(x, y);
                preX = x;
                preY = y;
                break;
            case MotionEvent.ACTION_MOVE:
                path.quadTo(preX, preY, x, y);
                preY = y;
                preX = x;
                break;
            case MotionEvent.ACTION_UP:
                cacheCanvas.drawPath(path, paint);
                path.reset();
                break;
        }
        invalidate();
        return true;
    }

    @Override
    protected void onDraw(Canvas canvas) {
        Paint bmpPaint = new Paint();
        // 将cacheBitmap绘制到该View组件上
        canvas.drawBitmap(cachaeBitmap, 0, 0 ,bmpPaint);
        canvas.drawPath(path, paint);
    }
}- Activity里面的代码
public class CanvasActivity extends AppCompatActivity {

    @Override
    protected void onCreate(Bundle savedInstanceState) {
        super.onCreate(savedInstanceState);
        LinearLayout linearLayout = new LinearLayout(this);
        DisplayMetrics displayMetrics = new DisplayMetrics();
        // 获取创建的宽度和高度
        getWindowManager().getDefaultDisplay().getRealMetrics(displayMetrics);
        DrawBoardView drawView = new DrawBoardView(this, displayMetrics.widthPixels, displayMetrics.heightPixels);
        linearLayout.addView(drawView);
        setContentView(linearLayout);
    }
}
显示效果:
以上便是我对Android中绘图知识的基本学习了。


 3989
3989

 被折叠的 条评论
为什么被折叠?
被折叠的 条评论
为什么被折叠?
 到【灌水乐园】发言


