文章目录
day01
1. 框架介绍
1. 什么是框架
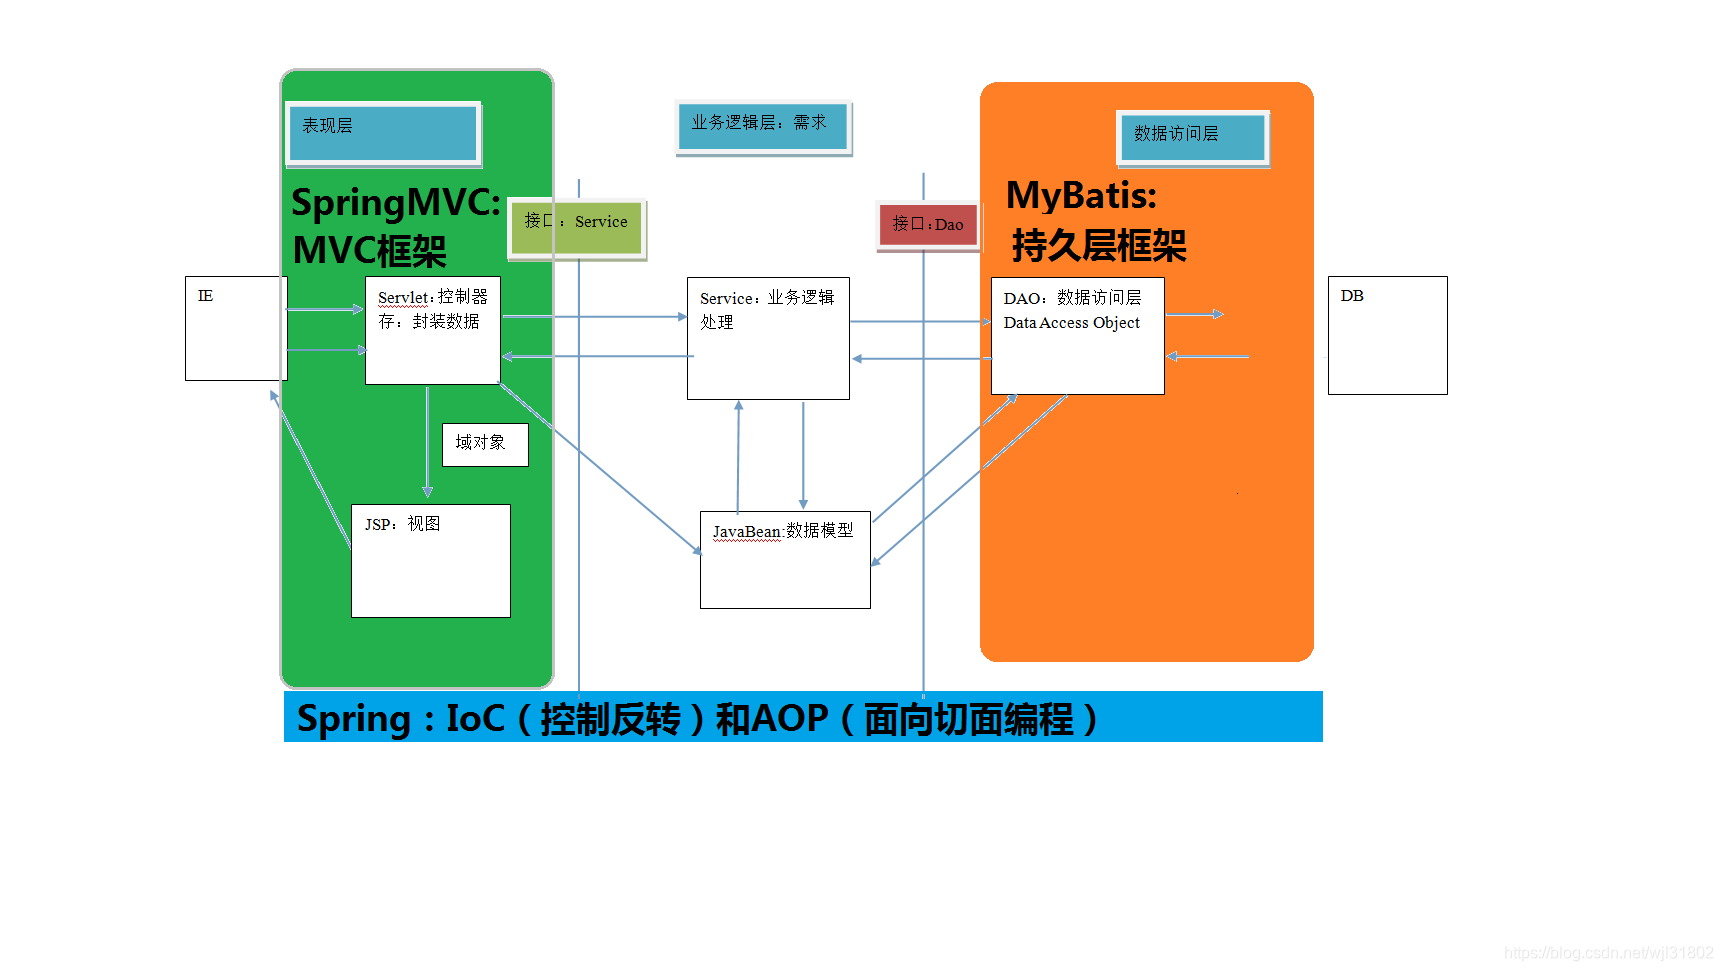
javaee开发分层
表现层:展示数据
业务层:处理业务需求
持久层:和数据库交互

框架概述
框架是针对某一层的完整解决方案。对某一层的复杂代码进行封装,使得更多精力专注业务功能的实现,大大提高开发效率。
2. mybatis框架
3. 持久层技术
jdbc技术
Spring的JdbcTemplate
Apache的DBUtils:
它和Spring的JdbcTemplate很像,也是对jdbc的简单封装
以上都不是框架
jdbc程序的回顾
public static void main(String[] args) {
Connection connection = null;
PreparedStatement preparedStatement = null;
ResultSet resultSet = null;
try {
//加载数据库驱动
Class.forName("com.mysql.jdbc.Driver");
//通过驱动管理类获取数据库链接
connection = DriverManager.getConnection("jdbc:mysql://localhost:3306/mybatis?characterEncoding=utf-8","root", "root");
//定义 sql 语句 ?表示占位符
String sql = "select * from user where username = ?";
//获取预处理 statement
preparedStatement = connection.prepareStatement(sql);
//设置参数,第一个参数为 sql 语句中参数的序号(从 1 开始),第二个参数为设置的参数值
preparedStatement.setString(1, "王五");
//向数据库发出 sql 执行查询,查询出结果集
resultSet = preparedStatement.executeQuery();
//遍历查询结果集
while(resultSet.next()){
	System.out.println(resultSet.getString("id")+""+resultSet.getString("username"));
  }
} catch (Exception e) {
	e.printStackTrace();
}finally{
  //释放资源
  if(resultSet!=null){
    try {
    resultSet.close();
    } catch (SQLException e) {
    e.printStackTrace();
    }
  }
  if(preparedStatement!=null){
    try {
    preparedStatement.close();
    } catch (SQLException e) {
    e.printStackTrace();
    }
  }
  if(connection!=null){
    try {
    connection.close();
    } catch (SQLException e) {
        // TODO Auto-generated catch block
        e.printStackTrace();
    }
  }
}
4. mybatis的概述
mybatis 是一个优秀的基于 java 的持久层框架,它内部封装了 jdbc,使开发者只需要关注 sql 语句本身,而不需要花费精力去处理加载驱动、创建连接、创建 statement 等繁杂的过程。
采用 ORM 思想解决了实体和数据库映射的问题,对 jdbc 进行了封装,屏蔽了 jdbc api 底层访问细节,使我们不用与 jdbc api 打交道,就可以完成对数据库的持久化操作。
ORM
object relational mapping 对象关系映射
简单的说,就是把数据库表和实体类以及实体类的属性对应起来,让我们可以操作实体类就能实现操作数据库表。
2. 入门
1. 环境搭建
第一步:创建maven工程并且导入坐标
第二步:创建实体类和dao的接口
第三步:创建mybatis的主配置文件 SqlMapConfig.xml
第四步:创建映射配置文件 IUserDao.xml
2. 环境搭建的注意事项:
第一个:
创建IUserDao.xml和IUserDao.java时名称是为了和我们之前的知识保持一致,在mybatis中它把持久层的操作接口名称和映射文件也叫做 Mapper
第二个:在idea中创建目录的时候,它和包是不一样的
第三个:mybatis的映射配置文件位置必须和dao接口的包结构相同
第四个:映射配置文件的mapper标签namespace属性的取值必须是dao接口的全限定类型
第五个:映射配置文件的操作配置select,id属性的取值必须是dao接口的方法名
当我们遵从了第3,4,5点之后,在开发中无需再写dao的实现类。
入门案例
/*
	读取配置文件:绝对路径和相对路径都不用
	第一个:使用类加载器,只能读取类路径的配置文件
	第二个:使用ServletContext对象的getRealPath();
*/
// 1.读取配置文件,从类路径中加载
InputStream in = Resources.getResourceAsStream("SqlMapConfig.xml");
/*
	创建工厂 mybatis使用了构建者模式,builder就是构建者,把对象的构建细节隐藏,我们只需要把in给构建者,屏蔽繁琐的操作。
	生产sqlSession使用工厂模式,避免new,解决类之间的依赖关系,解耦
*/
// 2. 创建sqlFactory工厂
SqlSessionFactoryBuilder builder = new SqlSessionFactoryBuilder();
SqlSessionFactory factory = builder.build(in);
// 3.使用工厂生产SqlSession对象
SqlSession session = factory.openSession();
/*
	创建Dao接口实现类使用代理模式,优势:不修改源码的基础上对已有方法增强。
*/
// 4. 使用SqlSession创建Dao接口的代理对象
IUserDao userDao = session.getMapper(IUserDao.class);
// 5. 使用代理对象执行方法
List<User> users = userDao.findAll();
for (User user : users) {
  System.out.println(user);
}
// 6. 释放资源
session.close();
in.close();
mysql 基于注解的入门案例
把IUserDao.xml移除,在dao接口的方法上使用@Select,修改
3. 自定义mybatis
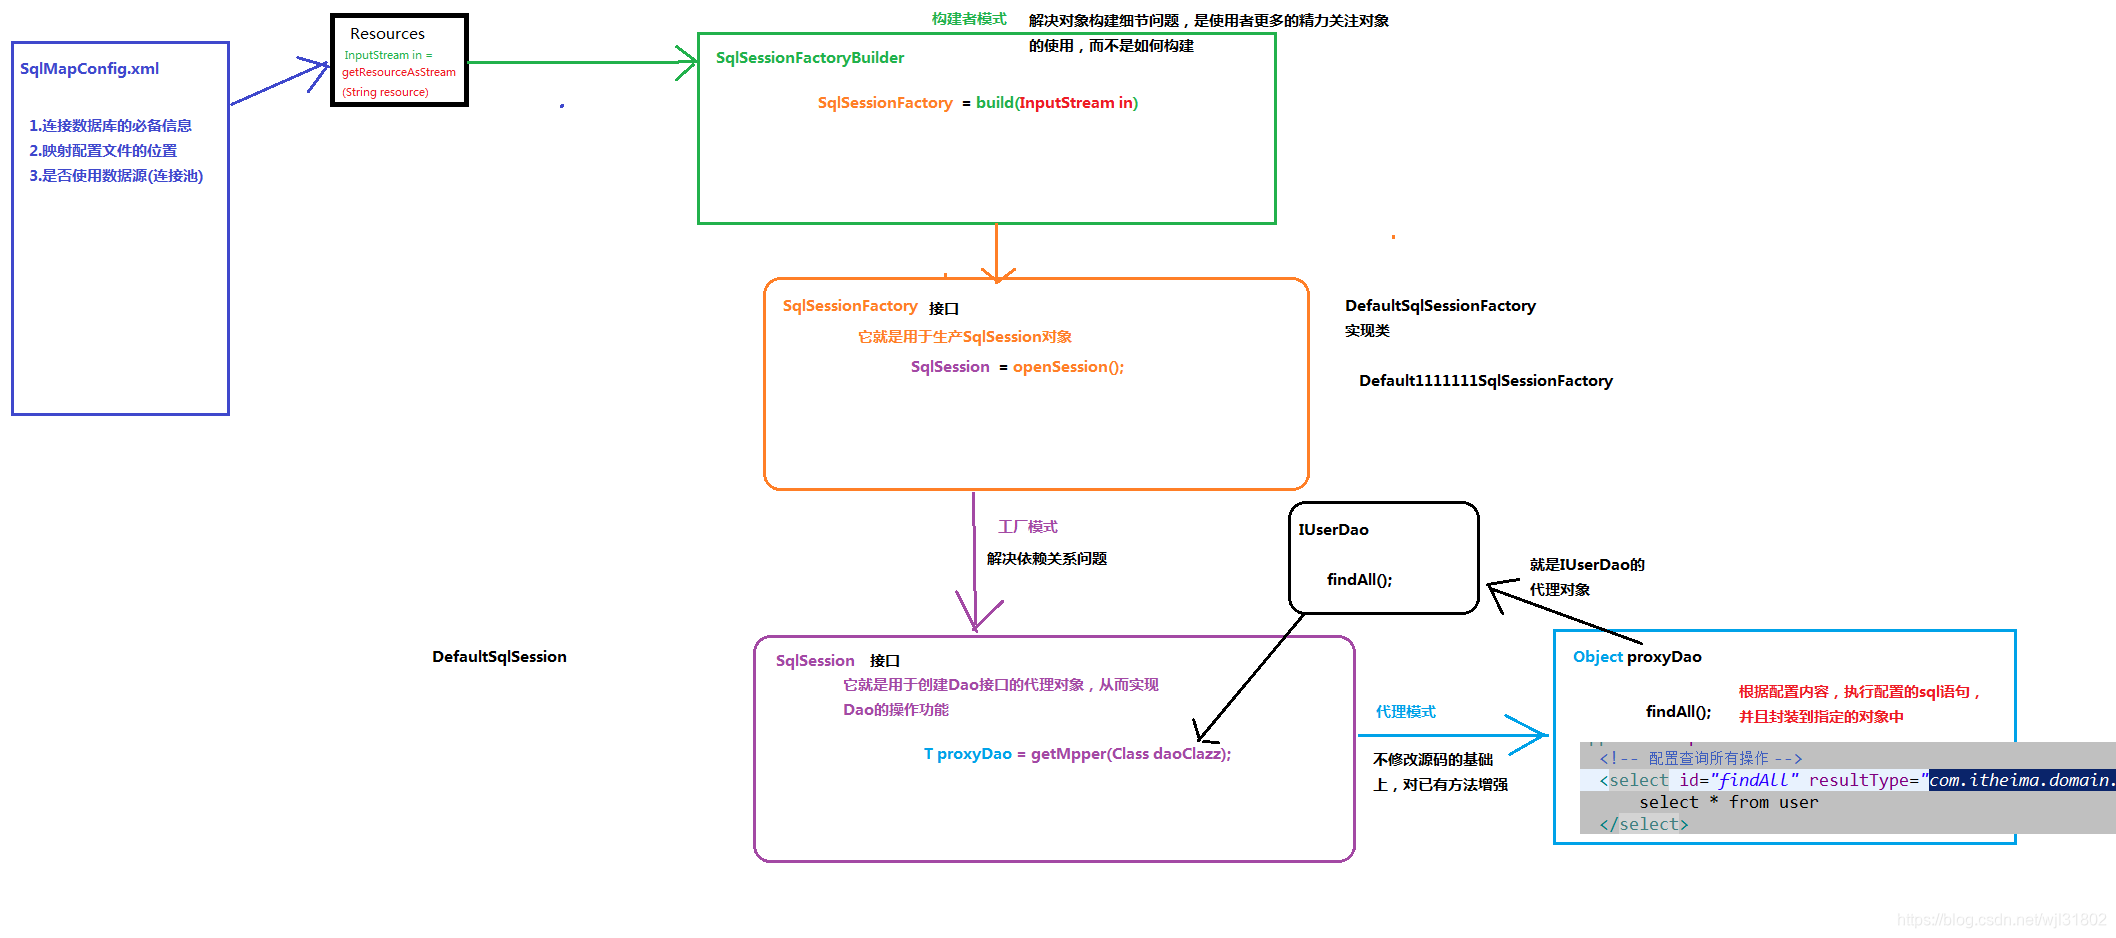
目的:对mybatis的内部实现有个大致的了解,理解内部如何执行。

详情见Visio流程图
自定义mybatis的分析
在使用代理dao的方式实现增删改查做了什么事?
1. 读取配置
连接数据库的信息,有了它可以创建Connection对象
<!--配置数据源(连接池)-->
<dataSource type="POOLED">
  <!--配置连接数据库的4个基本信息-->
  <property name="driver" value="com.mysql.jdbc.Driver"/>
  <property name="url" value="jdbc:mysql://localhost:3306/eesy"/>
  <property name="username" value="root"/>
  <property name="password" value="root"/>
</dataSource>
// 有了它及有了映射配置信息
<!--指定映射配置文件的位置,映射配置文件指的是每个dao独立的配置文件-->
    <mappers>
        <mapper resource="com/itheima/dao/IUserDao.xml"/>
    </mappers>
// 有了它就有了执行SQL语句,可以获取PreparedStatement
<!--映射文件所实现的接口-->
<!--接口的全限定类名-->
<mapper namespace="com.itheima.dao.IUserDao">
    <!--配置查询所有-->
    <select id="findAll" resultType="com.itheima.domain.User">
        select * from user
    </select>
</mapper>
上面所有的:
读取配置文件:用到的技术就是解析XML的技术
此处用到的是dom4j解析xml技术
根据配置文件的信息创建Connection对象
注册驱动、获取连接
2. 获取预处理对象 PreparedStaement
此时需要SQL语句
conn.prepareStatement(sql);
3. 执行查询
ResultSet resultSet = preparedStatement.executeQuery();
4. 遍历结果集用于封装
反射封装
List<E> list = new ArrayList();
while(resultSet.next()){
  E element =(E) Class.forName(配置的全限定类名).newInstance();
  rs.get
  /* 进行封装,把每个rs的内容添加到element中,把element加入list中
    我们的实体类属性和表中的列名是一致的,于是我们就可以把表的列名看成是实体类的属性名称,
    使用反射的方式根据名称获取每一个属性,并把值赋进去
    */
  list.add(element);
}
5. 返回list
return list;
要想让右侧的方法执行,需要给方法提供两个信息:
- 连接信息 2. 映射信息
包含两部分:执行的SQL语句和封装结果的实体类全限定类名
把这两个信息组合起来定义成一个对象,名字为Mapper,多个mapper需要存起来
放到map中,键为String,值为Mapper
String中包含
com.itheima.dao.IUserDao findAllMapper对象包含
String sql String domainClassPath
// 4. 使用SqlSession创建Dao接口的代理对象
IUserDao userDao = session.getMapper(IUserDao.class);
解析
// 根据dao接口的字节码创建dao的代理对象
public <T>T getMappperClass<T> daoInterfaceClass(){
  /*
  	类加载器:使用的和被代理对象相同的类加载器
  	代理对象要实现的接口:和被代理对象实现相同的接口
  	如何代理:就是增强的方法,需要自己提供
  	InvocationHandler的接口,需要写一个实现类,实现selectList方法
  */
  Proxy.newProxyInstance(类加载器,代理对象要实现的接口字节码数组,如何代理)
}
day02
1. 基于代理Dao实现CRUD
1. 使用要求
- 持久层接口和持久层接口的映射配置必须在相同的包下
- 持久层映射配置中 mapper 标签的 namespace 属性取值必须是持久层接口的全限定类名
- SQL 语句的配置标签
<select>,<insert>,<delete>,<update>的 id 属性必须和持久层接口的
方法名相同
2. 基于ID查询
1. 在持久层接口添加findById方法
/**
* 根据 id 查询
* @param userId
* @return
*/
User findById(Integer userId);
2. 在用户的映射配置文件中配置
<!-- 根据 id 查询 -->
<select id="findById" resultType="com.itheima.domain.User" parameterType="int">
	select * from user where id = #{uid}
</select>
细节:
-
parameterType属性
- 代表参数的类型,因为我们要传入的是一个类的对象,所以类型就写类的全名称
-
SQL语句使用#{}字符
- 它代表占位符, 相当于原来 jdbc 部分所学的? ,都是用于执行语句时替换实际的数据。
-
#{}中内容的写法
- 由于数据类型是基本类型,所以此处可以随意写。
3. 测试
@Test
public void testFindOne() {
  //6.执行操作
  User user = userDao.findById(41);
  System.out.println(user);
}
@Before//在测试方法执行之前执行
public void init()throws Exception {
  //1.读取配置文件
  in = Resources.getResourceAsStream("SqlMapConfig.xml");
  //2.创建构建者对象
  SqlSessionFactoryBuilder builder = new SqlSessionFactoryBuilder();
  //3.创建 SqlSession 工厂对象
  factory = builder.build(in);
  //4.创建 SqlSession 对象
  session = factory.openSession();
  //5.创建 Dao 的代理对象
  userDao = session.getMapper(IUserDao.class);
}
@After//在测试方法执行完成之后执行
public void destroy() throws Exception{
  session.commit();
  //7.释放资源
  session.close();
  in.close();
}
3. 保存操作
1. 接口方法
int saveUser(User user);
2. 映射文件配置
<!-- 保存用户-->
<insert id="saveUser" parameterType="com.itheima.domain.User">
insert into user(username,birthday,sex,address)
values(#{username},#{birthday},#{sex},#{address})
</insert>
#{}中的内容写法:由于要保存user对象,需要写user对象的属性名称,使用ognl表达式
3. ognl表达式
它是 apache 提供的一种表达式语言, 全称是: Object Graphic Navigation Language 对象图导航语言,语法格式就是使用 #{对象.对象}的方式 eg: #{user.username}
4. 测试
需要注意事务需要设置自动提交
session.commit();来实现事务提交。
4. 新增用户的返回值
新增用户后, 同时还要返回当前新增用户的 id 值 。
配置中需要修改
<insert id="saveUser" parameterType="USER">
    <!-- 配置保存时获取插入的 id -->
    <selectKey keyColumn="id" keyProperty="id" resultType="int">
    	select last_insert_id();
    </selectKey>
	insert into user(username,birthday,sex,address) values(#{username},#{birthday},#{sex},#{address})
</insert>
4. 更新操作
1. 接口方法
int updateUser(User user);
2. 映射文件配置
<!-- 更新用户 -->
<update id="updateUser" parameterType="com.itheima.domain.User">
  update user set username=#{username},birthday=#{birthday},sex=#{sex},
  address=#{address} where id=#{id}
</update>
3. 测试
@Test
public void testUpdateUser()throws Exception{
    //1.根据 id 查询
    User user = userDao.findById(52);
    //2.更新操作
    user.setAddress("北京市顺义区");
    int res = userDao.updateUser(user);
    System.out.println(res);
}
5. 删除操作
1. 接口方法
int deleteUser(Integer userId);
2. 映射文件配置
<!-- 删除用户 -->
<delete id="deleteUser" parameterType="java.lang.Integer">
	delete from user where id = #{uid}
</delete>
3. 测试
@Test
public void testDeleteUser() throws Exception {
    //6.执行操作
    int res = userDao.deleteUser(52);
    System.out.println(res);
}
6. 模糊查询
1. 接口方法
List<User> findByName(String username);
2. 映射文件配置
<!-- 根据名称模糊查询 -->
<select id="findByName" resultType="com.itheima.domain.User" parameterType="String">
	select * from user where username like #{username}
</select>
3. 测试
@Test
public void testFindByName(){
  //5.执行查询一个方法
    List<User> users = userDao.findByName("%王%");
    for(User user : users){
    	System.out.println(user);
	}
}
log日志打印
Preparing: select * from user where username like ?
Parameters: %王%(String)
原因:我们在配置文件中没有加入%来作为模糊查询的条件,所以在传入字符串实参时,就需要给定模糊查询的标
识%。 配置文件中的**#{username}也只是一个占位符**,所以 SQL 语句显示为“?”
4. 另一种配置
<select id="findByName" parameterType="java.lang.String" resultType="com.itheima.domain.User">
        <!--  select * from user where username like #{name}-->
    	select * from user where username like '%${value}%'
</select>
测试结果
 Preparing: select * from user where username like '%王%'
 Parameters:
将原来的#{}占位符,改成了${value}。注意如果用模糊查询的这种写法,那么${value}的写
法就是固定的,不能写成其它名字。
5. #{}与${}的区别
#{}表示一个占位符号
通过#{}可以实现 preparedStatement 向占位符中设置值,自动进行 java 类型和 jdbc 类型转换,
#{}可以有效防止 sql 注入。 #{}可以接收简单类型值或 pojo 属性值。 如果 parameterType 传输单个简单类
型值, #{}括号中可以是 value 或其它名称。
${}表示拼接 sql 串
通过${}可以将 parameterType传入的内容拼接在 sql 中且不进行 jdbc 类型转换, ${}可以接收简
单类型值或 pojo 属性值,如果 parameterType 传输单个简单类型值,${}括号中只能是 value。
6. pojo
POJO全称是Plain Ordinary Java Object,通指没有使用Entity Beans的普通java对象,可以把POJO作为支持业务逻辑的协助类。作用是方便程序员使用数据库中的数据表,对于广大的程序员,可以很方便的将POJO类当做对象来进行使用,当然也是可以方便的调用其get,set方法。
7. 使用聚合函数
1. 接口方法
int findTotal();
2. 映射文件的配置
<!-- 查询总记录条数 -->
<select id="findTotal" resultType="int">
	select count(*) from user;
</select>
3. 测试
@Test
public void testFindTotal() throws Exception {
    //6.执行操作
    int res = userDao.findTotal();
    System.out.println(res);
}
2. parameterType参数
SQL 语句传参,使用标签的 parameterType 属性来设定。该属性的取值可以是基本类型,引用类型(例如:String 类型),还可以是实体类类型(POJO 类)。同时也可以使用实体类的包装类
1. 传递基本类型和实体类
基本类型和String我们可以直接写类型名称,也可以使用包名.类名的方式;实体类类型,目前我们只能使用全限定类名 。
原因:mybaits 在加载时已经把常用的数据类型注册了别名,从而我们在使用时可以不写包名,而我们的是实体类并没有注册别名,所以必须写全限定类名。
2. 传递pojo包装对象
查询条件是综合的查询条件,不仅包括用户查询条件还包括其它的查询条件(比如将用户购买商品信息也作为查询条件),这时可以使用包装对象传递输入参数。
需求:根据用户名查询用户信息,查询条件放到 QueryVo 的 user 属性中
1. QueryVo的编写
public class QueryVo {
    private User user;

    public User getUser() {
        return user;
    }

    public void setUser(User user) {
        this.user = user;
    }
}
2. 接口方法
List<User> findByVo(QueryVo vo);
3. 映射文件配置
<!-- 根据用户名称模糊查询,参数变成一个 QueryVo 对象了 -->
<select id="findByVo" resultType="com.itheima.domain.User" parameterType="com.itheima.domain.QueryVo">
	select * from user where username like #{user.username};
</select>
4. 测试
@Test
public void testFindByQueryVo() {
    QueryVo vo = new QueryVo();
    User user = new User();
    user.setUserName("%王%");
    vo.setUser(user);
    List<User> users = userDao.findByVo(vo);
    for(User u : users) {
    	System.out.println(u);
    }
}
3. resultType配置结果类型
特殊情况
1. 修改实体类
public class User implements Serializable {
    private int userId;
    private String userName;
    private Date userBirthday;
    private String userSex;
    private String userAddress;
  ...
通过测试会发现查询不到东西,只有username还能用
解决方案1
使用别名查询
<!-- 配置查询所有操作 -->
<select id="findAll" resultType="com.itheima.domain.User">
	select id as userId,username as userName,birthday as userBirthday,sex as userSex,address as userAddress from user
</select>
优点:直接在SQL语句层面修改,执行效率高
缺点:如果查询很多,需要大量修改别名。
解决方案2
使用resultMap。
resultMap 标签可以建立查询的列名和实体类的属性名称不一致时建立对应关系。 在 select 标签中使用 resultMap 属性指定引用即可。同时 resultMap 可以实现将查询结果映射为复杂类型的 pojo,比如在查询结果映射对象中包括 pojo 和 list 实现一对一查询和一对多查询。
优点:开发效率高
2. resultMap的具体操作
1. 定义resultMap
<!-- 建立 User 实体和数据库表的对应关系
	type 属性:指定实体类的全限定类名
	id 属性:给定一个唯一标识,是给查询 select 标签引用用的。
-->
<resultMap type="com.itheima.domain.User" id="userMap">
    <id column="id" property="userId"/>
    <result column="username" property="userName"/>
    <result column="sex" property="userSex"/>
    <result column="address" property="userAddress"/>
    <result column="birthday" property="userBirthday"/>
</resultMap>
id 标签:用于指定主键字段
result 标签:用于指定非主键字段
column 属性:用于指定数据库列名
property 属性:用于指定实体类属性名称
2. 映射配置
<!-- 配置查询所有操作 -->
<select id="findAll" resultMap="userMap">
	select * from user
</select>
4. SqlMapConfig.xml文件的配置
1. 配置内容
-properties(属性) **
--property
-settings(全局配置参数)
--setting
-typeAliases(类型别名)
--typeAliase
--package          **
-typeHandlers(类型处理器)
-objectFactory(对象工厂)
-plugins(插件)
-environments(环境集合属性对象)**
--environment(环境子属性对象)**
---transactionManager(事务管理)**
---dataSource(数据源)**
-mappers(映射器)**
--mapper
--package   **
2. properties标签
两种方式指定属性的配置
第一种,不推荐
<properties>
    <property name="jdbc.driver" value="com.mysql.jdbc.Driver"/>
    <property name="jdbc.url" value="jdbc:mysql://localhost:3306/eesy"/>
    <property name="jdbc.username" value="root"/>
    <property name="jdbc.password" value="1234"/>
</properties>
第二种,推荐
在 classpath 下定义 jdbcConfig.properties 文件 ,也就是在resources的根路径
标签的配置
有三种,resource url 和URI,推荐resource
<properties resource="jdbcConfig.properties"></properties>
datasource的配置
<dataSource type="POOLED">
    <property name="driver" value="${jdbc.driver}"/>
    <property name="url" value="${jdbc.url}"/>
    <property name="username" value="${jdbc.username}"/>
    <property name="password" value="${jdbc.password}"/>
</dataSource>
注意:value里面需要把properties文件里的key写全,如jdbc.password。
3. typeAliases标签
同mybatis里的int等别名一样,通过它可以自定义别名
<typeAliases>
	<!-- 单个别名定义,不推荐 -->
    <typeAlias alias="user" type="com.itheima.domain.User"/>
    <!-- 批量别名定义,推荐,扫描整个包下的类,别名为类名(首字母大写或小写都可以) -->
    <package name="com.itheima.domain"/>
    <package name="其它包"/>
</typeAliases>
4. mappers配置
1. resource
xml使用
使用相对于类路径的资源
如: <mapper resource="com/itheima/dao/IUserDao.xml" />
2. class
注释使用
使用 mapper 接口类路径
如: <mapper class="com.itheima.dao.UserDao"/>
注意:此种方法要求 mapper 接口名称和 mapper 映射文件名称相同,且放在同一个目录中。
3. package
注册指定包下的所有 mapper 接口
如: <package name="cn.itcast.mybatis.mapper"/>
注意:此种方法要求 mapper 接口名称和 mapper 映射文件名称相同,且放在同一个目录中。
day03
1. 连接池
mybatis的连接池分为三类:UNPOOLED POOLED JNDI
重点关注POOLED连接池
源码如下:
PooledDataSource.java
@Override
  public Connection getConnection(String username, String password) throws SQLException {
    return popConnection(username, password).getProxyConnection();
  }
private PooledConnection popConnection(String username, String password) throws SQLException {
    boolean countedWait = false;
    PooledConnection conn = null;
    long t = System.currentTimeMillis();
    int localBadConnectionCount = 0;

    while (conn == null) { // 准备获取连接
      synchronized (state) {  // 同步锁
        if (!state.idleConnections.isEmpty()) {  // 空闲连接池不是空的,还有空闲连接
          // Pool has available connection
          conn = state.idleConnections.remove(0); // 直接从空闲连接池弹出一个
          if (log.isDebugEnabled()) {
            log.debug("Checked out connection " + conn.getRealHashCode() + " from pool.");
          }
        } else {
          // Pool does not have available connection
          // 空闲连接池没有可用连接,活动连接池的conn个数比峰值少
          if (state.activeConnections.size() < poolMaximumActiveConnections) {
            // Can create new connection
            // 创建连接,将连接放到活动连接池供使用
            conn = new PooledConnection(dataSource.getConnection(), this);
            if (log.isDebugEnabled()) {
              log.debug("Created connection " + conn.getRealHashCode() + ".");
            }
          } else {
            // Cannot create new connection
            // 活动连接池已满,就找到最老的那个连接,取出来收拾下给等待者使用
            PooledConnection oldestActiveConnection = state.activeConnections.get(0);
            long longestCheckoutTime = oldestActiveConnection.getCheckoutTime();
            if (longestCheckoutTime > poolMaximumCheckoutTime) {
              // Can claim overdue connection
              // 给一直占着的使用者提示连接超时
              state.claimedOverdueConnectionCount++;
              state.accumulatedCheckoutTimeOfOverdueConnections += longestCheckoutTime;
              state.accumulatedCheckoutTime += longestCheckoutTime;
              state.activeConnections.remove(oldestActiveConnection);
              if (!oldestActiveConnection.getRealConnection().getAutoCommit()) {
                try {
                  oldestActiveConnection.getRealConnection().rollback();
                } catch (SQLException e) {
                  /*
                     Just log a message for debug and continue to execute the following
                     statement like nothing happend.
                     Wrap the bad connection with a new PooledConnection, this will help
                     to not intterupt current executing thread and give current thread a
                     chance to join the next competion for another valid/good database
                     connection. At the end of this loop, bad {@link @conn} will be set as null.
                   */
                  log.debug("Bad connection. Could not roll back");
                }
              }
              conn = new PooledConnection(oldestActiveConnection.getRealConnection(), this);
              conn.setCreatedTimestamp(oldestActiveConnection.getCreatedTimestamp());
              conn.setLastUsedTimestamp(oldestActiveConnection.getLastUsedTimestamp());
              oldestActiveConnection.invalidate();
              if (log.isDebugEnabled()) {
                log.debug("Claimed overdue connection " + conn.getRealHashCode() + ".");
              }
            } else {
              // Must wait
              try {
                if (!countedWait) {
                  state.hadToWaitCount++;
                  countedWait = true;
                }
                if (log.isDebugEnabled()) {
                  log.debug("Waiting as long as " + poolTimeToWait + " milliseconds for connection.");
                }
                long wt = System.currentTimeMillis();
                state.wait(poolTimeToWait);
                state.accumulatedWaitTime += System.currentTimeMillis() - wt;
              } catch (InterruptedException e) {
                break;
              }
            }
          }
        }
        if (conn != null) {
          // ping to server and check the connection is valid or not
          if (conn.isValid()) {
            if (!conn.getRealConnection().getAutoCommit()) {
              conn.getRealConnection().rollback();
            }
            conn.setConnectionTypeCode(assembleConnectionTypeCode(dataSource.getUrl(), username, password));
            conn.setCheckoutTimestamp(System.currentTimeMillis());
            conn.setLastUsedTimestamp(System.currentTimeMillis());
            state.activeConnections.add(conn);
            state.requestCount++;
            state.accumulatedRequestTime += System.currentTimeMillis() - t;
          } else {
            if (log.isDebugEnabled()) {
              log.debug("A bad connection (" + conn.getRealHashCode() + ") was returned from the pool, getting another connection.");
            }
            state.badConnectionCount++;
            localBadConnectionCount++;
            conn = null;
            if (localBadConnectionCount > (poolMaximumIdleConnections + poolMaximumLocalBadConnectionTolerance)) {
              if (log.isDebugEnabled()) {
                log.debug("PooledDataSource: Could not get a good connection to the database.");
              }
              throw new SQLException("PooledDataSource: Could not get a good connection to the database.");
            }
          }
        }
      }

    }

    if (conn == null) {
      if (log.isDebugEnabled()) {
        log.debug("PooledDataSource: Unknown severe error condition.  The connection pool returned a null connection.");
      }
      throw new SQLException("PooledDataSource: Unknown severe error condition.  The connection pool returned a null connection.");
    }

    return conn;
  }
2. 事务
什么是事务?
事务的四大特性ACID
不考虑隔离性的3个后果
解决方法:四种隔离级别
如果想设置自动提交,在这一步设置
//3.获取SqlSession对象
sqlSession = factory.openSession(true);
3. 动态SQL语句
如果业务较复杂,如多条件查询,需要采用动态SQL语句。和JSTL语法类似,采用基于OGNL的表达式。
1. if标签
持久层dao映射配置
<select id="findByUser" resultType="user" parameterType="user">
	select * from user where 1=1
  <if test="username!=null and username != '' ">
      and username like #{username}
  </if>
  <if test="address != null">
      and address like #{address}
  </if>
</select>
注意:if标签的test属性写的是对象的属性名,如果包装类的对象需要用OGNL表达式的写法。另外要注意where 1=1的作用
2. where标签
为了简化where 1=1的条件拼装,采用where标签
持久层dao映射配置
<select id="findUserByCondition" parameterType="user" resultMap="userMap">
        select * from user
        <where>
            <if test='userName=="w"'>
                and username = "老王"
            </if>
            <if test="userSex!=null">
                and sex = #{userSex}
            </if>
        </where>
 </select>
注意,如果username要强化,用户查询时直接搜w,代表老王,需要上述写法。
3. foreach标签
持久层dao映射配置
<select id="findUserInIds" resultMap="userMap" parameterType="queryvo">
	select * from user
  <where>
  	<if test="ids !=null and ids.size()>0">
    	<foreach collectio"ids" open="and id in (" close=")" item="uid" separator=",">
      		#{uid}
      </foreach>
    </if>
  </where>
</select>
4. 简化编写的SQL语句
目的:SQL重用
-
定义代码片段
<!-- 抽取重复的语句代码片段 --> <sql id="defaultSql"> select * from user </sql> -
引用代码片段
<!-- 配置查询所有操作 -->
<select id="findAll" resultType="user">
	<include refid="defaultSql"></include>
</select>
<!-- 根据 id 查询 -->
<select id="findById" resultType="UsEr" parameterType="int">
  <include refid="defaultSql"></include>
	where id = #{uid}
</select>
3. 多表查询
1. 多对一
需求:查询所有账户信息,关联查询下单用户信息
从单个账户的角度出发,其实是一对一,只对应一个用户。
方法一:定义专门的po类作为输出类型,其中定义SQL查询的结果集的所有字段。非重点。
方法二:使用resultMap,映射一对一查询结果。
1. 修改Account类
增加user属性。
public class Account implements Serializable {
  ...
    private User user;
    public User getUser() {
    	return user;
    }
    public void setUser(User user) {
    	this.user = user;
    }
}
2. 修改AccountDao接口方法
public interface IAccountDao {
  	List<Account> findAll(); // 好像没改...
}
3. 重新定义AccountDao.xml文件
<mapper namespace="com.itheima.dao.IAccountDao">
    <!-- 建立对应关系 -->
    <resultMap type="account" id="accountMap">
        <id column="aid" property="id"/>
        <result column="uid" property="uid"/>
        <result column="money" property="money"/>
        <!-- 它是用于指定从表方的引用实体属性的 -->
        <association property="user" javaType="user">
            <id column="id" property="id"/>
            <result column="username" property="username"/>
            <result column="sex" property="sex"/>
            <result column="birthday" property="birthday"/>
            <result column="address" property="address"/>
        </association>
    </resultMap>
    	<select id="findAll" resultMap="accountMap">
    		select u.*,a.id as aid,a.uid,a.money from account a,user u where a.uid =u.id;
    	</select>
</mapper>
4. 测试
增加输出
@Test
public void testFindAll() {
    List<Account> accounts = accountDao.findAll();
    for(Account au : accounts) {
        System.out.println(au);
        System.out.println(au.getUser());
    }
}
2. 一对多查询
以用户未中心,查询所有用户信息和用户关联的账户信息,左外连接,先写好SQL语句
1. User类加入List<Account>
public class User implements Serializable {
  	...
    private List<Account> accounts;
    public List<Account> getAccounts() {
    	return accounts;
    }
    public void setAccounts(List<Account> accounts) {
    	this.accounts = accounts;
    }
}
2. 用户持久层Dao接口加入查询方法
List<User> findAll();
3. 用户持久层Dao映射文件配置
<mapper namespace="com.itheima.dao.IUserDao">
    <resultMap type="user" id="userMap">
        <id column="id" property="id"></id>
        <result column="username" property="username"/>
        <result column="address" property="address"/>
        <result column="sex" property="sex"/>
        <result column="birthday" property="birthday"/>
        <!-- collection 是用于建立一对多中集合属性的对应关系ofType 用于指定集合元素的数据类型-->
        <collection property="accounts" ofType="account">
            <id column="aid" property="id"/>
            <result column="uid" property="uid"/>
            <result column="money" property="money"/>
         </collection>
    </resultMap>
    <!-- 配置查询所有操作 -->
    <select id="findAll" resultMap="userMap">
    	select u.*,a.id as aid ,a.uid,a.money from user u left outer join account
    	a on u.id =a.uid
    </select>
</mapper>
注意关联写为了collection,ofType是关联查询的结果集中的对象类型
4. 测试同上
3. 多对多
用户和角色的关系,数据库中包括三张表,user role 和 user_role表
需求:实现查询所有对象并且加载它所分配的用户信息
1. 编写角色实体类
public class Role {
    private int id;
    private String roleName;
    private String roleDesc;
	...
    private List<User> users;

    public List<User> getUsers() {
        return users;
    }

    public void setUsers(List<User> users) {
        this.users = users;
    }

    @Override
    public String toString() {
        return "Role{" +
                "id=" + id +
                ", roleName='" + roleName + '\'' +
                ", roleDesc='" + roleDesc + '\'' +
                '}';
    }
}
注意:toString里面不能写user,否则会递归,内存溢出。
2. 编写role的持久层接口
public interface IRoleDao {
  	List<Role> findAll();
}
3. 编写映射文件
<mapper namespace="com.itheima.dao.IRoleDao">
    <resultMap id="roleMap" type="role">
        <id property="id" column="rid"></id>
        <result property="roleName" column="role_name"></result>
        <result property="roleDesc" column="role_desc"></result>
        <!--关联表-->
        <collection property="users" ofType="user">
            <id property="id" column="id"></id>
            <result property="username" column="username"></result>
            <result property="address" column="address"></result>
            <result property="sex" column="sex"></result>
            <result property="birthday" column="birthday"></result>
        </collection>
    </resultMap>

    <!--查询所有-->
    <select id="findAll" resultMap="roleMap">
        SELECT u.*,r.`ID` rid,r.`ROLE_NAME`,r.`ROLE_DESC` FROM  role r
        LEFT JOIN user_role ur ON ur.`RID`=r.`ID` LEFT JOIN USER u ON  u.`id`=ur.`UID`
    </select>
day04
1. 延迟加载
1. 实际需求
问题:在一对多中,当我们有一个用户,它有100个账户。
在查询用户时,要不要把用户下的账户信息查出来?
在查询账户时,要不要把关联的用户查出来?
在查询用户时,用户下的账户信息应该是,什么时候使用,什么时候查询的。
在查询账户时,账户的所属用户信息应该是随着账户查询时一起查询出来。
2. 延迟加载
在真正使用数据时,才发起查询,不用的时候不查询,也叫懒加载 lazyloading
3. 立即加载
不管用不用,只要一调用方法,马上发起查询。
4. 应用场景
一对多,多对多:通常采用延迟加载
多对一,一对一:通常用立即加载
5. 使用association实现延迟加载
1. 需求
查询账户Account,不查询相关的用户User信息
2. 账户持久层接口
public interface IAccountDao{
  List<Account> findAll();
}
3. 持久层映射文件
需要修改SQL语句部分。
select:填写要调用的select映射的id
column:填写传递给select映射的参数
<mapper namespace="com.itheima.dao.IAccountDao">
  <!-- 建立对应关系 -->
    <resultMap type="account" id="accountMap">
        <id column="aid" property="id"/>
        <result column="uid" property="uid"/>
        <result column="money" property="money"/>
        <!-- 它是用于指定从表方的引用实体属性的 -->
        <association property="user" javaType="user" select="com.itheima.dao.IUserDao.findById"column="uid">
        </association>
    </resultMap>
    <select id="findAll" resultMap="accountMap">
    	select * from account
    </select>
</mapper>
4. 用户的持久层接口和映射文件
public interface IUserDao{
  // 根据id查询
  User findById(Integer userId);
}
<mapper namespace="com.itheima.dao.IUserDao">
    <!-- 根据 id 查询 -->
    <select id="findById" resultType="user" parameterType="int" >
   		 select * from user where id = #{uid}
    </select>
</mapper>
5. 开启延迟加载策略
SqlMapConfig.xml
<settings>
    <setting name="lazyLoadingEnabled" value="true"/>
    <setting name="aggressiveLazyLoading" value="false"/>
</settings>
6. 测试
同之前。
6. 使用collection
1. 需求
一对多。用户和所拥有的账户信息
2. User类加入List<Account>属性
3. 编写用户和账户持久层接口
// 查询所有用户,同时获取每个用户下所有账户信息
List<User> findAll();

// 根据用户id查询账户信息
List<Account> findByUid(Integer uid);
4. 编写用户持久层映射配置
<resultMap type="user" id="userMap">
    <id column="id" property="id"></id>
    <result column="username" property="username"/>
    <result column="address" property="address"/>
    <result column="sex" property="sex"/>
    <result column="birthday" property="birthday"/>
    <!-- collection 是用于建立一对多中集合属性的对应关系 ofType 用于指定集合元素的数据类型  select 是用于指定查询账户的唯一标识(账户的 dao 全限定类名加上方法名称) column 是用于指定使用哪个字段的值作为条件查询 -->
    <collection property="accounts" ofType="account" select="com.itheima.dao.IAccountDao.findByUid" column="id"> </collection>
</resultMap>
<!-- 配置查询所有操作 -->
<select id="findAll" resultMap="userMap">
	select * from user
</select>
<collection>标签:用于加载关联的集合对象
select属性:用于指定查询account表的SQL语句,填写该SQL映射的id
column属性:用于指定select属性的SQL语句的参数来源,参数来自user的id列,写成id字段名。
5. 编写账户持久层映射配置
<!-- 根据用户 id 查询账户信息 -->
<select id="findByUid" resultType="account" parameterType="int">
	select * from account where uid = #{uid}
</select>
6. 测试
2. mybatis中的缓存
1. 什么是缓存
存在内存中的临时数据
1. 为什么使用缓存
减少和数据库交互次数,提高性能
2. 适用于缓存的数据:
经常查询并且不经常改变的
数据的正确与否对最终结果影响不大。
3. 不适用于缓存的数据
经常改变的数据,数据的正确与否对最终结果影响很大的。例如:商品的库存,银行的汇率,股市的牌价。
2. 一级缓存
指的是mybatis中sqlsession对象的缓存。默认已经开启一级缓存。
当我们执行查询之后,查询的结果会同时存入sqlsession为我们提供一块区域中,该结果是一个map,当我们再次查询同样的数据,mybatis会先去sqlsession中查询是否有,有的话直接拿出来。当sqlsession对象消失,mybatis的一级缓存就消失了。
如果SqlSession执行commit操作(执行插入、更新、删除),就会清空SqlSession中的一级缓存,目的是为了让缓存中存储的是最新的信息,避免脏读。
3. 一级缓存的源码和原理
见https://blog.csdn.net/finalcola/article/details/81155517
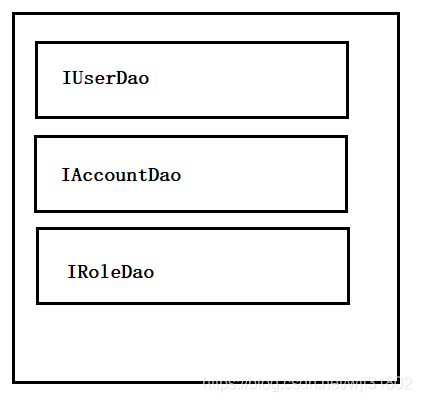
一级缓存和二级缓存使用的都是Cache接口的实现类。除了PerpetualCache外,其余的Cache都使用了装饰器模式,底层的PerpetualCache完成实际缓存。而PerpetualCache使用HashMap作为缓存容器,实现简单的缓存功能。缓存的key是根据sqlid参数的信息算出key值,查询的时候根据key查询缓存有没有value,没有,再查询db,再保存到缓存。
一级缓存基于sqlsession,用户级别的缓存;二级缓存基于每个namespace,用户之间数据可以共享,服务器级别缓存。

如图所示,二级缓存分为这三块,对于多表查询,如在XXXMapper.xml中也有个针对user单表的操作,会导致在UserMapper.xml做了刷新缓存,结果XXXMapper.xml中缓存仍然有效,造成脏数据。所以二级缓存不能用,避免使用二级缓存,用redis代替。
3. 注解开发
1. 基本的CRUD
1. 实体类User的编写
故意把属性写的和数据库中不一致。
private Integer userId;
private String userName;
private Date userBirthday;
private String userSex;
private String userAddress;
2. 使用注解开发持久层接口
// 查询所有用户
@Select("select * from user")
@Results(id="userMap",value={
  	@Result(id=true,column="id",property="userId"),
  	@Result(column="username",property="userName"),
  	@Result(column="sex",property="userSex"),
  	@Result(column="address",property="userAddress"),
  	@Result(column="birthday",property="userBirthday")
})
List<User> findAll();

// 根据id查询一个用户
@Select("select * from user where id=#{uid}")
@ResultMap("userMap")
User findById(Integer userId);

// 保存操作
@Insert("insert into user(username,x,x,x) values(#{username},x,x,x)")
@SelectKey(keyColumn="id",keyProperty="id",resultType=Integer.class,before =false, statement = { "select last_insert_id()"})
int saveUser(User user);

// 更新操作
@Update("update user set username=#{username},address=#{address} where id=#{id}")
void updateUser(User user);

// 删除用户
@Delete("delete from user where id=#{uid}")
void deleteUser(Integer userId);

// 查询使用聚合函数
@Select("select count(*) from user")
int findTotal();

// 模糊查询
@Select("select * from user where username like #{username}")
List<User> findByName(String name);
3. 配置文件
注意mappers里面写package接口的包名
4. 测试
略
2. 使用注解实现复杂关系映射
1. 注解说明
对应xml配置的<resultMap>,注解开发使用@Results,@Result,@One,@Many注解
@Results注解代替标签<resultMap>,里面为@Result
@Result注解代替了<id>标签和<result>标签,属性包括
- id是否是主键字段
- column 数据库的列名
- property 需要装配的属性名
- one 需要使用
@One注解 - many 需要使用
@Many注解
@One注解:一对一,代替<association>标签,属性包括
- select 指定多表查询的sqlmapper
- fetchType 会覆盖全局的配置参数 lazyLoadingEnabled,是否懒加载
@Many注解:一对多,代替<Collection>标签,需要注意的是xml配置的话需要写javaType指定泛型的类型,注解中不需要写。
3. 一对一复杂映射和延迟加载
1. 需求
加载账户信息时,根据情况延迟加载对应用户信息
2. 添加User实体类和Account类
Account类中添加
private User user;
// 对应的getter;setter;
3. 添加账户的持久层接口并使用注解配置
public interface IAccountDao{
  // 查询所有账户,延迟加载查询所属用户
  @Select("select * from account")
  @Results(id="accountMap",value={
    	@Result(id=true,column="id",property="id"),
    	@Result(column="uid",property="uid"),
    	@Result(column="money",property="money"),
    	@Result(column="uid",property="user",one=@One(
        	select="com.itheima.dao.IUserDao.findById",
          	fetchType=FetchType.LAZY
        ))
  })
}
List<Account> findAll();
4. 添加用户持久层接口并使用注解配置
public interface IUserDao{
  // 查询所有用户
  @Select("select * from user")
  @Results(id="userMap",value={
    @Result(id=true,column="id",property="userId"),
    @Result(column="username",property="userName"),
    @Result(column="sex",property="userSex"),
    @Result(column="address",property="userAddress"),
    @Result(column="birthday",property="userBirthday")
  })
  List<User> findAll();

  // 根据id查询一个用户
  @Select("select * from user where id = #{uid} ")
  @ResultMap("userMap")
  User findById(Integer userId);
}
5. 测试略
4. 注解实现一对多映射
1. 需求
查询用户,也查询他的账户列表
2. User类加入List<Account>
并且添加getter和setter
3. 编写User的持久层接口并用注解配置
public interface IUserDao{
  // 查询所有用户
  @Select("select * from user")
  @Results(id="userMap",value={
    @Result(id=true,column="id",property="userId"),
    @Result(column="username",property="userName"),
    @Result(column="sex",property="userSex"),
    @Result(column="address",property="userAddress"),
    @Result(column="birthday",property="userBirthday"),
    @Result(column="id" property="accounts",many=@Many(
    	select="com.itheima.dao.IAccountDao.findByUid",fetchType=FetchType.LAZY
    ))
  })
}
List<User> findAll();
4. 编写Account的接口
@Select("select * from account where uid=#{id}")
List<Account> findAccountByUid(Integer id);
5. 测试略
5. 注解实现多对多映射
1. 需求
user和role的关系,写出所有的user及其包含的角色列表
2. 编写role和user的类
注意都写对方的List以及getter和setter
3. 编写User的持久层接口
@Select("select * from user ")
    @Results({@Result(id=true,column = "id",property = "id"),
              @Result(column = "username",property = "username"),
              @Result(column = "address",property = "address"),
              @Result(column = "sex",property = "sex"),
              @Result(column = "birthday",property = "birthday"),
              @Result(column = "id",property = "roles",many=@Many(select = "com.itheima.dao.IRoleDao.findRoleByUid"))
    })
   List<User> findAll();
4. 编写Role的持久层接口
注意:关键是SQL语句的书写,另外,role表和实体类的字段并不对应,需要写@Results
// 根据uid查找所有的roles
    @Select("select * from role where id in (select rid from user_role where uid=#{id})")
    @Results({@Result(id=true,column = "id",property = "id"),
            @Result(column = "role_name",property = "roleName"),
            @Result(column = "role_desc",property = "roleDesc")
    })
    List<Role> findRoleByUid(int id);
5. 测试略
6. 多条件查询的注解
1. 需求
根据用户名和性别查询用户
2. 实现
@Select("select * from user where username=#{username} and sex=#{sex}")
User findUserByUsernameAndPassword(@Param("username")String username,@Param("sex")String password);
注意@Param注解的使用


 被折叠的 条评论
为什么被折叠?


