


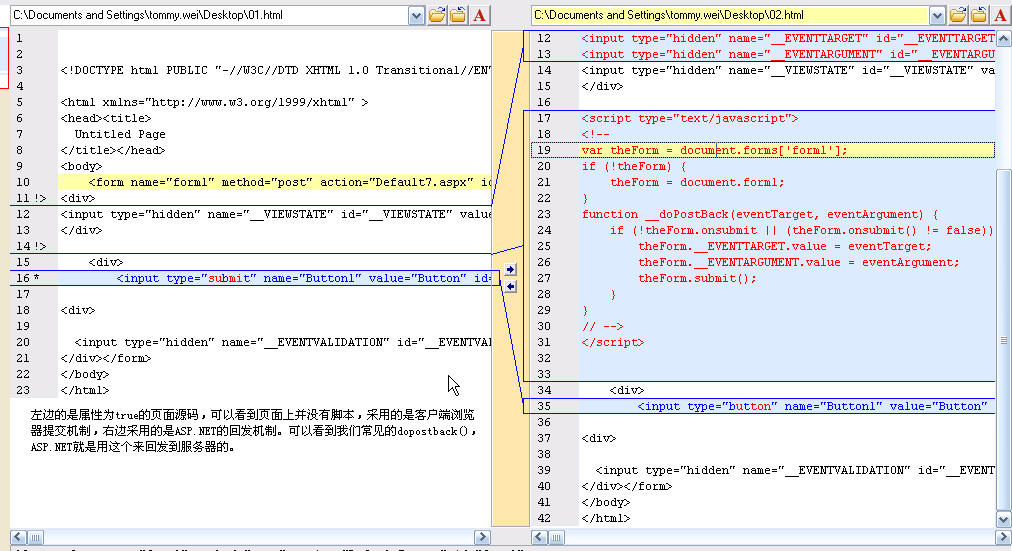
这个星期比较忙,公司有几个站点相继要上线,忙着上线前BUG的修改。我在空闲时间里做了GridView的数据库基本操作的练习,因为在公司里用的是VB.NET,而我平时比较喜欢C#,在学校里学的也是C#, 所以做这个也是顺便练一下手,免得时间长了C#都忘记了。下面是页面的source
 <
div
>
<
asp:GridView
ID
="GridView1"
runat
="server"
BackColor
="White"
BorderColor
="#336666"
BorderStyle
="Double"
BorderWidth
="3px"
CellPadding
="4"
GridLines
="Horizontal"
AllowPaging
="True"
AutoGenerateColumns
="False"
OnPageIndexChanged
="GridView1_PageIndexChanged"
OnPageIndexChanging
="GridView1_PageIndexChanging"
OnRowCancelingEdit
="GridView1_RowCancelingEdit"
OnRowEditing
="GridView1_RowEditing"
OnRowUpdating
="GridView1_RowUpdating"
OnSelectedIndexChanged
="GridView1_SelectedIndexChanged"
OnSelectedIndexChanging
="GridView1_SelectedIndexChanging"
OnRowDeleting
="GridView1_RowDeleting"
AllowSorting
="true"
OnRowDataBound
="GridView1_RowDataBound"
>
<
FooterStyle
BackColor
="White"
ForeColor
="#333333"
/>
<
RowStyle
BackColor
="White"
ForeColor
="#333333"
/>
<
SelectedRowStyle
BackColor
="#339966"
Font-Bold
="True"
ForeColor
="White"
/>
<
PagerStyle
BackColor
="#336666"
ForeColor
="White"
HorizontalAlign
="Center"
/>
<
HeaderStyle
BackColor
="#336666"
Font-Bold
="True"
ForeColor
="White"
/>
<
Columns
>
<
asp:CommandField
ButtonType
="Button"
ShowSelectButton
="True"
/>
<
asp:CommandField
ButtonType
="Button"
ShowEditButton
="True"
/>
<
asp:CommandField
ButtonType
="Button"
ShowDeleteButton
="True"
/>
<
asp:BoundField
DataField
="customerid"
HeaderText
="ID"
NullDisplayText
="No Record"
/>
<
asp:BoundField
DataField
="CompanyName"
HeaderText
="CompanyName"
NullDisplayText
="No Record"
/>
<
asp:BoundField
DataField
="ContactName"
HeaderText
="ContactName"
NullDisplayText
="No Record"
/>
<
asp:BoundField
DataField
="Address"
HeaderText
="Address"
NullDisplayText
="No Record"
/>
</
Columns
>
</
asp:GridView
>
</
div
>
<
div
>
<
asp:GridView
ID
="GridView1"
runat
="server"
BackColor
="White"
BorderColor
="#336666"
BorderStyle
="Double"
BorderWidth
="3px"
CellPadding
="4"
GridLines
="Horizontal"
AllowPaging
="True"
AutoGenerateColumns
="False"
OnPageIndexChanged
="GridView1_PageIndexChanged"
OnPageIndexChanging
="GridView1_PageIndexChanging"
OnRowCancelingEdit
="GridView1_RowCancelingEdit"
OnRowEditing
="GridView1_RowEditing"
OnRowUpdating
="GridView1_RowUpdating"
OnSelectedIndexChanged
="GridView1_SelectedIndexChanged"
OnSelectedIndexChanging
="GridView1_SelectedIndexChanging"
OnRowDeleting
="GridView1_RowDeleting"
AllowSorting
="true"
OnRowDataBound
="GridView1_RowDataBound"
>
<
FooterStyle
BackColor
="White"
ForeColor
="#333333"
/>
<
RowStyle
BackColor
="White"
ForeColor
="#333333"
/>
<
SelectedRowStyle
BackColor
="#339966"
Font-Bold
="True"
ForeColor
="White"
/>
<
PagerStyle
BackColor
="#336666"
ForeColor
="White"
HorizontalAlign
="Center"
/>
<
HeaderStyle
BackColor
="#336666"
Font-Bold
="True"
ForeColor
="White"
/>
<
Columns
>
<
asp:CommandField
ButtonType
="Button"
ShowSelectButton
="True"
/>
<
asp:CommandField
ButtonType
="Button"
ShowEditButton
="True"
/>
<
asp:CommandField
ButtonType
="Button"
ShowDeleteButton
="True"
/>
<
asp:BoundField
DataField
="customerid"
HeaderText
="ID"
NullDisplayText
="No Record"
/>
<
asp:BoundField
DataField
="CompanyName"
HeaderText
="CompanyName"
NullDisplayText
="No Record"
/>
<
asp:BoundField
DataField
="ContactName"
HeaderText
="ContactName"
NullDisplayText
="No Record"
/>
<
asp:BoundField
DataField
="Address"
HeaderText
="Address"
NullDisplayText
="No Record"
/>
</
Columns
>
</
asp:GridView
>
</
div
>
后台的代码:
string
ConStr
=
ConfigurationManager.ConnectionStrings[
"
NorthwindConnectionString
"
].ConnectionString;
protected
void
Page_Load(
object
sender, EventArgs e) {
{ if (!IsPostBack)
 { GridView1.AllowSorting = true; BindData(); SetGrid(); //ViewState["style"] = "0";
 }
} }
private
void
BindData()
{ SqlConnection MyCon = new SqlConnection(ConStr); string QueryStr = "SELECT customerid,CompanyName,ContactName,Address FROM customers"; SqlDataAdapter Da = new SqlDataAdapter(QueryStr,MyCon); DataSet Ds = new DataSet(); Da.Fill(Ds,"Customers"); GridView1.DataSource = Ds.Tables[0]; GridView1.DataKeyNames = new string []{"customerid"}; GridView1.DataBind(); }
private
void
SetGrid()
{ GridView1.AllowPaging = true; //GridView1.PageSize = 15; }
protected
void
GridView1_PageIndexChanging(
object
sender, GridViewPageEventArgs e)
{ GridView1.PageIndex = e.NewPageIndex; BindData(); }
protected
void
GridView1_RowEditing(
object
sender, GridViewEditEventArgs e)
{ GridView1.EditIndex = e.NewEditIndex; GridView1.EditRowStyle.BackColor = Color.Black; BindData(); }
protected
void
GridView1_RowCancelingEdit(
object
sender, GridViewCancelEditEventArgs e)
{ GridView1.EditIndex = -1; BindData(); }
protected
void
GridView1_SelectedIndexChanging(
object
sender, GridViewSelectEventArgs e)
{ GridViewRow Row = GridView1.Rows[e.NewSelectedIndex]; Response.Write("<script>alert('你选择了ID为" + Row.Cells[3].Text + "的行');</script>"); }
protected
void
GridView1_PageIndexChanged(
object
sender, EventArgs e)
{ Response.Write("<script>alert('你切换到了第" + (GridView1.PageIndex+1) + "页');</script>"); }
protected
void
GridView1_SelectedIndexChanged(
object
sender, EventArgs e)
{ GridViewRow Row = GridView1.SelectedRow; Row.BackColor = Color.Crimson; }
protected
void
GridView1_RowUpdating(
object
sender, GridViewUpdateEventArgs e)
{ string ID = GridView1.DataKeys[e.RowIndex].Value.ToString(); //防止非法的输入,预防脚本攻击 string CustomerId = Server.HtmlDecode(((TextBox)GridView1.Rows[e.RowIndex].Cells[3].Controls[0]).Text.ToString()); string CompanyName = Server.HtmlDecode(((TextBox)GridView1.Rows[e.RowIndex].Cells[4].Controls[0]).Text.ToString()); string ContactName = Server.HtmlDecode(((TextBox)GridView1.Rows[e.RowIndex].Cells[5].Controls[0]).Text.ToString()); string Address = Server.HtmlDecode(((TextBox)GridView1.Rows[e.RowIndex].Cells[6].Controls[0]).Text.ToString()); SqlConnection Con = new SqlConnection(ConStr); try { string UpdateStr = "UPDATE customers SET companyname='" + CompanyName + "',contactname='" + ContactName + "',address='" + Address + "' WHERE customerid='" + ID + "'"; SqlCommand Cmd = new SqlCommand(UpdateStr, Con); //尽可能晚的打开连接,尽早的关闭连接 Con.Open(); Cmd.ExecuteNonQuery(); GridView1.EditIndex = -1; BindData(); } catch (Exception ex) { Response.Write("<script>alert('编辑出错,请重新填写');</script>"); GridView1.EditIndex = -1; BindData(); } //要及时的关闭打开的连接,提高程序的性能 finally { Con.Dispose(); } }
protected
void
GridView1_RowDeleting(
object
sender, GridViewDeleteEventArgs e)
{ string ID = GridView1.DataKeys[e.RowIndex].Value.ToString(); string QueryStr = "DELETE FROM customers WHERE customerid='" + ID + "'"; SqlConnection Con = new SqlConnection(ConStr); SqlCommand Cmd = new SqlCommand(QueryStr,Con); try { Con.Open(); Cmd.ExecuteNonQuery(); BindData(); Response.Write("<script>alert('成功删除');</script>"); } catch (Exception ex) { Response.Write("<script>alert('删除有误,请检查该表是否与其他表有约束');</script>"); } finally { Con.Dispose(); } }
//
****************************************************************************************************************
//
当它写为“return confirm(...);”的时候,后边的任何客户端代码都不可能执行,
//
因此你注册时设计处理不可能执行。有些所谓的“示例”代码给你这样写的时候,你要注意,
//
它应该并不为按钮注册事件处理方法(注册了就很可笑了,因为根本无用),而是通过设置按钮的CommandName来让gridview处理。
//
这种写法下,按钮仅仅是提供命令名称和参数。
//
如果你要让后边的代码执行,应该写:
//
b.Attributes["onclick"] = "if(!confirm('你真的要删除该条记录么?'))return false;";
//
*****************************************************************************************************************
protected
void
GridView1_RowDataBound(
object
sender, GridViewRowEventArgs e)
{ if (e.Row.RowType == DataControlRowType.DataRow) { if (e.Row.RowState == DataControlRowState.Normal || e.Row.RowState == DataControlRowState.Alternate) { //这种写法不管你点击的是什么,后面的代码都不会执行。 //((Button)e.Row.Cells[2].Controls[0]).Attributes.Add("onclick", "javascript:return confirm('确定要删除"" + e.Row.Cells[3].Text + ""吗?')"); //正确的写法 ((Button)e.Row.Cells[2].Controls[0]).Attributes["onclick"] = "if(!confirm('你真的要删除" + e.Row.Cells[3].Text + "这条记录么?'))return false;"; } } }
}
private
void
BindData()
{ SqlConnection MyCon = new SqlConnection(ConStr); string QueryStr = "SELECT customerid,CompanyName,ContactName,Address FROM customers"; SqlDataAdapter Da = new SqlDataAdapter(QueryStr,MyCon); DataSet Ds = new DataSet(); Da.Fill(Ds,"Customers"); GridView1.DataSource = Ds.Tables[0]; GridView1.DataKeyNames = new string []{"customerid"}; GridView1.DataBind(); }
private
void
SetGrid()
{ GridView1.AllowPaging = true; //GridView1.PageSize = 15; }
protected
void
GridView1_PageIndexChanging(
object
sender, GridViewPageEventArgs e)
{ GridView1.PageIndex = e.NewPageIndex; BindData(); }
protected
void
GridView1_RowEditing(
object
sender, GridViewEditEventArgs e)
{ GridView1.EditIndex = e.NewEditIndex; GridView1.EditRowStyle.BackColor = Color.Black; BindData(); }
protected
void
GridView1_RowCancelingEdit(
object
sender, GridViewCancelEditEventArgs e)
{ GridView1.EditIndex = -1; BindData(); }
protected
void
GridView1_SelectedIndexChanging(
object
sender, GridViewSelectEventArgs e)
{ GridViewRow Row = GridView1.Rows[e.NewSelectedIndex]; Response.Write("<script>alert('你选择了ID为" + Row.Cells[3].Text + "的行');</script>"); }
protected
void
GridView1_PageIndexChanged(
object
sender, EventArgs e)
{ Response.Write("<script>alert('你切换到了第" + (GridView1.PageIndex+1) + "页');</script>"); }
protected
void
GridView1_SelectedIndexChanged(
object
sender, EventArgs e)
{ GridViewRow Row = GridView1.SelectedRow; Row.BackColor = Color.Crimson; }
protected
void
GridView1_RowUpdating(
object
sender, GridViewUpdateEventArgs e)
{ string ID = GridView1.DataKeys[e.RowIndex].Value.ToString(); //防止非法的输入,预防脚本攻击 string CustomerId = Server.HtmlDecode(((TextBox)GridView1.Rows[e.RowIndex].Cells[3].Controls[0]).Text.ToString()); string CompanyName = Server.HtmlDecode(((TextBox)GridView1.Rows[e.RowIndex].Cells[4].Controls[0]).Text.ToString()); string ContactName = Server.HtmlDecode(((TextBox)GridView1.Rows[e.RowIndex].Cells[5].Controls[0]).Text.ToString()); string Address = Server.HtmlDecode(((TextBox)GridView1.Rows[e.RowIndex].Cells[6].Controls[0]).Text.ToString()); SqlConnection Con = new SqlConnection(ConStr); try { string UpdateStr = "UPDATE customers SET companyname='" + CompanyName + "',contactname='" + ContactName + "',address='" + Address + "' WHERE customerid='" + ID + "'"; SqlCommand Cmd = new SqlCommand(UpdateStr, Con); //尽可能晚的打开连接,尽早的关闭连接 Con.Open(); Cmd.ExecuteNonQuery(); GridView1.EditIndex = -1; BindData(); } catch (Exception ex) { Response.Write("<script>alert('编辑出错,请重新填写');</script>"); GridView1.EditIndex = -1; BindData(); } //要及时的关闭打开的连接,提高程序的性能 finally { Con.Dispose(); } }
protected
void
GridView1_RowDeleting(
object
sender, GridViewDeleteEventArgs e)
{ string ID = GridView1.DataKeys[e.RowIndex].Value.ToString(); string QueryStr = "DELETE FROM customers WHERE customerid='" + ID + "'"; SqlConnection Con = new SqlConnection(ConStr); SqlCommand Cmd = new SqlCommand(QueryStr,Con); try { Con.Open(); Cmd.ExecuteNonQuery(); BindData(); Response.Write("<script>alert('成功删除');</script>"); } catch (Exception ex) { Response.Write("<script>alert('删除有误,请检查该表是否与其他表有约束');</script>"); } finally { Con.Dispose(); } }
//
****************************************************************************************************************
//
当它写为“return confirm(...);”的时候,后边的任何客户端代码都不可能执行,
//
因此你注册时设计处理不可能执行。有些所谓的“示例”代码给你这样写的时候,你要注意,
//
它应该并不为按钮注册事件处理方法(注册了就很可笑了,因为根本无用),而是通过设置按钮的CommandName来让gridview处理。
//
这种写法下,按钮仅仅是提供命令名称和参数。
//
如果你要让后边的代码执行,应该写:
//
b.Attributes["onclick"] = "if(!confirm('你真的要删除该条记录么?'))return false;";
//
*****************************************************************************************************************
protected
void
GridView1_RowDataBound(
object
sender, GridViewRowEventArgs e)
{ if (e.Row.RowType == DataControlRowType.DataRow) { if (e.Row.RowState == DataControlRowState.Normal || e.Row.RowState == DataControlRowState.Alternate) { //这种写法不管你点击的是什么,后面的代码都不会执行。 //((Button)e.Row.Cells[2].Controls[0]).Attributes.Add("onclick", "javascript:return confirm('确定要删除"" + e.Row.Cells[3].Text + ""吗?')"); //正确的写法 ((Button)e.Row.Cells[2].Controls[0]).Attributes["onclick"] = "if(!confirm('你真的要删除" + e.Row.Cells[3].Text + "这条记录么?'))return false;"; } } }
在点击删除按钮的时候弹出Confirm对话框有好几种办法,一种就是我刚才代码里的方法,在后台添加。还有一种是利用了ASP.NET2.0提供的一个新特性onclientClick,直接写你需要的脚本就可以,是不是很方便啊。如图.
需要注意的是要用这个方法的前提是你要把添加的这个这个转化为模板列才可以,在gridview里普通的删除按钮是没有这个属性的。


 1768
1768


 被折叠的 条评论
为什么被折叠?
被折叠的 条评论
为什么被折叠?
 到【灌水乐园】发言


