


1.软件准备:
Tomcat版本:apache-tomcat-6.0.35.tar.gz
Apache Http-Server 版本:httpd-2.2.22.tar.gz
Tomcat-Connectors:tomcat-connectors-1.2.32-src.tar.gz
JDK版本:jdk1.6.0_29
前三个可以到apache 官网上下载,JDK到oracle 官网上下载。
2.服务器环境
Red Hat Enterprise Linux Server release 5.4
3.JDK的安装
JDK安装(略),请详见帖子 Linux下的JDK安装与卸载
4.Tomcat的安装
解压 tar -zxvf apache-tomcat-6.0.35.tar.gz
5.http server 安装
1)解压 tar -zxvf httpd-2.2.22.tar.gz
2)cd httpd-2.2.22
3)进行编译参数配置
]# ./configure --prefix=/usr/local/apache2 --enable-mods-shared=all
关于configure参数的更多内容可参考:
http://httpd.apache.org/docs/2.2/en/programs/configure.html#installationdirectories
4)编译安装
]#make
]#make install
请注意:在进行第4步安装时,报Cannot use an external APR with the bundled APR-util错误的解决办法
4.1)进入httpd-2.2.22目录下的srclib 进行apr的安装
]#cd srclib/apr
]#./configure --prefix=/usr/local/apr
]#make
]#make install
4.2)进入httpd-2.2.22目录下的srclib 进行apr-util的安装
]#cd srclib/apr-util
]#./configure --prefix=/usr/local/apr-util --with-apr=/usr/local/apr
]#make
]#make install
4.3)返回到httpd-2.2.22目录下 进行httpserver的安装
]#cd ..
]#./configure --prefix=/usr/local/apache2 --enable-mods-shared=all \
--with-apr=/usr/local/apr --with-apr-util=/usr/local/apr-util/bin
5) 启动和关闭apache
完成上述步骤后,apache的安装就结束了,通过下面的命令启动和关闭apache:
启动:/usr/local/apache2/bin/apachectl start
关闭:/usr/local/apache2/bin/apachectl stop
6.Apache Tomcat Connector(生产mod_jk)的安装
1)解压tomcat-connectors-1.2.32-src.tar.gz
]#tar -zxvf tomcat-connectors-1.2.32-src.tar.gz
2)进入解压出的文件夹下的native子目录
]#cd tomcat-connectors-1.2.32-src/native
3)进行编译参数的配置
]#./buildconf.sh
]#./configure --with-apxs=/usr/local/apache2/bin/apxs \
--with-java-home=$JAVA_HOME --with-java-platform=2 --enable-jni
]#make
]#make install
如果成功结束,你可以在/usr/local/apache2/modules/下找到mod_jk.so文件。
7.修改Tomcat配置
7.1)修改端口
对于tomcat配置主要集中在conf/server.xml文件上。首先,鉴于是在同一机器上运行两个tomcat实例,
因此,要对server.xml中配置的所有端口进行修改,避免端口被占用,一种简单而稳妥的修改方法是将该
文件中出现的所有端口号按一种简单的规则统一进行改动,比如在原端口号基础上统一加1000或减1000。
基于这个原则,apache-tomcat-6.0.33-1的连接端口修改为:6080,apache-tomcat-6.0.33-2的
连接端口修改为:7080,其他端口配置同样依照该原则。
7.2)2.开启tomcat集群支持,同样是在conf/server.xml文件里,进行两处改动
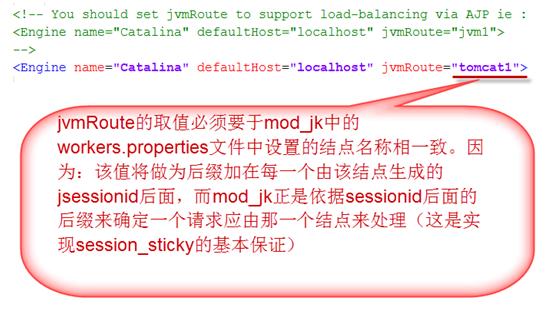
改动1:为<Engine>设置jvmRoute
说明:实际上,在server.xml里就有一段现成的带jvmRoute的<Engine>配置,我们可以参考这段配置
为<Engine/>加个jvmRoute就可以了,对于jvmRoute的取值要特别注意:其值必须于后面要提到的
mod_jk的workers.properties文件中结点名相一致!由于那个文件中结点名为tomcat1和tomcat2,
因此,此处我们必须设定jvmRoute的值为这两个值之一。关于这一点在tomcat官方关于Apache
Tomcat Connector的文档 :
http://tomcat.apache.org/connectors-doc/webserver_howto/apache.html 也有明确提及。
jvmRoute值会出现在由该结点创建的session id中,例如:在非集群环境下,一个sessionid可能是
“xxxxxxxxx” 的格式,而在集群环境下,如果当前结点的jvmRtomat1oute被配置为tomcat1,那由
该结点生成的sessionid将变成“xxxxxxxxx.tomat1”格式,而mod_jk正是依赖于这个节点后缀实现
sticky session的,也就是把所有后缀是tomat1的请求都发送给tomat1结点进行处理。
改动2:在<Engine/>中添加关于集群的配置
在tomcat官方关于tomcat集群配置的文档:
http://tomcat.apache.org/tomcat-6.0-doc/cluster-howto.html 中
有一份默认配置:
<Cluster className="org.apache.catalina.ha.tcp.SimpleTcpCluster"
channelSendOptions="8">
<Manager className="org.apache.catalina.ha.session.DeltaManager"
expireSessionsOnShutdown="false"
notifyListenersOnReplication="true"/>
<Channel className="org.apache.catalina.tribes.group.GroupChannel">
<Membership className="org.apache.catalina.tribes.membership.McastService"
address="228.0.0.4"
port="45564"
frequency="500"
dropTime="3000"/>
<Receiver className="org.apache.catalina.tribes.transport.nio.NioReceiver"
address="auto"
port="4000"
autoBind="100"
selectorTimeout="5000"
maxThreads="6"/>
<Sender className="org.apache.catalina.tribes.transport.ReplicationTransmitter">
<Transport className="org.apache.catalina.tribes.transport.nio.PooledParallelSender"/>
</Sender>
<Interceptor
className="org.apache.catalina.tribes.group.interceptors.TcpFailureDetector"/>
<Interceptor
className="org.apache.catalina.tribes.group.interceptors.MessageDispatch15Interceptor"/>
</Channel>
<Valve className="org.apache.catalina.ha.tcp.ReplicationValve"
filter=""/>
<Valve className="org.apache.catalina.ha.session.JvmRouteBinderValve"/>
<Deployer className="org.apache.catalina.ha.deploy.FarmWarDeployer"
tempDir="/tmp/war-temp/"
deployDir="/tmp/war-deploy/"
watchDir="/tmp/war-listen/"
watchEnabled="false"/>
<ClusterListener
className="org.apache.catalina.ha.session.JvmRouteSessionIDBinderListener"/>
<ClusterListener className="org.apache.catalina.ha.session.ClusterSessionListener"/>
</Cluster>
8.配置apache
打开apache安装目录下的conf/httpd.conf文件,在文件最后追加以下内容:
# Load mod_jk module
LoadModule jk_module modules/mod_jk.so
#Specify jk log file.
JkLogFile /var/log/mod_jk.log
# Specify jk log level [debug/error/info]
JkLogLevel info
# Specify workers.properties, this file tell jk:
# how many nodes and where they are.
JkWorkersFile conf/workers.properties
# Specify which requests should handled by which node.
JkMount /* controller
# controller--workers.properties 里指定的负载均衡器
上述配置中:JkWorkersFile conf/workers.properties 指明由一个workers.properties文件来描述
集群结点的情况,因此,我们需要创建这个workers.properties文件,并放置于conf文件夹下,这个文
件的内容如下:
#所有节点列表,其中controller是一个逻辑结点,负责负载均衡控制,
#如果JkMount中的URL指定给了controller就表示这个请求会被自动散列到某个物理节点上。
#注意:真正负责处理请求的tomcat的名称(这里就是tomcat1,tomcat2)必须于它们在conf/server.xml
#文件中配置的jvmRout的属性值是一致的!
worker.list = controller,tomcat1,tomcat2
#========tomcat1========
worker.tomcat1.port=6009 #ajp13 端口号,在tomcat下server.xml配置,默认8009
worker.tomcat1.host=localhost #tomcat的主机地址,如不为本机,请填写ip地址
worker.tomcat1.type=ajp13
worker.tomcat1.lbfactor = 1 #server的加权比重,值越高,分得的请求越多
#========tomcat2========
worker.tomcat2.port=7009 #ajp13 端口号,在tomcat下server.xml配置,默认8009
worker.tomcat2.host=localhost #tomcat的主机地址,如不为本机,请填写ip地址
worker.tomcat2.type=ajp13
worker.tomcat2.lbfactor = 1 #server的加权比重,值越高,分得的请求越多
#========controller,负载均衡控制器========
worker.controller.type=lb
worker.controller.balance_workers=tomcat1,tomcat2
#指定分担请求的tomcat,旧版本中的 balanced_workers,已不再推荐使用!
worker.controller.sticky_session=1 #sticky_session为1表示,
#当某一 client的session创建之后,后续由该客户端发起的请求,也就是这个session的所有
请求都始终由第一次处理该请求的结点
#负责处理(除非该结点挂掉)
到此,所有配置均已完成,启动两个tomcat和apache后,将某一应用同时部署到两个tomcat中,
通过apache访问这个应用,观察tomcat后台打出的日志会发现,请求被随机分配给了两个tomcat交替执行


 171
171


 被折叠的 条评论
为什么被折叠?
被折叠的 条评论
为什么被折叠?
 到【灌水乐园】发言


