


一个简单实例:
1、在web.xml文件中配置DispatcherServlet
<?xml version="1.0" encoding="UTF-8"?>
    <web-app xmlns:xsi="http://www.w3.org/2001/XMLSchema-instance"
        xmlns="http://java.sun.com/xml/ns/javaee" xmlns:web="http://java.sun.com/xml/ns/javaee/web-app_2_5.xsd"
        xsi:schemaLocation="http://java.sun.com/xml/ns/javaee http://java.sun.com/xml/ns/javaee/web-app_2_5.xsd"
        id="WebApp_ID" version="2.5">
        <display-name>lsn_springmvcold414</display-name>

        <!-- 配制spring分发器servlet -->
        <servlet>
            <servlet-name>action</servlet-name>
            <servlet-class>org.springframework.web.servlet.DispatcherServlet</servlet-class>
        </servlet>
        <servlet-mapping>
            <servlet-name>action</servlet-name>
            <url-pattern>*.action</url-pattern>
        </servlet-mapping>

        <welcome-file-list>
            <welcome-file>index.html</welcome-file>
        </welcome-file-list>
</web-app> 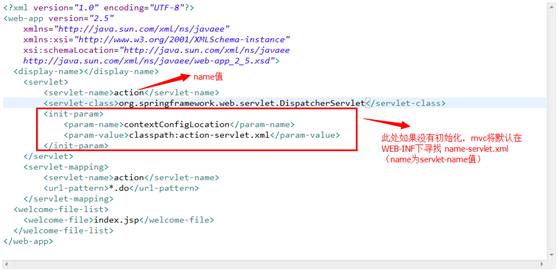
2、创建控制器HomeController
public class HomeController extends AbstractController {
    protected ModelAndView handleRequestInternal(HttpServletRequest arg0,
                HttpServletResponse arg1) throws Exception {
            System.out.println("hello world");
            return new ModelAndView("index");
        }
}
Return的是逻辑路径,此路径会根据xml配置的文件进行匹配指定的文件。
3、创建spring配置文件/WEB-INF/action-servlet.xml
<?xml version="1.0" encoding="UTF-8"?>
<beans xmlns="http://www.springframework.org/schema/beans"
xmlns:xsi="http://www.w3.org/2001/XMLSchema-instance"
xmlns:mvc="http://www.springframework.org/schema/mvc"
xmlns:context="http://www.springframework.org/schema/context"
xmlns:aop="http://www.springframework.org/schema/aop"
xmlns:tx="http://www.springframework.org/schema/tx"
xsi:schemaLocation="http://www.springframework.org/schema/beans
http://www.springframework.org/schema/beans/spring-beans-3.0.xsd
http://www.springframework.org/schema/mvc
http://www.springframework.org/schema/mvc/spring-mvc-3.0.xsd
http://www.springframework.org/schema/context
http://www.springframework.org/schema/context/spring-context-3.0.xsd
http://www.springframework.org/schema/aop
http://www.springframework.org/schema/aop/spring-aop-3.0.xsd
http://www.springframework.org/schema/tx
http://www.springframework.org/schema/tx/spring-tx-3.0.xsd ">
        <!-- 控制器 -->
        <bean name="/home.action" class="cn.itcast.springmvc.controller.HomeController">
        </bean>

        <!-- 内部资源视图解析器 -->
        <bean id="internalResourceViewResolver" class="org.springframework.web.servlet.view.InternalResourceViewResolver">
            <!-- 前缀 -->
            <property name="prefix" value="/WEB-INF/jsps/" />
            <!-- 后缀 -->
            <property name="suffix" value=".jsp" />
        </bean>
    </beans>
4、创建jsp./WEB-INF/jsps/index.jsp
    <html>
    <head>
    <title>index.jsp</title>
    </head>
    <body>
        hello world
    </body>
    </html>
至此,最简单的MVC就完成了。


 5111
5111

 被折叠的 条评论
为什么被折叠?
被折叠的 条评论
为什么被折叠?
 到【灌水乐园】发言


