仿ios通讯录实现中的细节感悟
本人选择实现ios通讯录的基本功能,主要也是考虑到UITableView在各种应用程序中的普遍使用,同时也包含了UITableView的删除,移动等编辑功能,同时也包含plist文件解析,UISearchController的基本使用,也比较全面的实现了通讯录的基本功能。
通讯录实现的细节:
- 静态plist文件解析
- tableview根据分组列表显示
- 删除联系人
- 添加联系人
- 分组内移动联系人
- 顶部搜索框实现(UISearchController基本使用)
- 导航栏以及searchbar设置
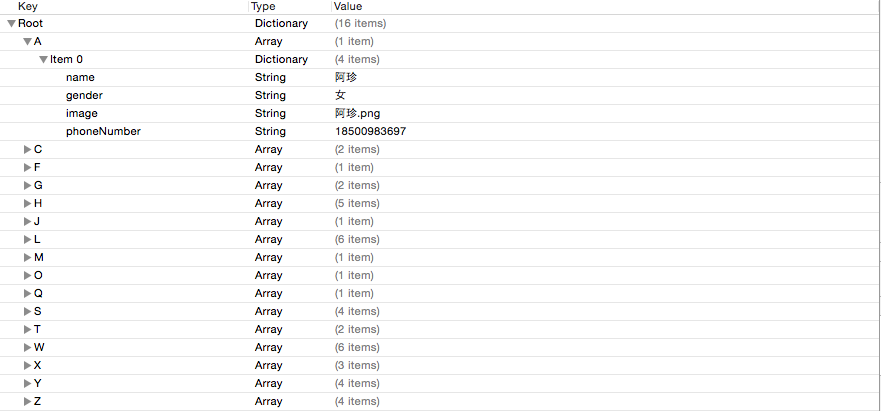
静态plist文件解析
这里需要注意的是在解析过程中,首先需要分析清楚plist文件的层级结构,解析的时候按照文件的层级结构,由外到内逐层解析。
解析代码实现:
使用字典和数组来存储数据
@property (nonatomic,retain) NSMutableDictionary *dictionary;
@property (nonatomic,retain) NSMutableArray *array;
//获取文件路径
NSString *path = [[NSBundle mainBundle] pathForResource:@"StudentInformation" ofType:@"plist"];
//获取文件内容(字典)
self.dictionary = [NSMutableDictionary dictionaryWithContentsOfFile:path];
//获取分组名
self.array = [NSMutableArray arrayWithArray:[_dictionary allKeys]];
//分组名排序
[_array sortUsingSelector:@selector(compare:)];tableview分组显示
这里需要实现数据显示,需要实现tableview的数据源和代理,我是使用UITableViewController实现,需要实现分组显示以及分组快速索引。
这里需要实现tableview的数据源和代理,有几个基本的方法是必不可少的。
设置tableview的分组数和分组名
这里需要根据解析的数据设置分组数和分组名
//返回分组数
- (NSInteger)numberOfSectionsInTableView:(UITableView *)tableView {
#warning Potentially incomplete method implementation.
    // Return the number of sections.
    return _array.count;
}
//设置分组名
- (NSString *)tableView:(UITableView *)tableView titleForHeaderInSection:(NSInteger)section{
return _array[section];
}设置tableview每个分组的行数和行高
需要根据字典中存储的数据设置
//返回分组的行数
- (NSInteger)tableView:(UITableView *)tableView numberOfRowsInSection:(NSInteger)section {
#warning Incomplete method implementation.
    // Return the number of rows in the section.
    //获取每个分组
    NSArray *arr = _dictionary[_array[section]];
    return arr.count;
}
//设置行高
- (CGFloat)tableView:(UITableView *)tableView heightForRowAtIndexPath:(NSIndexPath *)indexPath{
return 80;
}设置分组的快速索引
特别注意,函数的返回值是数组,因此需要将分组名的数组返回:
//设置快速索引
- (NSArray *)sectionIndexTitlesForTableView:(UITableView *)tableView{
    return _array;
}
设置cell
tableview自带重用机制,首先需要注册相应的cell,然后每次使用时到重用池中取,而不需要每次都创建新的cell,然后cell上显示的数据使用model传递,体现MVC模式。
注册cell:
//注册cell
[self.tableView registerClass:[ContactCell class] forCellReuseIdentifier:identifier];
//设置cell
- (UITableViewCell *)tableView:(UITableView *)tableView cellForRowAtIndexPath:(NSIndexPath *)indexPath {
ContactCell *cell = [tableView dequeueReusableCellWithIdentifier:identifier forIndexPath:indexPath];
// Configure the cell...
//获取
Person *per = [Person new];
NSArray *arr = _dictionary[_array[indexPath.section]];
[per setValuesForKeysWithDictionary:arr[indexPath.row]];
//设置
cell.per = per;
return cell;
}
这里需要将字典中的内容转换到model中,同时在model类的实现中,必须重写- (void)setValue:(nullable id)value forUndefinedKey:(NSString *)key方法,因为在这个方法中可以解决字段名不同的冲突。以防程序崩溃。
tableview动态删除联系人
这里只是实现了删除功能,编辑的状态之用一种。
tableview实现可以编辑,主要分四步完成:
1.设置tableview可以被编辑。
2.指定那些航可以被编辑。
3.制定编辑样式
4.完成编辑
//1.设置tableview可编辑
- (void)setEditing:(BOOL)editing animated:(BOOL)animated{
    //父类发送消息
    [super setEditing:editing animated:animated];
    //tableview设置状态
    [self.tableView setEditing:editing animated:animated];
    //title状态
    self.editButtonItem.title = editing ? @"完成" : @"编辑";
}

//2.指定那些行可以被编辑(默认所有行都可以被编辑)
// Override to support conditional editing of the table view.
- (BOOL)tableView:(UITableView *)tableView canEditRowAtIndexPath:(NSIndexPath *)indexPath {
    // Return NO if you do not want the specified item to be editable.
    return YES;
}

//3.设置编辑样式
- (UITableViewCellEditingStyle)tableView:(UITableView *)tableView editingStyleForRowAtIndexPath:(NSIndexPath *)indexPath{
    return UITableViewCellEditingStyleDelete;
}

//4.完成编辑
// Override to support editing the table view.
- (void)tableView:(UITableView *)tableView commitEditingStyle:(UITableViewCellEditingStyle)editingStyle forRowAtIndexPath:(NSIndexPath *)indexPath {
        // Delete the row from the data source
    //处理数据
    //获取分组
    NSString *key = _array[indexPath.section];
    NSMutableArray *arr = _dictionary[key];
    //判断分组人数
    if (arr.count == 1) {
        //删除整个分组
        //从dictionary中删除分组
        [_dictionary removeObjectForKey:key];
        //删除快速索引
        [_array removeObjectAtIndex:indexPath.section];
        //UI上处理
        //获取删除的分组
        NSIndexSet *indexSet = [NSIndexSet indexSetWithIndex:indexPath.section];
        //移除
        [tableView deleteSections:indexSet withRowAnimation:UITableViewRowAnimationFade];
    }else{
        //删除联系人
        //从arr中移除联系人
        [arr removeObjectAtIndex:indexPath.row];
        //操作UI
        [tableView deleteRowsAtIndexPaths:@[indexPath] withRowAnimation:UITableViewRowAnimationFade];
    }

}
需要特别注意的是:
- 编辑样式,默认只有添加和删除。
- 完成编辑首先是移除数据,然后才是操作UI,移除数据也要考虑到对分组的影响。
tableview分组内移动
移动和编辑相比而言,比较简单,只需要将数据处理好,不需要操作UI。
移动操作大概分三步:
1.设置编辑状态
2.设置哪些行可以被移动
3.移动完成
//2.设置可以移动的行
// Override to support conditional rearranging of the table view.
- (BOOL)tableView:(UITableView *)tableView canMoveRowAtIndexPath:(NSIndexPath *)indexPath {
    // Return NO if you do not want the item to be re-orderable.
    return YES;
}

//3.移动完成
// Override to support rearranging the table view.
- (void)tableView:(UITableView *)tableView moveRowAtIndexPath:(NSIndexPath *)fromIndexPath toIndexPath:(NSIndexPath *)toIndexPath {
    //获取分组
    NSMutableArray *arr = _dictionary[_array[fromIndexPath.section]];
    //获取删除的联系人
    NSDictionary *dic = arr[fromIndexPath.row];
    //从原位置删除数据
    [arr removeObjectAtIndex:fromIndexPath.row];
    //插入到目标位置
    [arr insertObject:dic atIndex:toIndexPath.row];

}
这里需要注意的就是跨行移动,因为分组内的移动才是有意义的,tableview提供了检测跨行移动的方法:
//检测跨行移动
- (NSIndexPath *)tableView:(UITableView *)tableView targetIndexPathForMoveFromRowAtIndexPath:(NSIndexPath *)sourceIndexPath toProposedIndexPath:(NSIndexPath *)proposedDestinationIndexPath{
    //判断是否在同一个分组
    if (sourceIndexPath.section == proposedDestinationIndexPath.section) {
        return proposedDestinationIndexPath;
    }
    //不再在同一个分区,返回源路径
    return sourceIndexPath;
}
UISearchController使用简介
之所以使用UISearchController,主要就是为了实现搜索的效果,我们查看手机中的通讯录不难发现,搜索框的实现效果还是极好的,这就要归功于UISearchController,在ios8之后 “UISearchDisplayController has been replaced with UISearchController”,UISearchController本省就有searchbar,因此使用起来更加方便。
查看UISearchController的文档不难发现,它的属性值不多,这也比较方便我们学习。
SearchResultController *search = [[SearchResultController alloc] init];
self.searchController = [[UISearchController alloc] initWithSearchResultsController:search];
self.searchController.searchResultsUpdater = search;
self.searchController.delegate = search;
注意:**UISearchController的对象一定要设置成属性质,不然会没有效果,即:@property (nonatomic,retain) UISearchController *searchController;。
再者,searchController的代理和搜索功能的实现可以具体查看UISearchController的代理协议。
searchbar设置和navigationbar设置
1.细心的朋友会发现,给tableview设置tableHeaderView后,如果按照如下代码设置,设置完成后会发现searchable顶部的背景和tableview的背景不一样,这里就需要换一种设置方式。
self.tableView.tableHeaderView = self.searchController.searchBar;#warning searchBar上面的背景跟tableview不一样,怎么解决
UIView *myView = [UIView new];
myView.frame = CGRectMake(0, 0, self.view.frame.size.width, 44);
[myView addSubview:self.searchController.searchBar];
self.tableView.tableHeaderView = myView;2.改变searchbar上取消按钮的颜色和文字如何设置,这里就需要实现UISearchController的代理,在UISearchController显示时改变设置。
#pragma mark - UISearchControllerDelegate代理事件
- (void)willPresentSearchController:(UISearchController *)searchController{
    //设置取消按钮显示
    [searchController.searchBar setShowsCancelButton:YES animated:YES];
    //查找searchBar子视图
    for(id cc in [[[searchController.searchBar subviews] firstObject] subviews])
    {
        //如果找到
        if([cc isKindOfClass:NSClassFromString(@"UINavigationButton")])
        {
            UIButton *btn = (UIButton *)cc;
            //改变颜色
            [btn setTitleColor:searchBarCancelButtonColor forState:UIControlStateNormal];
        }
    }
}
3.关于navigationbar的设置,主要是navigationbar底部的黑线,这里提供一种去掉黑点的方法
//去掉navigationbar下面的黑线
    if ([self.navigationBar respondsToSelector:@selector( setBackgroundImage:forBarMetrics:)]){
        NSArray *list=self.navigationBar.subviews;
        for (id obj in list) {
            if ([obj isKindOfClass:[UIImageView class]]) {
                UIImageView *imageView=(UIImageView *)obj;
                NSArray *list2=imageView.subviews;
                for (id obj2 in list2) {
                    if ([obj2 isKindOfClass:[UIImageView class]]) {
                        UIImageView *imageView2=(UIImageView *)obj2;
                        imageView2.hidden=YES;
                    }
                }
            }
        }
    }
总结
本文主要是针对通讯录应用进行了分析,阐释了主要的实现步骤,需要对tableview的各种代理方法比较清楚,同时tableview也是应用程序中使用频率最高的控件,希望本文对初学者有所帮助。


 本文详细解析了如何使用UITableView实现iOS通讯录的基本功能,包括静态plist文件解析、分组显示、删除与添加联系人、分组内移动联系人及顶部搜索框的实现。重点介绍了UITableView的数据源和代理方法,以及如何通过UISearchController实现搜索功能,并讨论了导航栏和searchbar的设置。此外,还分享了编辑和移动联系人的操作流程。


 被折叠的 条评论
为什么被折叠?


