


iPhone机型适配相关问题
这里主要是介绍自己在项目开发过程中, 遇到的关于iphone适配相关的问题, 这里不是讲解怎么去做机型适配, 而是介绍自己在适配中踩到的坑, 希望对同道中人有所帮助。
iPhone机型比较
首先, 先来看一下iPhone各大机型比较:
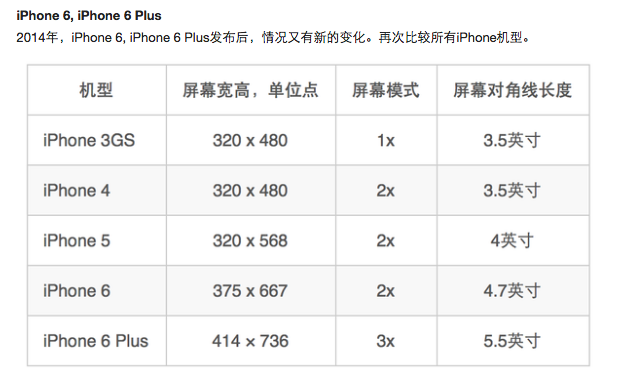
想必这些屏幕宽和高大家都是很清楚的, 这里就不具体解释了, 一般我们做机型判断的时候, 我们坑会这样做:
 //portrait
 if (UIInterfaceOrientationPortrait == orientation) {
        if (width ==  320.0f) {
           if (height == 480.0f) {
                return iPhone4;
            } else {
                 return iPhone5;
             }
         } else if (width == 375.0f) {
             return iPhone6;
         } else if (width == 414.0f) {
             return iPhone6Plus;
         }
     } else if (UIInterfaceOrientationLandscapeLeft == orientation || UIInterfaceOrientationLandscapeRight == orientation) {
     //landscape
         if (height == 320.0) {
            if (width == 480.0f) {
                return iPhone4;
             } else {
                return iPhone5;
             }
         } else if (height == 375.0f) {
            return iPhone6;
         } else if (height == 414.0f) {
            return iPhone6Plus;
        }
     }
不要问我为什么这样写, 这段代码从网上一篇文章摘录, 其实大致做法就是这样, 一般会判断宽和高的大小, 来判断具体的机型, 然后知道屏幕分辨率等信息, 但是这样做在iPhone 6之前是没有问题的, 那么在iPhone之后出现了新问题?
处理iPhone6、6+标准视图和放大视图
这里主要说的就是iPhone之后引入了标准视图和放大视图, iPhone6和6+的设置(Settings)->显示与亮度(Display & Brightness)->显示模式(View)都带有标准模式(Standard)和放大模式(Zoomed)。
这个功能被引入后,依赖[UIScreen bounds]和[UIScreen scale]并不能完全确定屏幕分辨率是多大、用户选择了放大试图还是标准视图。比如放大模式下iPhone6读到的这两个属性和iPhone5是一模一样的,而放大模式下iPhone6+的[UIScreen bounds]属性和标准模式下iPhone6的一样。
我们先来看看标准视图和放大视图下, 屏幕的宽和高:
iPhone6标准模式下输出:
ScreenTest[3441:3088752]
 bounds: { {0, 0}, {375, 667} }
 screen mode: <UIScreen: 0x155603cd0; bounds = { {0, 0}, {375, 667} }; mode = <UIScreenMode: 0x170021f40; size = 750.000000 x 1334.000000>>
 scale: 2.000000
 native scale: 2.000000
iPhone6放大模式下输出:
ScreenTest[3454:3089937]
 bounds: { {0, 0}, {320, 568} }
 screen mode: <UIScreen: 0x12ee03d40; bounds = { {0, 0}, {320, 568} }; mode = <UIScreenMode: 0x1700256e0; size = 640.000000 x 1136.000000>>
 scale: 2.000000
 native scale: 2.343750
再来看iPhone6+标准模式下输出:
ScreenTest[1876:465146]
 bounds: { {0, 0}, {414, 736} }
 screen mode: <UIScreen: 0x13ee01840; bounds = { {0, 0}, {414, 736} }; mode = <UIScreenMode: 0x17002b4e0; size = 1242.000000 x 2208.000000>>
 scale: 3.000000
 native scale: 2.608696
iPhone6+放大模式下输出:
ScreenTest[1893:466244]
 bounds: { {0, 0}, {375, 667} }
 screen mode: <UIScreen: 0x13f6021f0; bounds = { {0, 0}, {375, 667} }; mode = <UIScreenMode: 0x170028c20; size = 1125.000000 x 2001.000000>>
 scale: 3.000000
 native scale: 2.880000
这里有一个关于scale的理解, iOS8中苹果引入了[UIScreen screenScale],可以用来区分不同的显示模式。其实6 plus在放大模式下, 屏幕的bounds实际上就是6正常状态的bounds大小, 而6的放大模式I下的bounds就是5s的bounds, 所以, 在iPhone 6之后是判断屏幕bounds的方法不靠谱了, 需要结合scale来判断机型和屏幕比例。
[[UIScreen mainScreen] scale]使用场景
之前在项目中遇到使用scale的情况, 当我们在做截图相关的处理时, 我们要获取选中框中的原始图片, 截取图片我们可能会这样做:
    //截取图片
    CGImageRef imageRef = CGImageCreateWithImageInRect(image.CGImage, rect);
    resultImage = [UIImage imageWithCGImage:imageRef];
    CFRelease(imageRef);
这里的rect就是选择框的frame, 这里需要注意的就是, 图片截取的时候要根据机型, 乘以相应的比例:
    CGRect rect = CGRectMake(CGRectGetMinX(cropRect) * currentScale,
                             CGRectGetMinY(cropRect) * currentScale,
                             CGRectGetWidth(cropRect) * currentScale,
                             CGRectGetHeight(cropRect) * currentScale);
这里的currentScale就是屏幕的scale, 一般是1, 2, 3这三种, 这里我们就不能使用屏幕bounds来判断是那种机型, 然后设定currentScale, 而是要根据[[UIScreen mainScreen] scale]的值来定, 因为该死的标准视图和放大视图会影响判断结果, 建议直接使用scale获取。
总结
关于iPhone 6之后标准视图和放大视图踩坑之旅就结束了, 希望对遇到的小伙伴有所帮助。


 374
374

 被折叠的 条评论
为什么被折叠?
被折叠的 条评论
为什么被折叠?
 到【灌水乐园】发言


