


日期:2022年2月22日
出处:
黑马程序员SpringBoot2全套视频教程,springboot零基础到项目实战(spring boot2完整版)
黑马程序员SpringBoot2全套视频教程,springboot零基础到项目实战(spring boot2完整版)_哔哩哔哩_bilibili
正文
yaml配置文件语法
- 使用缩进表示层级关系
- 缩进时不允许使用 Tab 键,只允许使用空格
- 缩进的空格数不重要,但同级元素必须左侧对齐
- 大小写敏感
- :号和-号后面也必须有空格
yaml支持以下三种数据结构
- 对象:键值对的集合
- 数组:一组按次序排列的值
- 字面量:单个的、不可拆分的值
有关yaml配置文件的细节
1.想要实现读取配置文件的一整块内容
首先,先简单写一个yaml配置文件
datasource:
  driver: com.mysql.jdbc.Driver
  url: jdbc.mysql://localhost/springboot_db
  username: root
  password: root123
然后再写一个实体类MyDataSource
需要注意的是这里的两个注解@Component和@ConfigurationProperties
package com.springboot;

import org.springframework.boot.context.properties.ConfigurationProperties;
import org.springframework.stereotype.Component;

//1.定义数据模型防撞yaml文件中对应的数据
//2.定义为spring管控的bean
@Component
//3.指定加载的数据
@ConfigurationProperties(prefix = "datasource")
public class MyDataSource {
    private String driver;
    private String url;
    private String username;
    private String password;

    public String getDriver() {
        return driver;
    }

    public void setDriver(String driver) {
        this.driver = driver;
    }

    public String getUrl() {
        return url;
    }

    public void setUrl(String url) {
        this.url = url;
    }

    public String getUsername() {
        return username;
    }

    public void setUsername(String username) {
        this.username = username;
    }

    public String getPassword() {
        return password;
    }

    public void setPassword(String password) {
        this.password = password;
    }

    @Override
    public String toString() {
        return "MyDateSource{" +
                "driver='" + driver + '\'' +
                ", url='" + url + '\'' +
                ", username='" + username + '\'' +
                ", password='" + password + '\'' +
                '}';
    }
}
然后在主程序中稍作修改
package com.springboot.controller;

import com.springboot.MyDataSource;
import org.springframework.beans.factory.annotation.Autowired;
import org.springframework.beans.factory.annotation.Value;
import org.springframework.core.env.Environment;
import org.springframework.web.bind.annotation.GetMapping;
import org.springframework.web.bind.annotation.RequestMapping;
import org.springframework.web.bind.annotation.RestController;

//Rest模式,是一种书写风格。是设置当前控制器方法请求访问路径(网址)
@RestController
@RequestMapping("/books")
public class BookController {

    @Autowired
    private MyDataSource myDataSource;


    //@RequestMapping(method = RequestMethod.POST)
    @GetMapping
    public String getById(){
        System.out.println("springboot is running...");
        System.out.println(myDataSource);
        return "springboot is running...";
    }
}
运行成功!

2.读取yaml数据中不同形式的单一数据
首先,在配置文件中写出各种形式的数据
server:
  port: 81

country: China
province: Zhejiang
city: jinhua

user:
  name: Jack
  age: 20

likes:
  - game
  - music
  - sleep
  - hiphop

baseDir: C:\\windows

# 使用${属性名}引用数据
tempDir1: ${baseDir}\temp
# 使用引号包裹的字符出,其中的转义字符可以生效
tempDir2: "${baseDir}\temp"
然后修改主程序进行测试
package com.springboot.controller;

import com.springboot.MyDataSource;
import org.springframework.beans.factory.annotation.Autowired;
import org.springframework.beans.factory.annotation.Value;
import org.springframework.core.env.Environment;
import org.springframework.web.bind.annotation.GetMapping;
import org.springframework.web.bind.annotation.RequestMapping;
import org.springframework.web.bind.annotation.RestController;

//Rest模式,是一种书写风格。是设置当前控制器方法请求访问路径(网址)
@RestController
@RequestMapping("/books")
public class BookController {

    //读取yml数据中的单一数据
    @Value("${country}")
    private String Country;

    @Value("${user.age}")
    private int Age;

    @Value("${likes[2]}")
    private String Likes;

    @Value("${tempDir1}")
    private String temp1;
    @Value("${tempDir2}")
    private String temp2;

    //使用自动装配将所有的数据封装到一个对象Environment中
    @Autowired
    private Environment env;

    //@RequestMapping(method = RequestMethod.POST)
    @GetMapping
    public String getById(){
        System.out.println("springboot is running...");
        System.out.println("country--------->"+Country);
        System.out.println("Jack is--------->"+Age);
        System.out.println("Jack like "+Likes);
        System.out.println("tempDir---->"+temp1);
        System.out.println("tempDir---->"+temp2);
        System.out.println("-----------------------");
        System.out.println(env.getProperty("user.age"));
        System.out.println(env.getProperty("likes[3]"));
        return "springboot is running...";
    }
}
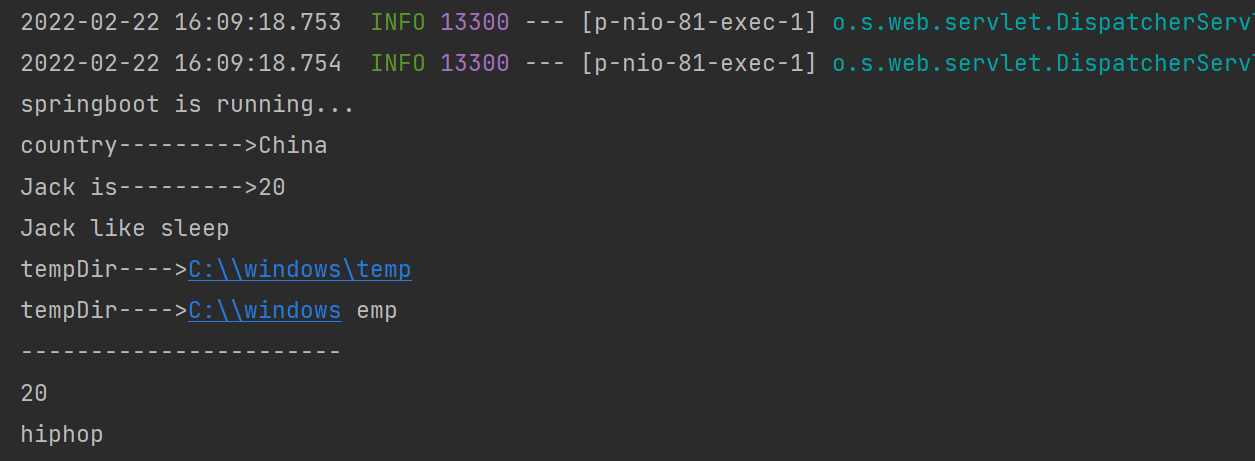
测试结果如图
这里涵盖内容较多需慢慢阅读
发现问题及解决方案

总结
读取整块配置文件内容用@ConfigurationProperties单个内容用@Value
他们俩的区别与联系:
@Value 和 @ConfigurationProperties 注解都能读取配置文件中的属性值并绑定到 JavaBean 中,但两者存在以下不同。
1. 使用位置不同
- @ConfigurationProperties:标注在 JavaBean 的类名上;
- @Value:标注在 JavaBean 的属性上。
2. 功能不同
- @ConfigurationProperties:用于批量绑定配置文件中的配置;
- @Value:只能一个一个的指定需要绑定的配置。
3. 松散绑定支持不同
@ConfigurationProperties:支持松散绑定(松散语法),例如实体类 Person 中有一个属性为 lastName,那么配置文件中的属性名支持以下写法:
- person.firstName
- person.first-name
- person.first_name
- PERSON_FIRST_NAME
@Vaule:不支持松散绑定。
4. SpEL 支持不同
- @ConfigurationProperties:不支持 SpEL 表达式;
- @Value:支持 SpEL 表达式。
5. 复杂类型封装
- @ConfigurationProperties:支持所有类型数据的封装,例如 Map、List、Set、以及对象等;
- @Value:只支持基本数据类型的封装,例如字符串、布尔值、整数等类型。
6. 应用场景不同
@Value 和 @ConfigurationProperties 两个注解之间,并没有明显的优劣之分,它们只是适合的应用场景不同而已。
- 若只是获取配置文件中的某项值,则推荐使用 @Value 注解;
- 若专门编写了一个 JavaBean 来和配置文件进行映射,则建议使用 @ConfigurationProperties 注解。


 6480
6480


 被折叠的 条评论
为什么被折叠?
被折叠的 条评论
为什么被折叠?
 到【灌水乐园】发言


