


本文尽量用朴实文字与实践的方式表达搭建一个简单的mysql高可用架构。
环境说明:
OS: ubuntu 16.04 LTS
MASTER:192.168.1.56
SLAVE:192.168.1.222
VIP:192.168.1.217
架构展示:
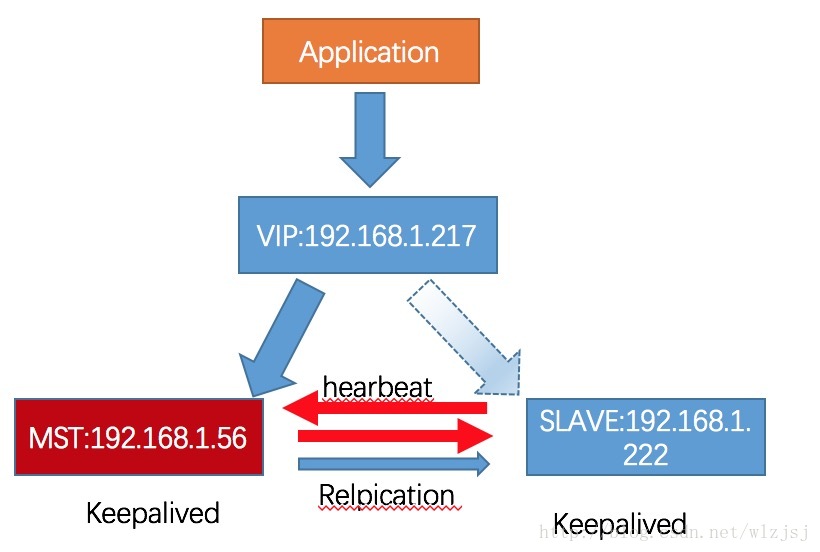
架构说明:应用访问的vip对应到后端的实例,master与slave是双主模式;
一、配置两台双主模式
假定读者有一定的mysql基础,mysql5.7的安装本文忽略,安装可参考:http://blog.csdn.net/wlzjsj/article/details/52289482
主:192.168.1.56 主要配置项说明:
#for master-slave
server-id       = 1001

replicate-ignore-db = information_schema
replicate-ignore-db = performance_schema
replicate-ignore-db = sys

auto_increment_offset=1
auto_increment_increment=2
#for master-slave
server-id       = 1002

replicate-ignore-db = information_schema
replicate-ignore-db = performance_schema
replicate-ignore-db = sys

auto_increment_offset=2
auto_increment_increment=2
搭建主主,这里我们搭建伪主主模式,伪主主实际上是主主,在逻辑上从库不提供写服务而已。
主库执行:
mysql>grant replication slave,replication client on *.* to repl@'192.168.1.%' identified by 'test123';

mysql>show master status;
从库执行:
mysql> change master to master_host='192.168.1.56',master_port=10122,master_user='repl',master_password='test123',master_log_file='mysql-bin.000001',master_log_pos=150;
mysql>start slave;
#查看主从状态:
mysql>show slave status;
#这里忽略了,主从同步正常后,在从库同样创建复制账号
mysql>grant replication slave,replication client on *.* to repl@'192.168.1.%' identified by 'test123';
#查看binlog的状态
mysql>show master status;
从库搭建了主从后,主库也需要搭建主从,从而达到主主模式;
#回到主库执行:
mysql> change master to master_host='192.168.1.56',master_port=10122,master_user='repl',master_password='test123',master_log_file='mysql-bin.000001',master_log_pos=150;
mysql>start slave;
#查看主从状态:
为了达到真正伪主从模式,可以在从库设置:set global read_only=1;
到此主主模式搭建完成;
二、安装配置Keepalived
ubuntu安装keepalived比较简单(在主从上都需要安装):
#shell下:
sudo apt-get install keepalivedroot@test1# keepalived -v
Keepalived v1.2.19 (03/13,2017)
配置keepalived:
主:192.168.1.56 配置keepalived
root@test1# vim /etc/keepalived/keepalived.conf
! Configuration File for keepalived
global_defs {
router_id MYSQL-HA

notification_email {
#        wlz@163.com # test mail
     }
#     notification_email_from wlz@163.com
#     smtp_server 127.0.0.1
#     smtp_connect_timeout 30
}

vrrp_instance VI_1{
   state BACKUP   ##两台配置此处均是BACKUP
     interface eth1  #网卡,可使用ifconfig查看
     virtual_router_id 11 #尽量不要与你生产环境冲突
     priority 100   #优先级,另一台改为90
     advert_int 1
     #nopreempt  #不抢占vip,主库配置为抢占
     authentication {
     auth_type PASS
     auth_pass wlz111222
   }
 virtual_ipaddress {
            192.168.1.217
     }
}

virtual_server 192.168.1.217 10122{
   delay_loop 2   #每个2秒检查一次real_server状态
     lb_algo wrr   #LVS算法
     lb_kind DR    #LVS模式
     persistence_timeout 60   #会话保持时间
     protocol TCP
     real_server 192.168.1.56 10122 {
     weight 3
     notify_down /usr/local/mysql/bin/MySQL.sh  #检测到服务down后执行的脚本
     TCP_CHECK {
     connect_timeout 10    #连接超时时间
     nb_get_retry 3       #重连次数
     delay_before_retry 3   #重连间隔时间
     connect_port 10122   #健康检查端口
     }
}
}
从库192.168.1.222 keepalived配置:
root@test2# vim /etc/keepalived/keepalived.conf
! Configuration File for keepalived
global_defs {
router_id MYSQL-HA

notification_email {
#        wlz@163.com # test mail
     }
#     notification_email_from wlz@163.com
#     smtp_server 127.0.0.1
#     smtp_connect_timeout 30
}

vrrp_instance VI_1{
   state BACKUP   ##两台配置此处均是BACKUP
     interface eth1  #网卡,可使用ifconfig查看
     virtual_router_id 11 #尽量不要与你生产环境冲突
     priority 100   #优先级,另一台改为90
     advert_int 1
     nopreempt  #不抢占vip,主库配置为抢占,从库优先级低配置为不抢占,该模式是主库down掉后起来会重新抢占vip
     authentication {
     auth_type PASS
     auth_pass wlz111222
   }
 virtual_ipaddress {
            192.168.1.217
     }
}

virtual_server 192.168.1.217 10122{
   delay_loop 2   #每个2秒检查一次real_server状态
     lb_algo wrr   #LVS算法
     lb_kind DR    #LVS模式
     persistence_timeout 60   #会话保持时间
     protocol TCP
     real_server 192.168.1.222 10122 {
     weight 3
     notify_down /usr/local/mysql/bin/MySQL.sh  #检测到服务down后执行的脚本
     TCP_CHECK {
     connect_timeout 10    #连接超时时间
     nb_get_retry 3       #重连次数
     delay_before_retry 3   #重连间隔时间
     connect_port 10122   #健康检查端口
     }
}
}
主从的keepalived 配置完成,我们还需要一个脚本MYSQL.sh
vim /usr/local/mysql/bin/MYSQL.sh
#!/bin/sh
pkill keepalived
该脚本就是在检测服务down后杀掉keepalived进程,实现vip漂移;
配置已经都完成,我们启动keepalive
keepalived -D三、检测VIP
首先我们登录主库192.168.1.56对一台物理机授权:
grants all privileges on test.* to test_user@'192.168.1.245' identified by 'test1234';
登录245机器,我们尝试登陆这个mysql实例:
root@test3:~# mysql -h 192.168.1.217 -P 10122 -utest_user -p
Enter password:
Welcome to the MySQL monitor.  Commands end with ; or \g.
Your MySQL connection id is 12
Server version: 5.7.17-log MySQL Community Server (GPL)

Copyright (c) 2000, 2016, Oracle and/or its affiliates. All rights reserved.

Oracle is a registered trademark of Oracle Corporation and/or its
affiliates. Other names may be trademarks of their respective
owners.

Type 'help;' or '\h' for help. Type '\c' to clear the current input statement.

mysql> use test;
Reading table information for completion of table and column names
You can turn off this feature to get a quicker startup with -A

Database changed
测试我们可以通过vip登陆到实例了;
四、测试切换
首先我们确认主库是抢占了vip,我们先断开主主,在主从分别输入:
mysql>stop slave;
在不做任何进程动作到情况下,我们在245上登陆数据库创建一个表和一条数据:
mysql> use test;
Reading table information for completion of table and column names
You can turn off this feature to get a quicker startup with -A

Database changed
mysql> create table t1(a int);
Query OK, 0 rows affected (0.14 sec)

mysql> insert into t1 values(1);
Query OK, 1 row affected (0.03 sec)
验证主库从库的数据
mysql> use test;
Database changed
mysql> select * from t1;
+------+
| a    |
+------+
|    1 |
+------+
1 row in set (0.00 sec)
验证从库的数据:
mysql> use test
Database changed
mysql> show tables;
Empty set (0.00 sec)
mysql>
可以看出来从库并不存在该表(注意之前我们已经分别断开了主从同步),说明这个时候vip是指向主库192.168.1.56。
接下来验证主库down掉的情况;
root@test1#
root@s0264-gz:/data1/mysql_root/data/10122# ps aux | grep 10122
root     41438  0.0  0.0   4508  1744 pts/0    S    11:02   0:00 /bin/sh /usr/local/mysql/bin/mysqld_safe --defaults-file=/data/mysql/data/10122/my.cnf --user=mysql --socket=/tmp/mysql_10122.sock --port=10122 --pid-file=/data/mysql/data/10122/mysql10122.pid --datadir=/data/mysql/data/10122

root@s0264-gz:/data1/mysql_root/data/10122# mysqld_multi stop 10122
#(上述停止实例等方法是为自己编写的脚本,大家根据实际情况停掉)
root@s0264-gz:/data1/mysql_root/data/10122# ps aux | grep 10122
root     42900  0.0  0.0  12944  1008 pts/0    S+   11:17   0:00 grep --color=auto 10122
再次到我们授权的192.168.1.245上登陆实例:
root@test3:~# mysql -h 192.168.1.217 -P 10122 -utest_user -p
Enter password:
Welcome to the MySQL monitor.  Commands end with ; or \g.
Your MySQL connection id is 12
Server version: 5.7.17-log MySQL Community Server (GPL)

Copyright (c) 2000, 2016, Oracle and/or its affiliates. All rights reserved.

Oracle is a registered trademark of Oracle Corporation and/or its
affiliates. Other names may be trademarks of their respective
owners.

Type 'help;' or '\h' for help. Type '\c' to clear the current input statement.

mysql> use test;
Reading table information for completion of table and column names
You can turn off this feature to get a quicker startup with -A
mysql> show tables;
Empty set (0.00 sec)
登陆后可以看到test库下没有t1表了,说明这个时候vip已经指向了从库192.168.1.222了;
五、问题说明
以此版本说明问题,不代表其它版本有同样问题:
vip生效后,实例无法连接
keepalived全部配置完成后,发现vip还是无法登陆,返回
root@test3:~# mysql -h 192.168.1.217 -P 10122 -utest_user -p
Enter password:
ERROR 2003 (HY000): Can't connect to MySQL server on '192.168.1.217' (111)
telnet测试,这个端口也不通,查证发现是mysql实例绑定了ip地址,导致其他地址无法登陆。
主从的实例my.cnf文件均去掉配置:
[mysqld]
character-set-server = utf8
port            = 10122
socket          = /tmp/mysql_10122.sock
#bind-address    = 192.168.1.56


 1188
1188

 被折叠的 条评论
为什么被折叠?
被折叠的 条评论
为什么被折叠?
 到【灌水乐园】发言


