


 本文详细介绍Linux系统中用户管理、文件管理及操作的基本命令,包括用户增删改查、文件目录创建、删除、移动、复制等,以及常用文件查看、编辑、搜索命令的使用方法。
一,系统管理
1,uptime—查看系统负载
 [root@demo5-6 ~]# uptime
 21:49:32 up 15 min,  1 user,  load average: 0.00, 0.01, 0.05
解析:
21:49:32 up 15 min, 1 user, load average: 0.00, 0.01, 0.05
系统时间 状态 运行多久 用户 平均负载 1 分钟 5分钟 15分钟
2,top—实时显示负载以及每个进程的资源占用情况
[root@demo5-6 ~]# top
top - 21:57:49 up 23 min,  1 user,  load average: 0.03, 0.03, 0.05
Tasks:  79 total,   1 running,  78 sleeping,   0 stopped,   0 zombie
Cpu(s):  0.0%us,  0.3%sy,  0.0%ni, 99.7%id,  0.0%wa,  0.0%hi,  0.0%si,  0.0%st
Mem:   1004136k total,   171284k used,   832852k free,    14872k buffers
Swap:  2097148k total,        0k used,  2097148k free,    37584k cached
解析:Tasks表示任务进程,当前共有79个进程;
Cpus表示用户占用CPU的百分比;
Men表示内存;
swap表示在磁盘上格式化的一个和内存相同的分区
3,ps—显示系统进程瞬间的运行动态命令
| ps -ef | 查看进程 |
|---|---|
| ps -A | 列出所有进程 |
| ps -a | 列出当前终端进程 |
| ps -u | 以用户使用的进程 |
| ps -ax | 显示详细信息 |
如:
  [root@demo5-6 ~]# ps -a
   PID TTY          TIME CMD
  1361 pts/0    00:00:00 ps
 [root@demo5-6 ~]# ps -aux |grep ssh
Warning: bad syntax, perhaps a bogus '-'? See /usr/share/doc/procps-3.2.8/FAQ
root       1196  0.0  0.1  66236  1200 ?        Ss   21:34   0:00 /usr/sbin/sshd
root       1318  0.0  0.4 102088  4816 ?        Ss   21:35   0:00 sshd: root@pts/0
root       1322  0.0  0.4 102088  4400 ?        Ss   21:35   0:00 sshd: root@notty
root       1326  0.0  0.2  57252  2276 ?        Ss   21:35   0:00 /usr/libexec/openssh/sftp-server
root       1366  0.0  0.0 103312   876 pts/0    S+   22:25   0:00 grep ssh
注:ps -aux |grep 进程名 列出指定进程信息
二,用户管理
1,useradd 增加新用户
(1)useradd 用户名 增加新用户
[root@demo5-6 ~]# useradd test
2,passwd—修改用户密码
(1)passwd 用户名 修改用户密码
[root@demo5-6 ~]# passwd test
Changing password for user test.
New password:
BAD PASSWORD: it is too simplistic/systematic
BAD PASSWORD: is too simple
Retype new password:
passwd: all authentication tokens updated successfully.
3,su —切换用户
(1)su 用户名 切换到用户
[root@demo5-6 ~]# su test
[test@demo5-6 root]$
(2)su - 用户 切换到用户
[root@demo5-6 ~]# su - test
[test@demo5-6 ~]$
注:(1)su test切换时用户目录未变化,su -test切换时到用户家目录;
(2)管理员用户为#,普通用户到$
(3)root到普通用户不用密码,普通用户间需要,普通用户到root需要
3,exit—退出
[test@demo5-6 ~]$ exit
logout
[root@demo5-6 ~]#
三,文件管理
1,mkdir —创建目录,文件夹
(1)mkdir 名称 创建一级目录
[root@demo5-6 ~]# mkdir test
(2)mkdir -p 名称 创建多级目录
[root@demo5-6 ~]# mkdir -p test/test1/test2
2,创建文件
(1)touch 文件名
[root@demo5-6 ~]# touch test
(2)> 文件名
[root@demo5-6 ~]# > test
3,cat—查看文件内容
(1)cat 文件名 查看文件内容
 [root@demo5-6 ~]# cat test
anaconda-ks.cfg
ceu1
ceu2
ceu3
first
install.log
install.log.syslog
test
(2)cat -n 文件名 打印文件内容的行号
[root@demo5-6 ~]# cat -n test
     1  anaconda-ks.cfg
     2  ceu1
     3  ceu2
     4  ceu3
     5  first
     6  install.log
     7  install.log.syslog
     8  test
(3)cat -s 文件名 去掉多个空行
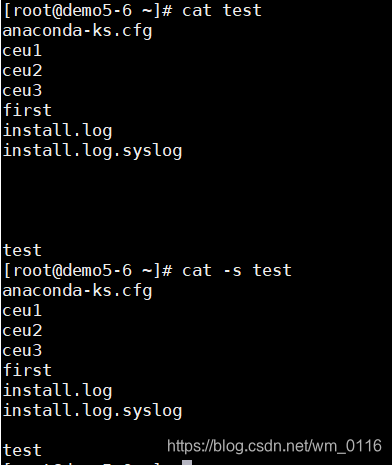
注:去掉后会留一个空行。
(4)cat -E 文件名 在每行结尾加$
[root@demo5-6 ~]# cat -E test
anaconda-ks.cfg$
ceu1$
ceu2$
ceu3$
first$
install.log$
install.log.syslog$
test$
(5)cat 文件1 文件2 把文件内容拼接在一起输出
 [root@demo5-6 ~]# cat test test2
anaconda-ks.cfg
ceu1
ceu2
ceu3
first
install.log
install.log.syslog
test
123
456
778123
456
778123
456
778123
456
4,echo—写入
(1)echo “内容” >> 文件名
[root@demo5-6 ~]# echo "linux" >> test
[root@demo5-6 ~]# cat test
linux
5,diff—查看两个文件差异
(1)diff 文件1 文件2
[root@demo5-6 ~]# diff test test1
1c1
< linux
---
> 222222222222
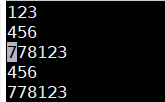
6,head—查看文件前几行,默认10行
(1)head -行数 文件名
[root@demo5-6 ~]# head -3 test2
123
456
778123
7,tail—查看文件结尾几行,默认10行
(1)tail -行数 文件名
[root@demo5-6 ~]# tail -5 test2
778123
456
778123
456
778
8,vi +行号 文件名—光标直接跳到对应的行
[root@demo5-6 ~]# vi +3 test2
9,grep—过滤
(1)grep ^关键字 文件名 以关键字开头的行过滤出来
[root@demo5-6 ~]# grep ^ceu test
ceu1
ceu2
ceu3
(2)grep -i 关键字 文件名 不区分大小写
[root@demo5-6 ~]# grep -i ceu test
Ceu
CEU
ceu1
ceu2
ceu3
(3)grep -c 关键字 文件名 统计打印的行数
[root@demo5-6 ~]# grep -c ceu test
3
(4)grep -n 关键字 文件名 打印文件的行号
[root@demo5-6 ~]# grep -n ceu test
4:ceu1
5:ceu2
6:ceu3
(5)grep -v 取反
[root@demo5-6 ~]# ip a|grep inet
    inet 127.0.0.1/8 scope host lo
    inet6 ::1/128 scope host
    inet 192.168.3.44/24 brd 192.168.3.255 scope global eth0
    inet6 fe80::20c:29ff:fe4a:bf8a/64 scope link
[root@demo5-6 ~]# ip a|grep inet |grep -v inet6
    inet 127.0.0.1/8 scope host lo
    inet 192.168.3.44/24 brd 192.168.3.255 scope global eth0
10,rm—删除
(1)rm 文件名 删除文件
[root@demo5-6 ~]# rm test1
rm: remove regular file `test1'? y
(2)rm -r 文件名 删除目录(递归删除)
[root@demo5-6 ~]# rm -r ceu3
rm: descend into directory `ceu3'? y
rm: remove regular empty file `ceu3/file1'? y
rm: remove regular empty file `ceu3/file3'? y
rm: remove regular empty file `ceu3/file2'? y
rm: remove directory `ceu3'? y
(3)rm -rf 文件名 强制删除(-f强制)
[root@demo5-6 ~]# rm -rf test
[root@demo5-6 ~]#
(4)rm -d 文件名 删除空文件
[root@demo5-6 ~]# rm -d first
rm: remove regular file `first'? y
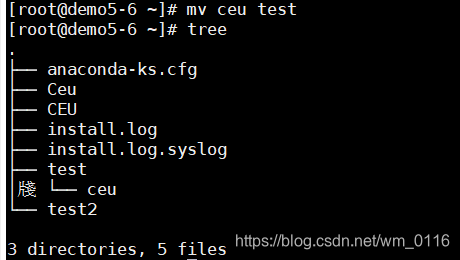
11,mv —移动文件位置
(1)mv 原文件名 新文件名 改名
[root@demo5-6 ~]# ls
aaa  anaconda-ks.cfg  Ceu  CEU  install.log  install.log.syslog  test  test2
[root@demo5-6 ~]# mv aaa ceu
[root@demo5-6 ~]# ls
anaconda-ks.cfg  ceu  Ceu  CEU  install.log  install.log.syslog  test  test2
(2)mv 文件名 位置 移动
12,cp—复制
(1)cp 文件名 位置
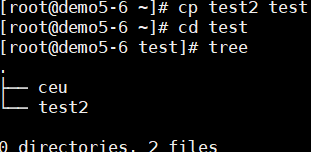
(2)cp -p 带权限复制
(3)cp -a 复制所有
14,file—查看文件类型
(1)file 文件名
[root@demo5-6 ~]# file test2
test2: ASCII text
(2)file,type,stat的区别
[root@demo3 ~]# type ll    ——查看命令类型,
ll is aliased to `ls -l --color=auto'
[root@demo3 ~]# file test     ——file查看文件的内容
test: directory
[root@demo3 ~]# stat test    ——stat显示文件的inode内容
  File: `test'
  Size: 4096            Blocks: 8          IO Block: 4096   directory
Device: 802h/2050d      Inode: 528525      Links: 11
Access: (0755/drwxr-xr-x)  Uid: (    0/    root)   Gid: (    0/    root)
Access: 2019-08-14 18:48:50.918153346 +0800
Modify: 2019-08-09 20:01:02.879567629 +0800
Change: 2019-08-09 20:01:02.879567629 +0800
14,ln
(1) ln 文件1 文件2创建硬链接
(2)ln -s file1 file2创建软链接
[root@demo5-6 ~]# ln test3 test4
[root@demo5-6 ~]# ln -s test3 test5
[root@demo5-6 ~]# echo "lin" >> test4
[root@demo5-6 ~]# cat test3
lin
[root@demo5-6 ~]# cat test4
lin
[root@demo5-6 ~]# cat test5
lin
注: 软连接,在原文件删除的情况下,文件内容失效,自己存在
硬连接,在原文件删除的情况下,文件内容存在
[root@demo5-6 ~]# rm test3
rm: remove regular file `test3'? y
[root@demo5-6 ~]# cat test4
lin
[root@demo5-6 ~]# cat test5
cat: test5: No such file or directory
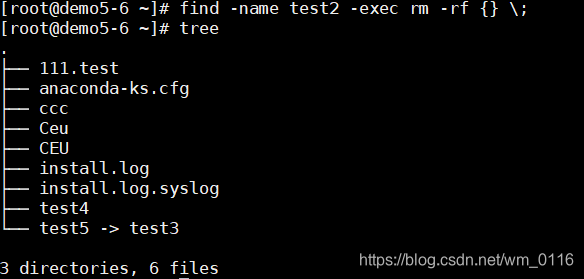
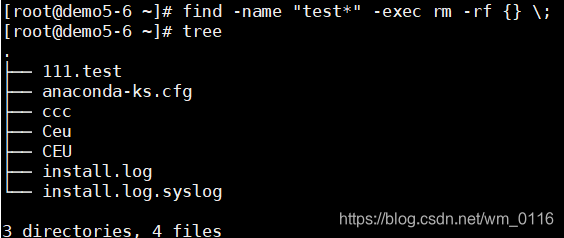
15,find— 查找路径(默认为当前路径)
(1) find / 根下查找
(2) find -name 文件名 -exec rm -rf {} ; 找到文件名的文件并删除
(3)find -name “文件名*” -exec rm -rf {} ; 模糊查找到关于文件名的文件并删除
16,Linux文件文件目录(类unix系统上,是个倒挂树形式)
| bin,sbin | 系统命令的二进制 |
|---|---|
| boot | 存放于系统启动有关的文件 |
| dev | 系统设备文件 |
| etc | 配置文件 |
| home | 用户的家目录 |
| lib | 库,模块文件 |
| opt | 第三方安装模块 |
| usr | 系统用户 |
| var | 与应用相关的文件 |
17,more—分屏显示
| ctrl+f | 向下分屏滚动 |
|---|---|
| ctrl+b | 向上分屏滚动 |
四,文件操作
1,cut -b按照字节字数截取文件
(1)cut -b 10-20 截取字数为10—20的文件
[root@demo5-6 ~]# ip a |grep inet |grep -v inet6 |cut -b 10-20
127.0.0.1/8
192.168.3.4
(2)cut -b 10- 截取字数为10以上的文件
[root@demo5-6 ~]# ip a |grep inet |grep -v inet6 |cut -b 10-
127.0.0.1/8 scope host lo
192.168.3.44/24 brd 192.168.3.255 scope global eth0
(3)cut -b -20 截取字数为小于20的文件
[root@demo5-6 ~]# ip a |grep inet |grep -v inet6 |cut -b -20
    inet 127.0.0.1/8
    inet 192.168.3.4
2,sor—t排序(默认正序排列)
(1)sort -n 文件名 或cat test |sort -n正序排列
[root@demo5-6 ~]# cat test
2
5
1
6
8
3
[root@demo5-6 ~]# sort -n test
1
2
3
5
6
8
(2)sort -r 文件名或cat test |sort -r 倒序排列
[root@demo5-6 ~]# sort -r test
8
6
5
3
2
1
3,unique—去掉连续的重复
[root@demo5-6 CEU]# cat 1
1
1
2
3
3
6
6
5
5
[root@demo5-6 CEU]# cat 1 |sort |uniq
1
2
3
5
6
4,wc -l统计行数
(1)wc -l 文件名
[root@demo5-6 ~]# wc -l test
6 test
5,which,whereis—查看命令路径(可以判断命令程序是否安装)
(1)which 命令
[root@demo5-6 ~]# which tree
/usr/bin/tree
(2)whereis 命令
[root@demo5-6 ~]# whereis tree
tree: /usr/bin/tree /usr/share/man/man1/tree.1.gz
6,(1)’’—强引用,可见即可得
(2)“”弱引用,把变量或者转义符正常输出
[root@demo5-6 ~]# echo $PATH
 /usr/local/sbin:/usr/local/bin:/sbin:/bin:/usr/sbin:/usr/bin:/root/bin
 [root@demo5-6 ~]# echo '$PATH'
 $PATH
 [root@demo5-6 ~]# echo "$PATH"
 /usr/local/sbin:/usr/local/bin:/sbin:/bin:/usr/sbin:/usr/bin:/root/bin


 被折叠的 条评论
为什么被折叠?
被折叠的 条评论
为什么被折叠?
 到【灌水乐园】发言


