


实验要求: 3 台服务器需要配置 rsync C/S 模式,配置成一个客户端,多个 服务器端的模式。在 serverO 中部署 rsync 客户端,在 serverP 和 serverQ 中部署 rsync 的服务器端,需要编写 rsync 的配置文件,配置文件内要包含认证的用户名和密码信息,以及同步模块, 同步的目录为/opt。测试文件使用/var/log/message,将此文件拷贝到/opt 目录下,然后从 serverO 同步到 serverP 和 serverQ 中。
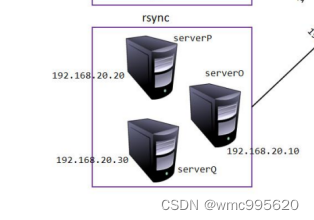
实验环境
客户端   server o 192.168.64.10 rsync inotify

服务器端 server p 192.168.64.20 rsync

服务器端 server q 192.168.64.30 rsync
server p (192.168.64.20)
systemctl stop firewalld.service
setenforce 0

yum -y install rsync

vim /etc/rsyncd.conf

uid = root
gid = root
use chroot = yes
address = 192.168.64.20
port 873
log file = /var/log/rsyncd.log
pid file = /var/run/rsyncd.pid
hosts allow = 192.168.64.0/24
[wwwroot]
path = /opt
comment = Document Root of www.wmc.com
read only = no
dont comperss = *.gz *.bz2 *.tgz *.zip *.rar *.z
auth users = p
secrets file = /etc/rsyncd_users.db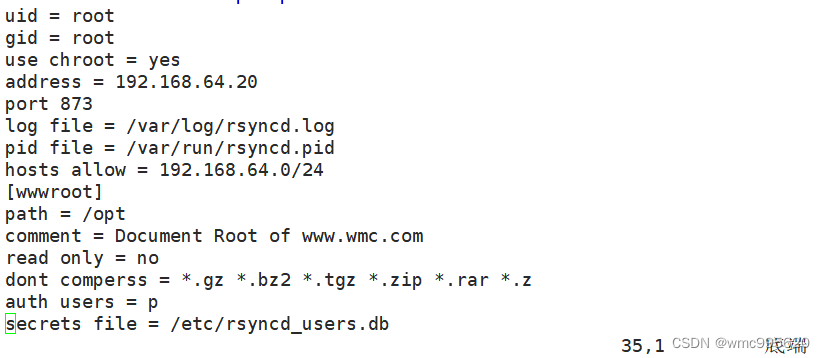
vim /etc/rsyncd_users.db
p:995620

chmod 600 /etc/rsyncd_users.db

rsync --daemon

server q (192.168.64.30)
systemctl stop firewalld.service
setenforce 0

yum -y install rsync

vim /etc/rsyncd.conf

uid = root
gid = root
use chroot = yes
address = 192.168.64.30
port 873
log file = /var/log/rsyncd.log
pid file = /var/run/rsyncd.pid
hosts allow = 192.168.64.0/24
[wwwroot]
path = /opt
comment = Document Root of www.wmc.com
read only = no
dont comperss = *.gz *.bz2 *.tgz *.zip *.rar *.z
auth users = q
secrets file = /etc/rsyncd_users.db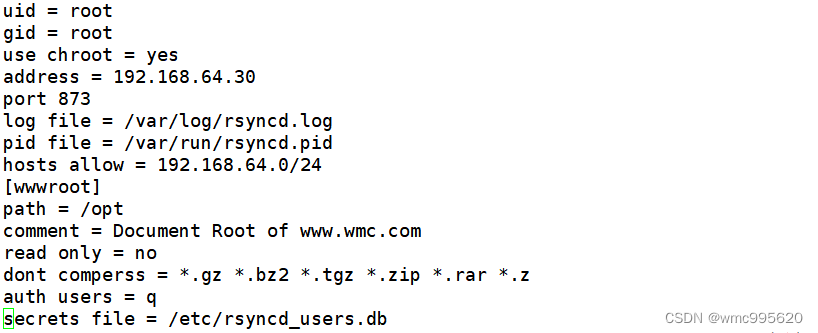
vim /etc/rsyncd_users.db
q:995620

chmod 600 /etc/rsyncd_users.db

rsync --daemon![]()
server o (192.168.64.10)
systemctl stop firewalld.service
setenforce 0
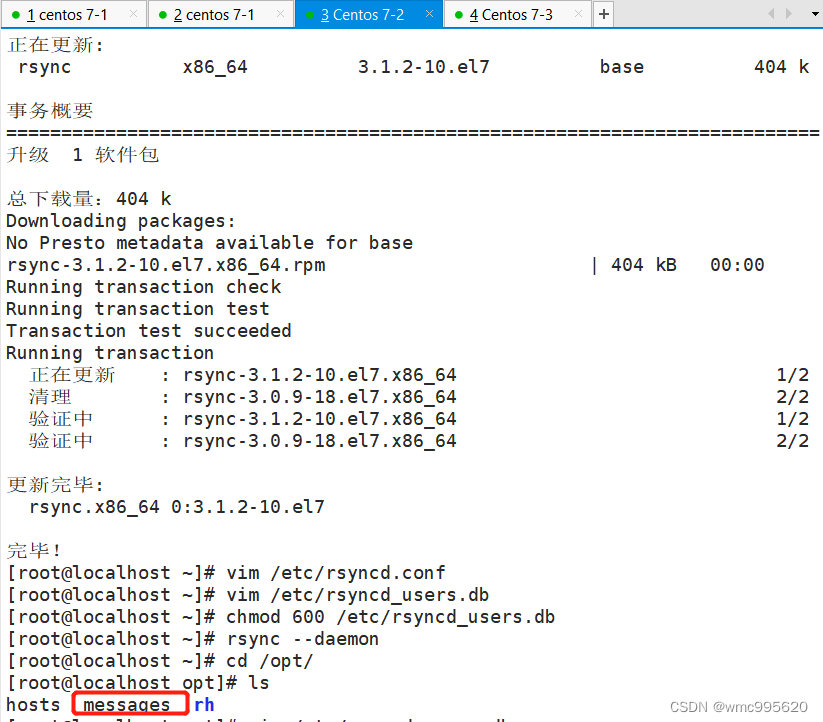
yum -y install rsync
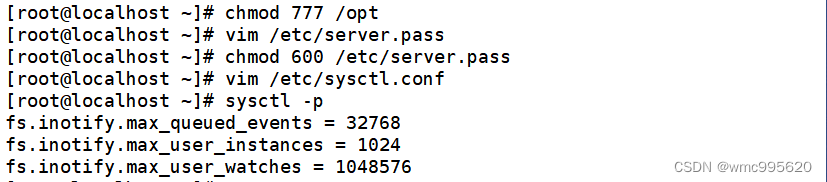
chmod 777 /opt
vim /etc/server.pass
995620
chmod 600 /etc/server.pass
vim /etc/sysctl.conf
fs.inotify.max_queued_events = 32768
fs.inotify.max_user_instances = 1024
fs.inotify.max_user_watches = 1048576
sysctl -p
yum -y install gcc gcc-c++
tar xf inotify-tools-3.14.tar.gz
cd inotify-tools-3.14/
./configure
make && make install
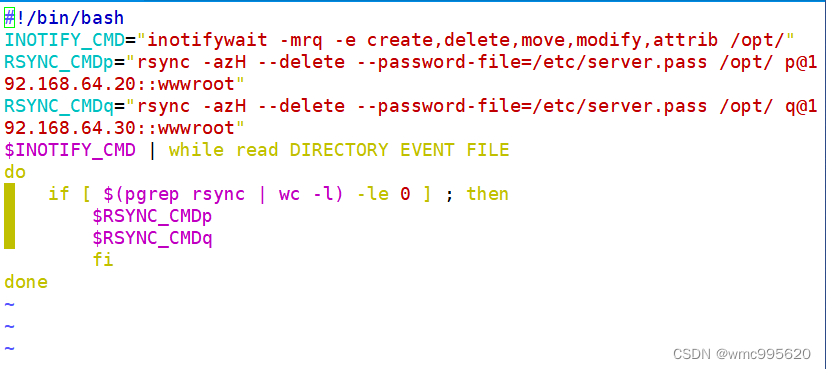
同步脚本
#!/bin/bash
INOTIFY_CMD="inotifywait -mrq -e create,delete,move,modify,attrib /opt/"
RSYNC_CMDp="rsync -azH --delete --password-file=/etc/server.pass /opt/ p@192.168.64.20::wwwroot"
RSYNC_CMDq="rsync -azH --delete --password-file=/etc/server.pass /opt/ q@192.168.64.30::wwwroot"
$INOTIFY_CMD | while read DIRECTORY EVENT FILE
do
    if [ $(pgrep rsync | wc -l) -le 0 ] ; then
        $RSYNC_CMDp
        $RSYNC_CMDq
        fi
done
执行验证
测试文件使用/var/log/message,将此文件拷贝到/opt 目录下,然后从 serverO 同步到 serverP 和 serverQ 中。
server o (192.168.64.10)
vim inotify.sh
cp /var/log/messages /opt
server p (192.168.64.20) server q (192.168.64.30)
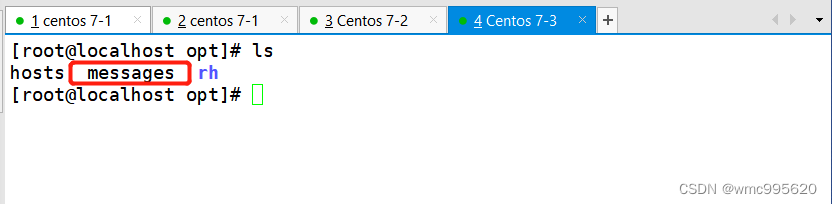
ls /opt

另开终端 ![]()
server p server q 都同步了messages文件


 476
476


 被折叠的 条评论
为什么被折叠?
被折叠的 条评论
为什么被折叠?
 到【灌水乐园】发言


