


一、静态添加Fragment
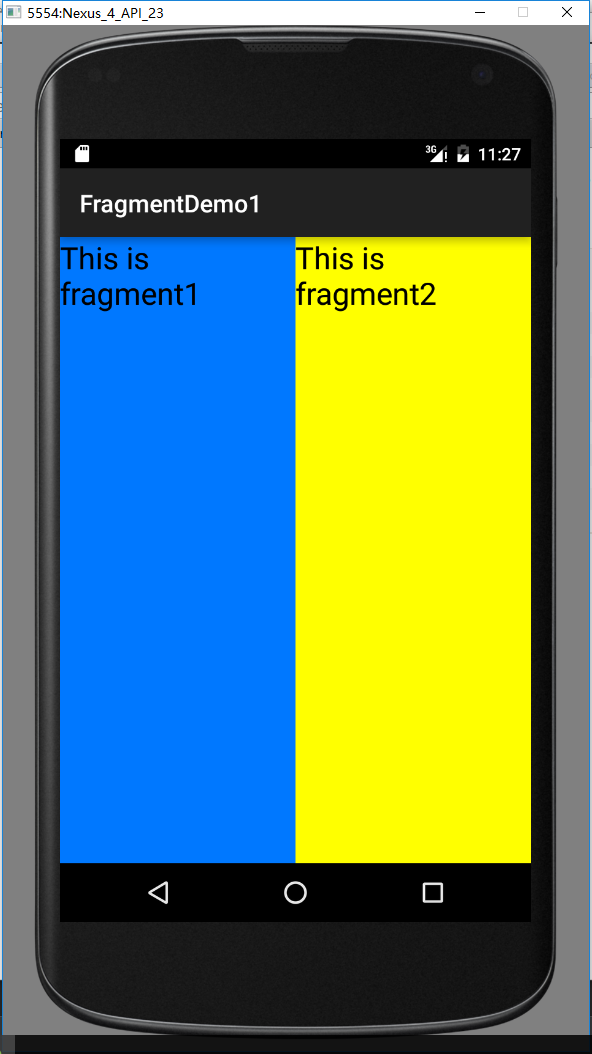
新建一个项目FragmentDemo1,
添加一个布局:fragment1.xml
<?xml version="1.0" encoding="utf-8"?>
<LinearLayout xmlns:android="http://schemas.android.com/apk/res/android"
    android:orientation="vertical" android:layout_width="match_parent"
    android:layout_height="match_parent"
    android:background="#0078ff"
    >
    <TextView
        android:layout_width="wrap_content"
        android:layout_height="wrap_content"
        android:text="This is fragment1"
        android:textColor="#000000"
        android:textSize="25dp"
        />
</LinearLayout>
添加另一个布局:fragment2.xml
<?xml version="1.0" encoding="utf-8"?>
<LinearLayout xmlns:android="http://schemas.android.com/apk/res/android"
    android:orientation="vertical" android:layout_width="match_parent"
    android:layout_height="match_parent"
    android:background="#ffff00"
    >

    <TextView
        android:layout_width="wrap_content"
        android:layout_height="wrap_content"
        android:text="This is fragment2"
        android:textColor="#000000"
        android:textSize="25dp"
        />
</LinearLayout>
新建一个类Fragment1,集成Fragment
package com.example.xm.fragmentdemo1;

import android.app.Fragment;
import android.os.Bundle;
import android.support.annotation.Nullable;
import android.view.LayoutInflater;
import android.view.View;
import android.view.ViewGroup;

/**
 * Created by xm on 2016/4/18.
 */
public class Fragment1 extends Fragment {
    /*3个参数
    1,Fragment需要加载的布局文件
    2,加载layout的父ViewGroup
    3,false:不返回父ViewGroup
    * */
    @Nullable
    @Override
    public View onCreateView(LayoutInflater inflater, ViewGroup container, Bundle savedInstanceState) {
        View view = inflater.inflate(R.layout.fragment1,container,false);

        return view;
    }
}
Fragment2类:
package com.example.xm.fragmentdemo1;

import android.app.Fragment;
import android.os.Bundle;
import android.support.annotation.Nullable;
import android.view.LayoutInflater;
import android.view.View;
import android.view.ViewGroup;

/**
 * Created by xm on 2016/4/18.
 */
public class Fragment2 extends Fragment {
    /*3个参数
    1,Fragment需要加载的布局文件
    2,加载layout的父ViewGroup
    3,false:不返回父ViewGroup
    * */
    @Nullable
    @Override
    public View onCreateView(LayoutInflater inflater, ViewGroup container, Bundle savedInstanceState) {
        View view = inflater.inflate(R.layout.fragment2,container,false);

        return view;
    }
}
主Activity的布局文件activity_main.xml,,在里面加入两个Fragment的引用,使用android:name前缀来引用具体的Fragment:
<?xml version="1.0" encoding="utf-8"?>
<LinearLayout xmlns:android="http://schemas.android.com/apk/res/android"
    xmlns:tools="http://schemas.android.com/tools" android:layout_width="match_parent"
    android:layout_height="match_parent"
    tools:context=".MainActivity"
    >
    <fragment
        android:id="@+id/fragment1"
        android:name="com.example.xm.fragmentdemo1.Fragment1"
        android:layout_width="wrap_content"
        android:layout_height="match_parent"
        android:layout_weight="1"
        />
    <fragment
        android:id="@+id/fragment2"
        android:name="com.example.xm.fragmentdemo1.Fragment2"
        android:layout_width="wrap_content"
        android:layout_height="match_parent"
        android:layout_weight="1"
        />


</LinearLayout>
MainActivity.java
package com.example.xm.fragmentdemo1;

import android.support.v7.app.ActionBarActivity;
import android.os.Bundle;
/*
* 此实验是简单的Fragment的静态添加
* */
public class MainActivity extends ActionBarActivity {

    @Override
    protected void onCreate(Bundle savedInstanceState) {
        super.onCreate(savedInstanceState);
        setContentView(R.layout.activity_main);
    }
}
运行效果:
二、动态添加Fragment
动态的添加Fragment,可以使程序的页面就可以定制更加的多样化
activity_main.xml
<?xml version="1.0" encoding="utf-8"?>
<LinearLayout xmlns:android="http://schemas.android.com/apk/res/android"
    xmlns:tools="http://schemas.android.com/tools" android:layout_width="match_parent"
    android:layout_height="match_parent"
    android:orientation="vertical"
    tools:context=".MainActivity">


    <Button
        android:id="@+id/btn_show_fragment1"
        android:layout_width="match_parent"
        android:layout_height="wrap_content"
        android:text="显示Fragment1"
        />

    <Button
        android:id="@+id/btn_show_fragment2"
        android:layout_width="match_parent"
        android:layout_height="wrap_content"
        android:text="显示Fragment2"
        />

    <FrameLayout
        android:id="@+id/fragment_container"
        android:layout_width="match_parent"
        android:layout_height="match_parent">
    </FrameLayout>
</LinearLayout>
要实现的效果:

在MainActivity.java中:
package com.example.xm.fragmentdemo2;
/*
* 动态的添加Fragment,可以使程序的页面就可以定制更加的多样化
* */

import android.app.FragmentManager;
import android.app.FragmentTransaction;
import android.support.v7.app.ActionBarActivity;
import android.os.Bundle;
import android.view.View;
import android.widget.Button;

public class MainActivity extends ActionBarActivity {

    @Override
    protected void onCreate(Bundle savedInstanceState) {
        super.onCreate(savedInstanceState);
        setContentView(R.layout.activity_main);

        Button button1 = (Button) findViewById(R.id.btn_show_fragment1);
        button1.setOnClickListener(new View.OnClickListener() {
            @Override
            public void onClick(View v) {
                Fragment1 fragment1 = new Fragment1();
                //1,获取到FragmentManager,通过getFragmentManager获取
                FragmentManager fragmentManager = getFragmentManager();

                //2,开启一个事务,通过调用beginTransaction方法开启
                FragmentTransaction transaction = fragmentManager.beginTransaction();
                //3,向容器内加入Fragment,一般使用add或者replace方法实现,需要传入容器的id和Fragment的实例
                transaction.add(R.id.fragment_container,fragment1);

                transaction.addToBackStack(null);
                //4,提交事务,调用的是commit方法提交
                transaction.commit();

            }
        });

        Button button2 = (Button) findViewById(R.id.btn_show_fragment2);
        button2.setOnClickListener(new View.OnClickListener() {
            @Override
            public void onClick(View v) {
                Fragment2 fragment2 = new Fragment2();
                FragmentManager fragmentManager = getFragmentManager();
                FragmentTransaction transaction = fragmentManager.beginTransaction();
                transaction.add(R.id.fragment_container,fragment2);
                transaction.commit();
            }
        });
    }
}


 1万+
1万+

 被折叠的 条评论
为什么被折叠?
被折叠的 条评论
为什么被折叠?
 到【灌水乐园】发言


