


一。KVM虚拟化
1.KVM的安装:
yum install qemu-kvm qemu-kvm-tools virt-manager libvirt virt-install
/etc/init.d/libvirtd start
2.创建一个5G的大小的虚拟机:
qemu-img create -f raw /opt/centos-6.5-x86_64.raw 5G
3.查看虚拟机空间使用大小:
qemu-img info /opt/centos-6.5-x86_64.raw
4.启动虚拟机,并指定内存512,磁盘位置,和CDROM的位置,并启动VNC。
virt-install --virt-type kvm --name centos-6.6-64 --ram 512 --cdrom=/opt/centos-6.5.iso --disk path=/opt/centos-6.5-x86_64.raw --network network=default --graphics vnc,listen=0.0.0.0 --noautoconsole --os-type=linux --os-variant=rhel6
5.使用VNC访问虚拟机:
172.16.2.210 5900端口 (第一台虚拟机默认是5900,第二台就是5901)
6.查看所有创建的虚拟机:
virsh list --all
7.启动虚拟机virsh start centos-6.6-64:
virsh start centos-6.6-64
7.1.直接进入虚拟机命令行:
virsh console centos-6.6-64
8.查看xml文件:
vim /etc/libvirt/qemu/centos-6.6-64.xml
virsh edit centos-6.6-64 (修改xml文件,不能直接用vim修改)
9.根据xml文件新建虚拟机:
virsh define /opt/centos-6.6-64.xml
10.虚拟机监控命令:virt-top
11.查看虚拟网桥状态:brctl show
12.创建桥接网卡并且关联到eth0上面:
brctl addbr br0
brctl addif br0 eth0 && ip del dev eth0 172.16.1.210/24 && ifconfig br0 172.16.1.210/24 up
(创建了桥接网卡以后需要把原来的eth0的IP去掉,把原来的IP配置在br0上面)
13。修改虚拟机的网卡为刚才创建的桥接网卡:
virsh edit centos-6.6-64 (修改虚拟机xml文件)
    <interface type='bridge'>
      <mac address='52:54:00:e4:46:c7'/>
      <source bridge='br0'/>
      <model type='virtio'/>
1.安装Openstack基础环境:
    wget https://dl.fedoraproject.org/pub/epel/epel-release-latest-6.noarch.rpm  (下载epel源)
    rpm -ivh epel-release-latest-6.noarch.rpm
yum install -y python-pip gcc gcc-c++ make libtool patch automake python-devel libxslt-devel MySQL-python openssl-devel libudev-devel git wget libvirt-python libvirt qemu-kvm gedit python-numdisplay python-eventlet device-mapper bridge-utils libffi-devel libffidefault-storage-engine = innodb
innodb_file_per_table
collation-server = utf8_general_ci
init-connect = 'SET NAMES utf8'
character-set-server = utf8create database keystone;
grant all on keystone.* to keystone@'172.16.0.0/255.255.0.0' identified by 'keystone';(改权限和限制访问的Ip段)
create database glance;
grant all on glance.* to glance@'172.16.0.0/255.255.0.0' identified by 'glance';
create database nova;
grant all on nova.* to nova@'172.16.0.0/255.255.0.0' identified by 'nova';
create database neutron;
grant all on neutron.* to neutron@'172.16.0.0/255.255.0.0' identified by 'neutron';
create database cinder;
grant all on cinder.* to cinder@'172.16.0.0/255.255.0.0' identified by 'cinder';
[openstack]
name=openstack
baseurl=http://repos.fedorapeople.org/repos/openstack/EOL/openstack-icehouse/epel-6
enabled=1
gpgcheck=0
gpgkey=file:///etc/pki/rpm-gpg/RPM-GPG-KEY-EPEL-6
vim /etc/keystone/keystone.conf admin_token=ADMIN
log_file=/var/log/keystone/keystone.log
connection=mysql://keystone:keystone@172.16.1.210/keystone12.配置连接keystone连接需要的环境变量:
export OS_SERVICE_TOKEN=ADMIN
export OS_SERVICE_ENDPOINT=http://172.16.1.210:35357/v2.0
13.初始化话keystone的用户数据(admin,demo):
创建admin,demo用户,创建admin角色,创建service,admin租户
 keystone user-create --name=admin --pass=admin --email=admin@example.com
 keystone role-create --name=admin
 keystone tenant-create --name=admin --description="Admin Tenant"
 keystone user-role-add --user=admin --tenant=admin --role=admin
 keystone user-role-add --user=admin --role=_member_ --tenant=admin
 keystone user-create --name=demo --pass=demo
 keystone tenant-create --name=demo --description="demo Tenant"
 keystone user-role-add --user=demo --role=_member_ --tenant=demo
 keystone tenant-create --name=service
 keystone service-create --name=keystone --type=identity
 keystone endpoint-create --service-id=$(keystone service-list | awk '/ identity / {print $2}') --publicurl=http://172.16.1.210:5000/v2.0 --internalurl=http://172.16.1.210:5000/v2.0 --adminurl=http://172.16.1.210:35357/v2.0
创建完成后,使用keystone user-list 命令查看是否有admin和demo两个账号
14.查看admin的token
unset OS_SERVICE_TOKEN
unset OS_SERVICE_ENDPOINT
keystone --os-username=admin --os-password=admin --os-tenant-name=admin --os-auth-url=http://172.16.1.210:35357/v2.0 token-get
15.创建admin和demo用户的环境变量文件:
vim /root/keystone-admin
export OS_TENANT_NAME=admin
export OS_USERNAME=admin
export OS_PASSWORD=admin
export OS_AUTH_URL=http://172.16.1.210:35357/v2.0
vim /root/keystone-demo
export OS_TENANT_NAME=demo
export OS_USERNAME=demo
export OS_PASSWORD=demo
export OS_AUTH_URL=http://172.16.1.210:35357/v2.0
三。镜像服务Glance(9292,9191)
1.安装glance:
yum install openstack-glance python-glance python-glanceclient
2.配置glance:
vim /etc/glance/glance-api.conf
[DEFAULT]
debug=True
default_store=file
filesystem_store_datadir=/data/glance/images/
log_file=/var/log/glance/api.log
notifier_strategy = rabbit
rabbit_host=172.16.1.210
rabbit_port=5672
rabbit_use_ssl=false
rabbit_userid=guest
rabbit_password=guest
rabbit_virtual_host=/
rabbit_notification_exchange=glance
rabbit_notification_topic=notifications
rabbit_durable_queues=False
[database]
connection=mysql://glance:glance@172.16.1.210/glance
[keystone_authtoken]
auth_host=172.16.1.210
auth_port=35357
auth_protocol=http
admin_tenant_name=service
admin_user=glance
admin_password=glance
[paste_deploy]
flavor=keystone
vim /etc/glance/glance-registry.conf
debug=True
log_file=/var/log/glance/registry.log
connection=mysql://glance:glance@172.16.1.210/glance

[keystone_authtoken]
auth_host=172.16.1.210
auth_port=35357
auth_protocol=http
admin_tenant_name=service
admin_user=glance
admin_password=glance

[paste_deploy]
flavor=keystone
3.同步glance的mysql数据库:
glance-manage db_sync (警告报错可以忽略)
chown -R glance:glance /var/log/glance
4.在keystone中创建glance的用户:
keystone user-create --name=glance --pass=glance (创建glance密码也是一样)
keystone user-role-add --user=glance --tenant=service --role=admin (讲glance用户加入到admin角色service租户中)
5.将glance在keystone注册服务和注册url:
keystone service-create --name=glance --type=image
keystone endpoint-create --service-id=$(keystone service-list|awk '/ image / {print $2}') --publicurl=http://172.16.1.210:9292 --internalurl=http://172.16.1.210:9292 --adminurl=http://172.16.1.210:9292
6.启动glance:
/etc/init.d/openstack-glance-api status
/etc/init.d/openstack-glance-registry start
7.查看镜像列表:
glance image-list
8.下载开发镜像并进行导入:
wget http://download.cirros-cloud.net/0.3.2/cirros-0.3.2-x86_64-disk.img
glance image-create --name "cirros-0.3.2-x86_64" --disk-format qcow2 --container-format bare --is-public True --file cirros-0.3.2-x86_64-disk.img
四。计算服务nova相关 (5000,35357)
1.安装控制节点的nova服务:
yum install openstack-nova-api openstack-nova-cert openstack-nova-conductor openstack-nova-console openstack-nova-novncproxy openstack-nova-scheduler python-novaclient
pip install websockify==0.5.1 (解决novnc启动不了的问题)
2.修改nova的配置文件:
vim /etc/nova/nova.conf
rabbit_host=172.16.1.210
rabbit_port=5672
rabbit_use_ssl=false
rabbit_userid=guest
rabbit_password=guest
rpc_backend=rabbit
my_ip=172.16.1.210
auth_strategy=keystone

network_api_class=nova.network.neutronv2.api.API
linuxnet_interface_driver=nova.network.linux_net.LinuxBridgeInterfaceDriver
neutron_url=http://172.16.1.210:9696
neutron_admin_username=neutron
neutron_admin_password=neutron
neutron_admin_tenant_id=96616014997f4f79b7dbd9e319912154  ("keystone tenant-list"命令看到的                                                           service_id)
neutron_admin_tenant_name=service
neutron_admin_auth_url=http://172.16.1.210:5000/v2.0
neutron_auth_strategy=keystone
firewall_driver=nova.virt.firewall.NoopFirewallDriver

novncproxy_base_url=http://172.16.1.210:6080/vnc_auto.html
vncserver_listen=0.0.0.0
vncserver_proxyclient_address=172.16.1.210
vnc_enabled=true
vnc_keymap=en-us
connection=mysql://nova:nova@172.16.1.210/nova
auth_host=172.16.1.210
auth_port=35357
auth_protocol=http
auth_uri=http://172.16.1.210:5000
auth_version=v2.0
admin_user=nova
admin_password=nova
admin_tenant_name=service
vif_driver=nova.virt.libvirt.vif.NeutronLinuxBridgeVIFDriver
3.初始化nova的数据库表结构:
nova-manage db sync
4在keystone中创建nova的用户:
source /root/keystone-admin
keystone user-create --name=nova --pass=nova
keystone user-role-add --user=nova --tenant=service --role=admin
5.将nova在keystone注册服务和注册url:
source /root/keystone-admin   (根据自己存放变量的文件)
keystone service-create --name=nova --type=compute
keystone endpoint-create --service-id=$(keystone service-list|awk '/ compute / {print $2}') --publicurl=http://172.16.1.210:8774/v2/%\(tenant_id\)s --internalurl=http://172.16.1.210:8774/v2/%\(tenant_id\)s --adminurl=http://172.16.1.210:8774/v2/%\(tenant_id\)s
6.启动nova所有相关服务:
for i in {api,cert,conductor,consoleauth,novncproxy,scheduler};do service openstack-nova-$i start; done7.在计算节点上面安装相关服务:
yum install -y qemu-kvm libvirt openstack-nova-compute python-novaclient
yum upgrade device-mapper-libs
8.将控制节点nova配置文件复制到计算节点:
scp /etc/nova/nova.conf 172.16.1.211:/etc/nova/nova.conf
修改vncserver_proxyclient_address=172.16.1.211 配置的IP为计算节点的。
9.启动计算节点的相关服务:
/etc/init.d/libvirtd start
/etc/init.d/messagebus start
/etc/init.d/openstack-nova-compute start
10.在控制节点上面查看是否注册上来:
nova host-list
六。网络服务neutron相关 (9696)
1.在控制节点安装neutron服务:
yum install openstack-neutron openstack-neutron-ml2 python-neutronclient openstack-neutron-linuxbridge
2.修改neutron配置文件:
vim /etc/neutron/neutron.conf
state_path = /var/lib/neutron
lock_path = $state_path/lock
core_plugin = ml2
service_plugins = router,firewall,lbaas
api_paste_config = /usr/share/neutron/api-paste.ini
auth_strategy = keystone
rabbit_host = 172.16.1.210
rabbit_password = guest
rabbit_port = 5672
rabbit_userid = guest
rabbit_virtual_host = /
notify_nova_on_port_status_changes = true
notify_nova_on_port_data_changes = true
nova_url = http://172.16.1.210:8774/v2
nova_admin_username = nova
nova_admin_tenant_id = 96616014997f4f79b7dbd9e319912154   ("keystone tenant-list"命令看到的                                                           service_id)
nova_admin_password = nova
nova_admin_auth_url = http://172.16.1.210:35357/v2.0
root_helper = sudo neutron-rootwrap /etc/neutron/rootwrap.conf
auth_host = 172.16.1.210
auth_port = 35357
auth_protocol = http
admin_tenant_name = service
admin_user = neutron
admin_password = neutron
connection = mysql://neutron:neutron@172.16.1.210:3306/neutron
service_provider=LOADBALANCER:Haproxy:neutron.services.loadbalancer.drivers.haproxy.plugin_driver.HaproxyOnHostPluginDriver:default
service_provider=VPN:openswan:neutron.services.vpn.service_drivers.ipsec.IPsecVPNDriver:default
vim /etc/neutron/plugins/ml2/ml2_conf.ini (下面是单一扁平网络的配置)
type_drivers = flat,vlan,gre,vxlan
tenant_network_types = flat,vlan,gre,vxlan
mechanism_drivers = linuxbridge,openvswitch
flat_networks = physnet1
enable_security_group = True
vim /etc/neutron/plugins/linuxbridge/linuxbridge_conf.ini (下面是单一扁平网络的配置)
network_vlan_ranges = physnet1
physical_interface_mappings = physnet1:eth0  (根据网卡来配置)
firewall_driver = neutron.agent.linux.iptables_firewall.IptablesFirewallDriver
enable_security_group = True
3.在keystone中创建neutron的用户:
keystone user-create --name neutron --pass neutron
keystone user-role-add --user neutron --tenant service --role admin
4.这里需要改下nova的neutron相关配置(我前面已经整合进去了)
5.将neutron在keystone注册服务和注册url:
keystone service-create --name neutron --type network
keystone endpoint-create --service-id=$(keystone service-list |awk '/ network / {print $2}') --publicurl=http://172.16.1.210:9696 --internalurl=http://172.16.1.210:9696 --adminurl=http://172.16.1.210:9696
6.先使用手动启动看是否有报错(启动成功会监听9696端口):
neutron-server --config-file=/etc/neutron/neutron.conf --config-file=/etc/neutron/pluns/ml2/ml2_conf.ini --config-file=/etc/neutron/plugins/linuxbridge/linuxbridge_conf.ini7.修改neutron服务的init启动脚本:
vim /etc/init.d/neutron-server
vim /etc/init.d/neutron-linuxbridge-agent (两个文件修改相同的地方)
configs=(
    "/etc/neutron/neutron.conf" \
    "/etc/neutron/plugins/linuxbridge/linuxbridge_conf.ini" \
    "/etc/neutron/plugins/ml2/ml2_conf.ini" \
)
8.启动neutron服务:
/etc/init.d/neutron-server status
/etc/init.d/neutron-linuxbridge-agent start
9.查看neutron的连接情况:
neutron agent-list
10.在计算节点安装neutron服务:
yum install openstack-neutron openstack-neutron-ml2 python-neutronclient openstack-neutron-linuxbridge
11.将控制节点的配置文件复制到计算节点上:
scp /etc/init.d/neutron-* 172.16.1.211:/etc/init.d/
scp /etc/neutron/neutron.conf 172.16.1.211:/etc/neutron/neutron.conf
scp /etc/neutron/plugins/ml2/ml2_conf.ini 172.16.1.211:/etc/neutron/plugins/ml2/ml2_conf.ini
scp /etc/neutron/plugins/linuxbridge/linuxbridge_conf.ini 172.16.1.211:/etc/neutron/plugins/linuxbridge/linuxbridge_conf.ini
12.在计算节点上启动neutron的客户端程序:
/etc/init.d/neutron-linuxbridge-agent start
七。web服务dashboard相关 (80)
1.安装dashboard服务:
yum install httpd mod_wsgi memcached python-memcached openstack-dashboard
2.修改dashboard的配置文件:
vim /etc/openstack-dashboard/local_settings (修改下面两项)
ALLOWED_HOSTS = ['horizon.example.com', 'localhost','172.16.1.210']   (允许的地址)
CACHES = {
   'default': {
       'BACKEND' : 'django.core.cache.backends.memcached.MemcachedCache',
       'LOCATION' : '127.0.0.1:11211',
   }
}

OPENSTACK_HOST = "172.16.1.210"
3.启动dashboard服务:
/etc/init.d/memcached start
/etc/init.d/httpd start
4.登录dashboard:
http://172.16.1.210/dashboard/
默认账户密码:admin/admin
八。调试Openstack
1.为demo创建一个单一扁平网络:
neutron net-create --tenant-id 9d18b0a337064af386cc0d599dd172fd flat_net --shared --provider:network_type flat --provider:physical_network physnet1id为keystone tenant-list 查看的demo_id, flat_net是创建网络的名称,--shared代表共享网络,后面是网络的类型,最后是对应neutron网络名称.
2.查看创建的网络:
neutron net-list
3.在网页上面创建子网:
管理员-网络-点击网络-创建子网-扁平网络网段就用和eth0一样的就可以
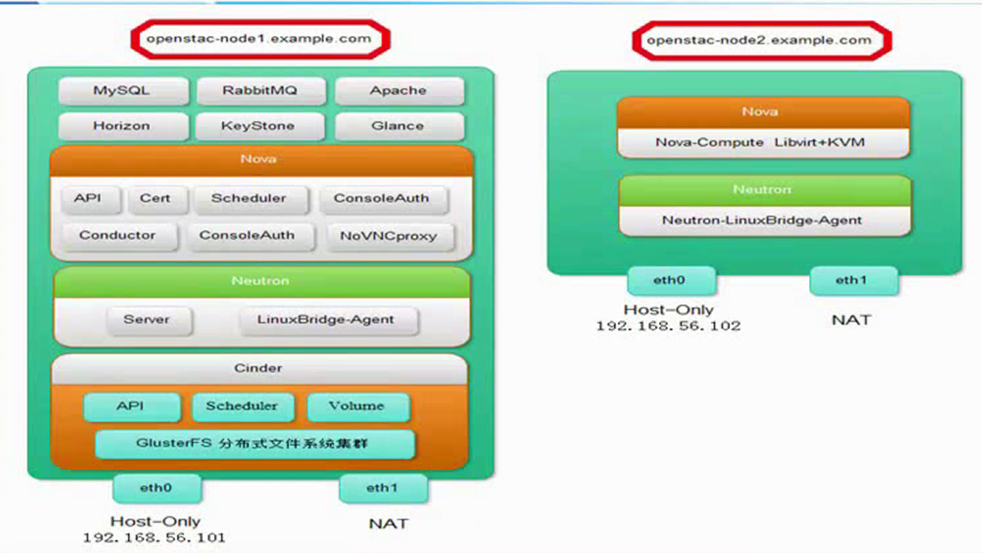
4.虚拟机创建流程图:

5.安装备注:
1.如果安装完成以后虚拟机无法ping同外网,请检查网卡是否打开“混杂模式”
2.强行修改虚拟机的状态为“运行”
nova reset-state 6986b3f8-be2c-4931-b3b9-90d8077210b6 --active
3.启动“主机集合”功能需要修改配置文件:
/etc/nova/nova.conf
scheduler_default_filters=AvailabilityZoneFilter,RetryFilter,RamFilter,ComputeFilter,ComputeCapabilitiesFilter,ImagePropertiesFilter,CoreFilter
4.将db4加入到gigold-2的主机集合里面:
nova aggregate-add-host gigold-2 db4
nova aggregate-remove-host gigold-2 db4 (这个是删除)
5.关闭默认的virbr0虚拟网卡
virsh net-destroy default
virsh net-undefine default
service libvirtd restart


 7598
7598

 被折叠的 条评论
为什么被折叠?
被折叠的 条评论
为什么被折叠?
 到【灌水乐园】发言


