


接入SpringbootAdmin
1,SpringbootAdmin是什么
Spring Boot Admin 是一个管理和监控 Spring Boot 应用程序的开源软件,它是在 Spring Boot Actuator 的基础上提供简洁的可视化 WEB UI。个人认为Spring Boot Actuator 是Springboot体系中非常好用且强大的监控能力节点,极大的方便了我们对springboot应用进行业务监控。但是,Spring Boot Actuator 监控接口返回的都是json数据,需要我们进一步开发自己的监控系统。Spring Boot Admin 就是这样一个系统。
Spring Boot Admin并不是 Spring Boot 官方出品的开源软件,但是其软件质量和使用广泛度都非常的高,并且 Spring Boot Admin 会及时随着 Spring Boot 的更新而更新,当 Spring Boot 推出 2.X 版本时 Spring Boot Admin 也及时进行了更新。
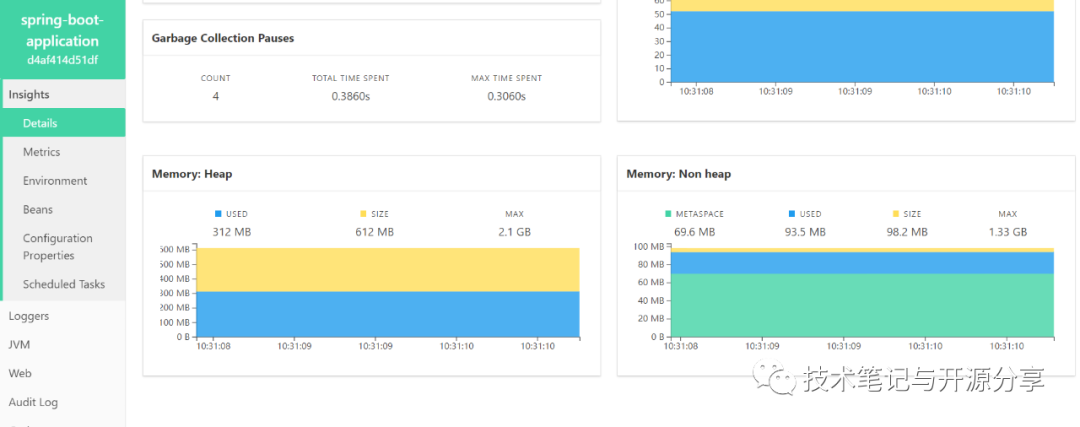
它可以在列表中浏览所有被监控 spring-boot 项目的基本信息、详细的 Health 信息、内存信息、JVM 信息、垃圾回收信息、各种配置信息(比如数据源、缓存列表和命中率)等,还可以直接修改 logger 的 level。
2,接入步骤
Spring Boot Admin 分为两部分。server端和client端。我们要做的就是部署server端,再我们的应用中集成client端。整个接入过程不算复杂,看完这篇文章,你一定会。
部署Server端
新建一个普通的springboot工程。
引入以下依赖
<dependency>
   <groupId>de.codecentric</groupId>
   <artifactId>spring-boot-admin-starter-server</artifactId>
   <version>2.2.2</version>
</dependency>

<dependency>
   <groupId>org.springframework.boot</groupId>
   <artifactId>spring-boot-starter-web</artifactId>
</dependency>
配置一个服务端口
server.port=8000
EnableAdminServer
@EnableAdminServer
@SpringBootApplication
public class MonitorApplication {

  public static void main(String[] args) {
    SpringApplication.run(MonitorApplication.class, args);
  }

}
好了,server端配置完成。部署启动即可。

监控client端
添加依赖:
配置文件配置
spring.boot.admin.client.url=http://localhost:8000
指定server地址
management.endpoints.web.exposure.include=*
暴露可被监控的服务节点。这里为了演示,开放了所有,具体的应该根据自己的需要配置。

3,开启认证
上面的步骤已经完成对应用的监控。但是有个问题,没有权限管理秘籍,任何人都可以随便查看甚至操作应用。这在生产环境是绝对不允许的,所以,我们必须开启权限认证。
server端
引入springboot-security
<dependency>
  <groupId>org.springframework.boot</groupId>
  <artifactId>spring-boot-starter-security</artifactId>
</dependency>
配置登录密码
spring:
security:
  user:
    name: "admin"
    password: "admin"
main类增加安全配置认证路由代码
@EnableAdminServer
@SpringBootApplication
public class MonitorApplication {

  public static void main(String[] args) {
    SpringApplication.run(MonitorApplication.class, args);
  }

  @Configuration
  public static class SecuritySecureConfig extends WebSecurityConfigurerAdapter {
    private final String adminContextPath;

    public SecuritySecureConfig(AdminServerProperties adminServerProperties) {
        this.adminContextPath = adminServerProperties.getContextPath();
    }

    @Override
    protected void configure(HttpSecurity http) throws Exception {
        SavedRequestAwareAuthenticationSuccessHandler successHandler = new SavedRequestAwareAuthenticationSuccessHandler();
        successHandler.setTargetUrlParameter("redirectTo");

        http.authorizeRequests()
              .antMatchers(adminContextPath + "/assets/**").permitAll()
              .antMatchers(adminContextPath + "/login").permitAll()
              .anyRequest().authenticated()
              .and()
              .formLogin().loginPage(adminContextPath + "/login").successHandler(successHandler).and()
              .logout().logoutUrl(adminContextPath + "/logout").and()
              .httpBasic().and()
              .csrf().disable();
    }
  }
server端好了
client端改造
因为现在server端启用了密码,所以client端是注册不上来的,需要配置密码
boot:
admin:
  client:
    url: http://localhost:8000
    username: admin
    password: admin
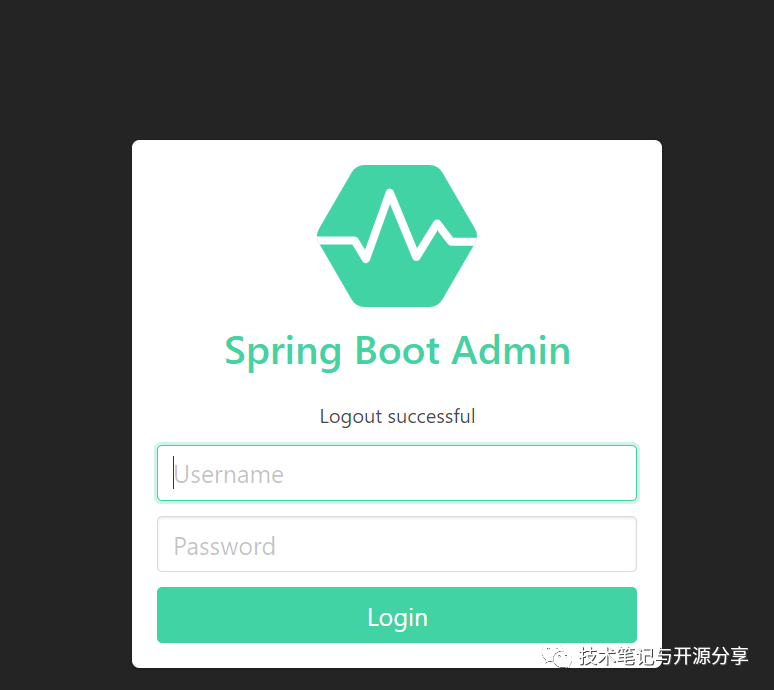
现在需要使用用户名密码登录,并且有了退出等基本功能


 3038
3038


 被折叠的 条评论
为什么被折叠?
被折叠的 条评论
为什么被折叠?
 到【灌水乐园】发言


