所有控件都可以加点击事件:
TextView
xml:
1)android:singleLine=”true” //只能显示单行lines=”“//限制行数
2)android:ellipsize=”marquee”文字过长时没有……跑马灯效果(api),参数start,middle,end
3)hint:提示
4)textColor(颜色:ARGB,RRGGBB,AARRGGBB,RGB.中间两种最常用)
5)autoLink=”web”//可以链接到文字的地址;=phone 就可以打到文字的号码
6)drawbleTop=”“//传入图片放在文字上边(Right,Left,Buttom)
7)gravity=”“//文字位置
8)drawblepadding=”30dp”//文字和图片之间的距离
9)paddingButtom//文字距离这个控件边框底部距离
10)InputType=”“//输入的类型限制
11)跑马灯需要加:
1>如果就一个textView:
android:focusable=”true”
android:focusableInTouchMode=”true”
就可以实现这样的功能。
2>当多个textview时,利用代码的方式。
步骤:
—-1.在layout中设置四行代码:
android:ellipsize=”marquee”
android:singleLine=”true”
android:focusable=”true”
android:focusableInTouchMode=”true”
—-2.自定义一个textview类继承TextView,,其中实现三个构造函数,并重写isFocused()的方法,让它始终return true;
—-3.最后将layout中的textview标签改换成自定义的textview,包名+类名。
<TextView
        android:id="@+id/text1"
        android:layout_width="match_parent"
        android:layout_height="wrap_content"
        android:textSize="48dp"
        android:textColor="#00ff00"
        android:text="this is a textview"
        android:singleLine="true"  //只能显示单行

        />
java代码:
1)getText,setText,setTextColor(Color.或者Color.argb()),setTextSize(50)//这是设置像素大小,
setAutoLinkMask(),参数传Linkify.**(这里查api)注:设置的文本必须在其设置之后。
setPaintFlags();//文字上划线,一般在商场减价使用。
2)富文本:可以支持一部分html,或动态的添加
Spanned spanned = Html.fromHtml(“我是一个<font color='#ff0000'>富文本</font>“);//可以加效果
文本对象.setText(spanned);
注意点: 利用gettet获取图片时,一定要设置图片的长度和宽度。
范例:
加个图片,利用反射。
 textSpanned=(TextView) findViewById(R.id.text_spanned);
        String text = "我是一个<font color='#ff0000'>富文本</font>,然后图片<img src='ic_launcher'/>";
 ImageGetter getter = new ImageGetter() {
            //这里利用反射
            @Override
            public Drawable getDrawable(String source) {
                // TODO Auto-generated method stub


try {
    id = R.drawable.ic_launcher;
    Class clazz = R.drawable.class;
    Field field = clazz.getDeclaredField(source);
    id = field.getInt(clazz);
    Log.d("id", ""+id);
} catch (NoSuchFieldException e) {
// TODO Auto-generated catch block
        e.printStackTrace();
} catch (IllegalArgumentException e) {
// TODO Auto-generated catch block
    e.printStackTrace();
} catch (IllegalAccessException e) {
// TODO Auto-generated catch block
    e.printStackTrace();
}

Drawable drawable = getResources().getDrawable(id);
drawable.setBounds(0, 0, drawable.getIntrinsicWidth(), drawable.getIntrinsicHeight());
return drawable;
}
        };
Spanned spanned = Html.fromHtml(text, getter, null);
textSpanned.setText(spanned);//添加到文本框中
3)加划线:
文本对象.setPaintFlags(Paint.**)//STRIKE_—-
附:getResources().getColor(R.color.) //获得res下设置的color
AutoCompleteTextView
1.功能:动态匹配输入的内容。
2.独特的属性:
android:completionThreshold==”2”
——-设置输入多少字符时自动匹配。
3.activity操作步骤:
—–第一步:初始化控件。
—–第二步:需要一个适配器,
—–第三步:初始化数据源,数据源用了匹配文本框中输入的内容。
—–第四步:将adaptar与当前AutoCompleteTextView控件绑定
范例:
xml:
<AutoCompleteTextView
        android:id="@+id/autoComplete"
        android:layout_width="match_parent"
        android:layout_height="wrap_content"
        android:hint="在这里写:"
        android:completionThreshold="2"/>
activity:
private  AutoCompleteTextView autoText;
//三步:
    private String[] res = {"beijing1","beijing2","beijing3","beijing4","tianjin1"};
    @Override
    protected void onCreate(Bundle savedInstanceState) {
        super.onCreate(savedInstanceState);
        setContentView(R.layout.activity_main);
        Button btn = (Button) findViewById(R.id.button1);
        Button btn_Prodilog = (Button) findViewById(R.id.button_proDialog);
      //第一步
       autoText =(AutoCompleteTextView) findViewById(R.id.autoComplete);
       //第二步,第三步:
      ArrayAdapter<String> adapter = new ArrayAdapter<String>(this, android.R.layout.simple_list_item_1,res);
      //第四步:
      autoText.setAdapter(adapter);
效果演示:
MultiAutoCompleteTextVeiw
1.功能:可支持选择多个值,分别用分隔符隔开。
Button
xml:
一)background=”“//更改背景颜色,或者图片(但图片会出现拉伸)
避免拉伸,出现了 .9 ninePatch图片,它分为上下左右。
上左,代表可拉伸的位置;
下右,设置内容的位置。
打开android中sdk—>tools—->draw9patch,进行更改。注意不要在天文件时写上后缀.9
演示:
范例:
点击更改:
1.button中一定要关联: android:background=”@drawable/selector“
2.在res下建立drawable文件,中建立selector.xml:注意没有限制的必须写在后面。
<?xml version="1.0" encoding="utf-8"?>
<selector xmlns:android="http://schemas.android.com/apk/res/android" >
    <item android:drawable="@drawable/patch9" android:state_pressed="true"/>
    <item android:drawable="@drawable/ppppp"/>

</selector>
演示:
二)点击事件:
1.监听器的方式:
 btn1.setOnClickListener(new View.OnClickListener() {
 @Override
 public void onClick(View v) {
 Intent intent = new Intent();
intent.putExtra("name",editText.getText().toString());
setResult(RESULT_OK, intent);
finish();
          }
});
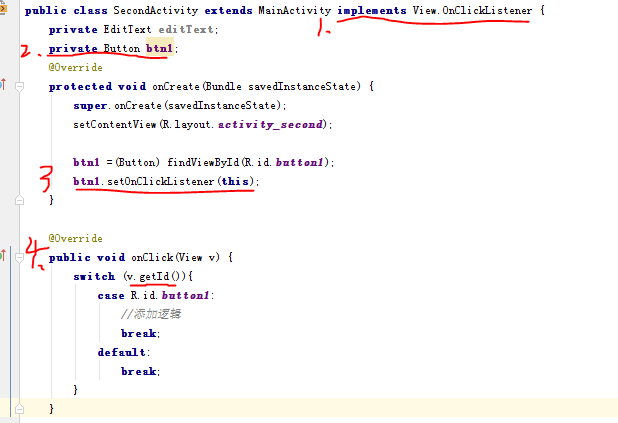
2.实现接口的方式:
适用于多个按钮都要添加点击事件时。
EditText
允许用户在控件中编辑文字,继承了textview,所有textview属性EditText都能用。
xml:
1)android:hint 提示文字 textColorHintr提示文字的颜色
2)android:maxLines=”2” 当文字过多时,maxlines限定了行数最大为两行。
3)password=“true”//密码隐藏
4)inputType=”number”//能输进 -,手机号一般这样输;
可以指定numberPassword,number,data,phone.
5)digits=“1234567890xX”//可以输入的数字和字母,例如输身份证号
6)selectAllOnFocus=”true”获得焦点时自动选中所有文本。
 <EditText
        android:id="@+id/editText_edit"
        android:layout_width="match_parent"
        android:layout_height="wrap_content"
        android:hint="提示文字"
        android:maxLines="2"/>
java代码:
1)更改密码形式:
文本框对象.setTransformationMethod(new PasswordTransformationMethod());//设为不可见
文本框对象.setTransformationMethod(null)//设为可见
ProgressDialog
- 功能:和AlertDialog有些类似,都可以在界面弹出一个对话框,用法也类似。
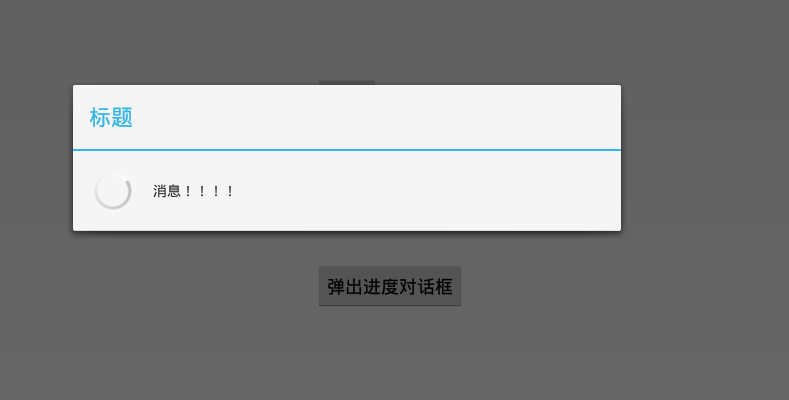
不同的是,1)ProgressDialog会在对话框中显示一个进度条,一般用于表示当前操作比较耗时时,让用户耐心等待。2)对象的建立方式不同3)不用写确定按键或者取消按键的点击事件 - 使用:
public void onClick(View arg0) {
//1.建立对象
    ProgressDialog dialog = new ProgressDialog(MainActivity.this);
    //2.设置属性
    dialog.setTitle("标题");
    dialog.setMessage("消息!!!!");
    dialog.setCancelable(true);
    //3.显示
    dialog.show();

            }
结果演示:
RadioButton
.一般和RadioGroup一起使用。
xml:
RadioGroup特有属性:
—–orientation
—–checkedButton=”@id/”//默认选择
范例:
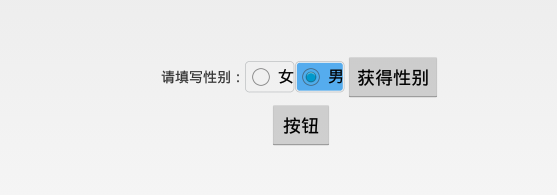
要求:选择按钮选择男女性别:
1.xml:
 <LinearLayout
         android:layout_width="match_parent"
         android:layout_height="wrap_content"
         android:gravity="center"
         android:layout_above="@id/button1">
         <TextView
             android:layout_width="wrap_content"
             android:layout_height="wrap_content"
             android:text="@string/sextext"/>
         <RadioGroup
             android:id="@+id/radiogroup"
             android:layout_width="wrap_content"
             android:layout_height="wrap_content"
             android:orientation="horizontal"
             >
             <RadioButton
                android:id="@+id/button_falmen"
                android:layout_width="wrap_content"
                android:layout_height="wrap_content"
                android:background="@drawable/selector"//背景利用在drawable中建立的selector
                android:text="@string/falmen"/>
             <RadioButton
                android:id="@+id/button_men"
                android:layout_width="wrap_content"
                android:layout_height="wrap_content"
                android:background="@drawable/selector"
                android:text="@string/men"/>
         </RadioGroup>
         <Button
            android:id="@+id/button_getsex"
            android:layout_width="wrap_content"
            android:layout_height="wrap_content"
            android:text="@string/getsex"/>
     </LinearLayout>
2.selector文件:
<?xml version="1.0" encoding="utf-8"?>
<selector xmlns:android="http://schemas.android.com/apk/res/android" >
    <item android:drawable="@drawable/selected" android:state_checked="true"/>
    <item android:drawable="@drawable/normal"/>

</selector>
2.java代码:
 btn_getsex=(Button) findViewById(R.id.button_getsex);
        radiogroup=(RadioGroup) findViewById(R.id.radiogroup);
//  //方法一:对单选group添加选择监听
//  radiogroup.setOnCheckedChangeListener(new RadioGroup.OnCheckedChangeListener() {
//
//  @Override   //复写onCheckedChanged方法中的参数,第二个表示被点击的按钮的id
//  public void onCheckedChanged(RadioGroup arg0, int arg1) {
//  RadioButton rb = (RadioButton) findViewById(arg1);
//  Log.d("sex", "性别为:"+rb.getText());
//
//  }
//  });

//方法二:
btn_getsex.setOnClickListener(new OnClickListener() {

    @Override
public void onClick(View arg0) {
//利用getCheckedRadioButtonId()方法获得被点击的单选按钮id
int checkedId = radiogroup.getCheckedRadioButtonId();
RadioButton rb = (RadioButton) findViewById(checkedId);
Log.d("sex", "您的性别:"+rb.getText());

}
});
结果演示:

注意:在eclipse中设定默认选择的按钮用,checked=”true“的方式;
在androidstudio中,可以在group中用checkedButton=”@id/“的方式。
设置默认选择的按钮方法:
代码中:
mButton.setChecked(true);
mRadioGroup.check(R.id.button);
xml中:
checked=”true“
checkedButton=”@id/“
CheckBox:
附:成员变量命名规则:m开头-控件类型-功能
mCheckBoxShowpassword;
1.xml:
android:button=”@null”;//除去原有的图片
2.activity:
1)按钮对象.isChecked();返回布尔类型,判断是否选中。
2)监听事件:
按钮对象.setOnCheckedChangeListener(),其中复写onCheckedChanged(,)方法中的第一个参数就是本按钮对象,第二个参数是是否选中isChecked的布尔类型。
范例:复选按钮控制密码是否可见:
layout:
<EditText
        android:id="@+id/textView_password"
        android:layout_width="match_parent"
        android:layout_height="wrap_content"
        android:password="true"
        android:hint="@string/password_tishi"/>
    <CheckBox
        android:id="@+id/checkbox_showpw"
        android:layout_width="wrap_content"
        android:layout_height="wrap_content"
        android:text="@string/show_pw"
        android:layout_gravity="right"/>
activity:
 mEditTextpassword=(EditText) findViewById(R.id.textView_password);
        mCheckBoxshowPw=(CheckBox) findViewById(R.id.checkbox_showpw);
        mCheckBoxshowPw.setOnCheckedChangeListener(new OnCheckedChangeListener() {
            @Override
            public void onCheckedChanged(CompoundButton arg0, boolean arg1) {
                if(arg1){
                    mEditTextpassword.setTransformationMethod(null);//若按钮选中,则密码显示可见
                }else{
                    mEditTextpassword.setTransformationMethod(new PasswordTransformationMethod());//若按钮未选中,密码不可见
                }

            }
        });

    }
结果演示:


 6885
6885

 被折叠的 条评论
为什么被折叠?


