事件传递介绍
详细介绍:http://www.cnblogs.com/lwbqqyumidi/p/3500997.html
讲的真的很详细哈^^.
对上面网址中的介绍的重点抓取:
1.
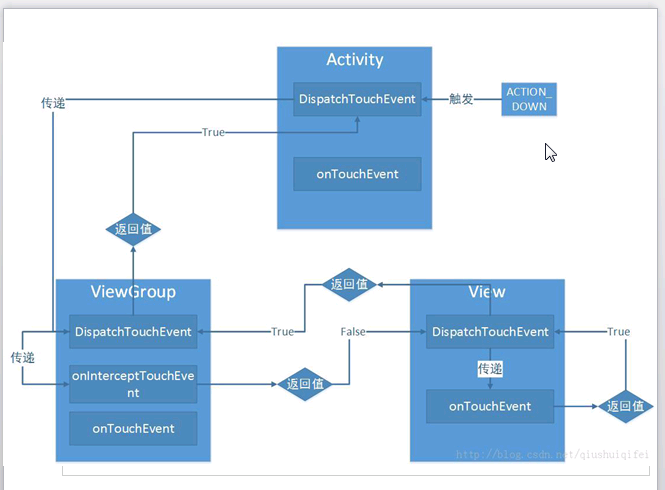
在捕获阶段,事件先由外部的View接收,然后传递给其内层的View,依次传递到更够接收此事件的最小View单元,完成事件捕获过程;在冒泡阶段,事件则从事件源的最小View单元开始,依次向外冒泡,将事件对层传递。
事件的捕获和冒泡是整个事件的传递流程,但是在实际的传递过程中,Android中则表现的相对复杂。
2.
Android中不同的控件所具有的事件分发、拦截和响应稍有不同,主要表现在Activity本身不具有事件拦截,不是ViewGroup的最小view单元不具有事件分发和事件拦截(因为它没有自己的子View)。
3.
事件分发:public boolean dispatchTouchEvent(MotionEvent ev):
如果事件分发返回true,表示改事件在本层不再进行分发且已经在事件分发自身中被消费了。至此,事件已经完结。如果你不想Activity中的任何控件具有任何的事件消费能力,
最简答的方法可以重写此Activity的dispatchTouchEvent方法,直接返回true就ok。
如果事件分发返回 false,表明事件在本层不再继续进行分发,并交由上层控件的onTouchEvent方法进行消费。
当然了,如果本层控件已经是Activity,那么事件将被系统消费或处理。
如果事件分发返回系统默认的 super.dispatchTouchEvent(ev),事件将分发给本层的事件拦截onInterceptTouchEvent 方法进行处理.
(如果本层控件是Activity,由于其没有事件拦截,因此将直接将事件传递到子View,并交给子View的事件分发进行处理)。
4.
事件拦截:public boolean onInterceptTouchEvent(MotionEvent ev):
如果 onInterceptTouchEvent 返回 true,则表示将事件进行拦截,并将拦截到的事件交由本层控件 的 onTouchEvent 进行处理;
如果返回结果是false;则表示不对事件进行拦截,事件得以成功分发到子View。并由子View的dispatchTouchEvent进行处理。
如果返回super.onInterceptTouchEvent(ev),事件默认不会被拦截,交由子View的dispatchTouchEvent进行处理。
5.
事件响应:public boolean onTouchEvent(MotionEvent ev):
如果onTouchEvent返回true,表示onTouchEvent处理完事件后消费了此次事件。此时事件终结,将不会进行后续的冒泡。
如果onTouchEvent返回false,事件在onTouchEvent中处理后继续向上层View冒泡,且有上层View的onTouchEvent进行处理。
如果返回super.onTouchEvent(ev),则默认处理的逻辑和返回false时相同。
单层事件的传递:
下拉刷新:
自定义的下拉刷新:
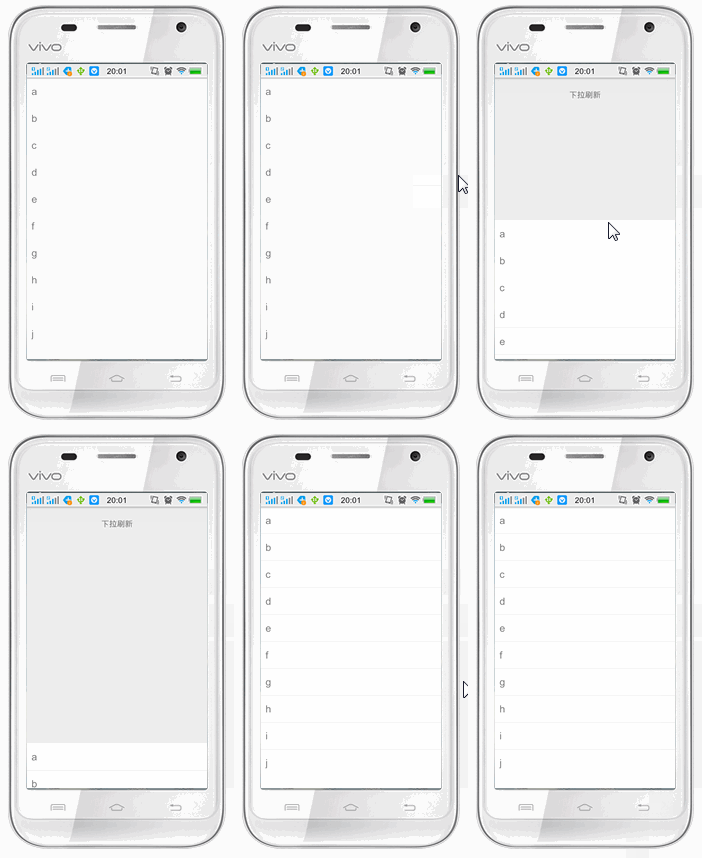
利用事件的传递进行下拉刷新功能的模拟。
思路:
1)自定义两个布局:
一个是放下拉刷新的header,一个是放顶层的列表的Listview。
2)新建一个刷新类,继承FrameLayout,上下叠放上面两个布局。
3)在刷新类中,重写事件方法onInterceptTouchEvent()方法,重写方法,当第一个itemview拉下来时,拦截事件(返回true),来处理自己的onTouch()。在onTouch中处理各种手势事件。
代码:
1.自定义的两个布局:
//底层header:
<?xml version="1.0" encoding="utf-8"?>
<LinearLayout xmlns:android="http://schemas.android.com/apk/res/android"
    android:layout_width="match_parent" android:layout_height="match_parent"
    android:orientation="vertical">
    <TextView
        android:id="@+id/textviewshuxin"
        android:layout_width="match_parent"
        android:layout_height="wrap_content"
        android:gravity="center"
        android:padding="20dp"
        android:text="下拉刷新"/>


</LinearLayout>
//顶层的content布局:
<?xml version="1.0" encoding="utf-8"?>
<com.example.myeventtest.MyListView xmlns:android="http://schemas.android.com/apk/res/android"
    android:id="@+id/listview"
    android:layout_width="match_parent" android:layout_height="match_parent"
    android:background="@color/white">


</com.example.myeventtest.MyListView>
//自定义顶层content的类:里面是空的,继承方法即可
public class MyListView extends ListView{

    public MyListView(Context context) {
        super(context);
    }

    public MyListView(Context context, AttributeSet attrs) {
        super(context, attrs);
    }

    public MyListView(Context context, AttributeSet attrs, int defStyleAttr) {
        super(context, attrs, defStyleAttr);
    }


}
2.新建一个刷新类
public class MyReFreshLayout extends FrameLayout{
    private ListView content;
    public MyReFreshLayout(Context context) {
        super(context);
    }

    public MyReFreshLayout(Context context, AttributeSet attrs) {
        super(context, attrs);
        LayoutInflater inflater = (LayoutInflater) context.getSystemService(context.LAYOUT_INFLATER_SERVICE);
        View diceng = inflater.inflate(R.layout.layout_shuaxin_diceng,null);
        addView(diceng);
       content = (ListView) inflater.inflate(R.layout.layout_content, null);

        ArrayAdapter adapter = new ArrayAdapter<String>(context,android.R.layout.simple_list_item_1,new String[]{"a","b","c","d","e","f","g","h","i","j"});
        content.setAdapter(adapter);
        addView(content);

    }

    public MyReFreshLayout(Context context, AttributeSet attrs, int defStyleAttr) {
        super(context, attrs, defStyleAttr);
    }

    float oldY = 0;
    float y = 0;
    int offset = 0;
    @Override
    public boolean onTouchEvent(MotionEvent event) {
        switch (event.getAction()){
            case MotionEvent.ACTION_DOWN://手按下时,获得y值
                oldY=event.getY();
                return true;
            case MotionEvent.ACTION_MOVE://手滑动
                y=event.getY();//滑到的位置y值
                float distance = y-oldY;//位移
                content.setTranslationY(content.getTranslationY()+distance);
                oldY=y;
                invalidate();
                return true;
            case MotionEvent.ACTION_UP://松手时弹回到顶部
                ObjectAnimator.ofFloat(content,"translationY",content.getTranslationY(),0).setDuration(300).start();
                return true;
        }
        return super.onTouchEvent(event);
    }

    //拦截事件

    @Override
    public boolean onInterceptTouchEvent(MotionEvent ev) {
        if(content.getFirstVisiblePosition()==0){
            View firstView = content.getChildAt(content.getFirstVisiblePosition());
            if (firstView.getY()>=0){
                Log.d("mytouch","拦截到事件");
                return true;
            }
        }
        return super.onInterceptTouchEvent(ev);
    }
}
3.main的布局文件:
<?xml version="1.0" encoding="utf-8"?>
<com.example.myeventtest.MyReFreshLayout xmlns:android="http://schemas.android.com/apk/res/android"
    android:layout_width="match_parent" android:layout_height="match_parent">

</com.example.myeventtest.MyReFreshLayout>
效果:
2.使用提供的support.v4包实现下拉刷新:
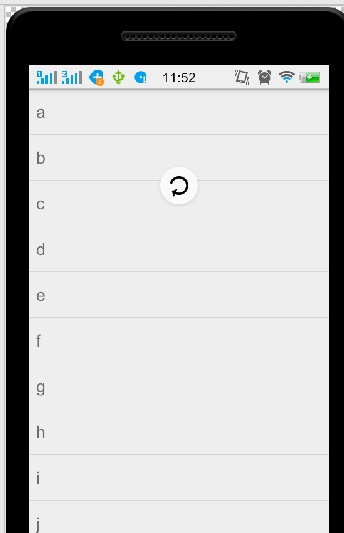
利用包下的wipeRefreshLayout类,组件里面只能放一个view。
只需要在主函数中获得组件,里面的listview添加数据即可。
这里还设置了setOnRefreshListener监听,里面设置了刷新结束就停止刷新。

范例:
public class MainActivity extends Activity {
    private ListView listView;
    private SwipeRefreshLayout swipeRefreshLayout;

    @Override
    protected void onCreate(Bundle savedInstanceState) {
        super.onCreate(savedInstanceState);
        setContentView(R.layout.activity_main);
        swipeRefreshLayout= (SwipeRefreshLayout) findViewById(R.id.swiperefresh);
        listView = (ListView) findViewById(R.id.listview);
        ArrayAdapter arrayAdapter = new ArrayAdapter(this,android.R.layout.simple_list_item_1,new String[]{"a","b","c","d","e","f","g","h","i","j"});
        listView.setAdapter(arrayAdapter);
        swipeRefreshLayout.setOnRefreshListener(new SwipeRefreshLayout.OnRefreshListener() {
            @Override
            public void onRefresh() {
                swipeRefreshLayout.setRefreshing(false);//设置监听,刷新结束后要停止刷新。
            }
        });

    }


}
布局:
<LinearLayout xmlns:android="http://schemas.android.com/apk/res/android"
    xmlns:tools="http://schemas.android.com/tools"
    android:layout_width="match_parent"
    android:layout_height="match_parent"
    tools:context=".MainActivity">

    <android.support.v4.widget.SwipeRefreshLayout
        android:id="@+id/swiperefresh"
        android:layout_width="match_parent"
        android:layout_height="match_parent">
        <ListView
            android:id="@+id/listview"
            android:layout_width="match_parent"
            android:layout_height="match_parent"></ListView>
    </android.support.v4.widget.SwipeRefreshLayout>

</LinearLayout>
效果:
小补充:


 1911
1911


 被折叠的 条评论
为什么被折叠?


