


在写代码的日常中,if...else语句是极为常见的。正因其常见性,很多同学在写代码的时候并不会去思考其在目前代码中的用法是否妥当。而随着项目的日渐发展,糟糕的if...else语句将会充斥在各处,让项目的可维护性急剧下降。故在这篇文章中,笔者想和大家谈谈如何避免写出糟糕if...else语句。
由于脱密等原因,文章中的示例代码将会从一些开源软件摘抄或者经过抽象的生产代码挑选出来作为示范。
| 问题代码
当我们看到一组if...else时,一般是不会有什么阅读负担的。但当我们看到这样的代码时:
private void validate(APICreateSchedulerMessage msg) {
    if (msg.getType().equals("simple")) {
        if (msg.getInterval() == null) {
            if (msg.getRepeatCount() != null) {
                if (msg.getRepeatCount() != 1) {
                    throw new ApiMessageInterceptionException(argerr("interval must be set when use simple scheduler when repeat more than once"));
                }
            } else {
                throw new ApiMessageInterceptionException(argerr("interval must be set when use simple scheduler when repeat forever"));
            }
        } else if (msg.getInterval() != null) {
            if (msg.getRepeatCount() != null) {
                if (msg.getInterval() <= 0) {
                    throw new ApiMessageInterceptionException(argerr("interval must be positive integer"));
                } else if ((long) msg.getInterval() * (long) msg.getRepeatCount() * 1000L + msg.getStartTime() < 0 ) {
                    throw new ApiMessageInterceptionException(argerr("duration time out of range"));
                } else if ((long) msg.getInterval() * (long) msg.getRepeatCount() * 1000L + msg.getStartTime() > 2147454847000L) {
                    throw new ApiMessageInterceptionException(argerr("stopTime out of mysql timestamp range"));
                }
            }
        }

        if (msg.getStartTime() == null) {
            throw new ApiMessageInterceptionException(argerr("startTime must be set when use simple scheduler"));
        } else if (msg.getStartTime() != null && msg.getStartTime() < 0) {
            throw new ApiMessageInterceptionException(argerr("startTime must be positive integer or 0"));
        } else if (msg.getStartTime() != null && msg.getStartTime() > 2147454847 ){
            //  mysql timestamp range is '1970-01-01 00:00:01' UTC to '2038-01-19 03:14:07' UTC.
            //  we accept 0 as startDate means start from current time
            throw new ApiMessageInterceptionException(argerr("startTime out of range"));
        }

        if (msg.getRepeatCount() != null && msg.getRepeatCount() <= 0) {
            throw new ApiMessageInterceptionException(argerr("repeatCount must be positive integer"));
        }
    }

    if (msg.getType().equals("cron")) {
        if (msg.getCron() == null || ( msg.getCron() != null && msg.getCron().isEmpty())) {
            throw new ApiMessageInterceptionException(argerr("cron must be set when use cron scheduler"));
        }
        if ( (! msg.getCron().contains("?")) || msg.getCron().split(" ").length != 6) {
            throw new ApiMessageInterceptionException(argerr("cron task must follow format like this : \"0 0/3 17-23 * * ?\" "));
        }
        if (msg.getInterval() != null || msg.getRepeatCount() != null || msg.getStartTime() != null) {
            throw new ApiMessageInterceptionException(argerr("cron scheduler only need to specify cron task"));
        }
    }
}
亦或是这样的代码:
try {
  for (int j = myConfig.getContentStartNum(); j <= rowNum; j++) {
    row = sheet.getRow(j);
    T obj = target.newInstance();
    for (int i = 0; i < colNum; i++) {

        Field colField = ExcelUtil.getOneByTitle(metaList, titleList[i]);
        colField.setAccessible(true);
        String fieldType = colField.getType().getSimpleName();
        HSSFCell cell = row.getCell(i);
        int cellType = cell.getCellType();
        System.out.println(colField.getName()+"|"+fieldType+" | "+cellType);

        if(HSSFCell.CELL_TYPE_STRING == cellType){
            if("Date".equals(fieldType)){
                colField.set(obj, DateUtil.parse(cell.getStringCellValue()));
            }else {
                colField.set(obj, cell.getStringCellValue());
            }
        }else if(HSSFCell.CELL_TYPE_BLANK == cellType){
            System.out.println("fieldName"+colField.getName());
            if("Boolean".equals(fieldType)){
                colField.set(obj, cell.getBooleanCellValue());
            }else{
                colField.set(obj, "");
            }
        }else if(HSSFCell.CELL_TYPE_NUMERIC == cellType){
            if("Integer".equals(fieldType) || "int".equals(fieldType)){
                colField.set(obj, (int)cell.getNumericCellValue());
            }else {
                colField.set(obj, cell.getNumericCellValue());
            }
        }else if(HSSFCell.CELL_TYPE_BOOLEAN == cellType){
            colField.set(obj, cell.getBooleanCellValue());
        }
    }
    result.add(obj);
}
} catch (InstantiationException | IllegalAccessException | ParseException e) {
e.printStackTrace();
}
看完这两段代码,相信大家和我的心情是一样的:

阅读它们的负担实在是太大了——我们要记住好几个逻辑判断分支,才能知道到底什么情况下才能得到那个结果。更别说维护的成本有多高了,每次维护时都要读一遍,然后再基于此来改。长此以往,我们的代码就变成"箭头式代码"了。
//...............
    //...............
         //...............
             //...............
                 //...............
                 //...............
             //...............
         //...............
   //...............
//...............
| 目标和关键指标
前面说过,我们的目标是减少糟糕的if...else代码。那么什么是糟糕的if...else代码呢?我们可以简单的总结一下:
-
两重以上的嵌套
-
一个逻辑分支的判断条件有多个,如:A && B || C这种。其实这也可以看作变种的嵌套
这样就可以看出来,我们的关键指标就是减少嵌套。
| 常见Tips
1. 三元表达式
三元表达式在代码中也是较为常见的,它可以简化一些if...else,如:
public Object getFromOpaque(String key) {
    return opaque == null ? null : opaque.get(key);
}为什么说是一些呢?因此三元表达式必须要有一个返回值。
这种情况下就没法使用三元表达式
public void putToOpaque(String key, Object value) {
    if (opaque == null) {
        opaque = new LinkedHashMap();
    }
    opaque.put(key, value);
}
2. switch case
在Java中,switch可以关注一个变量( byte short int 或者 char,从Java7开始支持String),然后在每个case中比对是否匹配,是的话则进入这个分支。
在通常情况下,switch case的可读性比起if...else会好一点。因为if中可以放复杂的表达式,而switch则不行。话虽如此,嵌套起来还是会很恶心。
因此,如果仅仅是对 byte,short,int和char以String简单的值判断,可以考虑优先使用switch。
3. 及时回头
/* 查找年龄大于18岁且为男性的学生列表 */
public ArrayList<Student> getStudents(int uid){
    ArrayList<Student> result = new ArrayList<Student>();
    Student stu = getStudentByUid(uid);
    if (stu != null) {
        Teacher teacher = stu.getTeacher();
        if(teacher != null){
            ArrayList<Student> students = teacher.getStudents();
            if(students != null){
                for(Student student : students){
                    if(student.getAge() > = 18 && student.getGender() == MALE){
                        result.add(student);
                    }
                }
            }else {
                throw new MyException("获取学生列表失败");
            }
        }else {
            throw new MyException("获取老师信息失败");
        }
    } else {
        throw new MyException("获取学生信息失败");
    }
    return result;
}
针对这种情况,我们应该及时抛出异常(或者说return),保证正常流程在外层,如:
/* 查找年龄大于18岁且为男性的学生列表 */
public ArrayList<Student> getStudents(int uid){
    ArrayList<Student> result = new ArrayList<Student>();
    Student stu = getStudentByUid(uid);
    if (stu == null) {
         throw new MyException("获取学生信息失败");
    }

    Teacher teacher = stu.getTeacher();
    if(teacher == null){
         throw new MyException("获取老师信息失败");
    }

    ArrayList<Student> students = teacher.getStudents();
    if(students == null){
        throw new MyException("获取学生列表失败");
    }

    for(Student student : students){
        if(student.getAge() > 18 && student.getGender() == MALE){
            result.add(student);
        }
    }
    return result;
}
| 使用设计模式
除了上面的几个tips,我们还可以通过设计模式来避免写出糟糕的if...else语句。在这一节,我们将会提到下面几个设计模式:
-
State模式
-
Mediator模式
-
Observer模式
-
Strategy模式
1. State模式
在代码中,我们经常会判断一些业务对象的状态来决定在当前的调用下它该怎么做。我们举个例子,现在我们有一个银行的接口:
public interface Bank {
/**
 * 银行上锁
 * */
void lock();
/**
 * 银行解锁
 * */
void unlock();
/**
 * 报警
 * */
void doAlarm();
}
让我们来看一下它的实现类
public class BankImpl implements Bank {
@Override
public void lock() {
    //保存这条记录
}

@Override
public void unlock() {
    if ((BankState.Day == getCurrentState())) {
        //白天解锁正常
        //仅仅保存这条记录
    } else if (BankState.Night == getCurrentState()) {
        //晚上解锁,可能有问题
        //保存这条记录,并报警
        doAlarm();
    }
}

@Override
public void doAlarm() {
    if ((BankState.Day == getCurrentState())) {
        //白天报警,联系当地警方,并保留这条记录
    } else if (BankState.Night == getCurrentState()) {
        //晚上报警,可能有事故,不仅联系当地警方,还需要协调附近的安保人员,并保留这条记录
    }
}


private BankState getCurrentState() {
    return BankState.Day;
}
}
显然,我们涉及到了一个状态:
public enum BankState {
Day,
Night
}在不同的状态下,同一件事银行可能会作出不同的反应。这样显然很挫,因为在真实业务场景下,业务的状态可能不仅仅只有两种。每多一种,就要多写一个if...else。所以,如果按照状态模式,可以这样来重构:
public class BankDayImpl implements Bank {
@Override
public void lock() {
    //保存这条记录
}

@Override
public void unlock() {
    //白天解锁正常
    //仅仅保存这条记录

}

@Override
public void doAlarm() {
    //白天报警,联系当地警方,并保留这条记录
}
}
public class BankNightImpl implements Bank {
@Override
public void lock() {
//保存这条记录
}
@Override
public void unlock() {
//晚上解锁,可能有问题
//保存这条记录,并报警
doAlarm();
}
@Override
public void doAlarm() {
//晚上报警,可能有事故,不仅联系当地警方,还需要协调附近的安保人员,并保留这条记录
}
}2. Mediator模式
在本文的第一段的代码中,其实是ZStack 2.0.5版本中某处的代码,它用来防止用户使用Cli时传入不当的参数,导致后面的逻辑运行不正常。为了方便理解,我们可以对其规则做一个简化,并画成图的样子来供大家理解。
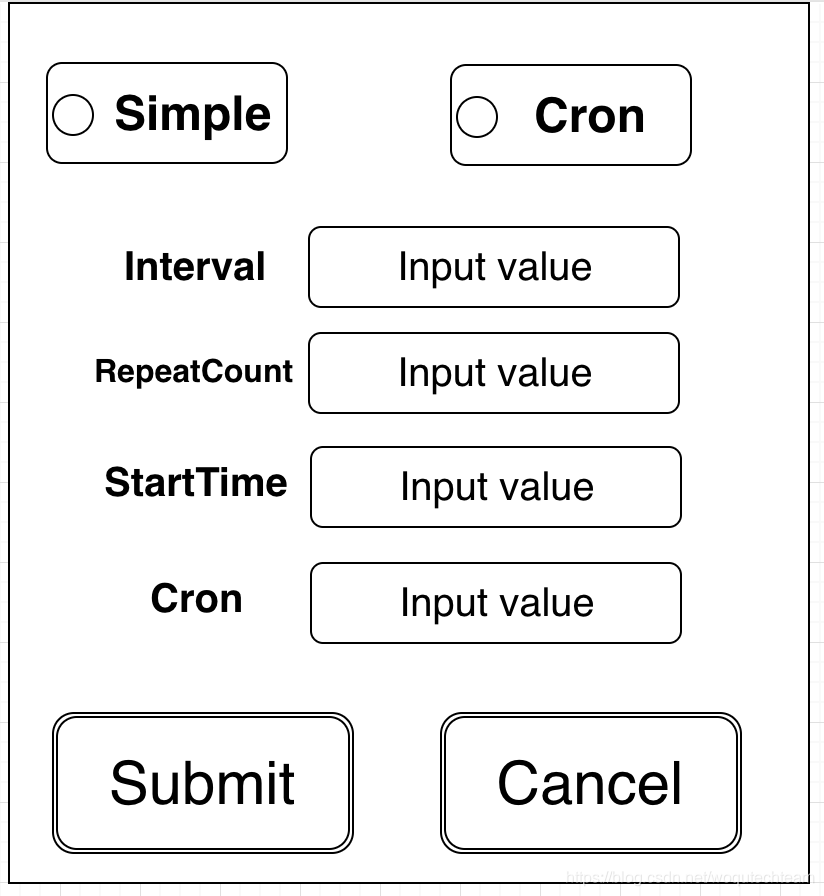
假设这是一个提交定时重启VM计划任务的“上古级”界面(因为好的交互设计师一定不会把界面设计成这样吧...).规则大概如下:
2.1 Simple类型的Scheduler
Simple类型的Scheduler,可以根据Interval,RepeatCount,StartTime来定制一个任务。
2.1.1 当选择Simple类型的任务时,Interval,StartTime这两个参数必填
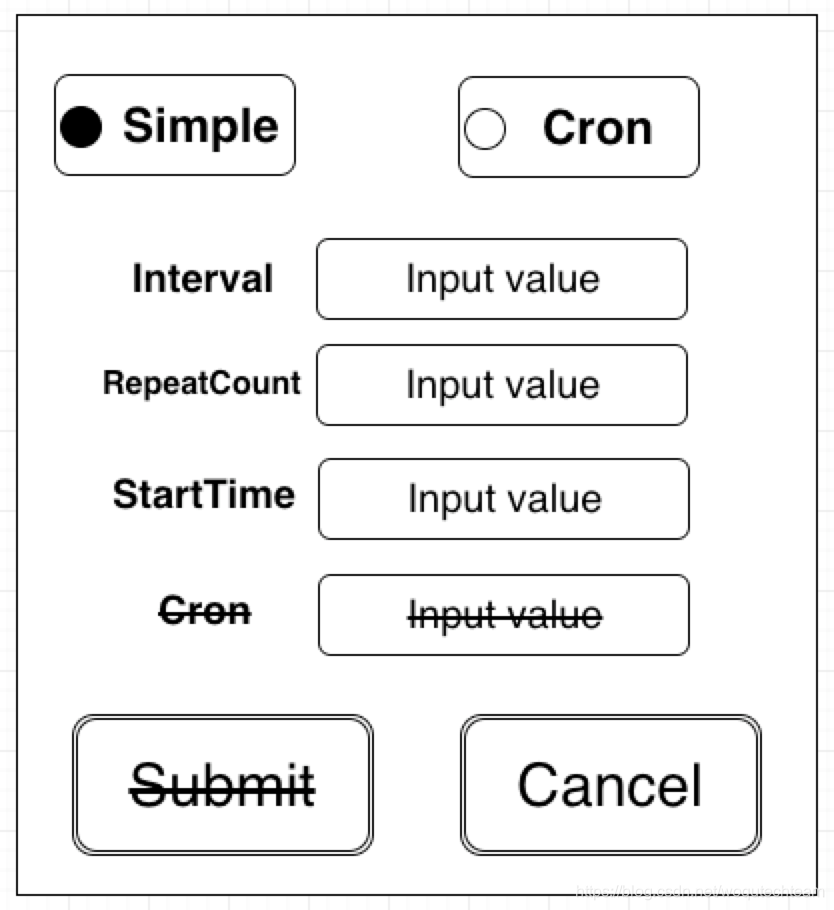
2.1.2 当填好Interval,和StartTime,这个时候已经可以提交定时任务了

2.1.3 RepeatCount是个可选参数
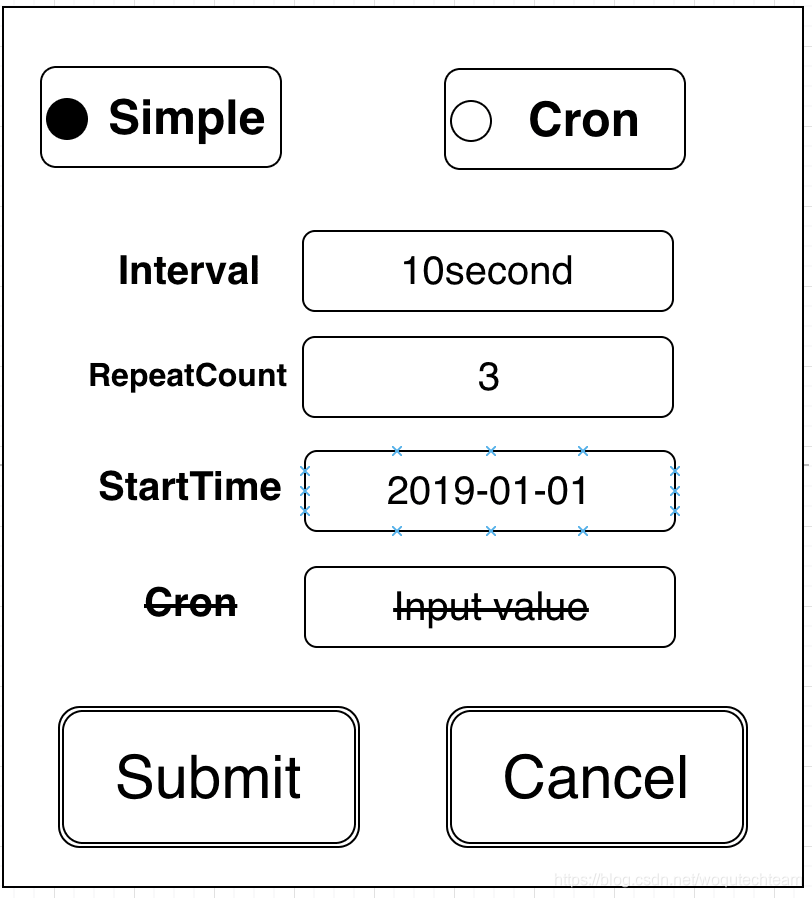
2.2 Cron类型的Scheduler
Cron类型的Scheduler,可以根据cron表达式来提交任务。
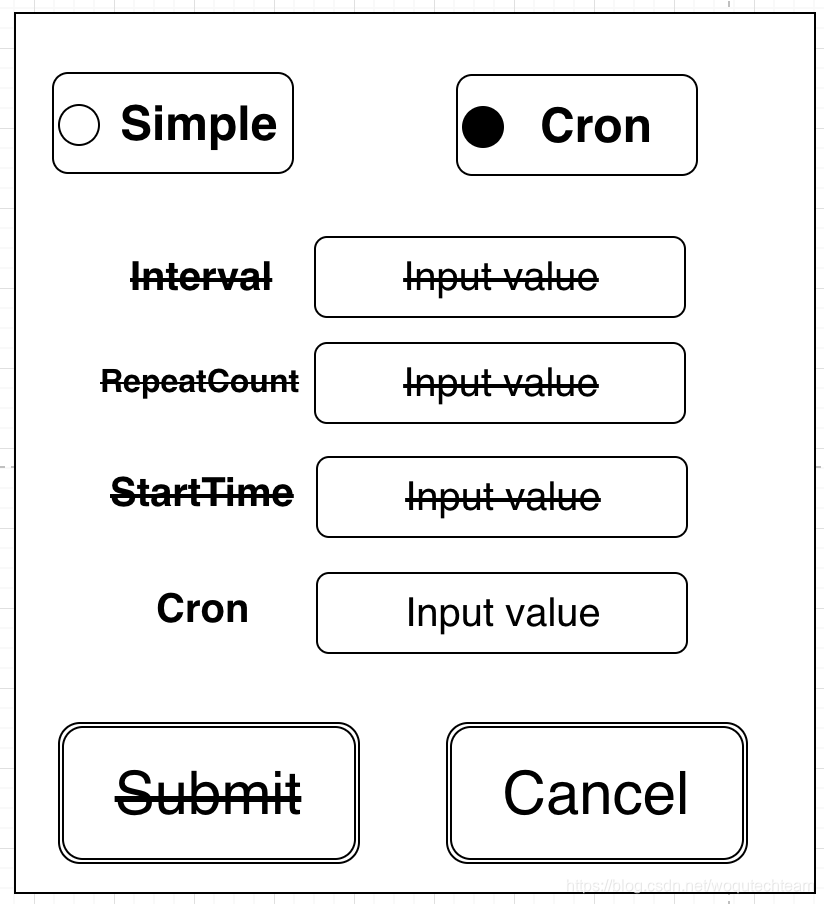
2.2.1 当填入cron表达式后,这个时候已经可以提交定时任务了
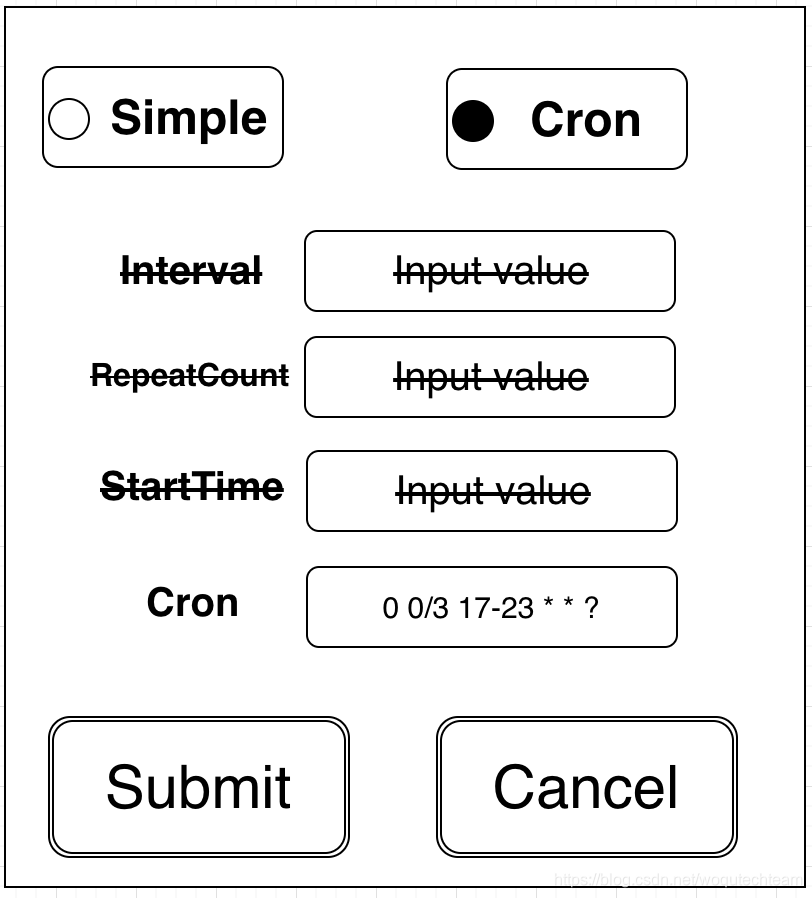
在这里请大家思考一个问题,如果要写这样的一个界面,该怎么写?——在一个windows类里,先判断上面的可选栏是哪种类型,然后根据文本框里的值是否被填好决定提交按钮属否亮起...这算是基本逻辑。上面还没有提到边界值的校验——这些边界值的校验往往会散落在各个组件的实例里,并通过互相通信的方式来判断自己应该做出什么样的变化,相信大家已经意识到了直接无脑堆if...else代码的恐怖之处了吧。
2.3 使用仲裁者改善它
接下来,我们将会贴上来一些伪代码,方便读者更好的理解这个设计模式
/**
* 仲裁者的成员接口
* */
public interface Colleague {
/**
 * 设置成员的仲裁者
 * */
void setMediator(Mediator mediator);

/**
 * 设置成员是否被启用
 * */
void setColleagueEnabled(boolean enabled);
}
/**
* 仲裁者接口
* */
public interface Mediator {
/**
* 当一个组员发生状态变化时,调用此方法
* */
void colllectValueChanged(String value);
}/**
* 含有textField的组件应当实现接口
*/
public interface TextField {
String getText();
}/**
* 当一个组件的值发生变化时,ValueListener会收到相应通知
* */
public interface ValueListener {
/**
* 当组员的值变化时,这个接口会被调用
* */
void valueChanged(String str);
}定义了几个接口之后,我们开始编写具体的类:
用于表示Simple和Cron的checkBox
public class CheckBox {
private boolean state;

public boolean isState() {
    return state;
}

public void setState(boolean state) {
    this.state = state;
}
}
Button
public class ColleagueButtonField implements Colleague, ValueListener {
private Mediator mediator;

@Override
public void setMediator(Mediator mediator) {
    this.mediator = mediator;
}

@Override
public void setColleagueEnabled(boolean enabled) {
    setEnable(enabled);
}

private void setEnable(boolean enable) {
    //当true时去掉下划线,并允许被按下
}

@Override
public void valueChanged(String str) {
    mediator.colllectValueChanged(str);
}
}
以及几个Text
public class ColleagueTextField implements Colleague, ValueListener, TextField {
private Mediator mediator;
private String text;

@Override
public void setMediator(Mediator mediator) {
    this.mediator = mediator;
}

@Override
public void setColleagueEnabled(boolean enabled) {
    setEnable(enabled);
}

private void setEnable(boolean enable) {
    //当true时去掉下划线,并允许值输入
}

@Override
public void valueChanged(String str) {
    mediator.colllectValueChanged(str);
}

@Override
public String getText() {
    return text;
}
}SchedulerValidator的具体实现SchedulerValidatorImpl就不贴上来了,里面仅仅是一些校验逻辑.
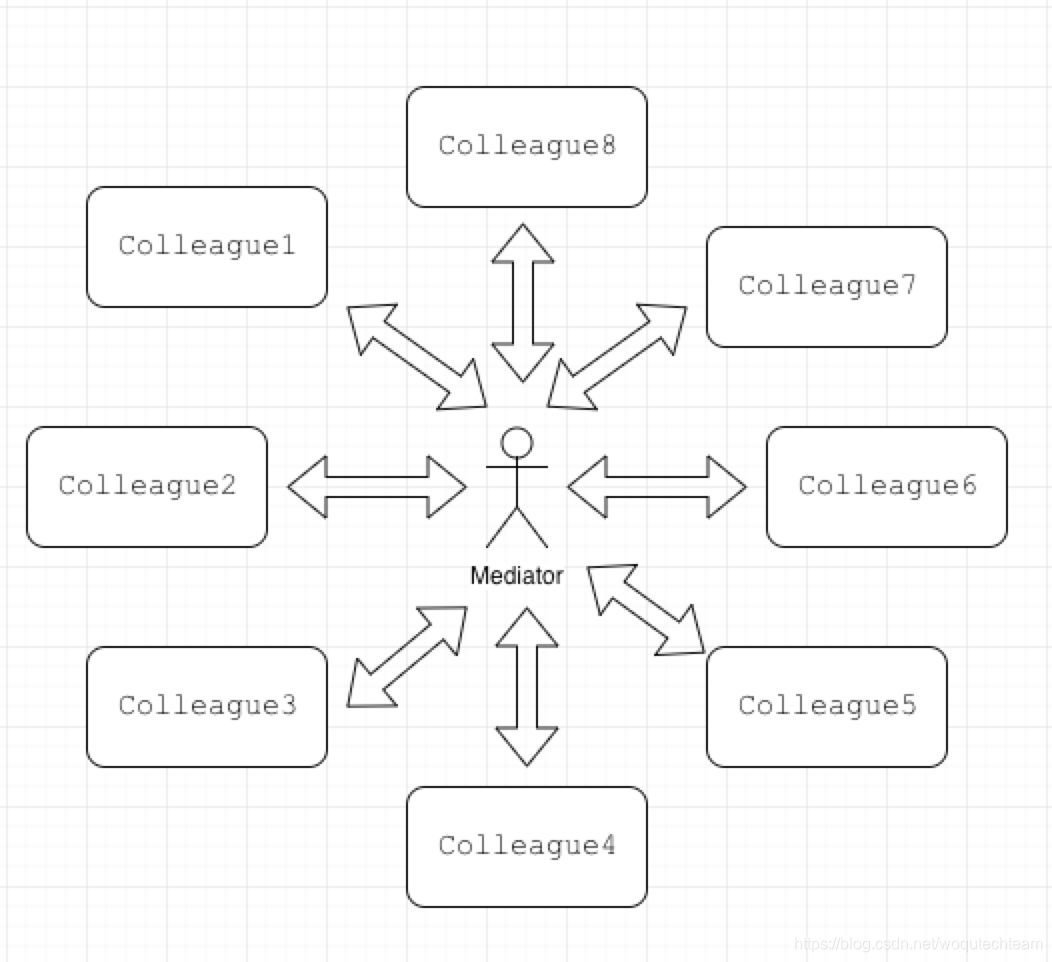
接着是我们的主类,也就是知道全局状态的窗口类
public class MainWindows implements Mediator {
private SchedulerValidator validator = new SchedulerValidatorImpl();
ColleagueButtonField submitButton, cancelButton;
ColleagueTextField intervalText, repeatCountText, startTimeText, cronText;
CheckBox simpleCheckBox, cronCheckBox;


public void main() {
    createColleagues();
}

/**
 * 当一个组员发生状态变化时,调用此方法
 * 组件初始化时都为true
 */
@Override
public void colllectValueChanged(String str) {
    if (simpleCheckBox.isState()) {
        cronText.setColleagueEnabled(false);
        simpleChanged();
    } else if (cronCheckBox.isState()) {
        intervalText.setColleagueEnabled(false);
        repeatCountText.setColleagueEnabled(false);
        startTimeText.setColleagueEnabled(false);
        cronChanged();
    } else {
        submitButton.setColleagueEnabled(false);
        intervalText.setColleagueEnabled(false);
        repeatCountText.setColleagueEnabled(false);
        startTimeText.setColleagueEnabled(false);
        cronText.setColleagueEnabled(false);
    }
}


private void cronChanged() {
    if (!validator.validateCronExpress(cronText.getText())) {
        submitButton.setColleagueEnabled(false);
    }
}

private void simpleChanged() {
    if (!validator.validateIntervalBoundary(intervalText.getText())
            || !validator.validateRepeatCountBoundary(repeatCountText.getText())
            || !validator.validateStartTime(startTimeText.getText())) {
        submitButton.setColleagueEnabled(false);
    }
}

private void createColleagues() {
    submitButton = new ColleagueButtonField();
    submitButton.setMediator(this);
    cancelButton = new ColleagueButtonField();
    cancelButton.setMediator(this);

    intervalText = new ColleagueTextField();
    intervalText.setMediator(this);
    repeatCountText = new ColleagueTextField();
    repeatCountText.setMediator(this);
    startTimeText = new ColleagueTextField();
    startTimeText.setMediator(this);
    cronText = new ColleagueTextField();
    cronText.setMediator(this);

    simpleCheckBox = new CheckBox();
    cronCheckBox = new CheckBox();
}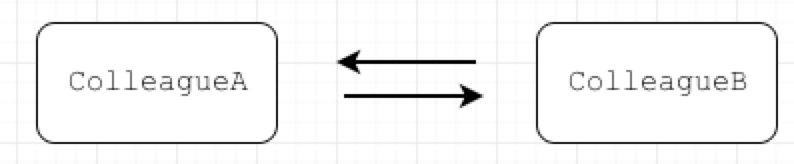
}在这个设计模式中,所有实例状态的判断全部都交给了仲裁者这个实例来判断,而不是互相去通信。在目前的场景来看,其实涉及的实例还不是特别多,但在一个复杂的系统中,涉及的实例将会变得非常多。假设现在有A,B两个实例,那么会有两条通信线路:
而有A,B,C时,则有6条线路
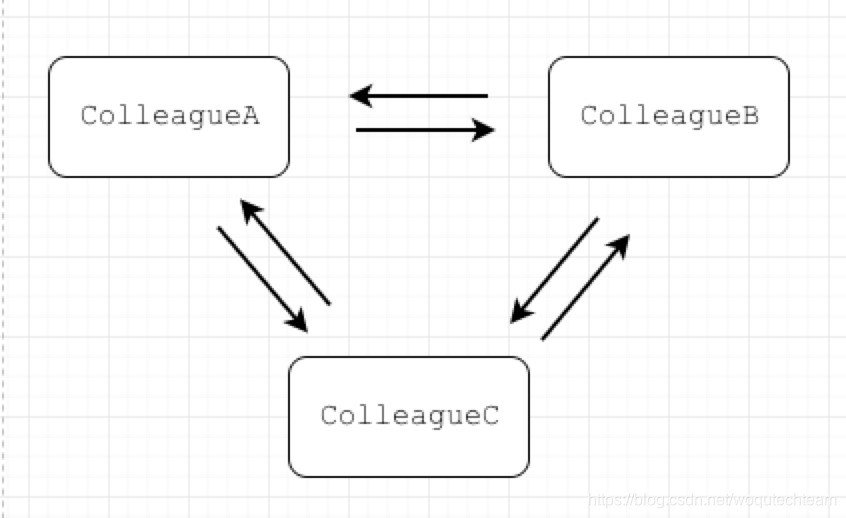
-
当有4个实例时,将会有12个通信线路
-
当有5个实例时,会有20个通信线路
-
以此类推...
这个时候,仲裁者模式的优点就发挥出来了——这些逻辑如果分散在各个角色中,代码将会变得难以维护。
3. Observer模式
结合本文的主题,其实观察者模式做的更多的是将if...else拆分到属于其自己的模块中。以ZStack的为例,当主存储重连时,主存储模块可能要让模块A和模块B去做一些事,如果不使用观察者模式,那么代码就会都耦合在主存储模块下,拆开if...else也就不太可能了。
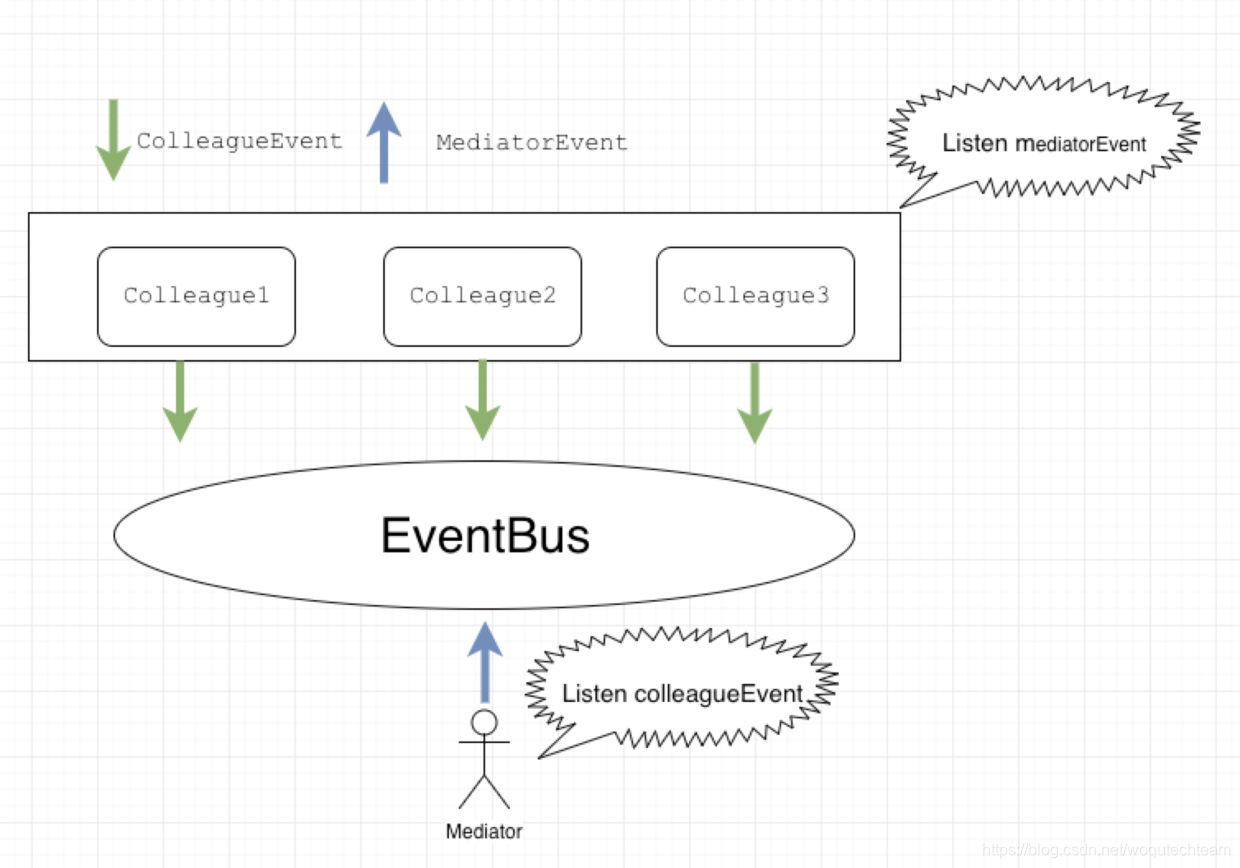
改进之前的仲裁者例子
观察者模式一般是通过事件驱动的方式来通信的,因此Observer和Subject一般都是松耦合的——Subject发出通知时并不会指定消费者。而在之前仲裁者模式的例子中,仲裁者和成员之间紧耦合的(即他们必须互相感知),因此可以考虑通过观察者模式来改进它。
4. Strategy模式
通常在编程时,算法(策略)会被写在具体方法中,这样会导致具体方法中充斥着条件判断语句。但是Strategy却特意将算法与其他部分剥离开来,仅仅定义了接口,然后再以委托的方式来使用算法。然而这种做法正是让程序更加的松耦合(因为使用委托可以方便的整体替换算法),使得整个项目更加茁壮。
| 小结
在这篇文章中,笔者和大家分享几个减少if...else的小tips,由于这些tips都会有一定的限制,因此还向大家介绍了几个能够避免写出糟糕的if...else的设计模式,并使用观察者模式简单的改进了仲裁者模式的例子。
| 作者简介
泊浮目·沃趣科技研发工程师
ZStack爱好者,曾就职于ZStack.目前主要负责公司的Iaas平台开发,对于代码整洁之道和自动化测试有着孜孜不倦的追求。


 693
693


 被折叠的 条评论
为什么被折叠?
被折叠的 条评论
为什么被折叠?
 到【灌水乐园】发言


