


做人要大度,海纳百川,做事要圆滑,左右逢源,这让我想到了编程也是如此,代码要扩展,界面也要考虑自适应。
这篇文章是android开发人员的必备知识,是我特别为大家整理和总结的,不求完美,但是有用。
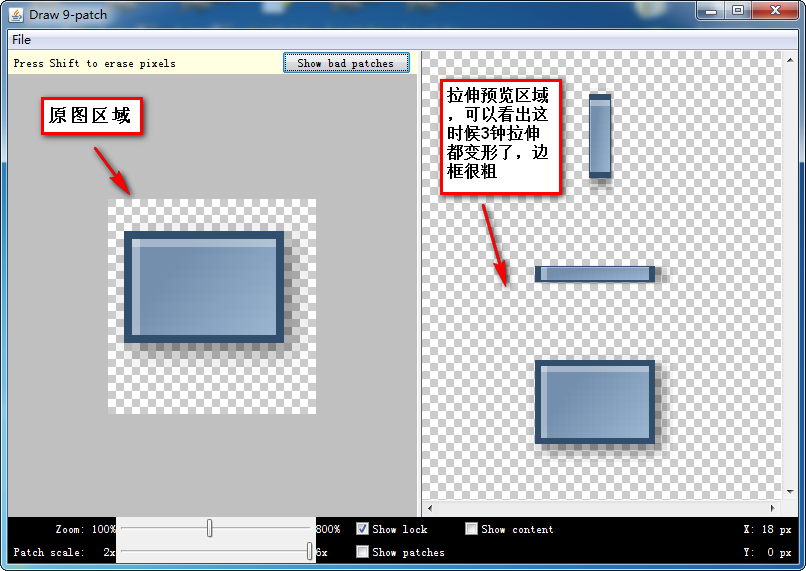
1.背景自适应且不失真问题的存在
制作自适应背景图片是UI开发的一个广泛问题,也是界面设计师渴望解决的问题,我相信我们彼此都深有体会。
比如,列表的背景图一定,但是列表的高度随着列表数据项会发生变化;标题栏的背景,无论横屏还是竖屏,高分辨率还是低分辨率,都能自动填充满,而且不失真等等背景问题。
根据以往的经验,我们一般采用先切图后拼凑的做法,这种做法本来我想在这里和大家介绍一下,其实有的时候还是很有用的,但是说起来会比较麻烦,就不说这个非重点了,略去,如果大家真的要介绍,在回复中说明,我再考虑一下。
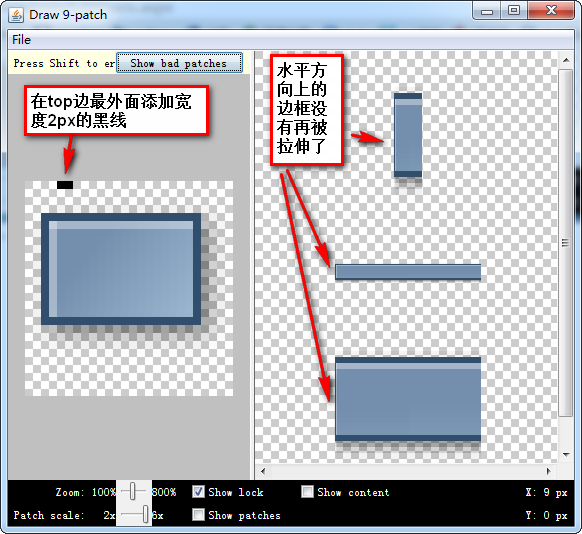
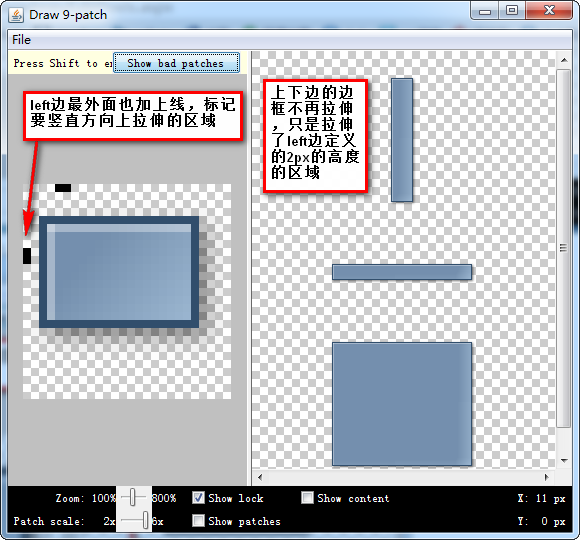
Android针对这种情况,专门制作了一种.9.PNG格式来解决这个问题。
2.9.PNG格式。


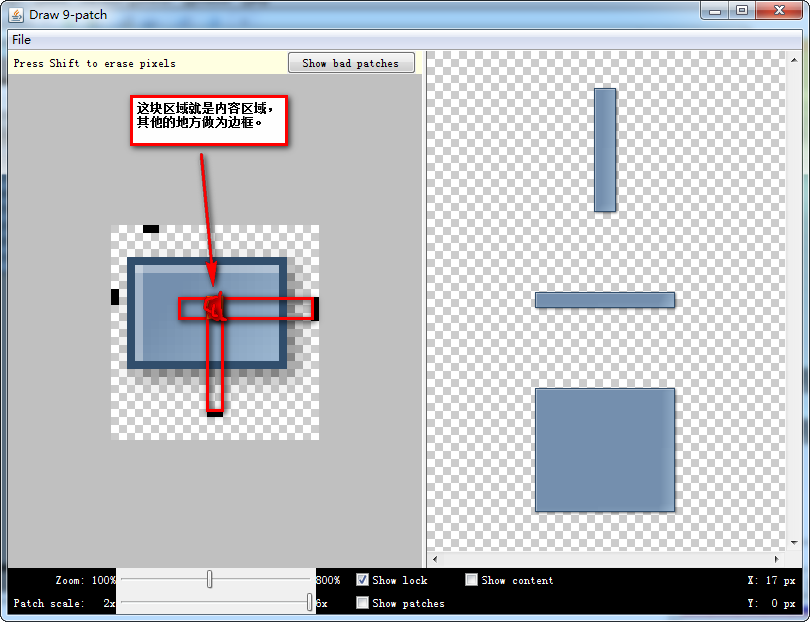
第二步:制作.9.PNG图片 。
打开Draw9Patch,把图片拖进去,如下:
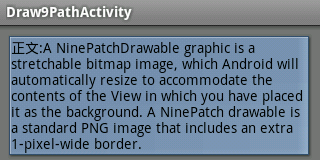
第三步:在layout文件中使用制作的 .9.PNG图片.
新建工程Draw9Patch,默认主Activity为Draw9PatchActivity.java:
@Override
    public void onCreate(Bundle savedInstanceState)
    {
        super.onCreate(savedInstanceState);
        setContentView(R.layout.main);
    }
我们把content.9.png文件拷贝到/res/drawable文件夹下,打开/res/layout目录下的main.xml,申明如下:
<?xml version="1.0" encoding="utf-8"?>
<LinearLayout xmlns:android="http://schemas.android.com/apk/res/android"
    android:orientation="vertical"
    android:layout_width="fill_parent"
    android:layout_height="fill_parent"
    android:background="#777"
    android:padding="8dip"
    >
    <TextView
    android:layout_width="fill_parent"
    android:layout_height="wrap_content"
    android:text="正文:A NinePatchDrawable graphic is a stretchable bitmap image."
    android:background="@drawable/content"
    android:textColor="#000"
    />
</LinearLayout>
如图,

<?xml version="1.0" encoding="utf-8"?>
<LinearLayout xmlns:android="http://schemas.android.com/apk/res/android"
android:orientation="vertical"
android:layout_width="fill_parent"
android:layout_height="fill_parent"
android:background="#777"
android:padding="8dip"
>
<TextView
android:layout_width="fill_parent"
android:layout_height="wrap_content"
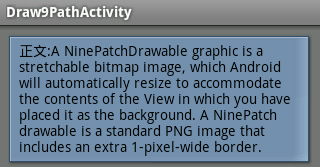
android:text="正文:A NinePatchDrawable graphic is a stretchable bitmap image, which Android will automatically resize to accommodate the contents of the View in which you have placed it as the background. A NinePatch drawable is a standard PNG image that includes an extra 1-pixel-wide border."
android:background="@drawable/content"
android:textColor="#000"
/>
</LinearLayout>如图,

到这里为止,我们已经基本会制作.9.PNG图片了。为了知识体系的全面性和深入性,我们继续。
4.使用Draw9Patch.jar制作9.PNG图片之定义内容区域。
是不是觉得文字和边距挨的太近,好,我们使用right和bottom边的线来定义内容区域,来达到增大内边距的目的。
在这里,我要特别说明,一开始为了增大内边距,很容易惯性思维,在<TextView>中申明android:padding="10dip" 之类的,我在这里劝告朋友们不要这么做,一是你将无法预知你的显示,二是这比较混淆,因为设置内容区域就是确定padding,所以我在前面部分说他们是神似。我个人认为通过内容区域设定padding比在布局xml中定义padding更优雅,更简洁!
关于Draw9Patch工具的其他使用说明,我在次不再累述,因为要说的话太多,为了节省篇幅,请参考官方文档。
5.制作.9.PNG的高级技巧。
对于初学Draw9Patch的人来说,这可以算是高级技巧,那就是:拉伸区域,可以不是连续的,可以不止一块,而且是和自定义的边框线的长度成正比。
直接上图说明:

6.SDK中如何处理9.PNG图片。
SDK专门针对9.PNG做了定义和处理,这里我们只是做个简单的流程分析,Bitmap在读取图像流数据的时候,会把判断图片的NinePatchChunk(9Patch数据块),如果NinePatchChunk不为空,则是NinePatchDrawable,NinePatchDrawable则又会交给NinePatch处理:
 setNinePatchState(new NinePatchState(
                new NinePatch(bitmap, bitmap.getNinePatchChunk(), "XML 9-patch"),
                padding, dither), r);
NinePatch检验成功则调用本地方法,绘制出最终的图片:
nativeDraw(canvas.mNativeCanvas, location,
                mBitmap.ni(), mChunk, paint != null ? paint.mNativePaint : 0,
                canvas.mDensity, mBitmap.mDensity);
7.android系统中大量应用了9.PNG图片。
通过解压随便一个rom,找到里面的framework_res.apk,里面有大量的9.PNG格式文件,被广泛的应用起来,比如常见的有:


 1326
1326

 被折叠的 条评论
为什么被折叠?
被折叠的 条评论
为什么被折叠?
 到【灌水乐园】发言


