


一、位置服务
requestPermissions(): void {
    let atManager = abilityAccessCtrl.createAtManager();
    try {
      atManager.requestPermissionsFromUser(this.context, CommonConstants.REQUEST_PERMISSIONS).then((data) => {
        if (data.authResults[0] !== 0 || data.authResults[1] !== 0) {
          return;
        }
        //实例化Callback对象,用于向系统提供位置上报的途径。 应用需要自行实现系统定义好的回调接口,
        // 并将其实例化。系统在定位成功确定设备的实时位置结果时,会通过该接口上报给应用。应用程序可以在接口的实现中完成自己的业务逻辑。
        LocationUtil.geolocationOn((location: geoLocationManager.Location) => {
          if (this.latitude === location.latitude && this.longitude === location.longitude) {
            return;
          }
          this.latitude = location.latitude;
          this.longitude = location.longitude;
          let reverseGeocodeRequest: geoLocationManager.ReverseGeoCodeRequest = {
            'locale': this.locale.toString().includes('zh') ? 'zh' : 'en',
            'latitude': this.latitude,
            'longitude': this.longitude
          };
          geoLocationManager.getAddressesFromLocation(reverseGeocodeRequest).then(data => {
            if (data[0].placeName) {
              this.currentLocation = data[0].placeName;
              this.GeoAddress = data[0]
            }
          }).catch((err: Error) => {
            Logger.error(TAG, 'GetAddressesFromLocation err ' + JSON.stringify(err));
          });
        });
      }).catch((err: Error) => {
        Logger.error(TAG, 'requestPermissionsFromUser err' + JSON.stringify(err));
      })
    } catch (err) {
      Logger.error(TAG, 'requestPermissionsFromUser err' + JSON.stringify(err));
    }
  }
二、扫码服务
当应用需要使用Account Kit(华为账号服务)、Call Kit(通话服务)、Game Service Kit(游戏服务)、Health Service Kit(运动健康服务)、IAP Kit(应用内支付服务)、Live View Kit(实况窗服务,当需要使用Push Kit时必须执行此步骤)、Map Kit(地图服务)、Payment Kit(华为支付服务)、Push Kit(推送服务)等开放能力的一种或多种时,为正常调试运行应用,需要预先添加公钥指纹。
步骤一 :申请应用证书(.cer)、Profile(.p7b)文件,具体操作参见调试HarmonyOS应用/元服务。
步骤二 :添加公钥指纹,具体操作参见配置应用签名证书指纹。
步骤三 :真机或模拟器需要在桌面设置应用程序中登录华为实名认证账号。
代码结构解读
├──entry/src/main/ets    // 代码区
│    ├──entryability
│    │    └──EntryAbility.ets    // 程序入口类
│    ├──pages
│    │    ├──Index.ets    // 应用首页
│    │    ├──CustomPage.ets    // 自定义扫码界面
│    ├──common
│    │    └──GlobalConstants.ets    // 常量类
└──entry/src/main/resources    // 资源文件目录
开发步骤
步骤一:导入Scan Kit模块及相关公共模块
// Index.ets
/**
 * @description
 * @author 白晓明
 * @organization 坚果派
 * @website: nutpi.com.cn
 * @date 2024/6/14
 */
import { scanCore, scanBarcode } from '@kit.ScanKit';
import { BusinessError } from '@kit.BasicServicesKit';
import { JSON } from '@kit.ArkTS';
import { promptAction, router } from '@kit.ArkUI';
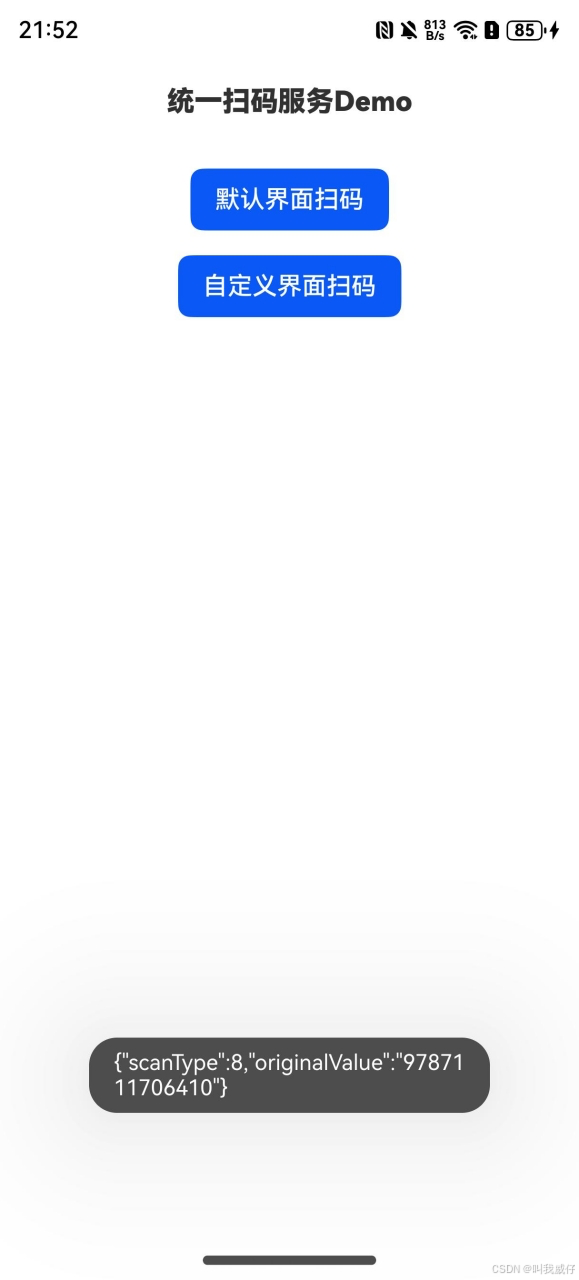
步骤二:调用startScanForResult方法拉起默认扫码界面
// Index.ets
Button('默认界面扫码')
  .type(ButtonType.Normal)
  .borderRadius(8)
  .onClick(async () => {
    console.info("[ScanKitDemo] 默认界面扫码开始。");
    // 定义扫码参数options
    const options: scanBarcode.ScanOptions = {
      scanTypes: [scanCore.ScanType.ALL],
      enableMultiMode: true,
      enableAlbum: true
    };
    try {
      const result: scanBarcode.ScanResult = await scanBarcode.startScanForResult(getContext(this), options);
      console.info("[ScanKitDemo] Succeed. Data: " + JSON.stringify(result));
      promptAction.showToast({
        message: JSON.stringify(result),
        duration: 5000
      })
    } catch (error) {
      const e: BusinessError = error as BusinessError;
      console.error("[ScanKitDemo] Failed. Cause: " + JSON.stringify(e));
    }
  })
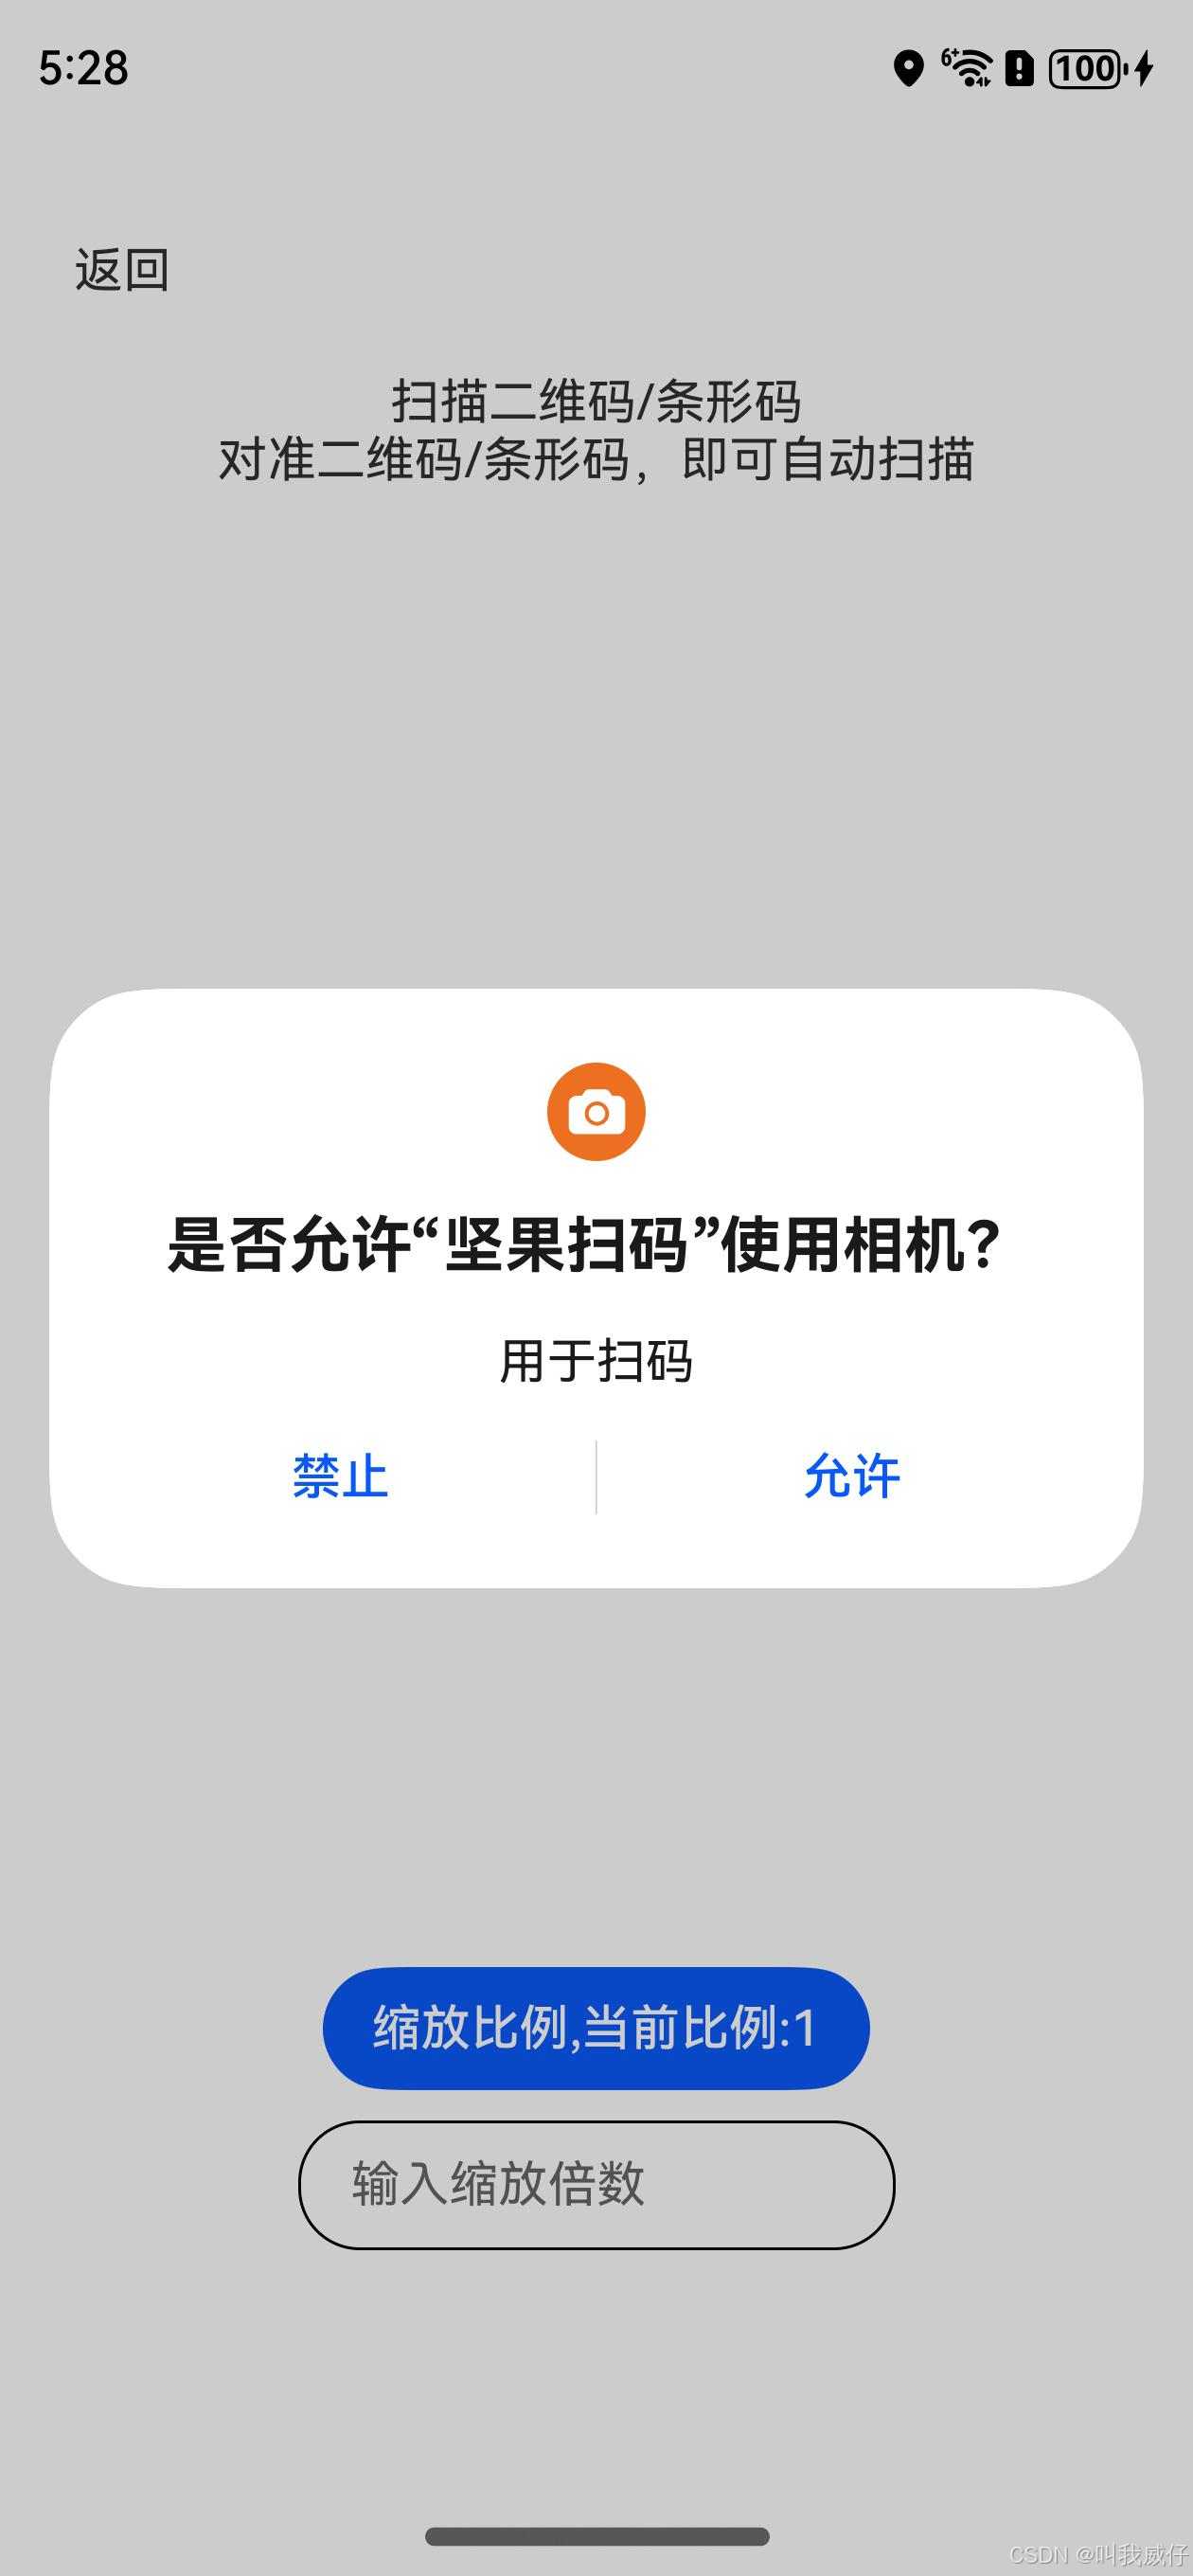
自定义界面扫码开发指南
步骤一:申请相机权限
自定义界面扫码需要申请相机权限,确保应用拥有访问相机的权限。在“module.json5”文件中配置允许使用相机扫码的权限“ohos.permission.CAMERA”,该权限授权方式为“user_grant”,在配置权限时需要描述申请权限原因reason和调用时机usedScene。
// module.json5
{
  "module": {
    "name": "entry",
    "type": "entry",
    ...
    "requestPermissions": [
      {
        "name": "ohos.permission.CAMERA",
        "reason": "$string:camera_desc",
        "usedScene": {
          "when": "inuse"
        }
      }
    ]
  }
}
步骤二:动态向用户申请授权
使用接口requestPermissionsFromUser去校验当前用户是否已授权,以及动态向用户申请授权
// CustomPage.ets
// 校验当前是否已经授权
async checkPermissions(): Promise<void> {
  const atManager: abilityAccessCtrl.AtManager = abilityAccessCtrl.createAtManager();
  let grantStatus: abilityAccessCtrl.GrantStatus = abilityAccessCtrl.GrantStatus.PERMISSION_DENIED;
  // 获取应用程序的accessTokenID
  let tokenId: number = 0;
  try {
    const bundleInfo: bundleManager.BundleInfo = bundleManager.getBundleInfoForSelfSync(bundleManager.BundleFlag.GET_BUNDLE_INFO_WITH_APPLICATION);
    const appInfo: bundleManager.ApplicationInfo = bundleInfo.appInfo;
    tokenId = appInfo.accessTokenId;
    grantStatus = atManager.checkAccessTokenSync(tokenId, GlobalConstants.PERMISSIONS[0]);
    if (grantStatus === abilityAccessCtrl.GrantStatus.PERMISSION_GRANTED) {
      // 已经授权,可以继续访问目标操作
      this.userGrant = true;
    } else {
      // 相机权限判断
      console.log("[ScanKitDemo] reqPermissionsFromUser start.");
      const permissionRequestResult: PermissionRequestResult = await atManager
        .requestPermissionsFromUser(getContext(this), GlobalConstants.PERMISSIONS);
      const authResults: number[] = permissionRequestResult.authResults;
      for (let i = 0; i < authResults.length; i++) {
        if (authResults[i] === 0) {
          // 用户授权,可继续访问目标操作
          this.userGrant = true;
        } else {
          // 用户拒绝授权,提示用户必须授权才能访问当前页面的功能,并引导用户到系统设置中打开相应的权限
          this.userGrant = false;
        }
      }
    }
  } catch (error) {
    const err: BusinessError = error as BusinessError;
    console.error('[ScanKitDemo] checkPermissions failed. Cause: ' + JSON.stringify(err));
  }
}
步骤三:定义相机控制参数,并调用初始化接口init。
// CustomPage.ets 其他方法参见源代码
// 自定义界面扫码参数
options: scanBarcode.ScanOptions = {
  scanTypes: [scanCore.ScanType.ALL], // 扫码类型,可选参数
  enableMultiMode: true, // 是否开启多码识别,可选参数
  enableAlbum: true // 是否开启相册扫码,可选参数
};

async onPageShow(): Promise<void> {
  // 校验相机授权
  await this.checkPermissions();
  // 计算预览流宽高
  this.setDisplay();
  // 初始化接口
  customScan.init(this.options);
}
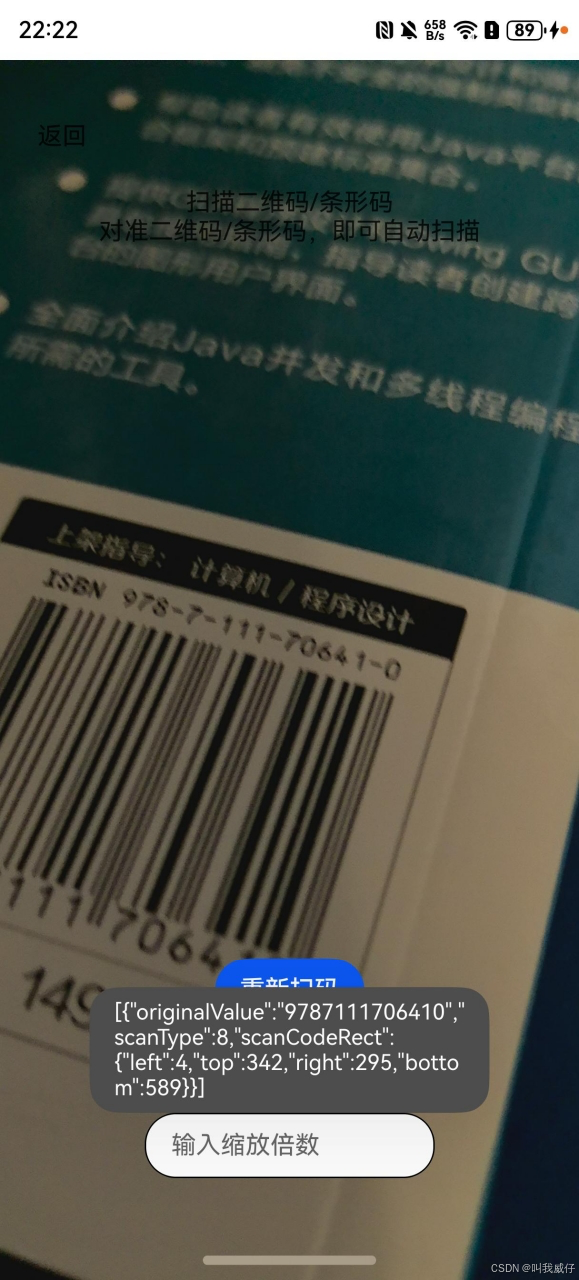
步骤四:调用扫码接口start
获取XComponent组件的surfaceId,调用扫码接口start,并处理扫码结果,使用on监听事件监听闪光灯。
// CustomPage.ets
XComponent({
  id: 'componentId',
  type: 'surface',
  controller: this.mXComponentControl
}).onLoad(async () => {
  console.info('[ScanKitDemo] Succeeded in loading, onLoad is called.');
  // 获取XComponent组件的surfaceId
  this.surfaceId = this.mXComponentControl.getXComponentSurfaceId();
  try {
    // 相机控制参数
    const viewControl: customScan.ViewControl = {
      width: this.cameraWidth,
      height: this.cameraHeight,
      surfaceId: this.surfaceId
    };
    // 请求扫码接口
    customScan.start(viewControl).then(async (result: Array<scanBarcode.ScanResult>) => {
      // 处理扫码结果
      await this.showScanResult(result);
    })
    // 闪光灯监听接口
    customScan.on('lightingFlash', (error, isLightingFlash) => {
      if (error) {
        console.error('[ScanKitDemo] Filed to on lightingFlash. Cause: ' + JSON.stringify(error));
        return;
      }
      if (isLightingFlash) {
        this.isFlashLightEnable = true;
      } else {
        if (!customScan.getFlashLightStatus()) {
          this.isFlashLightEnable = false;
        }
      }
      this.isSensorLight = isLightingFlash;
    })
  } catch (error) {
    const err: BusinessError = error as BusinessError;
    console.error('[ScanKitDemo] onload failed. Cause: ' + JSON.stringify(err));
  }
})
  .width(this.cameraWidth)
  .height(this.cameraHeight)
  .position({ x: this.cameraOffsetX, y: this.cameraOffsetY })
游戏登录
准备工作
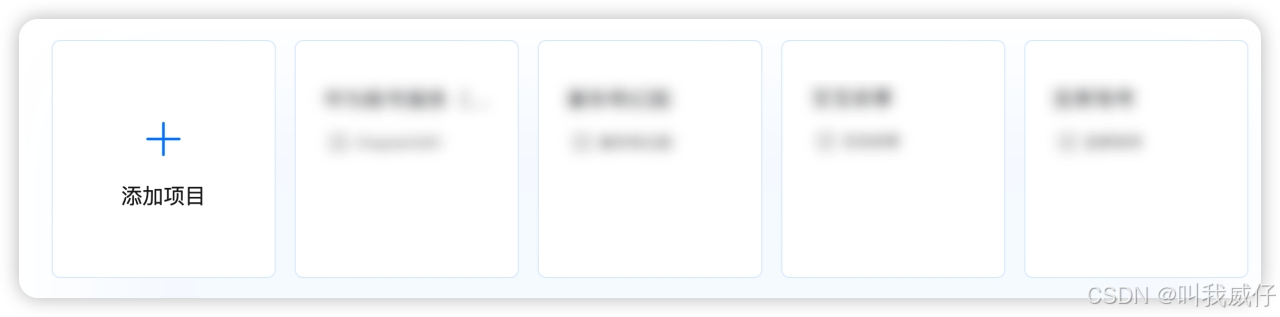
1 AppGallery Connect配置
步骤一:登录AppGallery Connect,点击“我的项目”,在项目中点击“添加项目”,输入项目名称后,点击“创建并继续”。
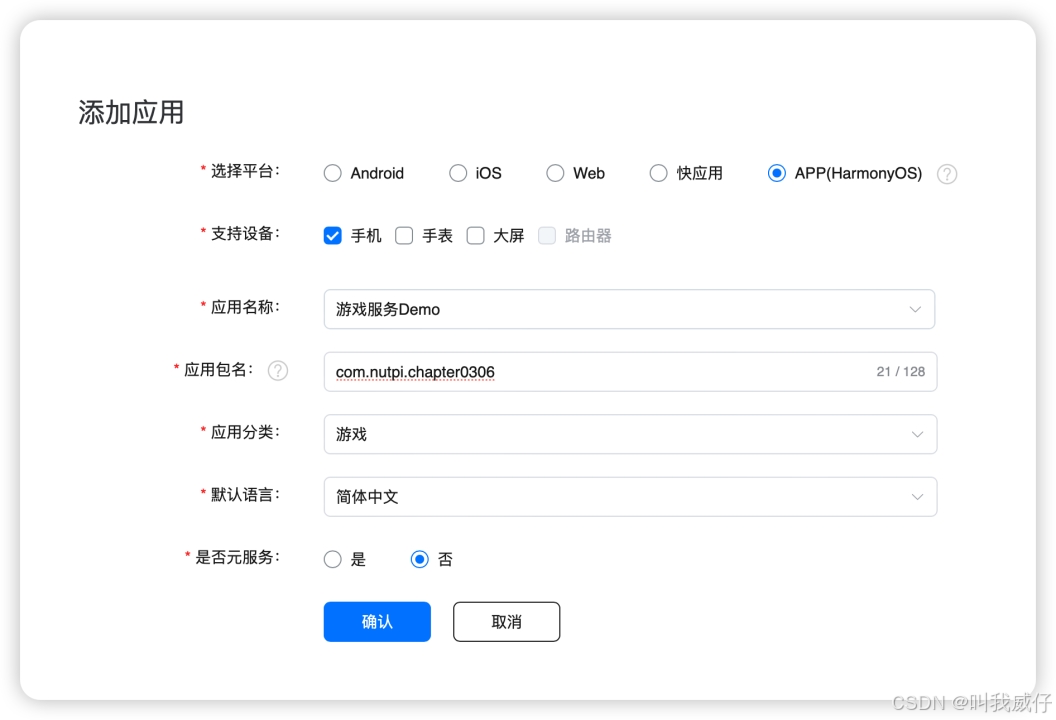
步骤二:项目创建完成后,点击项目设置页面“添加应用”按钮,在“添加应用”页面中设置参数后,点击“确认”。
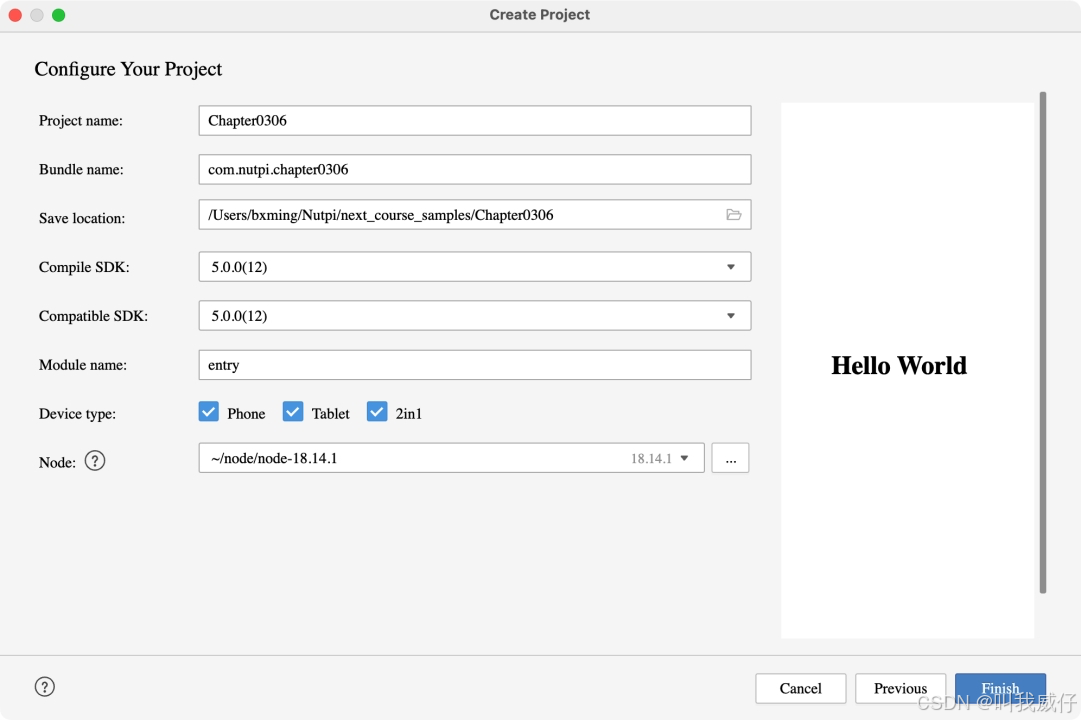
2 创建HarmonyOS工程
-
方式一:当前未打开任何工程,可以在DevEco Studio的欢迎页,选择Create Project打开新工程创建向导。
-
方式二:已打开新工程,可以在菜单栏选择File > New > Create Project打开新工程创建向导。
注: 在工程配置页面配置工程信息时,其中Bundle name(包名)需与AppGallery Connect控制台创建应用时的应用包名一致。
3 添加公钥指纹
当应用需要使用Account Kit(华为账号服务)、Call Kit(通话服务)、Game Service Kit(游戏服务)、Health Service Kit(运动健康服务)、IAP Kit(应用内支付服务)、Live View Kit(实况窗服务,当需要使用Push Kit时必须执行此步骤)、Map Kit(地图服务)、Payment Kit(华为支付服务)、Push Kit(推送服务)等开放能力的一种或多种时,为正常调试运行应用,需要预先添加公钥指纹。
步骤一 :申请应用证书(.cer)、Profile(.p7b)文件,具体操作参见调试HarmonyOS应用/元服务。
步骤二 :添加公钥指纹,具体操作参见配置应用签名证书指纹。
步骤三 :真机或模拟器需要在桌面设置应用程序中登录华为实名认证账号。
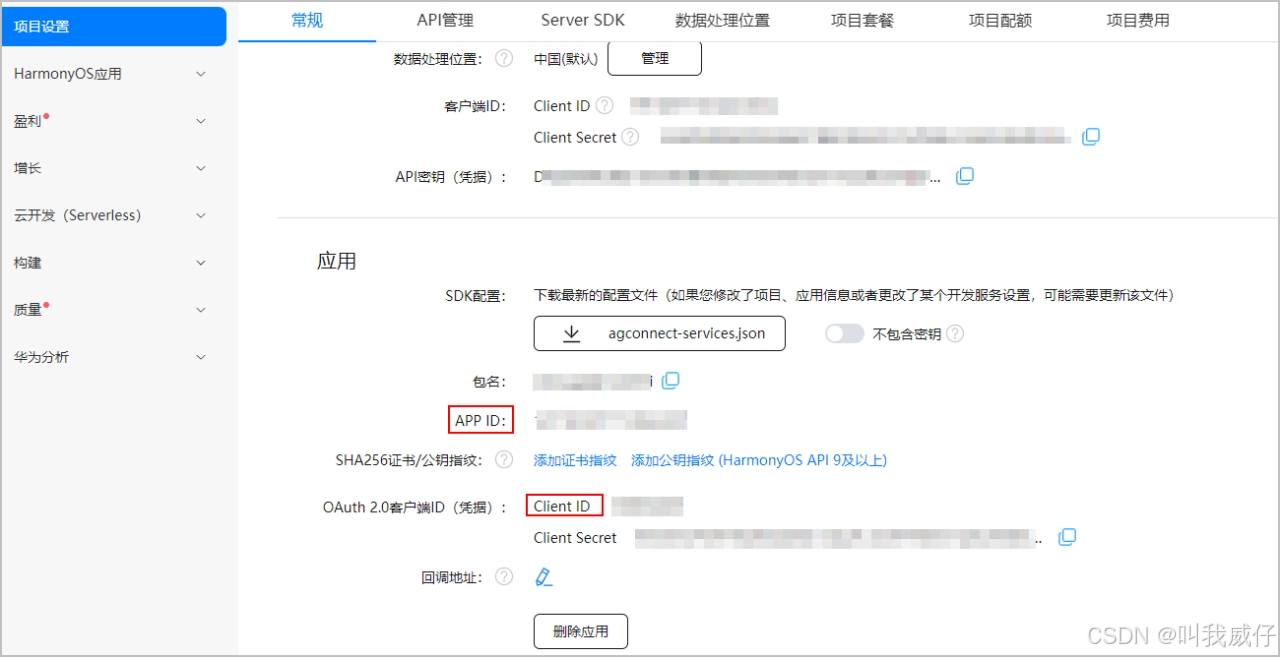
4 配置APP ID和Client ID
步骤一 :登录AppGallery Connect,在“我的项目”中选择目标应用,获取“项目设置 > 常规 > 应用”的APP ID和Client ID。
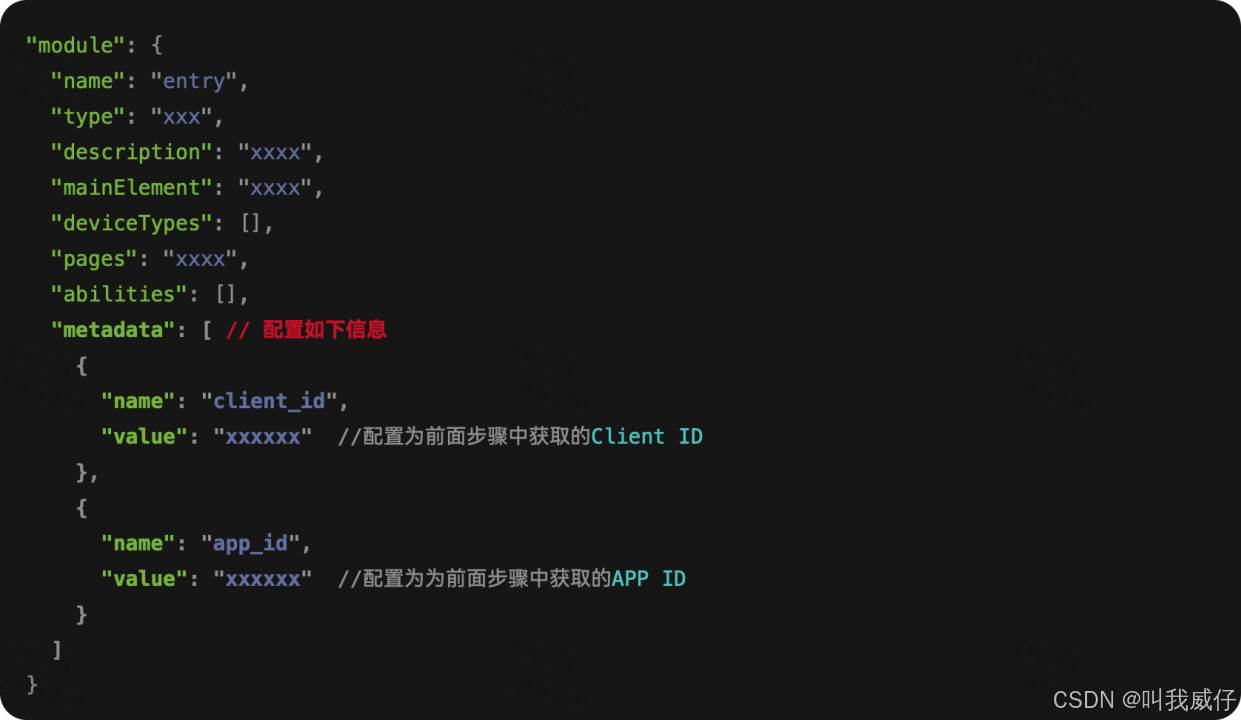
步骤二 :打开工程entry模块的module.json5文件,新增metadata,配置name为client_id,value为步骤一获取的Client ID值。
5 配置权限
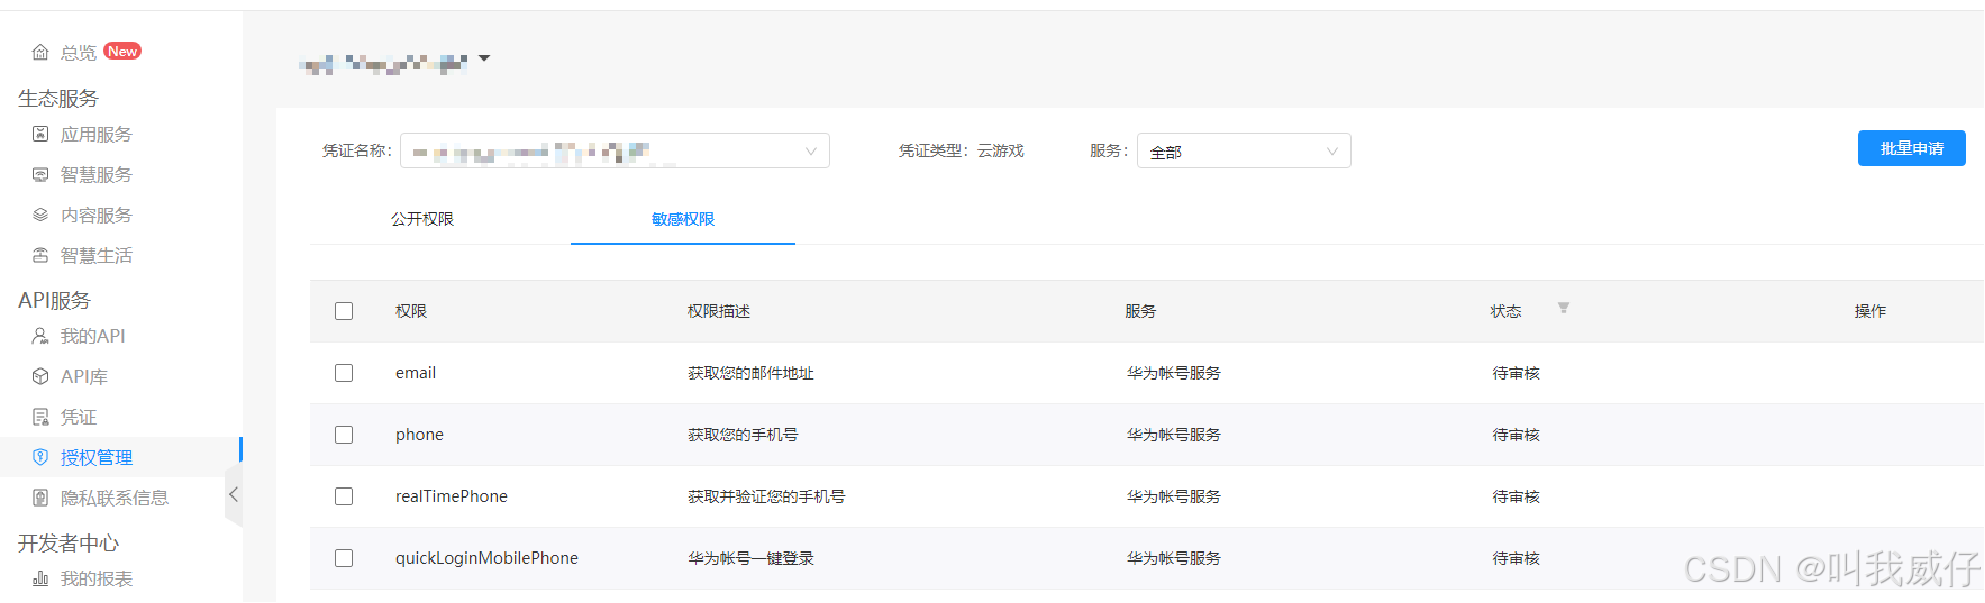
步骤一 :登录华为开发者联盟,选择“管理中心 > API服务 > 授权管理”。
步骤二 :凭证名称中选择目标应用名称,服务选择“华为账号服务”,点击“敏感权限”页签,根据应用需要选择申请对应的权限。

步骤三 :点击申请后选择对应“服务类型”选项,根据应用实际情况填写使用场景。
-
使用场景类型和业务场景类型参见表1 场景类型。
-
实际使用说明:描述该权限的使用流程和每秒请求次数峰值预估。
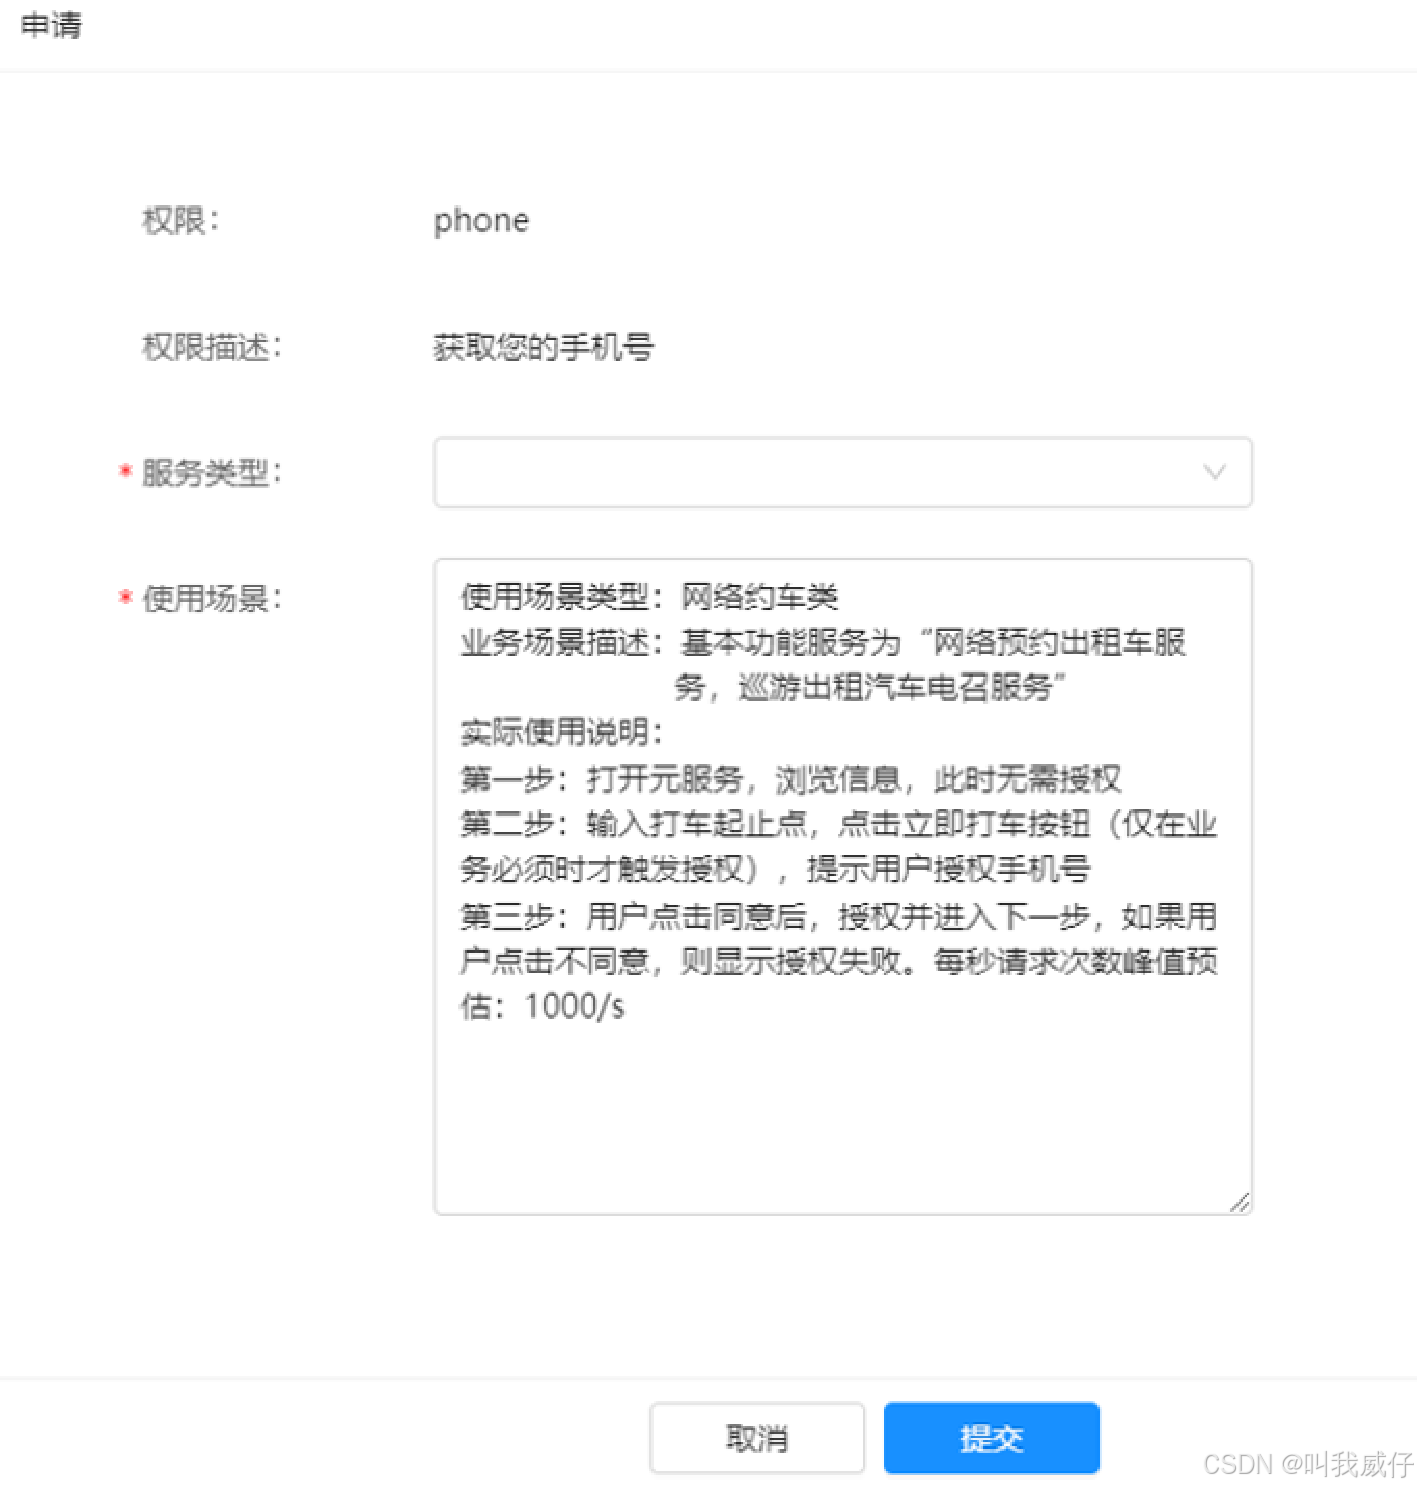
步骤四 :提交申请成功后查看状态“待审核”,5个工作日内审核结果会通过站内消息的形式发送到消息中心,开发者注意查收。
代码结构解读
本指南只对核心代码进行讲解,对于完整代码,可参考课程源代码。
├──entry/src/main/ets    // 代码区
│    ├──entryability
│    │    └──EntryAbility.ets    // 程序入口类
│    ├──pages
│    │    ├──Index.ets    // 应用首页
│    ├──utils
│    │    └──GameKitUtil.ets    // 封装的游戏服务
└──entry/src/main/resources    // 资源文件目录
开发步骤
步骤一:导入Account Kit、Game Service Kit模块及相关公共模块
// utils/GameKitUtil.ets
/**
 * @description
 * @author 白晓明
 * @organization 坚果派
 * @website: nutpi.com.cn
 * @date 2024/6/26
 */
import { common } from '@kit.AbilityKit';
import { hilog } from '@kit.PerformanceAnalysisKit';
import { gamePlayer } from '@kit.GameServiceKit';
import { BusinessError } from '@kit.BasicServicesKit';
import { authentication } from '@kit.AccountKit';
import { util } from '@kit.ArkTS';
import { promptAction } from '@kit.ArkUI';
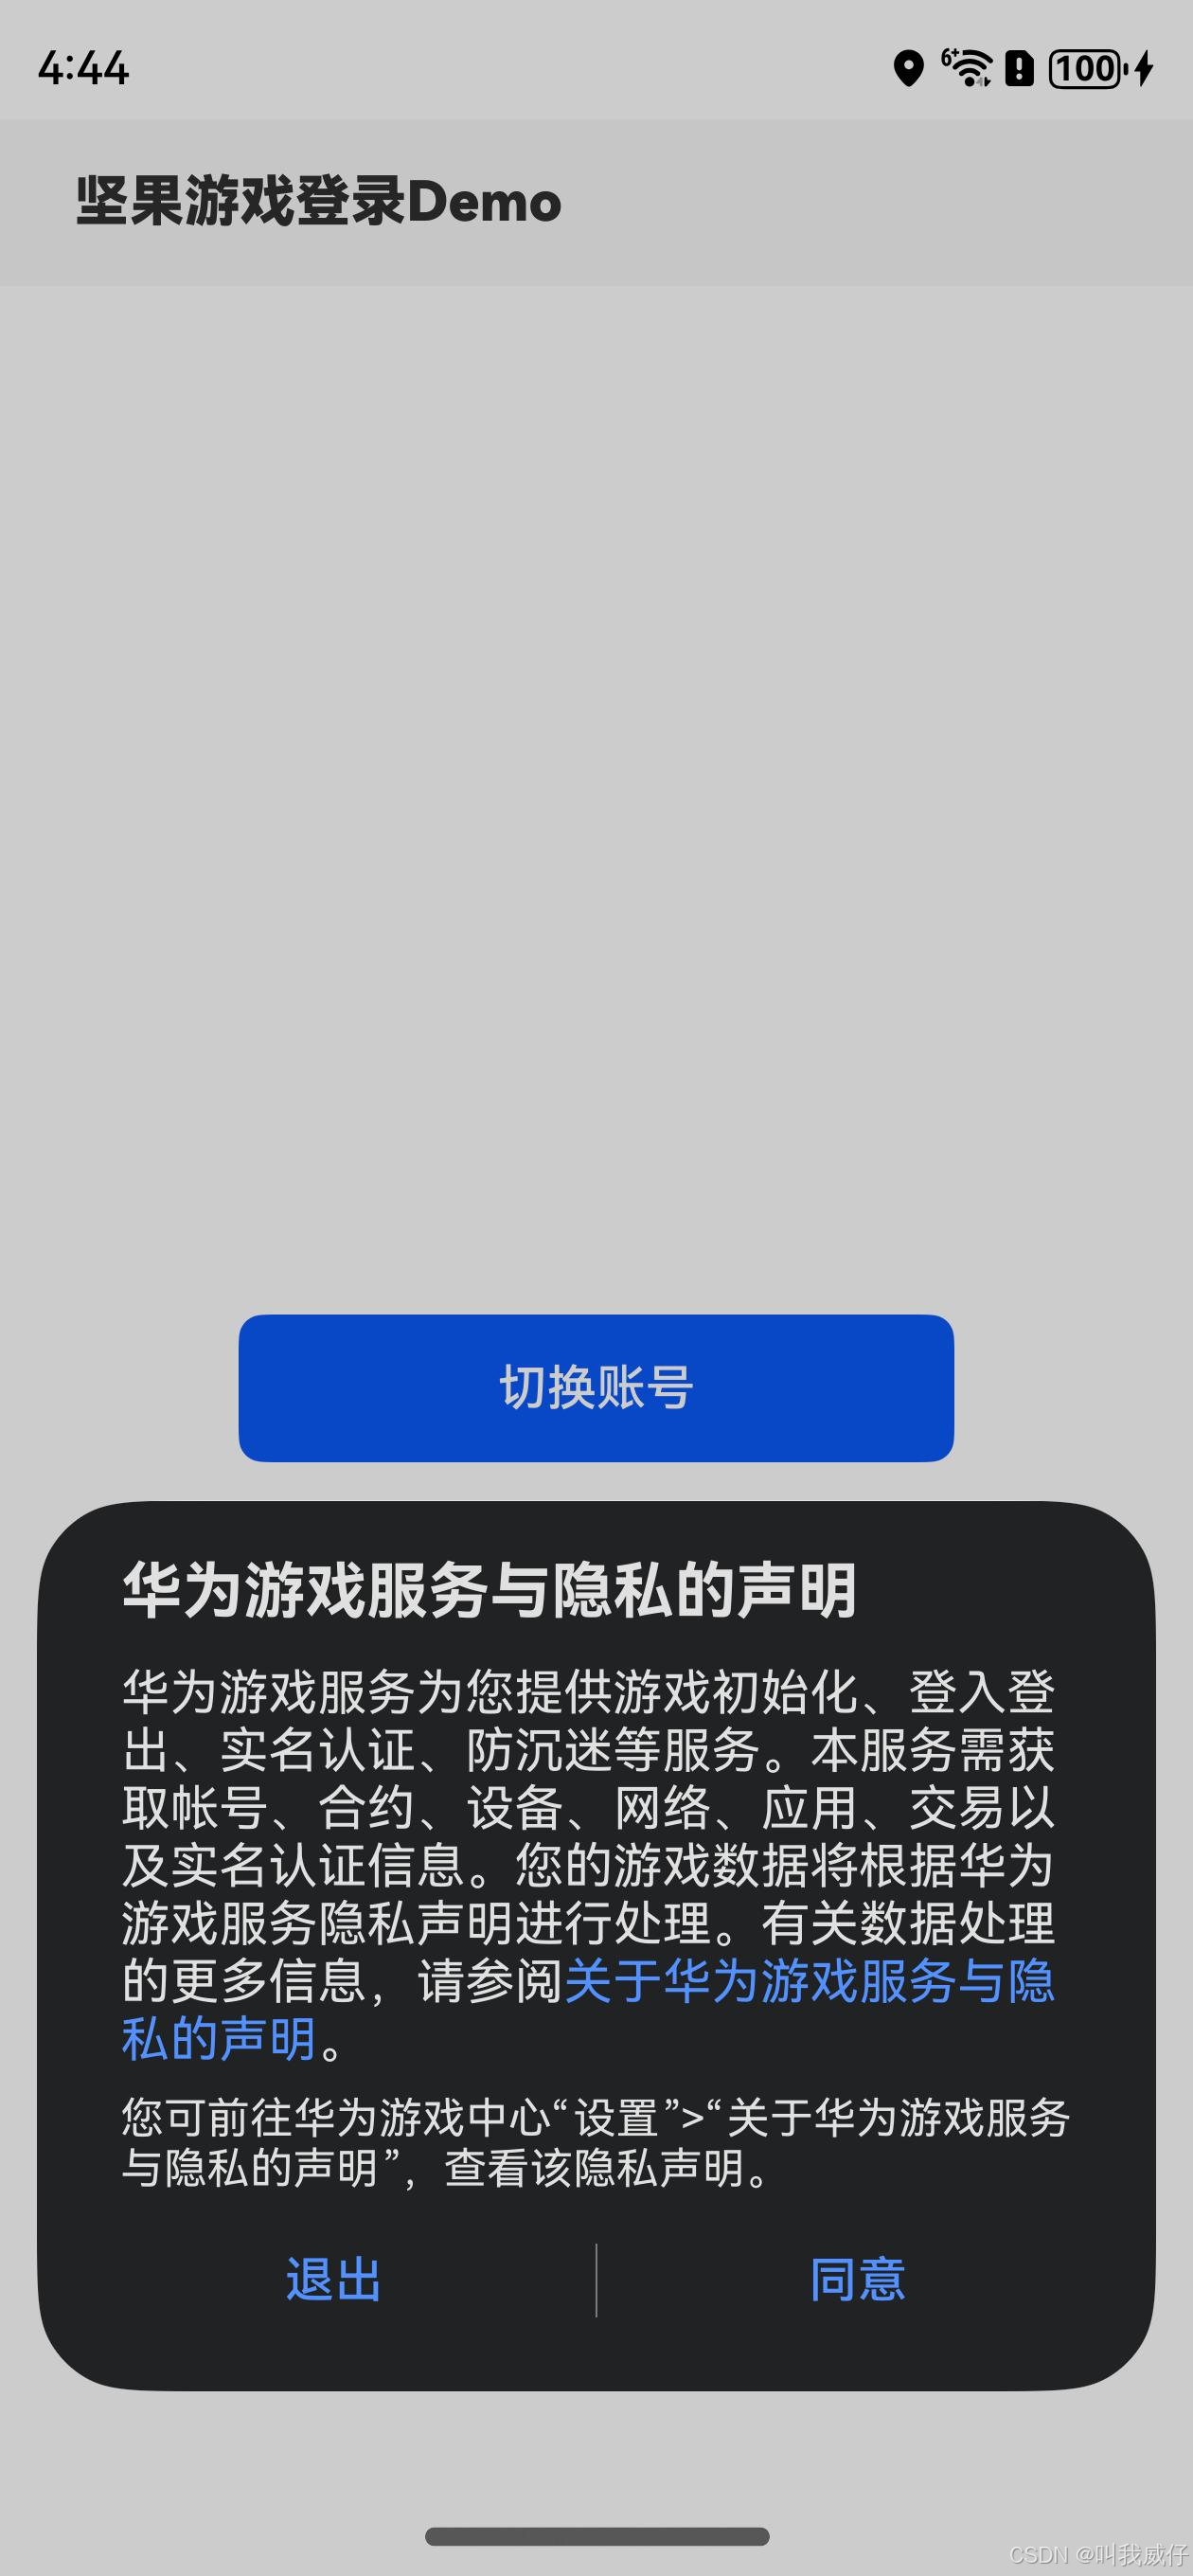
步骤二:导入相关模块后,游戏需先调用init完成初始化
初始化时Game Service Kit会弹出隐私协议弹框,玩家必须在同意隐私协议后,游戏才能调用其他接口,否则在调用其他接口时会返回1002000011错误码。调用init接口时严格要求继承UIAbility,并且获取上下文的时机是onWindowStageCreate生命周期中页面加载成功后。
// utils/GameKitUtil.ets
// 游戏服务初始化
public init(context: common.UIAbilityContext): void {
  hilog.info(0x0000, 'testTag', `Enter init.`);
  // 页面加载成功后,调用游戏服务初始化接口
  try {
    gamePlayer.init(context, () => {
      hilog.info(0x0000, 'testTag', 'Succeeded init.');
      })
    });
  } catch (error) {
    const err = error as BusinessError;
    hilog.error(0x0000, 'testTag', 'Failed to init. Cause: %{public}s', JSON.stringify(err) ?? '');
  }
}

// entryability/EntryAbility.ets ===> onWindowStageCreate()
onWindowStageCreate(windowStage: window.WindowStage): void {
  // Main window is created, set main page for this ability
  hilog.info(0x0000, 'testTag', '%{public}s', 'Ability onWindowStageCreate');

  windowStage.loadContent('pages/Index', (err) => {
    if (err.code) {
      hilog.error(0x0000, 'testTag', 'Failed to load the content. Cause: %{public}s', JSON.stringify(err) ?? '');
      return;
    }
    hilog.info(0x0000, 'testTag', 'Succeeded in loading the content.');
    // 游戏服务初始化
    GameKitUtil.init(this.context);
  });
}
步骤三:初始化成功后,游戏调用on接口注册playerChanged事件监听
当玩家信息变化后,比如游戏号切换等,将会执行playerChanged事件回调方法,以通知开发者进行本地缓存清理和再次调用unionLogin接口等。
// utils/GameKitUtil.ets
// 游戏服务初始化
public init(context: common.UIAbilityContext): void {
  hilog.info(0x0000, 'testTag', `Enter init.`);
  // 页面加载成功后,调用游戏服务初始化接口
  try {
    gamePlayer.init(context, () => {
      hilog.info(0x0000, 'testTag', 'Succeeded init.');
      // 游戏号切换事件注册
      gamePlayer.on('playerChanged', (result: gamePlayer.PlayerChangedResult) => {
        if (result.event === gamePlayer.PlayerChangedEvent.SWITCH_GAME_ACCOUNT) {
          // 游戏号已切换,完成本地缓存清理工作后,再次调用unionLogin接口等
          AppStorage.setOrCreate("LoginStatus", 0);
        }
      })
    });
  } catch (error) {
    const err = error as BusinessError;
    hilog.error(0x0000, 'testTag', 'Failed to init. Cause: %{public}s', JSON.stringify(err) ?? '');
  }
}
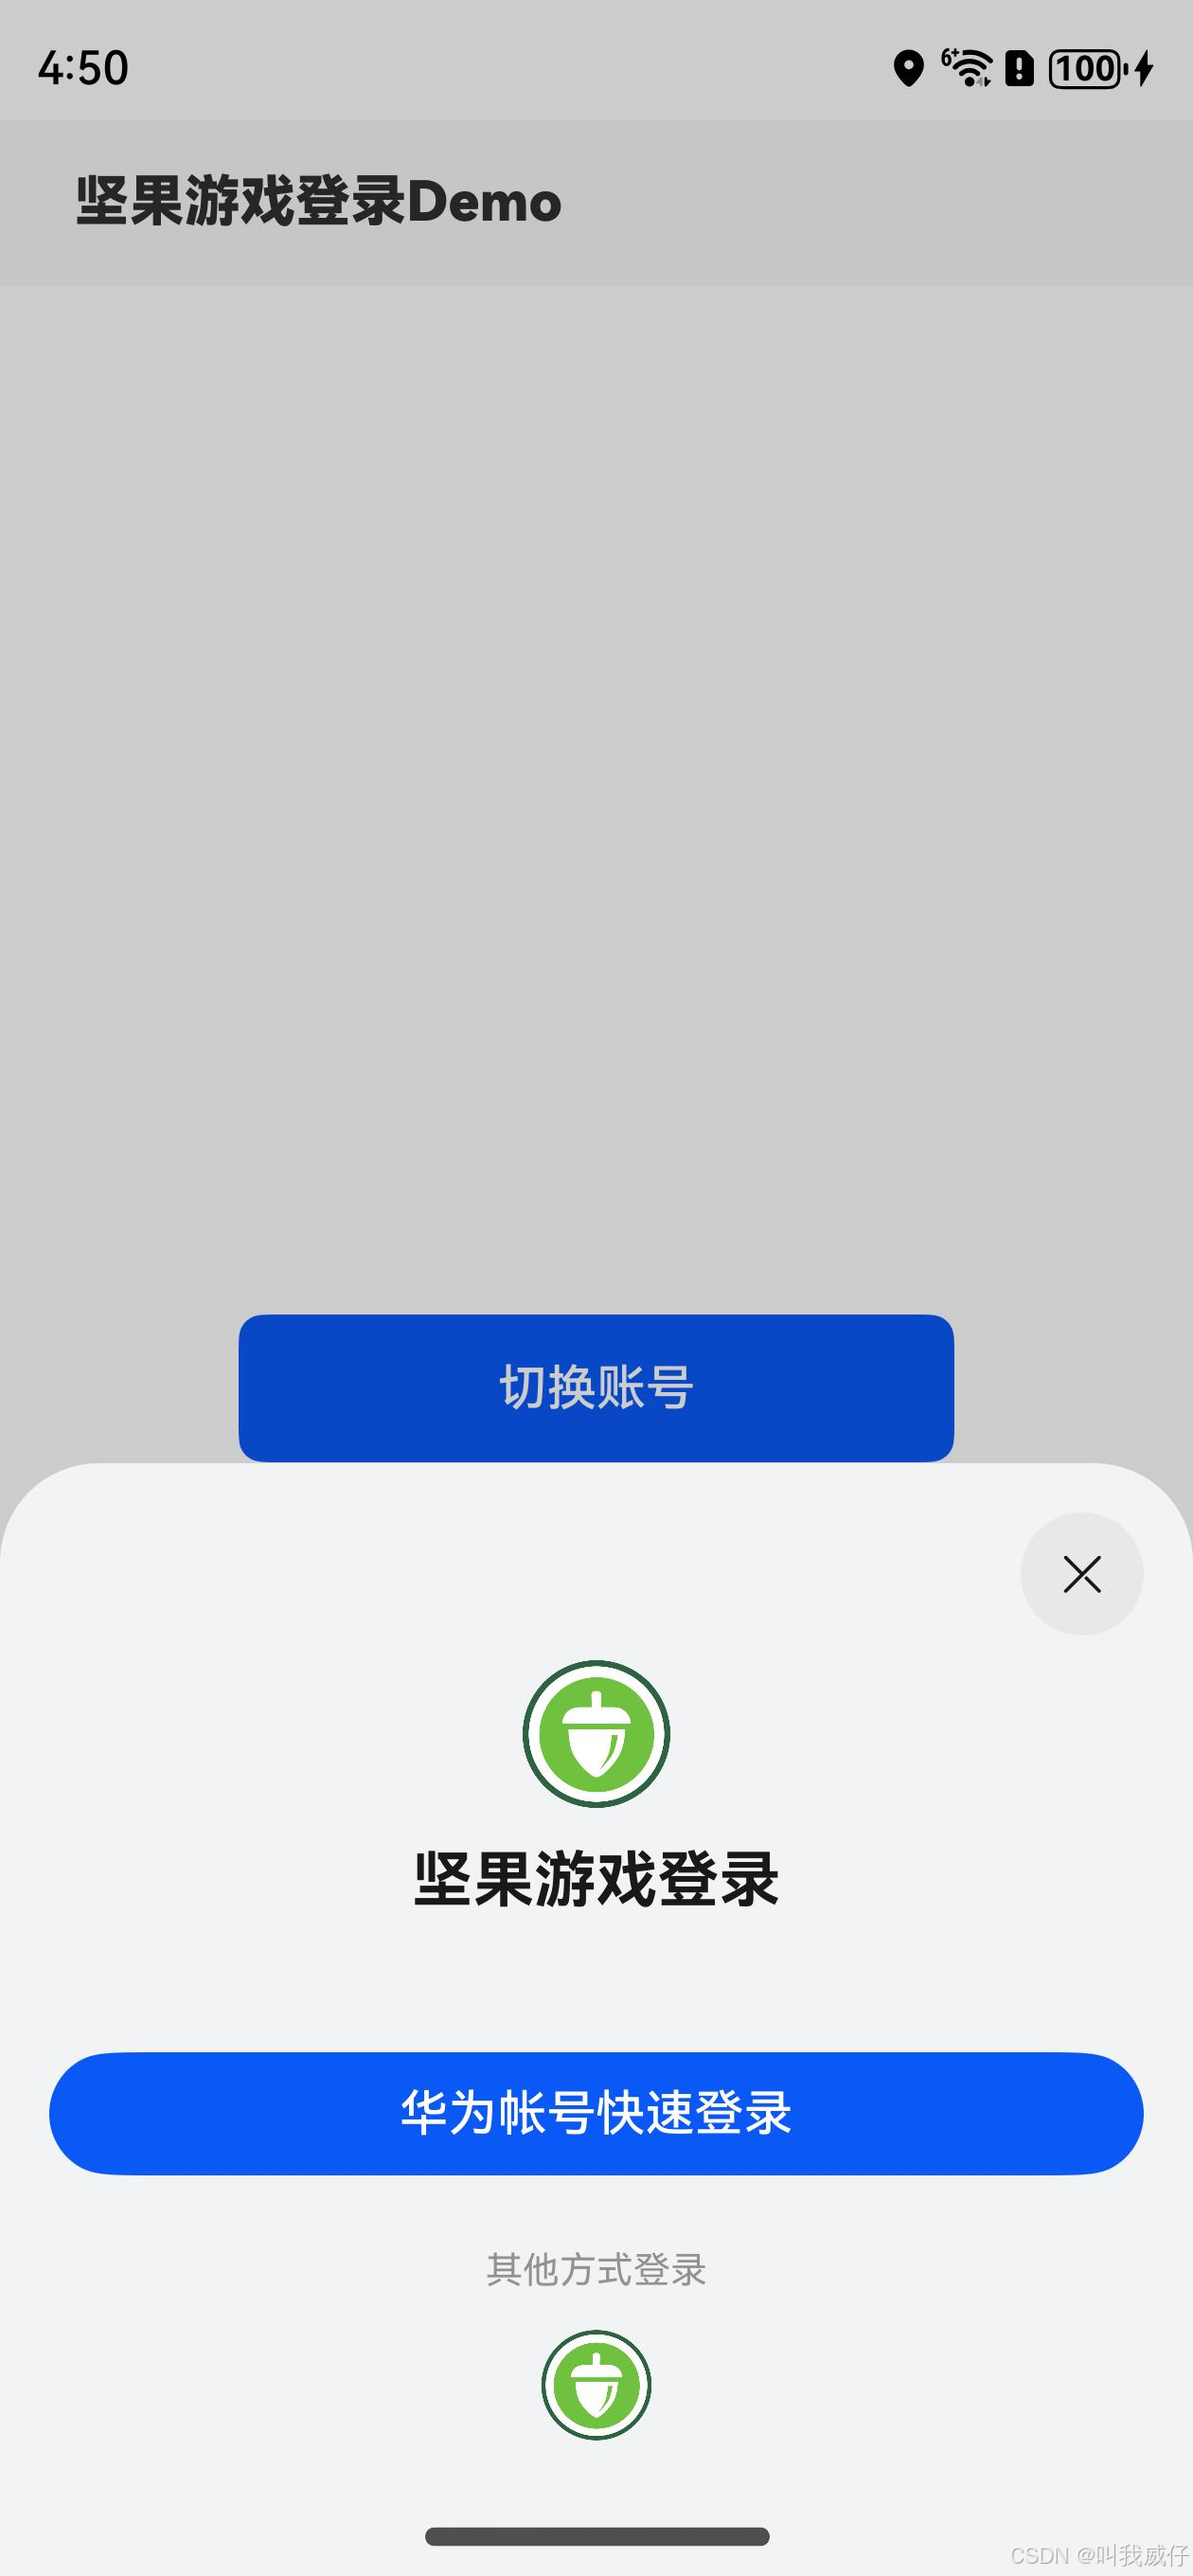
步骤四:初始化成功后,游戏可调用unionLogin接口进行联合登录
Game Service Kit向玩家展示联合登录弹窗,通过联合登录接口获取到accountName。
// utils/GameKitUtil.ets
// 游戏服务初始化
public init(context: common.UIAbilityContext): void {
  hilog.info(0x0000, 'testTag', `Enter init.`);
  // 页面加载成功后,调用游戏服务初始化接口
  try {
    gamePlayer.init(context, () => {
      hilog.info(0x0000, 'testTag', 'Succeeded init.');
      // 游戏号切换事件注册
      gamePlayer.on('playerChanged', (result: gamePlayer.PlayerChangedResult) => {
        if (result.event === gamePlayer.PlayerChangedEvent.SWITCH_GAME_ACCOUNT) {
          // 游戏号已切换,完成本地缓存清理工作后,再次调用unionLogin接口等
          AppStorage.setOrCreate("LoginStatus", 0);
        }
      })
      // 调用联合登录接口
      this.unionLogin(context);
    });
  } catch (error) {
    const err = error as BusinessError;
    hilog.error(0x0000, 'testTag', 'Failed to init. Cause: %{public}s', JSON.stringify(err) ?? '');
  }
}

// 游戏联合登录
public unionLogin(context: common.UIAbilityContext, showLoginDialog?: boolean): void {
  hilog.info(0x0000, 'testTag', 'Enter unionLogin.');
  const thirdAccountInfo: gamePlayer.ThirdAccountInfo = {
    accountName: 'NutpiGameAccountName', // 游戏官方账号名
    accountIcon: $r('app.media.nutpi_logo')  // 游戏官方账号图标资源信息
  };
  const unionLoginParam: gamePlayer.UnionLoginParam = {
    showLoginDialog: true,  // 默认为false;当需要切换账号或进行其他操作时,该值为true
    thirdAccountInfos: [
      thirdAccountInfo  // 游戏官方账号图标大小总和最大支持35KB
    ]
  };
  try {
    gamePlayer.unionLogin(context, unionLoginParam).then((result: gamePlayer.UnionLoginResult) => {
      hilog.info(0x0000, 'testTag', 'Succeeded in union login.');
      this.gamePlayerId = result.localPlayer?.gamePlayerId ?? '';
      this.teamPlayerId = result.localPlayer?.teamPlayerId ?? '';
      const accountName = result.accountName;
      if (accountName === 'hw_account') {
        promptAction.showToast({
          message: "玩家选择使用华为账号登录方式!"
        })
      } else if (accountName === 'official_account' || accountName === thirdAccountInfo.accountName) {
        promptAction.showToast({
          message: "玩家选择使用游戏官方账号登录方式!"
        })
      }
    }).catch((error: BusinessError) => {
      hilog.error(0x0000, 'testTag', 'Failed to union login. Cause: %{public}s', JSON.stringify(error) ?? '');
    })
  } catch (error) {
    const err = error as BusinessError;
    hilog.error(0x0000, 'testTag', 'Failed to union login. Cause: %{public}s', JSON.stringify(err) ?? '');
  }
}
步骤五:华为账号认证与授权。
通过联合登录接口获取到accountName,若值为“hw_account”时,通过Account Kit对应的创建授权/登录请求接口,获取用于服务器校验的Authorization Code信息;若值为unionLogin接口传入的thirdAccountInfo.accountName或“official_account”时,进行游戏官方账号自行登录处理。
// utils/GameKitUtil.ets ==> unionLogin()
if (accountName === 'hw_account') {
  promptAction.showToast({
    message: "玩家选择使用华为账号登录方式!"
  })
  if (result.needBinding) {
    // 当needBinding为true时(关联场景),华为玩家标识需与游戏官方账号进行关联绑定
    // 应调用createAuthorizationWithHuaweiIDRequest接口创建授权请求(授权获取手机号)
    this.createAuthorizationAndVerifyPlayer(context);
  } else {
    // 当needBinding为false时(转移场景),调用createLoginWithHuaweiIDRequest接口创建登录请求
    this.createLoginAndVerifyPlayer(context);
  }
} else if (accountName === 'official_account' || accountName === thirdAccountInfo.accountName) {
  // 1.进行游戏官方账号自行登录处理
  // 2.登录完成后,则调用verifyLocalPlayer接口进行合规校验
  // 3.合规检验成功后,在玩家创建角色时,游戏必须调用savePlayerRole将玩家角色信息上报。
  promptAction.showToast({
    message: "玩家选择使用游戏官方账号登录方式!"
  })
  // 玩家选择游戏官方帐号成功登录后,调用合规校验接口
  // thirdOpenId表示游戏官方帐号ID
  // this.thirdOpenId = '123xxxx';
  // this.verifyLocalPlayer(context);
}
- 需要华为玩家标识与游戏官方账号绑定(needBinding为true)
- 调用createAuthorizationWithHuaweiIDRequest创建授权请求并设置参数。若需授权获取用户手机号,应先完成“获取用户手机号”的scope权限申请,并在authRequest.scopes中传入“phone”。
- 调用AuthenticationController对象的executeRequest方法执行授权请求,并在Callback中处理授权结果,从授权结果中解析出头像昵称。
// utils/GameKitUtil.ets
// 需要华为玩家标识与游戏官方账号绑定
private createAuthorizationAndVerifyPlayer(context: common.UIAbilityContext): void {
  hilog.info(0x0000, 'testTag', 'Enter createAuthorizationAndVerifyPlayer.');
  // 创建授权请求,并设置参数
  let authRequest = new authentication.HuaweiIDProvider().createAuthorizationWithHuaweiIDRequest();
  // 获取头像昵称、手机号需要传入如下scope
  authRequest.scopes = ['profile', 'phone'];
  // 用户是否需要登录授权
  authRequest.forceAuthorization = true;
  authRequest.state = util.generateRandomUUID();
  try {
    // 执行授权请求
    let controller = new authentication.AuthenticationController(context);
    controller.executeRequest(authRequest, (err, data) => {
      if (err) {
        hilog.error(0x0000, 'testTag', 'Failed to auth. Cause: %{public}s', JSON.stringify(err) ?? '');
        return;
      }
      const response = data as authentication.AuthorizationWithHuaweiIDResponse;
      const state = response.state;
      if (state != undefined && authRequest.state != state) {
        hilog.error(0x0000, 'testTag', 'Failed to auth, state is different.');
        return;
      }
      hilog.info(0x0000, 'testTag', `Succeeded in authenticating.`);
      let authorizationWithHuaweiIDCredential = response.data!;
      let avatarUri = authorizationWithHuaweiIDCredential.avatarUri;
      let nickName = authorizationWithHuaweiIDCredential.nickName;
      let authorizationCode = authorizationWithHuaweiIDCredential.authorizationCode;
      promptAction.showToast({
        message: `登录用户信息:${nickName}`
      })
      // 开发者处理vatarUri, nickName, authorizationCode信息,并进行玩家信息校验:
      // 1.游戏客户端将玩家信息(Authorization Code、玩家标识等)上传给游戏开发者服务器
      // 2.开发者服务器通过authorizationCode调用华为账号服务器的获取凭证AccessToken接口,获取玩家的AccessToken
      // 3.开发者服务器通过AccessToken调用华为账号服务器的获取用户信息接口,获取授权手机号
      // 4.开发者服务器调用华为游戏服务器的获取玩家信息接口,根据AccessToken获取服务器侧的玩家标识
      // 5.开发者服务器将客户端与服务器分别获取的玩家标识进行一致性核验

      // this.thirdOpenId = '123xxxx'; // thirdOpenId表示游戏官方帐号ID
      // 游戏服务器校验玩家信息成功后,则进行如下操作:
      // 1.判断授权获取的手机号是否注册游戏官方账号,如未注册,则进行注册;
      // 2.判断teamPlayerId是否绑定游戏官方账号,如未绑定,则进行绑定;
      // 3.调用合规校验接口
      // 4.合规检验成功后,在玩家创建角色时,游戏必须调用savePlayerRole将玩家角色信息上报
      // if (!this.isBinding(this.teamPlayerId)) {
        // 将玩家标识与游戏官方帐号进行绑定
      //   this.bindPlayer(context, this.thirdOpenId, this.teamPlayerId);
      // }
      // 进行合规校验
      // this.verifyLocalPlayer(context);
    })
  } catch (error) {
    const err = error as BusinessError;
    hilog.error(0x0000, 'testTag', 'Failed to auth. Cause: %{public}s', JSON.stringify(err) ?? '');
  }
}
- 不需要华为玩家标识与游戏官方账号绑定(needBinding为false)
- 调用createLoginWithHuaweiIDRequest创建登录请求并设置参数。
- 调用AuthenticationController对象的executeRequest方法执行登录请求,并在Callback中处理登录结果,获取到AuthorizationCode。
// utils/GameKitUtil.ets
// 不需要华为玩家标识与游戏官方账号绑定
private createLoginAndVerifyPlayer(context: common.UIAbilityContext): void {
  hilog.info(0x0000, 'testTag', `Enter createLoginAndVerifyPlayer.`);
  // 创建登录请求,并设置参数
  let loginRequest = new authentication.HuaweiIDProvider().createLoginWithHuaweiIDRequest();
  // 当用户未登录华为帐号时,是否强制拉起华为帐号登录界面
  loginRequest.forceLogin = true;
  loginRequest.state = util.generateRandomUUID();
  try {
    // 执行授权请求
    let controller = new authentication.AuthenticationController(context);
    controller.executeRequest(loginRequest, (err, data) => {
      if (err) {
        hilog.error(0x0000, 'testTag', 'Failed to login. Cause: %{public}s', JSON.stringify(err) ?? '');
        return;
      }
      const response = data as authentication.AuthorizationWithHuaweiIDResponse;
      const state = response.state;
      if (state != undefined && loginRequest.state != state) {
        hilog.error(0x0000, 'testTag', 'Failed to login, state is different.');
        return;
      }
      hilog.info(0x0000, 'testTag', `Succeeded in logining.`);
      let loginWithHuaweiIDCredential = response.data!;
      let code = loginWithHuaweiIDCredential.authorizationCode;
      promptAction.showToast({
        message: `登录用户AuthorizationCode:${code}`
      })
      // 开发者处理authorizationCode
      // 1.游戏客户端将玩家信息(Authorization Code、玩家标识等)上传给游戏开发者服务器
      // 2.开发者服务器通过authorizationCode调用华为账号服务器的获取凭证AccessToken接口,获取玩家的AccessToken
      // 3.开发者服务器调用华为游戏服务器的获取玩家信息接口,根据AccessToken获取服务器侧的玩家标识
      // 4.开发者服务器将客户端与服务器分别获取的玩家标识进行一致性核验
      // 5.玩家选择游戏官方帐号成功登录后,无需绑定,但需要调用合规校验接口
      // 6.合规检验成功后,在玩家创建角色时,游戏必须调用savePlayerRole将玩家角色信息上报
      // this.thirdOpenId = ''; // thirdOpenId表示游戏官方帐号ID,此处赋值为空字符串
      // this.verifyLocalPlayer(context);
    })
  } catch (error) {
    const err = error as BusinessError;
    hilog.error(0x0000, 'testTag', 'Failed to login. Cause: %{public}s', JSON.stringify(err) ?? '');
  }
}
步骤六:服务端能力
- 通过Authorization Code获取AccessToken:
- 开发者服务器通过authorizationCode调用华为账号服务器的获取凭证Access Token接口,获取玩家的AccessToken。
- 通过Access Token获取手机号:
- 开发者服务器通过AccessToken调用华为账号服务器的获取用户信息接口,获取授权手机号。
- 玩家信息核验:
- 开发者服务器调用华为游戏服务器的获取玩家信息接口,根据AccessToken获取服务器侧的玩家标识。开发者服务器将客户端与服务器分别获取的玩家标识进行一致性核验。
步骤七:绑定玩家账号
当联合登录接口获取的needBinding值为true时,游戏可调用bindPlayer接口绑定华为玩家标识teamPlayerId与游戏官方账号。
// utils/GameKitUtil.ets
// 绑定玩家帐号
// thirdOpenId表示游戏官方帐号ID
// teamPlayerId表示玩家华为帐号对应的teamPlayerId
public bindPlayer(context: common.UIAbilityContext, thirdOpenId: string, teamPlayerId: string): void {
  hilog.info(0x0000, 'testTag', `Enter bindPlayer.`);

  try {
    gamePlayer.bindPlayer(context, thirdOpenId, teamPlayerId).then(() => {
      hilog.info(0x0000, 'testTag', `Succeeded in binding player.`);
      // 开发者进行持久化绑定结果
    }).catch((error: BusinessError) => {
      hilog.error(0x0000, 'testTag', `Failed to bind player. Cause: %{public}s`, JSON.stringify(error) ?? '');
    });
  } catch (error) {
    hilog.error(0x0000, 'testTag', `Failed to bind player. Cause: %{public}s`, JSON.stringify(error) ?? '');
  }
}
步骤八:合规校验
调用verifyLocalPlayer接口进行帐号实名认证和游戏防沉迷管控合规校验。
- 如果玩家未完成实名认证,Game Service Kit将向玩家弹出实名认证弹框要求玩家进行实名认证,如果玩家取消实名认证则返回1002000004错误码。此时需要禁止玩家进入游戏。
- 如果玩家帐号实名认证为未成年人,Game Service Kit将启动未成年人游戏时间自动检测功能,不在指定时间内登录游戏,Game Service Kit将强制玩家退出游戏并返回1002000006错误码。
// utils/GameKitUtil.ets
// 合规校验
private verifyLocalPlayer(context: common.UIAbilityContext): void {
  hilog.info(0x0000, 'testTag', `Enter verifyLocalPlayer.`);
  let request: gamePlayer.ThirdUserInfo = {
    thirdOpenId: this.thirdOpenId, // 游戏官方帐号ID
    isRealName: true, // 玩家是否实名,该值为true时表示已实名,为false时表示未实名
  };

  try {
    gamePlayer.verifyLocalPlayer(context, request).then(() => {
      hilog.info(0x0000, 'testTag', `Succeeded in verifying local player.`);
      // 合规检验成功后,允许玩家进入游戏
    }).catch((error: BusinessError) => {
      hilog.error(0x0000, 'testTag', `Failed to verify local player. Cause: %{public}s`, JSON.stringify(error) ?? '');
      // 合规检验失败,不允许玩家进入游戏
    });
  } catch (error) {
    hilog.error(0x0000, 'testTag', `Failed to verify local player. Cause: %{public}s`, JSON.stringify(error) ?? '');
    // 合规检验失败,不允许玩家进入游戏
  }
}
步骤九:提交玩家角色信息
游戏在登录成功后需要调用savePlayerRole接口,将玩家角色信息提交到华为游戏服务器。请在用户登录并选择角色以及区服后调用。如果游戏没有角色系统,roleId请传入“0”,roleName请传入“default”。
// utils/GameKitUtil.ets
// 提交玩家角色信息
// 在玩家创建角色时,游戏必须调用savePlayerRole将玩家角色信息上报
public savePlayerRole(context: common.UIAbilityContext): void {
  hilog.info(0x0000, 'testTag', `Enter savePlayerRole.`);
  let request: gamePlayer.GSKPlayerRole = {
    roleId: '123', // 玩家角色ID,如游戏没有角色系统,请传入“0”,务必不要传""和null
    roleName: 'Jason', // 玩家角色名,如游戏没有角色系统,请传入“default”,务必不要传""和null
    serverId: '456',
    serverName: 'Zhangshan',
    gamePlayerId: this.gamePlayerId, // 根据实际获取到的gamePlayerId传值
    teamPlayerId: this.teamPlayerId,
    thirdOpenId: this.thirdOpenId
  };

  try {
    gamePlayer.savePlayerRole(context, request).then(() => {
      hilog.info(0x0000, 'testTag', `Succeeded in saving player info.`);
    });
  } catch (error) {
    hilog.error(0x0000, 'testTag', `Failed to save player info. Cause: %{public}s`, JSON.stringify(error) ?? '');
  }
}
步骤十:为“切换账号”添加点击事件
// Index.ets
Button('切换账号')
  .width('60%')
  .height(48)
  .type(ButtonType.Normal)
  .fontSize(16)
  .borderRadius(8)
  .onClick(() => {
    hilog.info(0x0000, 'testTag', 'Test account change.');
    // 该点击事件主要用于模拟切换游戏登录账号场景,需要拉起联合登录弹框
    let context = getContext(this) as common.UIAbilityContext;
    GameKitUtil.unionLogin(context, true);
  })


 2625
2625

 被折叠的 条评论
为什么被折叠?
被折叠的 条评论
为什么被折叠?
 到【灌水乐园】发言


