


RabbitMq+WebSocket+Quartz+layui 实现网页端实时消息推送
讲在前面
前两天在项目中使用flowable编写流程时,项目上说在执行每一步步骤之后,需要在网页端给下一步的处理人弹一个消息框提示一下,并且这个消息推送可以在其他地方也能用到,比如发送系统公告等等,所以就写个全局消息推送功能吧。
我的思路
首先我这边业务是一个消息可能发给多个人,也可能是一个人,所以我这边封装一个消息类,保存消息的主要内容,需要发送到的list类型的用户id集合, 还有就是消息的唯一事件key,这些用户的消息属于同一个事件。
效果图
- 每个可以单独关闭
- 悬浮再消息框上,显示全部关闭按钮,点击全部关闭
- 四种不同的状态情景(log,success,warn,error)

码云Demo地址
篇幅较长,可以直接下载源码享用 码云demo项目链接
**
另外有错欢迎指正
**
**
转载请声明作者
**
首先安装erlang
-
安装之前我们得先安装 erlang, 因为rabbitMq是通过它去编写的,
-
64位地址: 百度网盘地址.
-
提取码:x56m
-
安装 ==>下一步

-
默认位置 ==> 下一步 ==> install

- 接下来配置环境变量
- 此电脑–>鼠标右键“属性”–>高级系统设置–>环境变量–>“新建”系统环境变量

变量名:ERLANG_HOME
变量值就是刚才erlang的安装地址,点击确定。
然后双击系统变量Path

点击“新建”,将%ERLANG_HOME%\bin加入到path中。

- 最后windows键+R键,输入cmd,再输入erl,看到版本号就说明erlang安装成功了。

安装RabbitMq
- 百度网盘地址 rabbitMq-server-3.7.7,
- 提取码:gz9y
- 双击安装,安装步骤与erlang相同,一直下一步安装,
- RabbitMQ安装好后接下来安装RabbitMQ-Plugins。打开命令行cd,输入RabbitMQ的sbin目录。
- 我的地址是C:\Program Files\RabbitMQ Server\rabbitmq_server-3.7.7\sbin
- 在后面输入rabbitmq-plugins enable rabbitmq_management命令进行安装

- 访问http://localhost:15672

- 默认用户名和密码都是guest
- 这样rabbitMq就安装成功了
demo项目模拟发送消息
- 新建一个springboot项目
- yml配置如下
- rabbitMq 默认端口是5672,用户名密码都是guest
server:
  port: 8080

spring:
  thymeleaf:
    mode: HTML
  rabbitmq:
    host: 127.0.0.1
    port: 5672
    username: guest
    password: guest
    publisher-confirms: true    #  消息发送到交换机确认机制,是否确认回调
    publisher-returns: true
    listener:
      simple:
        acknowledge-mode: manual
- 这是我的项目目录结构

- 在处理后端业务逻辑的时候,需要我们同时向前端页面返回一个通知,我们通过tabbitMq来发送消息,可这消息不是在后端进行处理,而是需要返回前端去展示,所以我们就需要通过webSocket来讲我们的消息异步返回给前端处理
- pom文件结构 引入 rabbitmq 与 webSocket 同时还有 quartz 后续我们会用到
- 同时还引入了 thymeleaf 模板引擎,这样可以再html页面直接获取后端model中的值
<?xml version="1.0" encoding="UTF-8"?>
<project xmlns="http://maven.apache.org/POM/4.0.0" xmlns:xsi="http://www.w3.org/2001/XMLSchema-instance"
         xsi:schemaLocation="http://maven.apache.org/POM/4.0.0 http://maven.apache.org/xsd/maven-4.0.0.xsd">
    <modelVersion>4.0.0</modelVersion>
    <parent>
        <groupId>org.springframework.boot</groupId>
        <artifactId>spring-boot-starter-parent</artifactId>
        <version>2.1.4.RELEASE</version>
        <relativePath/> <!-- lookup parent from repository -->
    </parent>
    <groupId>com.workfeng</groupId>
    <artifactId>message</artifactId>
    <version>0.0.1-SNAPSHOT</version>
    <name>message</name>
    <description>Demo project for Spring Boot</description>

    <packaging>jar</packaging>

    <properties>
        <java.version>1.8</java.version>
        <thymeleaf.version>3.0.11.RELEASE</thymeleaf.version>
        <thymeleaf-layout-dialect.version>2.1.1</thymeleaf-layout-dialect.version>
    </properties>

    <dependencies>

        <dependency>
            <groupId>com.alibaba</groupId>
            <artifactId>fastjson</artifactId>
            <version>1.2.47</version>
        </dependency>

        <dependency>
            <groupId>org.springframework.boot</groupId>
            <artifactId>spring-boot-devtools</artifactId>
            <scope>provided</scope>
            <optional>true</optional>
        </dependency>

        <dependency>
            <groupId>org.springframework.boot</groupId>
            <artifactId>spring-boot-starter-web</artifactId>
        </dependency>
        <dependency>
            <groupId>org.springframework.boot</groupId>
            <artifactId>spring-boot-starter-thymeleaf</artifactId>
        </dependency>


        <dependency>
            <groupId>org.springframework.boot</groupId>
            <artifactId>spring-boot-starter-test</artifactId>
            <scope>test</scope>
        </dependency>

        <dependency>
            <groupId>org.springframework.boot</groupId>
            <artifactId>spring-boot-devtools</artifactId>
            <optional>true</optional>
        </dependency>
        <dependency>
            <groupId>org.apache.commons</groupId>
            <artifactId>commons-lang3</artifactId>
            <version>3.7</version>
        </dependency>

        <dependency>
            <groupId>org.springframework.boot</groupId>
            <artifactId>spring-boot-starter-amqp</artifactId>
        </dependency>
        <dependency>
            <groupId>org.springframework.boot</groupId>
            <artifactId>spring-boot-starter-websocket</artifactId>
        </dependency>

        <!-- quartz定时任务 -->
        <dependency>
            <groupId>org.quartz-scheduler</groupId>
            <artifactId>quartz</artifactId>
            <version>2.2.1</version>
            <exclusions>
                <exclusion>
                    <artifactId>slf4j-api</artifactId>
                    <groupId>org.slf4j</groupId>
                </exclusion>
            </exclusions>
        </dependency>
        <dependency>
            <groupId>org.springframework</groupId>
            <artifactId>spring-context-support</artifactId>
        </dependency>
    </dependencies>

    <build>
        <plugins>
            <plugin>
                <groupId>org.springframework.boot</groupId>
                <artifactId>spring-boot-maven-plugin</artifactId>
                <configuration>
                    <fork>true</fork><!-- 如果没有该项配置,肯呢个devtools不会起作用,即应用不会restart -->
                </configuration>
            </plugin>
        </plugins>
    </build>

</project>
RabbitMq配置
- 接下类就是rabbitMq配置,
- 首先我们配置一个 RabbitMqConfig类,来声明队列,和绑定交换机与路由
- 现有一个RabbitConstant 类,声明名称
package com.workfeng.message.config.constant;

public class RabbitConstant {
    //交换机名称
    public final static String EXCHANGE = "exchange_test";
    //队列
    public final static String QUEUE_TRANSACTION = "queue_transaction";
    public final static String QUEUE_CONTRACT = "queue_contract";
    public final static String QUEUE_QUALIFICATION = "queue_qualification";
    //路由key
    public final static String RK_TRANSACTION = "transaction";
    public final static String RK_CONTRACT = "contract";
    public final static String RK_QUALIFICATION = "qualification";
}
- 接下来是 RabbitMqConfig 配置类,
package com.workfeng.message.config.rabbitmq;

import com.workfeng.message.config.constant.RabbitConstant;
import org.springframework.amqp.core.Binding;
import org.springframework.amqp.core.BindingBuilder;
import org.springframework.amqp.core.DirectExchange;
import org.springframework.amqp.core.Queue;
import org.springframework.context.annotation.Bean;
import org.springframework.context.annotation.Configuration;

@Configuration
public class RabbitMqConfig {

    /**
     * 声明队列
     *
     * @return
     */
    @Bean
    public Queue queueTransaction() {
        // true表示持久化该队列
        return new Queue(RabbitConstant.QUEUE_TRANSACTION, true);
    }

    @Bean
    public Queue queueContract() {
        // true表示持久化该队列
        return new Queue(RabbitConstant.QUEUE_CONTRACT, true);
    }

    @Bean
    public Queue queueQualification() {
        // true表示持久化该队列
        return new Queue(RabbitConstant.QUEUE_QUALIFICATION, true);
    }

    /**
     * 声明交互器
     *
     * @return
     */
    @Bean
    DirectExchange directExchange() {
        return new DirectExchange(RabbitConstant.EXCHANGE);
    }

    /**
     * 绑定
     *
     * @return
     */
    @Bean
    public Binding bindingTransaction() {
        return BindingBuilder.bind(queueTransaction()).to(directExchange()).with(RabbitConstant.RK_TRANSACTION);
    }

    /**
     * 绑定
     *
     * @return
     */
    @Bean
    public Binding bindingContract() {
        return BindingBuilder.bind(queueContract()).to(directExchange()).with(RabbitConstant.RK_CONTRACT);
    }

    /**
     * 绑定
     *
     * @return
     */
    @Bean
    public Binding bindingQualification() {
        return BindingBuilder.bind(queueQualification()).to(directExchange()).with(RabbitConstant.RK_QUALIFICATION);
    }

}
WebSocket配置
-
接下来就是去监听 RabbitMq 队列,如果有消息发送了,就通过webSocket发送到前端页面,给出弹出框提示,所以我们先来配置webSocket,再去处理监听事件。
-
这是我的前端资源文件摆放位置,消息弹框组件组要依赖jQuery,引了一个jquery.js

-
这边我只用了一个index页面,我们先用controller访问index页面
-
模拟一个用户登陆,在model中放入一个用户id,到index页面获取
package com.workfeng.message.controller;

import com.workfeng.message.config.rabbitmq.MessageVo;
import com.workfeng.message.config.rabbitmq.Sender;
import com.workfeng.message.utils.SuccessTip;
import org.springframework.beans.factory.annotation.Autowired;
import org.springframework.stereotype.Controller;
import org.springframework.ui.Model;
import org.springframework.web.bind.annotation.RequestMapping;
import org.springframework.web.bind.annotation.ResponseBody;

import java.util.Arrays;

@Controller
public class IndexController {

    @Autowired
    private Sender sender;

    @RequestMapping("/index")
    public String index(Model model){

        // 假设用户1登陆
        model.addAttribute("userId","1");

        return "index";
    }
}
- 访问index页面
- 设置一个input隐藏域保存userId

- 然后是index页面下 webSocket 的配置信息
<script>
    layui.use(['layer',"jquery"], function(){
        var layer = layui.layer;
        $ = layui.jquery;

        var websocket = null;
        var userId = $("#userId").val();

        //判断当前浏览器是否支持WebSocket
        if ('WebSocket' in window) {
            // 连接服务端  并将userId带入
            websocket = new WebSocket("ws://localhost:8080/ws/message/"+userId);
        }
        else {
            alert('当前浏览器 不支持WebSocket')
        }

        //连接发生错误的回调方法
        websocket.onerror = function () {
            //setMessageInnerHTML("连接发生错误");
            console.log("webSocket 连接发生错误")
        };

        //连接成功建立的回调方法
        websocket.onopen = function () {
            console.log("webSocket 连接成功")
        };

        //接收到消息的回调方法,此处添加处理接收消息方法,当前是将接收到的信息显示在网页上
        websocket.onmessage = function (event) {
            setMessageInnerHTML(event.data);
        };

        //连接关闭的回调方法
        websocket.onclose = function () {
            console.log("webSocket 连接关闭,如需登录请刷新页面。")
        };

        //监听窗口关闭事件,当窗口关闭时,主动去关闭websocket连接,防止连接还没断开就关闭窗口,server端会抛异常。
        window.onbeforeunload = function () {
            websocket.close();
        };

        //将消息显示在网页上,如果不需要显示在网页上,则不调用该方法
        function setMessageInnerHTML(result) {
            var message = JSON.parse(result.replace(/'/g,'\"'));
            // 消息不为空
            if(message !== undefined && message !== null){
                // 播放通知
                //$("#chatAudio").get(0).play();
                // 消息状态 log(默认), success(成功), warn(警告), error(危险)
                var status = message.status;
                naranja()[status]({
                    title: '新消息',
                    text:  "<div class='goto' m-type='"+message.type+"' m-key='"+message.bussinessKey+"'><a href='javascript:void(0)'>"+message.message+"</a></div>",
                    timeout: 'keep',
                    buttons: [{
                        text: '我知道了',
                        click: function (e) {
                            e.closeNotification();
                        }
                    }]
                })
            }
        }
		/**
         * 链接点击事件
         */
        $(document).on("click",".goto",function () {
            // 消息类型
            var type = $(this).attr("m-type");
            // 消息key
            var key = $(this).attr("m-key");
            // 点击之后关闭当前消息框
            naranja().closeThisNotification(this);
            // 根据类型去相应页面
            if(type === "todo"){
                // 根据 type请求不同的页面,key可作为参数携带
            }
        });
    });
</script>
- 接下来就是服务端的webSocket配置,要和js中的对应起来,首先是config类
package com.workfeng.message.config.webSocket;

import org.springframework.context.annotation.Bean;
import org.springframework.context.annotation.Configuration;
import org.springframework.web.socket.server.standard.ServerEndpointExporter;

@Configuration
public class WebSocketConfig {

    @Bean
    public ServerEndpointExporter serverEndpointExporter() {
        return new ServerEndpointExporter();
    }

}
- 然后是连接网页端的配置类
package com.workfeng.message.config.webSocket;

import com.alibaba.fastjson.JSONObject;
import com.workfeng.message.config.rabbitmq.MessageVo;
import org.slf4j.Logger;
import org.slf4j.LoggerFactory;
import org.springframework.stereotype.Component;

import javax.websocket.*;
import javax.websocket.server.PathParam;
import javax.websocket.server.ServerEndpoint;
import java.io.IOException;
import java.util.Iterator;
import java.util.Map;
import java.util.concurrent.ConcurrentHashMap;

/**
 * ServerEndpoint
 * <p>
 * 使用springboot的唯一区别是要@Component声明下,而使用独立容器是由容器自己管理websocket的,但在springboot中连容器都是spring管理的。
 * <p>
 * 虽然@Component默认是单例模式的,但springboot还是会为每个websocket连接初始化一个bean,所以可以用一个静态set保存起来。
 */
@ServerEndpoint("/ws/message/{userId}") //WebSocket客户端建立连接的地址
@Component
public class WebSocketServerEndpoint {

    private final static Logger log = LoggerFactory.getLogger(WebSocketServerEndpoint.class);
    /**
     * 存活的session集合(使用线程安全的map保存)
     */
    private static Map<String, Session> livingSessions = new ConcurrentHashMap<>();
    /**
     * 未发送出的消息
     */
    public static Map<String,Map<String,String>> unSensMessages = new ConcurrentHashMap<>();
    /**
     * 建立连接的回调方法
     *
     * @param session 与客户端的WebSocket连接会话
     * @param userId  用户名,WebSocket支持路径参数
     */
    @OnOpen
    public void onOpen(Session session, @PathParam("userId") String userId) {
        // 建立连接时 保存当前登陆人到已登录集合中
        livingSessions.put(userId, session);
        // 判断当前登陆人是否有未读的消息  有则发送
        Iterator<Map.Entry<String, Map<String, String>>> iterator = unSensMessages.entrySet().iterator();
        while (iterator.hasNext()){
            Map.Entry<String, Map<String, String>> next = iterator.next();
            Map<String, String> nextValue = next.getValue();
            Iterator<Map.Entry<String, String>> iterator1 = nextValue.entrySet().iterator();
            while (iterator1.hasNext()){
                Map.Entry<String, String> next1 = iterator1.next();
                if(next1.getKey().equals(userId)){
                    sendMessage(session,next1.getValue());
                    //移除已发送的消息
                    iterator1.remove();
                }
            }
            if(next.getValue().size() == 0){
                // 当前事件已全部发送 移除该事件
                iterator.remove();
            }
        }
        log.info(userId + "进入连接");
    }

    @OnMessage
    public void onMessage(String message, Session session, @PathParam("userId") String userId) {
        log.info(userId + " : " + message);
        //sendMessageToAll(userId + " : " + message);
    }


    @OnError
    public void onError(Session session, Throwable error) {
        log.info("发生错误");
        log.error(error.getStackTrace() + "");
    }


    @OnClose
    public void onClose(Session session, @PathParam("userId") String userId) {
        livingSessions.remove(userId);
        log.info(userId + " 关闭连接");
    }

    /**
     * 单独发送消息
     *
     * @param session
     * @param message
     */
    public void sendMessage(Session session, String message) {
        try {
            session.getBasicRemote().sendText(message.replace('\"', '\''));
        } catch (IOException e) {
            e.printStackTrace();
        }
    }

    /**
     * 群发消息
     * userIds 是需要接收消息的用户id集合 可单发,可群发
     *
     * @param message
     */
    public void sendMessageToAll(String message) {
        // 将json字符串转为message类
        MessageVo messageVo = JSONObject.parseObject(message, MessageVo.class);

        // 需要发送的人可能未上线 将未发送的消息保存到未发送集合中
        Map<String,String> unSendsUsers = new ConcurrentHashMap<>();
        // 遍历需要发送到的人
        for (Integer userId : messageVo.getUserIds()) {
            // 当前已登录的人
            if(livingSessions.get(String.valueOf(userId)) != null){
                //当前user已登录,发送消息
                sendMessage(livingSessions.get(String.valueOf(userId)), message);
            }else{
                // 当前user未登录,保存到集合中
                unSendsUsers.put(String.valueOf(userId),message);
            }
        };
        // 这些消息属于同一个事件,放入集合中
        unSensMessages.put(messageVo.getBussinessKey(),unSendsUsers);
    }

}
监听消息队列
- 最后就是监听消息队列,通过webSocke发送到前端页面
- 先封装一个 message 类,保存我们需要发送的消息
package com.workfeng.message.config.rabbitmq;

import org.springframework.stereotype.Component;

import java.io.Serializable;
import java.util.List;

/**
 * 公共消息类
 */
@Component
public class MessageVo implements Serializable {

    //消息的唯一标识
    private String bussinessKey;
    //消息内容
    private String message;
    //可以收到的用户id
    private List<Integer> userIds;

    public String getBussinessKey() {
        return bussinessKey;
    }

    public void setBussinessKey(String bussinessKey) {
        this.bussinessKey = bussinessKey;
    }

    public String getMessage() {
        return message;
    }

    public void setMessage(String message) {
        this.message = message;
    }

    public List<Integer> getUserIds() {
        return userIds;
    }

    public void setUserIds(List<Integer> userIds) {
        this.userIds = userIds;
    }
}
- 然后是监听类
package com.workfeng.message.config.rabbitmq;

import com.rabbitmq.client.Channel;
import com.workfeng.message.config.webSocket.WebSocketServerEndpoint;
import org.slf4j.Logger;
import org.slf4j.LoggerFactory;
import org.springframework.amqp.core.AcknowledgeMode;
import org.springframework.amqp.core.Message;
import org.springframework.amqp.core.Queue;
import org.springframework.amqp.rabbit.annotation.EnableRabbit;
import org.springframework.amqp.rabbit.annotation.RabbitListenerConfigurer;
import org.springframework.amqp.rabbit.connection.ConnectionFactory;
import org.springframework.amqp.rabbit.listener.RabbitListenerEndpointRegistrar;
import org.springframework.amqp.rabbit.listener.SimpleMessageListenerContainer;
import org.springframework.amqp.rabbit.listener.api.ChannelAwareMessageListener;
import org.springframework.beans.factory.annotation.Autowired;
import org.springframework.beans.factory.annotation.Qualifier;
import org.springframework.context.annotation.Bean;
import org.springframework.context.annotation.Configuration;
import org.springframework.messaging.converter.MappingJackson2MessageConverter;
import org.springframework.messaging.handler.annotation.support.DefaultMessageHandlerMethodFactory;

import java.io.IOException;


@Configuration
@EnableRabbit
public class ConsumerConfig implements RabbitListenerConfigurer {

    private final static Logger log = LoggerFactory.getLogger(ConsumerConfig.class);

    @Autowired
    private ConnectionFactory connectionFactory;
    @Autowired
    private WebSocketServerEndpoint webSocketServerEndpoint;

    @Bean
    public DefaultMessageHandlerMethodFactory handlerMethodFactory() {
        DefaultMessageHandlerMethodFactory factory = new DefaultMessageHandlerMethodFactory();
        factory.setMessageConverter(new MappingJackson2MessageConverter());
        return factory;
    }

    /**
     * 监听消息发送
     * @param transaction
     * @param contract
     * @param qualification
     * @return
     */
    @Bean
    public SimpleMessageListenerContainer messageContainer(@Qualifier("queueTransaction") Queue transaction, @Qualifier("queueContract") Queue contract, @Qualifier("queueQualification") Queue qualification) {
        SimpleMessageListenerContainer container = new SimpleMessageListenerContainer(connectionFactory);
        container.setQueues(transaction, contract, qualification);
        container.setMaxConcurrentConsumers(1);
        container.setConcurrentConsumers(1);
        container.setAcknowledgeMode(AcknowledgeMode.MANUAL); //设置确认模式手工确认
        container.setMessageListener(new ChannelAwareMessageListener() {
            @Override
            public void onMessage(Message message, Channel channel) throws Exception {
                // 获取消息体
                byte[] body = message.getBody();
                log.info("receive msg : " + new String(body));
                try {
                    // 通过websocket向前端发送消息
                    webSocketServerEndpoint.sendMessageToAll(new String(body));
                    channel.basicAck(message.getMessageProperties().getDeliveryTag(), false);//确认消息成功消费
                } catch (IOException e) {
                    log.error("消息推送前台出错:" + e.getMessage() + "/r/n重新发送");
                    channel.basicNack(message.getMessageProperties().getDeliveryTag(), false, true); //重新发送
                }
            }
        });
        return container;
    }

    @Override
    public void configureRabbitListeners(RabbitListenerEndpointRegistrar rabbitListenerEndpointRegistrar) {
        rabbitListenerEndpointRegistrar.setMessageHandlerMethodFactory(handlerMethodFactory());
    }
}
模拟发送消息
- ==============================
- 接下来我们模拟向用户1 发送消息
- ==============================
	@RequestMapping("/hello")
    @ResponseBody
    public Object hello(){

        // 发送给用户1的消息
        Integer[] ids = {1};
        String[] status = {"log","success","warn","error"};

        for(int i = 0; i< status.length;i++){
            MessageVo vo = new MessageVo();
            vo.setBussinessKey("00000"+i); // 消息唯一标识,将事件id作为消息唯一标识
            vo.setMessage("这是发送给用户 "+ids[0]+" 的 "+status[i]+" 状态的消息"); // 消息内容
            vo.setUserIds(Arrays.asList(ids)); //收消息的人
            vo.setStatus(status[i]); //警告
            vo.setType("toDo"); // 待办事项
            sender.send(vo);
        }

        return new SuccessTip();
    }
- 我们先访问 /index 模拟用户1登陆,
- 再访问 /hello ,这个时候我们前端就受到了四条消息

消息发送逻辑详解
- 我们来看看这中间都做了什么
- 1,用户登陆

- 2,前端html页面获取到userId, js向后端发起socket连接

- 3,连接到 *WebSocketServerEndpoint 类,触发 onOpen() 方法

- 4,onOpen() 方法将当前登陆人的id保存到已登录人的集合中,并判断当前登陆人是否有未读事件的消息,有则发送。注释已经写了。想看的可以看看

- 5,没有消息,就啥都没有反应啦。。。
- 所以我们就主动发一条

- 6 看一下send方法

- 7,这里就通过rabbitMq发送了一条消息
- 所以下一步就到了消息监听那里

- 8 再接下来就是webSocket那边给前端发送消息了
- 这边就是先遍历我需要发送的人,再查看我发送的人是否已登录,已登录就发送,未登陆就保存到集合中,下次登陆时就可以读到(第四步)


- 9,接下类我们测试一下先发消息,在登陆看看是否可以读到消息
- 我们先发消息,直接访问 /hello

- 10,发送成功 ,此时用户1是有一条未读消息的

- 11 我们 “登陆” 用户1,访问 /index

- 成功读到!!!

定时循环发送消息
- 这边的定时任务我用的是 quartz ,可以动态生成定时任务,和动态删除,正好可以用到。
- pom 文件我们之前引过了
- 接下来就是配置
- 首先是jobBean工厂
package com.workfeng.message.config.quartz;

import org.quartz.spi.TriggerFiredBundle;
import org.springframework.beans.factory.config.AutowireCapableBeanFactory;
import org.springframework.context.ApplicationContext;
import org.springframework.context.ApplicationContextAware;
import org.springframework.scheduling.quartz.SpringBeanJobFactory;

/**
 * 自动注入的jobBean工厂
 */
public class AutowiringSpringBeanJobFactory extends SpringBeanJobFactory
        implements ApplicationContextAware {

    private transient AutowireCapableBeanFactory beanFactory;

    @Override
    public void setApplicationContext(final ApplicationContext context) {

        beanFactory = context.getAutowireCapableBeanFactory();
    }

    @Override
    protected Object createJobInstance(final TriggerFiredBundle bundle) throws Exception {
        final Object job = super.createJobInstance(bundle);

        beanFactory.autowireBean(job);

        return job;
    }
}
- 配置一个监听类,可以在控制台看到任务的动态log信息
package com.workfeng.message.config.quartz;

import org.quartz.JobExecutionContext;
import org.quartz.JobExecutionException;
import org.quartz.JobListener;

public class SchedulerListener implements JobListener {
    public static final String LISTENER_NAME = "QuartSchedulerListener";

    @Override
    public String getName() {
        return LISTENER_NAME; //must return a name
    }

    //任务被调度前
    @Override
    public void jobToBeExecuted(JobExecutionContext context) {

        String jobName = context.getJobDetail().getKey().toString();
        System.out.println("jobToBeExecuted");
        System.out.println("Job : " + jobName + " is going to start...");

    }

    //任务调度被拒了
    @Override
    public void jobExecutionVetoed(JobExecutionContext context) {
        System.out.println("jobExecutionVetoed");
        //可以做一些日志记录原因

    }

    //任务被调度后
    @Override
    public void jobWasExecuted(JobExecutionContext context,
                               JobExecutionException jobException) {
        System.out.println("jobWasExecuted");

        String jobName = context.getJobDetail().getKey().toString();
        System.out.println("Job : " + jobName + " is finished...");

        if (jobException!=null&&!jobException.getMessage().equals("")) {
            System.out.println("Exception thrown by: " + jobName
                    + " Exception: " + jobException.getMessage());
        }

    }
}
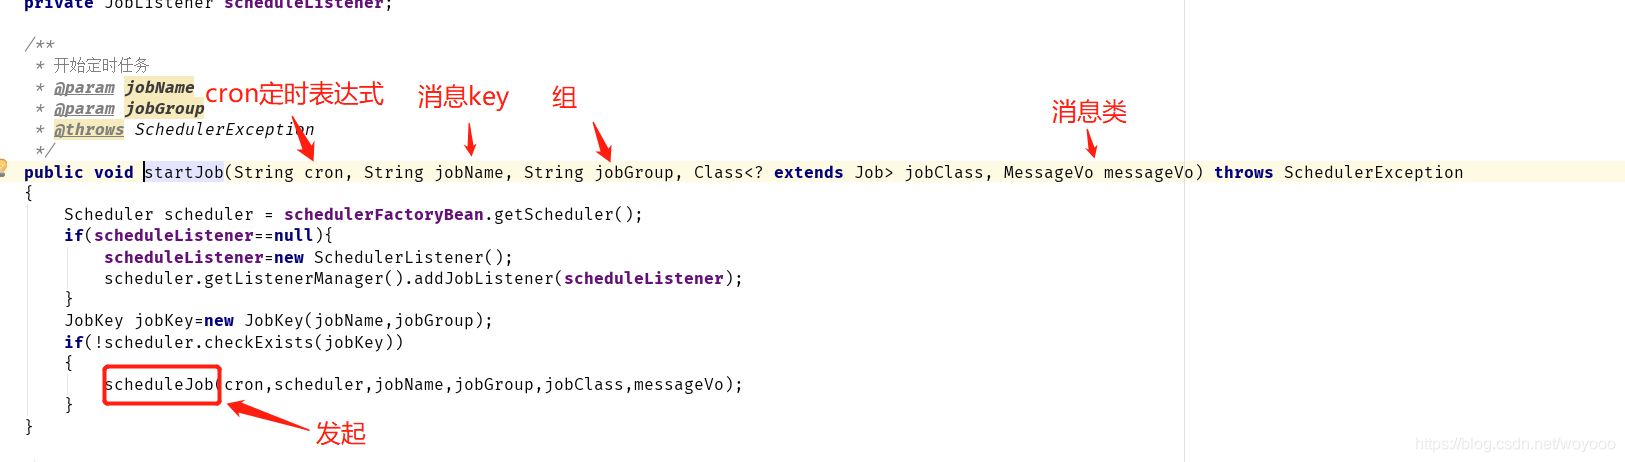
- 创建动态任务的管理类
- startJob() 方法创建定时任务,供外部调用
- scheduleJob() 启动任务
package com.workfeng.message.config.quartz;

import com.alibaba.fastjson.JSONObject;
import com.workfeng.message.config.rabbitmq.MessageVo;
import org.quartz.*;
import org.springframework.beans.factory.annotation.Autowired;
import org.springframework.scheduling.quartz.SchedulerFactoryBean;
import org.springframework.stereotype.Component;

@Component
public class SchedulerManager {

    @SuppressWarnings("SpringJavaInjectionPointsAutowiringInspection")
    @Autowired
    private SchedulerFactoryBean schedulerFactoryBean;
    private JobListener scheduleListener;

    /**
     * 开始定时任务
     * @param jobName
     * @param jobGroup
     * @throws SchedulerException
     */
    public void startJob(String cron, String jobName, String jobGroup, Class<? extends Job> jobClass, MessageVo messageVo) throws SchedulerException
    {
        Scheduler scheduler = schedulerFactoryBean.getScheduler();
        if(scheduleListener==null){
            scheduleListener=new SchedulerListener();
            scheduler.getListenerManager().addJobListener(scheduleListener);
        }
        JobKey jobKey=new JobKey(jobName,jobGroup);
        if(!scheduler.checkExists(jobKey))
        {
            scheduleJob(cron,scheduler,jobName,jobGroup,jobClass,messageVo);
        }
    }

    /**
     * 移除定时任务
     * @param jobName
     * @param jobGroup
     * @throws SchedulerException
     */
    public void deleteJob(String jobName,String jobGroup) throws SchedulerException
    {
        Scheduler scheduler = schedulerFactoryBean.getScheduler();
        JobKey jobKey=new JobKey(jobName,jobGroup);
        scheduler.deleteJob(jobKey);
    }
    /**
     * 暂停定时任务
     * @param jobName
     * @param jobGroup
     * @throws SchedulerException
     */
    public void pauseJob(String jobName,String jobGroup) throws SchedulerException
    {
        Scheduler scheduler = schedulerFactoryBean.getScheduler();
        JobKey jobKey=new JobKey(jobName,jobGroup);
        scheduler.pauseJob(jobKey);
    }
    /**
     * 恢复定时任务
     * @param jobName
     * @param jobGroup
     * @throws SchedulerException
     */
    public void resumeJob(String jobName,String jobGroup) throws SchedulerException
    {
        Scheduler scheduler = schedulerFactoryBean.getScheduler();
        JobKey triggerKey=new JobKey(jobName,jobGroup);
        scheduler.resumeJob(triggerKey);
    }
    /**
     * 清空所有当前scheduler对象下的定时任务【目前只有全局一个scheduler对象】
     * @throws SchedulerException
     */
    public void clearAll() throws SchedulerException {
        Scheduler scheduler = schedulerFactoryBean.getScheduler();
        scheduler.clear();
    }


    /**
     * 动态创建Job
     * @param scheduler
     * @throws SchedulerException
     */
    private void scheduleJob(String cron,Scheduler scheduler,String jobName,String jobGroup,Class<? extends Job> jobClass,MessageVo messageVo) throws SchedulerException{
		// 将消息key,和消息体作为参数发送
        JobDetail jobDetail = JobBuilder
                .newJob(jobClass).withIdentity(jobName, jobGroup)
                .usingJobData(messageVo.getBussinessKey(), JSONObject.toJSON(messageVo).toString())
                .usingJobData("businessKey",messageVo.getBussinessKey())
                .build();
        // 每5s执行一次
        CronScheduleBuilder scheduleBuilder = CronScheduleBuilder.cronSchedule(cron);
        CronTrigger cronTrigger = TriggerBuilder.newTrigger().withIdentity(jobName, jobGroup).withSchedule(scheduleBuilder).build();

        scheduler.scheduleJob(jobDetail,cronTrigger);
    }

}
- 这边定时任务还没有处理我们的业务逻辑(定时向前端推送消息)
- 下边我们就处理
package com.workfeng.message.config.quartz;

import com.workfeng.message.config.util.DateUtil;
import com.workfeng.message.config.webSocket.WebSocketServerEndpoint;
import org.jboss.logging.Logger;
import org.quartz.*;
import org.springframework.beans.factory.annotation.Autowired;

import java.util.Date;

/**
 * 自定义定时任务
 */
public class ScheduledJob implements Job {

    private static final Logger logger= Logger.getLogger(ScheduledJob.class);

    @Autowired
    private WebSocketServerEndpoint webSocketServerEndpoint;

    @Override
    public void execute(JobExecutionContext jobExecutionContext) throws JobExecutionException {

        // 获取 jobDataMap
        JobDetail jobDetail = jobExecutionContext.getJobDetail();
        JobDataMap jobDataMap = jobDetail.getJobDataMap();
        // 获取消息businessKey,
        String businessKey = jobDataMap.getString("businessKey");
        // 再根据key获取消息内容
        String message = jobDataMap.getString(businessKey);

        //发送消息  执行任务逻辑....
        webSocketServerEndpoint.sendMessageToAll(message);

        logger.info("时间: "+ DateUtil.format(new Date(),"yyyy-MM-dd HH:mm:ss")+" 执行定时任务: key: "+ businessKey +",message: " + message);
    }
}
测试定时发送消息
- 这样定时任务就配置的差不多了
- 我们测试一下
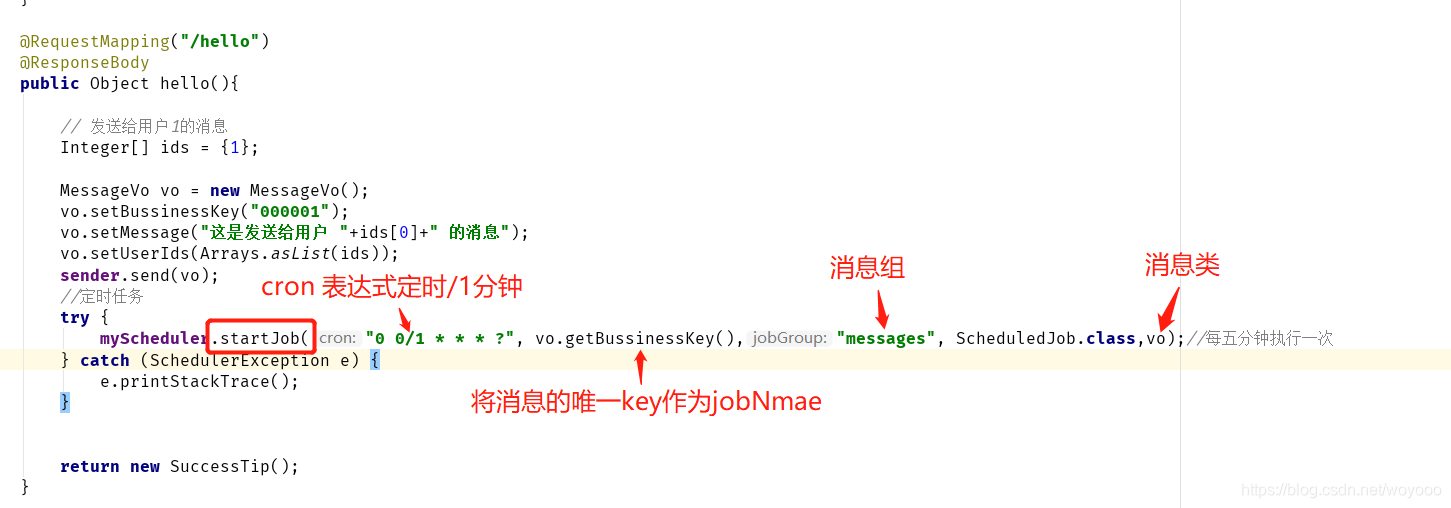
- 发消息是启动定时任务,每分钟发送一次
- 修改 /hello
	// 注入
	@Autowired
    public SchedulerManager myScheduler;

	@RequestMapping("/hello")
    @ResponseBody
    public Object hello(){

        // 发送给用户1的消息
        Integer[] ids = {1};
        String[] status = {"log","success","warn","error"};

        for(int i = 0; i< status.length;i++){
            MessageVo vo = new MessageVo();
            vo.setBussinessKey("00000"+i); // 消息唯一标识,将事件id作为消息唯一标识
            vo.setMessage("这是发送给用户 "+ids[0]+" 的 "+status[i]+" 状态的消息"); // 消息内容
            vo.setUserIds(Arrays.asList(ids)); //收消息的人
            vo.setStatus(status[i]); //警告
            vo.setType("toDo"); // 待办事项
            sender.send(vo);

            //定时任务
            try {
                myScheduler.startJob("0 0/1 * * * ?", vo.getBussinessKey(),"messages", ScheduledJob.class,vo);//每五分钟执行一次
            } catch (SchedulerException e) {
                e.printStackTrace();
            }
        }
        return new SuccessTip();
    }
- 重新访问之后,控制台打印

- 删除定时任务
	@RequestMapping("/deletejob")
    @ResponseBody
    public Object deleteJob(){
        //删除定时任务
        try {
        	// 根据 事件唯一key 来删除
        	// 删除 messages 组
            myScheduler.deleteJob("000001","messages");
            System.out.println("定时消息任务key: "+ "000001" + " 已删除");
        } catch (SchedulerException e) {
            e.printStackTrace();
        }
        return new SuccessTip();
    }
- 访问后控制台打印

quartz 定时任务实现逻辑步骤
- 1,启动定时任务
- 2,启动任务
- 3,发起时设置参数,携带message

- 4, 监听任务执行

**
另外有错欢迎指正
**
**
转载请声明作者
**
========================= end ===============


 2万+
2万+

 被折叠的 条评论
为什么被折叠?
被折叠的 条评论
为什么被折叠?
 到【灌水乐园】发言


