


一个在平面上可显示多个条目的可滚动的视图组件,该组件中的条目通过一个ListAdapter和该组件进行关联。比如android手机中显示的应用:

XML属性
| 属性名称 | 描述 |
| android:columnWidth | 设置列的宽度。关联的方法为:setColumnWidth(int) |
| android:gravity | 设置此组件中的内容在组件中的位置。可选的值有:top、bottom、left、right、center_vertical、fill_vertical、center_horizontal、fill_horizontal、center、fill、clip_vertical 可以多选,用“|”分开。关联方法:setGravity (int gravity) |
| android:horizontalSpacing | 两列之间的间距。关联方法:setHorizontalSpacing(int) |
| android:numColumns | 列数。关联方法:setNumColumns(int) |
| android:stretchMode | 缩放模式。关联方法:setStretchMode(int) |
| android:verticalSpacing | 两行之间的间距。关联方法:setVerticalSpacing(int) |
下面我们通过一个图片展示的例子
布局文件(gridview_main.xml)编写:
<?xml version="1.0" encoding="utf-8"?>
<GridView xmlns:android="http://schemas.android.com/apk/res/android"
    android:id="@+id/gridview"
    android:layout_width="fill_parent"
    android:layout_height="fill_parent"
    android:columnWidth="90dp"
    android:numColumns="auto_fit"
    android:verticalSpacing="10dp"
    android:horizontalSpacing="10dp"
    android:stretchMode="columnWidth"
    android:gravity="center"
/>
源码:
public class MainActivity extends Activity {
 @Override
 public void onCreate(Bundle savedInstanceState) {
     super.onCreate(savedInstanceState);
     setContentView(R.layout.gridview_main);
     GridView gridview = (GridView) findViewById(R.id.gridview);
     gridview.setAdapter(new ImageAdapter(this));
     gridview.setOnItemClickListener(new OnItemClickListener() {
      @Override
         public void onItemClick(AdapterView<?> parent, View v, int position, long id) {
             Toast.makeText(MainActivity.this, "" + position, Toast.LENGTH_SHORT).show();
         }
     });
 }

 public class ImageAdapter extends BaseAdapter {
     private Context mContext;
     public ImageAdapter(Context c) {
         mContext = c;
     }
     @Override
     public int getCount() {
         return mThumbIds.length;
     }
     @Override
     public Object getItem(int position) {
         return null;
     }
     @Override
     public long getItemId(int position) {
         return 0;
     }
     // create a new ImageView for each item referenced by the Adapter
     @Override
     public View getView(int position, View convertView, ViewGroup parent) {
         ImageView imageView;
         if (convertView == null) { // if it's not recycled, initialize some attributes
             imageView = new ImageView(mContext);
             imageView.setLayoutParams(new GridView.LayoutParams(85, 85));
             imageView.setScaleType(ImageView.ScaleType.CENTER_CROP);
             imageView.setPadding(8, 8, 8, 8);
         } else {
             imageView = (ImageView) convertView;
         }
         imageView.setImageResource(mThumbIds[position]);
         return imageView;
     }
     // references to our images
     private Integer[] mThumbIds = {
             R.drawable.sample_2, R.drawable.sample_3,
             R.drawable.sample_4, R.drawable.sample_5,
             R.drawable.sample_6, R.drawable.sample_7,
             R.drawable.sample_0, R.drawable.sample_1,
             R.drawable.sample_2, R.drawable.sample_3,
             R.drawable.sample_4, R.drawable.sample_5,
             R.drawable.sample_6, R.drawable.sample_7,
             R.drawable.sample_0, R.drawable.sample_1,
             R.drawable.sample_2, R.drawable.sample_3,
             R.drawable.sample_4, R.drawable.sample_5,
             R.drawable.sample_6, R.drawable.sample_7
     };
 }
}
在源码中,我们监听了GridView的OnItemClick事件,在点击时,通过Toast显示出当前图片的索引号。
这里我们也自定义了GridView的Adapter方法,使得在获取view对象时能获取到ImageView对象。
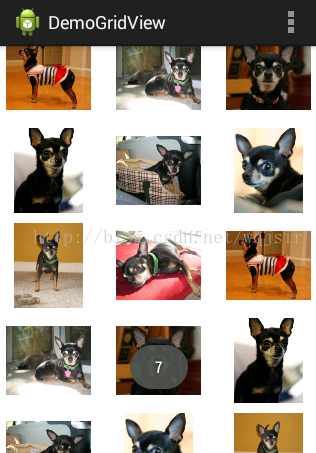
运行效果:


 4755
4755


 被折叠的 条评论
为什么被折叠?
被折叠的 条评论
为什么被折叠?
 到【灌水乐园】发言


