


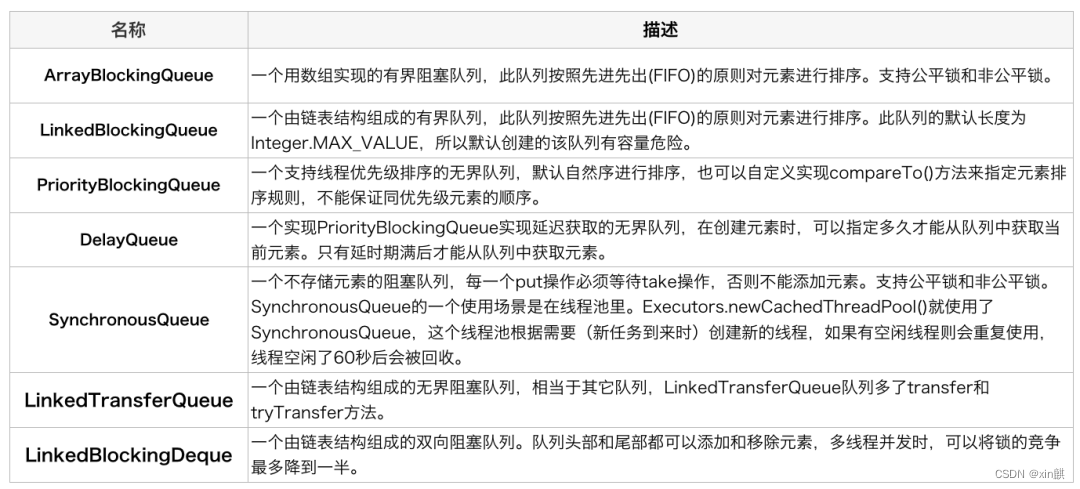
一、jdk的阻塞队列:
二、Spring boot工程的有哪些阻塞队列呢?
1、默认注入的ThreadPoolTaskExecutor
视频解说:
线程池篇-springboot项目中的service层里简单注入ThreadPoolTaskExecutor并且使用_哔哩哔哩_bilibili
程序代码:ThreadPoolDemo/ThreadPool00 · xin麒/XinQiUtilsOrDemo - 码云 - 开源中国 (gitee.com)
简单在service层注入的话是这样的:
@Autowired
ThreadPoolTaskExecutor threadPoolTaskExecutor;
同时在这里使用这个线程池:
@Override
public Object springbootThreadPool(Long count) {
    try {
        threadPoolTaskExecutor.execute(() -> {
            try {
                Thread.sleep(1000 * 1);
                log.debug("v me 50");
            } catch (InterruptedException e) {
                e.printStackTrace();
            }
        });
    } catch (Exception e) {
        e.printStackTrace();
    }
    return "nice";
}
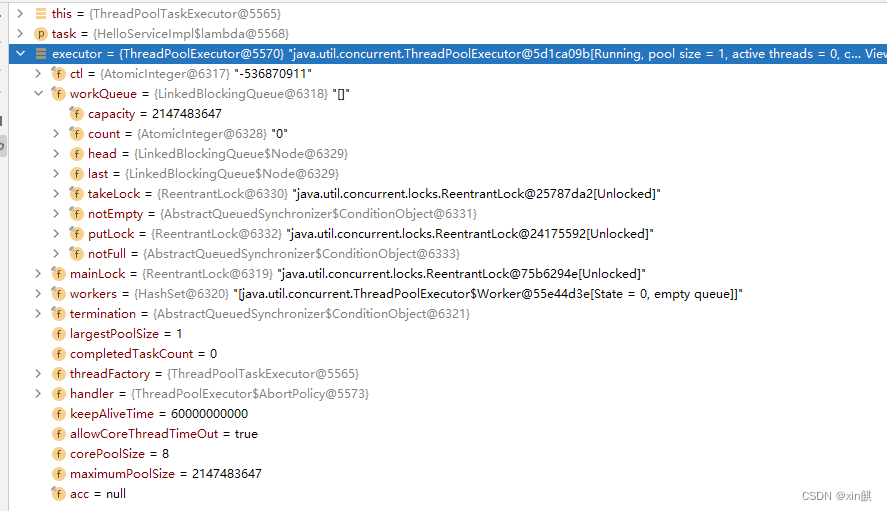
以debug方式启动项目来查看一下,发现这里默认使用的阻塞队列是:
2、自定义ThreadPoolTaskExecutor
视频解说:
【2】https://www.bilibili.com/video/BV1Qu4y1X7zk
【3】https://www.bilibili.com/video/BV1Cu4y1i7Ae
程序代码:
https://gitee.com/flowers-bloom-is-the-sea/XinQiUtilsOrDemo/tree/master/ThreadPoolDemo/ThreadPool0
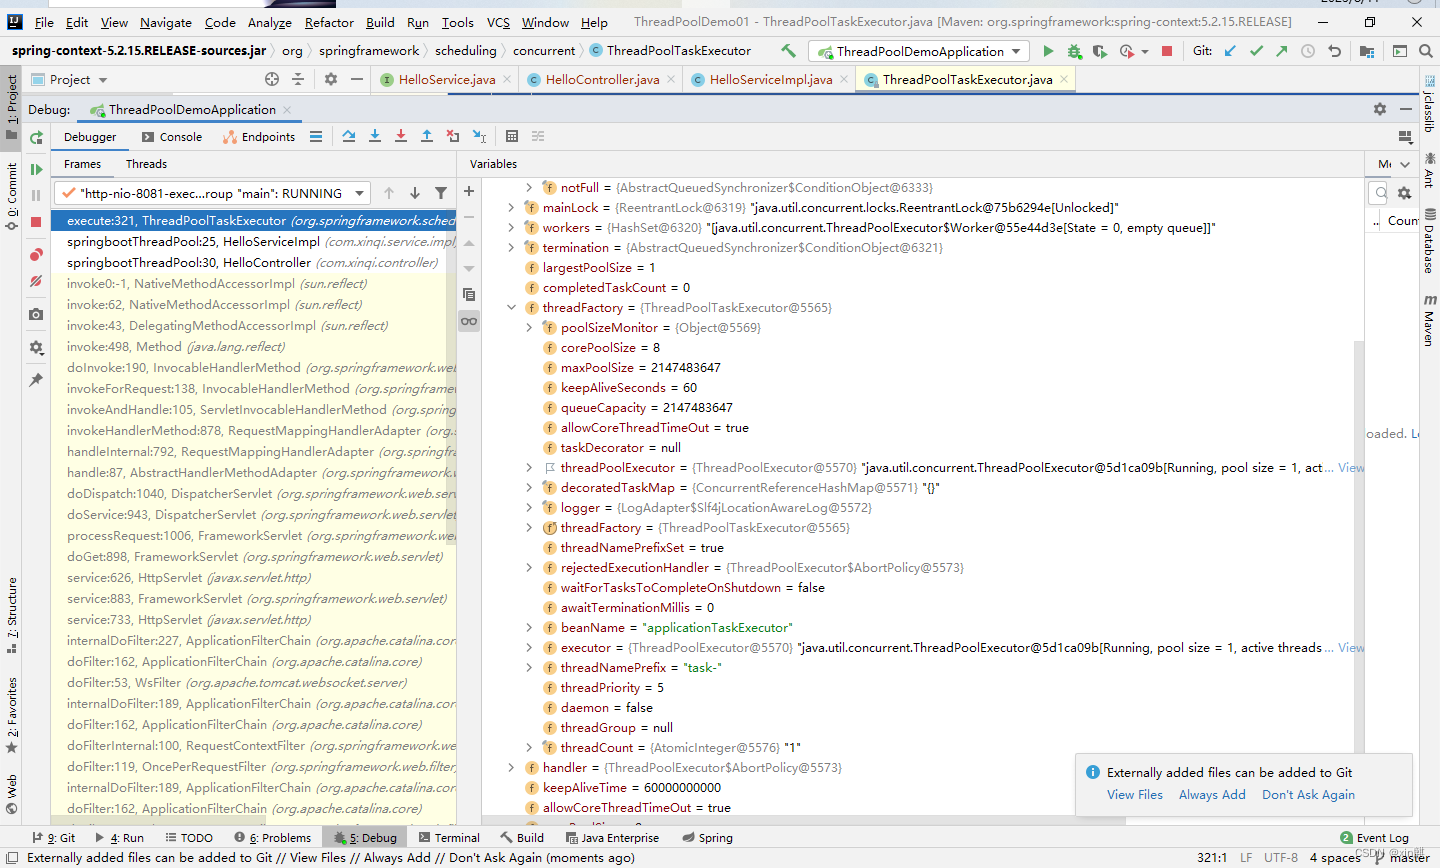
验证方式1-通过启动springboot工程,通过debug形式查看:
@Bean("xinTaskExecutor")
public Executor xinTaskExecutor() {
    ThreadPoolTaskExecutor taskExecutor = new ThreadPoolTaskExecutor();
    //设置线程池参数信息
    taskExecutor.setCorePoolSize(10);
    taskExecutor.setMaxPoolSize(50);
    taskExecutor.setQueueCapacity(0);
    taskExecutor.setKeepAliveSeconds(60);
    taskExecutor.setThreadNamePrefix("xinTaskExecutor--");
    taskExecutor.setWaitForTasksToCompleteOnShutdown(true);
    taskExecutor.setAwaitTerminationSeconds(60);

    //修改拒绝策略为使用当前线程执行
    taskExecutor.setRejectedExecutionHandler(new ThreadPoolExecutor.AbortPolicy());
    //初始化线程池
    taskExecutor.initialize();
    return taskExecutor;
}
验证方式2-main方法创建并初始化:
通过debug形式查看
①查看initialize方法就可以了
public static void main(String[] args) {
    ThreadPoolTaskExecutor taskExecutor = new ThreadPoolTaskExecutor();
    //设置线程池参数信息
    taskExecutor.setCorePoolSize(10);
    taskExecutor.setMaxPoolSize(50);
    taskExecutor.setQueueCapacity(0);
    taskExecutor.setKeepAliveSeconds(60);
    taskExecutor.setThreadNamePrefix("myExecutor--");
    taskExecutor.setWaitForTasksToCompleteOnShutdown(true);
    taskExecutor.setAwaitTerminationSeconds(10);

    //修改拒绝策略为使用当前线程执行
    taskExecutor.setRejectedExecutionHandler(new ThreadPoolExecutor.AbortPolicy());
    //初始化线程池
    taskExecutor.initialize();
}
②可以看到ExecutorConfigurationSupport类里面有这个方法
public void initialize() {
   if (logger.isInfoEnabled()) {
      logger.info("Initializing ExecutorService" + (this.beanName != null ? " '" + this.beanName + "'" : ""));
   }
   if (!this.threadNamePrefixSet && this.beanName != null) {
      setThreadNamePrefix(this.beanName + "-");
   }
   this.executor = initializeExecutor(this.threadFactory, this.rejectedExecutionHandler);
}
直接看this.executor = initializeExecutor(this.threadFactory, this.rejectedExecutionHandler)
③来到org.springframework.scheduling.concurrent.ThreadPoolTaskExecutor
@Override
protected ExecutorService initializeExecutor(
      ThreadFactory threadFactory, RejectedExecutionHandler rejectedExecutionHandler) {

   BlockingQueue<Runnable> queue = createQueue(this.queueCapacity);

   ThreadPoolExecutor executor;
   if (this.taskDecorator != null) {
      executor = new ThreadPoolExecutor(
            this.corePoolSize, this.maxPoolSize, this.keepAliveSeconds, TimeUnit.SECONDS,
            queue, threadFactory, rejectedExecutionHandler) {
         @Override
         public void execute(Runnable command) {
            Runnable decorated = taskDecorator.decorate(command);
            if (decorated != command) {
               decoratedTaskMap.put(decorated, command);
            }
            super.execute(decorated);
         }
      };
   }
   else {
      executor = new ThreadPoolExecutor(
            this.corePoolSize, this.maxPoolSize, this.keepAliveSeconds, TimeUnit.SECONDS,
            queue, threadFactory, rejectedExecutionHandler);

   }

   if (this.allowCoreThreadTimeOut) {
      executor.allowCoreThreadTimeOut(true);
   }

   this.threadPoolExecutor = executor;
   return executor;
}
直接看createQueue(this.queueCapacity)即可
④org.springframework.scheduling.concurrent.ThreadPoolTaskExecutor#createQueue
可以看到要么new LinkedBlockingQueue<>(queueCapacity)要么就new SynchronousQueue<>()
protected BlockingQueue<Runnable> createQueue(int queueCapacity) {
   if (queueCapacity > 0) {
      return new LinkedBlockingQueue<>(queueCapacity);
   }
   else {
      return new SynchronousQueue<>();
   }
}
那么有没有其他阻塞队列可选呢?这个我就没详细去看了,可以自己尝试下找一下有没有其他方式可以的,难道说重写在里面的方法吗?可行性有待验证。如果创建一个继承了org.springframework.scheduling.concurrent.ThreadPoolTaskExecutor类,且重写了createQueue方法的话那么可以考虑下。就这样吧。
三、和jdk的线程池的区别
1、感觉没什么区别,因为ThreadPoolTaskExecutor内使用的线程池本来就是成员变量中的
@Nullable
private ThreadPoolExecutor threadPoolExecutor;
2、springboot的项目里可以通过注解方式来执行方法
只不过指定使用哪个线程池来执行要异步执行方法的内容。
https://www.bilibili.com/video/BV1A14y1B78x/
如果是默认的注解来执行内容则可能有其他问题:
https://www.bilibili.com/video/BV1Gu4y1q7TY
但是可以通过注解指定使用哪个线程池:
https://www.bilibili.com/video/BV1e44y1c7uE


 376
376


 被折叠的 条评论
为什么被折叠?
被折叠的 条评论
为什么被折叠?
 到【灌水乐园】发言


