


全文来自于https://itbaima.net/document
spring mvc配置
基于xml的配置方法
- pom.xml添加依赖
<dependency>
    <groupId>org.springframework</groupId>
    <artifactId>spring-webmvc</artifactId>
    <version>6.0.10</version>
</dependency>
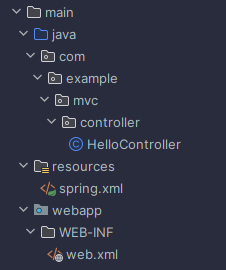
- 目录结构
- web.xml配置
- 这个是用于加载
spring.xml的文件 - 这个把核心的
dispatcherServlet加载进来
<servlet>
        <servlet-name>mvc</servlet-name>
        <servlet-class>org.springframework.web.servlet.DispatcherServlet</servlet-class>
        <init-param>
            <param-name>contextConfigLocation</param-name>
            <param-value>classpath:spring.xml</param-value>
        </init-param>
    </servlet>
    <servlet-mapping>
        <servlet-name>mvc</servlet-name>
        <url-pattern>/</url-pattern>
    </servlet-mapping>
- spring.xml配置
- 这个是用于扫描
bean的配置文件
<context:component-scan base-package="com.example"/>
- controller配置
@Controller
public class HelloController {
    @ResponseBody
    @RequestMapping("/")
    public String hello(){
        System.out.println("HelloWorld!");
        return "HelloWorld!";
    }
}
基于注解的配置方法(新版)
- 直接删了
web.xml, 用实现了AbstractAnnotationConfigDispatcherServletInitializer接口的类来代替 getRoot...和getServlet...区别不大,解耦用的 实在不行直接全扔第一个里面也行- 在
getRoot...里面配置我们需要的config类 - 一定要写这一句 意味着从头拦截 不然一直404
@Override
  protected String[] getServletMappings() {
      return new String[]{"/"};    //匹配路径,与上面一致,从根目录拦截
  }
- 完整版配置
public class MainInitializer extends AbstractAnnotationConfigDispatcherServletInitializer {

    @Override
    protected Class<?>[] getRootConfigClasses() {
        return new Class[]{WebConfiguration.class};   //基本的Spring配置类,一般用于业务层配置
    }

    @Override
    protected Class<?>[] getServletConfigClasses() {
        return new Class[0];  //配置DispatcherServlet的配置类、主要用于Controller等配置,这里为了教学简单,就不分这么详细了,只使用上面的基本配置类
    }

    @Override
    protected String[] getServletMappings() {
        return new String[]{"/"};    //匹配路径,与上面一致,从根目录拦截
    }
}
WebConfiguration配置类- 这个类里面配置了
@ComponentScan扫描的包 - 这个类里面配置了
@EnableWebMvc开启mvc配置 - @ComponentScan(“com.example.controller”)扫描的包是
controller包\- 把
controller包下的类注入成bean
- 把
@Configuration
@EnableWebMvc   //快速配置SpringMvc注解,如果不添加此注解会导致后续无法通过实现WebMvcConfigurer接口进行自定义配置
@ComponentScan("com.example.controller")
public class WebConfiguration {
}
controller配置
@Controller
public class HelloController {
    @ResponseBody
    @RequestMapping("/")
    public String hello(){
        System.out.println("HelloWorld!");
        return "HelloWorld!";
    }
}
视图解析器和控制器(thymeleaf了解即可 以后都是json)
pom.xml添加依赖
<dependency>
    <groupId>org.thymeleaf</groupId>
    <artifactId>thymeleaf-spring6</artifactId>
    <version>3.1.1.RELEASE</version>
</dependency>
- 主要是要了解webConfig 里面配置各种各样我们需要的bean
- 以后的
各种拦截器fastjson都是这种在配置类中配置bean的方式 配置(继承接口 webMvcConfigurer)
@Configuration
@EnableWebMvc
@ComponentScan("com.example.controller")
public class WebConfiguration {
    //我们需要使用ThymeleafViewResolver作为视图解析器,并解析我们的HTML页面
    @Bean
    public ThymeleafViewResolver thymeleafViewResolver(SpringTemplateEngine springTemplateEngine){
        ThymeleafViewResolver resolver = new ThymeleafViewResolver();
        resolver.setOrder(1);   //可以存在多个视图解析器,并且可以为他们设定解析顺序
        resolver.setCharacterEncoding("UTF-8");   //编码格式是重中之重
        resolver.setTemplateEngine(springTemplateEngine);   //和之前JavaWeb阶段一样,需要使用模板引擎进行解析,所以这里也需要设定一下模板引擎
        return resolver;
    }

    //配置模板解析器
    @Bean
    public SpringResourceTemplateResolver templateResolver(){
        SpringResourceTemplateResolver resolver = new SpringResourceTemplateResolver();
        resolver.setSuffix(".html");   //需要解析的后缀名称
        resolver.setPrefix("/");   //需要解析的HTML页面文件存放的位置,默认是webapp目录下,如果是类路径下需要添加classpath:前缀
      //resolver.setPrefix("classpath:");  这个是访问resource目录的写法

        return resolver;
    }

    //配置模板引擎Bean
    @Bean
    public SpringTemplateEngine springTemplateEngine(ITemplateResolver resolver){
        SpringTemplateEngine engine = new SpringTemplateEngine();
        engine.setTemplateResolver(resolver);   //模板解析器,默认即可
        return engine;
    }


}
controller配置- 了解即可
@RequestMapping(value = "/index")
public String index(Model model){  //这里不仅仅可以是Model,还可以是Map、ModelMap
        model.addAttribute("name", "yyds");
        return "index";
}
WebMvcConfigurer接口(很重要)
- https://blog.csdn.net/zhangpower1993/article/details/89016503
- 这个接口是用来配置
拦截器json跨域等等的 - 是给配置类实现的
- 里面有很多方法
@Configuration
@EnableWebMvc
@ComponentScan("com.example.controller")
public class WebConfiguration implements WebMvcConfigurer {

//    ... 上面是注册的很多bean(thymeleaf....) ...
//    dataSourse 以后可能也会在这些config里面配置

    @Override
    public void configureDefaultServletHandling(DefaultServletHandlerConfigurer configurer) {
        configurer.enable();   //开启默认的Servlet
    }

    @Override
    public void addResourceHandlers(ResourceHandlerRegistry registry) {
        registry.addResourceHandler("/static/**").addResourceLocations("/static/");
        //配置静态资源的访问路径
    }


}
@RequestMapping
快速使用
- postMethod
@RequestMapping(value = "/index", method = RequestMethod.POST)
public ModelAndView index(){
    return new ModelAndView("index");
}
- 要求参数
@RequestMapping(value = "/index", params = {"!username", "password"})
public ModelAndView index(){
    return new ModelAndView("index");
}
- 要求header
@RequestMapping(value = "/index", headers = "!Connection")
public ModelAndView index(){
    return new ModelAndView("index");
}
- 指定接受和返回类型
consumes和produces属性通常用于@RequestMapping注解(以及其专门的变体,如@GetMapping、@PostMapping等)来指定HTTP请求和响应的内容类型。- 其实有
内容协商机制 - https://blog.csdn.net/wsbnwzy/article/details/134868676
综合应用
下面是一个示例,说明如何使用这些属性。
示例
假设您正在编写一个RESTful服务,该服务包含一个接口,用于接收JSON格式的数据并返回JSON格式的响应。
@RestController注解相当于@ResponseBody + @Controller合在一起的作用。
@RestController// @RestController注解相当于@ResponseBody + @Controller合在一起的作用。
@RequestMapping("/api/users")
public class UserController {

    @PostMapping(consumes = "application/json", produces = "application/json")
    public UserResponse createUser(@RequestBody UserRequest userRequest) {
        // 处理userRequest(例如,保存用户信息)
        UserResponse userResponse = new UserResponse();
        // 设置userResponse的属性(例如,确认信息)
        return userResponse;
    }
}
在这个例子中:
@PostMapping注解用于处理POST请求。consumes = "application/json"表示这个方法仅处理请求的Content-Type为application/json的请求。这意味着它期望接收的数据是JSON格式的。produces = "application/json"表示这个方法返回的内容类型(即Content-Type响应头)是application/json。这意味着它将返回JSON格式的数据。@RequestBody UserRequest userRequest表示请求体中的JSON数据将被转换为UserRequest对象。@ResponseBody:https://blog.csdn.net/wsbnwzy/article/details/134725511
客户端在调用这个接口时,需要在请求头中设置Content-Type: application/json和Accept: application/json。这样,Spring框架就能知道客户端发送的数据是JSON格式的,并且期望返回的数据也是JSON格式的。
使用servlet自身的参数(代码举例)
@RequestMapping(value = "/index")
public ModelAndView index(HttpServletRequest request){
    System.out.println("接受到请求参数:"+request.getParameterMap().keySet());
    return new ModelAndView("index");
}
@RequestMapping(value = "/index")
public ModelAndView index(HttpSession session){
    System.out.println(session.getAttribute("test"));
    session.setAttribute("test", "鸡你太美");
    return new ModelAndView("index");
}
cookie和session(代码举例)
通过使用@CookieValue注解,我们也可以快速获取请求携带的Cookie信息:
@RequestMapping(value = "/index")
public ModelAndView index(HttpServletResponse response,
                          @CookieValue(value = "test", required = false) String test){
    System.out.println("获取到cookie值为:"+test);
    response.addCookie(new Cookie("test", "lbwnb"));
    return new ModelAndView("index");
}
同样的,Session也能使用注解快速获取:
@RequestMapping(value = "/index")
public ModelAndView index(@SessionAttribute(value = "test", required = false) String test,
                          HttpSession session){
    session.setAttribute("test", "xxxx");
    System.out.println(test);
    return new ModelAndView("index");
}
bean的web作用域(了解)
- request:对于每次HTTP请求,使用request作用域定义的Bean都将产生一个新实例,请求结束后Bean也消失。
- session:对于每一个会话,使用session作用域定义的Bean都将产生一个新实例,会话过期后Bean也消失。
@Component
@SessionScope//@requestScope
public class TestBean {

}
@Controller
public class MainController {

    @Resource
    TestBean bean;

    @RequestMapping(value = "/index")
    public ModelAndView index(){
        System.out.println(bean);
        return new ModelAndView("index");
    }
}
Rest 四种请求方式
@Controller
public class MainController {

    @RequestMapping(value = "/index/{id}", method = RequestMethod.GET)
    public String get(@PathVariable("id") String text){
        System.out.println("获取用户:"+text);
        return "index";
    }

    @RequestMapping(value = "/index", method = RequestMethod.POST)
    public String post(String username){
        System.out.println("添加用户:"+username);
        return "index";
    }

    @RequestMapping(value = "/index/{id}", method = RequestMethod.DELETE)
    public String delete(@PathVariable("id") String text){
        System.out.println("删除用户:"+text);
        return "index";
    }

    @RequestMapping(value = "/index", method = RequestMethod.PUT)
    public String put(String username){
        System.out.println("修改用户:"+username);
        return "index";
    }
}
拦截器
- 实现
HandlerInterceptor接口 - 在实现了
WebMvcConfigurer接口的配置类中重写addInterceptors方法
- 拦截器的写法
public class MainInterceptor implements HandlerInterceptor {
    @Override
    public boolean preHandle(HttpServletRequest request, HttpServletResponse response, Object handler) throws Exception {
        System.out.println("我是处理之前!");
        return true;   //只有返回true才会继续,否则直接结束
    }

    @Override
    public void postHandle(HttpServletRequest request, HttpServletResponse response, Object handler, ModelAndView modelAndView) throws Exception {
        System.out.println("我是处理之后!");
    }

    @Override
    public void afterCompletion(HttpServletRequest request, HttpServletResponse response, Object handler, Exception ex) throws Exception {
      	//在DispatcherServlet完全处理完请求后被调用
        System.out.println("我是完成之后!");
    }
}
- 拦截器在配置类中的加载
- registry.addInterceptor(new MainInterceptor())
- 如果有多个拦截器 按顺序加载
@Override
public void addInterceptors(InterceptorRegistry registry) {
    registry.addInterceptor(new MainInterceptor())
      .addPathPatterns("/**")    //添加拦截器的匹配路径,只要匹配一律拦截
      .excludePathPatterns("/home");   //拦截器不进行拦截的路径

        //二号拦截器
        registry.addInterceptor(new SubInterceptor()).addPathPatterns("/**");
}
异常
- @ControllerAdvice
- 也要被加载的config当作bean被扫描
@ControllerAdvice
public class ErrorController {

    @ExceptionHandler(Exception.class)
    public String error(Exception e, Model model){  //可以直接添加形参来获取异常
        System.out.println("error e");
        e.printStackTrace();
        model.addAttribute("e", e);
        return "500";
    }
}
@Configuration
@EnableWebMvc
@ComponentScan("com.example.controller")
@ComponentScan("com.example.Err") //这里扫描我们定义的error
public class WebConfiguration implements WebMvcConfigurer {

}
json传递
- maven用fastJson(jackson也行)
- 两种json的细说
- https://blog.csdn.net/weixin_43943901/article/details/105145796
- pom引入
<dependency>
      <groupId>com.alibaba.fastjson2</groupId>
      <artifactId>fastjson2</artifactId>
      <version>2.0.34</version>
</dependency>
<dependency>
    <groupId>com.alibaba.fastjson2</groupId>
    <artifactId>fastjson2-extension-spring6</artifactId>
    <version>2.0.34</version>
</dependency>
- config类配置
@ComponentScan("com.example.controller")
@EnableWebMvc
@Configuration
public class WebConfiguration implements WebMvcConfigurer {
    @Override
    public void configureMessageConverters(List<HttpMessageConverter<?>> converters) {
        converters.add(new FastJsonHttpMessageConverter());
    }
}
- 使用
- 现在对象+@ResponseBody 直接返回json
@RequestMapping(value = "/t1",produces = "application/json")
public User t1(){
        User user = new User("1", "2", "3");
        return user;
        }
- fastjson也可以本地解析
@RequestMapping(value = "/index")
public String index(){
        JSONObject object=new JSONObject();
        object.put("name","杰哥");
        object.put("age",18);
        JSONArray array=new JSONArray();
        array.add(object);
        System.out.println(array.toJSONString());
        return"index";
        }
//        看看解析过程即可 他用的视图解析器
文件的上传和下载
- 上传
你可以用commons-fileupload或者spring自带的MultipartFile来实现文件上传, - commons-fileupload
- https://www.netjstech.com/2018/09/spring-mvc-file-upload-multipart-request-example.html#SpringfileuploadServlet
- 使用spring自带的MultipartFile来实现文件上传。
- 直接看别人写好的
文件上传
利用SpringMVC,我们可以很轻松地实现文件上传和下载,我们需要在MainInitializer中添加一个新的方法:
public class MainInitializer extends AbstractAnnotationConfigDispatcherServletInitializer {

    ...

    @Override
    protected void customizeRegistration(ServletRegistration.Dynamic registration) {
      	// 直接通过registration配置Multipart相关配置,必须配置临时上传路径,建议选择方便打开的
        // 同样可以设置其他属性:maxFileSize, maxRequestSize, fileSizeThreshold
        registration.setMultipartConfig(new MultipartConfigElement("/Users/nagocoler/Download"));
    }
}
接着我们直接编写Controller即可:
@RequestMapping(value = "/upload", method = RequestMethod.POST)
@ResponseBody
public String upload(@RequestParam MultipartFile file) throws IOException {
    File fileObj = new File("test.png");
    file.transferTo(fileObj);
    System.out.println("用户上传的文件已保存到:"+fileObj.getAbsolutePath());
    return "文件上传成功!";
}
最后在前端添加一个文件的上传点:
<div>
    <form action="upload" method="post" enctype="multipart/form-data">
        <input type="file" name="file">
        <input type="submit">
    </form>
</div>
文件下载
下载其实和我们之前的写法大致一样,直接使用HttpServletResponse,并向输出流中传输数据即可。
@RequestMapping(value = "/download", method = RequestMethod.GET)
@ResponseBody
public void download(HttpServletResponse response){
    response.setContentType("multipart/form-data");
    try(OutputStream stream = response.getOutputStream();
        InputStream inputStream = new FileInputStream("test.png")){
        IOUtils.copy(inputStream, stream);
    }catch (IOException e){
        e.printStackTrace();
    }
}
在前端页面中添加一个下载点:
这样,点击提交之后,文件就会上传到服务器了。


 861
861

 被折叠的 条评论
为什么被折叠?
被折叠的 条评论
为什么被折叠?
 到【灌水乐园】发言


