


XMPP是目前主流的一款及时通信协议,其以支持XML流传出具有较强的扩展性。
摘抄:
XMPP的核心XML流传输协议的定义使得XMPP能够在一个比以往网络通信协议更规范的平台上。借助于>XML易于解析和阅读的特性,使得XMPP的协议能够非常漂亮。
XMPP的即时通讯扩展应用部分是根据IETF在这之前对即时通讯的一个抽象定义的,与其他业已得到广泛使>用的即时通讯协议,诸如AIM,QQ等有功能完整,完善等先进性。
smack是什么?
smack是一款封装了XMPP协议的开源的客户端类库,其功能强大,使用简单,实现客户端之间收发信息只需要几行代码。
下载资源:
smack.jar: http://download.csdn.net/detail/wslwno1/9860909
客户端只需要在项目中加载smack的jar包即可。
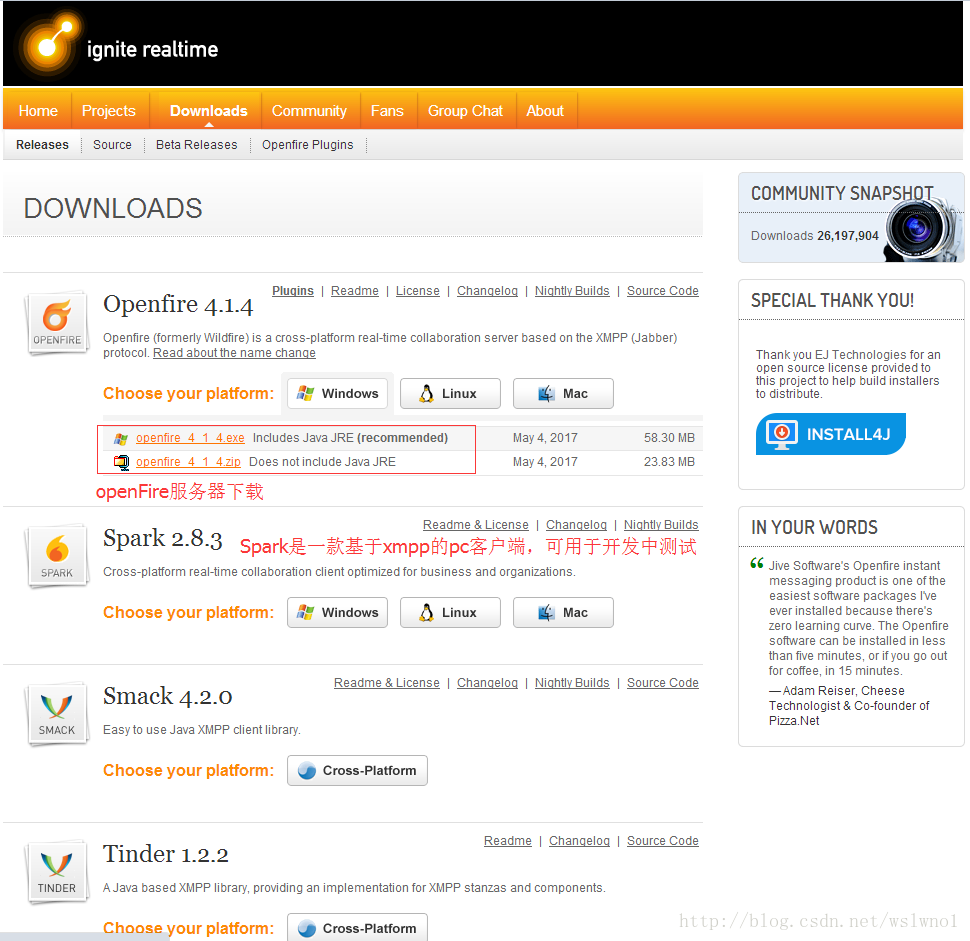
我们知道即时通信是需要客户端和服务器的,现在客户端的资源我们有了,服务器的话这里本人在学习用的是openFire服务器。
openFire服务器下载:http://www.igniterealtime.org/downloads/index.jsp
下载安装或者解压后进入你的 盘符目录\Openfire\bin
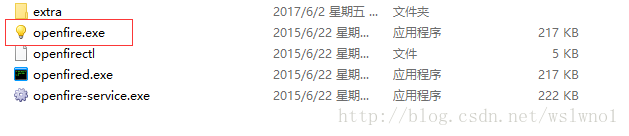
双击打开启动服务器
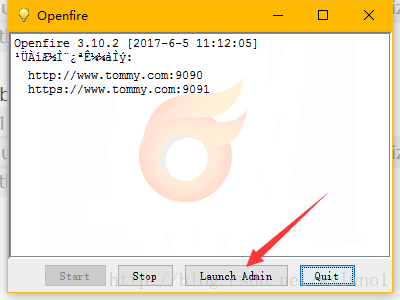
点击Launch Admin打开OpenFire的后台管理配置基本信息
这里我已经配置过了所以界面如下,配置的话很简单,傻瓜式next,但要注意的是,数据库那块的话请如果你需要配置自己的数据库就直接next,像我这种小白,我选择的是openfire默认嵌入式的数据库。
到这里你已经配置好服务器了,可以在用户/组这一栏去添加用户或者群组

下面是客户端代码的编写:
通过XMPPConnection连接服务器
这里是简单的代码实现,如果读者有好见解欢迎交流学习:
public class XmppUtil {
    //配置文件  参数(服务地地址,端口号,域)
    private static ConnectionConfiguration configuration;
    private static XMPPConnection conn;

    /**
     * 初始化XMpp
     */
    private static void initXmpp() {
        new Thread(new Runnable() {
            @Override
            public void run() {
                try {
                    //设置连接主机的ip与端口
                    configuration = new ConnectionConfiguration("192.168.1.103", 5222);
                    //设置不需要SAS验证
                    configuration.setSASLAuthenticationEnabled(false);
                    //开启调试模式
                    configuration.setDebuggerEnabled(true);
                    //设置安全类型
                    configuration.setSecurityMode(ConnectionConfiguration.SecurityMode.disabled);
                    // 设置登录状态为离线
//            configuration.setSendPresence(false);
                    // 断网重连
                    configuration.setReconnectionAllowed(true);
                    //建立连接
                    conn = new XMPPConnection(configuration);
                    //连接
                    conn.connect();
                    Log.e("init", "run: 链接成功");
                } catch (XMPPException e) {
                    e.printStackTrace();
                }
            }
        }).start();

    }

    public static XMPPConnection getConnection() {

        if (conn == null) {
            initXmpp();
        }
        return conn;
    }

    public static void closeConnection() {
        if (conn != null) {
            conn.disconnect();
        }
    }
调用api实现客户端登录
//这里为了写demo方便用了BufferKnift
public class LoginActivity extends AppCompatActivity {
    @BindView(R.id.username)
    TextView username;
    @BindView(R.id.edt_username)
    EditText edtUsername;
    @BindView(R.id.password)
    TextView password;
    @BindView(R.id.edt_password)
    EditText edtPassword;
    @BindView(R.id.login)
    Button login;

    @Override
    protected void onCreate(@Nullable Bundle savedInstanceState) {
        super.onCreate(savedInstanceState);
        setContentView(R.layout.activity_login);
        ButterKnife.bind(this);
    }

    @OnClick(R.id.login)
    public void onViewClicked() {
        String username = edtUsername.getText().toString();
        String password = edtPassword.getText().toString();
        if (!TextUtils.isEmpty(username) && !TextUtils.isEmpty(password)) {
            //这里是自己封装的工具类往下拉可以看到方法的实现
            boolean isLogin = ConnectionTool.login(username, password);
            if (isLogin) {
                Toast.makeText(LoginActivity.this,"登录成功",Toast.LENGTH_LONG).show();
                Intent intent = new Intent(LoginActivity.this, MainActivity.class);
                startActivity(intent);
                finish();
                UserInfo.mainJid = username;
                Log.d("login", "登录成功:" + isLogin);
            }else{
                Toast.makeText(LoginActivity.this,"登录失败",Toast.LENGTH_LONG).show();
            }
        }
    }
}
//ConnectionTool.login(username, password)方法实现
    /**
     * 登录
     * @param userName 用户名
     * @param password 密码
     * @return
     */
    public static boolean login(String userName, String password) {
        try {
            if (XmppUtil.getConnection() != null) {
                SASLAuthentication.supportSASLMechanism("PLAIN", 0);
                XmppUtil.getConnection().login(userName, password);
                return true;
            }
        } catch (XMPPException e) {
            e.printStackTrace();
            return false;
        }
        return false;
    }
获取联系人列表
private void initData() {
        /*
         *这里XmppUtil.getConnection()是之前封装的连接获取XMPPConnection
         *Roster 是获取联系人的花名册,拿到你的好友列表
         *这里的代码都是简单实现主要在于看懂和基本的会用。
         *高质量代码的话还是根据大家习惯了。
         */
        Roster roster = XmppUtil.getConnection().getRoster();
        mList = new ArrayList<>();
        for (RosterEntry enty:roster.getEntries()){
            mList.add(enty);
        }
        mUsersAdapter = new UsersAdapter();
        userlist.setAdapter(mUsersAdapter);
    }
实现P2P消息收发
//这里做个解释:
//收发消息需要的关键类有:

//ChatManager:聊天管理者主要负责跟踪所有当前聊天记录
//Chat:聊天对象用于两个用户之间发送消息
//Message :主要用于封装我们要发送的消息
//MessageListener:消息监听器,主要用于监听我们收发消息


public class ImP2PActivity extends AppCompatActivity {
    @BindView(R.id.send_edt)
    EditText sendEdt;
    @BindView(R.id.send_btn)
    Button sendBtn;
    @BindView(R.id.send_layout)
    RelativeLayout sendLayout;
    @BindView(R.id.im_list)
    ListView imList;

    String mNickName;
    String mJid;
    Chat mChat;

    List<Map<String, String>> mMessages;
    ImAdapter imAdapter;

    @Override
    protected void onCreate(@Nullable Bundle savedInstanceState) {
        super.onCreate(savedInstanceState);
        setContentView(R.layout.activity_p2p);
        ButterKnife.bind(this);
        mMessages = new ArrayList<>();
        mNickName = getIntent().getStringExtra("nickName");
        mJid = getIntent().getStringExtra("jid");
        new Thread(new Runnable() {
            @Override
            public void run() {
                ChatManager chatManager = XmppUtil.getConnection().getChatManager();
                mChat = chatManager.createChat(mJid, imMessageListener);
            }
        }).start();
        imAdapter = new ImAdapter();
        imList.setAdapter(imAdapter);
    }

    @OnClick(R.id.send_btn)
    public void onViewClicked() {
        try {
            //封装要发送的消息
            Message msg = new Message();
            //设置发送者
            msg.setFrom("admin@www.tommy.com");
            //设置消息实体就是我们要发送的内容
            msg.setBody(sendEdt.getText().toString());
            //设置发给谁
            msg.setTo(mJid);
            //发送选修
            mChat.sendMessage(msg);
            Map<String, String> map = new HashMap<String, String>();
            map.put("body", msg.getBody());
            map.put("from", msg.getFrom());
            mMessages.add(map);
            imAdapter.notifyDataSetChanged();
            imList.setSelection(mMessages.size()-1);
        } catch (XMPPException e) {
            e.printStackTrace();
            Log.i("im", "消息发送失败");
        }
    }

    ImMessageListener imMessageListener = new ImMessageListener();
    /**
     *消息监听器
     **/
    class ImMessageListener implements MessageListener {

        @Override
        public void processMessage(Chat chat, final Message message) {
            final String body = message.getBody();
            runOnUiThread(new Runnable() {
                @Override
                public void run() {
                    Log.e("im", "run: " + body);
                    Map<String, String> map = new HashMap<String, String>();
                    map.put("body", body);
                    map.put("from", message.getFrom());
                    mMessages.add(map);
                    imAdapter.notifyDataSetChanged();
                    imList.setSelection(mMessages.size()-1);
//                    Toast.makeText(ImP2PActivity.this, body, Toast.LENGTH_LONG).show();
                }
            });
        }
    }

    class ImAdapter extends BaseAdapter {

        @Override
        public int getCount() {
            return mMessages.size();
        }

        @Override
        public Object getItem(int position) {
            return mMessages.get(position);
        }

        @Override
        public long getItemId(int position) {
            return position;
        }

        @Override
        public View getView(int position, View convertView, ViewGroup parent) {
            ViewHolder v = null;
            if (convertView == null) {
                convertView = View.inflate(ImP2PActivity.this, R.layout.item_im, null);
                v = new ViewHolder(convertView);
            } else {
                v = (ViewHolder) convertView.getTag();
            }
            Map<String, String> map = mMessages.get(position);
            if (!"admin@www.tommy.com".equals(map.get("from"))) {
                v.leftLayout.setVisibility(View.VISIBLE);
                v.rightLayout.setVisibility(View.GONE);
                v.name.setText(mNickName);
                v.content.setText(map.get("body"));
            } else {
                v.leftLayout.setVisibility(View.GONE);
                v.rightLayout.setVisibility(View.VISIBLE);
                v.myname.setText("我");
                v.mycontent.setText(map.get("body"));
            }
            return convertView;
        }


        class ViewHolder {
            @BindView(R.id.logo)
            ImageView logo;
            @BindView(R.id.name)
            TextView name;
            @BindView(R.id.content)
            TextView content;
            @BindView(R.id.left_layout)
            RelativeLayout leftLayout;
            @BindView(R.id.mylogo)
            ImageView mylogo;
            @BindView(R.id.myname)
            TextView myname;
            @BindView(R.id.mycontent)
            TextView mycontent;
            @BindView(R.id.right_layout)
            RelativeLayout rightLayout;

            ViewHolder(View view) {
                ButterKnife.bind(this, view);
                view.setTag(this);
            }
        }
    }
}
本人占时只了解了这些,此博客未完待续,本人会继续努力为大家分享更多的博客
大家对博客有什么建议可以留言交流,谢谢大家


 2398
2398


 被折叠的 条评论
为什么被折叠?
被折叠的 条评论
为什么被折叠?
 到【灌水乐园】发言


