


Seekbar
1 SeekBar简介
SeekBar是进度条。我们使用进度条时,可以使用系统默认的进度条;也可以自定义进度条的图片和滑块图片等。
2 SeekBar示例
功能:手动拖动进度条,TextView中文字显示进度的改变。
  public class MainActivity extends AppCompatActivity {
      private SeekBar sb;
      private TextView tv;

      @Override
      protected void onCreate(Bundle savedInstanceState) {
          super.onCreate(savedInstanceState);
          setContentView(R.layout.activity_main);
          sb=(SeekBar)findViewById(R.id.sb);
         tv=(TextView) findViewById(R.id.tv);
         sb.setOnSeekBarChangeListener(new SeekBar.OnSeekBarChangeListener() {
             @Override
             public void onProgressChanged(SeekBar seekBar, int progress, boolean fromUser){
                 tv.setText("The progress is "+progress+"%");
             }

             @Override
             public void onStartTrackingTouch(SeekBar seekBar) {

             }

             @Override
             public void onStopTrackingTouch(SeekBar seekBar) {


             }
         });
     }
 }
 <?xml version="1.0" encoding="utf-8"?>
 <LinearLayout
 xmlns:android="http://schemas.android.com/apk/res/android"
 android:orientation="vertical"
 xmlns:tools="http://schemas.android.com/tools"
 android:layout_width="match_parent"
 android:layout_height="match_parent"
 tools:context="com.zhangmeng.www.seekbar.MainActivity">
 <SeekBar
 android:id="@+id/sb"
 android:layout_width="match_parent"
 android:layout_height="wrap_content"/>
 <TextView
 android:id="@+id/tv"
 android:layout_width="match_parent"
 android:layout_height="wrap_content"/>
 </LinearLayout>
3 自定义seekbar
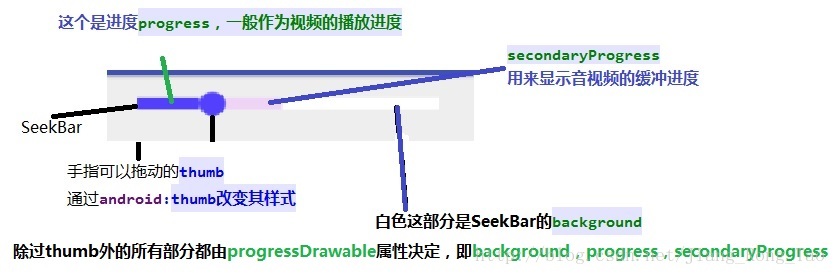
SeekBar的结构分析图
系统的values.xml搜索SeekBar
<style name="Base.Widget.AppCompat.SeekBar" parent="android:Widget">
        <item name="android:indeterminateOnly">false</item>
        <item name="android:progressDrawable">@drawable/abc_seekbar_track_material</item>
        <item name="android:indeterminateDrawable">@drawable/abc_seekbar_track_material</item>
        <item name="android:thumb">@drawable/abc_seekbar_thumb_material</item>
        <item name="android:focusable">true</item>
        <item name="android:paddingLeft">16dip</item>
        <item name="android:paddingRight">16dip</item>
    </style>
方式一
我们只要修改android:progressDrawable和android:thumb这个就可以达到自己想要的效果,所以将这两个属性Copy出来,在我们自己的styles.xml中创建如下style即可:
<style name="jrt_seekbar_style" parent="Base.Widget.AppCompat.SeekBar">
       <item name="android:progressDrawable">@drawable/my_seekbar_style</item>
       <item name="android:thumb">@drawable/seekbar_thumb</item>
</style>
接下来开启照猫画虎模式
my_seekbar_style这个drawable的写法我们去参靠系统的abc_seekbar_track_material.xml,直接一个copy在我们的drawable目录下,然后改成我们自己的文件名字,如:my_seekbar_style.xml;具体如下:
<?xml version="1.0" encoding="utf-8"?>
<layer-list xmlns:android="http://schemas.android.com/apk/res/android">
    <item android:id="@android:id/background"
        android:drawable="@drawable/seekbar_bg"/>
    <item android:id="@android:id/secondaryProgress">
        <scale android:scaleWidth="100%">
            <selector>
                <item android:state_enabled="false">
                    <color android:color="@android:color/transparent"/>
                </item>
                <item android:drawable="@drawable/seekbar_progress_2"/>
            </selector>
        </scale>
    </item>
    <item android:id="@android:id/progress">
        <scale android:scaleWidth="100%">
            <selector>
                <item android:state_enabled="false">
                    <color android:color="@android:color/transparent"/>
                </item>
                <item android:drawable="@drawable/seekbar_progress"/>
            </selector>
        </scale>
    </item>
</layer-list>
其实这些代码都是google工程师写好的,我们只要把对应的drawable换成我们自己的即可。在layout应用的时候直接给Seekbar设置style属性即可;
<SeekBar
        android:id="@+id/seekBar"
        android:layout_width="match_parent"
        android:layout_height="wrap_content"
        android:layout_alignParentTop="true"
        android:layout_alignParentRight="true"
        android:layout_alignParentEnd="true"
        android:layout_marginTop="140dp"
        style="@style/jrt_seekbar_style"
        />
注意:my_seekbar_style.xml在写的时候一定要按系统android:id的顺序来,不要随便改变item的顺序,必须是background->secondaryProgress->progress
方式二
我们不用在styles.xml中设置属性,将my_seekbar_style.xml和seekbar_thumb两个资源准备好了直接在layout中使用。如下:
<SeekBar
        android:id="@+id/myseekBar"
        android:layout_width="match_parent"
        android:layout_height="wrap_content"
        android:layout_alignParentTop="true"
        android:layout_alignParentRight="true"
        android:layout_alignParentEnd="true"
        android:progress="30"
        android:thumb="@drawable/seekbar_thumb"
        android:progressDrawable="@drawable/my_seekbar_style"
         />
做过开发的都知道这两种使用方式的要根据具体的场景而定,主要取决与你的SeekBar使用频率,如果只用一次就用方式二,如果多次,并且全局都使用同样的Seekbar那就用方式一,这样更体现了封装抽取,便于项目的维护和管理。
4 seekbar扩展
滑块不能位于进度条的最左边
解决方案: 设置偏移量
android:thumbOffset="5dp"
滑块不能居中在进度条中
解决方案:
设置高度自适应,会自动契合滑块高度
android:layout_height="wrap_content"
然后使用以下属性设置高度
android:maxHeight="30dip"
android:minHeight="30dip"
如何在滑块上写字
解决方案:
- 重写ondraw方法
protected synchronized void onDraw(Canvas canvas) {
        super.onDraw(canvas);
        Rect rect = new Rect();
        this.mPaint.getTextBounds(this.text, 0, this.text.length(), rect);
        int x = (getWidth() / 2) - rect.centerX();
        int y = (getHeight() / 2) - rect.centerY();
        canvas.drawText(this.text, x, y, this.mPaint);
} - 在seekbar上面覆盖一个TextView
<?xml version="1.0" encoding="utf-8"?>
<RelativeLayout xmlns:android="http://schemas.android.com/apk/res/android"
    android:layout_width="match_parent"
    android:layout_height="wrap_content"
    android:padding="16dp">

    <SeekBar
        android:id="@+id/sb"
        android:layout_width="match_parent"
        android:layout_height="wrap_content"
        android:max="100"
        android:progress="0"
        android:progressDrawable="@drawable/seekbar_bg"
        android:thumb="@drawable/thumb"
        android:thumbOffset="0dp" />

    <TextView
        android:id="@+id/tv"
        android:layout_width="match_parent"
        android:layout_height="wrap_content"
        android:layout_centerInParent="true"
        android:gravity="center"
        android:text="请按住滑块,拖动到最右边"
        android:textColor="#888888"
        android:textSize="14dp" />
</RelativeLayout>
seekbar中thumb出现的不透明效果
问题描述:
在Android5.0以上会出现thumb周围有一圈白色的不明东西,遮挡到父布局
解决方案:
设置splitTrack属性为false就可以了
android:splitTrack="false"
seekbar距离左右会有一定的边距
解决方案:
设置seekbar的paddingleft与paddingright为0dp
 android:paddingStart="0dp"
 android:paddingEnd="0dp"
禁止seekbar点击后方,只能拖拽
解决思路:
保存一个旧的位置progress——oldsign,默认是0
用户点击seekbar后方的时候,记录用户点击的progress
通过判断当前点击的progress是否 < (oldsign+某个值),如果是则能拖动,如果否则设置seekbar位置progress为0,从而达到不动效果。
方式一
import android.content.Context;
import android.graphics.Canvas;
import android.graphics.Color;
import android.graphics.Paint;
import android.graphics.Rect;
import android.util.AttributeSet;
import android.util.Log;
import android.view.View;
import android.widget.SeekBar;
import android.widget.SeekBar.OnSeekBarChangeListener;

public class ValidateSeekBar extends SeekBar implements OnSeekBarChangeListener{

    private Context context;
    //记录旧的位置
    private int oldsign;
    //写进度条上text的画笔
    private Paint mPaint;

    private String textStr ="请拖动到最右边完成验证";
    //text内容
    private String text=textStr;
    //text字体大小
    private int textSize =20;
    //text颜色
    private String textColor ="#607B8B";


    public interface ValidateSeekBarCallBack {
        void onProgressChangedCallBack(SeekBar seekbar, int progress, boolean arg2);
        void onStartTrackingTouchCallBack(SeekBar seekbar);
        void onStopTrackingTouchCallBack(SeekBar seekbar);
    }
    private ValidateSeekBarCallBack callback;

    public ValidateSeekBar(Context context) {
        super(context);
        this.context = context;
        init();
    }

    public ValidateSeekBar(Context context, AttributeSet attrs, int defStyle) {
        super(context, attrs, defStyle);
        this.context = context;
        init();
    }

    public ValidateSeekBar(Context context, AttributeSet attrs) {
        super(context, attrs);
        this.context = context;
        init();
    }

    private void init() {
        this.mPaint = new Paint();
        this.mPaint.setColor(Color.parseColor(textColor));
        this.mPaint.setTextSize(textSize);
        setMax(100);
        setOnSeekBarChangeListener(this);
    }

    @Override
    protected synchronized void onDraw(Canvas canvas) {
        super.onDraw(canvas);

        Rect rect = new Rect();
        this.mPaint.getTextBounds(this.text, 0, this.text.length(), rect);
        int x = (getWidth() / 2) - rect.centerX();
        int y = (getHeight() / 2) - rect.centerY();
        canvas.drawText(this.text, x, y, this.mPaint);
    }

    @Override
    public void onProgressChanged(SeekBar seekbar, int progress, boolean arg2) {
        //控制textview会闪的bug

        if(progress<(seekbar.getMax()/9+1)&&progress!=0){
            text="";
        }

        //当点击的位置大于 (0 + 100/9+1)时就不能被拖动  ,+号后数字越大,允许前方开始拖拽的范围就会越大
        //为什么要用“/”+某数值?是因为防止进度条的最大值有可能是1000、500、300等,所以都取进度条的 9分之1 + 一个自定义数值
        //为什么不能将判断改为当前位置大于 0? 因为在点击滑块的时候,progerss已经改变
        if(progress>oldsign+(seekbar.getMax()/9+1)){

            seekbar.setProgress(oldsign);
            return;
        }
        seekbar.setProgress(progress);
        oldsign = progress;
        if(this.callback!=null){
            this.callback.onProgressChangedCallBack(seekbar,progress,arg2);
        }

    }

    @Override
    public void onStartTrackingTouch(SeekBar seekbar) {

        seekbar.setProgress(oldsign);
        if(this.callback!=null){
            this.callback.onStartTrackingTouchCallBack(seekbar);
        }
    }

    @Override
    public void onStopTrackingTouch(SeekBar seekbar) {

        if(seekbar.getProgress()!=seekbar.getMax()){
            oldsign=0;
            text =textStr;
            seekbar.setProgress(oldsign);
        }
        else{
            text ="完成验证";
        }


        if(this.callback!=null){
                this.callback.onStopTrackingTouchCallBack(seekbar);

            }

    }
    /**
     * seekbar回调
     * @param callback
     */
    public void setValidateSeekBarCallBack(ValidateSeekBarCallBack callback){
        this.callback =callback;
    }

    public void refreshText(){
        text=textStr;
    }

}
事实上,这个方法也是不完整的,因为前方可拖动的范围太难掌控,导致如果只是点击滑块按钮的附近位置的时候,滑块就会动,只有在可拖拉范围外才不会动。如果点击中间进行滑动,progress还会跟着滑动
方式二
public class MainSeekbar extends android.support.v7.widget.AppCompatSeekBar implements SeekBar.OnSeekBarChangeListener {

    private static final int INDEX = 100;
    private static final int FINISH = 100;
    private boolean isMove = true;
    private OnSeekBarListener mOnSeekBarListener;

    public MainSeekbar(Context context) {
        super(context);
        setOnSeekBarChangeListener(this);
    }

    public MainSeekbar(Context context, AttributeSet attrs) {
        super(context, attrs);
        setOnSeekBarChangeListener(this);
    }

    public MainSeekbar(Context context, AttributeSet attrs, int defStyleAttr) {
        super(context, attrs, defStyleAttr);
        setOnSeekBarChangeListener(this);
    }

    public void setOnSeekBarListener(OnSeekBarListener onSeekBarListener) {
        mOnSeekBarListener = onSeekBarListener;
    }

    @Override
    public boolean dispatchTouchEvent(MotionEvent event) {
        int x = (int) event.getX();
        if (event.getAction() == MotionEvent.ACTION_DOWN) {
            isMove = true;
            if (x - INDEX > 0) {
                isMove = false;
                return true;
            }
        }
        if (event.getAction() == MotionEvent.ACTION_MOVE) {
            if (!isMove) {
                return true;
            }
        }
        return super.dispatchTouchEvent(event);
    }

    @Override
    public void onProgressChanged(SeekBar seekBar, int progress, boolean fromUser) {

    }

    @Override
    public void onStartTrackingTouch(SeekBar seekBar) {

    }

    @Override
    public void onStopTrackingTouch(SeekBar seekBar) {
        if (seekBar.getProgress() != FINISH || !isMove) {
            seekBar.setProgress(0);
            mOnSeekBarListener.onStart();
        } else {
            mOnSeekBarListener.onFinish();
        }
    }


    protected interface OnSeekBarListener {
        void onFinish();
        void onStart();
    }
}
这种方式可以解决从中间进行拖拽出现的问题


 2613
2613


 被折叠的 条评论
为什么被折叠?
被折叠的 条评论
为什么被折叠?
 到【灌水乐园】发言


