


目录
一、容器操作
1、删除容器
[root@docker ~]# docker rm 02137ca38871 #删除容器
[root@docker ~]# docker rm -f 0e193557f795 #强制删除容器
[root@docker ~]# docker rm `docker ps -aq` #批量删除容器
[root@docker ~]# for i in `docker pa -a | grep -i exit | awk '{print $1}'`; do docker rm -f $i;done
2、创建容器
[root@docker docker]# docker create -it nginx:latest /bin/bash #-i让容器的标准输入打开;-t分配一个伪终端;-d后台运行
d0055d5a5f15990804a187f2a9f4419413345dfe1596c786e0499775ffd24aca
[root@docker docker]# docker ps -a #查看容器
CONTAINER ID   IMAGE          COMMAND                  CREATED          STATUS    PORTS     NAMES
d0055d5a5f15   nginx:latest   "/docker-entrypoint.…"   25 seconds ago   Created             thirsty_lederberg
3、启动容器
[root@docker docker]# docker start d0055d5a5f15
d0055d5a5f15
[root@docker docker]# docker ps -a
CONTAINER ID   IMAGE          COMMAND                  CREATED         STATUS          PORTS     NAMES
d0055d5a5f15   nginx:latest   "/docker-entrypoint.…"   3 minutes ago   Up 10 seconds   80/tcp    thirsty_lederberg
4、一次性运行
[root@docker ~]# docker pull centos:7
7: Pulling from library/centos
2d473b07cdd5: Pull complete
Digest: sha256:0f4ec88e21daf75124b8a9e5ca03c37a5e937e0e108a255d890492430789b60e
Status: Downloaded newer image for centos:7
docker.io/library/centos:7
[root@docker ~]# docker images
REPOSITORY   TAG       IMAGE ID       CREATED        SIZE
nginx        latest    822b7ec2aaf2   25 hours ago   133MB
centos       7         8652b9f0cb4c   9 months ago   204MB

[root@docker ~]# docker run centos:7 /usr/bin/bash -c ls / #-c传递命令,开启后执行ls查看/

[root@docker ~]# docker ps -a
CONTAINER ID   IMAGE          COMMAND                  CREATED          STATUS                      PORTS     NAMES
e36291c0669a   centos:7       "/usr/bin/bash -c ls…"   16 seconds ago   Exited (0) 14 seconds ago             sleepy_saha
d0055d5a5f15   nginx:latest   "/docker-entrypoint.…"   10 minutes ago   Up 7 minutes                80/tcp    thirsty_lederberg
5、停止容器
[root@docker ~]# docker stop d0055d5a5f15
d0055d5a5f15
[root@docker ~]# docker ps -a
CONTAINER ID   IMAGE          COMMAND                  CREATED          STATUS                        PORTS     NAMES
e36291c0669a   centos:7       "/usr/bin/bash -c ls…"   5 minutes ago    Exited (0) 5 minutes ago                sleepy_saha
d0055d5a5f15   nginx:latest   "/docker-entrypoint.…"   15 minutes ago   Exited (137) 19 seconds ago             thirsty_lederberg
ps:
Exited非零值表示非正常退出,137表示主动停止
6、持续性的在后台运行
[root@docker ~]# docker run -d centos:7 /bin/bash -c "while true;do echo hello;done"
0e193557f795acfce3a773128213b6eea4dab22112aad6456c85fce93f797279
[root@docker ~]# docker ps -a
CONTAINER ID   IMAGE          COMMAND                  CREATED          STATUS                       PORTS     NAMES
0e193557f795   centos:7       "/bin/bash -c 'while…"   11 seconds ago   Up 9 seconds                           inspiring_satoshi
e36291c0669a   centos:7       "/usr/bin/bash -c ls…"   9 minutes ago    Exited (0) 9 minutes ago               sleepy_saha
d0055d5a5f15   nginx:latest   "/docker-entrypoint.…"   19 minutes ago   Exited (137) 4 minutes ago             thirsty_lederberg
[root@docker ~]# watch -n 2 docker ps -a

[root@docker ~]# docker rm `docker ps -aq` #删除容器
e36291c0669a
d0055d5a5f15
Error response from daemon: You cannot remove a running container 0e193557f795acfce3a773128213b6eea4dab22112aad6456c85fce93f797279. Stop the container before attempting removal or force remove
[root@docker ~]# docker ps -a #在运行的容器未删除
CONTAINER ID   IMAGE      COMMAND                  CREATED         STATUS         PORTS     NAMES
0e193557f795   centos:7   "/bin/bash -c 'while…"   2 minutes ago   Up 2 minutes             inspiring_satoshi
7、进入容器
[root@docker ~]# docker run -it nginx:latest /bin/bash #运行容器并进入
root@02137ca38871:/# exit
exit
ps:在容器中一些常规的命令无法使用。可以yum下载或在不同的环境中使用该命令
docker run -it会创建前台进程,但是会在输入exit后终止进程。
docker attach 会通过连接stdin,连接到容器内输入输出流,会在输入exit后终止进程.
docker exec -it 会连接到容器,可以像SSH一样进入容器内部,进行操作,可以通过exit退出容器,不影响容器运行。(进入正在运行的容器)
[root@docker ~]# docker exec -it 0e193557f795 /bin/bash
8、容器导出
#导出
[root@docker ~]# docker export 0e193557f795 > centos7_02
[root@docker ~]# scp centos7_02 root@192.168.238.99:/opt
root@192.168.238.99's password:
centos7_02

#导入
#在另一台中端
[root@localhost opt]# docker import centos7_02 centos:7
sha256:6ad5d10af738ca6f28b5014f8c3e63045f04222a8e58c6d9d05716c402008a9a
[root@localhost opt]# docker images #导出为镜像文件
REPOSITORY   TAG       IMAGE ID       CREATED              SIZE
centos       7         6ad5d10af738   About a minute ago   204MB
nginx        latest    822b7ec2aaf2   26 hours ago         133MB
二、网络模式
| host模式 | -net=host | 容器和宿主机共享Network namespace |
|---|---|---|
| container模式 | -net=container:NAME_or_ID | 多个容器共享一个Network namespace |
| none模式 | -net=none | 容器有独立的Network namespace,但并没有对其进行任何网络设置,如分配veth pair 和网桥连接,配置IP等 |
| bridge模式 | -net=bridge | 默认模式 |
一、自定义网络
#查看网络列表
[root@docker ~]# docker network ls
NETWORK ID     NAME      DRIVER    SCOPE
0a991c8ed2e4   bridge    bridge    local
1237283bf3ba   host      host      local
8d14fdfcc683   none      null      local

#查看容器ip
[root@docker ~]# docker run -itd nginx:latest /bin/bash #运行容器
ec4faf7e102deaf69991f654cd6f6c67ef51ee3e70cd23933a5681aea74e5107
[root@docker ~]# docker ps -a #查看容器列表
CONTAINER ID   IMAGE          COMMAND                  CREATED         STATUS         PORTS     NAMES
ec4faf7e102d   nginx:latest   "/docker-entrypoint.…"   3 minutes ago   Up 3 minutes   80/tcp    competent_mendeleev
[root@docker ~]# docker inspect ec4faf7e102d #查看容器信息,在此可以看到容器的ip

二、指定分配容器地址
[root@docker ~]# docker run -itd --name nginx-1 --network bridge --ip 172.17.0.10 nginx:latest /bin/bash
0ac721b002167083a5ca0cbd57bfca5d94eb153e18abf7d58348918b807a4192
docker: Error response from daemon: user specified IP address is supported on user defined networks only.
#开启容器报错
[root@docker ~]# docker ps -a
CONTAINER ID   IMAGE          COMMAND                  CREATED          STATUS          PORTS     NAMES
0ac721b00216   nginx:latest   "/docker-entrypoint.…"   39 seconds ago   Created                   nginx-1
ead40f9dbf7a   nginx:latest   "/docker-entrypoint.…"   48 seconds ago   Up 47 seconds   80/tcp    trusting_elgamal
三、可以通过自定义网络固定ip
[root@docker ~]# docker network create --subnet=172.18.0.0/16 mynetwork #指定创建一个子网段,使用默认网桥模式
c88401ae932514474a2c3f8ed700dd72ef2d273c64af4e22e8b0815faa38f858

#指定ip
[root@docker ~]# docker run -itd --name nginx-2 --net mynetwork --ip 172.18.0.10 nginx:latest /bin/bash
1f49348928f80d3f07956bd5980cdd82a62e7fd0b78a0b03ee84a122c8ecc0e5

ps:指定容器前,先自定义网络
[root@docker ~]# docker inspect nginx-2

四、暴露端口
[root@docker ~]# docker run -itd -p 555:80 nginx /bin/bash #指定端口
e12523f641ac094860d57e25e65e9ac2fa1050d93f483de46d3fe4a880e1c09b

[root@docker ~]# docker exec e12523f641ac nginx #运行Nginx容器
2021/09/04 11:15:28 [notice] 8#8: using the "epoll" event method
2021/09/04 11:15:28 [notice] 8#8: nginx/1.21.1
2021/09/04 11:15:28 [notice] 8#8: built by gcc 8.3.0 (Debian 8.3.0-6)
2021/09/04 11:15:28 [notice] 8#8: OS: Linux 3.10.0-957.el7.x86_64
2021/09/04 11:15:28 [notice] 8#8: getrlimit(RLIMIT_NOFILE): 1048576:1048576
2021/09/04 11:15:28 [notice] 14#14: start worker processes
2021/09/04 11:15:28 [notice] 14#14: start worker process 15
2021/09/04 11:15:28 [notice] 14#14: start worker process 16
2021/09/04 11:15:28 [notice] 14#14: start worker process 17
2021/09/04 11:15:28 [notice] 14#14: start worker process 18
访问192.168.238.100:555

[root@docker ~]# docker run -itd -P nginx /bin/bash #P随机端口
acc1a1f7a203325ae83c98899d826b45a401bc9824207a44360663ec684fa468

[root@docker ~]# docker exec acc1a1f7a203 nginx #启动Nginx容器
2021/09/04 11:21:44 [notice] 7#7: using the "epoll" event method
2021/09/04 11:21:44 [notice] 7#7: nginx/1.21.1
2021/09/04 11:21:44 [notice] 7#7: built by gcc 8.3.0 (Debian 8.3.0-6)
2021/09/04 11:21:44 [notice] 7#7: OS: Linux 3.10.0-957.el7.x86_64
2021/09/04 11:21:44 [notice] 7#7: getrlimit(RLIMIT_NOFILE): 1048576:1048576
2021/09/04 11:21:44 [notice] 14#14: start worker processes
2021/09/04 11:21:44 [notice] 14#14: start worker process 15
2021/09/04 11:21:44 [notice] 14#14: start worker process 16
2021/09/04 11:21:44 [notice] 14#14: start worker process 17
2021/09/04 11:21:44 [notice] 14#14: start worker process 18
访问192.168.238.100:49153

三、在容器中执行命令
[root@docker ~]# docker create -it centos:7 /bin/bash
[root@docker ~]# docker start f8980b1f0154
f8980b1f0154
[root@docker ~]# docker exec -it f8980b1f0154 /bin/bash
#发现无法执行命令
[root@docker ~]# docker run -itd --name centos-systemd --privileged=true centos:7 /sbin/init #指定特权容器
[root@docker ~]# docker exec -it ff3f87d9d6b6 /bin/bash
[root@ff3f87d9d6b6 /]# yum install -y httpd
[root@ff3f87d9d6b6 /]# systemctl status httpd
● httpd.service - The Apache HTTP Server
   Loaded: loaded (/usr/lib/systemd/system/httpd.service; disabled; vendor preset: disabled)
   Active: inactive (dead)
     Docs: man:httpd(8)
           man:apachectl(8)
四、数据卷
数据管理操作
-方便查看容器内产生的数据
-多容器间实现数据共享
两种管理方式
-数据卷
-数据卷容器
[root@docker ~]# docker run -v /var/www:/data1 -v /var/html:/data2 --name centos-1 -it centos:7 /bin/bash
1、在容器中看到data1和data2

2、在宿主机的/var目录中查看

3、在容器中创建文件
[root@d379d0c76f18 /]# cd data1
[root@d379d0c76f18 data1]# touch 1.txt
[root@d379d0c76f18 data1]# cd ..
[root@d379d0c76f18 /]# cd data2
[root@d379d0c76f18 data2]# touch 2.txt
4、在宿主机的目录中查看
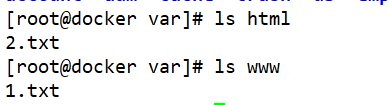
5、在宿主机的文件中编写内容
[root@docker var]# vim /var/www/1.txt
6、在容器的data1中的1.txt查看内容

五、数据卷容器
1、数据卷容器就是一个普通的容器
2、挂载web容器中的数据卷到新的容器
#容器1
[root@docker ~]# docker run --name web1 -v /data1 -v /data2 -it centos:7 /bin/bash

#容器2
[root@docker var]# docker run -it --volumes-from web1 --name web2 centos:7 /bin/bash

#容器1创建文件
[root@fcfb02360ed9 /]# cd data1
[root@fcfb02360ed9 data1]# touch 123
[root@fcfb02360ed9 data1]# cd ..
[root@fcfb02360ed9 /]# cd data2
[root@fcfb02360ed9 data2]# touch 456
#容器2查看
[root@520340c2e1b0 /]# ls data1
123
[root@520340c2e1b0 /]# ls data2
456
六、容器互联
1、创建容器
[root@docker ~]# docker run -itd --name web1 centos:7 /bin/bash
[root@docker ~]# docker run -itd --name web2 --link web1:web1 centos:7 /bin/bash
2、登录web1/2容器(两个容器操作相同)
[root@docker ~]# docker exec -it web1 /bin/bash
[root@76b67421be45 /]# yum install -y net-tools
3、查看两个容器网络是否互通


通过ping查看是否网络连通
web1pingweb2:
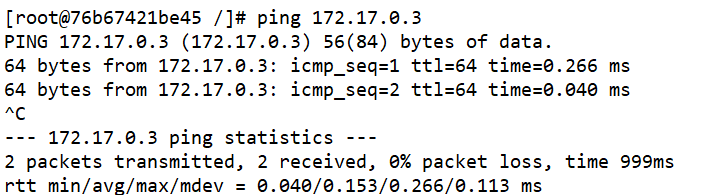
web2pingweb1:


 3万+
3万+


 被折叠的 条评论
为什么被折叠?
被折叠的 条评论
为什么被折叠?
 到【灌水乐园】发言


