


IOC原理
开发中遵循的原则:
- 编译时不依赖,运行时依赖
解决依赖关系的方法:
- 使用反射创建类对象
使用反射创建类对象引发的新问题:
- 使用配置文件,通过读取配置文件来反射创建类
简单来说,当一个项目在开发的时候,往往当前实现的功能必须依赖其它人所实现的功能。为了使我们的功能编译通过,则需要用反射的机制调用他人实现的类功能,这样就算别人的类还未完成,我们的编译依然能通过。下面写了一个简单的IOC的BeanFactory工厂类:
public class MyBeanFactory {
    private static Properties props = null;
//-------------------------1-----------------------------
//    static {
//
//        try {
//            //必须放在类路径下
//            InputStream in = BeanFactory.class.
//                    getResourceAsStream("bean.properties");
//            //不能用src路径,因为web程序没有src目录
//            //InputStream in = new FileInputStream("src/bean.prperties");
//
//                    props.load(in);
//        } catch (IOException e) {
//            throw  new ExceptionInInitializerError("读取配置文件失败!" + e);
//        }
//    }

//-------------------------2-----------------------------
    private static ResourceBundle bundle =
        ResourceBundle.getBundle("bean");//更简单的方式,只能读取properties文件
    //只能读取不能写入、只能读取类路径
    //注意方法参数的写法是报名.类名的方式,不要写扩展名

    //定义一个容器用于存放我们要使用的对象
    private static Map<String, Object> beans = new HashMap<String, Object>();
    //使用静态代码块,初始化map
    static {
        try {
            //1.读取配置文件中所有的配置
            Enumeration<String> keys = bundle.getKeys();
            //2.遍历keys
            while (keys.hasMoreElements()) {
                //3.取出一个key
                String key = keys.nextElement();
                //4.根据key获取beanPath
                String beanPath = bundle.getString(key);
                //5.根据beanPath反射建立bean对象
                Object value = Class.forName(beanPath).newInstance();
                //6.把key和value存入map中
                beans.put(key, value);
            }
        } catch (Exception e) {
            throw  new ExceptionInInitializerError("创建容器失败,程序停止执行")
        }
    }

    /**
     * 根据bean的唯一标识获取对象
     */
    public static Object getBean(String beanName) {
        return  beans.get(beanName);
    }

    public static void main(String[] args) {
        //接口 obj = (接口) MyBeanFactory.getBean(接口实现类);
        //obj.接口方法();
        //以上方法就能替代传统的:接口 obj = new 接口实现类();
        //以此从 编译依赖 变成 运行时依赖
    }
}
重点看main方法里面的内容,强依赖变为了弱依赖。其中的beans就是spring中的core container
以上就spring IOC简单实现,IOC就是用于削减计算机程序的耦合问题。

Bean创建的两种规则:
-
BeanFactory:提供的是一种延迟加载思想来创建bean对象,bean对象什么时候用什么时候创建
-
ApplicationContext:提供的是一种立即加载思想来创建bean对象,只要一解析完配置文件,就立马创建bean对象
  <?xml version="1.0" encoding="utf-8" ?>
  <beans xmlns="http://www.springframework.org/schema/beans"
     xmlns:xsi="http://www.w3.org/2001/XMLSchema-instance"
     xsi:schemaLocation="http://www.springframework.org/schema/beans
                         http://www.springframework.org/schema/beans/spring-beans.xsd">


  <!-- 配置资源: 把对象的创建交给spring来管理 -->
  <bean id="customerService" class="fty.impl.CustomerServiceImpl"></bean>
public class Client { public static void main(String[] args) { //1.ApplicationContext获取容器 ApplicationContext ac = new ClassPathXmlApplicationContext("bean.xml");//这里就创建了 ICustomerService cs1 = (ICustomerService) ac.getBean("customerService"); cs1.saveCustomer(); //2.BeanFactory获取容器 Resource resource = new ClassPathResource("bean.xml"); BeanFactory factory = new XmlBeanFactory(resource); ICustomerService cs2 = (ICustomerService) factory.getBean("customerService");//这个时候才会创建 cs2.saveCustomer(); } }
这里的ICustomerService 就是实现一个简单的打印工作,两种方式创建bean对象的时间是不同的!
Bean的三种创建方式:
-
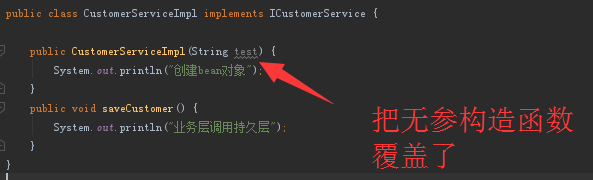
第一种方式(一般用第一种):调用默认无参构造函数创建,默认情况下,如果类中没有默认构造函数,则创建失败,会报异常!同样是上面的代码的例子,将CustomerServiceImpl的构造函数添加一个参数则会报错:
-
第二种方式:使用静态工厂中的方法创建对象,需要使用bean标签的factory-method属性,指定静态工厂中创建对象的方法。在bean.xml文件中定义如下:
  <!-- 配置使用静态工厂创建对象 -->
  <bean id="staticCustomerService" class="fty.factory.StaticFactory" factory-method="getCustomerService"></bean>
在模拟一个工厂类
	/**
	 * 模拟一个静态工厂
	 */
	public class StaticFactory {

	    public static ICustomerService getCustomerService() {
	        return new CustomerServiceImpl();
	    }
	}
在main中调用
	public class Client {
	    public static void main(String[] args) {
	        ApplicationContext ac = new ClassPathXmlApplicationContext("bean.xml");//这里就创建了
	        ICustomerService cs1 = (ICustomerService) ac.getBean("staticCustomerService");
	        cs1.saveCustomer();
	    }
	}
-
第三种方法:调用实例工厂的方法创建
  /**
   * 模拟一个实例工厂
   */
  public class InstanceFactory {
      public ICustomerService getCustomerService() {
          return new CustomerServiceImpl();
      }
  }
在看bean.xml中的配置:
		<!-- 配置实例工厂创建bean对象 -->
	    <bean id="instanceFactory" class="fty.factory.InstanceFactory"></bean>
	    <bean id="instanceCustomerService" factory-bean="instanceFactory" factory-method="getCustomerService"></bean>
Bean的作用范围
它是可以通过配置的方式调整作用范围。配置的属性:bean标签的scope属性。属性取值如下:
- singleton:单例(默认值)
- prototype:多例
- request:作用范围是一次请求和当前请求的转发
- session:一次会话
- globalsession:作用范围是一次全局会话。
Bean的生命周期
-
单例:出生——容器创建,对象就初赛;活着:只要容器在,对象就一直存在;死亡:容器销毁,对象消亡。
<bean id="customerService" class="fty.impl.CustomerServiceImpl" scope="singleton" init-method="init" destroy-method="destory"></bean>

这样就能调用init和destory方法了
- 多例:出生:每次使用时创建对象;活着:只要对象在使用中就一直或者;死亡:当对象长时间不使用并且没有别的对象引用时,由java的垃圾回收器回收。
Bean的注入
spring的依赖注入:
-
第一种:使用构造函数注入
 <!-- 构造函数注入
      涉及的标签:constructor-arg
      标签的属性:
         type:指定参数的类型
         index:指定参数的索引位置,从0开始
         name:指定参数的名称,一般用它
         ====================上面三个是指定给哪个参数赋值的,下面是指定赋什么值的==================
         value:指定基本数据类型或String类型的数据
         ref:指定其它bean类型的数据
      标签出现的位置:
         写在bean标签内部
  -->
 <bean id="now" class="java.util.Date"></bean>
 <bean id="customService" class="fty.impl.CustomerServiceImpl">
     <constructor-arg name="driver" value="com.mysql.jdbc.Driver"></constructor-arg>
     <constructor-arg name="port" value="3306"></constructor-arg>
     <constructor-arg name="today" ref="now"></constructor-arg>
 </bean>
然后是bean的类
public class CustomerServiceImpl implements ICustomerService {

    private String driver;
    private Integer port;
    private Date today;
    //以上三个类成员没有具体的实际意义,只是用于演示注入

    public CustomerServiceImpl(String driver, Integer port, Date today) {
        this.driver = driver;
        this.port = port;
        this.today = today;
    }
    public void saveCustomer() {
        System.out.println("业务层调用持久层" + driver + " " + port + " " + today);
    }
}
-
第二种:使用set方法注入
<!-- set方法注入 涉及的标签:property 标签的属性: name:指定参数的方法名称 ====================上面三个是指定给哪个参数赋值的,下面是指定赋什么值的================== value:指定基本数据类型或String类型的数据 ref:指定其它bean类型的数据 标签出现的位置: 写在bean标签内部 --> <bean id="customService" class="fty.impl.CustomerServiceImpl"> <property name="driver" value="com.mysql.jdbc.Driver"></property> <property name="port" value="3307"></property> <property name="today" ref="now"></property> </bean> public class CustomerServiceImpl implements ICustomerService { private String driver; private Integer port; private Date today; //以上三个类成员没有具体的实际意义,只是用于演示注入 public void setDriver(String driver) { this.driver = driver; } public void setPort(Integer port) { this.port = port; } public void setToday(Date today) { this.today = today; } } -
第三种:使用注释注入
在bean.xml中添加(注意约束的变化否则会报错!):<?xml version="1.0" encoding="utf-8" ?> <beans xmlns="http://www.springframework.org/schema/beans" xmlns:xsi="http://www.w3.org/2001/XMLSchema-instance" xmlns:context="http://www.springframework.org/schema/context" xsi:schemaLocation="http://www.springframework.org/schema/beans http://www.springframework.org/schema/beans/spring-beans.xsd http://www.springframework.org/schema/context http://www.springframework.org/schema/context/spring-context.xsd"> <!-- 告知spring在创建容器时要扫描的包。当配置了此标签后,spring创建容器就会去指定包下找对应的注解 --> <context:component-scan base-package="com.fty"></context:component-scan> </beans>
看类中的代码,已经注释的非常清楚了
@Component
public class CustomerServiceImpl implements ICustomerService {

    /**
     * 1、用于创建Bean对象(该类型的注释表示当前类对象放入容器中,需要调用当前类的方法)
     * @Component
     *      作用:相当于配置了一个bean标签
     *      位置:类上面
     *      属性:value,指定bean的id。默认值为当前类的短名然后首字母改小写
     *由此注解衍生的三个注解
     * @Controller   一般用于表现层注解
     * @Service      一般用于业务层
     * @Repository   一般用于持久层
     * 他们跟@Component的作用及属性是一模一样的,通过继承实现的
     *
     * 2、用于注入数据(集合类型是不能用注解注入的)
     * @Autowired 作用:自动按照类型注入,不关心bean的id
     *                  只要有唯一的类型匹配就能注入成功,set方法也不是必须的了
     *                  如果不唯一,即一个接口有多个实现类(看图)
     *                  则会判断变量名称是否跟bean的名称相同
     *                  如果都不匹配则报错
     * @Qualifier 作用:在自动按照类型注入的基础上,再按照bean的id注入
     *                  就用用于上述问题的解决方案,但是其在给类成员注入数据时
     *                  一定要和@Autowired一起使用!给方法的形参注入可以独立使用
     *            属性:value,用于指定bean的id
     *            注意:可以放在形参上,即方法的参数上指定形参的bean id
     *
     * @Resource 作用:自动按照bean的id进行注入,不关心bean的类型
     *           属性:name,用于指定bean的id
     * 以上三个注解都是用于注入其他bean类型的,用于注入基本类型或者String类型需要使用@Value
     *
     * @Value 作用:用于注入基本类型和String类型数据,可以借助Spring的el表达式读取properties文件中的配置
     *        属性:value,用于指定要注入的数据
     *
     * 3、用于改变作用范围的
     * @Scope 作用:用于改变bean的作用范围
     *        属性:value,用于指定范围的取值,取值和xml中scope属性的取值是一样的。
     *              singleton prototype request session 等
     *
     * 4、和生命周期相关的(了解)
     * @PostConstruct 作用:用于指定初始化方法,等于init-method
     * @PreDestroy 作用:用于指定销毁方法,等于destroy-method
     *
     * 5、其它注解(新建一个config包并新建SpringConfiguration类作为spring配置类)
     * @ComponentScan 作用:该类的作用就相当于bean.xml,在该类上添加当前注解
     *                属性:value,数组类型{},一个值可直接写"com.fty"表示扫描当前包
     *
     * @Bean 作用:让当前方法的返回值存入spring容器中,简单来说,当创建的对象是第三方的包new出来的时候,
     *             我们想使用注解却不能去修改第三方的包,则可以写一个createObject方法,返回一个第三方
     *             包new出来的对象,并加上@Bean就能表示该返回的对象是一个bean要加入容器中
     *       属性:name,指定bean的id,如果不指定则默认值为方法的名称
     *
     * @Configuration 作用:把当前类作用spring的配置类,当ApplicationContext去找bean.xml时,
     *                      可以闯入一个SpringConfiguration.class,表示bean.xml放在当前类的目录下
     *
     * @Import 作用:如果要将不同的配置文件拆开,则需要该注解,放在SpringConfiguration主配置类上
     *         属性:value,例如:OtherConfig.class,这样就可拆分配置类
     *         注意:该注释用于配置文件的引入,因此不会把配置文件的类放入容器中,一定注意什么时候
     *               用@Component什么时候用@Import,要不要需要使用当前类的方法!
     *
     * @PropertySource 作用:从配置文件中加载属性,例如properties文件,通过该属性对例如数据库的配置
     *                       进行加载。该注解放在主!配置类的上方,指定配置文件的路径即可,配合value使用
     *                 属性:value,classpath:properties.properties配置文件路径,@Value("${配置文件的key}")
     *                 注意:spring4.3之后会自带${}解析器,之前的版本需要自己配解析器
     */
    @Value("名字")
    private String name;
    @Autowired
    private ICustomerDao customerDao = null;
    public void saveCustomer() {
        customerDao.saveCustomer();
    }
}
下图是其它注解的使用方式(如果完全使用注解则ApplicationContext ac = new AnnotationConfigApplicationContext(SpringConfig.class)):

下图是@Autowired的简单原理,先看类型在找id

spring 4.3之前的占位符配置

Qualifier指定形参的id

注入的数据类型有3类:
-
第一类:基本类型和String类型
-
第二类:其他bean类型(必须是在spring的配置文件中出现过的bean)
-
第三类:复杂类型(集合类型)
复杂类型的注入:<!-- 复杂类型的注入 --> <bean id="customService" class="netease.fty.impl.CustomerServiceImpl"> <property name="myStrs"> <array> <value>AAA</value> <value>BBB</value> </array> </property> <property name="myList"> <list> <value>AAA</value> <value>BBB</value> </list> </property> <property name="mySet"> <set> <value>AAA</value> <value>BBB</value> </set> </property> <property name="myMap"> <map> <entry key="k1" value="v1"></entry> </map> </property> <property name="myProps"> <props> <prop key="p1">vv1</prop> </props> </property> </bean>
类也是很简单的:
public class CustomerServiceImpl implements ICustomerService {

    private String[] myStrs;
    private List<String> myList;
    private Set<String> mySet;
    private Map<String, String> myMap;
    private Properties myProps;

    public void setMyStrs(String[] myStrs) {
        this.myStrs = myStrs;
    }

    public void setMyList(List<String> myList) {
        this.myList = myList;
    }

    public void setMySet(Set<String> mySet) {
        this.mySet = mySet;
    }

    public void setMyMap(Map<String, String> myMap) {
        this.myMap = myMap;
    }

    public void setMyProps(Properties myProps) {
        this.myProps = myProps;
    }
  }


 1万+
1万+


 被折叠的 条评论
为什么被折叠?
被折叠的 条评论
为什么被折叠?
 到【灌水乐园】发言


