


Pass-through Service and Operation 实践
本文利用Django开发了一个REST风格的接口,然后对接到InterSystems Ensemble作为操作端,通过InterSystems Ensemble转换成服务端对外服务。
-
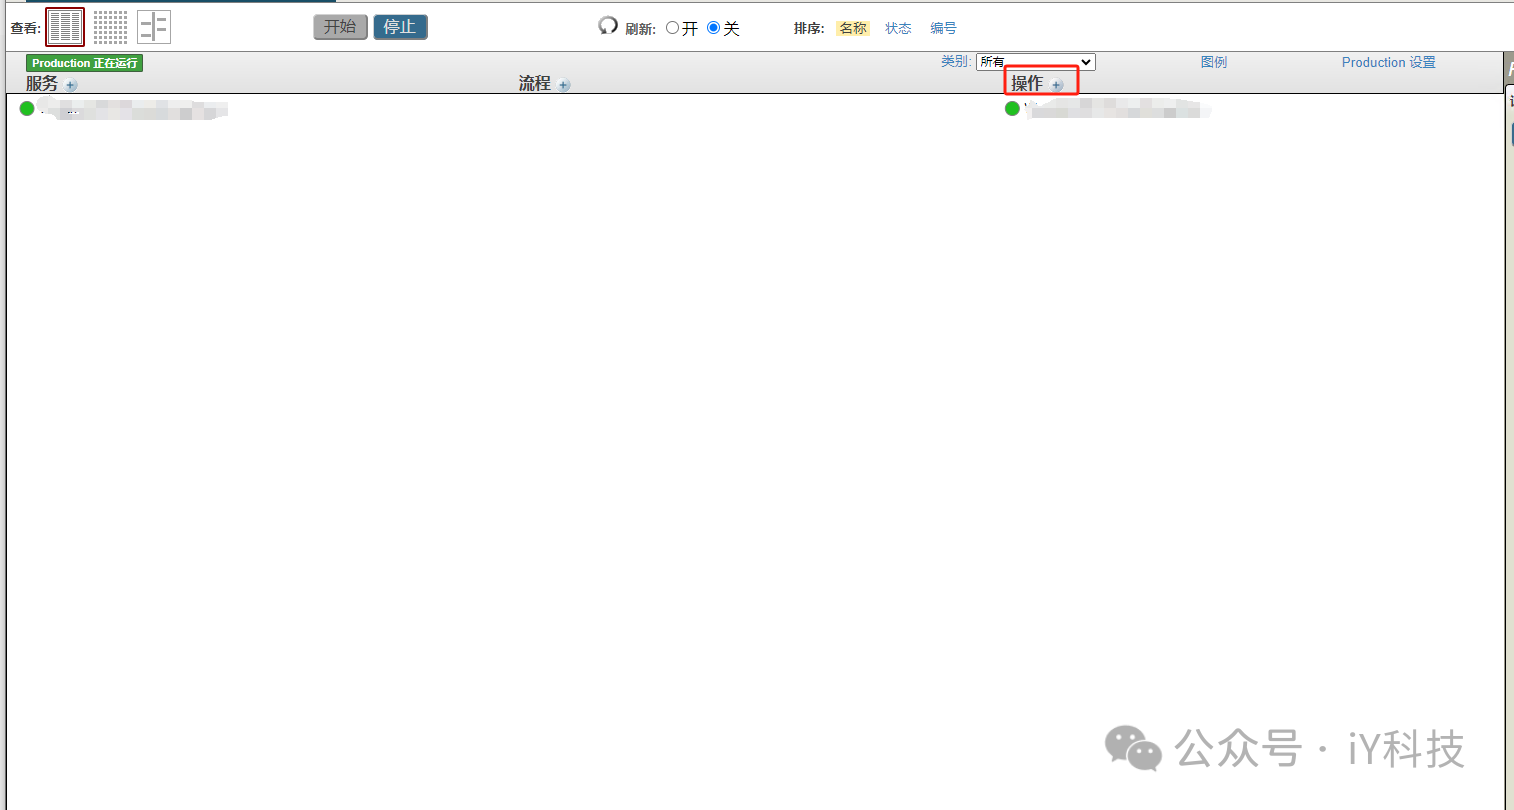
首先在Ensemble创建REST传递服务和操作
添加一个REST传递服务和一个REST pass-through操作。该服务在CSP端口上侦听,并将HTTP REST消息发送到直通操作(不使用router路由)。传递操作将HTTP REST消息发送到外部服务器这里的外部服务器是自利用Django开发的一个简单REST风格接口,该服务器返回当前日期信息。
选择或创建命名空间和生产。为了使用CSP端口,必须在命名空间中定义web应用程序和角色。有关创建命名空间、角色和web应用程序的分步说明,请参阅上一篇文章,并将web应用程序Dispatch Class(分派类)设置为EnsLib.REST.GenericService。
-
在生产配置页面上,选择加号以添加新操作。
-
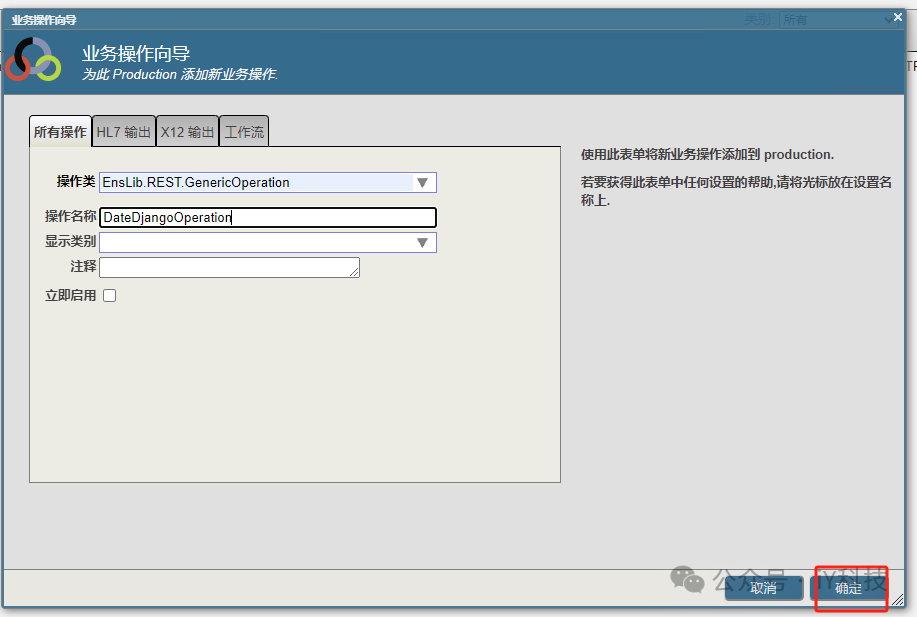
指定操作类:EnsLib.REST.GenericOperation在新选项卡中打开
-
命名操作,例如DateDjangoOperation。
-
暂时不要启用它。
-
选择“确定”。
-
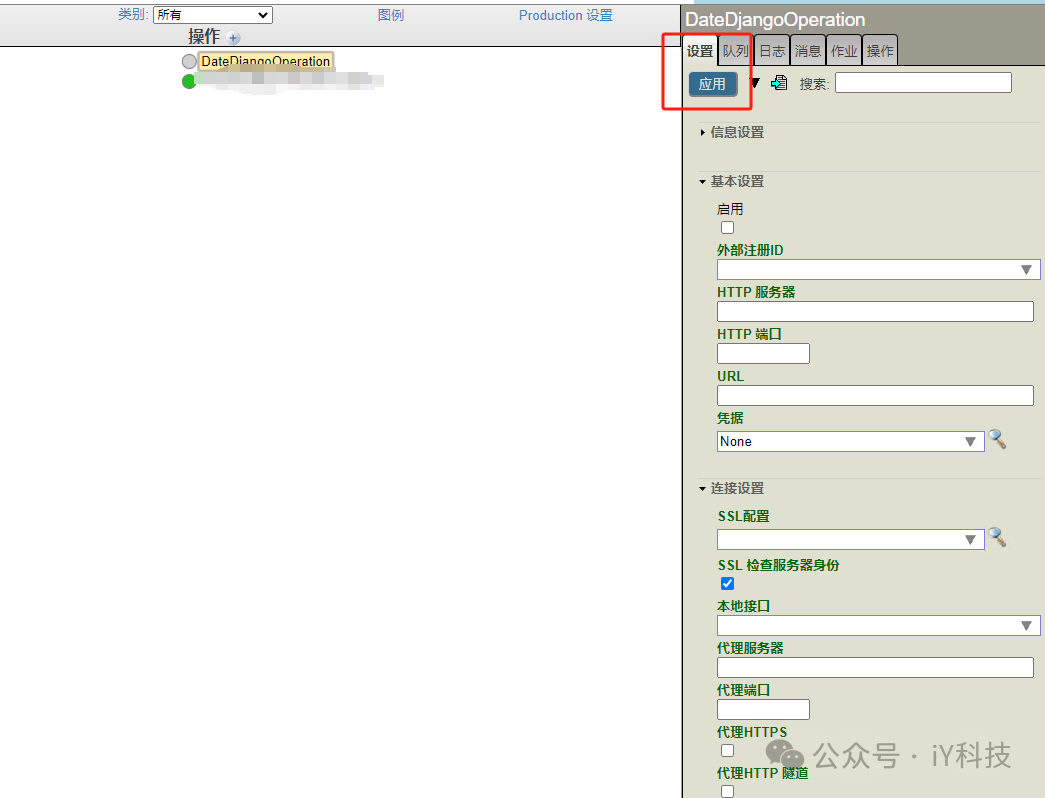
选择您创建的“传递”操作,即刚才创建的DateDjangoOperation,然后选择“设置”选项卡。
-
如果使用外部服务注册表,请设置“外部注册表ID”以标识用于设置HTTP服务器、HTTP端口和URL设置的注册表项,然后跳到步骤3。否则,直接指定这些设置:
-
输入HTTP服务器:localhost
-
将URL字段设置为:|
-
将其他字段保留为默认值。
-
选中已启用复选框。
-
选择应用。

-
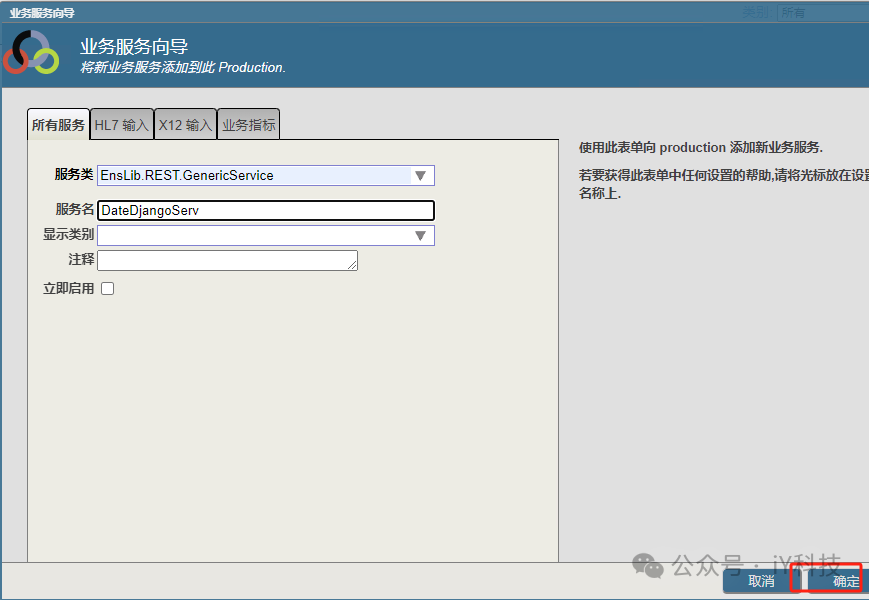
选择加号以添加新服务端。
-
指定服务类:EnsLib.REST.GenericService在新选项卡中打开
-
命名服务,例如DateDjangoServ。
-
暂时不要启用它。
-
选择“确定”。
-
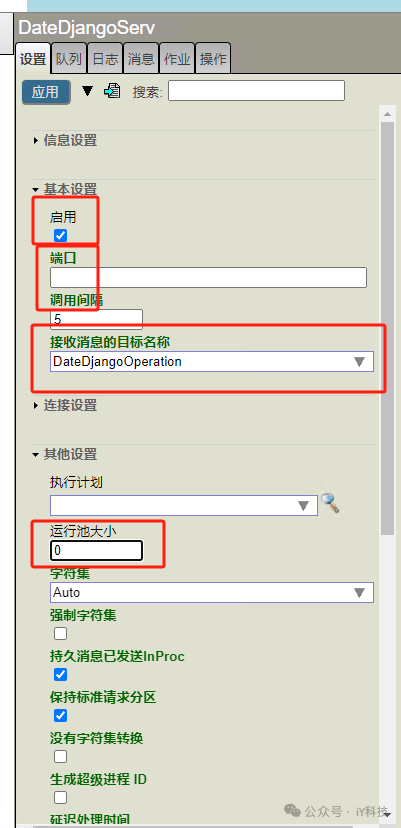
选择您创建的直通服务,即DateDjangoServ,然后选择“设置”选项卡。
-
确保端口号为空。
-
在TargetConfigName字段中,选择在上一步中添加的传递操作,即DateDjangoOperation。
-
在“连接设置”中,选中“启用标准请求”复选框。
-
在“其他设置”中,将“池大小”设置为0。这将禁止直通服务侦听特殊端口。如果未将池大小设置为0,则必须指定端口号。
-
选中已启用复选框。
-
选择应用。
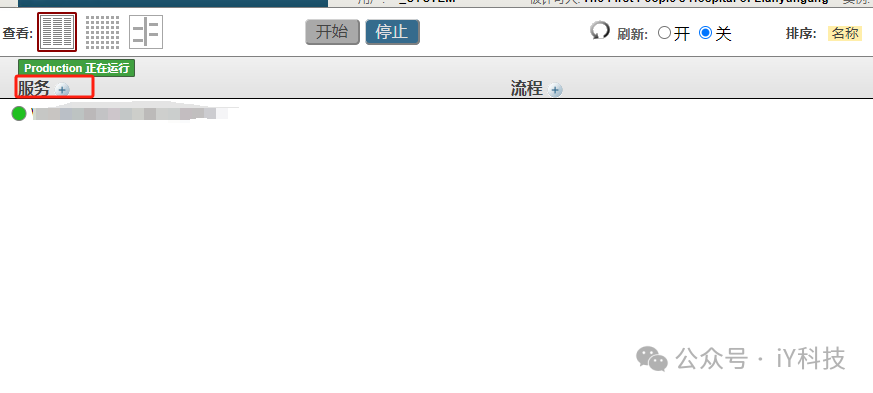
最后,开始 production。
使用CSP端口输入直通服务的URL。URL由以下部分组成:
http://localhost:nnnnnn/其中nnnnnn是默认的CSP端口。
外部服务所需的URL,例如data/2.5/wweather?q=英国伦敦。
例如,在web浏览器中输入以下URL:
http://localhost:57772/restpassthrough/DateDjangoServ/?date=123123123
以下是DateDjangoOperation的源代码,只贴出来改过的源代码 ,直接覆盖自己的文件即可,其他没改的文件就不贴了。
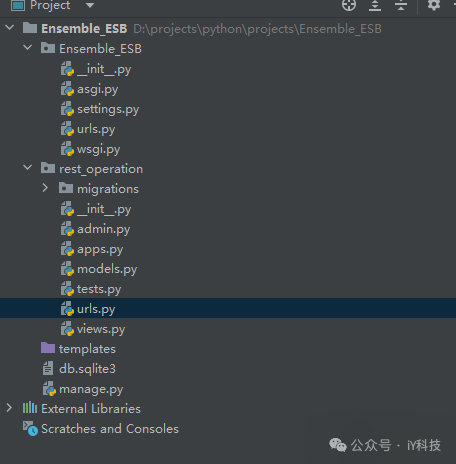
Django项目的整体文件结构如下,即Django默认的创建项目结构,只是在app中增加了一个urls.py文件:
views.py源代码
from django.shortcuts import render
from django.http import JsonResponse
from datetime import datetime
# Create your views here.

def rest_ope(request):
    date_now =  datetime.now()
    params = request.GET.get('date')
    content = {
        'date':date_now,
        'code':200,
        'params':params
    }
    return JsonResponse(content)
Ensemble_ESB.urls.py
"""Ensemble_ESB URL Configuration

The `urlpatterns` list routes URLs to views. For more information please see:
    https://docs.djangoproject.com/en/3.2/topics/http/urls/
Examples:
Function views
    1. Add an import:  from my_app import views
    2. Add a URL to urlpatterns:  path('', views.home, name='home')
Class-based views
    1. Add an import:  from other_app.views import Home
    2. Add a URL to urlpatterns:  path('', Home.as_view(), name='home')
Including another URLconf
    1. Import the include() function: from django.urls import include, path
    2. Add a URL to urlpatterns:  path('blog/', include('blog.urls'))
"""
from django.contrib import admin
from django.urls import path,include

urlpatterns = [
    # path('admin/', admin.site.urls),
    path('',include('rest_operation.urls'))
]
rest_operation.urls.py
from django.urls import path
from .views import rest_ope

urlpatterns = [
    path('',rest_ope)
]
settings.py
"""
Django settings for Ensemble_ESB project.

Generated by 'django-admin startproject' using Django 3.2.

For more information on this file, see
https://docs.djangoproject.com/en/3.2/topics/settings/

For the full list of settings and their values, see
https://docs.djangoproject.com/en/3.2/ref/settings/
"""

from pathlib import Path

# Build paths inside the project like this: BASE_DIR / 'subdir'.
BASE_DIR = Path(__file__).resolve().parent.parent


# Quick-start development settings - unsuitable for production
# See https://docs.djangoproject.com/en/3.2/howto/deployment/checklist/

# SECURITY WARNING: keep the secret key used in production secret!
SECRET_KEY = 'django-insecure-g6lowmbql4_t6@utp_c%dr4f!o#uh+3p^69@a)6##&4!klb-!q'

# SECURITY WARNING: don't run with debug turned on in production!
DEBUG = True

ALLOWED_HOSTS = []


# Application definition

INSTALLED_APPS = [
    'django.contrib.admin',
    'django.contrib.auth',
    'django.contrib.contenttypes',
    'django.contrib.sessions',
    'django.contrib.messages',
    'django.contrib.staticfiles',
    'rest_operation.apps.RestOperationConfig',
]

MIDDLEWARE = [
    'django.middleware.security.SecurityMiddleware',
    'django.contrib.sessions.middleware.SessionMiddleware',
    'django.middleware.common.CommonMiddleware',
    'django.middleware.csrf.CsrfViewMiddleware',
    'django.contrib.auth.middleware.AuthenticationMiddleware',
    'django.contrib.messages.middleware.MessageMiddleware',
    'django.middleware.clickjacking.XFrameOptionsMiddleware',
]

ROOT_URLCONF = 'Ensemble_ESB.urls'

TEMPLATES = [
    {
        'BACKEND': 'django.template.backends.django.DjangoTemplates',
        'DIRS': [BASE_DIR / 'templates']
        ,
        'APP_DIRS': True,
        'OPTIONS': {
            'context_processors': [
                'django.template.context_processors.debug',
                'django.template.context_processors.request',
                'django.contrib.auth.context_processors.auth',
                'django.contrib.messages.context_processors.messages',
            ],
        },
    },
]

WSGI_APPLICATION = 'Ensemble_ESB.wsgi.application'


# Database
# https://docs.djangoproject.com/en/3.2/ref/settings/#databases

DATABASES = {
    'default': {
        'ENGINE': 'django.db.backends.sqlite3',
        'NAME': BASE_DIR / 'db.sqlite3',
    }
}


# Password validation
# https://docs.djangoproject.com/en/3.2/ref/settings/#auth-password-validators

AUTH_PASSWORD_VALIDATORS = [
    {
        'NAME': 'django.contrib.auth.password_validation.UserAttributeSimilarityValidator',
    },
    {
        'NAME': 'django.contrib.auth.password_validation.MinimumLengthValidator',
    },
    {
        'NAME': 'django.contrib.auth.password_validation.CommonPasswordValidator',
    },
    {
        'NAME': 'django.contrib.auth.password_validation.NumericPasswordValidator',
    },
]


# Internationalization
# https://docs.djangoproject.com/en/3.2/topics/i18n/

LANGUAGE_CODE = 'en-us'

TIME_ZONE = 'UTC'

USE_I18N = True

USE_L10N = True

USE_TZ = True


# Static files (CSS, JavaScript, Images)
# https://docs.djangoproject.com/en/3.2/howto/static-files/

STATIC_URL = '/static/'

# Default primary key field type
# https://docs.djangoproject.com/en/3.2/ref/settings/#default-auto-field

DEFAULT_AUTO_FIELD = 'django.db.models.BigAutoField'
效果图如下:

通过Ensemble将原来直接访问的接口进行了转化,这就是简单的ESB效果。后面会介绍更复杂的应用。


 131
131

 被折叠的 条评论
为什么被折叠?
被折叠的 条评论
为什么被折叠?
 到【灌水乐园】发言


