


1.MHA是自动的master故障转移和slave提升的软件包,基于标准的Mysql复制(异步/半同步)
MHA包含两个组成部分:MHA manager(管理节点)和MHA Node(数据节点)。
https://github.com/yoshinorim/mha4mysql-manager;
https://github.com/yoshinorim/mha4mysql-node
2.MHA原理:
特点:可以修复多个slave之间的差异日志,使所有slave保持数据一致。然后从中选择一个充当新的master,并将其他slave指向它。当master出现故障时,通过对比slave之间I/Othread读取主库binlog的position号,选取最接近的slave作为备选主库,其他从库通过与备选主库对比生成差异的中继日志,在备选主库上应用从原来master保存的binlog,同时将备选主库提升为master,最后在其他slave上应用相应的差异中继日志并从新的master开始复制。
3.MHA优缺点:
优点:
(1)故障切换时,可以自行判断哪个从库与主库的数据最接近,然后切换到上面,可以减少数据丢失,保证数据的一致性。
(2)支持binlog server,可提高binlog的传送效率,进一步减少数据丢失的风险。
(3)结合mysql 5.7的增强半同步功能,确保故障切换时,数据不丢失。
缺点:
(1)自动切换的脚本太简单了,而且比较老化,建议后期逐渐完善。
(2)搭建MHA架构,需要开启Linux系统互信协议,对于系统安全性有一个考验。
4.MHA工具包功能:
(1)manager管理工具:
masterha_check_ssh:检查MHA的ssh配置
masterha_check_repl:检查mysql数据库主从复制功能
masterha_manager:启动MHA服务
masterha_check_status:检测当前MHA运行状态
masterha_master_monitor:监测master是否宕机。
masterha_master_switch:控制故障转移(自动或手动)
masterha_conf_host:添加或删除配置的server信息
(2)Node数据节点工具:
save binary_logs:保存和复制master的二进制日志
apply_diff_relay_logs:识别差异的中继日志事件并应用于其他slave
filter_mysqlbinlog:去除不必要的rollback事件(MHA已不再使用这个工具)
purge_relay_logs:清除中继日志(不会阻塞SQL线程)
5.环境建立:
5.1环境规划如下:
5.2架构图如下:

5.3配置三节点主机互信
5.3.1首先配置主库互信:
cd /root/
vi 1.sh
mkdir ~/.ssh
chmod 770 ~/.ssh
ssh-keygen -t rsa
ssh-keygen -t dsa
cat ~/.ssh/id_rsa.pub >>~/.ssh/authorized_keys
cat ~/.ssh/id_dsa.pub >>~/.ssh/authorized_keys
三台上执行脚本1.sh: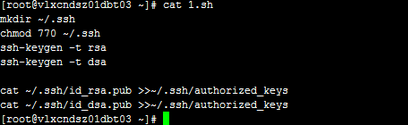
分别scp从节点上authorized_keys 两文件到主库上authorized_keys:
scp 10.161.170.90:/root/.ssh/authorized_keys ./authorized_keys-90
scp 10.161.170.91:/root/.ssh/authorized_keys ./authorized_keys-91
cat authorized_keys-90 >>authorized_keys
cat authorized_keys-91 >>authorized_keys
wc -l authorized_keys


将主节点上authorized_keys scp到从节点上:
scp ./authorized_keys 10.161.170.90:/root/.ssh/authorized_keys
scp ./authorized_keys 10.161.170.91:/root/.ssh/authorized_keys
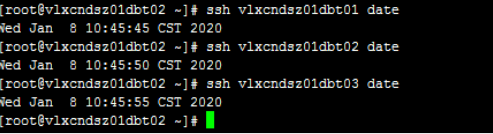
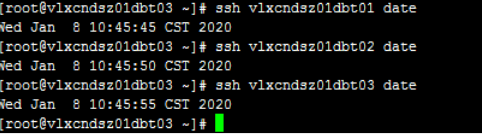
验证互信过程: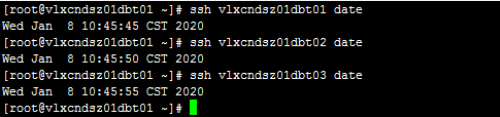
5.4配置主从环境,一主两从:
5.4.1关闭防火墙
service iptables stop
chkconfig iptables off;
chkconfig --list |grep iptables
或systemctl stop firewalld.service
systemctl disable firewalld.service

5.4.2修改I/O调度系统 为deadline模式(默认为cfq):
查看I/O调度文件,cat /sys/block/sda/queue/scheduler


修改为deadline:
vi /etc/grub.conf,在最后加入elevator=deadline(三台同样修改)

5.4.3操作系统限制(三台操作):
vi /etc/security/limits.conf
* soft nproc 65535
* hard nproc 65535
* soft nofile 65535
* hard nofile 65535

6.三台安装数据库软件:
yum -y install autoconf perl
6.1.创建mysql用户:
groupadd -g 5010 mysql
useradd -g mysql -u 5010 mysql -s /sbin/nologin
6.2.创建mysql数据目录,上传并解压源码包
cd /usr/local (mysql base目录,解压安装包)
上传安装包并解压包到此(三台):

创建软链接,方便升级及操作:
ln -s mysql-5.7.29-linux-glibc2.12-x86_64 mysql
chown mysql:mysql -R mysql

创建数据目录位置:
mkdir -p /u01/mysql
chown mysql:mysql /u01/mysql
chmod 775 /u01/mysql
6.3.配置my.cnf参数文件
[client]
port = 3306
socket = /tmp/mysql.sock
[mysql]
#default-character-set=utf8
#prompt="\u->curr DB is \d \R:\m\s->"
prompt="\u@db \R:\m:\s [\d]> "
no-auto-rehash
[mysqld]
user = mysql
port = 3306
basedir = /usr/local/mysql
datadir = /u01/mysql
socket = /tmp/mysql.sock
character-set-server = utf8mb4
skip_name_resolve = 1
open_files_limit = 65535
back_log = 1024
max_connections = 512
max_connect_errors =1000000
table_open_cache = 1024
table_definition_cache = 1024
table_open_cache_instances = 64
thread_stack = 512K
external-locking = FALSE
max_allowed_packet = 32M
sort_buffer_size = 4M
join_buffer_size = 4M
thread_cache_size = 768
query_cache_size = 0
#query_cache_size = 4M
query_cache_type = 0
interactive_timeout = 600
wait_timeout = 600
tmp_table_size = 32M
max_heap_table_size = 32M
slow_query_log = 1
slow_query_log_file = /u01/mysql/slow.log
log-error = /u01/mysql/error.log
long_query_time = 0.5
server-id = 330695
log-bin = /u01/mysql/mysql-binlog
sync_binlog = 1
binlog_cache_size = 4M
max_binlog_cache_size = 1G
max_binlog_size = 1G
expire_logs_days = 7
master_info_repository = TABLE
relay_log_info_repository = TABLE
gtid_mode = on
enforce_gtid_consistency = 1
log_slave_updates
#log_slave_updates = 1
binlog_format = row
relay_log_recovery = 1
relay-log-purge = 1
key_buffer_size = 32M
read_buffer_size = 8M
read_rnd_buffer_size = 4M
bulk_insert_buffer_size = 64M
lock_wait_timeout = 3600
explicit_defaults_for_timestamp = 1
innodb_thread_concurrency = 0
innodb_sync_spin_loops = 100
innodb_spin_wait_delay = 30
transaction_isolation = REPEATABLE-READ
innodb_buffer_pool_size = 1024M
innodb_buffer_pool_instances = 8
innodb_buffer_pool_load_at_startup = 1
innodb_buffer_pool_dump_at_shutdown = 1
innodb_data_file_path = ibdata1:1G:autoextend
innodb_flush_log_at_trx_commit = 1
innodb_log_buffer_size = 32M
innodb_log_file_size = 2G
innodb_log_files_in_group = 2
innodb_io_capacity = 2000
innodb_io_capacity_max = 4000
innodb_flush_neighbors = 0
innodb_write_io_threads = 8
innodb_read_io_threads = 8
innodb_purge_threads = 4
innodb_page_cleaners = 4
innodb_open_files = 65535
innodb_max_dirty_pages_pct = 50
innodb_flush_method = O_DIRECT
innodb_lru_scan_depth = 4000
innodb_checksum_algorithm = crc32
innodb_lock_wait_timeout = 10
innodb_rollback_on_timeout = 1
innodb_print_all_deadlocks = 1
innodb_file_per_table = 1
innodb_online_alter_log_max_size = 4G
internal_tmp_disk_storage_engine = InnoDB
innodb_stats_on_metadata = 0
innodb_status_file = 1
innodb_status_output = 0
innodb_status_output_locks = 0
#performance_schema
performance_schema = 1
performance_schema_instrument = '%=on'
#innodb monitor
innodb_monitor_enable="module_innodb"
innodb_monitor_enable="module_server"
innodb_monitor_enable="module_dml"
innodb_monitor_enable="module_ddl"
innodb_monitor_enable="module_trx"
innodb_monitor_enable="module_os"
innodb_monitor_enable="module_purge"
innodb_monitor_enable="module_log"
innodb_monitor_enable="module_lock"
innodb_monitor_enable="module_buffer"
innodb_monitor_enable="module_index"
innodb_monitor_enable="module_ibuf_system"
innodb_monitor_enable="module_buffer_page"
innodb_monitor_enable="module_adaptive_hash"
[mysqldump]
quick
max_allowed_packet = 32M
6.4.初始化数据库
6.4.1下载安装包并安装:
wget http://mirrors.sohu.com/mysql/MySQL-5.7/mysql-5.7.29-linux-glibc2.12-x86_64.tar.gz
cd /usr/local
tar -zxvf mysql-5.7.29-linux-glibc2.12-x86_64.tar.gz
ln -s mysql-5.7.29-linux-glibc2.12-x86_64 mysql
chown mysql:mysql mysql
cd /usr/local/mysql/bin
./mysqld --defaults-file=/etc/my.cnf --basedir=/usr/loca/mysql --datadir=/u01/mysql/ --user=mysql --initialize
![]()
#--initialize会生成一个临时数据库密码记录在log-error里,
#--initialize-insecure代表无密码进入,建议使用生成初始化密码

6.4.2启动数据库:
cp ../support-files/mysql.server /etc/init.d/mysqld
vi /etc/init.d/mysqld //编辑或者修改
basedir=/usr/local/mysql
datadir=/u01/mysql
cp /usr/local/mysql/bin/mysql /usr/local/bin/
 a
a
cd /usr/local/mysql/bin
./mysqld_safe --defaults-file=/etc/my.cnf & (或者service mysql start,因为前面已经做好了默认启动命令:/etc/init.d/mysqld )

cat /u01/mysql/error.log |grep password

6.4.3设置mysql密码:
mysql -uroot -p'生成的密码'
set PASSWORD = 'root123'
alter user
备注(不在本次MHA范围):
三主机互通:
mysql -uroot -proot123
use mysql;
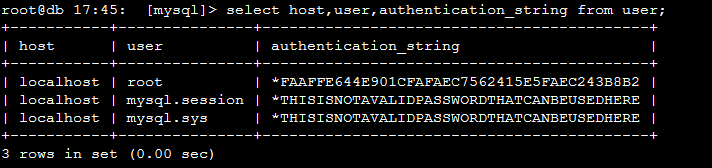
select host,user,authentication_string from user;
create user 'root'@'10.161.170.90' identified by 'root123';
grant select,insert,update,delete on root.* to 'root'@'10.161.170.90' identified by 'root123';
create user 'root'@'10.161.170.91' identified by 'root123';
grant select,insert,update,delete on root.* to 'root'@'10.161.170.91' identified by 'root123';
create user 'root'@'10.161.170.95' identified by 'root123';
grant select,insert,update,delete on root.* to 'root'@'10.161.170.95' identified by 'root123';
flush privileges;
select host,user,authentication_string from user;
连接测试 mysql -uroot -proot123 -P3306 -h10.161.170.90/91/95:


注、Mysql 5.6安装如下:
(1):mysql 5.6可以解压包后,如下mysqld安装:
cd /usr/local/mysql/scripts
./mysql_install_db --basedir=/usr/local/mysql --datadir=/u01/mysql --defaults-file=/etc/my.cnf --user=mysql #5.7以后不支持mysql_install_db了。

出现两个ok,说明mysql5.6数据库初始化成功。


注(2) 启动数据库
cd /usr/local/mysql/bin
./mysqld_safe --defaults-file=/etc/my.cnf &
查看启动后进程:
ps -ef |grep mysql

注(3)创建初始密码
初次登录为无密码登录:

use mysql
select host,user,password from user;
update user set password=password('root123') where user='root';
flush privileges;
安全加固(5.7以前建议执行):
delete from user where user!='root' or host!='localhost';
cp -r /usr/local/mysql/bin/mysql /usr/bin/
7.搭建主从
7.1创建账号:
在三主机上创建主从复制账号:
create user 'repl'@'10.161.170.%' identified by 'repl';
grant replication slave on *.* to 'repl'@'10.161.170.%';
flush privileges;

在三主机上创建管理账号:
create user 'admin'@'10.161.170.%' identified by 'root123';
grant all privileges on *.* to 'admin'@'10.161.170.%';
GRANT ALL PRIVILEGES ON *.* TO 'admin'@'%' IDENTIFIED BY 'root123' WITH GRANT OPTION;
flush privileges;

查询账号信息:
7.2主库上执行备份,并在备库上恢复:
/usr/local/mysql/bin/mysqldump --single-transaction -uroot -proot123 -A >all.sql 备库上scp 主库上备份文件:
cd /root/wlp/
scp 10.161.170.95:/root/wlp/all.sql .
备库恢复:
/usr/local/mysql/bin/mysqldump -uroot -proot123 --all-databases <all.sql
配置主从复制命令并开启主从同步:
change master to master_host='10.161.170.95',master_user='repl',master_auto_position=1;

主库上建立新数据库,并建立表,插入数据:
再到从库上执行主从复制命令并开启主从同步:
stop slave;
change master to master_host='10.161.170.95',master_user='repl',master_password='repl',master_auto_position=1;

并在从库上查询新建立数据库和表数据,此时已经同步到位:
到此一主两从复制架构建立完成。
备注:
例:主库直接关机,开启后,master_log_file后移一位,备库不同步:处理:
主库备份:
/usr/local/mysql/bin/mysqldump --single-transaction -uroot -proot123 -A >all.sql
cp备库并恢复:
mysql -uroot -proot123
stop slave;
source /root/wlp/all.sql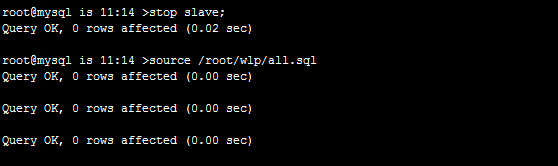
change master to master_auto_position=0;
show master status ;得到主库备份时的master_log_file='mysql-binlog.000004'和Position的值为288892;
change master to master_host='10.161.170.95',master_user='repl',master_password='repl',
master_port=3306,master_log_file='mysql-binlog.000004',master_log_pos=288892;
start slave;
show slave status \G;
8.安装MHA-node节点:
https://code.google.com/archive/p/mysql-master-ha/downloads
本次选择0.54 版本:mha4mysql-node-0.54.tar.gz 和 mha4mysql-manager-0.54.tar.gz
8.1在主,从,从节点都安装数据节点:
8.1.1安装Mysql依赖perl环境:
解压数据节点包:
安装perl-CPAN软件包:
cd mha4mysql-node-0.54/
yum -y install perl-CPAN*
perl Makefile.PL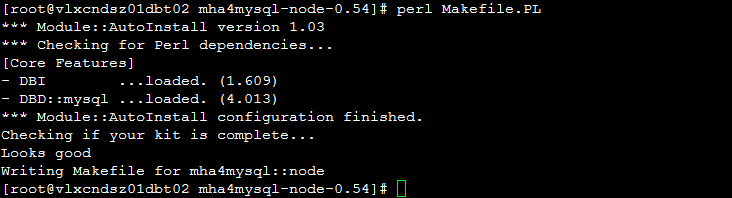
make && make install
同理啊等我把主机也安装数据节点。
8.2在slave2从节点上安装管理manager节点
安装环境所需要的包(以下都只在管理节点上操作):
yum -y install perl-DBD-MySQL*
yum -y install perl-Params-Validate perl-Config-Tiny perl-Log-Dispatch perl-Parallel-ForkManager

解压并安装管理节点:


make install
创建MHA宿主目录,配置启动文件:
mkdir /usr/local/mha
mkdir /etc/mha
cd /etc/mha
vi /etc/mha/mha.conf
[server default]
user=admin
password=admin
manager_workdir=/usr/local/mha
manager_log=/usr/local/mha/manager.log
remote_workdir=/usr/local/mha
ssh_user=root
repl_user=repl
repl_password=repl
ping_interval=1
master_ip_failover_script=/usr/local/scripts/master_ip_failover
master_ip_online_change_script=/usr/local/scripts/master_ip_online_change
[server1]
hostname=10.161.170.97.95
ssh_port=22
master_binlog_dir=/u01/mysql
candiate_master=1
port=3306
[server2]
hostname=10.161.170.97.90
ssh_port=22
master_binlog_dir=/u01/mysql
candiate_master=1
port=3306
[server3]
hostname=10.161.170.97.91
ssh_port=22
master_binlog_dir=/u01/mysql
no_master=1
port=3306
建立脚本目录及failover切换脚本:
mkdir -p /usr/local/scripts
cd /usr/local/scripts/
vi master_ip_failover
#!/usr/bin/env perl
use strict;
use warnings FATAL => 'all';
use Getopt::Long;
my (
$command, $ssh_user, $orig_master_host, $orig_master_ip,
$orig_master_port, $new_master_host, $new_master_ip, $new_master_port);
my $vip = '10.161.170.94/24';
my $key = '0';
my $ssh_start_vip = "/sbin/ifconfig eth1:$skey $vip";
my $ssh_stop_vip = "/sbin/ifconfig eth1:$skey down";
GetOptions (
'command=s' => \$command,
'ssh_user=s' => \$ssh_user,
'orig_master_host=s' => \$orig_master_host,
'orig_master_ip=s' => \$orig_master_ip,
'orig_master_port=i' => \$orig_master_port,
'new_master_host=s' => \$new_master_host,
'new_master_ip=s' => \$new_master_ip,
'new_master_port=i' => \$new_master_port,
);
exit &main();
sub main{
print "\n\nIN SCRIPT TEST====$ssh_stop_vip==$ssh_start_vip===\n\n";
if ( $command eq "stop" || $command eq "stopssh") {
my $exit_code = 1;
eval {
print "Disabling the VIP on old master:$orig_master_host \n";
$stop_vip();
$exit_code = 0;
};
if ($@) {
warn "Got Error:$@\n";
exit $exit_code;
}
elsif ( $command eq "start" ) {
my $exit_code = 10;
eval {
print "Enabling the VIP - $vip on the new master - $new_master_host \n";
$start_vip();
$exit_code = 0;
};
if ($@) {
warn $@;
exit $exit_code;
}
exit $exit_code;
}
elsif ( $command eq "status" ) {
print "Checking the status of the script .. OK \n";
exit 0;
}
else {
&usage ();
exit 1;
}
}
sub start_vip() {
`ssh $ssh_user\@$new_master_host \" $ssh_start_vip \"`;
}
sub stop_vip() {
return 0 unless ($ssh_user);
`ssh $ssh_user\@$orig_master_host \" $ssh_stop_vip \"`;
}
sub usage {
print
"Usage:master_ip_failover --command=start|stop|stopssh|status --orig_master_host=host --orig_master_ip=ip --orig_master_port=port --new_master_host=host --new_master_ip=ip --new_master_port=port\n";
vi master_ip_online_change
#cd /usr/local/scripts/
#vim master_ip_online_change
#!/usr/bin/env perl
use strict;
use warnings FATAL => 'all';
use Getopt::Long;
use MHA::DBHelper;
use MHA::NodeUtil;
use Time::HiRes qw( sleep gettimeofday tv_interval );
use Data::Dumper;
my $_tstart;
my $_running_interval = 0.1;
my $vip = "10.161.170.94";
my $if = "eth1";
my (
$command, $orig_master_is_new_slave, $orig_master_host,
$orig_master_ip, $orig_master_port, $orig_master_user,
$orig_master_password, $orig_master_ssh_user, $new_master_host,
$new_master_ip, $new_master_port, $new_master_user,
$new_master_password, $new_master_ssh_user,
);
GetOptions(
'command=s' => \$command,
'orig_master_is_new_slave' => \$orig_master_is_new_slave,
'orig_master_host=s' => \$orig_master_host,
'orig_master_ip=s' => \$orig_master_ip,
'orig_master_port=i' => \$orig_master_port,
'orig_master_user=s' => \$orig_master_user,
'orig_master_password=s' => \$orig_master_password,
'orig_master_ssh_user=s' => \$orig_master_ssh_user,
'new_master_host=s' => \$new_master_host,
'new_master_ip=s' => \$new_master_ip,
'new_master_port=i' => \$new_master_port,
'new_master_user=s' => \$new_master_user,
'new_master_password=s' => \$new_master_password,
'new_master_ssh_user=s' => \$new_master_ssh_user,
);
exit &main();
sub drop_vip {
my $output = `ssh -o ConnectTimeout=15 -o ConnectionAttempts=3 $orig_master_host /sbin/ip addr del $vip/32 dev $if`;
}
sub add_vip {
my $output = `ssh -o ConnectTimeout=15 -o ConnectionAttempts=3 $new_master_host /sbin/ip addr add $vip/32 dev $if`;
}
sub current_time_us {
my ( $sec, $microsec ) = gettimeofday();
my $curdate = localtime($sec);
return $curdate . " " . sprintf( "%06d", $microsec );
}
sub sleep_until {
my $elapsed = tv_interval($_tstart);
if ( $_running_interval > $elapsed ) {
sleep( $_running_interval - $elapsed );
}
}
sub get_threads_util {
my $dbh = shift;
my $my_connection_id = shift;
my $running_time_threshold = shift;
my $type = shift;
$running_time_threshold = 0 unless ($running_time_threshold);
$type = 0 unless ($type);
my @threads;
my $sth = $dbh->prepare("SHOW PROCESSLIST");
$sth->execute();
while ( my $ref = $sth->fetchrow_hashref() ) {
my $id = $ref->{Id};
my $user = $ref->{User};
my $host = $ref->{Host};
my $command = $ref->{Command};
my $state = $ref->{State};
my $query_time = $ref->{Time};
my $info = $ref->{Info};
$info =~ s/^\s*(.*?)\s*$/$1/ if defined($info);
next if ( $my_connection_id == $id );
next if ( defined($query_time) && $query_time < $running_time_threshold );
next if ( defined($command) && $command eq "Binlog Dump" );
next if ( defined($user) && $user eq "system user" );
next
if ( defined($command)
&& $command eq "Sleep"
&& defined($query_time)
&& $query_time >= 1 );
if ( $type >= 1 ) {
next if ( defined($command) && $command eq "Sleep" );
next if ( defined($command) && $command eq "Connect" );
}
if ( $type >= 2 ) {
next if ( defined($info) && $info =~ m/^select/i );
next if ( defined($info) && $info =~ m/^show/i );
}
push @threads, $ref;
}
return @threads;
}
sub main {
if ( $command eq "stop" ) {
## Gracefully killing connections on the current master
# 1. Set read_only= 1 on the new master
# 2. DROP USER so that no app user can establish new connections
# 3. Set read_only= 1 on the current master
# 4. Kill current queries
# * Any database access failure will result in script die.
my $exit_code = 1;
eval {
## Setting read_only=1 on the new master (to avoid accident)
my $new_master_handler = new MHA::DBHelper();
# args: hostname, port, user, password, raise_error(die_on_error)_ or_not
$new_master_handler->connect( $new_master_ip, $new_master_port,
$new_master_user, $new_master_password, 1 );
print current_time_us() . " Set read_only on the new master.. ";
$new_master_handler->enable_read_only();
if ( $new_master_handler->is_read_only() ) {
print "ok.\n";
}
else {
die "Failed!\n";
}
$new_master_handler->disconnect();
# Connecting to the orig master, die if any database error happens
my $orig_master_handler = new MHA::DBHelper();
$orig_master_handler->connect( $orig_master_ip, $orig_master_port,
$orig_master_user, $orig_master_password, 1 );
## Drop application user so that nobody can connect. Disabling per-session binlog beforehand
$orig_master_handler->disable_log_bin_local();
# print current_time_us() . " Drpping app user on the orig master..\n";
print current_time_us() . " drop vip $vip..\n";
#drop_app_user($orig_master_handler);
&drop_vip();
## Waiting for N * 100 milliseconds so that current connections can exit
my $time_until_read_only = 15;
$_tstart = [gettimeofday];
my @threads = get_threads_util( $orig_master_handler->{dbh},
$orig_master_handler->{connection_id} );
while ( $time_until_read_only > 0 && $#threads >= 0 ) {
if ( $time_until_read_only % 5 == 0 ) {
printf
"%s Waiting all running %d threads are disconnected.. (max %d milliseconds)\n",
current_time_us(), $#threads + 1, $time_until_read_only * 100;
if ( $#threads < 5 ) {
print Data::Dumper->new( [$_] )->Indent(0)->Terse(1)->Dump . "\n"
foreach (@threads);
}
}
sleep_until();
$_tstart = [gettimeofday];
$time_until_read_only--;
@threads = get_threads_util( $orig_master_handler->{dbh},
$orig_master_handler->{connection_id} );
}
## Setting read_only=1 on the current master so that nobody(except SUPER) can write
print current_time_us() . " Set read_only=1 on the orig master.. ";
$orig_master_handler->enable_read_only();
if ( $orig_master_handler->is_read_only() ) {
print "ok.\n";
}
else {
die "Failed!\n";
}
## Waiting for M * 100 milliseconds so that current update queries can complete
my $time_until_kill_threads = 5;
@threads = get_threads_util( $orig_master_handler->{dbh},
$orig_master_handler->{connection_id} );
while ( $time_until_kill_threads > 0 && $#threads >= 0 ) {
if ( $time_until_kill_threads % 5 == 0 ) {
printf
"%s Waiting all running %d queries are disconnected.. (max %d milliseconds)\n",
current_time_us(), $#threads + 1, $time_until_kill_threads * 100;
if ( $#threads < 5 ) {
print Data::Dumper->new( [$_] )->Indent(0)->Terse(1)->Dump . "\n"
foreach (@threads);
}
}
sleep_until();
$_tstart = [gettimeofday];
$time_until_kill_threads--;
@threads = get_threads_util( $orig_master_handler->{dbh},
$orig_master_handler->{connection_id} );
}
## Terminating all threads
print current_time_us() . " Killing all application threads..\n";
$orig_master_handler->kill_threads(@threads) if ( $#threads >= 0 );
print current_time_us() . " done.\n";
$orig_master_handler->enable_log_bin_local();
$orig_master_handler->disconnect();
## After finishing the script, MHA executes FLUSH TABLES WITH READ LOCK
$exit_code = 0;
};
if ($@) {
warn "Got Error: $@\n";
exit $exit_code;
}
exit $exit_code;
}
elsif ( $command eq "start" ) {
## Activating master ip on the new master
# 1. Create app user with write privileges
# 2. Moving backup script if needed
# 3. Register new master's ip to the catalog database
# We don't return error even though activating updatable accounts/ip failed so that we don't interrupt slaves' recovery.
# If exit code is 0 or 10, MHA does not abort
my $exit_code = 10;
eval {
my $new_master_handler = new MHA::DBHelper();
# args: hostname, port, user, password, raise_error_or_not
$new_master_handler->connect( $new_master_ip, $new_master_port,
$new_master_user, $new_master_password, 1 );
## Set read_only=0 on the new master
$new_master_handler->disable_log_bin_local();
print current_time_us() . " Set read_only=0 on the new master.\n";
$new_master_handler->disable_read_only();
## Creating an app user on the new master
#print current_time_us() . " Creating app user on the new master..\n";
print current_time_us() . "Add vip $vip on $if..\n";
# create_app_user($new_master_handler);
&add_vip();
$new_master_handler->enable_log_bin_local();
$new_master_handler->disconnect();
## Update master ip on the catalog database, etc
$exit_code = 0;
};
if ($@) {
warn "Got Error: $@\n";
exit $exit_code;
}
exit $exit_code;
}
elsif ( $command eq "status" ) {
# do nothing
exit 0;
}
else {
&usage();
exit 1;
}
}
sub usage {
print
"Usage: master_ip_online_change --command=start|stop|status --orig_master_host=host --orig_master_ip=ip --orig_master_port=port --new_master_host=host --new_master_ip=ip --new_master_port=port\n";
die;
}
未完,后面有时间待完善。。。


 215
215


 被折叠的 条评论
为什么被折叠?
被折叠的 条评论
为什么被折叠?
 到【灌水乐园】发言


